
![]()
Building a Game with the Cocos2d-html5 Library
HTML5 games are becoming more and more important in the mobile gaming industry. There are already many casual and social games available in HTML5. Compared to native games, HTML5 games support real-time updating, click-to-play without the need for installations, and efficient development cycles.
Cocos2d-html5 was created for HTML5 game development, focusing on mobile web games and hybrid games via Cocos2d JavaScript Binding (JSB). The Cocos2d JSB is a wrapper code that sits between native code and JavaScript. It enables HTML5 developers who don't have experience in C++ and mobile app development to make games with Cocos2d-html5 and then deploy them as native mobile apps.
In this section, I will introduce the core concepts of Cocos2d-html5 and set up a working demo to demonstrate how easy it can be to build a game. The game can run on desktop browsers or mobile browsers, and it can also run as a native app with native performance without any change to the game code.
What Is Cocos2d?
The original Cocos2d is a game framework written in Python, and it inspired the creation of Cocos2d-iPhone, Cocos2d-x, and Cocos2d-html5, which has rocked the mobile gaming industry with over a 25 percent adoption rate by game developers. Some of the reasons why Cocos2d is so appealing are the flow control via scenes, a plethora of transitions, fast and easy sprites, actions that allow you to animate everything easily, tiled maps, menus, and OpenGL support.
Why Was Cocos2d Created?
Before Cocos2d was created, the process of creating a 2D game was not easy, as developers had to build all of the components they needed for game development. The original Cocos2d developers decided to build a lighter and faster framework for game development without reinventing the wheel. Cocos2d makes many of the core concepts of a 2D game clearer and easier.
What Makes Cocos2d the Best Choice for Your 2D Game Development?
A large number of games in the Apple App Store and Google Play are made with Cocos2d, including many best sellers. There are over 400,000 Cocos2d developers around the world. Cocos2d is probably the de facto game engine in China for mobile games, and it has been taught in a course at the South China University of Technology (SCUT).
The API of Cocos2d is clearly defined, and it is easy to learn and use. All of the APIs in the Cocos2d family share the same root and style. If you know the core concepts, you can easily switch to another Cocos2d-like framework.
Another reason behind its popularity is the active Cocos2d community. The community is an amazing place for tutorials and articles about Cocos2d, and people in the community are willing to share their experience with you. A dedicated, full-time team maintains Cocos2d and releases a new version every six weeks. ChuKong, one of the gaming industry giants in China, financially backs Cocos2d.
Moreover, there are abundant tools for Cocos2d game development, such as CocoStudio, Particle Designer, Spine, Animation Editor, Font Editor, TileMap Editor, TexturePacker, Physics Editor, and so on. Most of them are free or open source.
Finally, Cocos2d-x and Cocos2d-html5 support cross-platform development, so you can deploy games to the most popular platforms without code modification.
What Sets Cocos2d Apart from Other Similar Frameworks?
Compared to other game frameworks, Cocos2d-x is superior because it is open source, free-of-charge, user-friendly, and provides multi-platform support. Cocos2d makes 2D game programming easier and faster. It clarifies the key components of 2D game programming with an easy-to-learn, easy-to-use API, which makes it an outstanding framework compared to others. If you google “Cocos2d,” you will find that the community is very large, active, and developer-friendly. These key points set Cocos2d apart from other similar frameworks.
What Is Cocos2d-html5?
Cocos2d-html5 is an open-source 2D web game framework, released under a generous MIT License (http://en.wikipedia.org/wiki/MIT_License). It is the HTML5 version of Cocos2d-x. The focus of Cocos2d-html5 development is bridging Cocos2d between browsers and native applications. On top of the framework provided by Cocos2d-html5, one can write games in JavaScript and have the game run on browsers that support HTML5. The API is completely compatible with that of Cocos2d-x JSB. Thus Cocos2d-html5 games can run using Cocos2d JSB on Cocos2d-x without or with very little modification.
Why Was Cocos2d-html5 Created?
Although Cocos2d-x is a cross-platform game framework, it is not accessible to browsers. Cocos2d-html5 was created to embrace HTML5, allowing applications and games created with it to run natively in browsers. It brings an easy-to-learn, easy-to-use API style to the HTML5 gaming world.
What Are the Main Differences in Cocos2d and Cocos2d-html5?
Cocos2d is designed for desktop and mobile platforms, while Cocos2d-html5 is designed for HTML5-ready browsers and web apps. Moreover, Cocos2d-html5 supports desktop and mobile platforms via the Cocos2d JSB, and it brings with it the hybrid app online updating feature.
It is becoming more and more feasible to develop and debug games on browsers. Browsers, such as Chrome, provide you with many useful debugging and profiling tools. After finishing your game on the Web, you can quickly port it to iOS or Android via Cocos2d JSB.
Extending the Power of Cocos2d-html5 with Cocos2d JavaScript Binding
You can now use Cocos2d-html5 to write games running on HTML5-compatible browsers. With the power of the Cocos2d JSB, you can use the same code base to run on a PC, mobile device, or even embedded systems. If you want to know more about JavaScript Binding and the corresponding generators, check out this link: https://github.com/Cocos2d/bindings-generator.
Understanding Cocos2d
In the Cocos2d world, everything is a node, and the world is mainly constructed from three types of nodes:
- A scene node
- Some layer nodes
- Lots of sprite nodes
Only one scene can be running at a time, which includes one or more layers, and layers that contain sprite nodes that are actually displaying something, such as an image, a character, an explosion, and so forth.
Basic Concepts of Cocos2d
Before creating the first scene of your game, you should be familiar with the basic concepts of Cocos2d. If you are already familiar with these concepts, you can skip to next section.
Now, let’s go over a few things about the framework and its basic concepts.
Director
The cc.Director is a shared (singleton) object that takes care of navigating between scenes. It is an important component for controlling the flow of the game. It knows which scene is currently active and allows you to change scenes by replacing the current scene or pushing a new one onto the scene stack. When you push a new scene onto the stack, cc.Director pauses the previous scene but keeps it in memory. Later, when you pop the top scene from the stack, the paused scene resumes from its last state. cc.Director is also responsible for initializing the scheduler, action manager, and touch dispatcher.
Scene
A scene (implemented with the cc.Scene object) is more or less an independent piece of the app workflow. (Some people call them “screens” or “stages.”) Your app can have many scenes, but only one of them can be active at a given time.
For example, you could have a game with the following scenes: Intro, Menu, Level 1, Level 2, Winning Scene, Losing Scene, and High Scores. You can think of each one of these scenes as a separate application that can be connected to other scenes with a small amount of “glue” code. For example, the Intro scene might go to the Menu scene when it finishes, and the scene for Level 1 might lead to the scene for Level 2 (if the player wins) or to the Losing scene (if the player loses). An example of how scenes might flow in a game is shown in Figure 24-1.
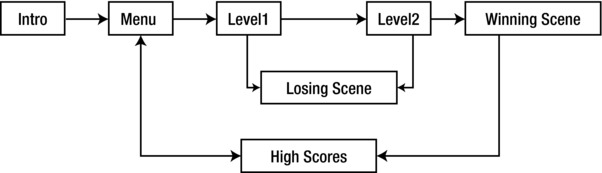
Figure 24-1. Example game flow
A Cocos2d cc.Scene is composed of one or more cc.Node objects, added as children to the scene. Subclasses of cc.Node, such as cc.Layer and cc.Sprite, give the scene its appearance and behavior. Typically, you implement your screens as subclasses of cc.Layer and add them to a blank instance of cc.Scene. Afterwards, you implement your other graphics and game objects as cc.Node and add them as children to the cc.Layer you created.
Because scenes are a subclass of cc.Node, they can be transformed manually or programatically by using cc.Action. See Actions at http://cocos2d-x.org/wiki/Actions for more information.
There is also a family of cc.Scene classes called transitions, implemented with the cc.TransitionScene class. These allow you to create special transition effects when switching from one scene to another, such as fading, and sliding in from the side.
Layer
A cc.Layer is a cc.Node, and it is often used as a container for displayable elements. Layers know how to draw themselves and may be semi-transparent, allowing players to see other layers behind them. cc.Layer is very useful in defining your game's appearance and behavior, so expect to spend a considerable amount of your programming time coding cc.Layer subclasses. A series of Cocos2d layers in a regular menu scene are shown in Figure 24-2.
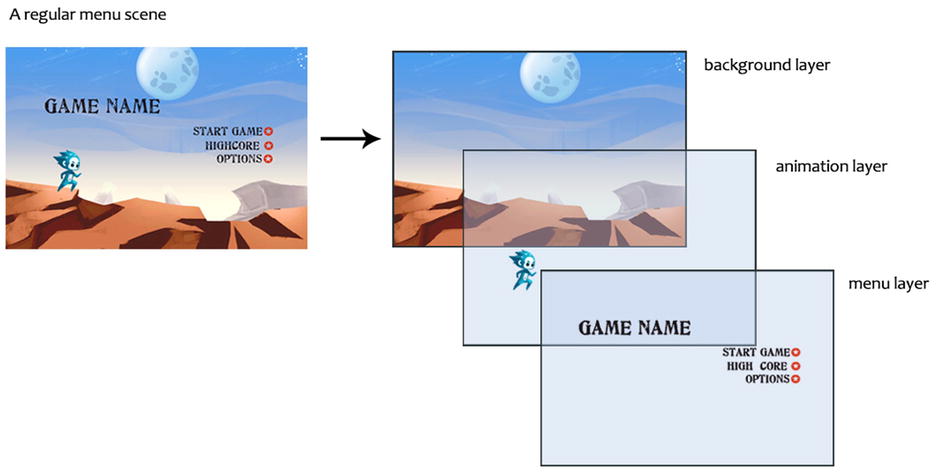
Figure 24-2. Cocos2d layers
The cc.Layer is where you define touch event handlers. By implementing a method to handle one of the touch events (cc.TouchBegan, cc.TouchMoved, cc.TouchEnded, or cc.TouchCancelled), a cc.Layer can react to the player's interaction. These touch events are propagated to all of the layers within a scene, from front to back, until the claimed layers catch the event and accept it.
While complex applications will require you to define custom cc.Layer subclasses, Cocos2d provides several predefined layers. Some examples include cc.Menu (a simple menu layer), cc.ColorLayer (a layer that draws a solid color), and cc.LayerMultiplex (a layer that lets you multiplex its children, activating one while disabling the others).
Layers may contain any cc.Node as a child, including cc.Sprite, cc.Label, and even other cc.Layer objects. Because layers are a subclass of cc.Node, they can be transformed manually or programatically by using cc.Action.
Sprite
A Cocos2d cc.Sprite is similar to sprites that you find in other game engines. It is a 2D image that can be moved, rotated, scaled, animated, or subjected to other transformations. Sprites (implemented using the cc.Sprite class) can have other sprites as children. When a parent is transformed, all of its children are transformed as well. Because sprites are a subclass of cc.Node, they can be transformed manually or programatically by using cc.Action.
Coordinate System
Cocos2d-html5 uses the same coordinate system as OpenGL, which is also called “the right-handed Cartesian coordinate system.” It is popular in the gaming industry; however, it is different from traditional top-left coordinate systems used in web page designs. The Cocos2d coordinate system is illustrated in Figure 24-3.
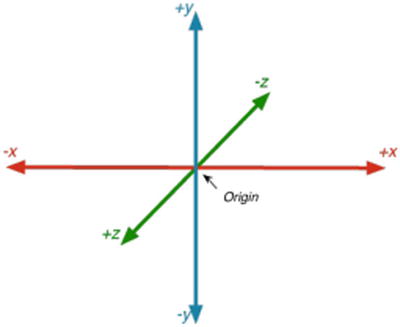
Figure 24-3. Cocos2d coordinate system
For a 2D game,
- The x-axis starts at the left side of the screen and increases to the right.
- The y-axis starts at the bottom of the screen and increases upwards.
The origin (x = 0, y = 0) is at the bottom-left corner of screen. It is the first quadrant of the right-handed Cartesian coordinate system.
The anchor point is used for both positioning and rotating of an object. The anchor point coordinate is a relative coordinate. For example, the anchor point in position (0, 0), which is always defined in Cocos2d shorthand as cc.p(0, 0), corresponds to the farthest bottom-left part of that object, while cc.p(0.5, 0.5) corresponds to the center of the object. When setting the position of the object, the object is positioned such that the anchor point will be at the coordinates specified in the setPosition() call. For example, Figure 24-4 shows the result of a blue circle sprite positioned with the code shown in Listing 24-1. Similarly, when rotating the object, it is rotated about the anchor point.
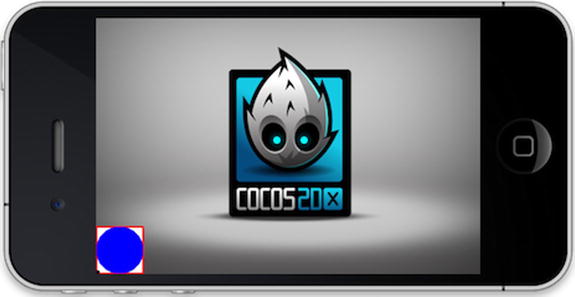
Figure 24-4. Anchor point
Listing 24-1. Sprite has an anchorPoint of cc.p(0, 0) and a Position of cc.p(0,0)
// create sprite
var sprite = cc.Sprite.create ( "bluecircle.png" ) ;
sprite.setAnchorPoint ( cc.p( 0 , 0 ) ) ; // Anchor Point
sprite.setPosition ( cc.p( 0 , 0 ) ) ;
this.addChild ( sprite ) ;
Action
Actions are like orders given to any cc.Node object. These actions usually modify some of the object's attributes, such as position, rotation, scale, and so forth. If these attributes are modified over a period of time, they are cc.IntervalAction actions; otherwise, they are cc.InstantAction actions. For example, the cc.MoveBy action modifies the position property during a certain time period, so it is a subclass of cc.IntervalAction. In another example, the following code snippet moves a sprite 50 pixels to the right and 10 pixels to the top over a period of 2 seconds:
sprite.runAction(cc.MoveBy.create(2, cc.p(50, 10)));
Animation
In Cocos2d, animations are bound to animated actions. You can use a sequence of images to create an animation. After the animation is created, you can use the code shown in Listing 24-2 to play the animation on a sprite.
Listing 24-2. Move a Sprite 50 Pixels to the Right and 10 Pixels to the Top over a Period of 2 Seconds
var animation = cc.Animation.create ( ) ;
for ( var i = 1 ; i < 15 ; i ++ ) {
    var frameName = "res/Images/grossini_dance_" + ( ( i < 10 ) ? ( "0" + i ) : i ) + ".png" ;
    animation.addSpriteFrameWithFile ( frameName ) ;
}
animation.setDelayPerUnit ( 2.8 / 14 ) ;
animation.setRestoreOriginalFrame ( true ) ;
var action = cc.Animate.create ( animation ) ;
sprite.runAction ( cc.Sequence.create ( action, action.reverse ( ) ) ) ;
Scheduler
The Scheduler is responsible for triggering the scheduled callbacks. There are two different types of callbacks (selectors) in Cocos2d:
- Update Selector: The update selector will be called on every frame. You can customize its priority: the lower the value, the earlier it is called.
- Custom Selector: A custom selector will be called on every frame, or with a customized interval of time.
Custom selectors should be avoided whenever possible. Update selectors are faster and consume less memory.
Touch Event
Cocos2d supports two different ways of handling touch events, which are described in CCTouchDelegateProtocol.js. There is the TargetedTouchDelegate event and the StandardTouchDelegate event.
TargetedTouchDelegate offers two benefits:
- You don’t have to deal with an event set, as the dispatcher does the job of splitting them. You get exactly one cc.Touch per call.
- You can claim a cc.Touch by returning true in onTouchBegan. Updates of claimed touches are sent only to the delegate(s) that claimed them. So if you get a move/ended/cancelled update, you can be certain that it's your touch. This frees you up from having to do numbers checks when using multi-touch.
StandardTouchDelegate also has two benefits:
- Splitting an event set is something that you must do. You can get each cc.Touch from the event set.
- You don’t need to state true or false in cc.TouchesBegan. All of your touch callbacks will be called when you touch the screen.
The difference between TargetedTouchDelegate and StandardTouchDelegate is as follows:
- TargetedTouchDelegate processes touch events one by one, while StandardTouchDelegate processes touch events in an event set. Thus when you need to process a multi-touch, you should choose StandardTouchDelegate.
- TargetedTouchDelegate has a higher priority to get a touch event than StandardTouchDelegate.
- TargetedTouchDelegate supports priority: the lower the value of the priority, the earlier it is to get the event. StandardTouchDelegate doesn’t support priority.
- TargetedTouchDelegeate can swallow touch events and prevent dispatching it to a low-priority one. You can set your priority and swallowsTouches parameters when you register your touch delegate with cc.registerTargetedDelegate(priority, swallowsTouches, delegate).
Introduction to the Directory Structure
The latest Cocos2d-html5 release package at the time of this writing (v2.2.2) contains the engine core module, extension modules, external libraries, samples, and templates. It doesn’t contain the Cocos2d JSB files, and you have to download the corresponding Cocosd-x package when you want to publish Cocos2d JSB applications.
The Cocos2d-x team is working on a Cocos2d-js project that includes both the Cocos2d-html5 and Cocos2d JSB. The Cocos2d-js v3.0 alpha will be released in March 2014. For more information about Cocos2d-js, visit https://github.com/cocos2d/cocos2d-js.
The directory structure is illustrated in Figure 24-5. It contains eight folders and four files.
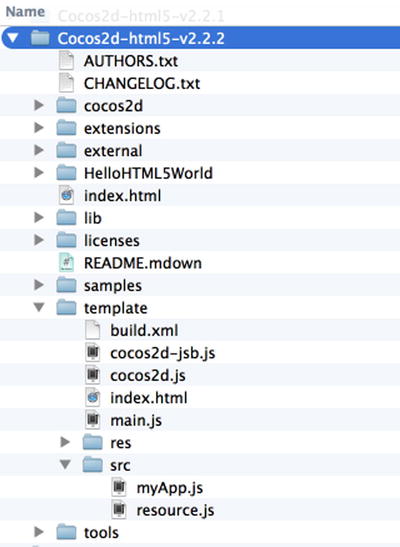
Figure 24-5. Directory structure
- The /root/template/ directory is used for creating new Cocos2d-html5 projects. All of your game resources, such as images, sounds, background music, and configuration files, should go in the /root/template/res folder. Your game source code files should go into /root/template/src.
- The /root/Cocos2d/ directory hosts the engine’s core module, audio module, and other modules, and the /root/extension/ directory hosts some useful modules, such as EditBox, CocosBuilder Reader, and CocoStudio Reader, and so on. These two directories contain expanded files, while /root/lib/ has a compressed file containing these two directories together.
- The /root/external directory hosts physics engines, such as box2d and chipmunk.
- The /root/HelloHTML5World/ directory contains a simple “Hello World” demo.
- The /root/license/ directory includes all of the license files in this project and, as mentioned previously, the license of Cocos2d-html5 is from MIT, and it is the freest open source license.
- Within the Samples directory, you can find the usage of all classes in Tests. It also includes sample games. All of the tests and games can be run on JSB. This is where you should start.
- The /root/tools/ directory includes the JS Doc tool and closure compiler. The /root/template/build.xml directory is the configuration file for the closure compiler, and you can package your game into a single file in advanced mode via ANT. You simply need to add your game's JS files and then type ant in the console in the directory of /root/template/ directory.
- The AUTHORS.txt contains the core developer and contributor information.
- The CHANGELOG.txt contains the change information for all versions.
- The index.html is the entry file of the engine samples and demos.
- The README.mdown contains an introduction to Cocos2d-html5.
Introduction to the Tiled Editor
There are various tools in the Cocos2d community that can help you to develop your game professionally and efficiently. In this chapter, you will use the Tiled Editor to build the game map for the live demo, so that’s the only tool I’ll be discussing here. Information regarding other tools is available on the Cocos2d web site.
The Tiled Editor is a tool that allows for the easy creation of map layouts. It is versatile enough to allow you to specific more abstract things, such as collision areas, enemy spawn positions, or power-up positions. It saves all of this data in a convenient, standardized TMX format.
What is TMX?
The TMX (Tile Map XML) map format used by the Tiled Editor is a flexible way to describe a tile-based map. It can describe maps with any tile size, number of layers, and number of tile sets, while also allowing custom properties to be set on most elements. Besides tile layers, it can also contain groups of objects that can be placed freely.
Why Tiled Editor?
The reason I use the Tiled Editor is because it allows you to focus on more important things in your game when you have a standardized system and a powerful, flexible tool already in place. With the Tiled Editor, you’ll be able to take a few tile sets, create your levels, and then be on your way.
In addition, with the Tiled Editor’s help, all of the map layout information is stored in the TMX file. This is powerful because it allows you to send the TMX file to a player, and then instantly have the layout available without having to re-download the client (assuming that the TMX map uses textures that are already on the player’s computer).
Getting Started on Built-in Examples
Installing Cocos2d-html5 is as easy as extracting it and running the index.html file. It can be downloaded from the official Cocos2d-x web site at Cocos2d-x.org/download (see Figure 24-6). Just save the downloaded .zip file; you will extract the code on a web server default path later.
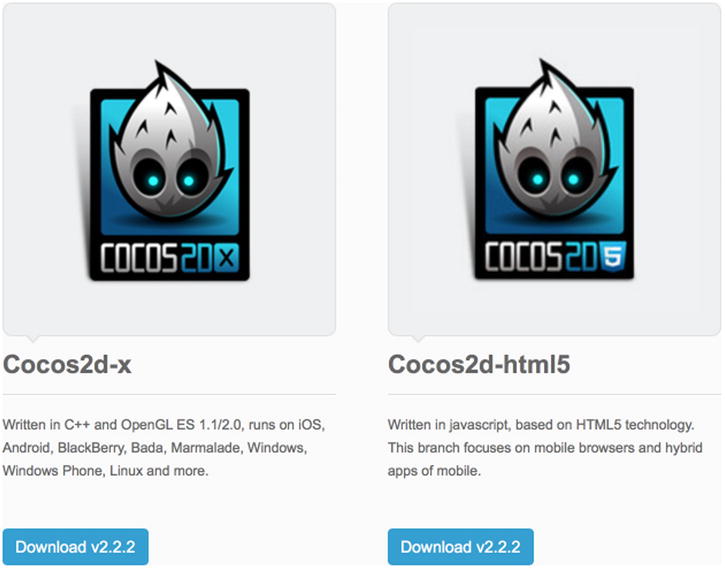
Figure 24-6. Cocos2d-x download page
Cocos2d-html5 releases a new version every six weeks. v2.2.2 was the latest version in use at the time of this writing, so this book will use version v2.2.2.
Next, you are going to install a web server. You have several options here:
Follow these steps to install the web server.
- Download one version of your platform.
- Follow the default instructions to install it.
- Specify the installation directory.
- Copy the extracted Cocos2d-html5 files to the root directory.
- Open your browser, and input “localhost” in the address bar.
Review the Built-in Examples
When you have downloaded and installed the web server successfully, it is highly recommended that you go through the built-in examples. They cover over 95 percent of the features of Cocos2d-html5, and they are also the most valuable learning resource that you can obtain at present.
When you start your web server and enter localhost in your browser’s address bar, you will see the screen shown in Figure 24-7.
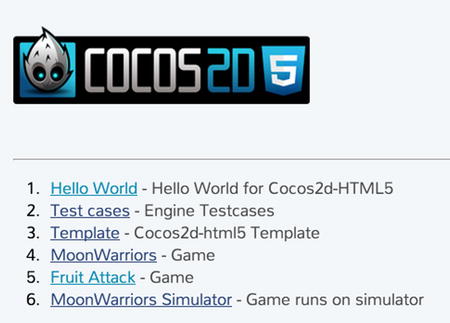
Figure 24-7. Cocos2d-html5 index page
As you can see, there are many demos and sample games. If you are new to Cocos2d-html5, you may want to give the MoonWarriors demo a try first.
Review the Tests
Figure 24-8 shows what happens when you open the link named Test cases. It will show you all of the built-in tests that come with Cocos2d-html5.
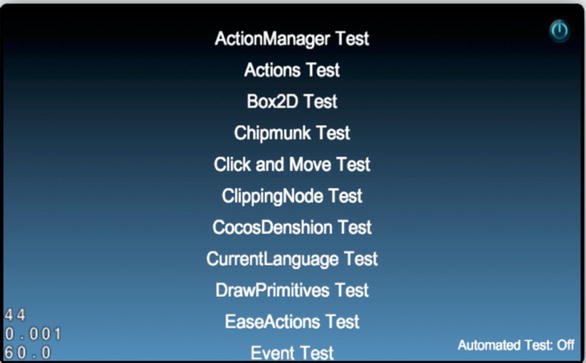
Figure 24-8. Cocos2d-html5 tests
The tests are the best learning resources available. If you make changes to the source file, you will see the result immediately. It is a much faster way to learn and obtain the features that you need for your game than by trying to create everything from scratch by yourself.
Taking a Look at the Sample Games
There are two types of full game samples built-in with Cocos2d-html5. All of the source code is completely free and open to you. The following sections provide a short introduction to these sample games.
MoonWarriors
The first game listed on the index page is MoonWarriors (see Figure 24-9). It is a vertical shooting game. In this sample game, many useful game techniques are applied, including tile-map, animation, parallax backgrounds, and so on. You can dive into the source code for more information.

Figure 24-9. MoonWarriors opening screen
Fruit Attack
This is a matching game. You can swap the position of a nearby fruit, and if there are three or more of the same type of fruits in a vertical or horizontal direction, you have a match and the same fruits will be cleared (see Figure 24-10).
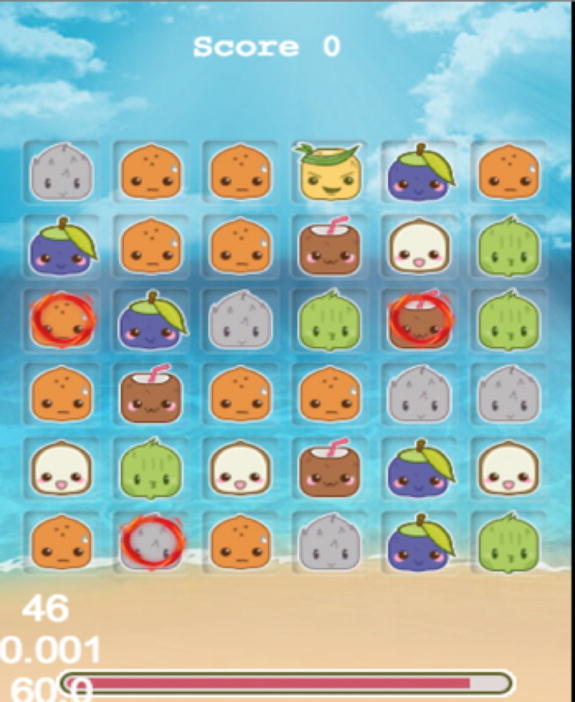
Figure 24-10. Fruit Attack game screen
Setting Up Your First “Hello World” Project
When creating new game project, I suggest that you create your project based on the template folder. To simplify matters, copy the template folder and rename the root folder to where you extracted the Cocos2d-html5 archive. The template includes five files and two directories, as shown in Figure 24-11.
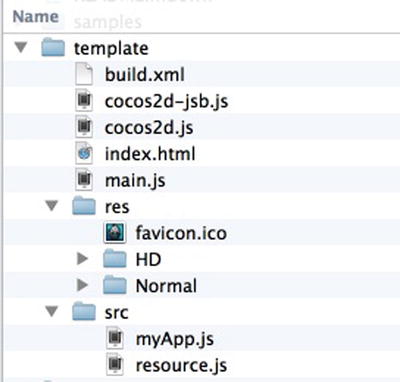
Figure 24-11. Cocos2d template structure
- The build.xml file is used for the Google closure compiler. You can use this file to package all of your game and engine files into a single file.
- The Cocos2d-jsb.js file is the entry file for the JSB project.
- The Cocos2d.js file is the entry file of index.html. It defines project configuration, such as render mode, debug mode, frame rate, and so forth. You also need to add the user’s game JavaScript files list to the file.
- The index.html file is the entry file of your project. It defines the canvas div that you will use in your game, viewport setting, full screen setting, and so on. Note that this HTML page references only one JavaScript file (Cocos2d.js).
- The main.js file initializes the game setting, sets different resolution resources for the search path, initializes the multi-resolution adaption, and launches the game.
- The res directory contains all of your resources, including images, sounds, background music, and configuration files. You can put different resolution resources in different subdirectories and set the corresponding path in main.js.
- The src directory includes all of the JavaScript files used in the game. The resource.js file defines all of the resources used in the game. In addition, you can separate your resources into different groups and preload them on demand.
Building the Tower Defence Game
In this section, you will start to create a tower defence game step by step based on Cocos2d-html5. I will also cover deploying the game to the web server and packaging all JavaScript files into a obfuscated single file for security.
Overview
Before coding, take a look at the overview of the game and then dive into its component details to learn its features.
The tower Defence gameplay is very simple and straightforward. The sample game will only require three scenes: main menu, game play, and game over. The main menu scene and game over scene are quite simple, while the game play scene has many layers to contain different elements, as shown in Figure 24-12.

Figure 24-12. The scenes and layers of the tower defence project
The Tower Defence Gameplay Scene
The game play scene contains a game layer and five sublayers: the Map layer, Tower layer, Monster layer, Bullet layer, and Toolbar layer. All of the layers will be introduced later.
The game play scene contains most of game logic in the game. There is a predefined path where all enemies walk. There are two gun towers on the path to defeat the enemies. The attack range of the tower is limited to a circle, and you can adjust the position of towers. There are two types of towers and three types of enemies. If your score is greater than 2,000, you win. You lose if one monster passes through the gate.
The key to winning is to reposition the towers in the right place or add the right monsters in the menu to help you to get a high score quickly.
Designing the Required Game Components
In order to make the tower defence game, you’ll design the following components:
- A main menu for the game, a game play scene, and a game over scene.
- The map has a predefined path. The path can be modified easily. In your game sample, you will use tiled maps to edit the path.
- There are two types of towers. The towers are gun towers and support repositioning. You must implement drag-and-drop functionality for the towers, and it should be easy to modify their properties.
- There are different types of enemies with various running speeds and hit points. You’ll use the CardinalSplineTo action to make the enemies follow the path.
- There is collision detection mechanism between the enemy and bullets fired from the tower. In this example, you’ll use QuadTree to implement collision detection. QuadTree is a tree data structure in which each internal node has exactly four children.
- Setting up the conditions for winning or losing a game.
A Step-by-Step Process for Making the Tower Defence Game
Now let’s create the game step by step. The name of your project is HalloweenDefence. You can refer to the repository on github: https://github.com/linshun/HalloweenDefence. The directory structure is shown in Figure 24-13.
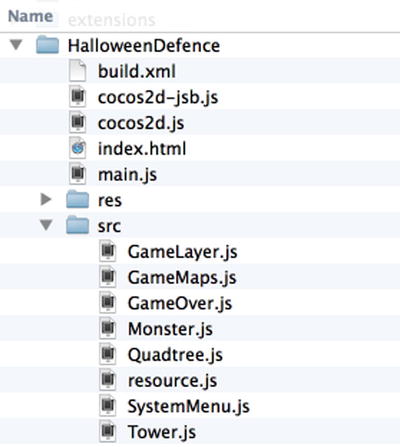
Figure 24-13. Directory structure of HalloweenDefence
You can deploy the existing project to a web server, and then play it in a browse.
Creating the Tower Defence Project
As mentioned earlier, you can copy the template folder and then paste and rename it. You will create the game based on the template.
After the game folder is created, open up the index.html file and set the gameCanvas to 480×318 pixels. This is the design resolution of the game, which I will discuss later. You also need to set screen-orientation to landscape mode.
Cocos2d-html5 supports the features of multi-resolution adaptation, and all of your game’s coordinates are based on the design resolution, no matter the size of your browser’s window. It is easy for you to enable the multi-resolution adaptation feature. Listing 24-3 provides the code to do so.
Listing 24-3. The applicationDidFinishLaunching Function Enables the Multi-resolution Adaptation Feature in main.js.
applicationDidFinishLaunching : function ( ) {

    // initialize director
    var director = cc.Director.getInstance();

    // Set full screen mode to SHOW_ALL mode.
    cc.EGLView.getInstance().setDesignResolutionSize(480, 318,
       cc.RESOLUTION_POLICY.SHOW_ALL);

    // Resize the game canvas when browser size changed
    cc.EGLView.getInstance().resizeWithBrowserSize(true);

    // turn on display FPS
    director.setDisplayStats(this.config['showFPS']);

    // set FPS. the default value is 1.0/60 if you don't call this
    director.setAnimationInterval(1.0 / this.config['frameRate']);

    //load resources
    cc.LoaderScene.preload(g_resources, function () {
        director.replaceScene(new this.startScene());
    }, this);

    return true;
}
The first half of the code in Listing 24-3 initializes the director, and it enables the multi-resolution adaptation feature of the engine and the auto resize event. It is enabled by default on the template. The setSearchPaths feature code should be removed, and you need to delete the HD and Normal folder under the res directory. Then copy all of the resources to the res directory.
There are five modes of multi-resolution adaptation.
- EXACT_FIT: The entire application is visible in the specified area without trying to preserve the original aspect ratio.
- NO_BORDER: The entire application fills the specified area without distortion, but possibly with some cropping, while maintaining the original aspect ratio of the application.
- SHOW_ALL: The entire application is visible in the specified area without distortion while maintaining the original aspect ratio of the application. Borders can appear on two sides of the application.
- FIXED_HEIGHT: The application takes the height of the design resolution and modifies the width of the internal canvas so that it fits the aspect ratio of the browser’s window.
- FIXED_WIDTH: The application takes the width of the design resolution and modifies the height of the internal canvas so that it fits the aspect ratio of the browser’s window.
In this game, you’ll choose the SHOW_ALL mode. For more details about cocos2d multi-resolution adaptation, visit http://www.cocos2d-x.org/wiki/Multi_resolution_support.
The rest of the code turns on the statistics display, sets the frame rate, and preloads the resources.
After defining the game display, it is recommended that you configure your project setting in Cocos2d.js (see Listing 24-4).
Listing 24-4. Project Setting Configuration in Cocos2d.js
 ( function ( ) {
    var d = document ;
    var c = {
        COCOS2D_DEBUG : 2 , //0 to turn debug off, 1 for basic debug, and 2 for full debug
        box2d : false ,
        chipmunk : false ,
        showFPS : true ,
        loadExtension : false ,
        frameRate : 60 ,
        renderMode : 1 ,     //Choose of RenderMode: 0(default), 1(Canvas only), 2(WebGL only)
        tag : 'gameCanvas' , //the dom element to run Cocos2d on
        engineDir : '../Cocos2d/' ,
        //SingleEngineFile:'../../lib/Cocos2d-html5-v2.2.2.min.js',
        appFiles : [
            'src/GameLayer.js' ,
            'src/GameMaps.js' ,
            "src/Monster.js" ,
            "src/Tower.js" ,
            'src/resource.js',
            "src/QuadTree.js",
            'src/SystemMenu.js',
            "src/GameOver.js"
            ]
        } ;
} ) ( ) ;
When you create your own JavaScript files for the game, remember to add them into the appFiles array. Similarly, you have to define all of your resources in resources.js and then preload them (see Listings 24-5A and 24-5B). Remember to add resources.js and other new JavaScript files into the appFiles array.
Listing 24-5A. Adding Background Tile Maps to the Resources Preloading Array in resources.js
var s_DtMapsTmx = "res/DtMaps.tmx" ;
var s_DtMapsImage = "res/DtMaps.png" ;
var g_resources = [
    //image
    { src : s_DtMapsImage } ,
    //tmx
    { src : s_DtMapsTmx }
] ;
Listing 24-5B. applicationDidFinishLaunching Function Preloads Resources in main.js
applicationDidFinishLaunching : function ( ) {

    //load resources
    cc. LoaderScene.preload ( g_resources , function ( ) {
        director. replaceScene ( new this.startScene ( ) ) ;
    } , this ) ;

    return true ;
}
The g_resouces will be preloaded when the engine executes the applicationDidFinishLaunching() function in main.js.
After preloading, the engine will call this.startScene() to launch the game. this.startScene is an operator and member of the class cocos2dApp. It will set the start scene SytemMenuScene to this.startScene in the ctor() function, which is your game main menu. Next, take a look at launching code on the last line of the main.js file. The game will be launched after executing this code.
var myApp = new cocos2dApp(SystemMenuScene);
Creating Main Menu Scene for the Game
The main menu scene will display the title of the game, the game theme, and a start button that allows you to begin the game (see Figure 24-14).
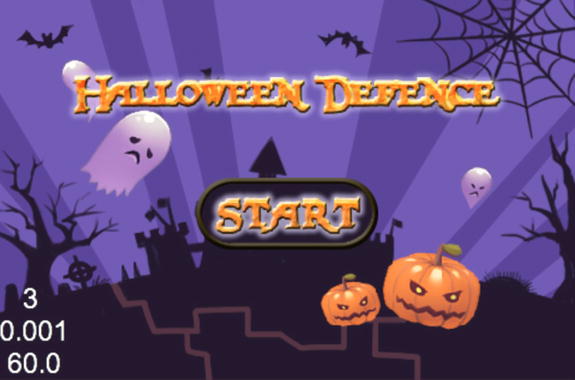
Figure 24-14. HalloweenDefence main menu
It is very easy to create the game. It is built on one layer that contains two sprites and a menu item. Now let’s create a SystemMenu.js file and add it to appFiles array. Then, let’s extend a SystemMenuLayer from cc.Layer and then add sprites and menu items to it. The code for doing this is provided in Listing 24-6.
Listing 24-6. Defining SystemMenuLayer Class in SystemMenu.js
var SystemMenuLayer = cc.Layer.extend ( {       //extend a SystemMenuLayer from standard cc.Layer
    init : function ( ) {
        this._super ( ) ;
        var winSize = cc.Director.getInstance( ).getWinSize ( ) ;

        // init background
        var background = cc.Sprite.create ( s_StartBG ) ;
        background.setPosition ( winSize. width / 2, winSize.height / 2 ) ;   //set the position to screen center
        this.addChild ( background , 0 ) ;      // add the background image to the layer

        // init title
        var title = cc.Sprite.create ( s_HalloweenDefence ) ;
        title.setPosition ( winSize.width / 2, winSize.height * 3 / 4 ) ;
        this.addChild ( title , 1 ) ;

        // add start button
       // create the menu item with normal image and selected image, and set the callback function.
        var StartItem = cc.MenuItemImage.create (
        s_Start ,
        s_StartSelected ,
            function ( ) {
                // when clicked, launch the game play scene.
                cc.Director.getInstance( ).replaceScene( new GameScene ( ) ) ;
            } , this ) ;
        StartItem.setAnchorPoint ( cc.p( 0.5, 0.5 ) ) ;

        var menu = cc.Menu.create ( StartItem ) ;   // create the menu with the start menu item
        menu.setPosition( cc.p( 0 , 0 ) ) ;
        this.addChild ( menu , 1 ) ;
        StartItem.setPosition ( winSize.width / 2, winSize.height / 2 - 20 ) ;
    }
} ) ;
Now the game main menu layer is ready, and you can connect it to the main menu, as shown in Listing 24-7.
Listing 24-7. Connecting the SystemMenuLayer to SytemMenuScene in SystemMenu.js
var SystemMenuScene = cc.Scene.extend ( {
    onEnter : function ( ) {
        this._super ( ) ;
        var layer = new SystemMenuLayer ( ) ;
        layer.init ( ) ;
        this.addChild ( layer ) ;
    }
} ) ;
Once the scene is created, an onEnter() function should be defined. It defines the SystemMenuLayer as its child. You can also define SystemMenuLayer in the ctor() function instead of the onEnter() function, because the ctor() function will be called automatically when the scene object is created.
Make sure that you add all of the resources in resources.js before using it, as you did in Listing 24-5A. The main menu will display on your screen.
Creating the Game Layer, Toolbar Layer, and Game Map Layer
Now it is time to create the game play scene. The first thing to do when creating a game play scene is to build a game layer. It contains all of the other layers, such as the Game Map layer, Tower layer, Monster layer, Bullet layer, and Toolbar layer.
You should create a GameLayer.js file and add it to appFiles array. The code to do this is provided in Listing 24-8.
Listing 24-8. Defining the Game Layer and Add Sub-layer to it (GameLayer.js)
// Extern GameLayer from standard cc.Layer.
var GameLayer = cc.Layer.extend({
  _maps:null,
  _winSize:null,
    init : function(){
            this._super();
            this._winSize = cc.Director.getInstance().getWinSize();
            // init game maps
            this.initMaps();   //Add and init your game map.

            // add tool bar
            this.initToolsBar();   //Add tool bar.
    },
    initMaps : function(){
            this._maps = GameMaps.create();
            this._maps.setPosition( cc.p( 0, 30));
            this.addChild(this._maps);  // Add game map to game layer.
    },
    initToolsBar : function(){
            var toolLayer = cc.Layer.create(); // We will add monsters menu items to this tool layer later.
            var sToolsBar = cc.Sprite.create(s_ToolsBar);
            sToolsBar.setPosition( cc.p( this._winSize.width / 2 , sToolsBar.getContentSize().height / 2));
            toolLayer.addChild(sToolsBar);
            this.addChild(toolLayer, 2);  // Add toolbar layer into game layer.
    }
});
You have created a toolbar layer and add it to game layer. You also defined a initMaps() for Game Map layer, now let’s implement it and add it to the Game layer.
As to Game Map layer, you use the Tile map editor Tiled to create the map (See Figure 24-15). You can download this powerful tool from www.mapeditor.org/download.html.
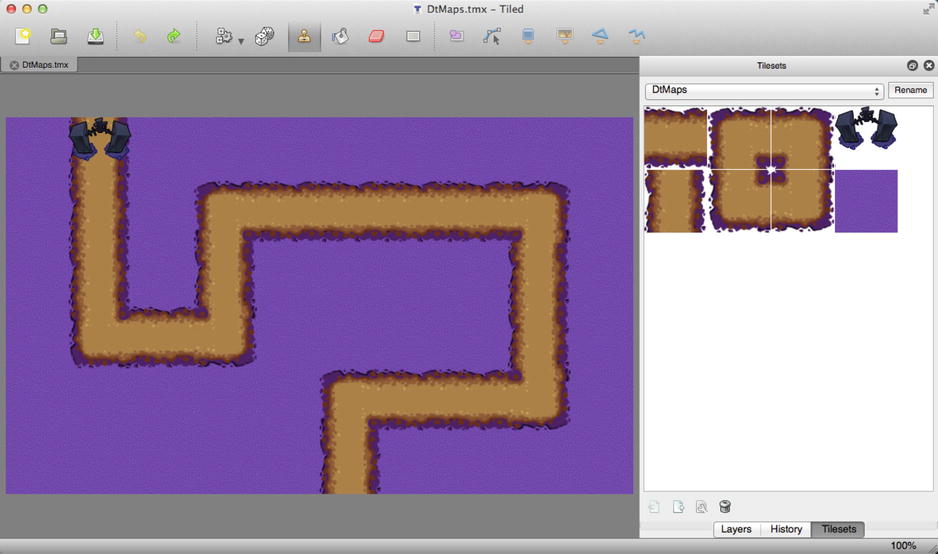
Figure 24-15. Tower Defence game map
The map has three layers:
- tlBackgroud
- tlWayPoint
- tlStartPoint
tlWayPoint defines the path that the monsters will take, and tlStartPoint is the place where the monsters are born.
Tiled will export two files: DtMaps.tmx and DtMaps.png. Add these files to the /TowerDefence/res/ folder. Cocos2d-html5 natively supports .tmx files, so it is easy for you to add the map to the scene.
Now let’s create the Game Map layer, step by step. First, you need to create a GameMaps.js file and add it to appFiles array. Then define the Game Map layer and add it to the Game layer. The sample code in Listing 24-9 shows you how to define a Game Map layer. Refer to GameMap.js for details of the setting.
Listing 24-9. Defining GameMaps Class in GameMaps.js
var GameMaps = cc.Layer.extend ( {
    _tiledMap : null ,
    _mapSize : null ,
    _mapContentSize : null ,

    init : function ( ) {
        this._super ( ) ;
        cc.log( "game maps init.");
        // init background tilemap
        this._tiledMap = cc.TMXTiledMap.create ( s_DtMapsTmx ) ;
        this.addChild ( this ._tiledMap ) ;

        // set background size
        var layer = this._tiledMap.getLayer ( "tlBackground" ) ;
        this._mapSize = layer.getLayerSize ( ) ;
        this._mapContentSize =layer.getContentSize ( ) ;

        // init start point
        this.initStartPoint ( ) ;

        // init way points
        this.initWayPoints ( ) ;

        cc.log("map size:" + this._mapSize.width + " " + this._mapSize.height ) ;
    }
} ) ;

GameMaps.create = function ( ) {
    var layer = new GameMaps ( ) ;
    layer.init();
    return layer;
};
cc.log() is an important debug API of Cocos2d, which you can use to print debug messages on Chrome debugger consoles. You can also debug game code step by step on the Chrome debugger or set a breakpoint on it.
As Listing 24-8 shows, you have added the toolbar layer and the Game Map layer to Game layer. Now that the Game layer is ready, you can connect it to the game scene, as shown in Listing 24-10.
Listing 24-10. Connecting the Game Layer to Game Scene in GameLayer.js
var GameScene = cc.Scene.extend({
    onEnter:function(){
        this._super();
        var layer = new GameLayer(); // Create the GameLayer.
        layer.init();
        this.addChild(layer);
    }
});
Now the game scene is ready to run, and it should look like Figure 24-16.
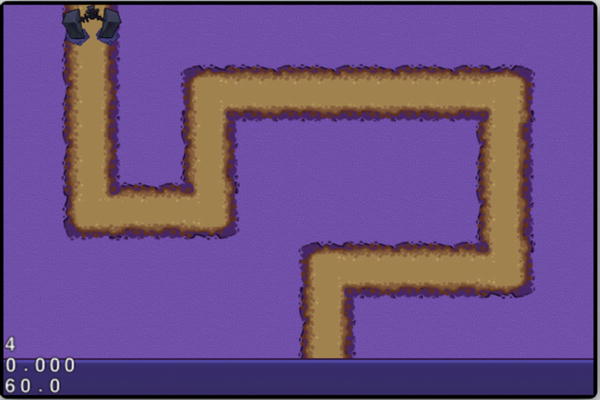
Figure 24-16. Tower Defence Game Map layer and Tool Bar layer
There are three numbers at the bottom-left corner. These numbers represent the following statistics:
- Draw calls
- Second per frame (SPF)
- Frame per second (FPS)
You should try to keep draw calls as few as possible and keep the updating time (SPF) as low as possible to get a high CPU idle time. For example, the cocos2d engine will cache the tile map automatically to improve performance, because the tile map is created by lots of tiles, and their position is always the same. This is why the draw calls only reads 4 with lots of tiles displayed on the screen. SPF will be indicated as 0 when it is less than 1ms.
Adding the Enemy Menu and the Show Range of the Game
In this part, you allow users to control monster creation manually. Thus you will add a menu item to the toolbar layer to control this.
All of the menu items will be added to the tool layer that you already defined. The code to do this is shown in Listing 24-11 through Listing 24-13.
Listing 24-11. Creating theGreen MonsterMenu Item in GameLayer.js
// add monster menu item of Green
var green = cc.Sprite.create ( s_Monster [ 0 ] ) ;
var greenSelected = cc.Sprite.create ( s_Monster [ 0 ] ) ;
greenSelected. setColor(cc.c4b( 125 , 125 , 125 , 125 ) ) ;
var menuMonsterGreen = cc. MenuItemSprite.create (
    green ,
    greenSelected ,
    function ( ) {
        this.addMonster ( Monster.createGreen ( ) ) ;
    } , this ) ;
menuMonsterGreen. setPosition ( cc.p( 118 , -245*0.6 ) ) ;
The code in Listing 24-11 through Listing 24-13 should be added in initToolsBar() of GameLayer.js. Listing 24-11 shows that you created a green monster sprite with an image for normal status. You then made its selected status grey. It then used the normal sprite and the grey sprite to create a menu item in the cc.MenuItemSprite.create() API. The menu item will be added to the menu later. The callback function of the menu item is addMonster. It will create a monster and add it to the game when clicked.
Similarly, you add the purple and orange monsters and set their position. Refer to GameLayer.js for the implementation. You also need an item to show the attackable range of the tower. It is created by cc.MenuItemFont (see Listing 24-12).
Listing 24-12. Creating a “Show Range” Menu Item in GameLayer.js
var menuShowRange = cc.MenuItemFont.create ( "Show Range" , function ( ) {
        // callback function, for showing the attackablt range.
    } , this ) ;
menuShowRange.setFontSize ( 14 ) ;   // set font size.
menuShowRange.setPosition ( cc.pAdd ( menuMonsterGreen. getPosition ( ) , cc. p( -120 , 5 ) ) ) ;
After creating all of the menu items, you will use the cc.Menu.create() function to build the menu and add it to the ToolBar layer. The code to do this is shown in Listing 24-13, and the result is shown in Figure 24-17.
Listing 24-13. Creating a Menu with All Items in GameLayer.js
var menu = cc. Menu.create (
    menuMonsterGreen ,
    menuMonsterPurple ,
    menuMonsterOrange ,
    menuShowRange
) ;
toolLayer. addChild ( menu ) ;
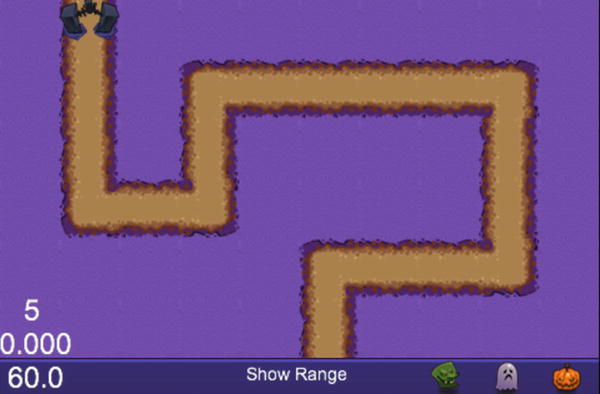
Figure 24-17. HalloweenDefence menu items
Creating Towers and Bullets
There are two different towers and two different types of bullets. The low-level tower attacks monsters with low-level bullets, while the high-level tower attacks monsters with high-level bullets.
The towers are created by four properties: tower building, weapon type, attackable range, and bullet speed. You will create a Monster layer to contain all of the monsters and add it to Game layer. The towers support positional movement with touch input and automatically generated bullets with monsters robotically attacking when they enter the attack range.
The towers need to register an input delegate when you want to use touch to control tower positions. You use TargetedTouchDelegate and enable the target type API cc.registerTargetedDelegate() to swallow the input event. Listing 24-14 provides the code to register touch for tower.
Listing 24-14. Register Touch for Towrers in Tower.js
var Tower = cc. Layer.extend ( {
      onEnter : function ( ) {
          this ._super ( ) ;
          cc.registerTargetedDelegate ( 0 , true , this ) ; //Register input delegate
      } ,
      onExit : function ( ) {
          this ._super ( ) ;
          cc.unregisterTouchDelegate ( this ) ;             // Unregister input delegate
      } ,
      onTouchBegan : function ( touch , event ) {
          // check rect
          if ( ! this.containsTouchLocation ( touch ) )
              return false ;
          this ._curPosition.x = this.getPositionX ( ) ;
          this ._curPosition.y = this.getPositionY ( ) ;
          this ._beganTouch = touch. getLocation ( ) ;
          return true ;
      } ,
      onTouchMoved : function ( touch , event ) {
          var touchPoint = touch. getLocation ( ) ;
          var moveTouch = cc.pSub ( touchPoint , this ._beganTouch ) ;
          this.setPosition ( cc.pAdd ( this ._curPosition , moveTouch ) ) ;
      } ,
      onTouchEnded : function ( touch , event ) {
          // check position
          var location = this ._gameLayer. checkTowerLocation ( this.getPosition ( ) ) ;
          if ( ! location ) {
              // If it is a invalid location, set to previous position.
              this.setPosition ( this ._curPosition ) ;
           } else {
               // Set the tower to new position.
              this.setPosition ( location ) ;
           }
           this ._curPosition.x = 0;
           this ._curPosition.y = 0;
       }
} ) ;
After registration of touch, you will have an input event in OnTouchBegan, OnTouchMoved, and OnTouchEnded. The code shows that the tower will move to the new position when the position is in a valid location. Please refer to Tower.js for implementation.
There are two types of bullets. The difference between them is that the low-level bullet will disappear after it hits a monster, and it can only hurt one monster at a time. Conversely, high-level bullets can go through and hurt all of the monsters.
High-level bullets extend from cc.Node, coming from a high-level tower and are removed when a lifetime is over. It has lifetime property and attack function. (Refer to Tower.js for the implementation.) The high-level bullets will be added to the bullet layer.
Low-level bullets are created when monsters come within the attack range of low-level towers. Low-level bullets are simply a sprite with a MoveTo action, and every bullet will hit one monster and then disappear. Thus you don’t need to check the collision of low-level bullets, you just add them to game layer instead of the bullet layer (refer to the Tower.js file). The code of low-level bullets is shown in Listing 24-15.
Listing 24-15. Low-level Bullets in Tower.js
var bullet = cc.Sprite.create ( s_Bullet ) ;
bullet. setPosition (
    cc. pAdd ( this.getPosition ( ), this ._sBall. getPosition ( ) ) ) ;
this ._gameLayer. addChild ( bullet ) ;

var move = cc. MoveTo.create ( 0.1 , monster. getSprite ( ).getPosition ( ) ) ;
bullet. runAction ( cc. Sequence.create (
    move ,
    cc. CallFunc.create ( function ( ) {
        bullet. removeFromParent ( ) ;      // auto removing call back.
    } , bullet )
) ) ;
monster. lostBlood ( 20 ) ;                 // it will shoot at monsters always.
The low-level bullets use cc.Sequence to create a series of actions, which will be executed in order. The cc.CallFunc function enables bullets to remove themselves when the action sequence is completed.
Creating Enemies and Actions
It is time to set up the enemies and make them move in the direction defined in the tile map tlWayPoint layer. There are three types of monsters, and all of them can display themselves and update the hit points. (Refer to Monster.js for the implementation.)
Monsters can be created both automatically and manually. The ToolBar allows you to create monsters manually, and you will use a schedule to add monsters to the game automatically. Listing 24-16 provides the code to accomplish this.
Listing 24-16. Adding the First Monster, and Starting a Schedule for Automatically Adding Monsters in GameLayer.js
var GameLayer = cc. Layer.extend ( {
    init : function ( ) {
    this.addMonster ( Monster.createOrange ( ) ) ;
    this.schedule ( this.autoAddMonster , 2 ) ;  // Add a monster every 2 seconds.
    } ,
} ) ;
The code will add a monster randomly every two seconds. Monsters will move on the path defined with cc.CardinalSplineTo, as shown in Listing 24-17.
Listing 24-17. The addMonster Function in GameLayer.js
addMonster : function ( monster ) {
    if ( ! this._monsterLayer ) {
        this._monsterLayer = cc.Layer.create ( ) ;
        this.addChild ( this ._monsterLayer ) ;
    }
    this ._monsterLayer.addChild ( monster , 1 ) ;

    var array = this._maps.getWayPositions ( ) ; // Get the way point frome tlWayPoint layer.
    var action1 = cc.CardinalSplineTo.create ( 20 , array , 0 ) ;   // create the action.
    var remove = cc.CallFunc.create ( function ( ) {

        // You will lose when monster passed the gate. We will create the GameOverScene later.
        cc.Director.getInstance().replaceScene(new GameOverScene(false));
        this.removeFromParent ( ) ;
        // cc.log("remove monster");
    } , monster ) ;
monster.showRange ( HD .SHOW_RANGE ) ;
monster.getSprite ( ).runAction ( cc.Sequence.create ( action1 , remove ) ) ;
It will create a monster layer and then add the monsters to it. After adding monster layer to the game layer, your screen should look like the one shown in Figure 24-18.
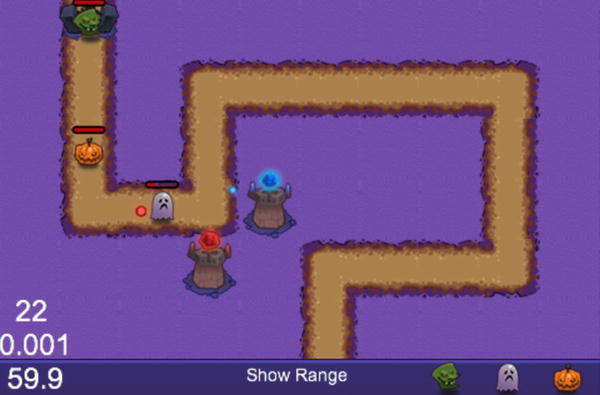
Figure 24-18. Tower Defence game’s enemies and actions
Monsters will be removed when they die or after completing the cc.CardinalSplineTo action. If the monster completes the journey, you will lose the game, and see the GameOverScene. When the monster dies, you will receive a score equal to monster’s hit points. If the score is higher than 2,000, you will win and also see the GameOverScene. I will discuss creating the GameOverScene later in this chapter.
Simple Collision Detection
Monsters and high-level bullets will move all over the screen. Sometimes the unlucky monster will get hit, and so you need to add collision detection to the game.
The prototype for collision detection in this game is known as QuadTree. Visit http://en.wikipedia.org/wiki/Quadtree to learn more about it, and refer to QuadTree.js for the implementation. QuadTree recursively splits the screen into four regions, and it checks the collision in each region. If objects in one region are larger than the maximum defined number, the region will be split again. The code to invoke QuadTree initially is as follows:
this ._quad = new Quadtree ( 0 , cc. rect ( 0 , 0 , this ._winSize. width , this ._winSize. height ) ) ;
With the Update function of GameLayer, you use QuadTree to check whether or not the monster is attackable. The code to do this is shown in Listing 24-18.
Listing 24-18. Checking Monster Attackability in GameLayer.js
this ._quad.clear ( ) ;
for ( var i = 0 ; i < monsters.length ; i ++ ) {
    this ._quad.insert ( monsters [ i ] ) ;
}
for ( var i = 0 , iLen = towers.length ; i < iLen ; i ++ ) {
    var tower = towers [ i ] ;
    var list = [ ] ;
    this ._quad.retrieve ( list , tower ) ;    // Get the check list
    // cc.log("length:" + list.length);
    for ( var j = 0 , jLen = list.length ; j < jLen ; j ++ ) {
        towers [ i ].checkAttack ( list [ j ] ) ;   // Check attackable
    }
}
In this game, the collision range of monsters and bullets is a circle shape, so you use circle-to-circle collision detection. It only needs to get the distance between monster and bullet, and check whether it is smaller than the sum of the bullet radius and the monster radius.
Adding Music and Sound Effects
For music and sound effects, you need to preload them and play them when desired. Note that you need at least two audio formats to support all browsers (mp3 and ogg, for instance). If you choose to play an mp3 or ogg file, the engine will choose the file that is supported by the installed browser. The code defining sound effects is shown in Listing 24-19.
Listing 24-19. Defining Sound Effects in resource.js
var s_AttackEffect_mp3 = "res/Music/AttackEffect.mp3" ;
var s_AttackEffect_ogg = "res/Music/AttackEffect.ogg" ;
var g_resources = [
    ... ...
    //effect
    { src : s_AttackEffect_mp3 } ,
    { src : s_AttackEffect_ogg }
] ;
After defining a sound effect in resource.js, you can play it when desired. The cc.AudioEngine is a singleton object in Cocos2d, and you can call it to play sound effects directly. The code for playing sound effects is as follows:
cc.AudioEngine.getInstance().playEffect(s_AttackEffect_mp3)
// play mp3 or ogg--you don’t need both.
You also should add a “Sound” menu item on ToolBar to control the on/off function for audio.
Creating the Game Over Scene
This is the final part of the game. The method for creating the game over scene is almost the same as that for creating the main menu, as learned previously. It shows you whether you win or lose, your score, and a start button. The win and lose game over screens are shown in Figure 24-19.
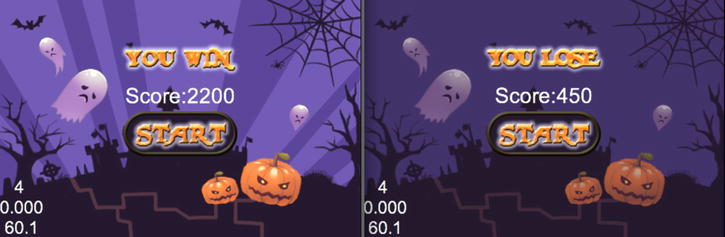
Figure 24-19. Tower Defence Game over scenes
Now create a GameOver.js file and add it to appFiles array. The game over scene contains only one GameOverLayer. The GameOverLayer can be created as shown in Listing 24-20.
Listing 24-20. Defining the GameOverLayer in GameOver.js
var GameOverLayer = cc. Layer.extend ( {
    init : function ( win ) {
        this._super ( ) ;
        var backgroudImage = null ;
        var titleImage = null ;
        var winSize = cc.Director.getInstance ( ).getWinSize ( ) ;

        if ( win ) {
            // Congratulations, you win
            backgroudImage = s_StartBG ;
            titleImage = s_Win ;
        } else {
           // Oh, no, you lose
           backgroudImage = s_LoseBG ;
           titleImage = s_Lose ;
        }
        // init background
        var background = cc.Sprite.create ( backgroudImage ) ;
        background.setPosition ( winSize. width / 2, winSize.height / 2 ) ;
        this.addChild ( background , 0 ) ;

        // init title
        var title = cc. Sprite.create ( titleImage ) ;
        title.setPosition ( winSize. width / 2, winSize.height * 3 / 4 ) ;
        cc.log ( winSize.width / 2 ) ;
        cc.log ( winSize.height / 2 ) ;
        this.addChild ( title , 1 ) ;

        // add the score on the screen
        score = cc.LabelTTF . create ( "Score:" + HD. SCORE , "Arial" , 28 ) ;
        score.setAnchorPoint ( cc. p( 0.5 , 0.5 ) ) ;
        score.setHorizontalAlignment ( cc. TEXT_ALIGNMENT_CENTER ) ;
        this.addChild ( score , 100 ) ;
        score.setPosition ( winSize. width / 2, winSize.height / 2 + 30 ) ;
        ... ...
        // add start button here
    } ) ;
You will notice that setPosition accepts two types of parameters: x and y or cc.p().
After creating GameOverLayer, connect it to GameOverScene, as shown in Listing 24-21.
Listing 24-21. Connecting the GameOverLayer to GameOverScene in GameOver.js
var GameOverScene = cc.Scene.extend ( {
    ctor : function ( win ) {
        //cc.log(win)
        this._super ( ) ;
        var layer = new GameOverLayer ( ) ;
        layer.init ( win ) ;
        this.addChild ( layer ) ;
    }
} ) ;
As the code in Listing 24-21 shows, the GameOverScene will be created with a different background and a different title according to the win parameter.
Deploying the Game
After finishing the game coding, you can package all of the JavaScript files into a single obfuscated file for security. Before packaging, you should add all of your JavaScript files to build.xml, which is found in the /root/Cocos2d-html5-v2.2.2/HalloweenDefence folder.
Open Terminal app. Use the cd command to switch to the directory where build.xml is stored, and execute ant, as shown in Listing 24-22. The resulting screen appears in Figure 24-20.
Listing 24-22. Packaging JavaScript Files
cd ∼/work/HalloweenDefence/Cocos2d-html5-v2.2.2/HalloweenDefence
ant
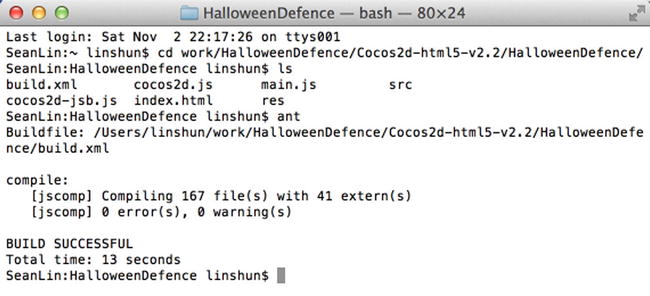
Figure 24-20. Packaging game files
The ant tool will be executed with build.xml, and it will call the Google closure compiler to release the file HalloweenDefence.js in the same folder. Then you can configure the project to load this single file.
There are two loading modes in Cocos2d.js. What you need to do is to delete the “delete section” and uncomment the commented section. Read the comments in Listings 24-23 and 24-24 carefully.
Listing 24-23. Multi-File Loading Mode in cocos2d.js
window. addEventListener ( 'DOMContentLoaded' , function ( ) {
    //first load engine file if specified
    var s = d.createElement ( 'script' ) ;
    /*********Delete this section if you have packed all files into one*******/
    if ( c.SingleEngineFile && ! c.engineDir ) {
        s.src = c.SingleEngineFile ;
    }
    else if ( c.engineDir && ! c.SingleEngineFile ) {
        s.src = c.engineDir + 'platform/jsloader.js' ;
    }
    else {
        alert ( 'You must specify either the single engine file OR the engine directory in "Cocos2d.js"' ) ;
    }
    /*********Delete this section if you have packed all files into one*******/
        //s.src = 'HalloweenDefence.js'; //IMPORTANT: Un-comment this line if you have packed all files into one
    d.body.appendChild ( s ) ;
    document.ccConfig = c ;
    s.id = 'Cocos2d-html5' ;
    //else if single file specified, load singlefile
} ) ;
Listing 24-24. Single-File Loading Mode in cocos2d.js
window. addEventListener ( 'DOMContentLoaded' , function ( ) {
    //first load engine file if specified
    var s = d.createElement ( 'script' ) ;
    s.src = 'HalloweenDefence.js' ; //IMPORTANT: Un-comment this line if you have packed all files into one
    d.body.appendChild ( s ) ;
    document. ccConfig = c ;
    s.id = 'Cocos2d-html5' ;
    //else if single file specified, load singlefile
} ) ;
After changing the loading file to HalloweenDefence.js, the game will load this obfuscated file. You also can use Texture Packer to package all of the game images into sprite sheets, which are supported by Cocos2d-html5 natively. The last thing you need to do is to deploy the HalloweenDefence folder or full project folder to the web server folder and visit it via the browsers. Enjoy!
Releasing a Cocos2d-html5 App to a Native App
Cocs2d-html5 and Cocos2d JSB have the same set of completely compatible JavaScript APIs. Thus a Cocos2d-html5 project can easily be run on HTML5-ready browsers. It also supports running game code as a native application via the Cocos2d JSB without code modification.
The Power of Distributing an HTML5 Game as a Native Package
Cocos2d JSB for C/C++ is the wrapper code that sits between the native code and JavaScript code. JSB enables the calling of the native code from the JavaScript code and vice versa, as illustrated in Figure 24-21.
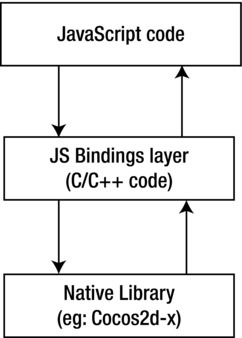
Figure 24-21. Cocos2d JSB
SpiderMonkey interprets JavaScript code, Mozilla’s JavaScript virtual machine (VM). The JavaScript VM is extended by JSB to support Cocos2d-x types, structures, and objects. SpiderMonkey is Mozilla's open source JavaScript engine written in C/C++, and it can be linked into any C++ program, not just web browsers.
C++ code accesses SpiderMonkey via the JSAPI. The JSAPI provides functions for setting up the JavaScript runtime, compiling and executing scripts, creating and examining JavaScript data structures, handling errors, enabling security checks, and debugging scripts. You can find the Cocos2d-x JSB wrapper code under the directory [Cocos2d-x root]/scripting/javascript/. This technology is used for rapid game development and game prototyping.
Setting Up the Cocos2d JSB Environment
Cocos2d-x is a multi-platform 2D game engine. As an example, the porting steps that follow focus on Android and iOS. Most of the steps for porting to these two platforms are the same, and I will point out the few differences.
CREATING A PROJECT FOR IOS
- Install Xcode from the App Store.
- Open your web browser, and navigate to the Cocos2d-x download page.
- Get the latest stable version of Cocos2d-x, and extract it to a location of your choice. This sample game used the latest version Cocos2d-x at the time of writing, which was v2.2.2.
- Open Terminal app. Use the cd command to switch to the directory where you extracted the Cocos2d-x archive, like so:
cd ∼/work/HalloweenDefence/Cocos2d-x-2.2.2/tools/project-creator
- Create the project using create_project.py, as follows:
./create_project.py -project HalloweenDefence -package org.Cocos2dx.HalloweenDefence -language javascript
If you see the information shown in Listing 24-25, the project has been created successfully.
Listing 24-25. Successful Project Creation Log
proj.ios        : Done!
proj.android    : Done!
proj.win32      : Done!
New project has been created in this path:
/Users/linshun/work/HalloweenDefence/Cocos2d-x-2.2.2/projects/HalloweenDefence
Have Fun!
As described above, create_project.py automatically creates iOS, Android, and win32 projects.
Adding Resources to the Project
Copy all files under the /HalloweenDefence/Cocos2d-html5-v2.2.2/HalloweenDefence of Cocos2d-Html5 project to directory ∼/work/HalloweenDefence/Cocos2d-x-2.2.2/projects/HalloweenDefence/Resources of the Cocos2d-x JSB project. Your HalloweenDefence Resources group should now look like the image shown in Figure 24-22.
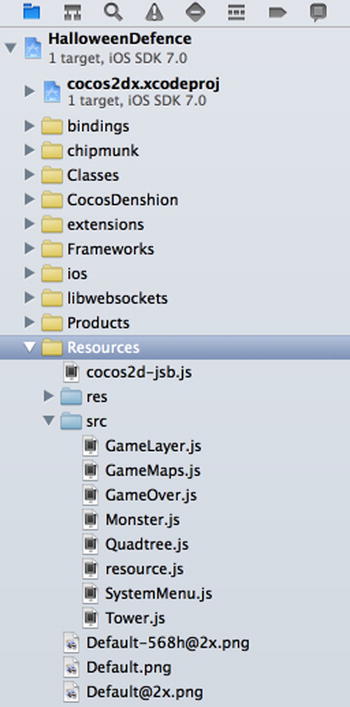
Figure 24-22. Project resources settings
Configuring the Project
The main entry between Cocos2d-x JSB and Cocos2d-html5 is different. The default entry file of the JSB project is cocos2d-jsb.js. Open cocos2d-jsb.j, shown in Listing 24-26, to review its contents.
Listing 24-26. Contents of cocos2d-jsb.js
require ( "jsb.js" ) ;
require ( "GameMaps.js" ) ;
require ( "Monster.js" ) ;
require ( "resource.js" ) ;
require ( "Tower.js" ) ;
require ( "GameLayer.js" ) ;
require ( "Quadtree.js") ;
require ( "SystemMenu.js" ) ;
require ( "GameOver.js") ;
    // main entry
    try {
        director = cc.Director.getInstance ( ) ;
        director.runWithScene ( new GameScene( ) ) ;
        // Show the game in full screen mode.
        cc.EGLView.getInstance( ).setDesignResolutionSize( 480, 318,
            cc.RESOLUTION_POLICY.SHOW_ALL ) ;
    } catch ( e ) {
log ( e ) ;
}
The require() function will load a JavaScript module and use a filename as a parameter. The jsb.js is the module that needs to be loaded if you are using Cocos2d-x JSB to develop a game. A module only needs to be loaded once in the runtime before it can be used anywhere else.
Load all JavaScript modules in the file cocos2d-jsb.js, and leave all of the JavaScript files unchanged.
Building for iOS
Switch to the project directory, and open the project. The code in Listing 24-27 shows how to do this.
Listing 24-27. Opening an iOS Project
cd ∼/work/HalloweenDefence/Cocos2d-x-2.2.2/projects/HalloweenDefence/proj.ios
open TD.xcodeproj
Select the targets of this project in Xcode, switch to label “Build Phases,” and unfold the item “Copy bundle Resources” (see Figure 24-23).
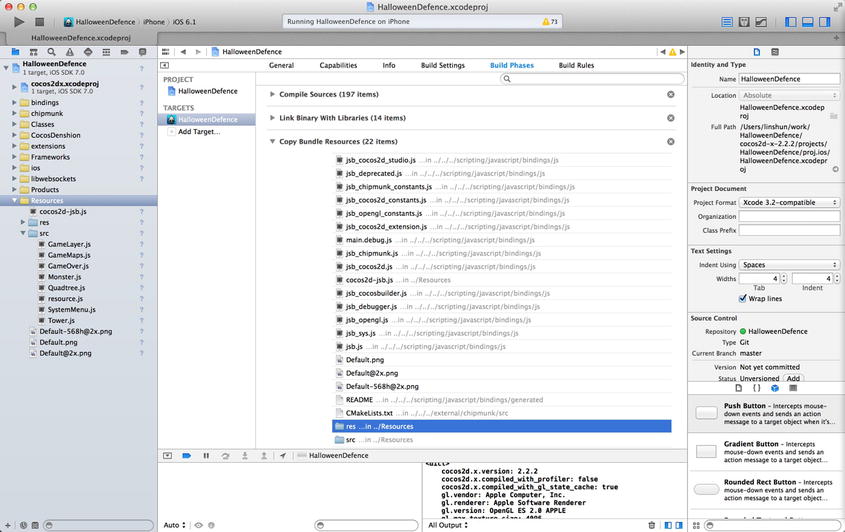
Figure 24-23. Copying bundle resources
As Figure 24-23 shows, the src and res directories are embedded as defaults.
The final step of porting a project is to run and test it. Thanks to the API's compatibility, this step is not very difficult.
Build and run the project, and check to see if there are any errors in the log panel. Test the game, and verify that every function is working the same way in the browser.
Figure 24-24 shows the Hybrid Project screen for iOS.
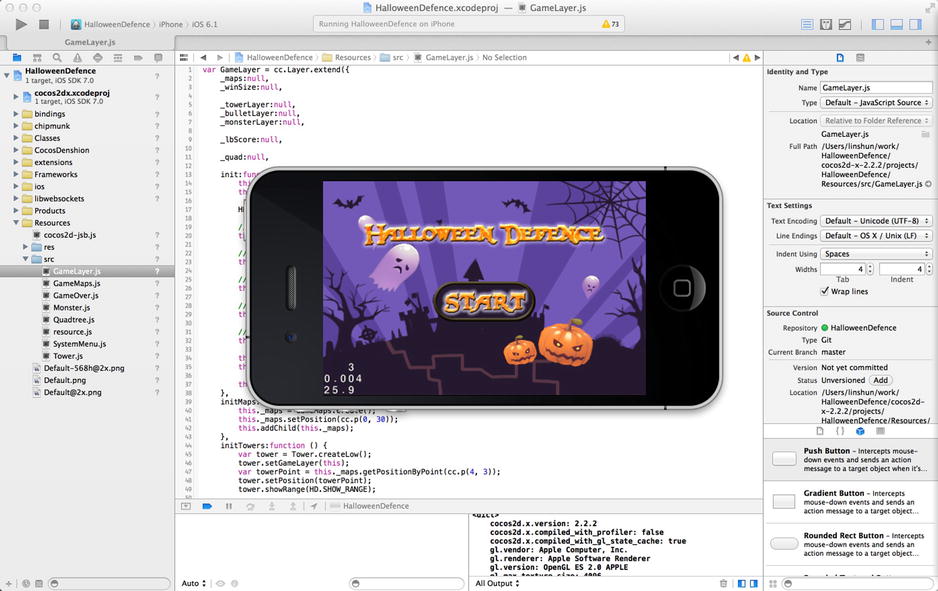
Figure 24-24. Hybrid Project screen for iOS
The game will be run on the iOS devices or simulators without code modification.
BUILDING FOR ANDROID
For Android, you can download the Eclipse ADT bundle from the Google ADT homepage at http://developer.android.com/sdk/index.html. Or you can install Eclipse with Java, ADT, and the CDT plug-ins. You also need to install and set up Android NDK. Refer to http://developer.android.com/sdk/index.html for further details.
There is a user’s guide for Android development setup. It is automatically generated when you create a new project. The path is
∼/work/HalloweenDefence/Cocos2d-x-2.2.2/projects/HalloweenDefence/proj.android/README.md
There are five steps that need to be taken to set up the Eclipse environment for Cocos2d-x. Let’s set up the COCOS2DX and NDK_ROOT variables before adding the existing project to Eclipse in this section. (Skip the first two steps if you’ve done this before.)
- Open Eclipse>Preference>General>Workspace>Linked Resources, and click the New button to add the Path Variable COCOS2DX pointing to the root Cocos2d-x.
- Open Eclipse>Preferences>C/C++>Build>Environment, and click the Add button to add a new variable NDK_ROOT pointing to the root Android NDK directory.
- Now let’s add the libCocos2dx library project and the game project. Open File>New>Project>Android Project From Existing Code, and click the Browse button.
- Open the ∼/work/HalloweenDefence/Cocos2d-x-2.2.2/Cocos2dx/platform/android/java directory, and click Finish to add the project.
- Open File>New>Project>Android Project From Existing Code, click Browse to go to your project directory, ∼/work/HalloweenDefence/Cocos2d-x-2.2.2/projects/HalloweenDefence/proj.android, and add the project.
As Listing 24-25 shows, you created the Android projects, and added the game resources to Cocos2d JSB project. Now everything is ready, and you can build and run the game on Android devices or an emulator.
Figure 24-25 shows the Hybrid Project screen for Android. You can get the same game in your Android device.

Figure 24-25. Hybrid Project screen for Android
Learning More
It’s extremely easy to communicate with Cocos2d community. If you have a question, use public mail list: [email protected]. If you find a bug or just a suggestion, please submit an issue on the issue tracker channel of http://www.cocos2d-x.org or post it in the forum.
If you want to learn more about Cocos2d, here are some very useful web sites:
- Official Cocos2d documentation: www.Cocos2d-x.org/wiki
- Official Cocos2d Forum: www.Cocos2d-x.org/forums/19
- The Cocos2d Community: www.Cocos2d-x.org/wiki/Cocos2d-html5
If you google Cocos2d tutorials, you will find tons of them out there. Besides the cocos2d-x web site, I highly recommend these two web sites:
- www.raywenderlich.com. This website provides many iOS related tutorials, including many awesome Cocos2d tutorials.
- http://paralaxer.com/Cocos2d-x-book/. Though all of the tutorials on this site are written in Objective-C or C++, the key ideas on how to construct a game with Cocos2d are the same as with Cocos2d-html5. When you read these tutorials, you can simply pick the main ideas while you start to write one with Cocos2d-html5.
How Active Is the Community?
Figure 24-26 provides a view of the entire Cocos2d family. It also illustrates the relationships between different versions of Cocos2d.
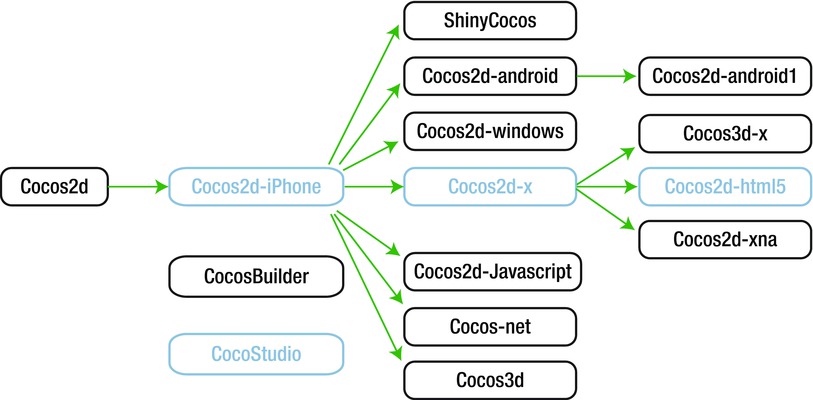
Figure 24-26. Cocos2d family
Cocos2d started in 2008 in Argentina. A group of Python developers attended weekly gatherings in a place called Los Cocos, a small town near Buenos Aires. These Python programmers created the basic framework, and name of the place where they met (Los Cocos) is where the framework name “cocos” came from. Later, in 2008, Ricardo Quesada ported it from Python to Objective-C, running on iOS devices. With the rise of Android two years later, the Cocos2d-x team expanded Cocos2d-x from Cocos2d-iphone, not only to focus on the Android platform but also to target cross-platform capability. In 2011, Google sponsored the Cocos2d-x team to port Cocos2d-x to Cocos2d-html5, which focuses on HTML5-ready browsers, web apps, and hybrid apps.
There are several other branches of Cocos2d, including Cocos2d-Android and Cocos2d-Android-1 (Java implementations for Android), ShinyCocos (a Ruby implementation), Cocos2d Javascript (another HTML5 web browser implementation), Cocos2d Windows (a C++ implementation for Windows), and CocosNet (a C# implementation for .NET). All of these implementations serve as examples of the widespread popularity of Cocos2d.
Currently, the most active branches of the Cocos2d family are Cocos2d-iPhone, Cocos2d-x, and Cocos2d-html5. All three branches have proven themselves in a wide range of games, with many tech giants joining the Cocos2d fold to make it more powerful, faster, and more stable.
Many Top Games Are Created with Cocos2d
You can refer to Cocos2d-x’s official web site for further information about the top-selling games created with Cocos2d. Figure 24-27 shows the various types of the leading games created with Cocos2d.
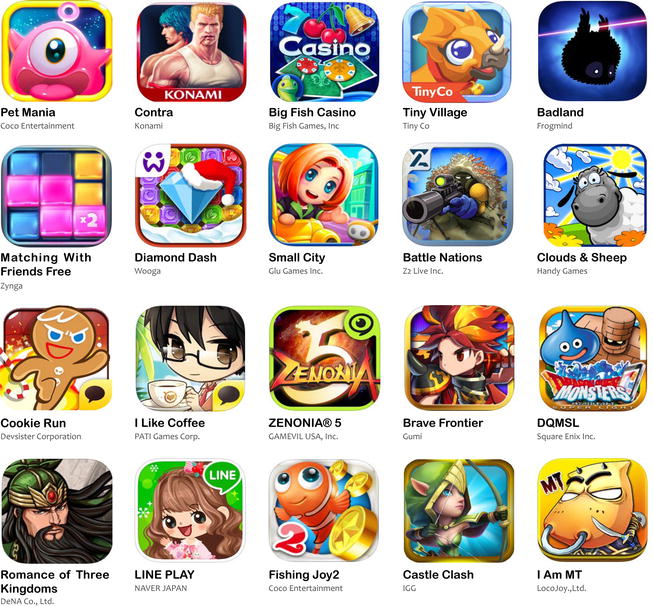
Figure 24-27. Cocos2d games
What If I Have a Question?
You will find many experienced peers on the Cocos2d Forum, so use it freely to ask questions when encountering problems. Be sure to read the forum rules first before posting. The No.1 rule is to search before posting.
Also try to find answers from Stackoverflow, Google, and Google+ first. If you have no luck there, you can post your question on the forum.
Conclusion
Cocos2d-html5 is a 2D game framework for developing multi-platform games that span rapid prototyping to finished high-performance games with a complete toolchain. It helps to try out ideas as you think of them and test them as soon as possible.
This chapter provides a quick introduction to Cocos2d-html5 and what it is all about. I hope that with this introduction, along with the examples found in this chapter, you have learned enough about the structure of a basic Cocos2d-html5 game and how to use the framework to implement your ideas quickly.
This is the final chapter of the book, and you have learned much about both JavaScript and programming. Now it is time to use what you have learned to optimize your Cocos2d-html5 game, making it awesome and running your code on the Web without a plug-in, on both iOS and Android devices via Cocos2d JSB.