
In the previous chapter, you learned the basics of C# syntax and the different types of data that C# can work with. You also learned how to store data using constants, variables, and arrays and to compare and analyze it using various C# operators. In this chapter, you will further expand your knowledge of C# programming by learning how to use conditional programming logic to analyze data and control program execution. You will then learn how to create and use loops to perform repetitive actions.
An overview of the major topics covered in this chapter includes learning how to:
Use different variations of the
ifstatement to analyze dataUse the
switchstatements to compare data against a range of valuesSet up loops using the
for, foreach, do, andwhilestatements
This chapter will demonstrate the execution of a number of different types of programming statements. In order to be able to better understand the usage of these statements, it helps to have a working example that can display results on the screen when it executes. In this section, you are going to create an XNA application that can be used as the basis for testing and experimenting with all of the examples that are presented in this chapter.
To set things up, you are going to need to create and customize a new XNA project that is capable of displaying text as it is executed. Once created, you will be able to adapt this application to run any of the examples presented in this chapter. The following procedures outline the steps involved in creating this new XNA application.
Click on File > New Project and then select Windows Game (3.1). Name the project Template and then click on OK.
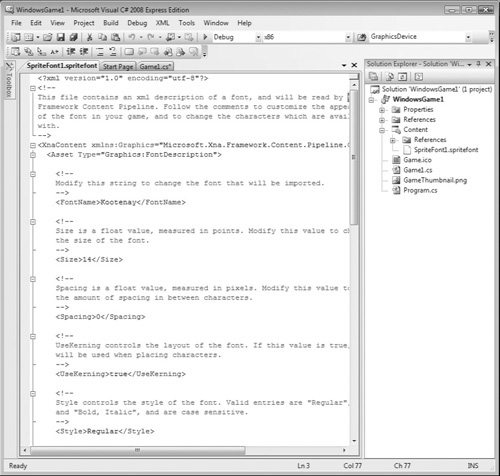
In order to be able to display text, you need to add a Sprite Font to the application. This is done by going into Solution Explorer, right-clicking on Content, and then clicking on Add > New Item. The Add new Item – Content window appears, as shown in Figure 5.1.

Hint
A sprite is a graphics representation of an object within a computer game. A sprite can be a graphic image or a graphic text.
Select the Sprite Font Icon and click on Add. XNA will add a Sprite Font named
SpriteFont1.spritefontto the project.The contents of the new Sprite Font file are displayed in the code editor in the form of an XML file, as demonstrated in Figure 5.2. If you look closely at the file you will see entries that you can modify that affect the selection of the font and set its attributes. Leave the default font type of
Kootenayin place and change its size from 14 to 20 by overtyping the values specified in between the<Size>and</Size> tags.
Hint
XML is a markup language used to facilitate the exchange of structured data between applications.
Close the SpriteFont1.spritefont file.
Next, you need to define a pair of global variables. To do so, add the following variable declaration statement to the beginning of the
Game1class (just after theSpriteBatch spriteBatch;statement).SpriteFont font; String Msg;
The first statement shown here creates a
SpriteFontvariable namedfontthat will be used to store a reference to the Sprite Font that you just added to the application. The second statement creates aStringvariable namedMsgwhich will be used by some examples to store and display string output.Add the following statement to the
LoadContent()method.font = Content.Load<SpriteFont>("SpriteFont1");
This statement uses the font variable to load the font you previously loaded into the project and to use the font variable to reference it.
Okay, you now have an XNA application that you can use as a template for testing any of the examples presented in this chapter. The examples in this chapter rely on the display of text to demonstrate the use of various programming constructs. To demonstrate its use, make a copy of the application (remember, by default you will find your XNA applications in your Documents folder in DocumentsVisual Studio 2008Projects) by copying and renaming its folder. Using this copy, replace the contents of the Draw() method with the statements shown here.
protected override void Draw(GameTime gameTime)
{
    GraphicsDevice.Clear(Color.White);
    Vector2 textVector = new Vector2(20, 20);


    spriteBatch.Begin();
    spriteBatch.DrawString(font, "Hello World!", textVector, Color.Blue);
    spriteBatch.End();

    base.Draw(gameTime);
}
This example merits additional explanation. It contains a number of new statements that you have not seen before and these statements will be used time and time again throughout this chapter. You have already seen the first statement in the method. It uses the GraphicsDevice class’s Clear() method to clear the screen using the specified color. In order to draw text on the screen, you must use a vector that tells the Draw() method where to begin drawing the text. A vector is a mechanism for specifying the coordinates. In a 2D application, coordinates are mapped out using a coordinates system as demonstrated in Figure 5.3.
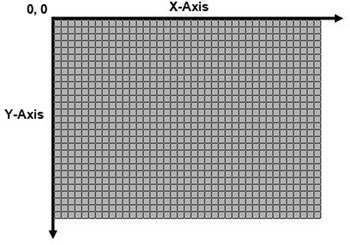
To create a vector, you must add an instance of the Vector2 (a 2D vector) object to your application. This is done above by defining a variable named textVector. Note that when you create a Vector2 object, you must supply the X and Y coordinates where the text should begin drawing.
NXA provides a class named SpriteBatch that can be used to draw sprites. XNA automatically adds an instance of the SpriteBatch class to every new project (in the LoadContent() method). Using the SpriteBatch class’s Begin() method you can begin executing drawing commands. To use the DrawString() method, you must tell it what font to use, the text you want to display, and supply it with the property coordinates and the color to use when displaying it. The End() method marks the end of drawing operations.
Trap
Most of the examples shown in this chapter are based on the placement of various programming statements in the Draw() method. This has been done to facilitate learning and to simplify the presentation of examples. However, this is not an ideal scenario. It is strongly advised that you only place programming statements responsible for drawing in the Draw() method and that other programming statements be placed within the Update() method.
Computer games involve the collection and processing of a lot of information. Data may, for example, be embedded within C# programs or it may be retrieved from external files. One thing is for certain, a lot of data comes directly from the player, providing it via the gamepad, keyword, etc. All of this data needs to be processed and analyzed. The mechanism for doing this is conditional programming logic. Conditional programming logic provides C# programs with the ability to make decisions based on the data they are presented with. To perform conditional logic you need to learn how to work with the if and switch statements along with the comparison operators that you learned about in Chapter 4.
The primary programming statement used to implement conditional programming logic is the if statement. It allows you to compare two values and to control the execution of one or more statements based on that analysis. In its simplest form, the if statement is written as a single statement using the following syntax.
if (condition) statement;Here, condition is an expression that when analyzed generates a true or false value, and statement is a C# statement that will be executed in the event that the tested condition evaluates as being true. Note that condition must be enclosed in parentheses. To better understand how to work with the if statement, look at the following example.
protected override void Update(GameTime gameTime)
{
    // Allows the game to exit
    if (GamePad.GetState(PlayerIndex.One).Buttons.Back ==
        ButtonState.Pressed)
        this.Exit();

    bool gameOver = true;
    if (gameOver == true) this.Exit();

    base.Update(gameTime);
}
In this example, a Boolean variable named gameOver is declared within the Update() method. A value of true is assigned to gameOver. Next, an if statement has been set up to analyze the value assigned to gameOver. Since gameOver is equal to true the statement this.Exit() is executed. To test the execution of this example, replace the statements that make up the Update() method in the model XNA application you created at the beginning of this chapter with those shown here, and then run the application. When you do, the application will start and then immediately terminate when the Exit() method executes.
Hint
In C#, the keyword this is a reference to the current object, providing a shortcut way of referring to it. In the previous example, this referred to the currently executing instance of the game class, which supports a method called Exit(). This method closes the game window and terminates the execution of the game in an orderly manner.
If you need to execute more than one statement as a result of a conditional analysis, then you can use the { and } characters to group those statements into a code block, which can then be executed. For example, look at the following set of statements, which analyzes the value assigned to a variable named playerScore.
protected override void Draw(GameTime gameTime)
{

    GraphicsDevice.Clear(Color.White);
    Vector2 textVector = new Vector2(20, 20);

    spriteBatch.Begin();

    int playerScore = 100;
    if (playerScore > 50)
    {
          playerScore = 0;
          spriteBatch.DrawString(font, "Game Over!", textVector,
            Color.Blue);
    }
    spriteBatch.End();

    base.Draw(gameTime);
}
As you can see, the value of playerScore is arbitrarily set to 100. The value of playerScore is then analyzed to see if it is greater than 50, which of course it is. This being the case, all of the statements embedded in the if statement code block are executed. Had the value of playerScore been less than or equal to 50, the evaluation would have proved false and the code statements in the code block would not have been executed.
To test the execution of this example, create a copy of the XNA Template application that you created at the beginning of this chapter and then replace the statements that make up the Draw() method with those shown here, and then run the application.
In the previous examples, the if statement was used to set up a conditional test that executed one or more embedded statements in the event a tested conditional evaluates as true. But what if you want to execute a different set of statements in the event the evaluated condition proves false? The solution is to add the optional else keyword to the if statement code block, as demonstrated in the following example.
protected override void Draw(GameTime gameTime)
{
    GraphicsDevice.Clear(Color.White);
    Vector2 textVector = new Vector2(20, 20);

    spriteBatch.Begin();

    int playerScore = 100;

    if (playerScore <= 500)
    {
        spriteBatch.DrawString(font, "Game Over. You lose.",
          textVector, Color.Blue);
    }
    else
    {
       spriteBatch.DrawString(font, "Game Over. You win.",
         textVector, Color.Blue);
}

    spriteBatch.End();

    base.Draw(gameTime);
}
Here, playerScore has been set to 100 and then a conditional statement is set up to analyze the value of playerScore to see if it is less than or equal to 500. If it is, a message is displayed telling the player that he lost. If playerScore is greater than 500, a different message is displayed as specified in the else portion of the conditional text.
Again, to test the execution of this example, create a copy of the XNA Template application that you created at the beginning of this chapter and then replace the statements that make up the Draw() method with those shown here, and then run the application.
If you need to you can expand upon the logic of your conditional text by including the else if keywords. The else if keywords allow you to evaluate and test different conditions, as demonstrated here:
protected override void Draw(GameTime gameTime)
{
    GraphicsDevice.Clear(Color.White);
    Vector2 textVector = new Vector2(20, 20);

    spriteBatch.Begin();

    int playerScore = 250;

    if (playerScore >= 100 && playerScore <= 199)
    {
        spriteBatch.DrawString(font,
          "Game Over. Your rank is beginner.", textVector, Color.Blue);
    }
    else if (playerScore >= 200)
    {
       spriteBatch.DrawString(font,
         "Game Over. Your rank is advanced.", textVector, Color.Blue);
    }
    else

    {
       spriteBatch.DrawString(font,
         "Game Over. You have not earned a rank.",
         textVector, Color.Blue);
    }

    spriteBatch.End();

    base.Draw(gameTime);
}
As you can see, this example first performs a check to see if playerScore is greater than or equal to 100 and less than or equal to 199. If this evaluation proves false, a second evaluation is performed to see if playerScore is greater and or equal to 200. If this evaluation proves false, then the statement located in the else code block is executed.
As powerful as the different variations of the if statement can be, there are times when you will need to set up more complex conditional logic, involving the comparison of multiple values, where one decision is based on the outcome of another decision. To set up this kind of conditional logic, you need to embed or nest if statements within one another. The following example demonstrates how this works.
protected override void Draw(GameTime gameTime)
{
    GraphicsDevice.Clear(Color.White);
    Vector2 textVector = new Vector2(20, 20);

    spriteBatch.Begin();

    bool gameOver = false;
    int playerScore = 100;
    if (gameOver == true)
        {
        if (playerScore <= 10000) {
            spriteBatch.DrawString(font, "Game Over. You lose.",
              textVector, Color.Blue);
        }

        else {
            spriteBatch.DrawString(font, "Game Over. You win.",
              textVector, Color.Blue);
        }
    }
    else {
        spriteBatch.DrawString(font, "Please try again.",
          textVector, Color.Blue);
    }
    spriteBatch.End();
    base.Draw(gameTime);
}
In this example, the value of gameOver is analyzed to see if it is true. If it is, a nested if statement is executed to check if the value of totalScore is less than or equal to 10000. If totalScore is not less than or equal to 10000 then the statement located in the else portion of the embedded code block is executed. However, if the value assigned to gameOver proved false, the nested if statement is never executed and the else portion of the first if statement code block is executed.
Another way of implementing conditional logic is to set up a switch statement code block, which lets you compare the results of an expression against a series of possible matches. The syntax that you need to follow when working with the switch is outlined below.
switch (expression){
  case label:
    statements;
    break;
    .
    .
    .
  case label:
    statements;
    break;
  default:
   statements;
    break;
}
The switch statement evaluates an expression and compares the results against a series of case statements to see if a match can be found. The value of expression is compared to the value of each case statement’s label, which itself is just an expression. The statements belonging to the first case statement matches are executed. If a match is not found, the statements belonging to the optional default statement, if specified, get executed.
Note the use of the break statement to mark the end of the list of statements belonging to each case statement. The break statement is optional. If specified, the break statement instructs C# to exit the switch statement. If the break statement is not included, the program will execute the statements belonging to all case statements. As a result, more than one match may occur. The following example demonstrates how to work with the switch statement.
protected override void Draw(GameTime gameTime)
{
    GraphicsDevice.Clear(Color.White);
    Vector2 textVector = new Vector2(20, 20);

    spriteBatch.Begin();

    String character = "Wizard";
    switch (character)
    {
        case "Knight":
            spriteBatch.DrawString(font, "Welcome Sir knight!",
              textVector, Color.Blue);
            break;
        case "Wizard":
            spriteBatch.DrawString(font, "Welcome great wizard!",
              textVector, Color.Blue);
            break;
        case "Troll":
            spriteBatch.DrawString(font, "Welcome wise troll!",
              textVector, Color.Blue);
            break;
        default:
            spriteBatch.DrawString(font, "Error: unknown character.",
              textVector, Color.Blue);
            break;
    }

    spriteBatch.End();
    base.Draw(gameTime);
}
Here, a switch statement code block is used to execute one of a number of different statements depending on the value assigned to the character variable.
Again, to test the execution of this example, create a copy of the XNA Template application that you created at the beginning of this chapter and then replace the statements that make up the Draw() method with those shown here, and then run the application.
Computer games must be able to process large amounts of data, quickly and efficiently. To do this, you must use loops. A loop is a collection of statements that get repeatedly executed. Loops let you process unlimited amounts of data using an absolute minimum number of statements. C# supports a number of different types of loops, including the for, while, do, and foreach loops.
The for loop executes as long as a specified condition evaluates as true. The execution of the for loop is controlled via variables. The loop’s syntax is outlined here:
for (expression; condition; increment)
{
  statements;
}
The for loop consists of three parts, including a starting expression, a tested condition, and an increment statement. The statements embedded in between the loop’s opening and closing brackets are executed every time the loop repeats or iterates. To better understand how the for loop works, look at the following example.
protected override void Draw(GameTime gameTime)
{
GraphicsDevice.Clear(Color.White);
int x = 20;
int y = 20;
spriteBatch.Begin();
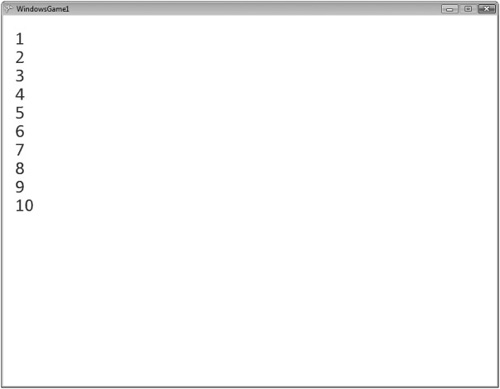
for (int i = 1; i <= 10; i++)
{
Vector2 textVector = new Vector2(x, y);
Msg = i.ToString();
spriteBatch.DrawString(font, Msg, textVector, Color.Blue);
y=y+ 30;
}
spriteBatch.End();
base.Draw(gameTime);
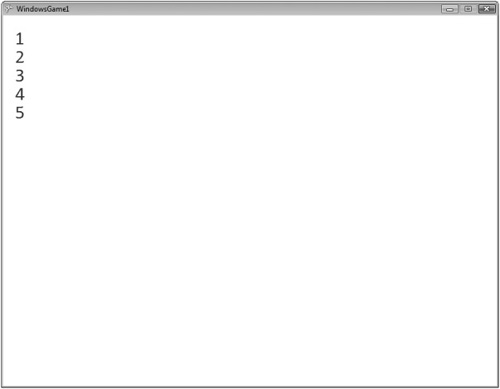
}Here, a for loop is set up to iterate 10 times. As you can see, the loop defines a variable named i, setting its starting value to 1. The loop iterates a total of 10 times, terminating once the value of i exceeds 10. Each time the loop repeats, the value of i is incremented by 1. Figure 5.4 shows the output produced when this example runs.
Using C#’s while loop, you can set up a loop that will execute as long as a specified condition is true. The syntax for the while loop is outlined here:
while (condition)
{
  statements;
}
The following example demonstrates the use of the while loop.
protected override void Draw(GameTime gameTime)
{
    GraphicsDevice.Clear(Color.White);

    int x = 20;
    int y = 20;
    int counter = 1;

    spriteBatch.Begin();

    while (counter <= 10)
    {

        Vector2 textVector = new Vector2(x, y);
        Msg = counter.ToString();
        spriteBatch.DrawString(font, Msg, textVector, Color.Blue);
        y= y+30;
        counter++; }
    spriteBatch.End();

    base.Draw(gameTime);
}
Here, a while loop has been set up to iterate for as long as the value of a variable named counter is less than or equal to 10. Each time the loop iterates, the value of counter is drawn to the screen and then incremented by 1.
The results produced when this example is processed are identical to the results from the for loop example. As you can see, you can use different types of loops to perform the same tasks. Despite this, each loop is better suited to specific circumstances. For example, the foreach loop, discussed a little later, is best used in processing the contents of lists and arrays, whereas the while loop is better used to set up a loop that has no specific predefined end but which executes for as long as a specific value or expression remains true.
C# also supports the use of the do loop, which executes repeatedly for as long as a tested condition remains true. The do loop has the following syntax.
do
{
   statements;
} while (condition)
The do loop always executes at least once since the loop’s condition is not evaluated until the end of the loop. To better understand how this loop works, take a look at the following example.
protected override void Draw(GameTime gameTime)
{
GraphicsDevice.Clear(Color.White);
int x = 20;
int y = 20;
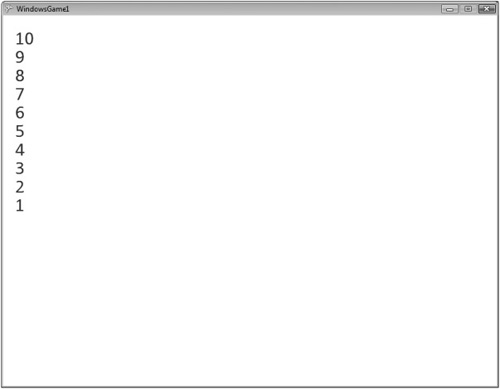
int counter = 10;
spriteBatch.Begin();
do
{
Vector2 textVector = new Vector2(x, y);
Msg = counter.ToString();
spriteBatch.DrawString(font, Msg, textVector, Color.Blue);
y=y+ 30;
counter–;
} while (counter >= 1);
spriteBatch.End();
base.Draw(gameTime);
}Here, a do loop has been set up to repeat for as long as the value of counter is greater than or equal to 1. As Figure 5.5 shows, this loop executes 10 times, counting backwards from 10 to 1.
The foreach loop is designed to process lists of data returned by commands or stored in arrays. Rather than iterating a specified number of times like the for loop or until a specified condition evaluates as true like the while and do loops, the foreach loop repeats once for each item in a list, using the following syntax:
foreach (type in list)
{
  statements;
}
The following example demonstrates how to work with the foreach statement.
protected override void Draw(GameTime gameTime)
{
GraphicsDevice.Clear(Color.White);
int x = 20;
int y = 20;
spriteBatch.Begin();
string[] SuperPowers = new string[3];
SuperPowers[0] = "Flight";
SuperPowers[1] = "Super Strength";
SuperPowers[2] = "Invisibility";
foreach (string power in SuperPowers)
{
Vector2 textVector = new Vector2(x, y);
spriteBatch.DrawString(font, power, textVector, Color.Blue);
y=y+ 30;
}
spriteBatch.End();
base.Draw(gameTime);
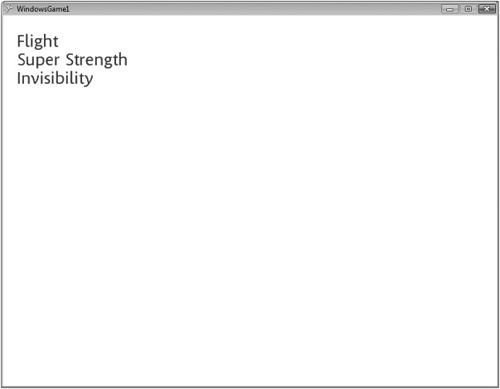
}Here, a loop has been set up to process the contents stored in an array named SuperPowers. Note that the loop includes the definition of a string variable named power. Since the array contains three items, the loop will iterate three times. Each time the loop iterates, it processes a different item stored in the array, assigning its value to the power variable. Figure 5.6 shows the output that is displayed when this example executes.
By default, a loop executes every statement embedded within it as many times as specified. However, there may be times where you want to alter this execution flow. For example, you might want to terminate a loop’s execution in the event invalid data is received or if the player signals your game to terminate. The following example demonstrates how to use the break statement to prematurely halt a loop’s execution.
protected override void Draw(GameTime gameTime)
{

    GraphicsDevice.Clear(Color.White);

    int x = 20;
    int y = 20;

    spriteBatch.Begin();

    for (int i = 1; i <= 10; i++)
    {

         Vector2 textVector = new Vector2(x, y);
         Msg = i.ToString();
         spriteBatch.DrawString(font, Msg, textVector, Color.Blue);
         y= y+30;
         if (i == 5) break;
    }

    spriteBatch.End();

    base.Draw(gameTime);
}
As demonstrated in Figure 5.7, the loop outlined in this example is halted when the value of i is set equal to 5.
Similarly, you can use the continue statement to halt the current iteration of a loop without terminating the loop’s execution. To see how to work with the continue keyword, look at the following example.
protected override void Draw(GameTime gameTime)
{

    GraphicsDevice.Clear(Color.White);

    int x = 20;

    int y = 20;

    spriteBatch.Begin();

    for (int i = 1; i <= 10; i++)
    {

         Vector2 textVector = new Vector2(x, y);
         if (i == 3 || i == 5 || i == 7) continue;
         Msg = i.ToString();
         spriteBatch.DrawString(font, Msg, textVector, Color.Blue);
         y=y+ 30;
    }

    spriteBatch.End();

    base.Draw(gameTime);
}
Hint
Note the use of the || characters in the previous example. These characters specify a logical operator that you can use to combine comparison operations, creating a compound expression that evaluates as true in the event that either one of the tested conditions proves true.
When executed, this example displays the following output on the screen. As you can see in Figure 5.8, the 3rd, 5th, and 7th iteration of the for loop have been skipped.

This chapter showed you how to use different variations of the if statement as a means of analyzing data and controlling the logical flow of programming logic in your NXA applications. You learned how to use the switch statement to compare a value to a range of possible matching values. You also learned how to set up a wide variety of different types of loops using the for, foreach, do, and while statements, giving you the ability to efficiently process large amounts of data and perform repetitive tasks. In Chapter 6 you will round out your C# programming knowledge by learning how to create and work with classes, objects, and their methods and properties.