
Running the Installer
It’s sometimes useful to keep older versions of Csound on your hard drive. For one thing, if you encounter problems with a new version, it will be easier to revert to the old version if you don’t have to install it again. I generally rename the folder containing the older version to something like csound512 before I install the new version. Once I’ve done this, all I need to do to revert to the old version is rename two folders.
Windows
The Windows installer for Csound operates pretty much like any other Windows installer. You’ll be asked to click through a series of screens. Depending on which version of Windows you’re running, you may have to begin the process by clicking in a dialog box to confirm that you’re allowing the installer program to make alterations in your system. Having done that, you’ll be presented with a standard Setup Wizard box.
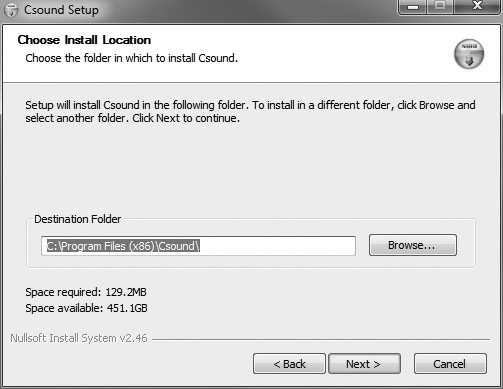
After clicking the “I Agree” button in the license agreement box (hey, I always read license agreements from top to bottom before agreeing with them—don’t you?), you’ll be asked to choose an install location (see Figure 2.3). There is usually no reason to change this, but if you’re installing an older version you might change the folder name in this box so the new installation won’t overwrite an existing one.
Figure 2.3 Tell the Windows installer where you want to put your Csound installation.
![]()
Note The user license for Csound is friendlier than some other licenses, as it gives you certain rights explicitly rather than restricting them. For details, you may want to read the license during the installation process.
One or two dialog boxes down the line, you’ll reach the Choose Components box (see Figure 2.4). I recommend leaving the checkboxes for the documentation checked. In the Front Ends area, you may want to uncheck CsoundQt, because CsoundQt is updated separately from Csound itself. It’s sometimes the case that the Csound installer will install an older version of CsoundQt, which is not what you want. On the other hand, the Csound installer might have a newer version of CsoundQt. You might want to rename your CsoundQt folder temporarily, let the Csound installer do its own installation, and then run the two versions of CsoundQt to see if they’re different.
Figure 2.4 In the Front Ends section of the installer, I recommend unchecking CsoundQt (which you can install separately) and checking csoundapi~ (for use with Pd).
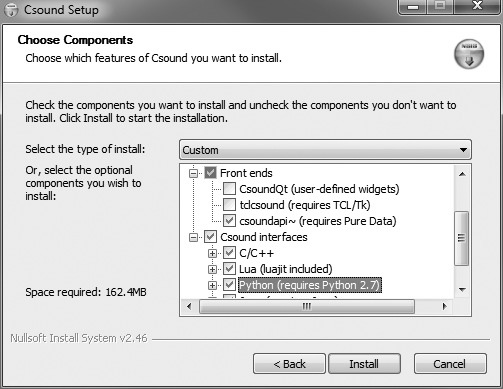
If you’re thinking you might want to use Csound as a module within Pd, you should click the checkbox for csoundapi~. (I recommend it.) The Csound installer for Windows will give you some choices about optional components. These include:
![]() C/C++
C/C++
![]() Lua
Lua
![]() Python
Python
![]() Java
Java
![]() Lisp
Lisp
These are components for experts. If you don’t plan to extend Csound by using any of the other programming languages with which it is compatible, you can save a little space on your disk drive by unchecking these items. I generally activate the Python item. (For more on using Csound with Python, see Chapter 10, “Using Csound with MIDI, OSC, Pd, Python, and Live Audio.” Python requires a separate download and installation; it’s not bundled with Csound.) After choosing what you want to install, click the Install button, and you should be ready to go.
When you’ve finished installing in Windows, if you plan to use CsoundQt there’s one additional step you may need to take manually. Three of the installed files may need to be removed. For details, see the Tip in the “Syntax Hints and Accessing Opcode Help” section in Chapter 5.
Macintosh
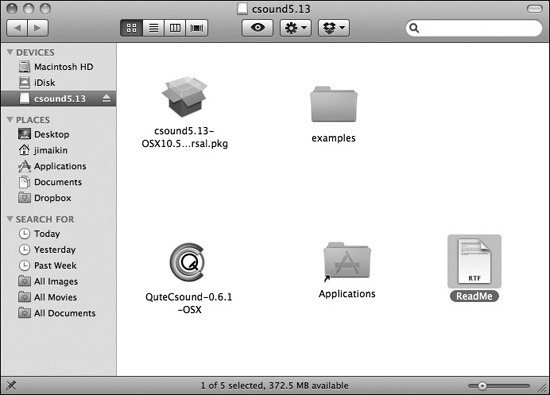
Csound downloads for Mac OS may be available in several versions—for PowerPC and Intel Macs, and also for Mac OS 10.4 or older and 10.5 or newer. The most recent version of the installer is called “-universal,” which means it should work with either PowerPC or Intel. After you’ve chosen and downloaded the package you want, it should open up in a Finder window, as shown in Figure 2.5. The .dmg (disk image) file itself will be visible on your desktop. After installing, you can either drag the .dmg to the trash or store it somewhere in case you need it again.
To install Csound, double-click the .pkg icon. After clicking the Continue button a few times, you’ll get to the Installation Type box (see Figure 2.6). Here you can choose a non-default location for the install or customize the list of components that will be installed by clicking the Customize button. Unless you’re extremely tight for hard disk space, there’s probably no reason to use the Customize list; just leave everything as is. This will install both the floats (32-bit) and doubles (64-bit) versions.
Click the Install button. The computer will ask you for your password and then proceed with the installation.
Figure 2.5 A downloaded .dmg file containing Csound for Macintosh.
Figure 2.6 From this box, you can click the Customize button to choose the components you want included in the Csound installation.
You can install CsoundQt at the same time, by dragging its icon in the .dmg window onto the Applications folder shortcut in that window. As noted earlier, however, the version of CsoundQt in the Csound installer may not be the most current, so you may prefer to download and install CsoundQt separately.
Drag the Examples folder onto your desktop or into your Documents folder. The Examples folder contains dozens of .csd files that illustrate useful techniques.
Linux
For information on installing Csound in Linux computers, I turned to Linux audio guru Dave Phillips, who generously provided the following information.
The Csound download for Linux is in source code form, as Linux users are quite used to compiling their own software. The download is in the form of a .tar.gz file. Some systems will prompt the user to unpack and uncompress this file, but you can always do it from the command line. A typical command-line invocation would look something like this:
tar xzvf foosound .tar.gz
The mystery letters are flags. The “z” unzips the package, “x” unpacks the tar’d archive, “v” views the unpacking/uncompression process, and “f” applies the actions to the named file. This will unpack the package in its local directory. You may want to create a directory for all source code packages and unpack it there.
After unpacking, you’ll have a new subdirectory in the directory where you unpacked the tarball. If you unpacked it in your home directory, the result would look something like this:
/home/jimaikin/foosound
Once the tarball is unpacked, Dave suggests, you should inspect its contents using a file manager (or using command-line tools). A tarball may contain a pre-built binary, or only the source code required to build the program, or a combination of binary and source code. The Csound tarball is a source-only package.
“Compiling Csound for Linux isn’t really rocket science,” Dave reports, “but you do need to know what you’re doing. I advise new users to check their Linux distribution’s software repositories for a pre-compiled Csound. For example, my Ubuntu 10.04 (Lucid Lynx) package manager lists Csound and a variety of other Csound-related packages, any or all of which can be installed with a few clicks of the mouse.” CsoundQt is available from the standard repositories for Ubuntu, Debian, and Arch Linux. At this writing, it’s not available in the Fedora or SUSE repositories.
Assuming all of the necessary build tools are installed, here’s how you would compile Csound yourself:
  scons -h
  scons WithFoo=1 WithFoobar=0
  sudo python install .py
The first line runs the Scons build utility and checks for available build options. The second line runs Scons with the selected options, which may include the builds of various front ends. The third line, which requires that Python be already installed in your system, installs Csound. (sudo will prompt you for a password.)
You then need to set some Csound environment variables. Assuming you’re using the default installation paths:
  export OPCODEDIR=/usr/local/lib/csound/plugins/
  export OPCODEDIR64=/usr/local/lib/csound/plugins64/
  export CSSTRNGS=/usr/local/share/locale
The second line is needed only if you’re doing a 64-bit build.
“The tools required to build Csound,” Dave adds, “are not usually installed for a normal user. Happily, at least for Ubuntu users, there’s a way to simplify the process. First we get the basic tool chain components with this command:
sudo apt-get build-essential
“Next, we get the dependencies required by Csound:
sudo apt-get build-dep csound
“Now we can go ahead and build Csound locally. Again, the reason to do any of this is to customize a personal build of Csound. If no such customization is required, I suggest that the user install the version of Csound maintained by his or her distribution.” Both CsoundQt and blue, Dave points out, have dependencies that may not be met automatically by most major Linux distributions. Qt is usually installed, but Java and Python may need to be added to the system. For CsoundQt you can do:
sudo apt-get build-dep qutecsound
In Debian and Ubuntu, this will fetch all of CsoundQt’s dependencies. (Note that at present, this command still refers to CsoundQt by its old name, QuteCsound. At some point in the future, you may need to change the command to reflect the new name.)