
Sequencing Project
In this project you’ll create a Csound synthesizer and write a sequence of notes for it to play. Along the way you’ll meet a few essential components, including oscillators and envelope generators.
Launch CsoundQt and Create a New Project
Launch CsoundQt by double-clicking its icon. Depending on how you installed it, the icon may be on the desktop, or you may have to find it in your Applications folder (Mac) or in the Windows Start Menu.
If you’ve launched CsoundQt before, the main editor window may already have one or more tabs with Csound files. If so, you can create a new project by clicking the New button at the left end of the toolbar. This will create a new, unsaved file called default .csd. If this is the first time you’ve launched CsoundQt, the default file will be loaded for you; it will be called untitled .csd.
In either case, you should see the following code in the editor window:
  <CsoundSynthesizer>
  <CsOptions>
  </CsOptions>
  <CsInstruments>

  </CsInstruments>
  <CsScore>

  </CsScore>
  </CsoundSynthesizer>
If by chance you find yourself looking at an editor window with no code at all (unlikely), type the lines above. For now we’re not going to worry about what it all means.
Save the file to some suitable location on your hard drive, such as a Csound Projects folder that you’ve created.
Create an Instrument and a Score
To start with, we need to give Csound a few general instructions. Position the typing cursor at the end of the line that says <CsInstruments> (not the line that says the same thing with a slash character near the beginning), hit Return or Enter a couple of times, and type the following code:
  sr = 44100
  ksmps = 10
  nchnls = 2
  0dbfs = 1
This code tells Csound what sample rate you want your digital audio to use, and a few other things. You’ll always need to use a header of this type, but the details may change from one project to another.
In order for Csound to make sound, it needs a waveform. To create a sine wave, position the typing cursor after the line that says, 0dbfs=1, hit Return or Enter a couple of times, and type this code:
giSine ftgen 0, 0, 8192, 10, 1
Be careful to put commas where shown, and don’t capitalize letters that aren’t shown as capitals. (Csound is case-sensitive.) If you haven’t changed CsoundQt’s default settings for syntax coloring, giSine should be in green and ftgen in blue. ftgen is a Csound opcode—a widget that does some work. This particular widget creates a table (a memory space) and puts a digital representation of a sine wave into it. giSine is a value—essentially, a number variable—with which we’ll be able to access the sine wave.
Hit Return or Enter a couple more times to leave a blank line below the line you just typed and then add these lines:
  instr 1
  aout oscil 0.6, 220, giSine
  outs aout, aout
  endin
The spacing isn’t important—Csound doesn’t care whether you indent your lines, and it doesn’t care whether you put tab characters between elements or just spaces. What does matter is that each of these instructions has to be on a line by itself. Also, you need to be careful not to leave out a comma or misspell one of the odd-looking words.
Briefly, this code creates an instrument, which we will shortly be referring to by its number— instrument 1. The second line creates an oscillator. The symbol aout is like an audio patch cord; it’s the output of the oscil opcode. The third line sends the signal in aout to the stereo output channels, so you can listen to them. And every instrument you create must end with the symbol endin, on a line by itself.
In the line below <CsScore>, add the following code:
i1 0 2
This instruction tells Csound to play a note. It begins with i1, so instrument 1 will be used. The note will begin at time 0 (the start of the score) and will last for 2 seconds.
![]()
Tip In a Csound score, you can put a space after the i in an instrument event line or omit it. Whether you type i1 or i 1 is entirely a matter of personal taste. The other spaces are necessary, however. If you type i102 in the code shown here, Csound will think you’re referring to a nonexistent instrument 102.
Click CsoundQt’s Run button. If you’ve entered the code correctly, you should hear a sine wave at 220 Hz, lasting for two seconds.
If you don’t hear the sine wave, of course you should start by checking that your speakers are turned on and so forth. If your system is set up correctly, the most likely culprit is a typo in your code. If CsoundQt’s Output Console window is not open at the bottom of the screen, click the Console button in the toolbar to open it. You may see some error messages about illegal characters, or perhaps something like this:
error: input arg ‘aout’ used before defined, line 29:
Unfortunately, Csound isn’t always correct about counting line numbers. It tends to get confused by multi-line comments and macro statements, for instance. So the fact that the error message mentions line 29 may or may not be helpful. To find the typo, you’ll need to go back through your code line by line and check it carefully for mistakes. It can also happen that a single typo will be reported as two or more separate errors. Consider this output, which I copied from the Output Console:
  instr 1
  error: illegal character -, line 321:
  asig1 foscli 1, kfreq - idetune, icar, imod, kfm, giSine
                        ^
  error: no legal opcode, line 321:
  asig1 foscli 1, kfreq - idetune, icar, imod, kfm, giSine
  error: input arg ‘asig1’ used before defined, line 329:
  asigA = asig1 + (asig2 * 0.4)
There is only one error in this code: I’ve misspelled the opcode foscili as “foscli.” Csound first objects to the subtraction symbol (using a caret on the next line to point to it) because it doesn’t understand the line at all, then complains (correctly) that there’s no legal opcode—and finally, because asig1 is now undefined, reports a nonexistent error when this symbol is later used.
Sorting through compiler error messages is just part of the fun (??) of writing code.
![]()
Note Not sure what a sine wave is? See the sidebar in the section “Sinusoids with GEN 09, 10, and 11” in Chapter 7, “Thirty Opcodes You Must Know.”
Add an Amplitude Envelope
You may have noticed that the sine wave you just played ended with a click. There’s a fundamental lesson in this: Unlike commercial music software, Csound doesn’t do anything behind the scenes to make sure your music sounds good. When you notice an audio glitch, it’s up to you to figure out how to fix it.
In this case, we need to give our instrument an amplitude envelope, so that the sound will fade out smoothly at the end rather than stopping abruptly. Leaving the last two lines of your instrument definition untouched, edit the beginning of the instrument code so that the instrument looks like this:
  instr 1
  iamp = 0.6
  kampenv linseg 0, 0.01, iamp, (p3 - 0.01), 0
  aout oscil kampenv, 220, gisine
  outs aout, aout
  endin
Here we’ve added a named value (iamp), which will contain the maximum amplitude of the sound. The next line creates an envelope using the linseg opcode. linseg creates a contour by building it out of linear segments, hence the name. In the oscil line, we’ve replaced 0.6 with the symbol kampenv. When you click the Run button, you should hear the sine wave tone start a bit more smoothly and then fade out nicely to silence.
Briefly, linseg creates a series of line segments—as many or as few segments as we’d like. The numbers and/or symbols to the right of the linseg opcode define, alternately, the levels of the envelope and the times (in seconds) at which those levels are to be reached. By analyzing this line of code, you may be able to see that the envelope starts with a level of zero. Over the next 0.01 second, it rises to the level defined by iamp.
The next value being given to linseg is, again, a time value. In this case it uses a special symbol, p3. Symbols beginning with “p” and then followed by a number take their values from lines in the score. The “p” is short for “parameter,” and you’ll sometimes hear numbers in the score referred to as “p-fields.” If you look back at the score we created earlier, you’ll see that the line beginning with i has three numbers. The first p-field (p1) tells Csound what instrument to use when playing this score line. The second p-field tells Csound when to start the note, 0 being “start playing immediately at the beginning of the score.” The third p-field (p3) indicates how long the note is to last.
Our envelope has already used up 0.01 second rising from 0 to the level defined by iamp. So the time that it takes to fall back to zero should be set to (p3 – 0.01). This way, if our score contains some longer notes and some shorter ones, the lengths of their envelopes will be adjusted accordingly. Each note will end smoothly.
In the oscil line, the fixed value 0.6 has been replaced with the symbol kampenv. This symbol is the output coming from the linseg opcode. The first value to the right of the oscil opcode is used for setting the amplitude of the signal that will come from the oscillator.
As an exercise, you may want to look up linseg and oscil in The Canonical Csound Reference Manual. You’ll find that the second input to oscil is for the frequency of the wave it will produce. We’ve set that at 220, so we hear a sine wave at 220 Hz. But what if we want to play different pitches?
Input Pitches from the Score
To play any sort of melody or harmony from the score, we need to tell Csound what pitches (frequencies) we’d like to hear. We can specify these in the score. Add some lines to your score, and add a fourth p-field to each line, so that it looks like this:
  i1 0 1 250
  i1 1 1 225
  i1 2 1 200
  i1 3 1 225
  i1 4 1 250
  i1 5 1 250
  i1 6 2 250
Tip Values entered into a Csound score are not separated by commas, only by spaces (or tabs). The values entered on the line following an opcode in an instrument, however, are separated by commas. (There is no comma between the opcode name and the first item after the name, however.)
The fourth p-field is going to play a melody. Edit your oscil line to use p4 as its second argument:
aout oscil kampenv, p4, giSine
When you click the Run button, you should hear “Mary Had a Little Lamb.” Not a very scintillating rendition of it, to be sure, but we’re just getting started.
Specifying frequencies using raw numbers can get to be a chore—especially if you’re composing music using standard 12-note-per-octave equal temperament, where the frequencies are irrational numbers. (The example above plays the melody in just intonation, not equal temperament.) Fortunately, we don’t have to specify the frequencies manually; we can let Csound calculate them for us. Replace the p4 values in your score so that the score looks like this:
  i1 0 1 8.04
  i1 1 1 8.02
  i1 2 1 8.00
  i1 3 1 8.02
  i1 4 1 8.04
  i1 5 1 8.04
  i1 6 2 8.04
Next, add this line to your instrument:
ifreq = cpspch(p4)
To finish the job, edit your oscil line to make use of the value that is now stored in ifreq:
aout oscil kampenv, ifreq, giSine
The cpspch opcode calculates the frequencies of notes in 12-note equal temperament. As is often the case in Csound, the name provides a clue about what the opcode does: “cps” refers to cycles per second, which is the frequency, and “pch” refers to the pitch. Musicians tend to consider “pitch” and “frequency” synonymous, but in this case the term “pitch” should be understood as a higher-level musical construct.
The 8 in p4 of the score specifies the octave of the desired pitch, and the decimal part of the number specifies the pitch step within the octave. Now our instrument can play whatever notes we like. We don’t need to calculate the pitch values; Csound can do that for us.
Make a Richer Tone Color
Sine waves are among the less interesting tones electronic instruments can produce. (Sometimes, of course, less interesting is good.) Csound gives us many, many ways to produce richer tone colors. To make an analog-style instrument, for instance, we could use the vco2 opcode. But since our .csd file already has a sine wave, let’s use it for a little FM synthesis.
Change the line in your instrument that contains the oscil opcode so that it uses foscil instead. foscil implements two FM operators as a carrier/modulator pair. (If you’re not sure what that means, read “FM Synthesis” in Chapter 7 to learn more.) foscil has a few additional input parameters. (The technical term for the inputs to an opcode is “arguments.”) Edit the foscil line so that it looks like this:
aout foscil kampenv, ifreq, 1, 1, 3, giSine
When you click Run, you’ll hear a somewhat warmer sawtooth-like tone. The two 1’s in that line control the relative frequencies of the carrier and modulator in the FM process. You can edit these to hear different timbres. Normally you’ll want to use integers between 1 and 10, but fractional values such as 1.073 will give you some bizarre and possibly useful sounds.
The 3 in that line controls the amount of FM. The technical term is “FM index.” Higher index values will boost the levels of the partials (overtones) in the sound.
As an exercise, you might try adding various values for the carrier, modulator, and index to your score, so that they can be varied from note to note. This is one of the many compositional techniques that are easier to set up in Csound than in a conventional MIDI sequencer. Try adding three more p-fields to each of your score lines, and then use p5, p6, and p7 in place of 1, 1,
3, in the foscil line.
Add a Timbre Envelope
The tones produced by many acoustic instruments change, slightly or dramatically, during the course of a single note. To accomplish something similar in Csound, we may want to add a timbre envelope. (Csound gives us many other ways to vary the timbre.) For the instrument we’re developing, we’ll use this envelope to control the FM index of the foscil opcode.
Add these two lines to your instrument:
  index = 3
  kindexenv linseg index, p3, 0
Be sure to put them above the foscil line. Now replace the 3 in the foscil line shown above, which was a fixed value, with kindexenv. Your foscil line should now look something like this:
aout foscil kampenv, ifreq, 1, 1, kindexenv, giSine
Thanks to the FM index envelope created using a second linseg, the tone becomes more muted as the note decays. If we want the FM sound to have a more definite attack transient, we can edit the index envelope like this:
kindexenv linseg index, 0.05, (index * 0.5), (p3 - 0.05), 0
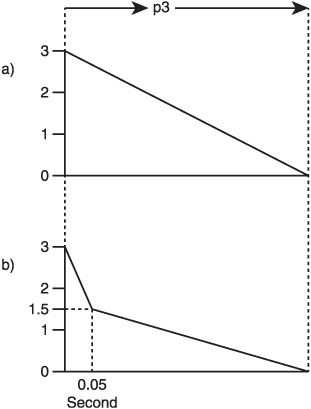
This envelope starts at a level set by the index value. Over the course of 0.05 second, it falls to half of that value. It then fades out to 0 during the remainder of the note. So each note will have an attack transient of 0.05 second. Figure 3.1 shows the difference between our first attempt at a timbre envelope and the second version. Much more complex envelopes can be created using this same technique, by adding more envelope segments to linseg. Unlike an envelope generator on a hardware synthesizer, linseg isn’t limited to a fixed number of segments; we can give it as many as we need, by giving it alternate values for level and time—level, time, level, time, level, time, level, and so on, ending with a value for the final level.
Figure 3.1 An envelope generated by the linseg opcode that falls smoothly from an initial level of 3 to a final level of 0 over the duration of a note (a), and an envelope that starts at 3, falls quickly to 1.5, and then falls more slowly to 0 (b). This diagram assumes that the total length of the note (p3, a value taken from the score) is considerably longer than 0.05 second. If the note is shorter, the decay to 0 will be more abrupt. In fact, if the entire note is shorter than 0.05 second, the output of linseg will drop abruptly to 0 at the moment when the note ends. There will be no smooth decay at all.
While we’re adding features to the instrument, let’s improve the tone color a little by adding a second foscil and detuning it from the first one. Using two detuned oscillators is a standard technique in synthesis: It produces a sort of chorusing quality due to the interference patterns between the two tones. Here’s the new code for the oscillators:
  idetune = 0.7
  aout foscil kampenv, ifreq - idetune, 1, 1, kindexenv, giSine
  aout2 foscil kampenv, ifreq + idetune, 1, 1, kindexenv, giSine
  aout = aout + aout2
You can adjust the value of idetune to produce a smoother or more active tone. The last line above mixes the two signals (aout and aout2) and puts the result back into the aout “patch cord.”
When you add the second oscillator and play the project, you may hear digital distortion. Open CsoundQt’s Console window, if it isn’t open already. Even if the audio sounds okay, as it plays you’ll see messages indicating that some samples are out of range. This is not good. Samples that are out of range cause clipping distortion, which is nasty stuff. The reason the sound is distorting is because we’re adding two waveforms together, so the total amplitude level is higher than before.
One solution is to reduce the value of iamp to 0.4 or thereabouts. After doing this, replay the project to check whether the out-of-range samples have gone away. Another solution is to pan the two oscillators so that one is feeding the left output channel and the other the right. To do this, delete the line in which aout and aout2 are summed and then edit the outs line as follows:
outs aout, aout2
This adds a stereo chorusing quality to the sound.
Summing Up What We’ve Done So Far
Let’s pause to review the code we’ve developed so far in this tutorial. If you’ve been entering it as you read, the instrument should now look something like this:
  instr 1

  ; setup:
  iamp = 0.6
  ifreq = cpspch(p4)
  idetune = 0.7
  index = 3

  ; envelopes:
  kindexenv linseg index, 0.05, (index * 0.5), (p3 - 0.05), 0
  kampenv linseg 0, 0.01, iamp, (p3 - 0.01), 0

  ; tone generators:
  aout foscil kampenv, ifreq - idetune, 1, 1, kindexenv, giSine
  aout2 foscil kampenv, ifreq + idetune, 1, 1, kindexenv, giSine

  ; output:
  outs aout, aout2

  endin
If you’re new to writing code, you might find it easier to understand this if it’s presented graphically. Figure 3.2 shows the same instrument as it would appear if we diagrammed it.
Figure 3.2 Diagrams can often help make the signal flow in a software instrument easier to understand. The signals move from the top of the diagram toward the bottom. Modules’ inputs are at the top, and the “patch cord” lines are labeled with the names of the variables used in the code.

Add Rhythms, Chords, and Dynamics to the Score
The meanings of the first three p-fields in a Csound score are fixed: They refer to the instrument number, the start time of the note, and the note’s length. (The meaning of the word “note” is somewhat arbitrary. “Event” might be a better term, as a single score line in Csound can generate a very complex sound event, perhaps consisting of hundreds of discrete notes. For more on the techniques with which you might do that, see “Creating Score Events during Performance” in Chapter 7.)
The meanings of any other p-fields that you add to a score line are defined by the user and may be different from one instrument to another. In the score events we’ve looked at so far in this chapter, p4 has been used to control the pitch of the note. But it’s more usual (though not required) to use p4 to control the amplitude of the note and p5 for the pitch. To see this in action, we’ll have to edit both the instrument and the score. First the instrument. Edit these two lines as shown:
  iamp = p4 * 0.6
  ifreq = cpspch(p5)
Then insert new values for p4 into your score, pushing the pitch values back to p5, like this:
  i1 0 1 0.6 8.04
  i1 1 1 0.5 8.02
  i1 2 1 0.4 8.00
  i1 3 1 0.5 8.02
  i1 4 1 0.6 8.04
  i1 5 1 0.7 8.04
  i1 6 2 0.8 8.04
The second and third notes will get softer, and the last four will get progressively louder.
So far, the values in p2 and p3 have been some number of seconds, so our rendition of “Mary Had a Little Lamb” has been proceeding at a stately, if not lugubrious, tempo. Before we start adding some rhythmic spice to it, let’s speed it up by adding a t statement to the score. The t is an abbreviation for “tempo.” Add this line before the first i statement:
t 0 120
When you play the example again, the tempo will be twice as fast. If there’s no t statement in a score, Csound defaults to a t value of 60—60 beats per minute. In other words, the values in p2 and p3 are interpreted as seconds. Now we’re running at 120 bpm, so Csound will produce notes that move twice as quickly and are half as long.
To add rhythmic interest to a Csound score, we need to edit the start times (p2) and probably the lengths (p3) of various events. Below is a slightly elaborated version of the tune. It uses eighth notes (p2 values that increase by 0.5) and triplets (p2 values that increase by 0.33). I’ve also bumped the melody up by an octave (replacing the 8’s in p5 with 9’s) to make room for the harmony we’re about to add.
  i1 0     0.5  0.7  9.04
  i1 0.5   0.5  0.5  9.02
  i1 1     0.5  0.6  9.04
  i1 1.5   0.5  0.4  9.02
  i1 2 1   0.7       9.04
  i1 3 1   0.5       9.02
  i1 4     0.3  0.6  9.00
  i1 4.33  0.3  0.5  9.02
  i1 4.67  0.3  0.4  8.11
  i1 5     0.3  0.6  9.00
  i1 5.33  0.3  0.5  9.02
  i1 5.67  0.3  0.4  8.11
  i1 6 1   0.5       9.00
  i1 7 1   0.6       9.02
  i1 8     0.7  0.6  9.04
  i1 8.67  0.7  0.5  9.05
  i1 9.33  0.7  0.4  9.03
  i1 10    0.7  0.6  9.04
  i1 10.67 0.7  0.5  9.05
  i1 11.33 1.7  0.7  9.04
Using tab characters to line up the columns will make your score easier to read.
Now let’s add some chords to the music. There are two main ways to organize a Csound score when you want several notes to sound at once. You can list the notes in strict chronological order by start time, or you can list the events for each part in a multi-part texture in their own set of lines. This can be easier to read.
Before performing your score, Csound will sort the score lines, so it doesn’t matter what order you put the lines in. (In more complex score situations, it may matter a great deal, for reasons that would take several paragraphs to explain. The score we’re working with is simple enough that we don’t need to get into that.) All that matters is the start times of the notes. Two notes that have the same start time will, indeed, start at the same time.
Leaving the melody above as is, let’s add a harmony below it. Copy these lines into your score below the lines that are creating the melody.
  i1 0 2 0.3 7.00
  i1 0 2 0.3 7.07
  i1 2 2 0.3 7.05
  i1 2 2 0.3 7.09
  i1 4 2 0.3 7.04
  i1 4 2 0.3 7.07
  i1 6 2 0.3 7.05
  i1 6 2 0.3 7.09
  i1 8 2 0.2 7.02
  i1 8 2 0.2 7.05
  i1 8 2 0.2 7.09
  i1 10 1.3 0.3 7.07
  i1 10 1.3 0.3 7.11
  i1 11.33 1.7 0.3 7.00
  i1 11.33 1.7 0.3 7.07
As when we added a second oscillator, adding more voices may cause clipping distortion in the output. If you see the “samples out of range” message in the Console window—and if you’ve been entering the code exactly as shown, you will—it’s time to lower the output level again.
There are at least three ways to do this. First, we could edit all of the p4 values in our score. This would be very time-consuming and also error-prone. Second, we could change the orchestra header to indicate that 0dbfs=1.5. This will fix the problem in our sample score, but in a project that has several different instruments playing (as opposed to several instances of the same instrument, which is what we have here), all of the instruments would get quieter, which may not be desirable musically.
A good compromise would be to edit instrument 1 to reduce its amplitude. This has the same effect as lowering the fader on a mixer channel. Leaving 0dbfs=1, edit the iamp line of the instr code to reduce its value as needed:
iamp = p4 * 0.3
Now the level of this instrument will be half as loud as before, while any other instruments that are playing will be unaffected.
Control the Instrument Panning from the Score
We’re almost ready to send “Mary Had a Little Lamb” out to pasture (and none too soon!), but first let’s look at a couple of other techniques that are extremely useful.
This project runs in stereo, because the header says nchnls=2. In case it isn’t obvious, that’s a cryptic abbreviation for “number of channels.” When Csound is operating in stereo, any instrument that we want to hear will use the outs opcode, which takes two input signals, one for the left channel and the other for the right channel. So far, those signals have been identical, so our music was functionally monaural.
Let’s add a new p-field to our score, to control panning. The values for p6 can be anywhere from 0.0 (hard left) to 1.0 (hard right). At the end of instrument 1, add a new line using the pan2 opcode, and edit the outs line, like this:
  aL, aR pan2 aout, p6
  outs aL, aR
The pan2 opcode has two outputs, which appear at the left end of the line. We’ll name these outputs aL and aR. These signals are now the inputs for the outs opcode. To use panning, we’ll add p6 to the score lines.
![]()
Tip Csound is a case-sensitive programming language, so the symbols ar and aR are not the same.
While doing so, we’ll introduce one of a number of convenience features that make building Csound scores easier. When p-fields are at the end of the line, if they don’t change we can skip them. Csound will infer that the same value should be used again, until it sees a different value. So we can type a p6 value of 0.5 (for center panning) only on the first line of the melody. This value will be used until a different one appears. For example:
  i1 0 0.5 0.7 9.04 0.5
  i1 0.5 0.5 0.5 9.02
  i1 1 0.5 0.6 9.04
  i1 1.5 0.5 0.4 9.02
For the accompaniment, we’d like to spread the chord notes to the left and right. You can enter 0.1 and 0.9 alternately on these score lines. (One of the chords in the accompaniment shown above has three notes, not two, so give one of the notes a p6 value of 0.5.) Now our ensemble is nicely spread out, with the melody in the center and the accompaniment voices at left and right. As a side benefit, this will lower the level of the signal being sent to each of the outputs, so we can increase the overall amplitude of our instrument:
iamp = p4 * 0.5
Process the Sound through a Reverb
To conclude our first QuickStart tutorial, we’re going to add a reverb. This will be in a separate “instrument.” We’ll send the signal from instrument 1 to the reverb instrument using a stereo bus. To create the bus, add these two lines to the orchestra header, just below the ftgen line that creates the sine wave and above the first instrument definition:
  gaRevInL init 0
  gaRevInR init 0
After the endin for instr 1, leave one or two blank lines and create a new instrument, like this:
  instr 100
  aInL = gaRevInL
  aInR = gaRevInR
  gaRevInL = 0
  gaRevInR = 0
  aoutL, aoutR reverbsc aInL, aInR, 0.8, 10000
  iamp = p4
  kdeclick linseg iamp, (p3 - 0.05), iamp, 0.05, 0
  aoutL = aoutL * kdeclick
  aoutR = aoutR * kdeclick
  outs aoutL, aoutR
  endin
This instrument starts by reading the audio signals in the stereo bus and assigning them to local variables. It then zeroes out the input bus. This is important, as we’ll see in a moment. Next, the reverbsc opcode processes the signals. Its outputs are adjusted by a “declick” envelope, which ensures that the output of the reverb falls to zero as it’s being shut off. This envelope also adjusts the output level of the reverb by taking an amplitude value from the score using p4. The enveloped signals are sent to outs.
The code in the reverb instrument above is written for clarity (because we’re in the middle of a tutorial). We could reduce it from twelve lines to six by rewriting it like this:
  instr 100
  aoutL, aoutR reverbsc gaRevInL, gaRevInR, 0.8, 10000
  clear gaRevInL, gaRevInR
  kdeclick linseg p4, (p3 - 0.05), p4, 0.05, 0
  outs aoutL * kdeclick, aoutR * kdeclick
  endin
We’ve used the global audio variables directly as inputs to reverbsc, introduced the clear opcode, which can zero out a number of audio variables in a single line, used p4 directly as an argument to linseg, and multiplied the output variables by the declick envelope directly in the call to outs. The result will be exactly the same as before. As this example illustrates, Csound code can be written in various ways. Some methods will be more concise, while others may be easier to read.
We need to do two more things in order to hear the reverb. First, we need to send a signal to it. Add these two lines before the outs line for instrument 1:
  gaRevInL = gaRevInL + aL
  gaRevInR = gaRevInR + aR
These lines add the signals from aL and aR to whatever is in the reverb send bus already. We have to use addition here, because several instances of instrument 1 are running at the same time. There will quite likely be a signal in the bus already, and we want to mix the new signal with it. The reverb itself will clear out the bus by setting the signals to 0. If it didn’t do this, the signal would quickly build up to an astronomical level. For this reason, we want to give the reverb instrument a higher number than the number(s) of any instruments that are sending signals to it.
Finally, we have to turn on the reverb instrument in the score. It needs only a single “note” event, which will run for as long as the rest of the score, and a couple of seconds extra at the end, to let the reverb tail die away. Looking at our score, we can see that the last note ends at beat 13, so we need a 17-beat reverb event. Add this line near the end of your score, directly above the </CsScore> line:
i100 0 17 0.2
When you play the file, you should hear a pleasant wash of reverb behind the notes. If you want more reverb, you can increase the p4 value for the i100 line from 0.2 to 0.4 or thereabouts. When you do this, however, you’ll quite likely hear output distortion again, because the reverb signal is being mixed with the original, dry signal coming from instrument 1. One solution is to go back to instrument 1 and lower the value of iamp. By adjusting the amplitudes of instruments 1 and 100, you can get whatever wet/dry reverb mix you’d like.