
MIDI
For better or worse (and usually for the better), MIDI remains a vital tool for making music with any type of electronic technology. MIDI was introduced in 1982, so as I write this it is nearing its 30th anniversary. While the MIDI Specification has been extended in a number of ways over the years, the basics of the MIDI language haven’t changed. (That’s the “worse” part.) Nor will they. Given the huge installed base of MIDI devices, it’s safe to say MIDI will never change in any fundamental way. It may eventually be replaced by OSC (Open Sound Control), which is a far more powerful communications protocol—but OSC remains poorly supported by commercial products. (A few tips on using OSC with Csound will be found later in this chapter.)
This book is not the place to provide a thorough explanation of the MIDI communications protocol or how it’s used. If you’re new to MIDI, you can find some helpful explanations online, but I have yet to see a good, complete discussion of the details on the Web. The MIDI Manufacturers Association (the official body that keeps the MIDI world in sync with itself) has a very decent, though short, tutorial at www.midi.org/aboutmidi/intromidi.pdf.
You’re most likely to use MIDI in conjunction with Csound by sending MIDI messages to your computer from a hardware controller, such as a keyboard. Csound can also transmit MIDI messages, so it can be used to generate performances using hardware instruments or even MIDI-controlled light and video devices. Csound can also load and play Standard MIDI Files, so if you’ve created a composition in a conventional sequencing system you can port it over to Csound in order to make use of Csound’s synthesis capabilities.
With respect to the ability to play Standard MIDI Files, the manual says this (lightly edited): “You can load a MIDI file using the -F or --midifile=FILE command-line flag. The MIDI file is read in real time, and behaves as if it were being performed or received in real time. The Csound program is not aware of whether MIDI input comes from a MIDI file or directly from a MIDI interface.” So all of the information in this chapter about receiving MIDI messages in real time, other than the information about setting up a hardware MIDI system, should apply equally well to MIDI file playback.
Setting Up a MIDI System
The most common way to use MIDI (with Csound or with any other music software) is to connect a hardware MIDI controller of some sort to your computer. The controller could be a keyboard, a grid controller such as the Novation Launchpad, or something else. Some MIDI keyboards are also self-contained synthesizers, but we won’t be concerned with that functionality here; we’ll treat the keyboard strictly as a device that transmits MIDI data to your computer.
Many controllers can link directly to a computer using a USB cable. If your controller won’t do this, you’ll need a separate MIDI interface device. The interface will attach to the computer via USB or FireWire, and the controller will be connected to the interface using a standard five-pin MIDI cable.
Some MIDI interfaces are built into audio interfaces. This is a convenient type of device to have: It can handle both audio I/O and MIDI I/O for your computer.
Another way of using MIDI is to stream it from one program to another within the computer environment. In the Mac OS, this can be done with the IAC (inter-application control) bus, which is built into the system. Windows users can take advantage of MIDI Yoke (www.midiox.com), a free utility that provides eight separate software busses to link programs to one another. Users of 32-bit Windows 7 systems may also want to look at the Maple Virtual MIDI Cable (maplemidi.com).
This type of internal connection can be quite useful. For instance, if you would like to process the MIDI signals coming from your hardware controller with a program such as Pd before they’re received by Csound, or if you would like to use Csound to generate MIDI and send it to Ableton Live, you’ll need MIDI Yoke or Apple IAC.
There’s no need for a Linux equivalent to these utilities, as ALSA MIDI contains routing and patching capabilities by default. However, the Csound implementation of ALSA MIDI uses the “raw” sequencer interface, so Linux users may need to load the vir-midi kernel module.
![]()
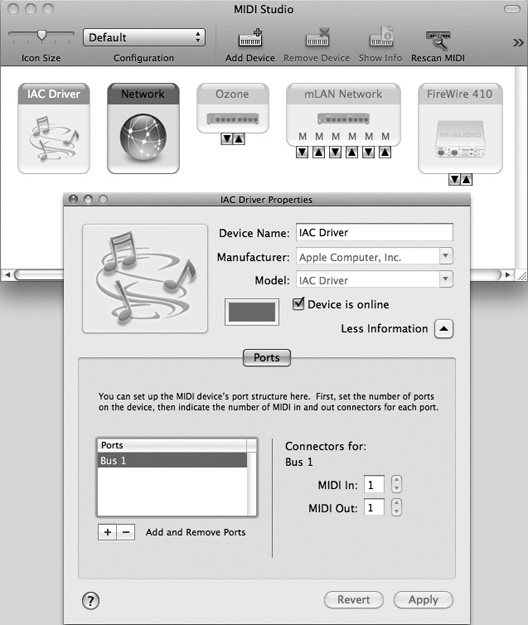
Tip The Mac OS IAC utility, with which two music applications can communicate via MIDI, is well hidden from the casual user. Go to the Applications > Utilities folder and launch the Audio MIDI Setup program. From the Window menu in this program, choose Show MIDI Window. Double-click the IAC Driver icon in the MIDI window and click the Device Is Online checkbox, as shown in Figure 10.1. This will give you an internal MIDI input/output bus.
Figure 10.1 Switch on the IAC bus for internal MIDI communications in the Macintosh by opening up the MIDI window in the Audio MIDI Setup utility program.
Receiving MIDI Input
Once your MIDI hardware is set up, you can send MIDI messages into Csound in order to play your Csound instruments in real time. An assortment of opcodes is available for this purpose.
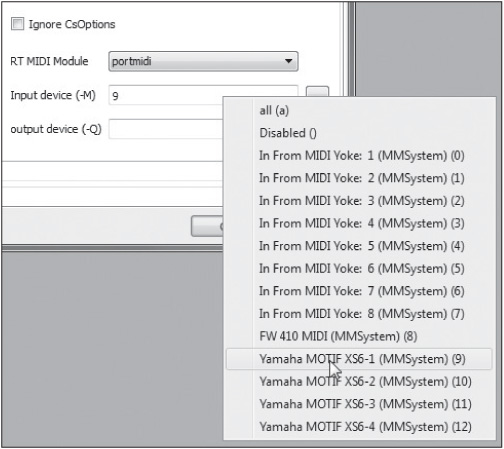
Before you start adding opcodes, you’ll need to set up Csound so that it’s looking for MIDI input. In CsoundQt, you can do this in the Run tab of the Configuration box, as shown in Figure 10.2. From the drop-down menu, select PortMidi as the RT MIDI Module. Then click on the box to the right of the Input Device (-M) field. The list of available input devices will be displayed. Click on the device you’d like to use, and you should be ready to go.
Figure 10.2 Choosing a MIDI input for CsoundQt.
If you’re running Csound from the command line, you’ll need to use the -M command-line flag, followed by a device number. Alternatively, you can put this flag in the <CsOptions> area of your .csd file. Csound refers to the available MIDI devices by number. If you choose a number for the -M flag that doesn’t correspond to any of the devices in your system, Csound will display an error message that lists the devices and gives their numbers. This makes it easy to correct your choice. If you aren’t sure what number to use, just enter -M999 and run the file. This will be an error, so you’ll see the list displayed.
massign
MIDI defines 16 channels for performance purposes. By default, Csound routes messages on these 16 channels to the instruments in your orchestra that are numbered from 1 to 16. As a side benefit, Csound automatically interprets sustain pedal messages (Control Change 64) and keeps notes sounding until the pedal is lifted.
Using the first 16 instruments for the 16 channels is convenient, but it may not always be what you want. If you need to route channels to different instruments, put one or more calls to the massign opcode in your orchestra header. For instance, to get messages on channel 1 to instrument 101, you would write:
massign 1, 101
This opcode is also useful if you want to prevent MIDI messages from triggering your instruments. An input value of 0 means “all input channels,” and an output value of 0 means “disable the response to note triggers on this channel.” To prevent MIDI triggering, do this:
massign 0, 0
Using massign in this manner doesn’t shut off the MIDI message pipeline entirely; it simply prevents MIDI note-ons from triggering new events. You can still create instruments that respond to other kinds of MIDI messages.
![]()
MIDI Note Messages Each MIDI note message contains three pieces of information—the channel (from 1 to 16), the note number (from 0 to 127), and the velocity (from 0 to 127). The keys on a standard five-octave MIDI keyboard transmit note numbers 36 through 96, and Middle C is note 60.
The note-on and note-off messages are separate types. A note-on is transmitted when a key is pressed, and a note-off when the key is lifted. However, for technical reasons having to do with data transmission speed in early MIDI systems, a note-on message with a velocity of 0 is interpreted as a note-off. (If you’re curious about the reasons for this odd design choice, enter the term “MIDI running status” into your favorite search engine.) If you’re writing code to test what sort of MIDI message your Csound instrument is receiving, it’s essential to understand this point. You may not know whether your MIDI keyboard is sending note-offs when keys are lifted, or note-ons with velocity 0, so your code should be written so as to handle both possibilities.
As a result of this design, when a new note starts, its velocity will be between 1 and 127. The velocity value is a measure of how fast the key was traveling when (or just before) it struck the keybed. Many explanations of MIDI velocity incorrectly use phrases such as “how hard the key was pressed.” Pressure (also called aftertouch) is a separate type of MIDI data—in fact, it’s two different types, channel pressure and polyphonic pressure. Pressure has nothing to do with velocity, although in some hardware both pressure and velocity are sensed using the same physical mechanism.
cpsmidi, veloc, and notnum
When an instrument is being triggered using MIDI note-on messages (and terminated via note-off messages), the cpsmidi opcode can be used to get the frequency value that corresponds to a MIDI note in 12-note-per-octave equal temperament. Here is some setup code for an instrument that uses cpsmidi as well as veloc (to get the MIDI note-on velocity value) and ctrl7 (to get modulation wheel movements):
  ifreq cpsmidi
  ivel veloc
  ivel = 0.01 + (ivel / 130)
  kmod ctrl7 1, 1, 0, 1
MIDI note-on velocities have a range from 1 to 127. The third line of the above code scales the value of ivel so that it is approximately in the range between 0.01 and 1.0, as that range will probably be easier to use in your other Csound code. Other velocity scaling methods are easy enough to set up. You can even use the raw velocity value as an index into a table so as to implement a velocity response curve.
If you want to play some other type of tuning from your MIDI keyboard, you can get the MIDI note number directly using notnum. The lines below produce exactly the same output as cpsmidi, but the process is easier to customize:
  ikey notnum
  ioct = int(ikey / 12) + 3
  iclass = int(ikey % 12) * 0.01
  ifreq = cpspch (ioct + iclass)
Here, the raw note number (ikey) is being transformed into octave/pitch-class data, as explained in the “Pitch Converters” section of Chapter 7. If we want the keyboard to play in 17-note equal temperament, for instance, we can edit the above slightly so as to be able to use cpsxpch:
  iscalesteps = 17
  ibasepitch = 30
  ioct = int(ikey / iscalesteps)
  iclass = int(ikey % iscalesteps) * 0.01
  ifreq cpsxpch (ioct + iclass), iscalesteps, 2.0, ibasepitch
pgmassign
If you need to route your keyboard performance to a different instrument while playing the music, you can do it by switching the hardware controller’s MIDI output to a different channel, but this may not always be convenient in the heat of performance, and in any case it limits you to a maximum of 16 playable instruments. Another method is to use pgmassign. With this opcode in play, MIDI program change messages can be used to switch instruments. To do this, you would first create a named program-switching instrument, like this:
  instr ProgSwitch; a program switcher
  pgmassign 1, 1, 1
  pgmassign 2, 21, 1
  endin
This instrument would then be made active using alwayson in the orchestra header:
alwayson “ProgSwitch”
In this example, the keyboard is transmitting on channel 1 (the third argument to pgmassign). Program change 1 routes notes on channel 1 to instrument 1. Program change 2 routes them instead to instrument 21. It appears in my experiments that pgmassign offsets the actual transmitted values by 1. That is, MIDI program changes are numbered 0–127 but are interpreted by pgmassign as having values from 1 to 128. (This is not as unusual as it may sound. The 16 MIDI channels are actually numbered 0–15, but they are universally referred to as being in the range 1–16.)
midiin
The most generic way to get MIDI data from an active input port is to use midiin. The prototype is:
kstatus, kchan, kdata1, kdata2 midiin
This opcode has four outputs: The status byte, the channel (1–16), and the two data bytes associated with the message. The status byte defines the type of message being received. The values, as listed in the manual, are:
![]() 128 (note off)
128 (note off)
![]() 144 (note on)
144 (note on)
![]() 160 (polyphonic aftertouch)
160 (polyphonic aftertouch)
![]() 176 (control change)
176 (control change)
![]() 192 (program change)
192 (program change)
![]() 208 (channel aftertouch)
208 (channel aftertouch)
![]() 224 (pitch-bend)
224 (pitch-bend)
If no MIDI message is in the input buffer, the value of kstatus will be zero. This enables us to write a simple but useful always-on MIDI data monitor, which will display MIDI messages to the Output Console:
  instr MidiMonitor
  kstatus, kchan, kdata1, kdata2 midiin
  if kstatus != 0 then
    printks “Status %d, channel %d, data %d, %d.
”, 0, kstatus,
    kchan, kdata1, kdata2
  endif
  endin
If you’re not familiar with MIDI, a few points about this may be less than transparent:
![]() Depending on what your keyboard is transmitting, you may see a note-on message (status 144) rather than a note-off each time you lift a finger. See the “MIDI Note Messages” sidebar earlier in this chapter for further details.
Depending on what your keyboard is transmitting, you may see a note-on message (status 144) rather than a note-off each time you lift a finger. See the “MIDI Note Messages” sidebar earlier in this chapter for further details.
![]() Channel aftertouch messages have only one data byte, so the value of kdata2 will always be zero when channel aftertouch is being received.
Channel aftertouch messages have only one data byte, so the value of kdata2 will always be zero when channel aftertouch is being received.
![]() Control change messages use the first data byte to indicate which controller is being moved (in a range from 0 to 127) and the second data byte to indicate the current value of the controller. The MIDI modulation wheel, for example, is controller 1.
Control change messages use the first data byte to indicate which controller is being moved (in a range from 0 to 127) and the second data byte to indicate the current value of the controller. The MIDI modulation wheel, for example, is controller 1.
![]() Pitch-bend messages have two data bytes, giving them a theoretical resolution of 14 bits. (MIDI uses up one bit in each byte, leaving seven bits to contain data.) But some hardware controllers don’t take advantage of this high resolution, so the second data byte may always be 0 or 64.
Pitch-bend messages have two data bytes, giving them a theoretical resolution of 14 bits. (MIDI uses up one bit in each byte, leaving seven bits to contain data.) But some hardware controllers don’t take advantage of this high resolution, so the second data byte may always be 0 or 64.
Other MIDI Input Opcodes
Numerous opcodes are available for grabbing MIDI messages from the input buffer: aftouch, chanctrl, polyaft, pchbend, midictrl, ctrl7, and so forth. Some of these are meant to be used within an instrument that is being triggered by a MIDI note-on message, so they assume the value of the MIDI channel. Others let you specify the desired channel as an argument, so you can use them even in instruments that are not responding to MIDI note triggers.
You may want to set the initial value of a MIDI control change message, so that it will be something other than zero when your MIDI performance starts. This might be especially useful if you’re using CC7 or CC11 messages to control instruments’ volume, because a default of 0 will cause an instrument to be silent until you move your hardware controller device. For this purpose, you can use ctrlinit in the orchestra header. For example, this line:
ctrlinit 1, 7, 100
will cause CC7 on channel 1 to be set to an initial value of 100 each time the file starts playing.
The ctrl14, ctrl21, midic14, and midic21 opcodes are described in the manual as producing 14-bit or 21-bit floating-point values from two or three MIDI control change messages. This is a non-standard use of MIDI control change messages, and some work would be required to set up your controller hardware to transmit data in the correct form (if it could do so at all). MIDI has a mechanism for transmitting 14-bit control values using two separate control change messages, one for the MSB and one for the LSB, but if your hardware will transmit using this format at all (not guaranteed), it will almost certainly assume that you want to transmit 14-bit integers, not 14-bit floating-point values. So this Csound feature is likely to be of limited utility.
In my experiments, in Csound version 5.13 aftouch produces a maximum output value (default 127) until it receives the first channel aftertouch message. This is a bug in Csound. The workaround is to use midiin instead:
  kaft init 0
  kstatus, kchan, kdata1, kdata2 midiin
  if kstatus == 208 && kchan == 1 then
      kaft = kdata1
  endif
Performance Considerations
When playing Csound instruments in real time via MIDI, you may hear glitches in the audio output. This can happen for two reasons—CPU overload and output clipping distortion. CPU overload tends to sound like dropouts. Clipping tends to sound like popping, clicking, and grinding, or in extreme cases like nasty buzzing. In this section we’ll look at how to prevent these problems.
Also worth noting: In real-time performance, Csound doesn’t know how long your notes are going to be, so its normal envelope generators (linseg, for example) can’t calculate an amplitude envelope that tapers nicely to 0 at the end of the note. The solution is to use the versions of envelope opcodes whose names end with -r: linsegr, expsegr, and so on. (You might expect to be able to use adsr in this situation, to take advantage of its classic approach to enveloping, but adsr is not an -r opcde. Use madsr instead.) MIDI-triggered notes will go into the release portion of the -r envelope when a note-off message or a note-on with velocity 0 is received.
CPU Overloads
CPU overloads happen when you’re asking the computer’s main microprocessor to do more work per second than it’s capable of doing. It can’t keep up, so there will be a brief gap during which it has no data to send to the output. This is also called a buffer underrun, because the driver for the audio hardware is trying to get new data from the buffer in order to send the data on to the hardware, but the CPU hasn’t had time to put new data in the buffer yet, so the buffer is empty.
Four or five strategies are available for handling buffer underruns.
First, you can simplify your performance itself by requesting fewer simultaneous notes. If you’re playing an instrument whose amplitude envelopes have long release segments, for instance, you’ll have overlaps. Notes that are dying away and no longer important musically will still be using computer resources, because each note you play starts a new instance of an instrument. Shortening the release segments of the notes’ envelopes will reduce the number of overlaps, thereby reducing the total number of notes being generated at once.
Second, you can simplify your instrument code. If you can replace a k-rate argument to an opcode with an i-time argument, the opcode may run more efficiently. Multiplications are slightly more efficient than divisions, so look for places where you can replace something like this:
kresult = kdata / 5
with this:
kresult = kdata * 0.2
Changing one division to a multiplication isn’t likely to make any perceptible difference, but if your code has dozens of divisions per k-period, you may see some improvement when you make this change.
If you can get rid of an LFO without changing the timbre in an undesirable way, or replace data that’s being calculated on the fly with data stored in a table, you’ll see an improvement.
You may be wondering, how much of my CPU power does this or that opcode use? Detailed figures haven’t been published—and given the sheer number of opcodes, doing the research to answer this question would be a large undertaking. In some cases, there may not be a definite answer, because the CPU load will depend on the arguments sent to the opcode. As Oeyvind Brandtsegg pointed out in a discussion of this topic on the Csound mailing list, the granular synthesis opcodes will use more CPU when large amounts of grain overlaps are being requested.
Third, you can increase the value of ksmps. For rendering high-quality audio, a value of ksmps=1 is ideal, but for live work, you may find that you need ksmps=100. The tradeoff is that k-rate envelopes that are being used to modulate the audio will start to sound a bit grainy.
Fourth, you can increase the buffer settings. There’s a tradeoff here: Doubling the size of the software and hardware buffers doubles the latency—the amount of time that passes between when you press a MIDI key or button and when you hear the result.
I find that I can set -b to 512 and -B to 1024 and generally get acceptable low-latency performance from my computer with an ASIO driver. (The ASIO output driver in my Windows 7 computer is ASIO4ALL v2.) The same values with a non-ASIO driver, such as the Windows MME driver, won’t work acceptably. The settings given above will work under ASIO when I play six or eight notes at once on a three-oscillator, two-envelope instrument with a global reverb; more complex instruments and more polyphony might require higher settings to avoid problems. Needless to say, you should check your entire music set before going onstage to make sure the settings you’ve chosen won’t cause your system to choke in the middle of a concert! Values of 128, 256, 384, 512, 768, and 1024 would be typical for -b, and -B should probably be twice or four times as high.
Fifth, if some portions of your music won’t change from one gig or concert to another—if they’re backing tracks, for instance—you can render them to the hard drive ahead of time and substitute a sample playback instrument to stream the audio from the hard drive. This is not practical with music that’s entirely improvised or being generated by algorithmic processes, of course, but if you can pre-record some parts of the music, you should see a huge improvement in the CPU performance.
Finally, it should be noted that modern computers are typically running many processes in the background, without your necessarily being aware of them. Such processes “wake up” periodically and grab some CPU cycles. Streamlining your operating system by shutting off background processes can help prevent buffer underruns.
Avoiding Clipping
When you’re developing a score that won’t be performed onstage, you can easily avoid clipping just by lowering the output amplitudes of all the instruments in your orchestra. In live work, you can’t do this. By the time you hear the clipping, it’s too late.
I’ve had good luck using the compress opcode. With the proper settings, this seems to tame high output levels without introducing any artifacts. For more information, see the section on compress in Chapter 7.
The audio produced by Csound is of such high quality that you should be able to lower the overall output level of the orchestra somewhat and compensate by turning up your amplification system. The amount of background noise introduced by doing this will almost always be masked by the ambient noise of the club or concert hall.
Keeping Csound Running
The normal behavior of Csound is to keep running until it has finished rendering a score (either to a disk file or to the audio output) and then stop. Using Csound for a MIDI performance, we obviously need it to keep running in the background, doing nothing, until it receives a suitable MIDI input. There are three more or less interchangeable ways to do this.
The old-fashioned method was to create a score with a dummy f-statement set to some arbitrary time:
f0 3600
If the score is running at the default rate (one beat per second), this statement will cause Csound to keep running for an hour and then stop. Instead, you can use a p-field with an e-statement. The e-statement ends the score. This line does the same thing as the dummy f-statement:
e 3600
A more practical method is to use the alwayson opcode in the orchestra header, most likely in conjunction with an instrument such as a global reverb processor, which you want to continue to be active throughout the performance:
alwayson “Reverb”
This will cause Csound to run until you terminate it manually, for instance by clicking the Stop button in the CsoundQt interface.
A Monophonic Legato MIDI Instrument
Each time you press a MIDI key, Csound starts a new instance of the corresponding instrument— by default, the instrument whose number corresponds to the MIDI channel. This is fine if you’re planning to play chords. But what if you want a monophonic instrument that will produce legato lines? This is a standard feature of commercial MIDI instruments.
Producing the same effect in Csound requires a little trickery. The example below is adapted from a code example provided by Victor Lazzarini. Almost nothing of Victor’s work remains except the basic idea, which is this: Instrument 1, which we’ll assume is responding to MIDI channel 1, does nothing but derive the pitch from the MIDI note number. The tone is generated by an always-on instrument (instrument 11). The latter counts the number of instances of instrument 1 that are currently playing, using the active opcode. If active returns zero, instrument 11 knows that no keys are pressed, so it ramps the amplitude of the output down to zero.
The comments in the code will explain what’s going on.
  sr = 44100
  ksmps = 4
  nchnls = 2
  0dbfs = 1

  alwayson “ToneGenerator”
  giSaw ftgen 0, 0, 8192, 10, 1, 1, 1, 1, 1, 1, 1, 1, 1, 1, 1, 1, 1, 1, 1
  gkCheck init 0
  gkPitch init 260

  instr 1; activated from MIDI channel 1, tracks the pitch
  gkPitch cpsmidib 2
  gkCheck = 1
  endin

  instr ToneGenerator

  ; check whether any instances of instr 1 are active
  kon active 1
  ; velocity sensing -- only accept a new velocity input if
  ; there’s no note overlap (if kon == 1) -- get the velocity
  ; and scale it to an 0.2 – 1.0 range
  kvel init 0
  kstatus kchan kdata1 kdata2 midiin
  if kstatus == 144 && kdata2 != 0 && kon == 1 then
      kvel = kdata2 * 0.006 + 0.2
  endif

  ; amplitude control
  kampraw init 0
  if kon != 0 then
      kampraw = 0.5 * kvel
      ; fast attack:
      kenvramp = 50
  else
     kampraw = 0
     ; slow release;
     kenvramp = 1
  endif
  kamp tonek kampraw, kenvramp

  ; pitch glide -- higher numbers cause faster glide
  ipitchglide = 4
  kpitch tonek gkPitch, ipitchglide

  ; oscillators
  idetune = 0.3
  asig1 oscil kamp, kpitch + idetune, giSaw
  asig2 oscil kamp, kpitch, giSaw
  asig3 oscil kamp, kpitch - idetune, giSaw
  asig = asig1 + asig2 + asig3

  ; if no MIDI keys are pressed, reinitialize the filter envelope
  if gkCheck == 1 && kon == 0 then
      reinit filtenv
  endif

  ifiltdec1 = 1.5
  ifiltdec2 = 3
  filtenv:
  kfilt expseg 500, 0.01, 8000, ifiltdec1, 2000, ifiltdec2, 500, 1, 500
  rireturn

  ; smooth the filter envelope so a reinit won’t cause it to jump; --
  also have the cutoff track the keyboard and velocity
  kfilt tonek (kfilt * (0.6 + kvel * 0.5)) + kpitch, kenvramp
  afilt lpf18 asig, kfilt, 0.3, 0.1

  outs afilt, afilt
  endin

  </CsInstruments>
  <CsScore>
  e 3600
Csound and VST
In theory, Csound is capable of loading and running third-party plug-ins in the VST format. Given the number of high-quality commercial and freeware VST instruments, this feature makes it easier to produce evocative sounds with a minimum of effort.
The vstinit, vstnote, vstedit, and related opcodes enable you to load and use VST plug-ins. These opcodes require the file vst4cs.dll, which is not distributed with Csound. It is, however, readily available. If you post a polite message to the Csound mailing list, most likely someone will be happy to send you a copy or point you to a download link. It should be copied into your Csound > plugins64 directory.
My experiences with vst4cs.dll have been decidedly mixed. Some plug-in instruments work well. Some of them produce sound but display blank edit windows. Some of them crash Csound. However, this book is being written in the summer of 2011. If you’re reading it a couple of years from now, the situation may have improved. Or you may find that the current version works well with the particular VSTi you want to use. As they say, your mileage may vary.
It’s also possible that Windows users may be able to figure out how to run Csound itself as a VST plug-in within a host program. This is done using files called CsoundVST.dll and vst4cs.dll. These files are, again, not included with the standard Csound distribution, apparently due to licensing issues, but a version of Csound that includes them can be downloaded from http://michael-gogins.com.
I’ve never had any luck getting CsoundVST to run, and the instructions in the manual are sketchy to the point of being nearly useless. If you have enough patience and determination, you may be able to get it running, but you’ll probably find it easier to download MIDI Yoke and simply send MIDI data from your sequencer to Csound with Csound running as a separate program.
A better alternative, if you want to run your Csound instruments within a VST host, may be to download and learn to use Cabbage (http://code.google.com/p/cabbage). Cabbage is a toolkit (available for Windows only at this writing, but Linux and Mac OS versions are in the works) with which you can turn Csound instruments into standard VST plug-ins.