
5 The Hybrid Workflow
“The person scanning your film is ultimately responsible for how your image will look.”
You have a film camera, you shot something, so now what? You need to get your film developed and into your computer. Yup, into your computer. This is the modern age; prints just don’t cut it anymore. You need high resolution and quality scans to edit, sort, and present, all via computer. So what do you do?
There are a few options and price points for getting your film developed and scanned. These options vary from user to user and are based on your end goals and needs. First I’ll go over what I do; then I’ll talk about the other options available.
I shoot weddings. That’s my gig, so I need to be able to present almost 1,000 photos to a couple after their wedding via an online gallery where they can peruse the images and order prints. For this I first need to get all my images scanned, edited, and sorted. At times I have to remove unwanted items in an image or clean up some of the bride’s or groom’s skin blemishes, so I need high-res scans. To accomplish this, I send all my film to a professional lab that will develop my film and then scan my images to 6 or even 11 megapixels—whatever I ask for. I generally get 6-megapixel scans, because that’s large enough for an 11×17, and if a client wants to go bigger, I can always have one or two frames rescanned at the higher resolution.
Labs today use two primary scanners for bulk roll-film scanning: Noritsu and Fuji mini lab scanners. Both are great machines; Google them, and you will find tons of blogs about how people love the color on a Fuji Frontier or how they like the sharpness of the Noritsu better for black-and-white images. The machines are pretty powerful and are great for getting your images from negatives and onto the computer. I use the Noritsu just because it’s the most common machine offered by many labs, but truthfully, I believe that getting a good scan from these machines has more to do with the person doing the scanning than with the actual machines. The person scanning your film is ultimately responsible for how your image will look. He or she has the ability to adjust contrast, chroma, sharpness, graininess, color balance, and brightness.
I shoot film because I love the way it looks and the incredible latitude and highlight retention it has, but if I have, say, Walgreens scan my film, then the whole point of shooting film in the first place is gone. If the person scanning your film doesn’t care much about image quality or doesn’t know about the latitude of the film you shot, you may get back oddly colored shots and images that just don’t look how you expect they will. For that reason, I highly recommend finding a great photo lab, such as Richard Photo Lab, North Coast Photo, or another pro lab that understands film and will work with you and talk to you about how you want your film scans to look.
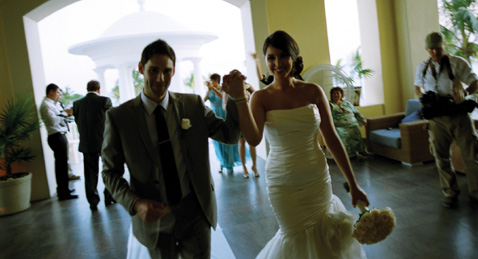
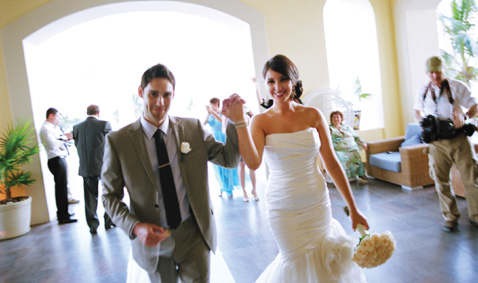
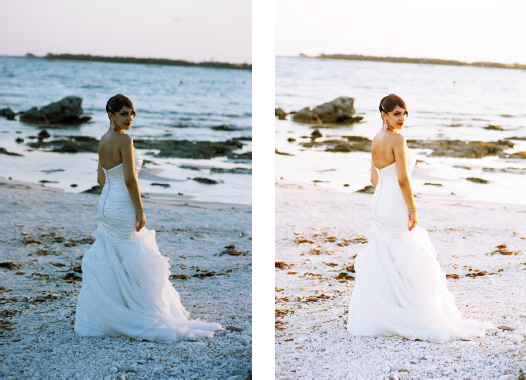
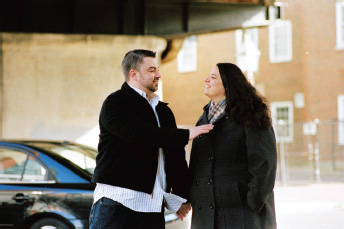
These pairs of images show you the difference the scan operator can make.
My workflow for this is now very simple, as the lab I use knows my look, how I like my color and contrast, and how I shoot. All I have to do is mark my rolls, fill out a developing sheet (for the lab), overnight my film to them, and then wait for a DVD in the mail or an email with access to an FTP site to download the images.
NOFEAR
Don’t be afraid to talk to your lab and tell them how you want your images to look. If you don’t discuss what you’re expecting, they can’t give you what you want. The lab’s job of developing, scanning, and printing is highly customizable.
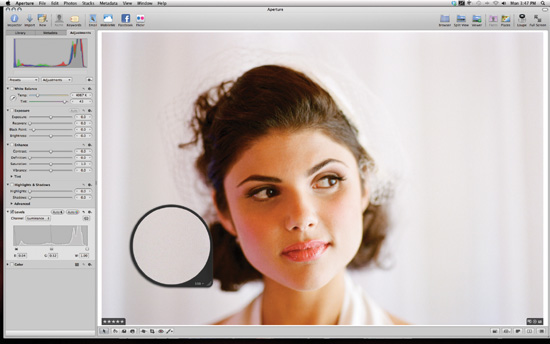
The next steps are very important! I download all the images to my computer and import them into Aperture. I then spend about 10 minutes sorting them and about an hour making any small adjustments that I want. Then I export them to my online gallery, and the images are ready to be viewed and admired. That’s it.
If you’re not shooting events or you shoot fewer events, you are super-critical of your images, and you want the ultimate scans that capture every nuance of the negative, then you want drum scans or a good dedicated film scanner with high dynamic range, such as a Coolscan V or an Imacon. These scanners are made to scan a frame at a time, not rolls in minutes. So in the time that a Noritsu would scan a roll, these machines would scan a frame or two.
The difference is very visible in the final image. When the Fuji and Noritsu machines scan images, you get JPEGs that are more or less close to the final image; they aren’t Raw files, which is why it’s up to the person scanning your film to make all the adjustments during the scan. With dedicated scanners, the workflow is a bit different. These scanners do multipass scans that scan the frame for shadow and highlights on many levels and create large image files, like those of a Raw file from a digital camera. You can then open these files in Photoshop; they are huge and editable to the full extent of the information the negative had. This is great if you’re just doing personal projects or you need images blown up for an art gallery or presentation, but for me it’s just too slow and expensive. Drum scans aren’t cheap.
Making adjustments to an image in Aperture.
Now the cheap option... This will totally consume your time, but it’s an option nonetheless: Use a cheap flatbed film scanner. When I say “cheap,” I mean that they are less than $1,000, which is cheap compared to a dedicated film scanner. However, as with all compromises, there will be differences. You won’t have to pay someone to scan your film rolls (most labs charge $5 to $15 per roll); you will usually have your film developed for less than $5 a roll. But now you’ll have to scan your rolls a few frames at a time and deal with dust on your flatbed, dust on the negatives, and the speed at which your scanner operates. Most flatbeds also don’t have the quality lens or high dynamic range of the dedicated scanners that most labs use, so your images will look good for web usage, but they won’t stand up to scans done by lab scanners.
This is what I use flatbed scanners for—to create contact sheets.
Images with scratches or dust all over them aren’t acceptable.
Alternatively, you can use this method to make contact sheets, send out just the individual frames you want scanned, and get those scanned at the best resolution you can afford.
With all scanning methods, there is always the issue of dust. Whatever method you use or whichever lab you choose, make sure your images are dust free. Nothing ruins your day like getting back a ton of photos from a shoot and seeing dust spots that you need to remove on all of them. A small particle of dust here and there is acceptable to me, but not all over the place and on every frame.
If you’re scanning your film yourself, the best way to remove dust is to use compressed air to spray any dust or particles off it. You can use an air can, but be careful to hold it correctly so that fluid does not spray out onto your film. I prefer to use a small air compressor with a spray-nozzle attachment, readily available at most hardware stores. These compressors have no fluid and can’t damage your film.
“Nothing ruins your day like getting back a ton of photos from a shoot and seeing dust spots that you need to remove on all of them.”
Other things to watch for include tar and leftover chemical residue on your negatives, or underdeveloped or improperly developed negatives. If you choose a lab that doesn’t run a good amount of film, chances are that their chemistry is not in check or up to the standards required to develop the film properly. Dirty machines with poor chemistry can do horrible things to your film. So make sure you pick a lab that’s healthy—one that runs their film properly or runs enough of it to make sure their machines stay workable. Dirty machines can scratch and ruin your film. Not fun.
In the end, it’s about getting your image off the negative and onto the computer so you can share it with the world. Whatever options you choose to do so have to be right for you.
See the weird glob near the top right of this image? That’s something the developer left on the film.
Ingrid’s Turn
The hybrid workflow takes the best parts of analog and adds the ease and flexibility of the modern world. I tell my clients that I use traditional capture with modern perks. By scanning in all my film, I can share online, print from digital files (though traditional printing does have a certain look to it), and do some simple printing techniques in Photoshop (which is easier than working in the dark).
I love using a hybrid workflow on the back end of my photographic process. One perk to scanning your film is that you really can see your images up close and personal, in a fairly organized way. Unlike the old ways of developing film and making a contact sheet or proof prints or viewing negatives with a loupe, you can now see what you have in full size and decide what’s worth working on. This also gives you a better way to store images and categorize them for future reference. I can’t tell you how many thousands of loose negatives I have stored in unmarked photo sleeves in boxes in my closet. Importing images into a program such as Adobe Lightroom, naming them, and creating a matching label for your sleeved negatives is super simple. You can print from your scans or from your negatives.
Sharing images through digital media is an added bonus to the advances of the digital age. Art buyers, clients, networking groups, and the like are all using the Internet to share images. Because of digital capture, there are literally trillions of images floating around out in the ether. But now, we film shooters stand out because of the smaller percentage of photographers actually using film. There are many groups out there dedicated to the classic analog craft; we are not completely alone! I promise. You can find them on Tumblr, Flicker, Facebook, and the like.