
Chapter 3. Getting Around with Linux
To the uninitiated, Linux may seem like a strange beast. It comes with a lot of power, customizability, and is heavily influenced by operating systems that date back to the early days of computing. Besides the price (free), the best part of using a Linux OS is the huge community of users, who have contributed their knowledge to the code itself and to helping other users.
While there are many different distributions, or flavors, of Linux, the people at BeagleBoard.org provide their version of the Debian distribution of Linux for use with the BeagleBone. It’s the software that’s preloaded on the BeagleBone Black and is also available for download from their servers. Throughout this book, we’ll be using Debian, but it’s possible to use other distributions of Linux and even other operating systems on the BeagleBone.
The Command Line
The main objective of Chapter 2 was to connect to your BeagleBone and get to a command line prompt. At this prompt, you can enter commands to start programs, work with files (such as create, delete, copy, and move them), compile your own programs, update system settings, and much more. By default, the BeagleBone’s command line prompt will look like this:
root@beaglebone:~#
Let’s take a close look at the prompt to see what each part means.
-
root - This indicates the user you’re logged in as, in this case, root. The user account root is considered the superuser, or administrator of the system. As root, you’ll have unfettered access to most of the system’s functions. But with great power comes great responsibility: it also makes it much easier to make changes that can make your board unusable.
-
beaglebone - This indicates the hostname. This is how other computers on your network refer to your BeagleBone. Later in this chapter, you’ll see how to change this in case you need something more descriptive like “toaster.”
-
~ -
This indicates the current working directory. It’s your current location in the filesystem. If you run a command to create a file without specifying another location, the file will be created in the working directory. The tilde is shorthand for the logged in user’s home directory. When you’re logged in as root on the BeagleBone, the tilde indicates the location
/root. -
# -
This is the prompt for input. It also indicates that we’re logged in as a superuser. If you were logged in as a regular user, the prompt for input would appear as a
$.
Filesystem
Just like in many other operating systems, the Linux filesystem is an organized structure of files within folders, or directories. The root of the filesystem (not to be confused with the root user) is indicated by a forward slash (/). Within the root of the filesystem, there are a few main directories, most of which are listed in Table 3-1.
bin | Programs and commands for users |
boot | Files needed at boot time |
dev | Files that represent devices on your system |
etc | Configuration files |
home | User home directories |
lib | System libraries and drivers |
media | Location of removable media such as USB flash drives and microSD cards |
proc | Files that represent information about your system |
root | Root’s home directory |
sbin | System maintenance programs |
sys | Files for accessing the BeagleBone’s hardware |
tmp | Temporary files |
usr | Programs available for all users |
var | System log files |
Let’s start using the command line now to explore the Linux filesystem on the BeagleBone. The first command you’ll learn is pwd, which stands for print working directory. It tells you where you are in the filesystem.
root@beaglebone:~# pwd
/root
This indicates that you’re in the directory named root, which is contained in the home directory, which is in the root of the filesystem. This particular location is the root user’s home folder. In most cases, this is where you’ll put projects that you work on as the root user.
Changing Directories
Let’s say you want to change the working directory to the root of the filesystem. You can use the cd command:
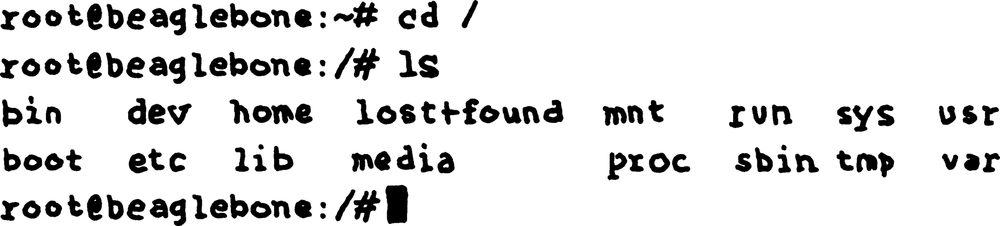
root@beaglebone:~# cd /
root@beaglebone:/#
Did you notice that subtle change in the command line prompt? Instead of a tilde, there’s now a forward slash, which indicates we’ve changed from the home directory to the root of the filesystem. To be sure, we can always execute pwd again:
root@beaglebone:/# pwd
/
Note
Because the tilde is shorthand for your home directory, you’ll only see it when you’re in your home directory or in one of its subdirectories. Otherwise, you’ll see what’s known as the absolute path, which starts with /, the root of the filesystem.
To change to the current directory’s parent, use cd ..:
root@beaglebone:/#cd ~root@beaglebone:~#pwd/root root@beaglebone:~#cd ..root@beaglebone:/#pwd/
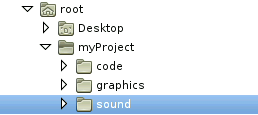
The .. notation can also be used when typing out paths. For instance, if you were in the hypothetical path /root/myProject/sound shown in the directory structure in Figure 3-1, you could change to /root/myProject/sound by typing cd ../code.
Listing the Contents of Directories
And now that you’re in the root of the filesystem, list the contents of the current working directory, with the command ls:
root@beaglebone:/# ls
bin   dev  home  lost+found  mnt  proc  run   selinux  sys  usr
boot  etc  lib   media       opt  root  sbin  srv      tmp  var
Now you can see all the directories explained in Table 3-1 (plus a few others). If you’re interested in even more information about the contents of the current working directory, you can add the -l option to the ls command to display them in long format:
root@beaglebone:/# ls -l
total 76
drwxr-xr-x   2 root root  4096 Apr 23 20:35 bin
drwxr-xr-x   3 root root  4096 Apr 23 20:35 boot
drwxr-xr-x  14 root root  3620 Apr 23 20:58 dev
drwxr-xr-x 103 root root  4096 Apr 23 20:58 etc
drwxr-xr-x   3 root root  4096 Apr 23 20:57 home
drwxr-xr-x  15 root root  4096 Apr 11 01:41 lib
drwx------   2 root root 16384 Apr 23 20:21 lost+found
drwxr-xr-x   2 root root  4096 Apr 23 20:20 media
drwxr-xr-x   2 root root  4096 Feb  3 10:24 mnt
drwxr-xr-x   5 root root  4096 Apr 23 20:35 opt
dr-xr-xr-x 115 root root     0 Jan  1  1970 proc
drwx------   3 root root  4096 Apr 23 20:28 root
drwxr-xr-x  23 root root   740 Apr 23 20:58 run
drwxr-xr-x   2 root root  4096 Apr 23 20:40 sbin
drwxr-xr-x   2 root root  4096 Jun 10  2012 selinux
drwxr-xr-x   2 root root  4096 Apr 23 20:14 srv
dr-xr-xr-x  12 root root     0 Apr 23 20:57 sys
drwxrwxrwt   8 root root  4096 Jul 21 15:17 tmp
drwxr-xr-x  10 root root  4096 Feb 21 04:24 usr
drwxr-xr-x  12 root root  4096 Apr 23 20:34 var
This listing gives a more complete picture, showing the permissions, owner, size, and date modified for each file or directory. Next, you’re going to create some files and directories, so let’s go back into the root account’s home directory:
root@beaglebone:/# cd /root
root@beaglebone:~#
More Shortcuts Home
In the preceding example, you typed out the path to change the working directory to the root account’s home directory, but there are a couple shortcuts that can take you there much more quickly.
The tilde always refers to the logged in user’s home directory, so typing cd ~ will also return you to your home directory. And if that’s too much to type, entering cd alone on the command line will also take you home.
Creating Files and Directories
Use the command mkdir to create a new directory:
root@beaglebone:~# mkdir myProject
Change to the newly created directory:
root@beaglebone:~# cd myProject
root@beaglebone:~/myProject#
If you want to create a new file and store some text in it, you can do all that with one command:
root@beaglebone:~/myProject# echo 'Hello, world!' > hello.txt
The job of the command echo is to output to the terminal whatever text follows the command. We use the greater than sign to redirect that output to the file hello.txt, which will be created if it doesn’t already exist.
Warning
If hello.txt already exists, you’ll overwrite it, so be careful using the redirection symbol.
Now if you list the contents of myProject, you’ll see your new file in the listing:
root@beaglebone:~/myProject# ls
hello.txt
To see the contents of the file, you can use the command cat:
root@beaglebone:~/myProject# cat hello.txt
Hello, world!
If you want to append text to the end of a file, the command you type will look like this:
root@beaglebone:~/myProject# echo 'What a beautiful day!' >> hello.txt
Be sure you use two greater than signs, which means to append the output from echo to the end of the file. To see the results, use cat again:
root@beaglebone:~/myProject# cat hello.txt
Hello, world!
What a beautiful day!
Although we’re using cat to display the contents of the file, cat’s main function is to concatenate files. In other words, it will take a series of files and appends one after the other. To try that out, first make a few file:
root@beaglebone:~/myProject# echo 'See you real soon!' > bye.txt
Now let’s use cat to join hello.txt to bye.txt to create a new file called greetings.txt:
root@beaglebone:~/myProject# cat hello.txt bye.txt > greetings.txt
Now when you output the content of greetings.txt, you’ll see the content copied from the first two files:
root@beaglebone:~/myProject# cat greetings.txt
Hello, world!
What a beautiful day!
See you real soon!
All these command line tools can make it fairly easy to work with files, but sometimes you might just want to get inside a file to view and edit its contents. For that, I recommend the text editor nano. To open your file in nano, simply type nano followed by the file you want to open.
root@beaglebone:~/myProject# nano greetings.txt
Within nano, you can use your arrow keys to move the cursor around to delete and insert text. To save, type Control-O and to exit, type Control-X. Nano can do a lot of stuff including searching, clipboard operations, and spell check. To view the help information within nano, type Control-G.
Of course, you can also create new files with nano. Just type the name of the file you want to create after the nano command and that file will be written when you save within nano.
Copying, Moving, and Renaming Files
Copying and moving files around from the command line is fairly straightforward. To try it out, create a new directory called archive inside ~/myProject:
root@beaglebone:~/myProject# mkdir archive
To copy a file into the archive directory, use the command cp followed by the name of the file you want to copy and then its destination:
root@beaglebone:~/myProject# cp hello.txt archive
Now try moving a file with the mv command. It’s used the same way as cp, except of course it moves the file instead of copying it.
root@beaglebone:~/myProject# mv bye.txt archive
You can also use mv to rename a file but keep it in the same spot. Here’s how to rename greetings.txt to salutations.txt:
root@beaglebone:~/myProject# mv greetings.txt salutations.txt
Deleting Files and Directories
Use the command rm to delete files.
root@beaglebone:~/myProject# rm salutations.txt
If you want to delete an entire directory and its contents, use rm with the option -r. Be careful when using this since there’s no way to undelete!
root@beaglebone:~/myProject# rm -r archive
Setup
Just like with any computer, there are settings on the BeagleBone that you may want to tinker with to suit your preferences. You’re not required to do any of this, but it may come in handy for some projects.
Date and Time
Most computers have a real time clock, a piece of hardware that keeps track of the date and time. RTCs frequently have a battery backup so that they can keep time even when there’s no power supplied to the computer. Although the BeagleBone doesn’t have an RTC, whenever it’s connected to the Internet, it will attempt to set the time. To see what time the BeagleBone thinks it is, try running the date command:
root@beaglebone:~# date
Mon Jul 21 15:36:39 UTC 2014
Note that the timezone is set to UTC. If this isn’t your timezone, you’ll need to do is set your timezone. Type the command dpkg-reconfigure tzdata, and select your timezone from the menu that appears. For example, if you are in San Francisco, you’d choose US→Pacific Ocean. You could also have chosen America and picked your city or, if it doesn’t appear, another city in your timezone.
Software Installation, Updates
If your BeagleBone has a connection to the Internet, you can easily install or upgrade software and code libraries. The software comes in packages and Debian uses the utility apt-get to manage the process of installing and updating packages.
apt keeps a list of available package versions within the BeagleBone’s filesystem, so it’s important to update this list before attempting to install or update software. To update the list of available packages, simply execute:
root@beaglebone:~# apt-get update
You’ll see some text scroll by as it downloads all the latest listings. If you want to update the software, the apt-get command upgrade will upgrade all of your installed packages if there are new versions available. Depending on how many software packages have been upgraded since the release of the software you’re running, this process may take a very long time (a few hours, even):
root@beaglebone:~# apt-get upgrade
If there’s a particular piece of software or code library that you want to install, you can also install it by name using apt-get. To install the unzip utility for uncompressing ZIP files at the command line, you would type:
root@beaglebone:~# apt-get install unzip
Changing the Hostname
By default, your BeagleBone identifies itself with the hostname beaglebone on your network so that you can access it via the web with http://beaglebone.local or SSH with ssh [email protected]. (On some networks, you might need to use beaglebone.home.) In most cases, you won’t need to change this, but if you start to use many BeagleBones on the same network, you’ll want to distinguish one from another.
To edit the hostname, execute the following, keeping in mind that the hostname can only contain letters, numbers, or a hyphen. It cannot contain any other characters such as $, #, or a space:
root@beaglebone:~# echo 'your-hostname' > /etc/hostname
So that your BeagleBone recognizes its own hostname as itself, you’ll also want to edit the hosts file as well:
root@beaglebone:~# nano /etc/hosts
Change the line that says 127.0.0.1 beaglebone, replacing beaglebone with your hostname. After you save the file and quit nano, you need to reboot your BeagleBone. After you log in again, you should see your custom hostname in the prompt.
Setting a Password
By default, there’s no password set for the user root in the Linux images provided by BeagleBoard.org. If you exclusively use the BeagleBone via USB or on your own private network, you don’t need to set one, but it’s probably a good idea to set a unique password if you use the BeagleBone on a network that you share with others.
To set or change the password, use the command passwd:
root@xively-box:~#passwdEnter new UNIX password:[hidden]Retype new UNIX password:[hidden]passwd: password updated successfully
Shutting Down
Disconnecting the power or resetting the BeagleBone without properly shutting it down can corrupt data and cause problems with your operating system. To shut down the BeagleBone properly, issue the following command:
root@beaglebone:~# shutdown -h now
You’ll know when it’s safe to disconnect the power when the user LEDs stop blinking and the power LED next to the DC barrel jack connector turns off. The board will turn back on when you reconnect it to power. If you just want to reboot the board, use the reboot command.
root@beaglebone:~# reboot