3
BUILDING QUICKLY AND TRAVELING FAR WITH MATH

In Chapter 2, you learned how to create a variable and change its value. In this chapter, you’ll learn how to use math in Python to generate any block you want and quickly build complex structures in your Minecraft world. You’ll even give yourself superpowers to make the player super jump!
EXPRESSIONS AND STATEMENTS
When you’re having a conversation with someone, you want them to understand what you’re telling them. You use short phrases, such as “three diamonds” or “behind a tree,” to give information to the person you’re talking to. However, the phrases don’t make sense on their own unless they’re combined into sentences, such as “I found three diamonds behind a tree.”
Python programming has concepts similar to phrases and sentences, which are called expressions and statements.
You can combine values, variables, and operators to create small pieces of code called expressions, like 2 + 2. Expressions can be combined into statements, which you learned about in Chapter 2. Statements are single lines or short blocks of code that do something in a program, such as zombies = 2 + 2. In this example, 2 + 2 is an expression and is part of the statement zombies = 2 + 2.
For longer programs that use a text editor instead of the Python shell, be sure to write entire statements. For example, the Python shell and a program written in a text editor will treat the expression 2 + 2 entirely differently. When you’re using the Python shell in IDLE, Python will output 4 as the result of 2 + 2, as shown here:
>>> 2 + 2
4
However, when you’re using a text editor, Python won’t do anything with the expression because it’s not part of a complete statement. To turn this expression into a complete statement, you could assign its value to a variable, like this:
zombies = 2 + 2
Then print that variable to see its value:
print(zombies)
When you run this code, it will print 4.
Again, when writing programs in the text editor, it’s very important that you use full statements, not just expressions.
OPERATORS
In math, operators are used to alter and combine numbers. For example, the addition operator lets you add two (or more) numbers, and the subtraction operator is used to subtract one number from another.
Python uses all the basic math operators that you already know—addition, subtraction, multiplication, and division—as well as more advanced operators, like exponents. Let’s start with addition.
ADDITION
In Python, addition looks like you would normally write it using the plus sign (+). For example, if you have two flowers and you pick two more, you could describe that with a statement using addition:
>>> flowers = 2 + 2
Python works out the result of the expression on the right side of the equal sign and then assigns it to the variable on the left. In this case, the result of the expression on the right is 4. For the rest of the time that this particular code is in use, the variable flowers will have a value of 4.
You can use addition in Minecraft to build things in the blink of an eye. Are you ready for your next mission? Let’s get started!
MISSION #5: STACK BLOCKS
You can use the setBlock() function to create and place a block in Minecraft. Just like setPos() and setTilePos(), setBlock() takes x-, y-, and z-coordinates as arguments, but it also needs a fourth value: the block type. This value identifies the kind of block you want to place in the game.
Whether it’s grass, lava, melon, or any other block, each type is represented by a specific integer. For example, grass is 2, empty air is 0, water is 8, and melon is 103. For a full list of blocks and their integer values, see “Block ID Cheat Sheet” on page 283.
To use setBlock(), pass values for the x-, y-, and z-coordinates and the integer representing the block type to the function, separated by commas. For example, let’s place a melon block (type 103) at coordinates (6, 5, 28):
from mcpi.minecraft import Minecraft
mc = Minecraft.create()
mc.setBlock(6, 5, 28, 103)
After the first two familiar lines that you’ll see in all Minecraft Python programs, just call setBlock() with all the values you want to use. You can also use variables instead of numbers to get the same effect, as shown in Listing 3-1.
blockStack.py
from mcpi.minecraft import Minecraft
mc = Minecraft.create()
x = 6
y = 5
z = 28
blockType = 103
mc.setBlock(x, y, z, blockType)
Listing 3-1: A program to create a melon block
First, create variables to represent the block coordinates (x, y, and z) and type (blockType). Then, pass all the variables to the setBlock() function, and the Minecraft Python API works its magic. Now you can use those variables again anywhere in your program, and if you decide to change their values later, you only have to change them in one place.
When you combine this code with math operators, you can do some pretty cool things. Let’s create a stack of blocks.
Create a new folder called math within the Minecraft Python folder. Open IDLE and create a blank program using IDLE’s text editor. Save this file as blockStack.py in the math folder. Copy the code from Listing 3-1 into your editor and add the two lines from Listing 3-2 to stack another melon block on top of the one you just set.
blockStack.py
➊ y = y + 1
➋ mc.setBlock(x, y, z, blockType)
Listing 3-2: Extra code to stack a second melon block on top of the first melon
You’re adding 1 to the value of y ➊, and you’re using the setBlock() function to create another new block ➋. By increasing the value of y by 1, the second block is placed higher on the y-axis than the first block, so the second block is stacked on top of the first one.
From here, your mission is to add two more blocks to the stack. Try modifying your blockStack.py program so it stacks four blocks instead of two! When you run your program, a stack of four melon blocks should appear, as shown in Figure 3-1.

Figure 3-1: I’ve made a stack of melon blocks.
HINT
To add a second block on top of the first, we increased the y variable by 1 and then used the setBlock() function again. What do you think would happen if you reused these two statements at the end of your program? What if you used them three times? Would this be a solution for creating a stack of four blocks?
MISSION #6: SUPER JUMP
In Chapter 2, you learned how to change the player’s location. Let’s take that skill one step further and send the player high into the air using the power of addition. First, find out where the player is by calling getTilePos(), as shown in Listing 3-3.
superJump.py
from mcpi.minecraft import Minecraft
mc = Minecraft.create()
position = mc.player.getTilePos()
x = position.x
y = position.y
z = position.z
Listing 3-3: Code to find the player’s position
The dot between the position variable and the x, y, and z is called dot notation. Dot notation is used by certain variables and functions, such as all of the functions you use in the Minecraft Python API (for example, mc.setTilePos()). You’ll learn more about dot notation in Chapters 11 and 12.
Once you have the player’s position, you can set the x, y, and z variables to the player’s current coordinates, which are represented by position.x, position.y, and position.z. You can then teleport the player anywhere you want in relation to the current coordinates, as shown in Listing 3-4.
superJump.py
x = x + 5
mc.player.setTilePos(x, y, z)
Listing 3-4: Code to move the player’s x position up by 5 blocks
Here, I’ve transported the player 5 blocks along the x-axis, but this isn’t that special: you can move the player around horizontally any time you want in Minecraft. Let’s give the player a super jump instead!
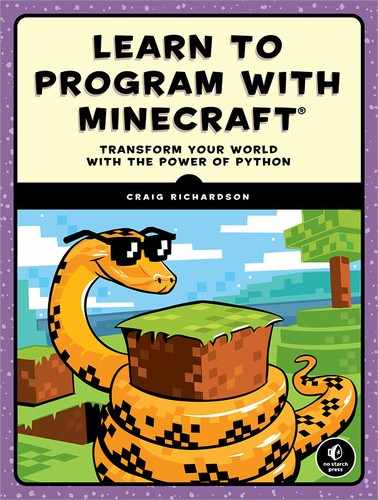
Your mission is to make the player jump 10 blocks into the air above their current position. You should be able to do this using the code in Listings 3-3 and 3-4 but with some slight differences. Copy the code in Listings 3-3 and 3-4 into IDLE, save it as superJump.py, and change the y variable in a similar way to how I changed the x variable. When you run the program, the player should jump into the air, as in Figure 3-2.
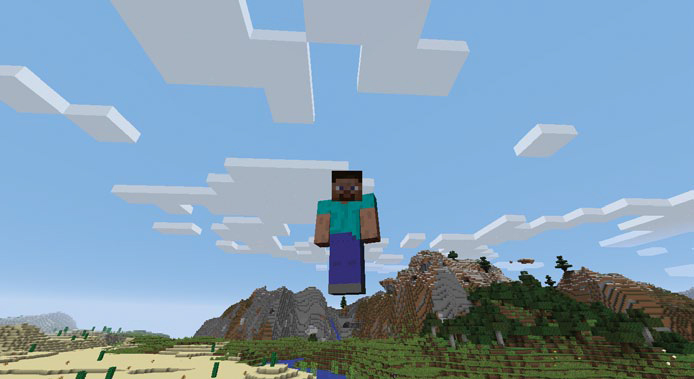
Figure 3-2: Here’s the super jump in action!
SUBTRACTION
Python handles subtraction similarly to how it handles addition. Let’s say you’re out exploring a cave, a spider attacks you, and you lose some health:
health = 20
health = health - 2
The value of health in the statement is now 18. Just as with the addition operation, Python works out the result of the operation on the right of the equal sign and sets the variable to that value.
Let’s have some fun with subtraction in Minecraft!
MISSION #7: CHANGE THE BLOCKS UNDER YOU
Have you ever wanted to set a trap for someone in Minecraft? Imagine the ground beneath the player suddenly changing to lava when they least expect it. You can use Python to make your wish come true. Using subtraction, you can place blocks below the player’s current position. In fact, it takes only a few lines of code to place any block you want directly below the player!
In this mission, you’ll change the block underneath the player to lava using getTilePos() and setBlock(). But this is a dangerous mission, so be careful when testing it: if you don’t move the player to a new position quickly enough, they might fall into the lava!
The program in Listing 3-5 creates a block at the player’s current position. Copy this code into a new file in IDLE and save it as blockBelow.py. Then, using your knowledge of the subtraction operator, change the code so it places a lava block directly below the player’s feet, as shown in Figure 3-3.
from mcpi.minecraft import Minecraft
mc = Minecraft.create()
pos = mc.player.getTilePos()
x = pos.x
y = pos.y
z = pos.z
blockType = 10
mc.setBlock(x, y, z, blockType)
Listing 3-5: This code places a block at the player’s current location.
Notice that I’ve named the variable that stores the player’s position pos. I chose this name because I use this variable a lot, it’s easy to understand what the name means, and it’s shorter and faster to type than position.
The y-coordinate determines how high or low a block is. Your mission is to figure out how to change the y variable to place a block below the player.
Figure 3-3: After the block below me changed, I fell into the lava.
USING MATH OPERATORS IN ARGUMENTS
When you use a function, such as setBlock() or setTilePos(), you give the function arguments, which specify the values you want the function to use when it runs.
So far, you’ve been introduced to the addition and subtraction operators. You can use these operators inside a function’s parentheses to set the values of arguments. Let’s revisit the stacking blocks in Mission #5 (page 49). We can use the addition operator inside the parentheses of the setBlock() function, as shown in Listing 3-6, and it will add two values together within the parentheses without the need for an extra statement.
blockStack1.py
from mcpi.minecraft import Minecraft
mc = Minecraft.create()
x = 6
y = 5
z = 28
blockType = 103
mc.setBlock(x, y, z, blockType)
➊ mc.setBlock(x, y + 1, z, blockType)
Listing 3-6: The block stacking program with an operator in the arguments
Listing 3-6 is the almost same as the stacking blocks program. However, it uses the addition operator in the setBlock() function’s parentheses instead of in a separate statement. The last line uses y + 1 as an argument in the function ➊. Although the value of this argument is 6 (5 + 1), the value of the y variable is still 5. The argument lets you add to the y variable without actually changing its value, which is useful if you want to use y again somewhere else in your code.
You can also add two variables together and use them as a single argument. Listing 3-7 is the same as Listing 3-6, but an extra variable named up determines the distance the new block will be placed on the y-axis.
blockStack2.py
from mcpi.minecraft import Minecraft
mc = Minecraft.create()
x = 6
y = 5
z = 28
blockType = 103
up = 1
mc.setBlock(x, y, z, blockType)
➊ mc.setBlock(x, y + up, z, blockType)
Listing 3-7: Another version of the stacking program that uses an addition operator in the arguments
On the last line, the y and up variables are added together ➊. As in Listing 3-6, this makes the setBlock() function’s second argument 6. Variables are useful because if you want to place the new block two blocks higher on the y-axis, all you have to do is change your code and set up to 2. You can see the effect of all three versions (Listings 3-1 and 3-2, 3-6, and 3-7) of the program in Figure 3-4.

Figure 3-4: The three versions of the program have the same effect, even though they are different.
MISSION #8: SPEED BUILDING
Usually, you spend your first day in Minecraft building a shelter. With what you’ve learned so far, you can build a simple house and spend your first night in style! The program in this mission will help you quickly generate a building’s walls, ceiling, and floor. Instead of spending lots of time placing every block by hand, you can construct the basic structure of your building in a few lines of code.
You’ve used setBlock() to create a single block, but setBlock() has a friend called setBlocks(), which creates several blocks in the shape of a cuboid. A cuboid is a 3D rectangle. A cuboid’s length, width, and height can all be different values.
The setBlocks() function lets you create many blocks in a large area. To use setBlocks(), just pass it two sets of coordinates and the block type. The first set of coordinates identifies where you want one corner of the cuboid, and the second set specifies where you want the opposite corner. Figure 3-5 shows you the corners of the cuboid, labeled with their coordinates.
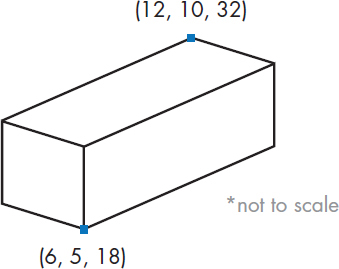
Figure 3-5: A cuboid and the coordinates used to set its dimensions
Let’s create the cuboid in Figure 3-5. As you can see in Listing 3-8, mine is made of cobblestone, but use any block type you like. Well, you can use anything except for lava, water, or air—those would give you a pretty strange house!
building.py
from mcpi.minecraft import Minecraft
mc = Minecraft.create()
➊ pos = mc.player.getPos()
x = pos.x
y = pos.y
z = pos.z
width = 10
height = 5
length = 6
➋ blockType = 4
➌ air = 0
mc.setBlocks(x, y, z, x + width, y + height, z + length, blockType)
Listing 3-8: Code that builds a cuboid of blocks
Notice that I’ve used getPos() ➊ instead of getTilePos(). The getPos() function is the same as the getTilePos() function, but it returns the coordinates as three floats instead of three integers.
The width, height, and length of this cuboid are 10, 5, and 6 respectively, and I’ve used a block ID of 4 to generate cobblestone ➋. You can see the finished building in Figure 3-6.
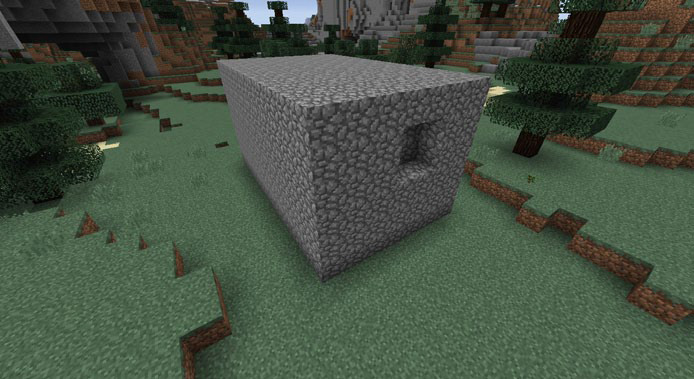
Figure 3-6: The building that the program creates
However, the house has a slight problem: it’s completely solid! After I ran the program, I punched a hole in the side of the building so you can see that it’s solid in the center. This cuboid is a great start, though, and now you’ll be in charge of hollowing it out so the player can actually go inside.
Your mission is to change the program to create a building with walls, a ceiling, and a floor at the player’s position. To accomplish this, you’ll create a cuboid made of air inside the solid cuboid you just made. The two cuboids together should produce an empty box. You can see the result of the finished program in Figure 3-7. I’ve created a hole in the side so you can see the hollow center.
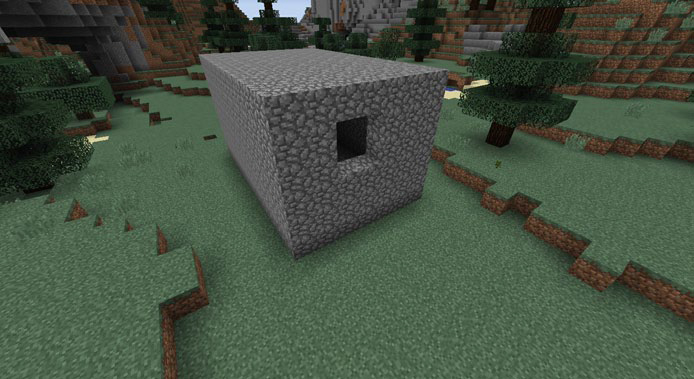
Figure 3-7: When your program is finished, it should create a hollow cuboid. A cuboid is perfect for creating buildings quickly!
Listing 3-8 already includes a variable called air ➌, which you can use to set the blocks inside the building to air. Copy Listing 3-8 into IDLE, save it as building.py, and adapt it to create a second cuboid made of air. You’ll need to add an extra setBlocks() function on the last line to create this air cuboid. The air cuboid should be one block inside the walls all the way around, which is what you need to figure out how to do using addition and subtraction. Be patient: if your first try doesn’t work, try something else!
HINT
To create the air cuboid one block inside the walls, you can use the addition and subtraction operators. Create the air cuboid using setBlocks() and increase the first x, y, and z arguments by 1. Then subtract 1 from the x + width, y + height, and z + length arguments.
MULTIPLICATION
In Python code, multiplication looks slightly different from what you’re probably used to seeing. Instead of writing an × to multiply two numbers, you use an asterisk (*). But other than the symbol, multiplication works the same as usual. The expression 2 * 2 equals 4, just like 2 × 2.
Imagine there are four trees outside your Minecraft house, and suddenly the number of trees doubles. You can represent this calculation in Python like this:
trees = 4
trees = trees * 2
The value of trees in this example is 8, which is 4 multiplied by 2.
DIVISION
In Python, division is represented by a forward slash (/) instead of the ÷ symbol.
The division operator divides one value by another. Just put the number that you want to divide on the left side of the forward slash (/) and the number you want to divide by on the right.
Let’s say eight skeletons are outside your Minecraft fortress, but half of them walk away. To find out how many are left, you would divide 8 by 2. Here’s how you’d represent this using a division operator in Python:
skeletons = 8
skeletons = skeletons / 2
Now just 4 skeletons are outside your fortress. Phew! Let’s try out these two operators in Minecraft.
MISSION #9: SPECTACULAR SPIRES
One strength of variables is that you can change the value of a single variable, and its value will change everywhere the variable appears in the program. You can make a program do totally different things just by changing a single variable using math operators, like multiplication and division.
In this mission, you’ll discover how to use division and multiplication to build a very tall, thin tower, also called a spire.
Figure 3-8 shows what the spire will look like when the program is finished.
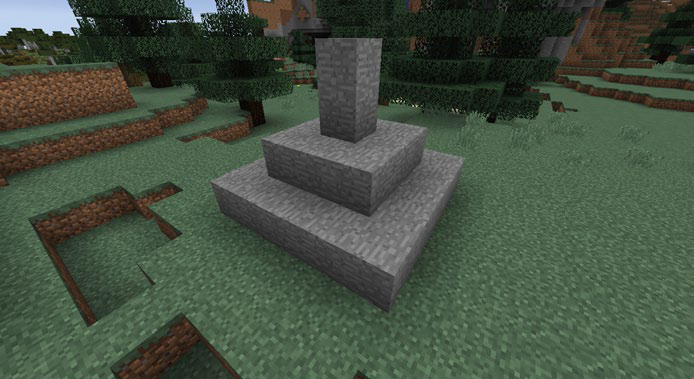
Figure 3-8: A spire created from stone blocks
The program will use a single variable to set the spire’s height. Using multiplication and division, you’ll set different spire heights.
In Listing 3-9, I’ve started the program that creates the spire, but I haven’t used the height variable or math operators to set the height of each part.
spire.py
from mcpi.minecraft import Minecraft
mc = Minecraft.create()
pos = mc.player.getTilePos()
x = pos.x
y = pos.y
z = pos.z
height = 2
blockType = 1
# Spire sides: should be same as height
sideHeight = height
mc.setBlocks(x + 1, y, z + 1, x + 3, y + sideHeight - 1, z + 3, blockType)
# Spire point: should be two times the height
➊ pointHeight = 4
mc.setBlocks(x + 2, y, z + 2, x + 2, y + pointHeight - 1, z + 2, blockType)
# Spire base: should be half the height
➋ baseHeight = 1
mc.setBlocks(x, y, z, x + 4, y + baseHeight - 1, z + 4, blockType)
Listing 3-9: The spire-building program
Copy Listing 3-9 into a new file in IDLE and save it as spire.py in the math folder. This program will create a spire, but changing the height variable and rerunning the program won’t affect the height of all parts of the spire.
To fix this program so all parts of the spire’s height change when you change the height variable, you need to change the pointHeight ➊ and baseHeight ➋ variables to include expressions that use the height variable and multiplication or division operators. You want pointHeight to be twice the size of height and baseHeight to be half the size of height. For example, if I wanted the spire point to be three times the height of the spire sides, I would change the code to pointHeight = height * 3 and baseHeight = height / 2.
After you’ve made these changes, when you change the height variable, all the spire’s parts will change size.
You don’t need to change any other parts of the program.
You can test the program by changing the original height variable and rerunning it. If you change the height variable to 3, your spire will look like Figure 3-9.

Figure 3-9: You can make the spire taller just by changing the height variable.
Because you use the height variable to set the values for pointHeight and baseHeight, it’s very easy to change the spire. Play around with this code by changing the original height variable to a few different numbers. Rerun the program each time to see what happens!
EXPONENTS
You can use an exponent to show that a number should be multiplied by itself a certain number of times. For example, 34 (three to the power of four) is a short way of saying 3 * 3 * 3 * 3.
In Python, ** is the exponential operator. The number you want to multiply (the base) goes on the left of the operator, and the number of times you want to multiply it by itself (the exponent) goes on the right.
Say you want to start a Minecraft farm. You need to till four plots of land. You want each plot of land to be four blocks by four blocks so you can grow lots of wheat. Mathematically, you can write this as 4 * 4 * 4, or 43. Here’s the code to work out how much wheat you’re growing:
wheat = 4 ** 3
Your answer should be 64 individual plots of wheat, because 4 * 4 is 16 and 16 * 4 is 64.
PARENTHESES AND ORDER OF OPERATIONS
When you use several math operators in one expression, you need to be careful how you arrange them. Different operators have different priority. When you’re using multiple operators, division and multiplication are evaluated first from left to right, and then addition and subtraction are calculated. Let’s look at how this expression is evaluated:
mooshroom = 5 * 2 – 1 + 4 / 2
Because multiplication and division always happen before addition and subtraction, Python starts on the left by multiplying 5 by 2 to get 10, and then divides 4 by 2 to get 2. That gives us 10 – 1 + 2. Next, Python starts back on the left by subtracting 1 from 10, and then adds 2 to that, setting mooshroom to 11.
But you can control the order of operations by using parentheses. Expressions with operators in parentheses will evaluate the operations in parentheses before anything else. Let’s look at how parentheses change the order of operations. To start, here’s a statement that doesn’t use any parentheses:
zombiePigmen = 6 * 3 - 2
Written this way, zombiePigmen ends up with a value of 16, because 6 times 3 is 18, and 18 minus 2 is 16. However, with parentheses, the result changes:
zombiePigmen = 6 * (3 - 2)
zombiePigmen now has a value of 6! Instead of following the usual order, first Python subtracts 2 from 3, which results in 1, and then multiplies 6 by 1 to get 6.
When you want a calculation to happen in a certain order, use parentheses to tell Python what to do first. This gives you even more control over Python.
HANDY MATH TRICKS
In the following sections, I’ll teach you two more math skills to level up your Python programming, and then we’ll combine what you’ve learned so far in one more mission.
SHORTHAND OPERATORS
Quite often, you’ll want to use an operator on a variable and then store the result in the same variable. For example, you might want to add five sheep to your existing herd:
sheep = 6
sheep = sheep + 5
But typing sheep = sheep + 5 will probably get tiresome after a while. Don’t worry; there’s a shorter way! Python has shorthand operators that let you use a math operator on a variable and reassign the result to the same variable. Here are the four shorthand operators:
• Addition (+=)
• Subtraction (-=)
• Multiplication (*=)
• Division (/=)
For example, you can rewrite the sheep example using the addition shorthand operator:
sheep = 6
sheep += 5
The value of sheep equals 11, just like before.
PLAYING WITH RANDOM NUMBERS
Using random numbers is one way to add some mystery and fun to your programs. You never know what you’ll end up with! Many real-world board games rely on random numbers: think about how many games you’ve played where you had to roll the dice to see how many spaces you could move. A dice roll is a classic example of random numbers in action.
Python can generate random numbers for you easily, so let’s simulate the roll of a die. The number generated should be between 1 and 6:
➊ import random
➋ diceValue = random.randint(1, 6)
When you want to create random numbers, make sure you include import random ➊ at the start of your program. The randint() ➋ function generates an integer value that the program can use just like any other number. The numbers you place inside the parentheses as arguments tell randint() to generate values between the first number and the second number. In this example, the number generated can have a value of 1, 2, 3, 4, 5, or 6.
You can use randint() to add a random number to the value of a variable, and you can even generate negative numbers. Let’s see how!
import random
score = 0
score += random.randint(0, 99)
points = random.randint(-99, 99)
The lowest number that Python can generate to add to score is 0, and the highest is 99. On the other hand, because of the negative argument, points might get set to a number as low as –99!
MISSION #10: SUPER JUMP SOMEWHERE NEW!
In this chapter’s last mission, you’ll make the player jump a random distance on the x-, y-, and z-axes by storing the player’s current position and then adding a random number to each of the three coordinates. Use the random numbers between –10 and 10 to change the x and z values, and make sure the random values for y are between 0 and 10.
To get started, copy Listing 3-10 into a new file in IDLE and save it as randomJump.py.
randomJump.py
from mcpi.minecraft import Minecraft
mc = Minecraft.create()
import random
pos = mc.player.getPos()
x = pos.x
y = pos.y
z = pos.z
➊ x = x + random.randint(-10, 10)
mc.player.setPos(x, y, z)
Listing 3-10: The incomplete random jump program
The random number generation code for the y and z variables is missing, and it’s up to you to add it. Once you do, the player will have the ability to jump anywhere, as I did in Figure 3-10. Let the randomness take you to new and exciting places!
At the moment, the code doesn’t use shorthand operators to change the values of the variables. Try changing the addition expression at ➊ to use shorthand instead.
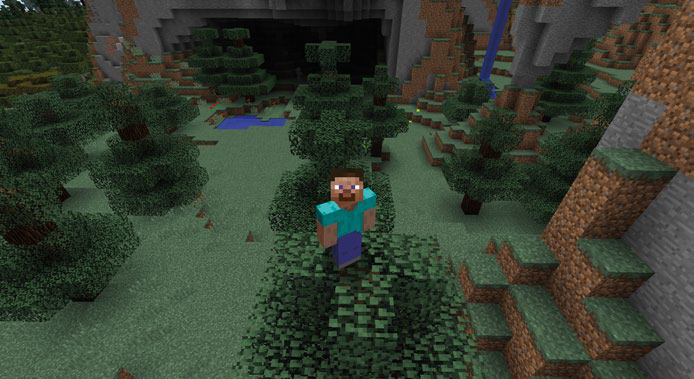
Figure 3-10: I jumped in a random direction and ended up on top of this tree. Where did you end up?
WHAT YOU LEARNED
In this chapter, you learned how to do math in Python. You’ll use addition, subtraction, multiplication, and division frequently in the Python programs in the rest of this book and in the programs that you create in the future. You’ve also learned how to generate random numbers and created some very useful programs in Minecraft along the way. Great job!
In Chapter 4, you’ll learn about the string data type in Python, which is used to contain letters, symbols, and numbers. Strings are very useful in Minecraft, because you can use them to post messages to Minecraft’s chat. You’ll also explore strings to manipulate Minecraft’s chat and do other cool things.