
![]()
Creating and Configuring a Web API Application
In this chapter, I create the example application that I use for all the chapters in this part of the book. I show you how to perform basic configuration and set up dependency injection to create loosely coupled components. In short, this chapter sets the foundation for the more detailed topics that follow so that I don’t have to create a new example application in each chapter.
That said, dependency injection for Web API applications is an interesting topic in its own right because it is an example of the kinds of problems that arise when designing applications that have Web API and MVC components that work together. Web API uses a completely different set of namespaces and types, but behind that is an evolution in design that shows up in the way that dependency injection for Web API differs from what you are used to in the MVC framework. Table 10-1 summarizes this chapter.
Table 10-1. Chapter Summary
Problem | Solution | Listing |
|---|---|---|
Configure a Web API application. | Add statements that manipulate the properties of the HttpConfiguration object in the Register method of the WebApiConfig class (which can be found in the App_Start folder). | 1–9 |
Implement dependency injection for Web API. | Implement the IDependencyResolver and IDependencyScope interfaces and register the IDependencyResolver implementation using the HttpConfiguration.DependencyResolver property. | 10–16 |
Implement shared dependency injection for Web API and MVC. | Like for Web API, but add the System.Web.Mvc.IDependencyResolver interface to the set implemented by the resolver and call the DependencyResolver.SetResolver method. | 17–20 |
Preparing the Example Project
For this chapter, I need to create a new Visual Studio project. Select New Project from the File menu to open the Visual Studio New Project dialog window, select the ASP.NET Web Application project type, and set the name to ExampleApp. Click the OK button to advance through the wizard, selecting the Empty project template and checking the options to add the core references for MVC and Web API, just as I did in Chapter 2. Click the OK button, and Visual Studio will create the new project.
After Visual Studio finishes creating the project, enter the following commands into the Package Manager Console to get the NuGet packages that are required:
Update-Package microsoft.aspnet.mvc -version 5.1.1
Update-Package microsoft.aspnet.webapi -version 5.1.1
Update-Package Newtonsoft.json -version 6.0.1
Install-Package jquery -version 2.1.0
Install-Package bootstrap -version 3.1.1
Install-Package knockoutjs –version 3.1.0
Creating the Model and Repository
My focus in this part of the book is on components that deliver web application functionality, so I need only a basic model and repository. To keep the example simple, I will create a repository that maintains a collection of data objects in memory. Listing 10-1 shows the contents of the Product.cs file that I added to the Models folder.
Listing 10-1. The Contents of the Product.cs File
namespace ExampleApp.Models {
    public class Product {
        public int ProductID { get; set; }
        public string Name { get; set; }
        public decimal Price { get; set; }
    }
}
This is a simplified version of the model class that I created for the SportsStore application in Chapter 5. Listing 10-2 shows the contents of the Repository.cs class file that I added to the Models folder.
Listing 10-2. The Contents of the Repository.cs File
using System.Collections.Generic;

namespace ExampleApp.Models {
    public class Repository {
        private Dictionary<int, Product> data;
        private static Repository repo;

        static Repository() {
            repo = new Repository();
        }

        public static Repository Current {
            get { return repo; }
        }

        public Repository() {
            Product[] products = new Product[] {
                new Product {ProductID = 1, Name = "Kayak", Price = 275M },
                new Product {ProductID = 2, Name = "Lifejacket", Price = 48.95M },
                new Product {ProductID = 3, Name = "Soccer Ball", Price = 19.50M },
                new Product {ProductID = 4, Name = "Thinking Cap", Price = 16M },
            };

            data = new Dictionary<int, Product>();

            foreach (Product prod in products) {
                data.Add(prod.ProductID, prod);
            }
        }

        public IEnumerable<Product> Products {
            get { return data.Values; }
        }

        public Product GetProduct(int id) {
            return data[id];
        }

        public Product SaveProduct(Product newProduct) {
            newProduct.ProductID = data.Keys.Count + 1;
            return data[newProduct.ProductID] = newProduct;
        }

        public Product DeleteProduct(int id) {
            Product prod = data[id];
            if (prod != null) {
                data.Remove(id);
            }
            return prod;
        }
    }
}
My example repository populates an in-memory collection with Product objects and exposes them through a mix of properties and methods. Storing the data in memory means that the contents of the repository will be reset when the application is restarted. There is a static Current property that returns a shared instance of the Repository class. I use this to get the application up and working and then remove it when I demonstrate how to set up dependency injection.
Creating an HTTP Web Service
I need a Web API controller to provide the HTTP web service for this chapter. I right-clicked the Controllers folder, selected Add ![]() Controller from the pop-up menu, and selected Web API 2 Controller – Empty from the list of controller types. I set the name to ProductsController and edited the Controllers/ProductsController.cs file that Visual Studio created to define the controller shown in Listing 10-3. After editing the file, the controller defines a single action that returns the collection of Product objects contained in the repository.
Controller from the pop-up menu, and selected Web API 2 Controller – Empty from the list of controller types. I set the name to ProductsController and edited the Controllers/ProductsController.cs file that Visual Studio created to define the controller shown in Listing 10-3. After editing the file, the controller defines a single action that returns the collection of Product objects contained in the repository.
![]() Tip By default, the action method is targeted with an HTTP GET request sent to the /api/products URL. I explain how this is handled in Chapter 22.
Tip By default, the action method is targeted with an HTTP GET request sent to the /api/products URL. I explain how this is handled in Chapter 22.
Listing 10-3. The Contents of the ProductsController.cs File
using System.Collections.Generic;
using System.Web.Http;
using ExampleApp.Models;

namespace ExampleApp.Controllers {
    public class ProductsController : ApiController {
        Repository repo;

        public ProductsController() {
            repo = Repository.Current;
        }

        public IEnumerable<Product> GetAll() {
            return repo.Products;
        }
    }
}
![]() Note The Repository object is obtained through the static Current property I added to the Repository class, which means the ProductsController and Repository classes are tightly coupled. This presents the same problems in a Web API application as it does in the MVC framework. I explain how you can use dependency injection to decouple the components later in this chapter.
Note The Repository object is obtained through the static Current property I added to the Repository class, which means the ProductsController and Repository classes are tightly coupled. This presents the same problems in a Web API application as it does in the MVC framework. I explain how you can use dependency injection to decouple the components later in this chapter.
Creating the Browser Client
I am going to create a simple browser client using the MVC framework. The client will include the initial data available in the repository and provide the user with the means to refresh that data through an Ajax request sent to the web service. I right-clicked the Controllers folder, selected Add ![]() Controller from the pop-up menu, and selected MVC 5 Controller – Empty from the list of controller types. I set the name to HomeController and edited the Controllers/HomeController.cs file that Visual Studio created to define the controller shown in Listing 10-4.
Controller from the pop-up menu, and selected MVC 5 Controller – Empty from the list of controller types. I set the name to HomeController and edited the Controllers/HomeController.cs file that Visual Studio created to define the controller shown in Listing 10-4.
![]() Note The HomeController class is tightly coupled to the Repository class in the same way that the Web API controller I defined in the previous section is. I explain how to use dependency injection to break the dependency later in the chapter.
Note The HomeController class is tightly coupled to the Repository class in the same way that the Web API controller I defined in the previous section is. I explain how to use dependency injection to break the dependency later in the chapter.
Listing 10-4. The Contents of the HomeController.cs File
using System.Web.Mvc;
using ExampleApp.Models;

namespace ExampleApp.Controllers {
    public class HomeController : Controller {
        Repository repo;

        public HomeController() {
            repo = Repository.Current;
        }

        public ActionResult Index() {
            return View(repo.Products);
        }
    }
}
I created a view for the Index action by right-clicking the method in the code editor and selecting Add View from the pop-up menu. I set the name of the view to Index and checked the option to use a layout page. Listing 10-5 shows the contents of the Views/Index.cshtml file.
Listing 10-5. The Contents of the Index.cshtml File
@model IEnumerable<ExampleApp.Models.Product>
@{ ViewBag.Title = "Index";}

@section Scripts {
    <script>
        var products = ko.observableArray(
            @Html.Raw(Newtonsoft.Json.JsonConvert.SerializeObject(Model)));
    </script>
    <script src="~/Scripts/exampleApp.js"></script>
}

<div class="panel panel-primary">
    <div class="panel-heading">RSVPs</div>
    <table id="rsvpTable" class="table table-striped">
        <thead>
            <tr><th>ID</th><th>Name</th><th>Price</th></tr>
        </thead>
        <tbody data-bind="foreach: products">
            <tr>
                <td data-bind="text: ProductID"></td>
                <td data-bind="text: Name"></td>
                <td data-bind="text: Price"></td>
            </tr>
        </tbody>
    </table>
</div>
<button data-bind="click: getProducts" class="btn btn-primary">Refresh</button>
This view contains a table element, the contents of which I manage using the Knockout techniques that I described in Chapter 3. To that end, I took the view model data and rendered it to a JavaScript array, like this:
...
<script>
    var products = ko.observableArray(
        @Html.Raw(Newtonsoft.Json.JsonConvert.SerializeObject(Model)));
</script>
...
MVC framework views that process data from HTTP web services need some way of generating HTML content from that data, and the easiest way to approach this is to adopt a single mechanism throughout the view, starting with the view model data that is rendered by Razor.
The view also contains a script element that loads the exampleApp.js file from the Scripts folder. I created this file and added the code that is shown in Listing 10-6, which contains the getProducts function that I used in the Knockout click binding on the Refresh button.
![]() Tip If you are following the examples by typing them in, then see Chapter 7 for details of how to create a _references.js file that will enable IntelliSense for JavaScript files. And don’t forget that you can download the complete source code for every chapter in this book from www.apress.com.
Tip If you are following the examples by typing them in, then see Chapter 7 for details of how to create a _references.js file that will enable IntelliSense for JavaScript files. And don’t forget that you can download the complete source code for every chapter in this book from www.apress.com.
Listing 10-6. The Contents of the exampleApp.js File
$(document).ready(function () {
    getProducts = function() {
        $.ajax("/api/products", {
            success: function (data) {
                products.removeAll();
                for (var i = 0; i < data.length; i++) {
                    products.push(data[i]);
                }
            }
        })
    };
    ko.applyBindings();
});
The exampleApp.js file defines the getProducts function, which uses jQuery to make an Ajax GET request to the /api/products URL. I have specified a success function, as described in Chapter 3, which updates the model that Knockout maintains to update the contents of the table element.
The last step is to update the Views/Shared/_Layout.cshtml file that Visual Studio created when I added a view for the Index action, as shown in Listing 10-7.
Listing 10-7. The Contents of the _Layout.cshtml File
<!DOCTYPE html>
<html>
<head>
    <meta name="viewport" content="width=device-width" />
    <script src="~/Scripts/jquery-2.1.0.min.js"></script>
    <script src="~/Scripts/jquery.validate.js"></script>
    <script src="~/Scripts/jquery.validate.unobtrusive.js"></script>
    <script src="~/Scripts/knockout-3.1.0.js"></script>
    <link href="~/Content/bootstrap.css" rel="stylesheet" />
    <link href="~/Content/bootstrap-theme.css" rel="stylesheet" />
    <title>@ViewBag.Title</title>
    <style>
        body { padding-top: 10px; }
        .validation-summary-errors { font-weight: bold; color: #f00; }
    </style>
    @RenderSection("Scripts", false)
</head>
<body class="container">
    @RenderBody()
</body>
</html>
Visual Studio adds default content that I don’t need, so I have replaced the content with a simple document that loads the JavaScript and CSS files I require and renders the Scripts and body sections of views.
Testing the Example Application
I am going to test the web service and web client separately. Start the application and request the /Home/Index URL. If the application is working, then you will see an initial snapshot of the data in the HTML that the MVC controller sends to the browser, as shown in Figure 10-1.
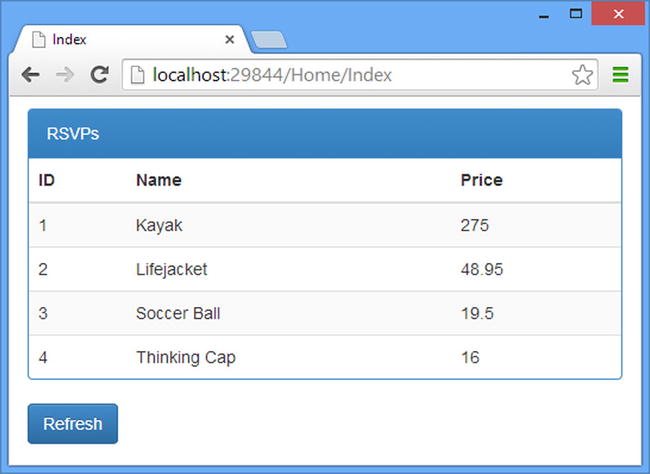
Figure 10-1. Testing the MVC client for the example application
![]() Tip The jQuery code in the exampleApp.js file handles the Refresh button click event by requesting the same data from the Web API controller, but you will need to use the F12 tools to monitor the network requests to see what’s happening because there is no visible change in the browser window.
Tip The jQuery code in the exampleApp.js file handles the Refresh button click event by requesting the same data from the Web API controller, but you will need to use the F12 tools to monitor the network requests to see what’s happening because there is no visible change in the browser window.
I am going to use Postman, which I explained how to set up in Chapter 1, to test the web service. There is only one action method defined by the Web API controller, which is targeted through the /api/products URL.
To test with Postman, I need to know what TCP port the example application will be using to listen for HTTP requests, which there are two ways to determine. The first is to select ExampleApp Properties from the Visual Studio Project menu, select the Web tab, and locate the Project URL field, as shown in Figure 10-2.
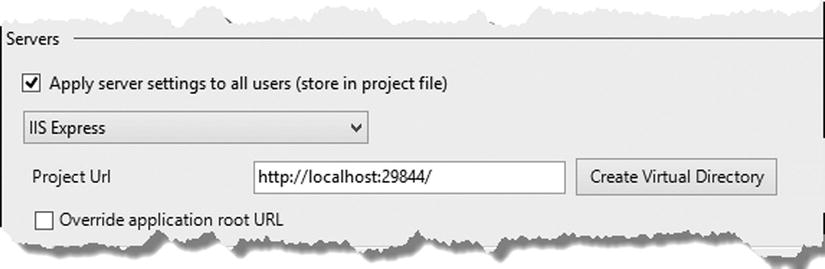
Figure 10-2. Determining the project URL using Visual Studio
The other approach is to look at the browser bar, which shows the URL that Visual Studio told the browser to request, as shown in Figure 10-3.
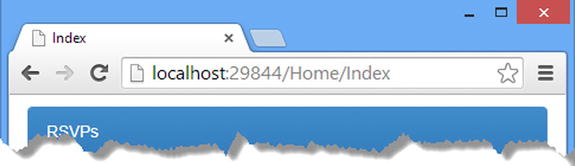
Figure 10-3. Getting the TCP port from the browser bar
As both figures show, the example application will run on port 29844 on my system, although you will have a different value. The following is the URL I need to enter into Postman is to test my example:
http://localhost:29844/api/productsUsing Postman to send a GET request to the URL produced the following result:
 [{"ProductID":1,"Name":"Kayak","Price":275.0},
 {"ProductID":2,"Name":"Lifejacket","Price":48.95},
 {"ProductID":3,"Name":"Soccer Ball","Price":19.50},
 {"ProductID":4,"Name":"Thinking Cap","Price":16.0}]
Configuring a Web API Application
It should come as no surprise that Web API applications are configured in a new and different way. In this section, I explain how Web API applications are configured and describe the classes that are used to manage the configuration process. I use these classes later in the chapter when I demonstrate the process for setting up dependency injection and throughout the rest of the book as I describe different Web API features. Table 10-2 puts Web API configuration in context.
Table 10-2. Putting Web API Configuration in Context
Question | Answer |
|---|---|
What is it? | The configuration system allows the behavior of Web API infrastructure and components to be customized. |
When should I use it? | Configuring Web API is required whenever you want to change the default behavior, including defining new routes (see Chapters 20 and 21) or setting up dependency injection (described later in this chapter). |
What do I need to know? | Web API doesn’t use the standard ASP.NET platform configuration features, such as the Web.config file. Configuration is performed in the App_Start/WebApiConfig.cs file, which is referenced from the global application class when Web API is deployed to IIS. |
Configuring Web API Through the ASP.NET Platform
When hosting Web API in IIS, either hosted locally or on Azure, the starting point for the configuration process is the Global Application Class, just as it is for the MVC framework. However, not all Web API deployment options have a global application class, and it is used only to bootstrap the configuration process. Listing 10-8 shows the contents of the Global.asax.cs file, which you can open by double-clicking the Global.asax item in Solution Explorer.
Listing 10-8. The Contents of the Global.asax.cs File
using System;
using System.Collections.Generic;
using System.Linq;
using System.Web;
using System.Web.Mvc;
using System.Web.Routing;
using System.Web.Security;
using System.Web.SessionState;
using System.Web.Http;

namespace ExampleApp {
    public class Global : HttpApplication {
        void Application_Start(object sender, EventArgs e) {
            AreaRegistration.RegisterAllAreas();
            GlobalConfiguration.Configure(WebApiConfig.Register);
            RouteConfig.RegisterRoutes(RouteTable.Routes);
        }
    }
}
The important statement is this one, which kicks off the Web API configuration process:
...
GlobalConfiguration.Configure(WebApiConfig.Register);
...
The System.Web.Http.GlobalConfiguration class provides the entry point for configuring Web API and defines the static members shown in Table 10-3.
Table 10-3. The Members Defined by the GlobalConfiguration Class
Name | Description |
|---|---|
Configuration | Returns an HttpConfiguration object that represents the Web API configuration. See Table 10-4 for details. |
DefaultHandler | Returns the HttpMessageHandler that is used to handle requests by default. See Chapter 19. |
Configure(callback) | Registers a callback method that will be invoked to configure the application. |
![]() Caution Do not add configuration statements for Web API components to the Global Application Class because it won’t be available if you deploy your web service outside of IIS or Azure. Use the WebApiConfig.cs file shown in Listing 10-9.
Caution Do not add configuration statements for Web API components to the Global Application Class because it won’t be available if you deploy your web service outside of IIS or Azure. Use the WebApiConfig.cs file shown in Listing 10-9.
Listing 10-9. The Contents of the WebApiConfig.cs File
using System;
using System.Collections.Generic;
using System.Linq;
using System.Web.Http;

namespace ExampleApp {
    public static class WebApiConfig {
        public static void Register(HttpConfiguration config) {

            config.MapHttpAttributeRoutes();

            config.Routes.MapHttpRoute(
                name: "DefaultApi",
                routeTemplate: "api/{controller}/{id}",
                defaults: new { id = RouteParameter.Optional }
            );
        }
    }
}
The Configure method allows a callback method to be specified that will be passed a System.Web.Http.HttpConfiguration object so that Web API can be configured.
![]() Tip An instance of the HttpConfiguration class is accessible throughout the application via the static GlobalConfiguration.Configuration property and through some of the Web API context objects that I described in Chapter 9.
Tip An instance of the HttpConfiguration class is accessible throughout the application via the static GlobalConfiguration.Configuration property and through some of the Web API context objects that I described in Chapter 9.
The call to the GlobalConfiguration.Configure method in the global application class calls the WebApiConfig.Register method, defined in the App_Start/WebApiConfig.cs file. Listing 10-9 shows the initial contents of the WebAPiConfig.cs file, as created by Visual Studio.
The default configuration statements in the WebApiConfig.cs file sets up the URL routing, which I describe in Chapters 20 and 21, but I’ll add additional configuration statements that set other HttpConfiguration properties throughout the book.
![]() Tip Notice that the routing configuration for Web API is kept separate from the RouteConfig.cs file used to configure routes for MVC framework and Web Forms applications.
Tip Notice that the routing configuration for Web API is kept separate from the RouteConfig.cs file used to configure routes for MVC framework and Web Forms applications.
Understanding the Configuration Object
The Web API configuration is managed through an instance of the HttpConfiguration class, which presents a series of properties that return objects that determine how Web API will handle HTTP requests. Configuring or customizing Web API means changing the value of these properties in the configuration callback method described in the previous section. The HttpConfiguration class defines the properties shown in Table 10-4.
Table 10-4. The Properties Defined by the HttpConfiguration Class
Name | Description |
|---|---|
DependencyResolver | Gets or sets the class used for dependency injection. See the “Configuring Web API Dependency Injection” section of this chapter. |
Filters | Gets or sets the request filters, which I describe in Chapters 23 and 24. |
Formatters | Gets or sets the media type formatters, which I describe in Chapters 12 and 13. |
IncludeErrorDetailPolicy | Gets or sets whether details are included in error messages. See Chapter 25. |
MessageHandlers | Gets or sets the message handlers, which I describe in Chapter 19. |
ParameterBindingRules | Gets the rules by which parameters are bound, as described in Chapter 14. |
Properties | Returns a ConcurrentDictionary<object, object> that can be used as a general property bag to coordinate the behavior of components. |
Routes | Gets the set of routes configured for the application. See Chapters 20 and 21. |
Services | Returns the Web API services, as described in Chapter 9. |
These properties—and the objects they return—define the infrastructure that Web API uses to process HTTP requests, and the table contains references to the parts of the book where I describe of them in depth. I start in the next section, where I show you how to set up an important feature: dependency injection.
![]() Tip You can also define configurations for individual controllers. See Chapter 22 for details.
Tip You can also define configurations for individual controllers. See Chapter 22 for details.
Configuring Web API Dependency Injection
In Chapter 4, I explained the importance of ensuring that web services and their clients are loosely coupled, and this is a theme that carries over to the components within the Web API application.
The controllers and the repository that I created in the example application are tightly coupled: the controllers obtain an instance of the Repository class and use its properties directly to access the data it provides access to. This is a problem for the same reasons that tightly coupled components are avoided in the MVC framework: it makes it harder to test the controller without also implicitly testing the repository, and it means that changing the repository means finding all of the references to the Repository class and replacing them, a process that is time-consuming and error-prone.
Dependency injection (DI) breaks the direct dependency between classes. A dependency injection container is configured with mappings between interfaces and implementation classes and is used by Web API to create instances of the classes it requires to handle HTTP requests. The DI container inspects the classes it has been asked to create and resolves dependencies on the interfaces it has been configured with by creating and injecting the implementation classes. In this way, I can arrange my application so that my controllers depend on the IRepository interface without any direct knowledge of which implementation class they receive in their constructor. DI allows me to change the implementation that I use or to create mock implementations for unit testing without having to make any changes to the controller class.
A WORD ABOUT DEPENDENCY INJECTION
Not everyone likes dependency injection: it can be a mind-bending topic, the tools can be difficult to master, and it is easy to end up creating objects that are disposed of too quickly or kept around too long.
There is no rule that says you must use DI in your projects. I am a fan DI, but even I don’t use it when prototyping or working on simple applications. If you are a non-DI reader, then skip the rest of this chapter and go to Chapter 11, where I start digging into the detail of Web API.
Although DI plays the same role for Web API as it does in the MVC framework, the approach required is different and a slight improvement, but there are some issues to be aware of, especially when it comes to creating instances of objects for each HTTP request. Table 10-5 puts Web API dependency injection in context.
Table 10-5. Putting Dependency Injection in Context
Question | Answer |
|---|---|
What is it? | Dependency injection allows interfaces to be used without direct knowledge of the classes that implement them, creating loosely coupled components. |
When should I use it? | You should use dependency injection in any project that you need to unit test or where you expect to make changes following deployment. |
What do I need to know? | Web API defines two interfaces to support DI but are some obstacles to implementing per-request object scopes in Web API applications without relying on the ASP.NET platform. |
Preparing for Dependency Injection
In this section, I’ll add an interface to the example application and use it to break the direct dependency so that the Web API controller can access repository functionality abstractly. I am going to focus on setting up DI for Web API first and then show you how to manage DI in an application that contains both MVC framework and Web API controllers.
I need to define an interface that the Repository class can implement and that the Products controller can depend on. To this end, I created a class file called IRepository.cs in the Models folder and used it to define the interface shown in Listing 10-10.
Listing 10-10. The Contents of the IRepository.cs File
using System.Collections.Generic;

namespace ExampleApp.Models {
    public interface IRepository {

        IEnumerable<Product> Products { get; }
        Product GetProduct(int id);
        Product SaveProduct(Product newProduct);
        Product DeleteProduct(int id);
    }
}
Having defined the interface, I can update the Repository class to implement it, as shown in Listing 10-11.
Listing 10-11. Implementing the IRepository Interface in the Repository.cs File
using System.Collections.Generic;

namespace ExampleApp.Models {
    public class Repository : IRepository {
        private Dictionary<int, Product> data;
        private static Repository repo;

        // ...statements omitted for brevity...
    }
}
The final preparatory step is to update the Web API controller so that it declared a dependency on the IRepository interface in its constructor. Listing 10-12 shows the changes I made to the Products controller.
Listing 10-12. Declaring a Dependency in the ProductsController.cs File
using System.Collections.Generic;
using System.Web.Http;
using ExampleApp.Models;

namespace ExampleApp.Controllers {
    public class ProductsController : ApiController {
        IRepository repo;

        public ProductsController(IRepository repoImpl) {
            repo = repoImpl;
        }

        public IEnumerable<Product> GetAll() {
            return repo.Products;
        }
    }
}
![]() Tip I am focusing on just the Web API controller for the moment. I’ll add DI support for the MVC Home controller in the “Configuring Dependency Injection for Web API and MVC” section.
Tip I am focusing on just the Web API controller for the moment. I’ll add DI support for the MVC Home controller in the “Configuring Dependency Injection for Web API and MVC” section.
The controller now declares a dependency on the IRepository interface in its constructor. Ninject supports a range of different ways for classes to declare dependencies, but using the constructor is the one I like to use.
Understanding the Web API Dependency Interfaces
Dependency injection in Web API is handled by the IDependencyResolver and IDependencyScope interfaces, which are defined in the System.Web.Http.Dependencies namespace. Listing 10-13 shows the definition of the IDependencyResolver interface.
Listing 10-13. The Definition of the IDependencyResolver Interface
namespace System.Web.Http.Dependencies {
    public interface IDependencyResolver : IDependencyScope {
        IDependencyScope BeginScope();
    }
}
Notice that the IDependencyResolver interface is derived from IDependencyScope; I’ll explain the effect of this in the “The Relationship Between the Dependency Interfaces” sidebar, but Listing 10-14 shows the definition of the IDependencyScope interface.
Listing 10-14. The Definition of the IDependencyScope Interface
using System.Collections.Generic;

namespace System.Web.Http.Dependencies {

    public interface IDependencyScope : IDisposable {

        object GetService(Type serviceType);
        IEnumerable<object> GetServices(Type serviceType);
    }
}
This IDependencyScope interface defines GetService and GetServices methods, which perform the same role as in the equivalents in the MVC framework. The GetService method is called when the Web API infrastructure needs a concrete type (such as a controller) or needs to use an interface for which there should be only one implementation (such as the IHttpActionInvoker interface, which I describe in Chapter 22). The GetServices method is used when the Web API infrastructure expects there to be multiple implementations of an interface, all of which are required (such as IFilter, which I describe in Chapter 23).
THE RELATIONSHIP BETWEEN THE DEPENDENCY INTERFACES
The inheritance relationship between the interfaces can be confusing, but it starts to make sense when you understand that the Web API developers were trying to make it easier to deal with the two most common dependency injection scenarios in a web application: creating objects that are used for the life of the application and creating objects that are used for a single request.
When the application starts, a single instance of the IDependencyResolver implementation object is created and kept by Web API for the life of the application, and its GetService and GetServices methods are used whenever an object is required for the Web API infrastructure. In practice, this means it is used to create a lot of objects when the application is started (filters, data formatters, and so on) and then not used again.
There is only ever one instance of the class that implements the IDependencyResolver interface. When Web API needs an object that will be used for a single request, such as a controller or a database context class, then it calls the BeginScope method of the IDependencyResolver object in order to get an implementation of the IDependencyScope interface and uses the GetService and GetServices methods to create the instances it needs. When the request has been handled and the objects that have been created are no longer required, Web API calls the Dispose method on the IDependencyScope object (because it implements IDisposable) so that the objects that have been created can be prepared for destruction.
Most DI containers support scopes, which are used to decide when to create a new instance of a class and when to reuse an existing instance. Building the per-request scopes into the dependency interfaces makes it easier to integrate DI containers into the Web API request handling process. Most DI containers rely on the System.Web.HttpContext class to support per-request object life cycles, which can be a problem with Web API because you cannot rely on the System.Web classes. It will be a while before the mainstream dependency injection containers catch up to the new Web API design, and until then, it can be slightly awkward to align container scopes to Web API scopes (as you will see in the “Implementing the Dependency Interfaces” section).
Installing the Dependency Injection Container
Many dependency injection containers are available, and it is worth looking at a few before making a decision. Popular choices include StructureMap, Castle Windsor, and Unity, which comes from Microsoft.
The DI container that I always return to in my projects and my books is Ninject, which I described in Pro ASP.NET MVC 5. I like its simple and fluent API, and I have yet to encounter a problem that wasn’t easily solved. You don’t have to use Ninject in your own projects, of course, and the techniques that I describe in this chapter apply equally to any DI container package.
Ninject, like all of the major DI containers, is available as a NuGet package. To install Ninject, I entered the following commands into the Visual Studio Package Manager Console window:
Install-Package Ninject -version 3.0.1.10
Install-Package Ninject.Extensions.ChildKernel -Version 3.0.0.5
Implementing the Dependency Interfaces
Ninject makes it easy to support the two Web API resolution interfaces, and although it may seem odd, the easiest way to do so is by creating a single class. I created an Infrastructure folder and added a class file called NinjectResolver.cs to it, the contents of which are shown in Listing 10-15.
Listing 10-15. The Contents of the NinjectResolver.cs File
using System;
using System.Collections.Generic;
using System.Web.Http.Dependencies;
using ExampleApp.Models;
using Ninject;
using Ninject.Extensions.ChildKernel;

namespace ExampleApp.Infrastructure {

    public class NinjectResolver : IDependencyResolver {
        private IKernel kernel;

        public NinjectResolver() : this (new StandardKernel()) {}

        public NinjectResolver(IKernel ninjectKernel, bool scope = false) {
            kernel = ninjectKernel;
            if (!scope) {
                AddBindings(kernel);
            }
        }

        public IDependencyScope BeginScope() {
            return new NinjectResolver(AddRequestBindings(
                new ChildKernel(kernel)), true);
        }

        public object GetService(Type serviceType) {
            return kernel.TryGet(serviceType);
        }

        public IEnumerable<object> GetServices(Type serviceType) {
            return kernel.GetAll(serviceType);
        }

        public void Dispose() {
            // do nothing
        }

        private void AddBindings(IKernel kernel) {
            // singleton and transient bindings go here
        }

        private IKernel AddRequestBindings(IKernel kernel) {
            kernel.Bind<IRepository>().To<Repository>().InSingletonScope();
            return kernel;
        }
    }
}
UNDERSTANDING OBJECT SCOPES
When working with dependency injection in web applications, there are three types of objects you need to create: singleton objects, request objects, and transient objects.
Singleton objects are instantiated the first time they are required, and all classes that depend on them share the same instance. As the same suggests, there is a single instance in the application. If my Repository class in the example application were configured as a singleton, then only one instance would be created, and every Products controller object that was created would receive that instance to satisfy its dependency on the IRepository interface. Singleton objects have to be written to deal with their long life and the need to protect their state against multiple concurrent callers.
Transient objects are instantiated every time there is a dependency on them. If my Repository class were configured as a transient, a new instance would be created each time a Products controller was created. Transient objects are not reused by the dependency injection container, and their life is generally tied to the life of the object they are injected into.
Request objects are somewhere in the middle. A new instance is created for each request that the web application receives and is reused to resolve dependencies declared by all of the objects created by the Web API infrastructure to process that request. Or, to put it another way, the objects created to process a single request share a single instance of the request object. The request object is discarded after the request has been handled.
Repository classes are usually configured as request objects, which allows all of the objects that deal with a single request to share a common view of the model, and all see the changes that the request causes. And, since just about every Web API and MVC framework application has a repository, supporting request objects is an important feature.
Each of these object types is configured by creating a dependency injection scope. I explain how to create each kind of scope using Ninject later in the chapter.
![]() Caution A number of NuGet packages extend Ninject in order to integrate the DI functionality into different environments. As I write this, there are several that are aimed at ASP.NET Web API, but they all assume you will be deploying your application to IIS, and they rely on the ASP.NET platform module feature to manage per-request object life cycles. The class shown in Listing 10-15 supports Web API dependency injection without relying on the ASP.NET platform, so you can deploy your web service freely. See the “Configuring Dependency Injection for Web API and MVC” section for sharing DI between Web API and MVC framework components, where relying on the ASP.NET platform can be an acceptable compromise.
Caution A number of NuGet packages extend Ninject in order to integrate the DI functionality into different environments. As I write this, there are several that are aimed at ASP.NET Web API, but they all assume you will be deploying your application to IIS, and they rely on the ASP.NET platform module feature to manage per-request object life cycles. The class shown in Listing 10-15 supports Web API dependency injection without relying on the ASP.NET platform, so you can deploy your web service freely. See the “Configuring Dependency Injection for Web API and MVC” section for sharing DI between Web API and MVC framework components, where relying on the ASP.NET platform can be an acceptable compromise.
This class acts as the touch point between Web API and Ninject. It implements both of the Web API dependency interfaces (NinjectResolver implements IDependencyResolver, which is derived from IDependencyScope) and responds to the BeginScope method by creating a child kernel, which allows me to use Ninject to create objects scopes for each request. There is only one dependency mapping in the example application, which I set up as follows:
...
kernel.Bind<IRepository>().To<Repository>().InSingletonScope();
...
I have highlighted the three important parts of the statement. The generic type parameter for the Bind method specifies the interface that I want to configure, which is IRepository in this case. The generic type parameter for the To method specifies the implementation class that Ninject should use to resolve dependencies on the interface, which is the Repository class in this example.
The final part of the mapping statement is a call to the InSingletonScope method, which specifies the scope for the instances of the class that are created to resolve dependencies on the interface.
This is where things get a little confusing because of the way that the NinjectResolver class works: I create a request scope by creating a child kernel for each request and creating a singleton scope on the child kernel, ensuring that there is only one instance of the object created for each request.
![]() Tip Don’t worry if this doesn’t make immediate sense because it is an implementation detail specific to one dependency injection container. You can use the NinjectResolver class as-is in your projects, just as long as you follow the instructions in Table 10-6.
Tip Don’t worry if this doesn’t make immediate sense because it is an implementation detail specific to one dependency injection container. You can use the NinjectResolver class as-is in your projects, just as long as you follow the instructions in Table 10-6.
Table 10-6. Creating Web API Object Scopes with Ninject
Scope | Method | Example |
|---|---|---|
Singleton | AddBindings | kernel.Bind<IRepository>().To<Repository>().InSingletonScope(); |
Request | AddRequestBindings | kernel.Bind<IRepository>().To<Repository>().InSingletonScope(); |
Transient | AddBindings | kernel.Bind<IRepository>().To<Repository>(); |
This wrinkle means there are two methods in which bindings between interfaces and their implementations are defined: the AddBindings and AddRequestBindings methods. The AddBindings method is used to define singleton and transient scopes, and the AddRequestBindings method is used to define request scopes. Table 10-6 summarizes the three object scopes and gives examples of how to use the methods defined by the NinjectResolver class.
![]() Tip The singleton and request bindings are both created with the InSingletonScope method, but request scopes are set up in the AddRequestBindings method, which is called on the child Ninject kernels created when the BeginScope method is called.
Tip The singleton and request bindings are both created with the InSingletonScope method, but request scopes are set up in the AddRequestBindings method, which is called on the child Ninject kernels created when the BeginScope method is called.
Configuring Web API
The final step is to configure the Web API to use the NinjectResolver class to resolve dependencies. Listing 10-16 shows the additions I made to the WebApiConfig.cs file to perform the configuration.
Listing 10-16. Configuring Dependency Injection in the WebApiConfig.cs File
using System;
using System.Collections.Generic;
using System.Linq;
using System.Web.Http;
using ExampleApp.Infrastructure;

namespace ExampleApp {
    public static class WebApiConfig {
        public static void Register(HttpConfiguration config) {

            config.DependencyResolver = new NinjectResolver();

            config.MapHttpAttributeRoutes();

            config.Routes.MapHttpRoute(
                name: "DefaultApi",
                routeTemplate: "api/{controller}/{id}",
                defaults: new { id = RouteParameter.Optional }
            );
        }
    }
}
The HttpConfiguration.DependencyResolver is set to a new instance of the NinjectResolver class, which means that Web API will use it to instantiate the objects it needs for the application infrastructure and to handle individual requests.
Configuring Dependency Injection for Web API and MVC
Although Web API is using the NinjectResolver class to resolve dependency, the MVC Home controller remains tightly coupled to the Repository class. In this section, I am going to show you how to set up dependency injection for an application that contains Web API and MVC components. This is a simple process because the MVC framework can be hosted only on the ASP.NET platform, which means that the request scope support that DI containers such as Ninject provide can be used, even in the Web API components.
![]() Note Using the technique in this section ties your web services the ASP.NET platform because it relies on the System.Web.HttpContext class being instantiated and providing access to an HttpRequest object that describes the current request. These classes are not part of the Web API namespaces, and using them prevents Web API components from being deployed outside of IIS. For the moment, at least, most Web API applications will be deployed to the ASP.NET platform, but if you decide that you want to separate the Web API and MVC components at a later date, then you will have to revert to the techniques I described earlier in the chapter.
Note Using the technique in this section ties your web services the ASP.NET platform because it relies on the System.Web.HttpContext class being instantiated and providing access to an HttpRequest object that describes the current request. These classes are not part of the Web API namespaces, and using them prevents Web API components from being deployed outside of IIS. For the moment, at least, most Web API applications will be deployed to the ASP.NET platform, but if you decide that you want to separate the Web API and MVC components at a later date, then you will have to revert to the techniques I described earlier in the chapter.
Declaring the Dependency
I am going to start by updating the Home controller so that it no longer uses the Repository class directly and instead declares a dependency on the IRepository interface, as shown in Listing 10-17.
Listing 10-17. Declaring a Dependency in the HomeController.cs File
using System.Web.Mvc;
using ExampleApp.Models;

namespace ExampleApp.Controllers {
    public class HomeController : Controller {
        IRepository repo;

        public HomeController(IRepository repoImpl) {
            repo = repoImpl;
        }

        public ActionResult Index() {
            return View(repo.Products);
        }
    }
}
Now that both the Web API and MVC controllers declare dependencies on the IRepository interface, I have taken the opportunity to remove the static property and constructor from the Repository class, which would cause an extra Repository object to be created the first time the class was instantiated to resolve a dependency. Listing 10-18 shows the statements that I commented out.
Listing 10-18. Removing the Static Instance from the Repository.cs File
using System.Collections.Generic;

namespace ExampleApp.Models {
    public class Repository : IRepository {
        private Dictionary<int, Product> data;
        //private static Repository repo;

        //static Repository() {
        //    repo = new Repository();
        //}

        //public static Repository Current {
        //    get { return repo; }
        //}

        // ...other statements omitted for brevity...
    }
}
Installing the Dependency Injection Packages
I need to install two additional Ninject packages, which I do by entering the following commands into the Visual Studio Package Manager Console window:
Install-Package Ninject.Web.Common -version 3.0.0.7
Install-Package Ninject.MVC3 -Version 3.0.0.6
The Ninject.Web.Common package contains support for integrating dependency injection with the ASP.NET platform so that dependencies on modules and handlers can be resolved. The Ninject.MVC3 package adds additional features required by the MVC framework (don’t worry about the reference to MVC3 because the package works happily with MVC 3, 4, and 5). This package adds a NinjectWebCommon.cs file to the App_Start folder that contains code to set up dependency injection for ASP.NET modules and handlers. This file can be ignored or deleted because it has no bearing on Web API.
![]() Tip See my Pro ASP.NET MVC 5 Platform book, published by Apress, if you are not familiar with ASP.NET platform components such as modules and handlers. Even though you should avoid directly relying on the ASP.NET platform when using Web API, there are many features that are useful in MVC framework applications.
Tip See my Pro ASP.NET MVC 5 Platform book, published by Apress, if you are not familiar with ASP.NET platform components such as modules and handlers. Even though you should avoid directly relying on the ASP.NET platform when using Web API, there are many features that are useful in MVC framework applications.
Adding MVC Support to the Resolver
MVC framework dependency resolution is handled by the System.Web.Mvc.IDependencyResolver interface, which defines the methods described in Table 10-7.
Table 10-7. The Methods Defined by the MVC IDependencyResolver Interface
Name | Description |
|---|---|
GetService(type) | Resolves a type for which one implementation is registered |
GetServices(type) | Resolves a type for which multiple implementations are registered |
These methods match the ones defined by the Web API IDependencyScope interface, which I listed in Listing 10-14. This duplication allows me to extend the NinjectResolver class to support both Web API and the MVC framework, as shown in Listing 10-19.
Listing 10-19. Adding MVC Framework Support to the NinjectResolver.cs File
using System;
using System.Collections.Generic;
using System.Web.Http.Dependencies;
using ExampleApp.Models;
using Ninject;
using Ninject.Extensions.ChildKernel;
using Ninject.Web.Common;

namespace ExampleApp.Infrastructure {

    public class NinjectResolver : System.Web.Http.Dependencies.IDependencyResolver,
            System.Web.Mvc.IDependencyResolver {
        private IKernel kernel;

        public NinjectResolver() : this (new StandardKernel()) {}

        public NinjectResolver(IKernel ninjectKernel) {
            kernel = ninjectKernel;
            AddBindings(kernel);
        }

        public IDependencyScope BeginScope() {
            return this;
        }

        public object GetService(Type serviceType) {
            return kernel.TryGet(serviceType);
        }

        public IEnumerable<object> GetServices(Type serviceType) {
            return kernel.GetAll(serviceType);
        }

        public void Dispose() {
            // do nothing
        }

        private void AddBindings(IKernel kernel) {
            kernel.Bind<IRepository>().To<Repository>().InRequestScope();
        }
    }
}
The Web API and MVC framework interfaces have the same name, so I have to use the fully qualified names in the class definition in order to implement both interfaces.
Being able to rely on the ASP.NET platform means that Ninject is able to provide the InRequestScope method, which configures bindings so that the objects they create are scoped to the request. This allows me to support the Web API BeginScope method without using child kernels and, in turn, to consolidate my bindings into a single method. The overall effect is to simplify the dependency resolution class by tying the life of per-request objects to the features provided by the ASP.NET platform.
But this simpler and more elegant approach comes at the cost of depending on the ASP.NET platform, which limits the deployment options for the application, but that is likely to be an acceptable trade-off for most applications if they contain MVC components. Table 10-8 shows how to create the different object scopes using the resolver in Listing 10-19.
Table 10-8. Creating Web API and MVC Object Scopes with Ninject
Scope | Method | Example |
|---|---|---|
Singleton | AddBindings | kernel.Bind<IRepository>().To<Repository>().InSingletonScope(); |
Request | AddBindings | kernel.Bind<IRepository>().To<Repository>().InRequestScope(); |
Transient | AddBindings | kernel.Bind<IRepository>().To<Repository>(); |
This is a more natural way of using Ninject and is the same set of methods that you would use if you were working with just the MVC framework on its own.
Configuring the MVC Framework
The final step is to configure the MVC framework so that the NinjectResolver class is used to create objects and resolve dependencies. Listing 10-20 shows the changes that I made to the Global Application Class.
Listing 10-20. Configuring Dependency Injection in the Global.asax.cs File
using System;
using System.Collections.Generic;
using System.Linq;
using System.Web;
using System.Web.Mvc;
using System.Web.Routing;
using System.Web.Security;
using System.Web.SessionState;
using System.Web.Http;

namespace ExampleApp {
    public class Global : HttpApplication {
        void Application_Start(object sender, EventArgs e) {

            AreaRegistration.RegisterAllAreas();
            GlobalConfiguration.Configure(WebApiConfig.Register);
            RouteConfig.RegisterRoutes(RouteTable.Routes);

            System.Web.Mvc.DependencyResolver.SetResolver(
                (System.Web.Mvc.IDependencyResolver)
                GlobalConfiguration.Configuration.DependencyResolver);
        }
    }
}
I could have moved the Web API configuration statement from the WebApiConfig.cs file to the Global Application Class, but I wanted to demonstrate the way that the Web API configuration is universally available. The statement I added uses the GlobalConfiguration.Configuration property to obtain an instance of the HttpConfiguration class, reads the DependencyResolver to get the NinjectResolver instance, and uses it as the argument to the DependencyResolver.SetResolver method to configure the MVC framework. The effect is to apply a single instance of the NinjectResolver class as the resolver for the entire application so that the MVC framework and Web API share the same set of singleton objects and have access to the same set of request and transient objects.
Summary
In this chapter, I created and configured the example application that I will use in this part of the book. I explained the most important configuration classes and used them to show you how to set up dependency injection, with and without dependencies on the ASP.NET platform. In the next chapter, I start to dig into the details of ASP.NET Web API, starting with the results that action methods produce. This may not sound like a promising topic, but, as you will see, results define the character of an HTTP web service, and knowing how to produce the results you require is essential for effective Web API development.