
![]()
SportsStore: Deployment
The biggest day in the life of any application is the one on which it is deployed and used for the first time. In this chapter, I will show you how to prepare and deploy the SportsStore application to the Microsoft Azure platform.
Web API introduces some new patterns for application deployment through its support for OWIN, which I describe in Chapter 26. However, if you have developed an application that contains MVC and Web API functionality—which is the most common use for Web API currently—then you are limited to deployment to IIS or Azure. I have selected Azure for this chapter because it is universally available and offers free trials, whereas not all developers have access to a Windows Server installation running IIS.
![]() Caution Deploying an application can be fraught with problems, and it pays dividends to practice with a test application before doing it for real. It is not that the ASP.NET deployment features are especially dangerous (they are not), but rather, any interaction that involves a running application with real user data deserves careful thought and planning.
Caution Deploying an application can be fraught with problems, and it pays dividends to practice with a test application before doing it for real. It is not that the ASP.NET deployment features are especially dangerous (they are not), but rather, any interaction that involves a running application with real user data deserves careful thought and planning.
Preparing the SportsStore Application
There are a couple of changes I need to make to the project before I can deploy the SportsStore application. I perform the changes—and explain their significance—in the sections that follow.
Preventing the Product Database from Resetting
The first change is to prevent the product database from being dropped and re-created each time that the application is started. That has been a useful feature to ensure that you see the right results in the previous chapters, but it is a dangerous feature to leave in a deployed application. Listing 8-1 shows the changes I made to the database initializer class.
Listing 8-1. Changing the Base Class in the ProductDbInitializer.cs File
using System.Collections.Generic;
using System.Data.Entity;

namespace SportsStore.Models {

    public class ProductDbInitializer : CreateDatabaseIfNotExists<ProductDbContext> {

        protected override void Seed(ProductDbContext context) {

            new List<Product> {
                new Product() { Name = "Kayak", Description = "A boat for one person",
                    Category = "Watersports", Price = 275m },
                new Product() { Name = "Lifejacket",
                    Description = "Protective and fashionable",
                    Category = "Watersports", Price = 48.95m },
                new Product() { Name = "Soccer Ball",
                    Description = "FIFA-approved size and weight",
                    Category = "Soccer", Price = 19.50m },
                new Product() {
                    Name = "Corner Flags",
                    Description = "Give your playing field a professional touch",
                    Category = "Soccer", Price = 34.95m },
                new Product() { Name = "Stadium",
                    Description = "Flat-packed 35,000-seat stadium",
                    Category = "Soccer", Price = 79500m },
                new Product() { Name = "Thinking Cap",
                    Description = "Improve your brain efficiency by 75%",
                    Category = "Chess", Price = 16m },
                new Product() { Name = "Unsteady Chair",
                    Description = "Secretly give your opponent a disadvantage",
                    Category = "Chess", Price = 29.95m },
                new Product() { Name = "Human Chess Board",
                    Description = "A fun game for the family",
                    Category = "Chess", Price = 75m },
                new Product() { Name = "Bling-Bling King",
                    Description = "Gold-plated, diamond-studded King",
                    Category = "Chess", Price = 1200m },
            }.ForEach(product => context.Products.Add(product));

            context.SaveChanges();

            new List<Order> {
                new Order() { Customer = "Alice Smith", TotalCost = 68.45m,
                    Lines = new List<OrderLine> {
                        new OrderLine() { ProductId = 2, Count = 2},
                        new OrderLine() { ProductId = 3, Count = 1},
                    }},
                new Order() { Customer = "Peter Jones", TotalCost = 79791m,
                    Lines = new List<OrderLine> {
                        new OrderLine() { ProductId = 5, Count = 1},
                        new OrderLine() { ProductId = 6, Count = 3},
                        new OrderLine() { ProductId = 1, Count = 3},
                   }}
            }.ForEach(order => context.Orders.Add(order));

            context.SaveChanges();
        }
    }
}
I explained the different base classes that can be used in Chapter 5, and applying the CreateDatabaseIfNotExists ensures that a new database will be created the first time the application starts but not on subsequent restarts.
Adding Database Connection Strings
The second change I need to make is a little odd. I need to add connection strings to the Web.config file so that they can be updated during the publishing process. I have not needed to define connection strings so far because the default behavior for creating databases is to use the LocalDB feature, which is what I wanted. The default behavior will not work within Azure, but the publishing process doesn’t work correctly unless there are connection strings for it to modify. Listing 8-2 shows the changes I made to the Web.config file.
Listing 8-2. Adding Connection Strings to the Web.config File
...
<configuration>
  <configSections>
    <section name="entityFramework"
      type="System.Data.Entity.Internal.ConfigFile.EntityFrameworkSection,
      EntityFramework, Version=6.0.0.0, Culture=neutral, PublicKeyToken=b77a5c561934e089"
          requirePermission="false" />
  </configSections>

  <connectionStrings>
    <add name="SportsStoreDb" providerName="System.Data.SqlClient"
      connectionString="Data Source=(localdb)v11.0;
          Initial Catalog=SportsStoreDb;Integrated Security=True;
          Connect Timeout=15;Encrypt=False;TrustServerCertificate=False" />
    <add name="SportsStoreIdentityDb" providerName="System.Data.SqlClient"
      connectionString="Data Source=(localdb)v11.0;
          Initial Catalog=SportsStoreIdentityDb;Integrated Security=True;
          Connect Timeout=15;Encrypt=False;TrustServerCertificate=False" />
  </connectionStrings>

<appSettings>
    <add key="webpages:Version" value="3.0.0.0" />
...
![]() Caution The values for the connectionString properties should be on a single line and not wrapped as they are shown in the listing. I had to break up the string to fit it on the page.
Caution The values for the connectionString properties should be on a single line and not wrapped as they are shown in the listing. I had to break up the string to fit it on the page.
These connection strings have no effect, other than to give the publishing process what it needs to replace them with details of the Azure databases I created in the previous section.
Preparing Azure
You have to create an account before you can use Azure, which you can do by going to http://azure.microsoft.com. At the time of writing, Microsoft is offering free trial accounts, and most MSDN packages include Azure services. Once you have created your account, you can manage your Azure services by going to http://manage.windowsazure.com to provide your credentials. When you start, you will see the summary view shown in Figure 8-1.
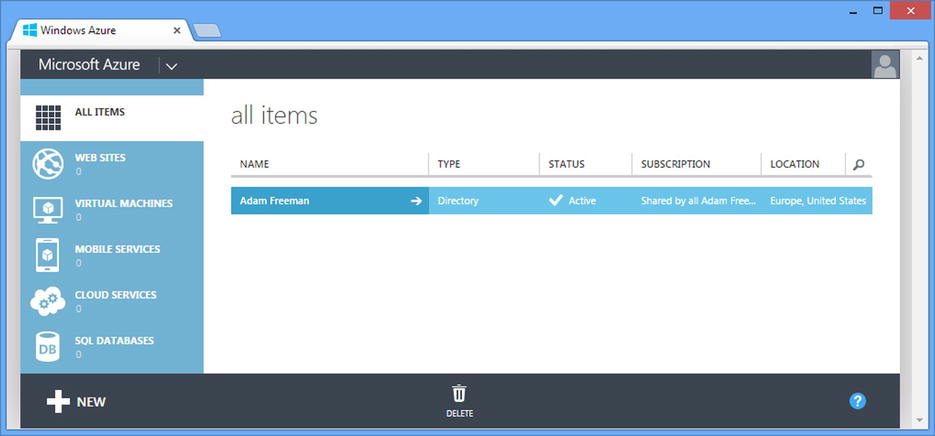
Figure 8-1. The Azure portal
Creating the Databases
The first step is to create the databases that will be used to store the product and ASP.NET Identity data. In the sections that follow, I will create the databases and get the information I need to configure the application.
Create the Product Database
Click the large plus (+) sign at the bottom of the window and select Data Services ![]() SQL Database
SQL Database ![]() Quick Create. Populate the input elements using the values in Table 8-1.
Quick Create. Populate the input elements using the values in Table 8-1.
Table 8-1. Creating the Azure Product Database
Field | Description |
|---|---|
Database Name | Enter SportsStoreDb. |
Subscription | Leave as is. |
Server | Leave as New SQL Database Server. |
Region | Select the region you want to deploy to. I live in London, so I selected the West Europe region. |
Login Name | Enter a memorable account name that will be used by the application to connect to the database. I selected SportsStoreDb. |
Password | Select a secure and memorable password. I selected SuperSecurePassword100. |
When you have configured the database, the screen should be similar to Figure 8-2.
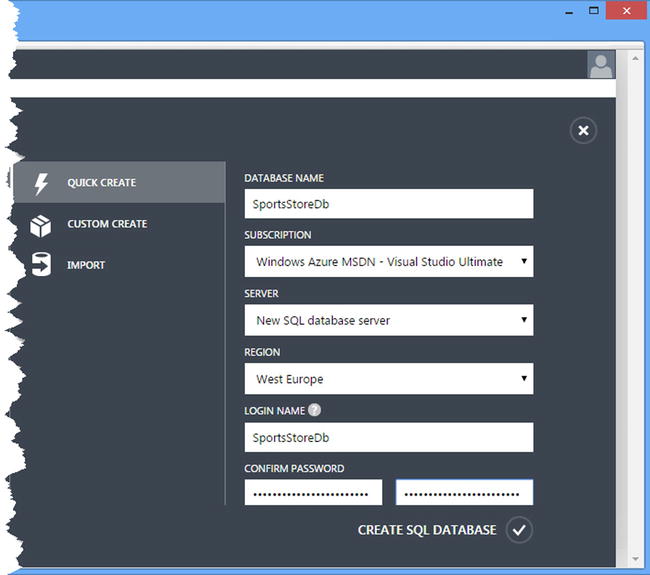
Figure 8-2. Configuring the Azure product database
Click the Create SQL Database button to create the database.
Click the plus button again and select Data Services ![]() SQL Database
SQL Database ![]() Quick Create. Populate the input elements using the values in Table 8-2.
Quick Create. Populate the input elements using the values in Table 8-2.
Table 8-2. Creating the Azure Product Database
Field | Description |
|---|---|
Database Name | Enter SportsStoreIdentityDb. |
Subscription | Leave as is. |
Server | Leave as is; the server created for the product server will be selected automatically. |
When you have configured the database, the screen should be similar to Figure 8-3.
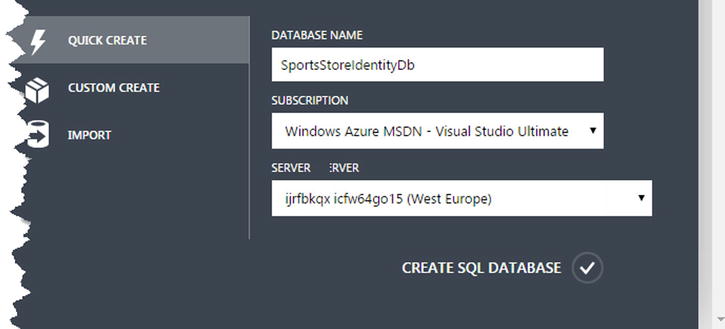
Figure 8-3. Configuring the Azure Identity database
Click the Create SQL Database button to create the database.
Getting the Server Name
Once you have created the databases, click the Servers button and make note of the server name that has been created as part of the process, as shown in Figure 8-4.
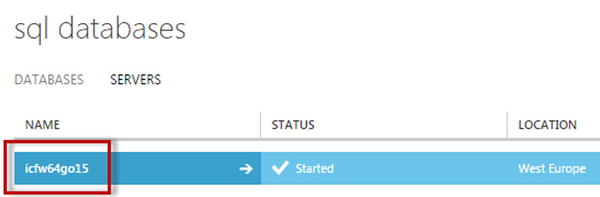
Figure 8-4. Getting the database name
The server name is a random string. The one that Azure has created for me is called icfw64go15, but your name will differ. You will need the server name when configuring the application for deployment.
I am going to deploy the application using an Azure web site, which is one of the options for deploying ASP.NET applications. Within the Azure management portal, click the plus sign and select Compute ![]() Web Site
Web Site ![]() Quick Create.
Quick Create.
Select a URL for your application and enter it into the URL input element. URLs have to be unique, although you can pay more to use custom URLs. The URL I selected for my deployment is sportsstorews, as shown in Figure 8-5. Click the Create Web Site button to complete the process.
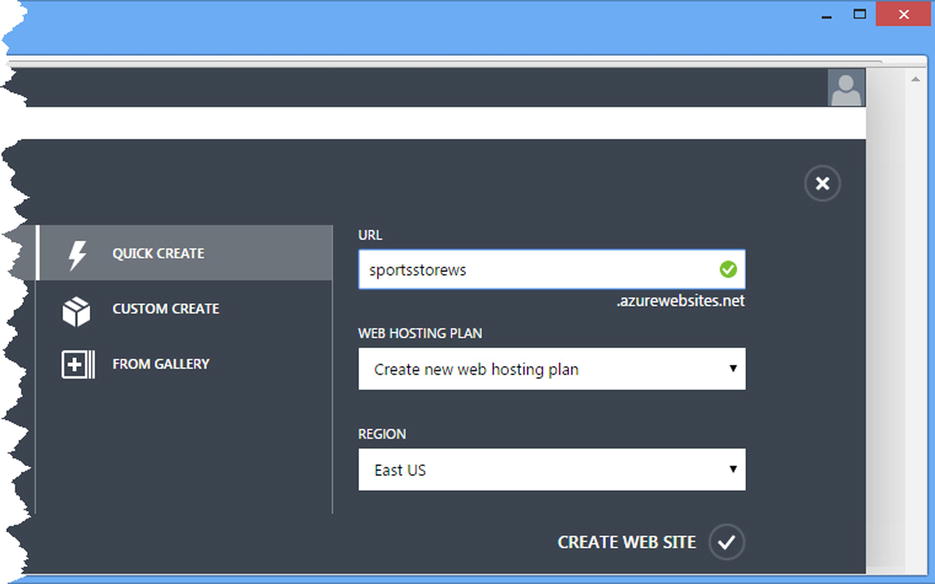
Figure 8-5. Creating the Azure web site
Downloading the Publish Profile
Once the web site has been created, you will see an entry under the web sites area with the name you selected in the previous section. Click the name to open the detail page and click the Download the Publish Profile link. This will cause the browser to download a file that contains the configuration details of the web site you created; save this file where you can easily access it.
Deploying the Application
I am now at the stage where I can deploy the application. Table 8-3 shows the pieces of information that are needed for the process.
Table 8-3. The Information Needed to Deploy the Application
Item | My Value |
|---|---|
Database Server Name | icfw64go15 |
Database User Name | SportsStoreDb |
Database Password | SuperSecurePassword100 |
Select Publish SportsStore from the Visual Studio Build menu to start the process. Click the Import button and locate the publish profile file that you downloaded after creating the Azure web site. The window will jump to the Connection section, as shown in Figure 8-6.
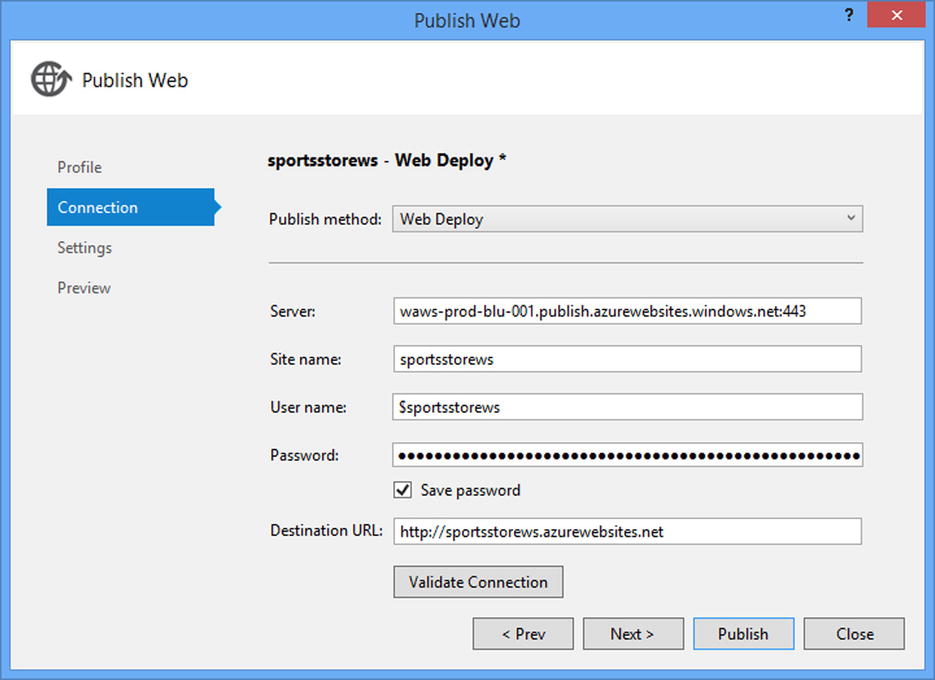
Figure 8-6. Details of the deployment connection
There is no need to change any of the values. Click Next to move to the Settings part of the dialog.
This is the part of the deployment process that sets up the database connections. The publishing wizard gets confused at this point and displays more entries than it should. I’ll explain how to deal with each of them in turn.
Configuring the ProductDbContext(SportsStoreDb) Entry
Click the ellipsis (...) button to open a dialog that allows a connection string to be composed. Ensure that Microsoft SQL Server is selected as the data source; then enter the name of the database server from the start of this section, followed by .database.windows.net, into the Server Name field. My server is called ijrfbkqxdu, so I entered icfw64go15.database.windows.net. Ensure that the Use SQL Server Authentication option is checked, enter the database username and password into the fields, and check the Save my password option. Enter SportsStoreDb into the Select or Enter a Database Name field to specify the database that will be used. Click the OK button to close the database and set the connection string, which will be as follows (although your server name and credentials will differ):
Data Source=icfw64go15.database.windows.net;
    Initial Catalog=SportsStoreDb;Persist Security Info=True;
    User ID=SportsStoreDb;Password=SuperSecurePassword100
Configuring the SportsStoreIdentityDb Entry
Repeat the same process as in the previous section, but enter SportsStoreIdentityDb into the Select or Enter a Database Name field. The connection string will be similar to this, but with a different server name and credentials:
Data Source=icfw64go15.database.windows.net;
    Initial Catalog=SportsStoreIdentityDb;Persist Security Info=True;
    User ID=SportsStoreDb;Password=SuperSecurePassword100
Configuring the StoreIdentityDbContext Entry
Uncheck the Use this Connection String at Runtime box. This entry isn’t required.
All that remains is to push the application to Azure, which is done by clicking the Publish button. You can follow the publishing process in the Visual Studio Output window, but it can take a while to publish an application, especially if this is the initial update to the cloud since all of the files have to be uploaded. Only differences are uploaded for future releases.
Once the application has been published, Visual Studio will open a browser window that loads the SportsStore web site URL, which is http://sportsstorews.azurewebsites.net in my case, as shown in Figure 8-7.

Figure 8-7. Using the published SportsStore application
![]() Tip My URL won’t be in service by the time you read this. I use my Azure web sites to test problems that readers encounter, and I keep these private to avoid generating odd results.
Tip My URL won’t be in service by the time you read this. I use my Azure web sites to test problems that readers encounter, and I keep these private to avoid generating odd results.
Summary
In this chapter I showed you how to deploy the SportsStore application to Azure, which is one of the platform options for an application that mixes Web API and MVC framework functionality. (The other option is to deploy to IIS running on Windows Server.) Deployment concludes the SportsStore chapters and this part of the book. In Part 2, I start to dig into the details of how Web API works, starting with the results that action methods produce and the parameter values they consume.