
![]()
Dispatching Requests
In this part of the book, I describe the process by which Web API dispatches requests, which is the sequence of steps by which an incoming HttpRequestMessage object is processed to produce an HttpResponseMessage that can be sent to the client.
You have already seen some of the steps in Part 2, in which I described how parameter binding and model binding are used to provide an action method with the values it needs to handle a request and how the action method can produce a response. In this chapter, I explain how Web API selects and invokes an action method. I detail the interfaces that describe different areas of functionality and explain how the default implementation of those interfaces work together to create the default dispatching process. In the chapters that follow, I dig into the details and show you how to can take control of request dispatching to tailor the process to your own needs. Table 19-1 summarizes this chapter.
Table 19-1. Chapter Summary
Problem | Solution | Listing |
|---|---|---|
Prevent requests from being processed. | Create a custom message handler that generates an HttpResponseMessage object without invoking the handler chain. | 1–7 |
Add support for a custom header. | Create a custom message handler that modifies the HttpRequestMessage before passing it on to the next handler in the chain. | 8–9 |
Use a message handler as a diagnostic tool. | Create a custom message handler that calls the Debugger.Break method. | 10 |
Change the suffix used to identify controller classes. | Create custom implementations of the IHttpControllerTypeResolver and IHttpControllerSelector interfaces or use reflection to modify the default implementation classes. | 11–15 |
Preparing the Example Project
The ExampleApp project I have been using since Chapter 10 is now overcrowded with classes, so I created a new project for this chapter. I selected the ASP.NET Web Application project type and set the name to Dispatch. I clicked the OK button to advance through the New Project Wizard, selected the Empty project template, and checked the options to add the core references for MVC and Web API, just as I did in Chapter 2. I clicked the OK button, and Visual Studio created the new project.
After Visual Studio created the project, I entered the following commands into the Package Manager Console to get the NuGet packages I require:
Update-Package microsoft.aspnet.mvc -version 5.1.1
Update-Package microsoft.aspnet.webapi -version 5.1.1
Update-Package Newtonsoft.json -version 6.0.1
Install-Package jquery -version 2.1.0
Install-Package bootstrap -version 3.1.1
Install-Package knockoutjs –version 3.1.0
This is the standard set of NuGet packages that I use for Web API applications that includes an MVC framework component.
Creating the Model Class
I require only a simple model class for this chapter, and I don’t need any means to store instances persistently. I added a class file called Product.cs to the Models folder and used it to define the class shown in Listing 19-1.
Listing 19-1. The Contents of the Product.cs File
namespace Dispatch.Models {

    public class Product {
        public int ProductID { get; set; }
        public string Name { get; set; }
        public decimal Price { get; set; }
    }
}
Creating the Web API Web Service
For this chapter, I need a simple web service controller that defines some basic action methods. I added a class file called ProductsController.cs to the Controllers folder and used it to define the controller shown in Listing 19-2.
Listing 19-2. The Contents of the ProductsController.cs File
using System.Collections.Generic;
using System.Linq;
using System.Web.Http;
using Dispatch.Models;

namespace Dispatch.Controllers {
    public class ProductsController : ApiController {
        private static List<Product> products = new List<Product> {
                new Product {ProductID = 1, Name = "Kayak", Price = 275M },
                new Product {ProductID = 2, Name = "Lifejacket", Price = 48.95M },
                new Product {ProductID = 3, Name = "Soccer Ball", Price = 19.50M },
                new Product {ProductID = 4, Name = "Thinking Cap", Price = 16M },
            };

        public IEnumerable<Product> Get() {
            return products;
        }

        public Product Get(int id) {
            return products.Where(x => x.ProductID == id).FirstOrDefault();
        }

        public Product Post(Product product) {
            product.ProductID = products.Count + 1;
            products.Add(product);
            return product;
        }
    }
}
This is a RESTful controller that defines Get and Post methods that will be targeted by the GET and POST HTTP verbs. (I explain how the verbs are mapped to the action methods in Chapter 22.)
![]() Caution I have included a static List of Product objects so that I can respond to requests without having to define and implement a repository. This is suitable for a simple example, but for real projects, follow the repository pattern that I used for the SportsStore application in Chapter 5.
Caution I have included a static List of Product objects so that I can respond to requests without having to define and implement a repository. This is suitable for a simple example, but for real projects, follow the repository pattern that I used for the SportsStore application in Chapter 5.
The Get action method return either a Product object or all of the Products objects, which will be serialized and sent to the client using one of the media type formatters I described in Chapter 17. The Post method receives a Product object as an argument, which I add to the static List.
Creating the MVC Controller and View
As with my previous examples, I am going use the MVC framework to deliver HTML and JavaScript code to the client, which will then use Ajax requests to talk to a Web API web service. I created a HomeController.cs class file in the Controllers folder and used it to define the controller shown in Listing 19-3.
Listing 19-3. The Contents of the HomeController.cs File
using System.Web.Mvc;

namespace Dispatch.Controllers {

    public class HomeController : Controller {

        public ActionResult Index() {
            return View();
        }
    }
}
The Home controller exists solely to deliver the contents of a view to the client. Listing 19-4 shows the contents of the Index.cshtml file, which I added to the Views/Home folder.
Listing 19-4. The Contents of the Index.cshtml File
@{ Layout = null;}
<!DOCTYPE html>
<html>
<head>
    <meta name="viewport" content="width=device-width" />
    <title>Index</title>
    <link href="~/Content/bootstrap.min.css" rel="stylesheet" />
    <link href="~/Content/bootstrap-theme.min.css" rel="stylesheet" />
    <script src="~/Scripts/jquery-2.1.0.min.js"></script>
    <script src="~/Scripts/knockout-3.1.0.js"></script>
    <script src="~/Scripts/dispatch.js"></script>
    <style>
        body { padding-top: 10px; }
    </style>
</head>
<body class="container">
    <div class="alert alert-success" data-bind="css: { 'alert-danger': gotError }">
        <span data-bind="text: response()"></span>
    </div>

    <div class="panel panel-primary">
        <div class="panel-heading">Products</div>
        <table class="table table-striped">
            <thead>
                <tr><th>ID</th><th>Name</th><th>Price</th></tr>
            </thead>
            <tbody data-bind="foreach: products">
                <tr>
                    <td data-bind="text: ProductID"></td>
                    <td data-bind="text: Name"></td>
                    <td data-bind="text: Price"></td>
                </tr>
            </tbody>
        </table>
    </div>

    <button class="btn btn-primary" data-bind="click: getAll">Get All</button>
    <button class="btn btn-primary" data-bind="click: getOne">Get One</button>
    <button class="btn btn-primary" data-bind="click: postOne">Post</button>
</body>
</html>
I am not using a layout in this project, so the view contains all of the HTML that will be sent to the client. The body element contains a div element that I styled as an alert using Bootstrap and a button that relies on Knockout to call a function called sendRequest.
There is also a table element whose rows are populated by Knockout foreach binding and three button elements, all of which use Knockout to invoke functions when they are clicked.
The last script element in the Index.cshtml file references a file called dispatch.js in the Scripts folder. I created this file to keep the JavaScript code separate from the view. As Listing 19-5 shows, this file defines the data used in the Index.cshtml Knockout bindings and defines the functions that the button elements invoke.
Listing 19-5. The Contents of the dispatch.js File
var viewModel = ko.observable({
    productId: 100, name: "Bananas", price: 12.34
});

var products = ko.observableArray();
var response = ko.observable("Ready");
var gotError = ko.observable(false);

var getAll = function () {
    sendRequest("GET");
}

var getOne = function () {
    sendRequest("GET", 2);
}

var postOne= function () {
    sendRequest("POST");
}

var sendRequest = function (verb, id) {

    var url = "/api/products/" + (id || "");

    var config = {
        type: verb || "GET",
        data: verb == "POST" ? viewModel() : null,
        success: function (data) {
            gotError(false);
            response("Success");
            products.removeAll();
            if (Array.isArray(data)) {
                data.forEach(function (product) {
                    products.push(product);
                });
            } else {
                products.push(data);
            }
        },
        error: function (jqXHR) {
            gotError(true);
            products.removeAll();
            response(jqXHR.status + " (" + jqXHR.statusText + ")");
        }
    }

    $.ajax(url, config);
};

$(document).ready(function () {
    ko.applyBindings();
});
The three functions that the button elements invoke—getAll, getOne, and postOne—all rely on the sendRequest function to send an Ajax request to the web service. Within the sendRequest method, I create the URL and the configuration object based on the function arguments, which allows me to send the three different types of request I need using the same code.
![]() Note There are no input elements to allow the user to change the values in the view model. I will change the view model in the code when I want to send different data to the web service.
Note There are no input elements to allow the user to change the values in the view model. I will change the view model in the code when I want to send different data to the web service.
Testing the Example Application
To test the web service, start the application. Navigate to the /Home URL with the browser and click the Get One button. jQuery will send a GET request to the server, receive a serialized representation of a Product object, and use its property values to update the alert div element, as shown in Figure 19-1.
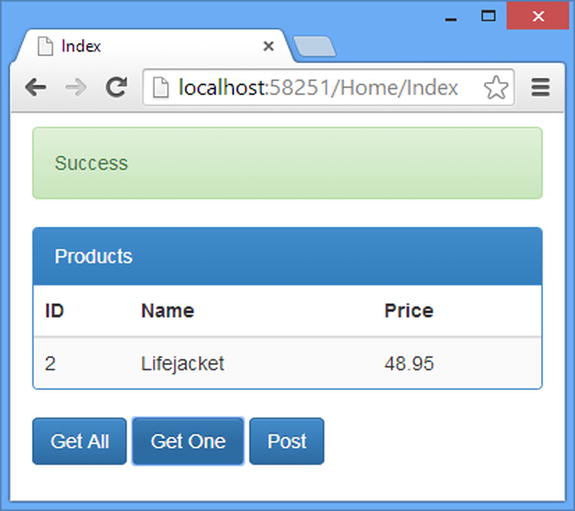
Figure 19-1. Testing the example application
Understanding Request Dispatching
Three classes coordinate the way that Web API handles HTTP requests, known collectively as the message handlers. The term message handler arises because all three classes are derived from the abstract HttpMessageHandler class in the System.Web.Http namespace. The HttpMessageHandler class defines one important method, which derived classes are required to implement.
...
protected internal override Task<HttpResponseMessage> SendAsync(
    HttpRequestMessage request,
    CancellationToken cancellationToken
)
...
The method is called SendAsync, and it receives an HttpRequestMessage object and returns a Task that produces an HttpResponseMessage object when it completes. The use of the Task result and the CancellationToken parameter indicate that the method should execute asynchronously.
Processing HttpRequestMessage objects to produce HttpResponseMessage objects is the task of any web application framework that uses the System.Net.Http classes. The three MessageHandler classes that I describe in this chapter are the gatekeepers to the world of Web API.
Message handlers are organized into a chain, and each handler processes the request in turn, which gives handlers the chance to modify or enhance the HttpRequestMessage object. The last message handler in the chain creates the HttpResponseMessage, which then passes back along the list, allowing each message handler to modify the response before it is sent to the client. You can see the overall effect in Figure 19-2.

Figure 19-2. The chain of message handlers
The host will usually be IIS, especially if you are also using the MVC framework, but there are other options, as I explain in Chapter 26.
From the moment that the host passes on an HttpRequestMessage object, its progress through the request handling pipeline is always under the supervision of a message handler, right until the point where the HttpResponseMessage object is given to the host so a response can be sent to the client.
Web API defines a number of interfaces that are used by the message handlers to hand off important tasks. The use of interfaces means that the dispatch process can be customized, as I describe in the
“Customizing the Dispatch Process” section. It can be hard to keep track of the message handlers, interfaces, and implementation classes involved in the dispatch process, so I have summarized them in Table 19-2. I explain the purpose and role of each of them in the sections that follow.
Table 19-2. The Dispatcher Interfaces and Default Implementation Classes
Name | Description |
|---|---|
HttpServer | The first message handler to receive new HttpRequestMessage objects. |
HttpRoutingDispatcher | The second message handler, which creates routing data for the request. |
HttpControllerDispatcher | The third and final message handler, which selects, activates, and executes a controller to create an HttpResponseMessage object. |
IHttpControllerSelector | The interface that the HttpControllerDispatcher class uses to delegate controller selection. The default implementation is the DefaultHttpControllerSelector class. |
IHttpControllerTypeResolver | The interface used by the DefaultHttpControllerSelector class to locate the controller classes in the application. The default implementation is the DefaultHttpControllerTypeResolver. |
IAssembliesResolver | The interface used to locate the assemblies in the application so that the IHttpControllerTypeResolver implementation can search them for controllers. The default implementation is the DefaultAssembliesResolver class. |
IHttpControllerActivator | The interface used by the HttpControllerDispatcher class to delegate creating an instance of the selected controller. The default implementation is the DefaultHttpControllerActivator class. |
IHttpController | The interface used to denote a controller. I describe controllers fully in Chapter 22, but most controllers are derived from the ApiController class, which implements the IHttpController interface. |
There are two parts of the dispatch process that I touch upon only lightly in this chapter: URL routing and controllers. I cover both in later chapters, specifically, URL routing in Chapters 20 and 21 and controllers in Chapter 22. Table 19-3 puts the Web API dispatch process in context.
Table 19-3. Putting the Web API Dispatch Process in Context
Question | Answer |
|---|---|
What is it? | Web API uses the dispatch process to receive an HttpRequestMessage object representing an HTTP request and to produce a corresponding HttpResponseMessage object that will be used to generate the response sent to the client. |
When should you use it? | The dispatch process is automatically applied to all incoming HTTP requests in a Web API application and requires no explicit action. |
What do you need to know? | The dispatch process is managed by three message handler classes. The HttpServer class receives requests from the hosting environment, the HttpRoutingDispatcher integrates URL routing, and the HttpControllerDispatcher selects a controller to handle the request. I explain the details of the URL routing system in Chapters 20 and 21 and of controllers in Chapter 22. |
Understanding the HttpServer Class
The first message handler in the chain is an instance of the HttpServer class, which acts as the contact point between the hosting environment and Web API.
The HttpServer class has a simple job: it receives an HttpRequestMessage object, prepares it for use in a Web API application, and passes it on to the next message handler in the chain. The preparation involves associating a security principal with the request, creating the HttpRequestContext object, and setting up the classes that will deal with any errors when the HttpResponeMessage comes back along the chain.
![]() Tip I describe web service security in Chapters 23 and 24, I described the HttpRequestContext class in Chapter 9, and I show you how Web API deals with errors in Chapter 25.
Tip I describe web service security in Chapters 23 and 24, I described the HttpRequestContext class in Chapter 9, and I show you how Web API deals with errors in Chapter 25.
The HttpServer class is instantiated by the GlobalConfiguration class during the configuration phase of the application life cycle. The GlobalConfiguration class also specifies the next message handler in the list, and you can access both classes through the GlobalConfiguration properties shown in Table 19-4.
Table 19-4. The GlobalConfiguration Properties That Relate to the HttpServer Class
Name | Description |
|---|---|
DefaultHandler | Returns the HttpMessageHandler implementation that the HttpServer class should pass the HttpRequestMessage object to when it has finished its preparations. By default, this is the HttpRoutingDispatcher class, which I describe in the next section. You can add custom message handlers to the chain, which I describe in the “Customizing the Dispatch Process” section. |
DefaultServer | Returns the HttpMessageHandler implementation that is the entry point into Web API, which is the HttpServer class. |
You can’t change the values returned by the DefaultHandler and DefaultServer properties, and the HttpServer class cannot be replaced as the entry point into Web API. But you can add custom message handler classes to change the way requests are processed; see Chapters 23 and 24 for details and examples. Knowing that the HttpServer class is the first message handler in the chain allows me to revise my pipeline diagram, as shown in Figure 19-3.

Figure 19-3. Revising the pipeline diagram to include the HttpServer class
Understanding the HttpRoutingDispatcher Class
The second message handler in the chain is an instance of the HttpRoutingDispatcher class, which integrates URL routing into the Web API request handling pipeline. The HttpRoutingDispatcher class is defined in the System.Web.Http.Dispatcher namespace.
The URL routing system has one purpose: to inspect the request in order to produce data that other components will need to process further along the message handler chain. The data that the routing system produces is called routing data or route data. Consolidating the functionality that inspects requests to extract the routing data means that a request can be inspected just once by the routing system, even though the routing data that is generated will be used repeatedly by other components.
Routing data is expressed as a collection of name-value pairs. To generate the routing data, the URL routing system tries to match a request against a routing pattern, which usually means examining the URL that the client has requested, but it can also incorporate other aspects of the request such as header values. The instructions for matching a request and for generating the routing data are collectively known as a route.
Routing data is typically used to extract three types of data from a request:
- The name of a controller
- The name of an action method
- Values that can be used for parameter binding
I say that URL routing typically extracts this data because there is a lot of variability in how routing can be configured and how much information each request can provide. Requests won’t always contain parameter binding values or an action method name, for example, and even when they do, the components that consume the routing data may choose to ignore the values and use some other source of information to do their work.
Even though it may be used to extract controller and action method names, the URL routing system doesn’t do anything with those names. It doesn’t select the controller or action method, and it doesn’t generate the HttpResponseMessage that will be sent to the client. The routing system doesn’t assign any meaning to the data it retrieves; it just extracts the data and does nothing more.
In fact, the routing system doesn’t have any knowledge of what controllers and action methods are, which is why URL routing works as well in a Web Forms application as it does in Web API and the MVC framework. Routing data is also used for parameter binding, but the routing system doesn’t do that binding itself; instead, there is a built-in value provider that gets its data from the routing data associated with a request.
The purpose of the HttpRoutingDispatcher class uses the routing system to inspect the HttpRequestMessage object and produce routing data, which is then associated with the HttpRequestContext object associated with the request and made accessible through the HttpRequestContext.RouteData property.
![]() Tip I explain the format of the routing data, and the classes that provide it, in Chapters 20 and 21.
Tip I explain the format of the routing data, and the classes that provide it, in Chapters 20 and 21.
Understanding the Default URL Routing Configuration
There are two ways in which to define Web API routes. The first is to use convention-based routing, which means that routes are configured in a single location and are written to match as many requests as possible. This is the traditional use of URL routing, and it originates from the MVC framework where a uniform and standardized URL schema makes it easier for users to interact with the application.
The other way to define routes is direct routing or attribute-based routing. There are some common RESTful URL formats that are hard to implement easily with convention-based routing but that are more easily expressed by applying routing information directly to the controllers and action methods that support a specific URL pattern. I am not a fan of direct routing for MVC framework applications, but it can be extremely useful in Web API applications. There are no default direct routes defined in a Web API application, but I describe the feature in detail in Chapters 20 and 21. Web API routing is set up in the WebApiConfig.cs file, as follows:
using System;
using System.Collections.Generic;
using System.Linq;
using System.Web.Http;

namespace Actions {
    public static class WebApiConfig {
        public static void Register(HttpConfiguration config) {

            config.MapHttpAttributeRoutes();

            config.Routes.MapHttpRoute(
                name: "DefaultApi",
                routeTemplate: "api/{controller}/{id}",
                defaults: new { id = RouteParameter.Optional }
            );
        }
    }
}
The two highlighted statements set up the default URL routing configuration. The MapHttpAttributesRoutes method sets up direct routing (which I describe in Chapter 21).
![]() Tip Web API and MVC framework URL routing work in similar ways but do not share a common class hierarchy or configuration files. Applications that use both frameworks have two separate routing configurations. MVC framework routing is configured in the App_Start/RouteConfig.cs file using classes in the System.Web.Routing namespace. Web API routing is configured in the App_Start/WebApiConfig.cs file using classes from the System.Web.Http namespace. Be careful when creating your routing configuration, especially when using Visual Studio to resolve namespaces, because it is easy to end up with a class that mixes classes with the same names from different namespaces and so won’t compile.
Tip Web API and MVC framework URL routing work in similar ways but do not share a common class hierarchy or configuration files. Applications that use both frameworks have two separate routing configurations. MVC framework routing is configured in the App_Start/RouteConfig.cs file using classes in the System.Web.Routing namespace. Web API routing is configured in the App_Start/WebApiConfig.cs file using classes from the System.Web.Http namespace. Be careful when creating your routing configuration, especially when using Visual Studio to resolve namespaces, because it is easy to end up with a class that mixes classes with the same names from different namespaces and so won’t compile.
The other statement calls the Routes.MapHttpRoute method on the HttpConfiguration argument passed to the Register method. The MapHttpRoute method sets up a new route called DefaultApi that generates two pieces of routing data, controller and id, both of which are extracted from the request URL. This is an example of convention-based routing, which I describe in detail in Chapter 20.
The controller value is used to select the controller that will handle the request, and the id value is for parameter binding. You can see how the controller and id values are extracted from the URL by looking at the routeTemplate property used to create the route.
...
routeTemplate: "api/{controller}/{id}",
...
For this URL:
/api/productsthe DefaultApi route would produce routing data that contains only the products value for controller because there is no value for the id key. I explain how route templates are defined and applied in Chapters 20 and 21.
For this URL:
/api/products/1the routing data produced by the DefaultApi route would contain products as the value for controller and 1 as the value for id. Table 19-5 summarizes the routing data for the /api/products/1 URL, which I will use as the exemplar request for the rest of this section.
Table 19-5. The Routing Data Generated by the Default Route for the Exemplar URL
Key | Value |
|---|---|
controller | products |
id | 1 |
![]() Tip Notice that the DefaultApi route doesn’t generate a routing data value for an action method name. I explain why in Chapter 22.
Tip Notice that the DefaultApi route doesn’t generate a routing data value for an action method name. I explain why in Chapter 22.
Figure 19-4 shows my pipeline diagram, updated to show the HttpRoutingDispatcher class, the routing system, and the routing data.
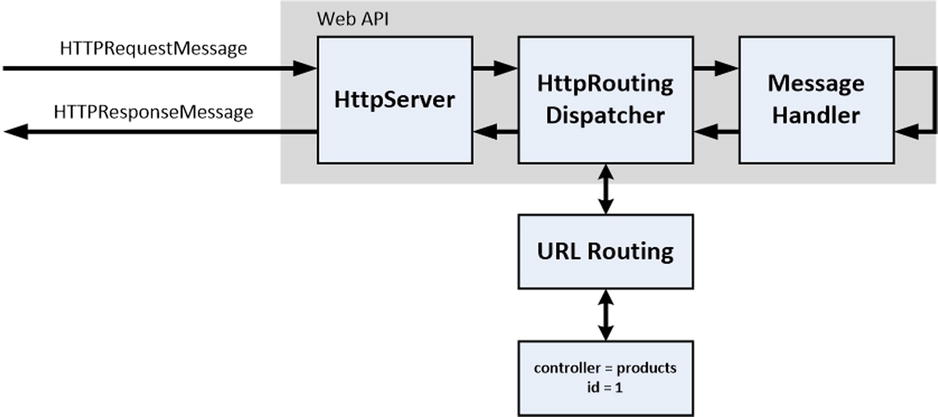
Figure 19-4. Revising the pipeline diagram to include the HttpRoutingDispatcher class
Understanding the HttpControllerDispatcher Class
The third and final built-in message handler class is HttpControllerDispatcher, and it is responsible for locating a controller class, creating an instance of it, and asking it to process the request to produce the HttpResponseMessage that will be passed back to the hosting environment via the other message handlers in the chain. The HttpControllerDispatcher class relies on several components to achieve its goal. In the sections that follow, I describe how controllers are located and instantiated.
The HttpControllerDispatcher class delegates the selection of the controller class to an implementation of the IHttpControllerSelector interface, which is defined in the System.Web.Http.Dispatcher namespace. Here is the definition of the IHttpControllerSelector interface:
using System.Collections.Generic;
using System.Diagnostics.CodeAnalysis;
using System.Net.Http;
using System.Web.Http.Controllers;

namespace System.Web.Http.Dispatcher {

    public interface IHttpControllerSelector {

        IDictionary<string, HttpControllerDescriptor> GetControllerMapping();

        HttpControllerDescriptor SelectController(HttpRequestMessage request);
    }
}
The GetControllerMapping method returns a collection of all the controllers that are available in the application. I explain the purpose of this method in the “Customizing Other Dispatch Components” section later in the chapter, but it is not of interest at the moment.
Instead, it is the SelectController method that is important, and it is called by the HttpControllerDispatcher to obtain an HttpControllerDescriptor object that describes the controller that can handle the request. The HttpControllerDescriptor class is defined in the System.Web.Http.Controllers namespace and provides the properties and methods shown in Table 19-6.
Table 19-6. The Members Defined by the HttpControllerDescriptor Class
Name | Description |
|---|---|
Configuration | Returns the HttpConfiguration object associated with the controller. Controllers can have their own configurations, as I explain in Chapter 22. |
ControllerName | Returns the name of the controller. |
ControllerType | Returns the Type of the controller. |
CreateController(request) | Creates an instance of the controller that will handle the specified HttpRequestMessage object. |
GetCustomAttributes<T>() | Returns the collection of attributes of type T that have been applied to the controller class. |
GetFilters() | Returns the filters that have been applied to the class. I describe Web API filters in Chapters 23 and 24. |
The default implementation of the IHttpControllerSelector interface is the DefaultHttpControllerSelector class, which is defined in the System.Web.Http.Dispatcher namespace. To select a controller, the DefaultHttpControllerSelector class needs to do the following tasks: identify all of the controllers in the application, select the controller to handle the current request, and then, finally, create an instance of that controller. I describe how each task is completed in the following sections.
During application startup, the DefaultHttpControllerSelector builds a list of all the controller classes in the application, which is later used as the basis for selecting a controller to handle each request. It delegates the identification of controllers to the IHttpControllerTypeResolver interface, as follows:
using System.Collections.Generic;
using System.Diagnostics.CodeAnalysis;

namespace System.Web.Http.Dispatcher {

    public interface IHttpControllerTypeResolver {

        ICollection<Type> GetControllerTypes(IAssembliesResolver assembliesResolver);
    }
}
The IHttpControllerTypeResolver interface defines the GetControllerTypes method, which is required to return a collection of all the controller types in the application. The GetControllerTypes method is passed an implementation of the IAssembliesResolver interface. This interface defines the GetAssemblies method, which is responsible for returning a collection of all the assemblies in the application, as follows:
using System.Collections.Generic;
using System.Diagnostics.CodeAnalysis;
using System.Reflection;

namespace System.Web.Http.Dispatcher {

    public interface IAssembliesResolver {
        ICollection<Assembly> GetAssemblies();
    }
}
The default implementations of these interfaces are simple. The DefaultAssembliesResolver class implements the IAssembliesResolver interface and returns all the assemblies in the application domain. A custom implementation could filter the assembly collection to include just those that are known to contain controllers, but the benefit would be a marginally quicker startup process at the cost of an application that won’t work properly if the assembly structure is changed.
The default implementation of the IHttpControllerTypeResolver interface is the DefaultHttpControllerTypeResolver class, and it inspects the classes in the assemblies returned by the IAssembliesResolver interface and identifies those that are controllers. Controllers are identified by three characteristics:
- They are classes that implement the IHttpController interface.
- The name of the class has the Controller suffix (for example, ProductsController).
- The class is public and is not abstract.
The DefaultHttpControllerSelector class creates a cache of HttpControllerDescriptor objects for each controller class that the IHttpControllerTypeResolver implementation identifies.
![]() Tip The controller classes are inspected at startup because it can be a slow process, especially for large projects. The set of controller classes that the DefaultHttpControllerSelector locates is cached so that the process is performed only when the application first starts.
Tip The controller classes are inspected at startup because it can be a slow process, especially for large projects. The set of controller classes that the DefaultHttpControllerSelector locates is cached so that the process is performed only when the application first starts.
When the HttpControllerDispatcher class asks for a controller by calling the SelectController method, the DefaultHttpControllerSelector class looks through its cache of HttpControllerDescriptor objects until it finds one with a ControllerName value that matches the controller value from the routing data created by the HttpRoutingDispatcher class.
![]() Note The DefaultHttpControllerTypeResolver and DefaultAssembliesResolver classes are the default implementations of their interfaces if you want to derive new functionality without implementing the IHttpControllerTypeResolver and IAssembliesResolver directly. However, if you are hosting your Web API application in IIS, two other classes are used: WebHostHttpControllerTypeResolver and WebHostAssembliesResolver. Hosting environments are free to change the default implementations of interfaces, and you should make sure you understand the impact of replacing them with custom implementations, especially for such low-level interfaces.
Note The DefaultHttpControllerTypeResolver and DefaultAssembliesResolver classes are the default implementations of their interfaces if you want to derive new functionality without implementing the IHttpControllerTypeResolver and IAssembliesResolver directly. However, if you are hosting your Web API application in IIS, two other classes are used: WebHostHttpControllerTypeResolver and WebHostAssembliesResolver. Hosting environments are free to change the default implementations of interfaces, and you should make sure you understand the impact of replacing them with custom implementations, especially for such low-level interfaces.
Activating the Controller
At this point, the HttpControllerDispatcher class has obtained an HttpControllerDescriptor object that describes the controller that will handle the request. The next step is to instantiate the controller class, a process known as activation.
Activation is performed by calling the CreateController method of the HttpControllerDescriptor class, which in turn delegates the process to an implementation of the IControllerActivator interface.
using System.Net.Http;
using System.Web.Http.Controllers;

namespace System.Web.Http.Dispatcher {

    public interface IHttpControllerActivator {
        IHttpController Create(HttpRequestMessage request,
            HttpControllerDescriptor controllerDescriptor, Type controllerType);
    }
}
The Create method is called to create an IHttpController object and is provided with the HttpRequestMessage that describes the current request, the HttpControllerDescriptor that describes the controller, and the controller Type.
The default IHttpControllerActivator implementation is the DefaultHttpControllerActivator class, which is defined in the System.Web.Http.Dispatcher namespace. The process that the DefaultHttpControllerActivator class follows is simple:
- Try to get an instance of the controller type from the dependency resolver.
- Create an instance of the controller by invoking a parameterless constructor.
This approach supports the dependency injection model I described in Chapter 10 but falls back to instantiating classes directly if there is no resolver in the application. It also means that if you need to define controllers without parameterless constructors, you must either create a custom implementation of the IHttpControllerActivator interface or configure a dependency resolver that knows how to instantiate them (as I did in the SportsStore application for controllers that defined a repository constructor argument).
The HttpControllerDispatcher has almost completed its task: it has selected a controller and created an instance of it, and all that remains is to ask it to process the result so that the HttpResponseMessage can be returned along the chain of message handlers and, ultimately, sent to the client. As I mentioned in the previous section, one of the identifying characteristics of a controller is that it implements the IHttpController interface.
using System.Net.Http;
using System.Threading;
using System.Threading.Tasks;

namespace System.Web.Http.Controllers {

    public interface IHttpController {
        Task<HttpResponseMessage> ExecuteAsync(HttpControllerContext controllerContext,
            CancellationToken cancellationToken);
    }
}
The IHttpController interface defines the ExecuteAsync method, which is passed an HttpControllerContext and a CancellationToken. The purpose of the method is to asynchronously process the request using the information provided by the HttpControllerContext and return a Task that produces an HttpResponseMessage object when it completes.
The HttpControllerContext object is created by the HttpControllerDispatcher class in order to provide the controller with all the details it needs to do its work. The HttpControllerContext class defines the properties shown in Table 19-7.
Table 19-7. The Properties Defined by the HttpControllerContext Class
Name | Description |
|---|---|
Configuration | Returns the HttpConfiguration object that should be used to service the request. As I explain in Chapter 22, controllers can be given their own configuration to work with. |
Controller | Returns the IHttpController instance. This is not entirely useful when the HttpControllerContext is being passed an argument to the controller but is more useful when used for other tasks such as action method selection (which I describe in Chapter 22). |
ControllerDescriptor | Returns the HttpControllerDescriptor that led to the controller being instantiated. |
Request | Returns the HttpRequestMessage that describes the current request. |
RequestContext | Returns the HttpRequestContext that provides additional information about the request. |
RouteData | Returns the IHttpRouteData object that contains the routing data for the request. See Chapters 20 and 21 for details. |
The details of how the IHttpController implementation processes the HttpControllerContext into an HttpResponseMessage are entirely opaque to the message handlers, but I explain how the default controller class, ApiController, works in Chapter 22. You won’t be surprised that it relies on delegating work to implementations of interfaces that you can replace or customize.
Now that I have explained how the HttpControllerDispatcher works, I can update my diagram to reflect the end-to-end flow of a request and its response through the Web API dispatch process, as illustrated in Figure 19-5.
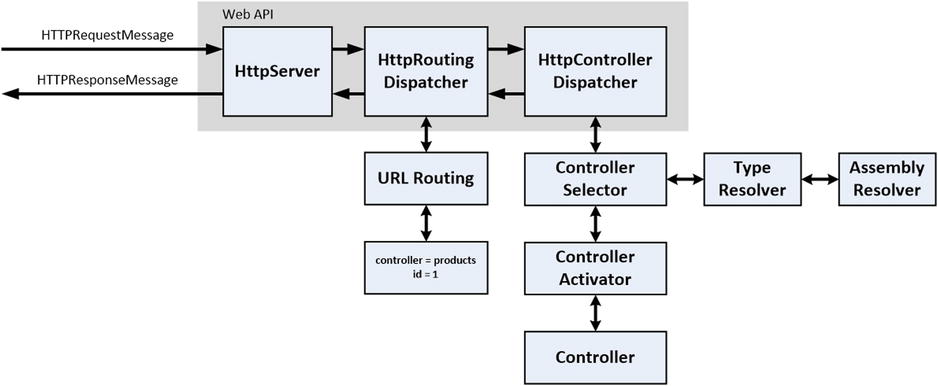
Figure 19-5. The end-to-end Web API dispatch process
There are two areas that I have only lightly touched on as I described the dispatch process: URL routing and controllers. In both cases, this is because they are big enough features to warrant their own chapters. I describe URL routing in Chapters 20 and 21 and explain how controllers work in Chapter 22.
Customizing the Dispatch Process
The reason that there are so many interfaces involved in the dispatch process is so that the way requests are handled can be customized. Although I described the default implementation classes in the previous section, implementations of the dispatch interfaces are obtained from the services collection, using the extension methods listed in Table 19-8.
Table 19-8. The Extension Methods That Obtain Dispatcher Objects from the Services Collection
Name | Description |
|---|---|
GetAssembliesResolver() | Returns an implementation of the IAssembliesResolver interface |
GetHttpControllerActivator() | Returns an implementation of the IHttpControllerActivator interface |
GetHttpControllerSelector() | Returns an implementation of the IHttpControllerSelector interface |
GetHttpControllerTypeResolver() | Returns an implementation of the IHttpControllerTypeResolver interface |
These extension methods are defined in the System.Web.Http namespace and operate on the ServicesContainer class. That means you can obtain a reference to instances of the default classes by calling one of these methods on the HttpConfiguration.Services property, like this:
...
GlobalConfiguration.Configuration.Services.GetHttpControllerSelector()
...
The fact that implementation classes are located via the services collection means that it is easy to create and use custom classes to replace the defaults and that, if you do, you can take advantage of the services in your own classes so that you don’t have to reimplement the entire dispatch process.
In the sections that follow, I’ll show you how to extend and customize the dispatch process, by adding new message handlers and creating custom implementations of the dispatch interfaces. Table 19-9 puts customizing the dispatch process in context.
Table 19-9. Putting the Customizing the Dispatch Process in Context
Question | Answer |
|---|---|
What is it? | The dispatch process can be customized to control the way that requests flow through the Web API application. |
When should you use it? | The default dispatch process is suitable for most Web API applications, but customizations can be useful for integrating custom systems into Web API (such as custom authentication) or to support unusual or legacy clients. |
What do you need to know? | You can use custom message handlers to adapt requests from difficult clients to the standard Web API model or to stop requests from being processed. Finer-grained customizations are possible by reimplementing the interfaces that are used to locate and select controller classes. |
Creating Custom Message Handlers
Web API allows custom message handlers to be added to the chain between the HttpServer and HttpRoutingDispatch classes. Custom message handlers are similar to traditional ASP.NET modules and can be used to prepare an HttpRequestMessage for process or modify an HttpResponseMessage before it is used to produce a response to the client.
Custom message handlers are derived from the DelegatingHandler class, which is derived from MessageHandler, but adds support for an inner handler, which is the next handler in the chain. A custom handler can call the inner handler to advance the request to the next stage in the dispatch pipeline or generate a response itself to terminate the request handing process. As a demonstration, I created a folder called Infrastructure and added to it a class file called CustomMessageHandler.cs. Listing 19-6 shows the custom message handle that I created.
Listing 19-6. The Contents of the CustomMessageHandler.cs File
using System.Net;
using System.Net.Http;
using System.Threading;
using System.Threading.Tasks;

namespace Dispatch.Infrastructure {
    public class CustomMessageHandler : DelegatingHandler {

        protected async override Task<HttpResponseMessage> SendAsync(HttpRequestMessage
            request, CancellationToken cancellationToken) {

            if (request.Method == HttpMethod.Post) {

                return request.CreateErrorResponse(HttpStatusCode.MethodNotAllowed,
                    "POST Not Supported");
            } else {
                return await base.SendAsync(request, cancellationToken);
            }
        }
    }
}
This class demonstrates how a message handler can intercept requests and create a result directly. Within the SendAsync method, I look for POST requests by checking the HttpRequestMessage.Method property. When the method is POST, I create an HttpResponseMessage with the 405 (Method Not Allowed) status code, like this:
...
return request.CreateErrorResponse(HttpStatusCode.MethodNotAllowed,
    "POST Not Supported");
...
CreateErrorResponse is one of the extension methods that can be applied to HttpRequestMessage objects to create HttpResponseMessage objects. These methods conveniently populate the HttpResponseMessage fields from their parameter values and details of the request. There are methods available to create successful and error responses, all of which are defined by the HttpRequestMessageExtensions class. I have shown the most useful methods for creating HttpResponseMessage objects in Table 19-10. (I have omitted a few versions that specify a particular media type formatter to encode data objects or provide additional detail about an error.)
Table 19-10. The Methods for Creating HttpResponseMessage Objects from an HttpRequestMessage
Method | Description |
|---|---|
CreateResponse() | Creates a basic HttpResponseMessage with the 200 (OK) status code and no content. |
CreateResponse(status) | Creates an HttpResponseMessage with the specified status code, which is expressed as an HttpStatusCode value. |
CreateResponse(data) | Creates an HttpResponseMessage with the 200 (OK) status code and the specified data object as the content. The data object is encoded using the content negotiation process that I described in Part 2. |
CreateResponse(status, data) | Creates an HttpResponseMessage with the specified status code and data object. The status code is expressed as an HttpStatusCode, and the data object is encoded using the content negotiation process I described in Part 2. |
CreateResponse(status, data, mime) | Creates an HttpResponseMessage with the specified status code and data object. The status code is expressed as an HttpStatusCode, and the data object is encoded using the specified MIME type using the media type formatter process I described in Part 2. |
CreateErrorResponse(status, message) | Creates an HttpResponseMessage with the specified status code and error message. The status code is expressed using HttpStatusCode, and the message is a string. I describe Web API error handling in Part 2. |
CreateErrorResponse(status, error) | Creates an HttpResponseMessage with the specified status code and error. The status code is expressed using HttpStatusCode, and the error is an HttpError. I describe Web API error handling in Chapter 25. |
A message handle that returns an HttpResponseMessage from its SendAsync method terminates the normal process of the HttpRequestMessage through the chain of message handlers. For my example message handler, this means that POST requests are rejected, and both requests with other verbs are allowed to processed.
If a handler wants to pass on a request to the next handler in the chain, then it calls the SendAsync method of the base class and returns the result, like this:
...
return await base.SendAsync(request, cancellationToken);
...
Each message handler is automatically configured with details of the next message handler so that you don’t have to manage details of the handler chain inside your custom class.
Message handlers are registered through the HttpConfiguration.MessageHandlers property, as shown in Listing 19-7.
Listing 19-7. Registering a Custom Message Handler in the WebApiConfig.cs File
using System;
using System.Collections.Generic;
using System.Linq;
using System.Web.Http;
using Dispatch.Infrastructure;

namespace Dispatch {
    public static class WebApiConfig {
        public static void Register(HttpConfiguration config) {

            config.MapHttpAttributeRoutes();

            config.Routes.MapHttpRoute(
                name: "DefaultApi",
                routeTemplate: "api/{controller}/{id}",
                defaults: new { id = RouteParameter.Optional }
            );

            config.MessageHandlers.Add(new CustomMessageHandler());
        }
    }
}
The MessageHandlers collection contains only custom message handlers, which are always placed after HttpServer and before HttpRoutingDispatcher in the message handler chain. To test the new message handler, start the application and click the Post button—the handler will intercept the request and return the error response shown in Figure 19-6.
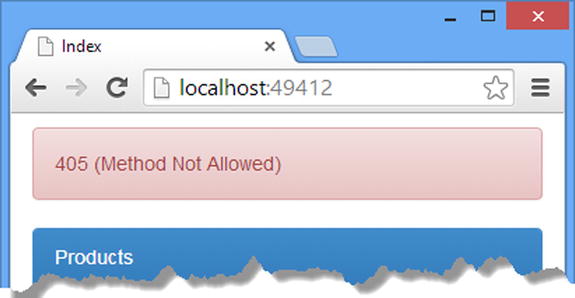
Figure 19-6. Testing the custom message handler
![]() Caution A single instance of the message handler class is created and used to service all of the requests that the Web API application receives. This means your code must be thread-safe and must be able to deal with concurrent execution of the SendAsync method.
Caution A single instance of the message handler class is created and used to service all of the requests that the Web API application receives. This means your code must be thread-safe and must be able to deal with concurrent execution of the SendAsync method.
Modifying Requests or Responses in a Message Handler
Although you can use a message handler to stop or allow requests through the application—as I did in the previous section—a more common use for a message handler is to modify the HttpRequestMessage or HttpResponseMessage object to add new features to your web service.
The problem is that Web API already has every feature that a web service needs, and while it is useful that you can intercept and modify the request and response, there is little need to do so.
The standard demonstration for message handlers is to add support for the X-HTTP-Method-Override header, which isn’t supported by Web API by default. It isn’t an example that I like (for the reasons I set out in the “Understanding the X-HTTP-Method-Override Header” sidebar), but it is a simple and self-contained demonstration of how a message handler can be used, so I have included it in this chapter. Listing 19-8 shows how I have revised the CustomMessageHandler class so that it supports the X-HTTP-Method-Override header.
Listing 19-8. Supporting a Nonstandard Header in the CustomMessageHandler.cs File
using System.Net;
using System.Net.Http;
using System.Threading;
using System.Threading.Tasks;
using System.Linq;

namespace Dispatch.Infrastructure {
    public class CustomMessageHandler : DelegatingHandler {

        protected async override Task<HttpResponseMessage> SendAsync(HttpRequestMessage
            request, CancellationToken cancellationToken) {

            if (request.Method == HttpMethod.Post
                && request.Headers.Contains("X-HTTP-Method-Override")) {

                HttpMethod requestedMethod = new HttpMethod(
                    request.Headers.GetValues("X-HTTP-Method-Override").First());

                if (requestedMethod == HttpMethod.Put
                        || requestedMethod == HttpMethod.Delete) {
                    request.Method = requestedMethod;
                } else {
                    return request.CreateErrorResponse(HttpStatusCode.MethodNotAllowed,
                        "Only PUT and DELETE can be overridden");
                }
            }
            return await base.SendAsync(request, cancellationToken);
        }
    }
}
UNDERSTANDING THE X-HTTP-METHOD-OVERRIDE HEADER
The X-HTTP-Method-Override header allows clients to tell the web service that the request should be handled as though it has a different HTTP verb. For example, if the server receives an HTTP POST request with the X-HTTP-Method-Override set to PUT, then the request should be handled as though the PUT verb had been used.
The X-HTTP-Method-Override arose to work around limitations in some clients that could send only GET or POST requests or to work around firewalls that blocked any verb except GET or POST. Using the X-HTTP-Method-Override allows clients to work around these limitations and take full advantage of a RESTful web service.
As helpful as the X-HTTP-Method-Override header can be, it requires coordination between the client and the server: the client needs to know that the server is looking for the header and will honor it. If the client and server are not coordinated, then the header will be ignored, and POST requests will always be taken as POST requests, even if the X-HTTP-Method-Override header specifies a different verb. In addition, clients have no way of knowing whether there are verbs that cannot be used; there is no way of detecting the policy of a corporate firewall, for example. In short, the X-HTTP-Method-Override has some issues, and I recommend avoiding it if at all possible. It is no accident that neither Web API nor the MVC framework supports the header.
I look for POST requests that contain the X-HTTP-Method-Override header, which I apply only to the PUT and DELETE verbs (although if you are supporting this header in a real project, you should take care to allow all of the verbs that your web service requires). For requests that meet my criteria, I set the value of the HttpRequestMethod.Method property, which has the effect of causing the rest of the Web API message handlers to treat the request as though it was made using the verb specified by the X-HTTP-Method-Override header.
The example web service supports only POST and GET, but Listing 19-9 shows the changes that are required to the dispatch.js file to support the X-HTTP-Method-Override header.
Listing 19-9. Adding Support for the X-HTTP-Method-Override Header in the dispatch.js File
...
var sendRequest = function (verb, id) {

    var url = "/api/products/" + (id || "");

    var config = {
        type: verb || "GET",
        data: verb == "POST" ? viewModel() : null,
        success: function (data) {
            gotError(false);
            response("Success");
            products.removeAll();
            if (Array.isArray(data)) {
                data.forEach(function (product) {
                    products.push(product);
                });
            } else {
                products.push(data);
            }
        },
        error: function (jqXHR) {
            gotError(true);
            products.removeAll();
            response(jqXHR.status + " (" + jqXHR.statusText + ")");
        }
    }

    if (verb != "GET" && verb != "POST") {
        config.type = "POST";
        config.headers = {
            "X-HTTP-Method-Override": verb
        };
    }

    $.ajax(url, config);
};
...
Using Message Handlers as Diagnostic Tools
I find message handlers most useful as a diagnostic tool for when I can’t figure out the cause of a problem and I start to lose trust in my tools. Sometimes this is a consequence of desperation—a growing conviction that I am missing something fundamental—but most often I use message handlers so I can break the Visual Studio debugger right at the start of the dispatch process and follow a request all the way through the application and follow the response all the way back out again. This is especially useful when using the debugger to display the Web API source code, which allows all of the objects and variables to be inspected and makes it easy (or at least easier) to find out what is causing a problem.
You can manually apply breakpoints to your application code, but a request handler can break the debugger while the request has just entered the world of Web API. Listing 19-10 shows how I have changed the CustomMessageHandler class so that it breaks the debugger.
Listing 19-10. Creating a Diagnostic Tool in the CustomMessageHandler.cs File
using System.Net;
using System.Net.Http;
using System.Threading;
using System.Threading.Tasks;
using System.Linq;

namespace Dispatch.Infrastructure {
    public class CustomMessageHandler : DelegatingHandler {

        protected async override Task<HttpResponseMessage> SendAsync(HttpRequestMessage
            request, CancellationToken cancellationToken) {

            if (request.Method == HttpMethod.Post) {
                System.Diagnostics.Debugger.Break();
            }
            return await base.SendAsync(request, cancellationToken);

        }
    }
}
The System.Diagnostics.Debugger class controls the debugger, and the Break method stops execution of the application and hands it control. With this message handler installed, every POST request causes the debugger to break so that you can step through the dispatch process. To see the effect, start the application and click the Post button in the browser. The Break method will be called and execution of the application will be stopped so that you can control it through the standard Visual Studio debugger.
Customizing Other Dispatch Components
You can create custom implementations of all the interfaces that I described in this chapter, but there is little point in doing so because the Web API default implementations are serviceable for most applications. That said, it is always useful to know that you can replace the standard components if you need to, and in the sections that follow, I show the process for changing the suffix used to identify controller classes, which is Controller by default.
Implementing the Interfaces
An implementation of the IHttpControllerTypeResolver interface is responsible for identifying the controller classes in the application. The default implementation of the interface is the DefaultHttpControllerTypeResolver class, and it defines a method called IsControllerType that is called for each type in the application to see whether it is a controller, as follows:
...
internal static bool IsControllerType(Type t) {
    return
        t != null &&
        t.IsClass &&
        t.IsVisible &&
        !t.IsAbstract &&
        typeof(IHttpController).IsAssignableFrom(t) &&
        HasValidControllerName(t);
}
...
This method is exactly what you would expect to see; it looks for classes that are public, not abstract, and that are derived from IHttpController. The final test is the one that is interesting for this example: only classes for which the HasValidControllerName method returns true are selected. Here is the definition of the HasValidControllerName method:
...
internal static bool HasValidControllerName(Type controllerType) {
    string controllerSuffix = DefaultHttpControllerSelector.ControllerSuffix;
    return controllerType.Name.Length > controllerSuffix.Length
        && controllerType.Name.EndsWith(controllerSuffix,
            StringComparison.OrdinalIgnoreCase);
}
...
The DefaultHttpControllerSelector.ControllerSuffix property is set to Controller, and the HasValidControllerName method checks to see that the class name contains the suffix (and isn’t just the suffix so that a class called Controller won’t be identified as a controller).
Ideally, I could change the suffix used to identify controllers by deriving from the DefaultHttpControllerTypeResolver class and overriding either the IsControllerType or HasValidControllerName method; these are both marked as internal. An alternative would be to change the value of the DefaultHttpControllerSelector.ControllerSuffix property, but that isn’t possible because it has been marked as readonly.
...
public static readonly string ControllerSuffix = "Controller";
...
The implementation of the DefaultHttpControllerSelector and DefaultHttpControllerTypeResolver classes means that I need to create my own implementation of the IHttpControllerTypeResolver interface in order to change the controller suffix. I added a class file called CustomControllerTypeResolver.cs to the Infrastructure folder and used it to define the class shown in Listing 19-11.
Listing 19-11. The Contents of the CustomControllerTypeResolver.cs Class
using System;
using System.Collections.Generic;
using System.Linq;
using System.Web.Http.Controllers;
using System.Web.Http.Dispatcher;

namespace Dispatch.Infrastructure {
    public class CustomControllerTypeResolver : IHttpControllerTypeResolver {

        public string Suffix { get; set; }

        public ICollection<Type> GetControllerTypes(IAssembliesResolver
            assembliesResolver) {

            return assembliesResolver.GetAssemblies()
                .Select(assembly => assembly.GetTypes())
                .SelectMany(t => t)
                .Where(t => t != null
                    && t.IsClass
                    && t.IsVisible
                    && !t.IsAbstract
                    && typeof(IHttpController).IsAssignableFrom(t)
                    && HasValidControllerName(t)).ToList();
        }

        private bool HasValidControllerName(Type t) {
            return t.Name.Length > Suffix.Length
                && t.Name.EndsWith(Suffix, StringComparison.OrdinalIgnoreCase);
        }
    }
}
My custom implementation has a Suffix property that is used to locate controller classes in the assemblies provided by the IAssembliesResolver implementation object that is passed to the GetControllerTypes method.
Unfortunately, the class shown in Listing 19-11 doesn’t have the effect you might expect, which is because the DefaultHttpControllerSelector class uses a cache to speed up controller selection, and the class that handles the caching (the HttpControllerTypeCache class) has a hard-coded dependency on the DefaultHttpControllerSelector.ControllerSuffix property that it uses to retrieve cached classes. This means that if I want to change the suffix used by controllers, it isn’t enough to create a new implementation of the IHttpControllerTypeResolver class—I also have to create a new implementation of the IHttpControllerSelector interface as well. Listing 19-12 shows the contents of the CustomControllerSelector.cs file that I added to the Infrastructure folder.
Listing 19-12. The Contents of the CustomControllerSelector.cs File
using System;
using System.Collections.Generic;
using System.Linq;
using System.Net;
using System.Net.Http;
using System.Web.Http;
using System.Web.Http.Controllers;
using System.Web.Http.Dispatcher;

namespace Dispatch.Infrastructure {

    public class CustomControllerSelector : IHttpControllerSelector {
        private IDictionary<string, HttpControllerDescriptor> dictionary;
        private ILookup<string, HttpControllerDescriptor> mappings;

        public CustomControllerSelector(string suffix) {

            Suffix = suffix;
            HttpConfiguration config = GlobalConfiguration.Configuration;

            IHttpControllerTypeResolver typeFinder =
                config.Services.GetHttpControllerTypeResolver();
            IAssembliesResolver assemblyFinder = config.Services.GetAssembliesResolver();

            IEnumerable<HttpControllerDescriptor> descriptors
                = typeFinder.GetControllerTypes(assemblyFinder)
                .Select(type => new HttpControllerDescriptor {
                    Configuration = GlobalConfiguration.Configuration,
                    ControllerName = type.Name.Substring(0,
                        type.Name.Length - Suffix.Length),
                    ControllerType = type});

            mappings = descriptors.ToLookup(descriptor =>
                    descriptor.ControllerName, StringComparer.OrdinalIgnoreCase);

            dictionary = descriptors.ToDictionary(d => d.ControllerName, d => d);
        }

        private string Suffix { get; set; }

        public IDictionary<string, HttpControllerDescriptor> GetControllerMapping() {
            return dictionary;
        }

        public HttpControllerDescriptor SelectController(HttpRequestMessage request) {
            string key
                = request.GetRequestContext().RouteData.Values["controller"] as string;
            IEnumerable<HttpControllerDescriptor> matches = mappings[key];
            switch (matches.Count()) {
                case 1:
                    return matches.First();
                case 0:
                    throw new HttpResponseException(HttpStatusCode.NotFound);
                default:
                    throw new HttpResponseException(HttpStatusCode.InternalServerError);
            }
        }
    }
}
The IHttpControllerSelector interface requires two methods to be implemented. The GetControllerMapping method is used by the attribute routing feature to configure itself during application startup and requires a Dictionary that maps controller names to HttpControllerDescriptor objects. I use LINQ to create an enumeration of HttpControllerDescriptor object in the CustomControllerSelector constructor and then use the always-convenient LINQ ToDictionary method to create the collection that the GetControllerMapping mapping demands.
I have taken a different approach for the SelectController method and used the LINQ ToLookup method. This little-used method groups together objects based on a key, which is useful because a Web API application can contain multiple controller classes with the same name but defined in different namespaces. I follow the default behavior and throw an exception if more than one controller matches the value of the controller routing data value.
Registering the Interface Implementations
Listing 19-13 shows how I replaced the default implementations of the IHttpControllerTypeResolver and IHttpControllerSelector interfaces with my custom classes in the WebApiConfig.cs file.
Listing 19-13. Registering Custom Classes in the WebApiConfig.cs File
using System;
using System.Collections.Generic;
using System.Linq;
using System.Web.Http;
using Dispatch.Infrastructure;
using System.Web.Http.Dispatcher;

namespace Dispatch {
    public static class WebApiConfig {
        public static void Register(HttpConfiguration config) {

            config.MapHttpAttributeRoutes();

            config.Routes.MapHttpRoute(
                name: "DefaultApi",
                routeTemplate: "api/{controller}/{id}",
                defaults: new { id = RouteParameter.Optional }
            );

            config.MessageHandlers.Add(new CustomMessageHandler());

            config.Services.Replace(typeof(IHttpControllerTypeResolver),
                new CustomControllerTypeResolver { Suffix = "Service" });
            config.Services.Replace(typeof(IHttpControllerSelector),
                new CustomControllerSelector("Service"));
        }
    }
}
![]() Tip Notice that I set the suffix when I create instances of both classes. The CustomControllerTypeResolver class needs to know the suffix so that it can select classes from the application assemblies that are controllers. The CustomControllerSelector class needs to know the suffix because it needs to remove it from the class names to create the controller name for the HttpControllerDescriptor objects. It is this dual use of the suffix that has led Microsoft to define a field in the DefaultHttpControllerSelector class that is then used in other classes. A better approach would be to define an IHttpControllerNameSelector interface that would consolidate the naming policy in a single place, but I have chosen to take the more direct—if less ideal—path of just repeating the suffix as a string literal when instantiating the classes that require it.
Tip Notice that I set the suffix when I create instances of both classes. The CustomControllerTypeResolver class needs to know the suffix so that it can select classes from the application assemblies that are controllers. The CustomControllerSelector class needs to know the suffix because it needs to remove it from the class names to create the controller name for the HttpControllerDescriptor objects. It is this dual use of the suffix that has led Microsoft to define a field in the DefaultHttpControllerSelector class that is then used in other classes. A better approach would be to define an IHttpControllerNameSelector interface that would consolidate the naming policy in a single place, but I have chosen to take the more direct—if less ideal—path of just repeating the suffix as a string literal when instantiating the classes that require it.
Creating a Controller with the New Suffix
The final step is to create a controller class that has the new suffix and will be selected by the custom classes. Listing 19-14 shows the contents of the ProductsService.cs file that I added to the Controllers folder and used to define a simple Web API controller.
Listing 19-14. The Contents of the ProductsService.cs File
using System.Net;
using System.Web.Http;
using Dispatch.Models;

namespace Dispatch.Controllers {
    public class ProductsService : ApiController {

        public IHttpActionResult Get() {
            return StatusCode(HttpStatusCode.ServiceUnavailable);
        }

        public IHttpActionResult Get(int id) {
            return StatusCode(HttpStatusCode.ServiceUnavailable);
        }

        public IHttpActionResult Post(Product product) {
            return StatusCode(HttpStatusCode.ServiceUnavailable);
        }
    }
}
I want it to be obvious that this is the controller that the application is using to respond to requests from the client, so I have defined the same actions methods as in the ProductsController.cs file but modified them so that they return the 503 (Service Unavailable) status code. To test the custom implementation classes, start the application and click the Get All or Get One button. The classes I defined in this section will be used to match the request to a controller; the ProductsService class will be selected, the appropriate action methods executed, and the status code displayed in the browser window, as shown in Figure 19-7.
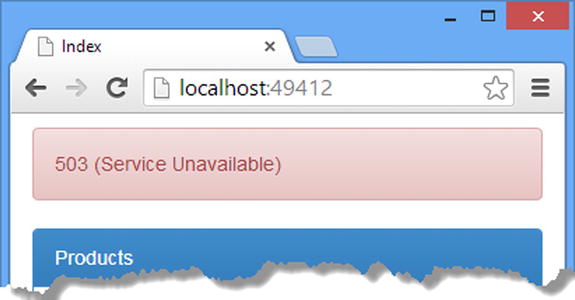
Figure 19-7. Changing the controller class suffix
![]() Tip You can also click the Post button, but the custom message handler that I defined earlier will break the debugger, so you will have to click the Visual Studio Continue button to see the result.
Tip You can also click the Post button, but the custom message handler that I defined earlier will break the debugger, so you will have to click the Visual Studio Continue button to see the result.
Taking the Simpler Path
Creating two new interface implementations is a lot of work just to change the controller class suffix, but it provided a nice demonstration of how you can create custom implementations of the dispatcher interfaces and use them to customize the dispatch process.
In a real project, I would take a much more direct route, albeit an ugly one. All of the work in this section was required because Microsoft defines the suffix in a field like this:
...
public static readonly string ControllerSuffix = "Controller";
...
I can’t change the value of the field because it is readonly—but it is also marked as static, and that means it is possible to use reflection to change the value of the field and bypass the readonly constraint. Listing 19-15 shows the changes required to the WebApiConfig.cs file.
Listing 19-15. Using Reflection to Change the Controller Class Suffix in the WebApiConfig.cs File
using System;
using System.Collections.Generic;
using System.Linq;
using System.Web.Http;
using Dispatch.Infrastructure;
using System.Web.Http.Dispatcher;
using System.Reflection;

namespace Dispatch {
    public static class WebApiConfig {
        public static void Register(HttpConfiguration config) {

            config.MapHttpAttributeRoutes();

            config.Routes.MapHttpRoute(
                name: "DefaultApi",
                routeTemplate: "api/{controller}/{id}",
                defaults: new { id = RouteParameter.Optional }
            );

            config.MessageHandlers.Add(new CustomMessageHandler());

            //config.Services.Replace(typeof(IHttpControllerTypeResolver),
            //    new CustomControllerTypeResolver { Suffix = "Service" });
            //config.Services.Replace(typeof(IHttpControllerSelector),
            //    new CustomControllerSelector("Service"));

            FieldInfo field = typeof(DefaultHttpControllerSelector)
                .GetField("ControllerSuffix", BindingFlags.Static | BindingFlags.Public);
            if (field != null) {
                field.SetValue(null, "Service");
            }
        }
    }
}
![]() Caution This is a terrible, terrible example of the worst kind of behavior that all programmers should avoid at all times. It circumvents the restrictions placed on the ControllerSuffix field by the original developers, it creates a hard-coded dependency on a private implementation of an interface, and it will almost certainly break when a future version of Web API takes a more helpful approach to defining the suffix. That said, I use this technique in a real projects because I think it is a reasonable trade-off against reimplementing two low-level interfaces with the testing and maintenance requirements that implies. But just because I think it is a good trade-off doesn’t mean that it will be appropriate for your projects.
Caution This is a terrible, terrible example of the worst kind of behavior that all programmers should avoid at all times. It circumvents the restrictions placed on the ControllerSuffix field by the original developers, it creates a hard-coded dependency on a private implementation of an interface, and it will almost certainly break when a future version of Web API takes a more helpful approach to defining the suffix. That said, I use this technique in a real projects because I think it is a reasonable trade-off against reimplementing two low-level interfaces with the testing and maintenance requirements that implies. But just because I think it is a good trade-off doesn’t mean that it will be appropriate for your projects.
Summary
In this chapter, I explained how Web API dispatches requests, which is the process of receiving an HttpRequestMethod object and using it to produce an HttpResponseMessage that will be used to generate a response to the client. I explained the role of the message handler classes and the different dispatch interfaces that control the flow of a request through a Web API application. I also demonstrated how to customize the dispatch process by creating custom message handlers and by reimplementing some of the dispatch interfaces. In the next chapter, I start to describe the URL routing feature, which is the first step for requests in the dispatch process.