
![]()
SportsStore: Creating the Clients
In this chapter, I will create a pair of single-page applications that deliver the functionality of the web services I created in Chapter 6 to clients and to administrators. I will build a common foundation of JavaScript code and then layer on the functionality that is specific to each client.
Client-side development isn’t part of the Web API world, but I wanted to show you the end-to-end development process for the SportsStore application. As a consequence, I cover a lot of ground in this chapter and don’t explain the implementation of all of the JavaScript functions I define, but I do include enough information for you to see the overall structure and layering I use to target the Web API action methods from Chapter 6.
![]() Tip There are a lot of files in this chapter. If you don’t want to type in all of the code and HTML, you can download the project for this chapter—and all chapters of this book—from Apress.com.
Tip There are a lot of files in this chapter. If you don’t want to type in all of the code and HTML, you can download the project for this chapter—and all chapters of this book—from Apress.com.
Preparing the Example Project
Before I get into the process of creating the clients, I need to make some general preparations. The first is the addition of an MVC controller that I can use to deliver HTML and JavaScript content to the browser. Listing 7-1 shows the contents of the HomeController.cs class file, which I added to the Controllers folder.
Listing 7-1. The Contents of the HomeController.cs File
using System.Web.Mvc;

namespace SportsStore.Controllers {
    public class HomeController : Controller {

        public ActionResult Index() {
            return View();
        }
    }
}
For my initial development, I created a placeholder view by creating the Views/Home folder, adding a view file called Index.cshtml, and using it to define the markup shown in Listing 7-2.
Listing 7-2. The Contents of the Index.cshtml File
<h2>Client Content Will Go Here</h2>
I will use the controller and view to test the lower-level functionality that I begin development with in this chapter and then use them deliver the customer client as the application becomes fully formed.
Setting Up JavaScript IntelliSense
I am going to be writing JavaScript code in this chapter, and I find it easier to do so using Visual Studio IntelliSense, which is the feature responsible for providing autocompletion of class, method, and property names in C# files. IntelliSense will also work with JavaScript, but it needs a little help through the creation of a filed called _references.js in the Scripts folder. I created the _references.js file by right-clicking the Scripts folder and selecting Add ![]() JavaScript File from the pop-up menu. Once Visual Studio created the file, I dragged the JavaScript files I will be depending on from the Solution Explorer and dropped them on the editor window for the _references.js file, producing the result shown in Listing 7-3.
JavaScript File from the pop-up menu. Once Visual Studio created the file, I dragged the JavaScript files I will be depending on from the Solution Explorer and dropped them on the editor window for the _references.js file, producing the result shown in Listing 7-3.
Listing 7-3. The Contents of the _references.js File
/// <reference path="jquery-2.1.0.js" />
/// <reference path="bootstrap.js" />
/// <reference path="knockout-3.1.0.js" />
/// <reference path="storeAjax.js" />
/// <reference path="storeCommonController.js" />
/// <reference path="storeOrdersController.js" />
/// <reference path="storeProductsController.js" />
/// <reference path="storeCustomerController.js" />
/// <reference path="storeCustomerModel.js" />
/// <reference path="storeAdminModel.js" />
/// <reference path="storeAdminController.js" />
The first three entries are for the JavaScript files from the packages I installed in Chapter 5: jQuery, Bootstrap, and Knockout. The remaining entries—all of which begin with store—are the names of the JavaScript files I will create in this chapter for the SportsStore application.
Updating the Layout
I also need to update the Views/Shared/_Layout.cshtml file so that it contains script elements that reference the JavaScript files that I create in this chapter. Listing 7-4 shows the additions that I made to the layout.
Listing 7-4. Adding script Elements to the _Layout.cshtml File
<!DOCTYPE html>
<html>
<head>
    <meta name="viewport" content="width=device-width" />
    <script src="~/Scripts/jquery-2.1.0.min.js"></script>
    <script src="~/Scripts/knockout-3.1.0.js"></script>
    <link href="~/Content/bootstrap.css" rel="stylesheet" />
    <link href="~/Content/bootstrap-theme.css" rel="stylesheet" />
    <script src="~/Scripts/storeAjax.js"></script>
    <script src="~/Scripts/storeModel.js"></script>
    <script src="~/Scripts/storeCommonController.js"></script>
    <script src="~/Scripts/storeProductsController.js"></script>
    <script src="~/Scripts/storeOrdersController.js"></script>
    <title>SportsStore</title>
    <style>
        body { padding-top: 10px; }
    </style>
    @RenderSection("Scripts", false)
</head>
<body class="container">
    @RenderBody()
</body>
</html>
The order of these script elements is important and reflects the order in which they depend upon one another.
![]() Tip In a real project, I would generally use fewer files or concatenate the files using the MVC bundles feature, but for this chapter I want to make the structure and nature of the JavaScript code as clear as possible.
Tip In a real project, I would generally use fewer files or concatenate the files using the MVC bundles feature, but for this chapter I want to make the structure and nature of the JavaScript code as clear as possible.
Implementing the Common Code
Even though I am creating clients for two different types of user, they will be accessing the same pair of web services that I created in Chapter 6. That means there is a core of common code that I can write once and use for both clients, which will make the SportsStore code base smaller and easier to maintain.
I will loosely follow the same structure in the client as I have done for the Web API part of the application; there will be a model that contains the application data and controllers that update that model based on user interactions. These updates will be performed using Ajax requests sent to the Web API web services. JavaScript doesn’t provide the same programming experience as C#, so there will be some differences, but understanding the general shape of what I am writing will help you preserve a sense of context.
I like to start by creating a JavaScript file that contains the code that will make Ajax calls on behalf of other parts of the application so that I don’t have to duplicate the code that deals with the web service. I created a JavaScript file called storeAjax.js in the Scripts folder and used it to define the code shown in Listing 7-5.
Listing 7-5. The Contents of the storeAjax.js File
var sendRequest = function (url, verb, data, successCallback, errorCallback, options) {

    var requestOptions = options || {};
    requestOptions.type = verb;
    requestOptions.success = successCallback;
    requestOptions.error = errorCallback;

    if (!url || !verb) {
        errorCallback(401, "URL and HTTP verb required");
    }

    if (data) {
        requestOptions.data = data;
    }
    $.ajax(url, requestOptions);
}

var setDefaultCallbacks = function (successCallback, errorCallback) {
    $.ajaxSetup({
        complete: function (jqXHR, status) {
            if (jqXHR.status >= 200 && jqXHR.status < 300) {
                successCallback(jqXHR.responseJSON);
            } else {
                errorCallback(jqXHR.status, jqXHR.statusText);
            }
        }
    });
}

var setAjaxHeaders = function (requestHeaders) {
    $.ajaxSetup({ headers: requestHeaders });
}
The most important function is sendRequest, which the other parts of the client-side application will call to send Ajax requests to the web services I defined in Chapter 6. Table 7-1 lists the parameters defined by the sendRequest function and explains their use.
Table 7-1. The Parameters for the sendRequest Function
Name | Description |
|---|---|
url | This property specifies the URL that the request will be sent to. |
verb | This property specifies the HTTP verb for the request. |
data | This property specifies the data for the request, which will be sent to the web service as a query string for GET requests and in the request body for other verbs. |
successCallback | This property specifies a callback function that will be invoked if the Ajax request is successful and passed the data from the response. |
errorCallback | This property specifies a callback function that will be invoked if the Ajax request is unsuccessful and passed the status code and explanatory text. |
options | This property is used to set jQuery options for a single Ajax request. |
The only parameters that must be set are url and verb. If either is missing, then the error callback function is invoked to report a problem.
The setAjaxHeaders function sets headers for all subsequent Ajax requests by calling the jQuery $.ajaxSetup method. I’ll use this feature to set the header required for authentication.
The setDefaultCallbacks function allows success and error callbacks to be registered so they will be invoked for all requests, which I’ll use to control when errors are displayed to the user. This approach allows me to define controller-like functionality that has request-specific callbacks and still update the model, which I define in the next section.
Defining the Model
The next step is to define the client-side model, which I will use to store the product and order data and keep track of the client application state. I created a file called storeModel.js in the Scripts folder and added to it the JavaScript shown in Listing 7-6.
Listing 7-6. The Contents of the storeModel.js File
var model = {
    products: ko.observableArray([]),
    orders: ko.observableArray([]),
    authenticated: ko.observable(false),
    username: ko.observable(null),
    password: ko.observable(null),
    error: ko.observable(""),
    gotError: ko.observable(false)
};


$(document).ready(function () {
    ko.applyBindings();
    setDefaultCallbacks(function (data) {
            if (data) {
                console.log("---Begin Success---");
                console.log(JSON.stringify(data));
                console.log("---End Success---");
            } else {
                console.log("Success (no data)");
            }
            model.gotError(false);
        },
        function (statusCode, statusText) {
            console.log("Error: " + statusCode + " (" + statusText + ")");
            model.error(statusCode + " (" + statusText + ")");
            model.gotError(true);
        });
});
The model object defines a set of properties, each of which I have described in Table 7-2. I have also defined a handleError function that my client-side controllers will be able to call to handle failed Ajax calls, and I have used the jQuery ready function—which I described in Chapter 2—to set up the Knockout data bindings, which I will start to define in the next section.
Table 7-2. The Client-Side Model Properties
Name | Description |
|---|---|
products | This property is an observable array that will be used to store the product objects obtained from the server. |
orders | This property is an observable array that will be used to store the order objects obtained from the server. |
authenticated | This property will be set to true when a successful authentication request has been performed and will be false otherwise. |
username | This property will be set to the username entered by the user. |
password | This property will be set to the password entered by the user. |
error | This property is set to the error string that will be displayed to the user when an Ajax request fails. |
gotError | This property is set to true when a request fails and false when a request succeeds. I will use this property to decide when to display error messages to the user. |
Defining the Authentication Controller
The first client-side controller that I am going to create will handle authentication. I added a file called storeCommonController.js to the Scripts folder and added the code statements shown in Listing 7-7.
Listing 7-7. The Contents of the storeCommonController.js File
var authenticateUrl = "/authenticate"

var authenticate = function (successCallback) {
    sendRequest(authenticateUrl, "POST", {
        "grant_type": "password", username: model.username(), password: model.password()
    }, function (data) {
        model.authenticated(true);
        setAjaxHeaders({
            Authorization: "bearer " + data.access_token
        });
        if (successCallback) {
            successCallback();
        }
    });
};
![]() Tip This isn’t really a controller in the Web API or MVC framework sense of that word, but it helps to add structure to the client-side part of the application and ensure that functionality is concentrated in a single place, rather than repeated in different files.
Tip This isn’t really a controller in the Web API or MVC framework sense of that word, but it helps to add structure to the client-side part of the application and ensure that functionality is concentrated in a single place, rather than repeated in different files.
This file defines a function called authenticate, which sends an Ajax request to the /authenticate URL that is maintained by ASP.NET Identity. The function includes the username and password values from the data model, and if the request is successful, it sets the Authorization header for subsequent requests to the access_token value generated by the web service.
Testing Authentication
To test the client-side authentication, I added some JavaScript code and HTML markup to the Index view to display the current authentication status and to send an authentication request, as shown in Listing 7-8.
Listing 7-8. Adding Support for Testing Authentication to the Index.cshtml File
<script>
    var testAuth = function () {
        model.username('Admin'),
        model.password('secret'),
        authenticate();
    }
</script>

<div class="panel panel-primary">
    <div class="panel-heading">Authentication</div>
    <table class="table table-striped">
        <tr><td>Authenticated:</td><td data-bind="text: model.authenticated()"></td></tr>
        <tr><td>User:</td><td data-bind="text: model.username()"></td></tr>
        <tr><td colspan="2"><button
                data-bind="click: testAuth">Authenticate</button></td></tr>
    </table>
</div>
The HTML markup is based around a Bootstrap-styled table with rows that contain Knockout data bindings to the authenticated and username model properties. I added an Authenticate button with a binding that calls the testAuth function defined in the script element when it is clicked. The testAuth function sets the model username and password properties to Admin and secret (which are the database seed values that I defined in Chapter 5) and calls the authenticate function that I defined in Listing 7-7.
To test the support for authentication, start the application and use the browser to navigate to the /Home/Index URL. The initial content will show no username and report that the client has not been authenticated. Click the Authenticate button; an Ajax request will be sent to the web service, and the client will be authenticated, causing the layout to be updated through the data bindings, as shown in Figure 7-1.
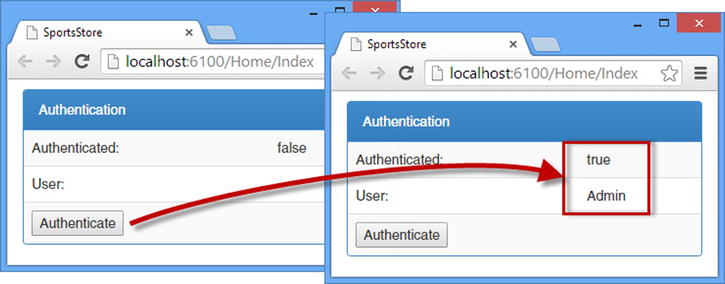
Figure 7-1. Testing client authentication
The first authentication request after you start the application will take a couple of seconds because the database will be initialized. This means the username will be displayed immediately because it is set locally in the client but that the Authenticated status will not change to true for a moment. To get a more realistic result, reload the web page in the browser and click the Authenticate button again.
![]() Note Reloading the web page in the browser means that the client loses the authentication token required to authorize requests. This is a side effect of using the Authorization header, which makes it easier to build and test client-side code but requires authentication each time the page is loaded.
Note Reloading the web page in the browser means that the client loses the authentication token required to authorize requests. This is a side effect of using the Authorization header, which makes it easier to build and test client-side code but requires authentication each time the page is loaded.
Defining the Products Controller
The next step is to create the client-side code that will send Ajax requests to get and manipulate products. Listing 7-9 shows the content of the storeProductsController.js file, which I added to the Scripts folder.
Listing 7-9. The Contents of the storeProductsController.js File
var productUrl = "/api/products/";

var getProducts = function () {
    sendRequest(productUrl, "GET", null, function (data) {
        model.products.removeAll();
        model.products.push.apply(model.products, data);
    })
};

var deleteProduct = function (id) {
    sendRequest(productUrl + id, "DELETE", null, function () {
        model.products.remove(function (item) {
            return item.Id == id;
        })
    });
}

var saveProduct = function (product, successCallback) {
    sendRequest(productUrl, "POST", product, function () {
        getProducts();
        if (successCallback) {
            successCallback();
        }
    });
}
The code consists of three functions, getProducts, deleteProduct, and saveProduct, each of which sends an Ajax call to the corresponding call to the server-side Products controller. Note that these functions exist solely to map server-side data to and from the client-side model.
Testing the Products Controllers
To test the client-side product code, I added some additional HTML and JavaScript to the Index.cshtml file. In addition to adding code that calls the functions defined in Listing 7-9, I have added support for displaying details of the HTTP error message when Ajax requests fail, as shown in Listing 7-10.
Listing 7-10. Adding Markup and JavaScript to the Index.cshtml File
<script>

    var testAuth = function () {
        model.username('Admin'),
        model.password('secret'),
        authenticate();
    }

    var testDeleteProduct = function () {
        deleteProduct(2);
    }

    var testChangeProduct = function () {
        var product = model.products()[2];
        product.Price = product.Price + 10;
        saveProduct(product);
    }

</script>

<div class="alert alert-danger" data-bind="visible: model.gotError(), text: model.error()">
</div>

<div class="panel panel-primary">
    <div class="panel-heading">Authentication</div>
    <table class="table table-striped">
        <tr><td>Authenticated:</td><td data-bind="text: model.authenticated()"></td></tr>
        <tr><td>User:</td><td data-bind="text: model.username()"></td></tr>
        <tr><td colspan="2"><button
                data-bind="click: testAuth">Authenticate</button></td></tr>
    </table>
</div>

<div class="panel panel-primary">
    <div class="panel-heading">Product Controller Functions</div>
    <table class="table table-striped">
        <tr>
            <td><button data-bind="click: getProducts">Get Products</button></td>
            <td><button data-bind="click: testDeleteProduct">Delete Product</button></td>
            <td><button data-bind="click: testChangeProduct">Change Product</button></td>
        </tr>
    </table>
</div>
![]() Tip You should not show HTTP messages to real users, but since this is a book about web services, I am going to display the low-level messages.
Tip You should not show HTTP messages to real users, but since this is a book about web services, I am going to display the low-level messages.
I have added three buttons with Knockout data bindings to the view. The Get Products button invokes the getProducts controller function when it is clicked, but the Delete Product and Change Product buttons call functions defined in the script element so that I can control the arguments passed to the corresponding controller functions.
To test the new functionality, start the application and use the browser to navigate to the /Home/Index URL. The debug output from the JavaScript code will be writing to the JavaScript console, so you will need to open the browser F12 tools to see the messages.
Click the Get Products button, and you will see a JavaScript console message that lists the Product objects contained in the database, formatted as JSON, like this:
---Begin Success--- storeModel.js:16
[{"Id":1,"Name":"Kayak","Description":"A boat for one person","Price":275,
       "Category":"Watersports"},
 {"Id":2,"Name":"Lifejacket","Description":"Protective and fashionable",
      "Price":48.95,"Category":"Watersports"},
 {"Id":3,"Name":"Soccer Ball","Description":"FIFA-approved size and weight",
      "Price":19.5,"Category":"Soccer"},
 {"Id":4,"Name":"Corner Flags",
      "Description":"Give your playing field a professional touch",
      "Price":34.95,"Category":"Soccer"},
 {"Id":5,"Name":"Stadium",
      "Description":"Flat-packed 35,000-seat stadium",
      "Price":79500,"Category":"Soccer"},
 {"Id":6,"Name":"Thinking Cap",
      "Description":"Improve your brain efficiency by 75%",
      "Price":16,"Category":"Chess"},
 {"Id":7,"Name":"Unsteady Chair",
      "Description":"Secretly give your opponent a disadvantage",
      "Price":29.95,"Category":"Chess"},
 {"Id":8,"Name":"Human Chess Board",
      "Description":"A fun game for the family",
      "Price":75,"Category":"Chess"},
 {"Id":9,"Name":"Bling-Bling King",
      "Description":"Gold-plated, diamond-studded King",
      "Price":1200,"Category":"Chess"}]
---End Success---
This is the same product list you have been seeing since Chapter 5, and the key point to note is that all of the products that I defined in the database seed class are present.
Next, click the Delete Product button. This button sends a request that targets an action method to which the Authorize attribute was applied in Chapter 6. As a consequence, a 401 (Unauthorized) response is returned. This triggers my error handling code and reveals the error element I added to the Index.cshtml file, as shown in Figure 7-2.
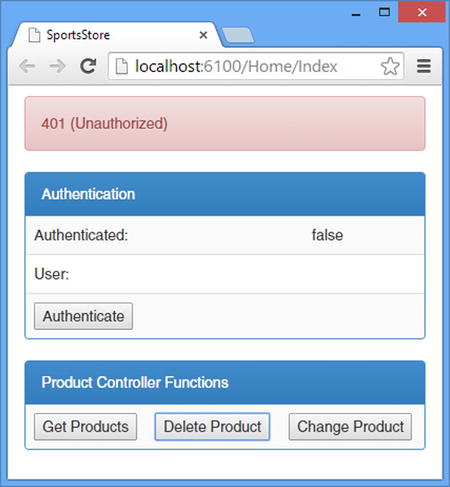
Figure 7-2. Displaying an HTTP error
Click the Authenticate button and then, once the Authenticated status is shown as true, click the Delete Product button again. The JavaScript console will show the following message:
Success (no data)To see the effect of the operation, click the Get Products button and look at the Id numbers of the objects that are described, as follows:
---Begin Success---
[{"Id":1,"Name":"Kayak","Description":"A boat..."},
 {"Id":3,"Name":"Soccer Ball","Description":"FIFA-approved..."},
 {"Id":4,"Name":"Corner Flags","Description":"Give your ..."},
 {"Id":5,"Name":"Stadium","Description":"Flat-packed..."},
 {"Id":6,"Name":"Thinking Cap","Description":"Improve ..."},
 {"Id":7,"Name":"Unsteady Chair","Description":"Secretly..."},
 {"Id":8,"Name":"Human Chess Board","Description":"A fun..."},
 {"Id":9,"Name":"Bling-Bling King","Description":"Gold-plated…"}]
---End Success---
As the highlighted statements show, the Product with the Id value of 2 has been removed.
The final test is to click the Change Product button. The client-side controller function reloads the product data when it completes, and you will see that the Price property of the product as index 2 (which will be the Corner Flags if you have followed along and deleted a product) will be incremented by $10.
Defining the Orders Controller
The final controller is to provide access to the orders. I added a file called storeOrdersController.js to the Scripts folder and used it to define the functions shown in Listing 7-11.
Listing 7-11. The Contents of the storeOrdersController.js File
var ordersUrl = "/nonrest/orders";
var ordersListUrl = ordersUrl + "/list";
var ordersCreateUrl = ordersUrl + "/createorder/";
var ordersDeleteUrl = ordersUrl + "/deleteorder/";

var getOrders = function () {
    sendRequest(ordersListUrl, "GET", null, function (data) {
        model.orders.removeAll();
        model.orders.push.apply(model.orders, data);
    });
}

var saveOrder = function (order, successCallback) {
    sendRequest(ordersCreateUrl, "POST", order, function () {
        if (successCallback) {
            successCallback();
        }
    });
}

var deleteOrder = function (id) {
    sendRequest(ordersDeleteUrl + id, "DELETE", null, function () {
        model.orders.remove(function (item) {
            return item.Id == id;
        })
    });
}
The getOrders, saveOrder, and deleteOrder functions target their server-side counterparts. The server-side Web API controller for Orders objects is non-RESTful, which is why I have had to define URLs for each of the different operations.
Testing the Orders Controller
Following the same approach as for the other client-side controllers, I added some new HTML and JavaScript code to the Index.cshtml file, as shown in Listing 7-12.
Listing 7-12. Adding Support for Testing Orders in the Index.cshtml File
<script>

    var testAuth = function () {
        model.username('Admin'),
        model.password('secret'),
        authenticate();
    }

    var testDeleteProduct = function () {
        deleteProduct(2);
    }

    var testChangeProduct = function () {
        var product = model.products()[2];
        product.Price = product.Price + 10;
        saveProduct(product);
    }

    var testDeleteOrder = function () {
        deleteOrder(1);
    }

    var testSaveOrder = function () {
        var order = model.orders()[0];
        order.TotalPrice = order.TotalPrice + 10;
        saveOrder(order);
    }

</script>

<div class="alert alert-danger"
     data-bind="visible: model.gotError(), text: model.error()">
</div>

<div class="panel panel-primary">
    <div class="panel-heading">Authentication</div>
    <table class="table table-striped">
        <tr><td>Authenticated:</td><td data-bind="text: model.authenticated()"></td></tr>
        <tr><td>User:</td><td data-bind="text: model.username()"></td></tr>
        <tr><td colspan="2"><button
                data-bind="click: testAuth">Authenticate</button></td></tr>
    </table>
</div>

<div class="panel panel-primary">
    <div class="panel-heading">Product Controller Functions</div>
    <table class="table table-striped">
        <tr>
            <td><button data-bind="click: getProducts">Get Products</button></td>
            <td><button data-bind="click: testDeleteProduct">Delete Product</button></td>
            <td><button data-bind="click: testChangeProduct">Change Product</button></td>
        </tr>
    </table>
</div>

<div class="panel panel-primary">
    <div class="panel-heading">Order Controller Functions</div>
    <table class="table table-striped">
        <tr>
            <td><button data-bind="click: getOrders">Get Orders</button></td>
            <td><button data-bind="click: testDeleteOrder">Delete Order</button></td>
            <td><button data-bind="click: testSaveOrder">Save Order</button></td>
        </tr>
    </table>
</div>
There are three order-related buttons. The Get Orders button calls the controller getOrders function directly, and the Delete Order and Save Order buttons call functions that I added to the local script element. Figure 7-3 shows the additions.
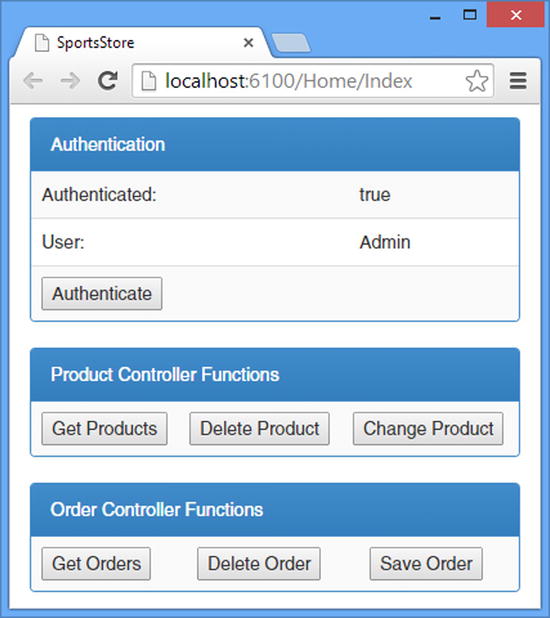
Figure 7-3. Adding order test support
The action methods targeted by the Get Orders and Delete Order buttons require authentication, so click the Authenticate button and wait a moment for the authentication state to change. Click the Get Orders button, and the JavaScript console will display a list of the orders obtained from the web service. Click the Delete Order to remove one of the orders and then click Get Orders again to see the effect. Finally, click Save Order to add a new order to the repository.
Now that I have a solid foundation of client-side controller and Ajax functions, I can begin to build the client that will present the SportsStore application to clients. In the sections that follow, I will create the JavaScript code and MVC framework views required to allow the user to select and order products.
![]() Note I am not going to add all the SportsStore features from the version I create in Pro ASP.NET MVC 5 because I want to demonstrate how to consume the Web API web services that I created in Chapter 6 without spending too much time dealing with the fit-and-finish of the client application. The main features are present, but I have omitted lesser features that are not directly related to web services, such as paginating the list of products, performing client-side validation, and displaying useful error messages—none of which requires interactions with the web service.
Note I am not going to add all the SportsStore features from the version I create in Pro ASP.NET MVC 5 because I want to demonstrate how to consume the Web API web services that I created in Chapter 6 without spending too much time dealing with the fit-and-finish of the client application. The main features are present, but I have omitted lesser features that are not directly related to web services, such as paginating the list of products, performing client-side validation, and displaying useful error messages—none of which requires interactions with the web service.
Creating the Customer Model
I have created a separate model that contains just the data and state required to manage the customer client, which allows me to keep it separate from the common model that contains the raw product data. Listing 7-13 shows the contents of the storeCustomerModel.js file, which I added to the Scripts folder.
Listing 7-13. The Contents of the storeCustomerModel.js File
var customerModel = {
    productCategories: ko.observableArray([]),
    filteredProducts: ko.observableArray([]),
    selectedCategory: ko.observable(null),
    cart: ko.observableArray([]),
    cartTotal: ko.observable(0),
    cartCount: ko.observable(0),
    currentView: ko.observable("list")
}
All of the model properties that I define are observable, and you will see that I rely on the automatic updates that Knockout provides to keep the client interface synchronized with the underlying data. To help you keep track of what goes on in the custom client, Table 7-3 describes the purpose of each of the model properties.
Table 7-3. The Customer Client Model Properties
Name | Description |
|---|---|
productCategories | This property is an array of the product category names, which I use to allow the customer to filter products so that only those in a given category are shown. |
filteredProducts | This property contains the set of products that belong to the currently selected category. |
selectedCategory | This property specifies the currently selected category and is used to filter the products shown to the customer through the filteredProducts property. |
cart | This property represents the customer’s shopping cart and contains details of the products they have selected and the quantity of each. |
cartTotal | This property specifies the total value of the products in the cart. |
cartCount | This property specifies the number of products in the cart. |
currentView | This property specifies which view the custom should be shown. |
Creating the Customer Controller
I added a file called storeCustomerController.js to the Scripts folder and used it to define the functions that will support the views that present functionality to the customer and operation on the application models—both the common model and the one that is specific to the customer client. Listing 7-14 shows the functions that I defined. This is a lengthy file, and much of the code is responsible for sorting and filtering the common model objects that represent the SportsStore products so they can be presented to the user.
Listing 7-14. The Contents of the storeCustomerController.js File
var setCategory = function (category) {
    customerModel.selectedCategory(category);
    filterProductsByCategory();
}

var setView = function (view) {
    customerModel.currentView(view);
}

var addToCart = function (product) {
    var found = false;
    var cart = customerModel.cart();
    for (var i = 0; i < cart.length; i++) {
        if (cart[i].product.Id == product.Id) {
            found = true;
            count = cart[i].count + 1;
            customerModel.cart.splice(i, 1);
            customerModel.cart.push({
                count: count,
                product: product
            });
            break;
        }
    }

    if (!found) {
        customerModel.cart.push({ count: 1, product: product });
    }

    setView("cart");
}

var removeFromCart = function (productSelection) {
    customerModel.cart.remove(productSelection);
}

var placeOrder = function () {
    var order = {
        Customer: model.username(),
        Lines: customerModel.cart().map(function (item) {
            return {
                Count: item.count,
                ProductId: item.product.Id
            }
        })
    };

    saveOrder(order, function () {
        setView("thankyou");
    });
}

model.products.subscribe(function (newProducts) {

    filterProductsByCategory();

    customerModel.productCategories.removeAll();
    customerModel.productCategories.push.apply(customerModel.productCategories,
        model.products().map(function (p) {
            return p.Category;
        })
        .filter(function (value, index, self) {
            return self.indexOf(value) === index;
        }).sort());
});

customerModel.cart.subscribe(function (newCart) {

    customerModel.cartTotal(newCart.reduce(
        function (prev, item) {
            return prev + (item.count * item.product.Price);
        }, 0));

    customerModel.cartCount(newCart.reduce(
        function (prev, item) {
            return prev + item.count;
        }, 0));
});


var filterProductsByCategory = function () {
    var category = customerModel.selectedCategory();

    customerModel.filteredProducts.removeAll();
    customerModel.filteredProducts.push.apply(customerModel.filteredProducts,
        model.products().filter(function (p) {
            return category == null || p.Category == category;
        }));
}

$(document).ready(function () {
    getProducts();
})
Not all of the code is made up of functions for views to call; I have also used the Knockout subscribe function to define functions that are called automatically when there are changes to observable data items, like this:
...
model.products.subscribe(function (newProducts) {

    filterProductsByCategory();

    customerModel.productCategories.removeAll();
    customerModel.productCategories.push.apply(customerModel.productCategories,
        model.products().map(function (p) {
            return p.Category;
        })
        .filter(function (value, index, self) {
            return self.indexOf(value) === index;
        }).sort());
});
...
This fragment registers a function to be called when the model.products array changes. The function filters the products so that only those in the category that the user is viewing are displayed. It also generates the set of product categories, which is what allows the user to perform the filtering. The effect is that a change in the model.products array automatically updates the customer model, which will, in turn, cause the Knockout data bindings I will apply in the views to update as well.
The controller uses the jQuery ready function, which I described in Chapter 2, to load the product data when the browser has loaded and processed the HTML and JavaScript files, as follows:
...
$(document).ready(function () {
    getProducts();
})
...
This means that there is no data available until the Ajax request that the getProduct function sends has completed.
Creating the Views
I am at the point where I need to create the views that will consume the data in the models and use the controller functions to respond to user input. This is a departure from the Web API theme of this book, so I am going to describe the contents of the files only briefly. In the sections that follow, I will create a series of MVC framework views that use entirely standard Razor features in order to compose an HTML document that will respond dynamically to user input and data changes.
Creating the Placeholders
I will use a set of MVC framework partial views to break the content into more manageable chunks. I want to be able to demonstrate how the different features fit together as I go, so I have started by creating a set of placeholder view files that I will revise once the structure of the application comes together. Table 7-4 lists the file names, all of which I created in the Views/Home folder, and describes their purpose in the application.
Table 7-4. The Placeholder View Files for the Customer Client
Name | Description |
|---|---|
ProductList.cshtml | This view is used to present the customer with a list of products that can be filtered by category. |
ProductCart.cshtml | This view is used to present the user with a summary of the products they have selected. |
Checkout.cshtml | This view is used to present the customer with the (simple) checkout process. |
CartWidget.cshtml | This view is used to insert a small summary of the cart in the SportsStore header. |
ThankYou.cshtml | This view is displayed to the user when they have completed their order. |
Listing 7-15 shows the initial contents of the ProductList.cshtml file.
Listing 7-15. The Contents of the ProductList.cshtml File
ProductList View
Listing 7-16 shows the initial contents of the ProductCart.cshtml file.
Listing 7-16. The Contents of the ProductCart.cshtml File
ProductCart View
Listing 7-17 shows the contents of the Checkout.cshtml file.
Listing 7-17. The Contents of the Checkout.cshtml File
Checkout View
Listing 7-18 shows the contents of the CartWidget.cshtml file. This placeholder requires the application of some Bootstrap styles because it will be displayed in the banner at the top of the page and would not be visible without them.
Listing 7-18. The Contents of the CartWidget.cshtml File
<div class="navbar-text navbar-right">
    CartWidget View
</div>
The ThankYou.cshtml file is so simple that it doesn’t require a placeholder, and Listing 7-19 shows the final content of the file.
Listing 7-19. The Contents of the ThankYou.cshtml File
<h2>Thanks!</h2>
Thanks for placing your order. We'll ship your goods as soon as possible.
With the exception of the ThankYou.cshtml file, I’ll revise the contents and show you the effect as I add each feature.
Creating the Index View
The Views/Home/Index.cshtml file is the top-level view for the customer client. I used this view earlier in the chapter to test the common JavaScript code, but in Listing 7-20 you can see how I have changed the contents to provide the framework in which content will be added so that it can be displayed to the user.
Listing 7-20. The Contents of the Index.cshtml File
@section Scripts {
    <script src="~/Scripts/storeCustomerModel.js"></script>
    <script src="~/Scripts/storeCustomerController.js"></script>
}

<div class="navbar navbar-inverse" role="navigation">
    <a class="navbar-brand" href="#">SPORTS STORE</a>
    @Html.Partial("CartWidget");
</div>

<div id="categories" class="col-xs-3">
    <button class="btn btn-block btn-default btn-lg"
            data-bind="click: setCategory.bind(null)">
        Home
    </button>
    <div data-bind="foreach: customerModel.productCategories()">
        <button class="btn btn-block btn-default btn-lg"
                data-bind="click: setCategory.bind($data), text: $data,
                    css: {'btn-primary': $data ==
                        customerModel.selectedCategory()}"></button>
    </div>
</div>

<div class="alert alert-danger col-xs-8"
     data-bind="visible: model.gotError(), text: model.error()">
</div>

<div class="col-xs-8">
    <div class="row panel" data-bind="visible: customerModel.currentView() == 'list'">
         @Html.Partial("ProductList")
    </div>
    <div class="row panel"
         data-bind="visible: customerModel.currentView() == 'cart'">
         @Html.Partial("ProductCart")
    </div>
    <div class="row panel"
         data-bind="visible: customerModel.currentView() == 'checkout'">
         @Html.Partial("Checkout")
    </div>
    <div class="row panel"
         data-bind="visible: customerModel.currentView() == 'thankyou'">
         @Html.Partial("ThankYou")
    </div>
</div>
I have added script elements for the customer model and controller files and defined a banner across the page to identify the application. In addition, I have defined a set of category buttons (which is populated based on the categories generated by the customer controller), an alert box to display any errors, and the main content area, which uses Knockout bindings to determine which Razor partial view is displayed to the client.
You can see the initial structure of the layout by starting the application and using the browser to navigate to the /Home/Index URL. As Figure 7-4 shows, there are buttons for each of the categories of product in the repository, and the placeholders for the CartWidget and ProductList views are visible.
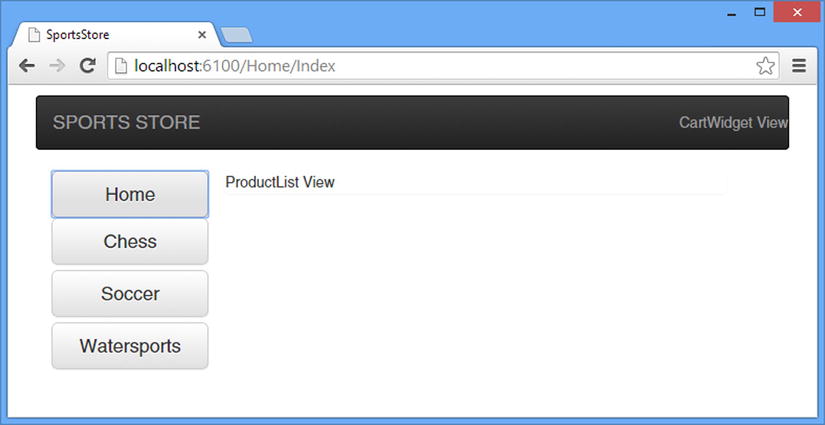
Figure 7-4. The initial structure of the customer client
Creating the Product List View
The most important content to present to the customer is a list of the products they can add to their basket, which is the job of the ProductList view. Listing 7-21 shows the markup I added to the view to describe each product.
Listing 7-21. Adding Markup to the ProductList.cshtml File
<div data-bind="foreach: customerModel.filteredProducts()">
    <div class="well">
        <h3>
            <strong data-bind="text: $data.Name"></strong>
            <span class="pull-right label label-primary"
                  data-bind="text: ('$' + $data.Price.toFixed(2))"></span>
        </h3>
        <span class="lead" data-bind="text: $data.Description"></span>
        <div class="pull-right">
            <button class="btn btn-success"
                    data-bind="click: addToCart">Add to Cart</button>
        </div>
    </div>
</div>
I use a Knockout foreach binding to generate a div element for each of the products in the currently selected category. Each product is displayed with its name, description, and price, as well as an Add to Cart button that calls the addToCart function in the customer controller, which adds details of the product to the customer’s cart. Figure 7-5 shows the effect of the changes in the listing.
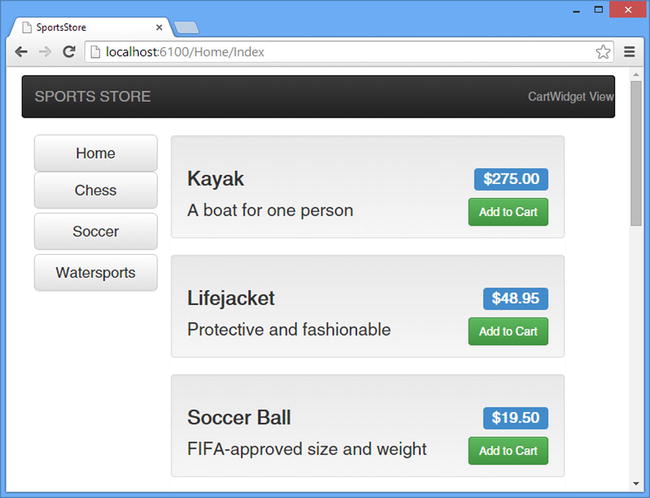
Figure 7-5. Adding details of the products
You can filter the products shown in the list by clicking one of the category buttons; you can show all of the products again by clicking the Home button.
Creating the Cart View
When the customer clicks an Add to Cart button, the ProductCart view is displayed to summarize the set of chosen products and their cost. Listing 7-22 shows the changes I made to the ProductCart.cshtml file to display this information.
Listing 7-22. Displaying Product Selections in the ProductCart.cshtml File
<h2>Your Cart</h2>

<div class="panel panel-primary">
    <table class="table">
        <thead>
            <tr>
                <th>Quantity</th><th>Item</th>
                <th>Price</th><th class="text-right">Subtotal</th>
                <td></td>
            </tr>
        </thead>
        <tbody data-bind="foreach: customerModel.cart()">
            <tr>
                <td data-bind="text: $data.count"></td>
                <td data-bind="text: $data.product.Name"></td>
                <td data-bind="text: '$' + $data.product.Price.toFixed(2)"></td>
                <td class="text-right"
                    data-bind="text: '$'
                        + ($data.count * $data.product.Price).toFixed(2)"></td>
                <td><button class="btn btn-xs btn-danger"
                    data-bind="click: removeFromCart.bind($data)">Remove</button></td>
            </tr>
        </tbody>
        <tfoot>
            <tr>
                <td colspan="2"></td><td>Total:</td>
                <th class="text-right"
                    data-bind="text: '$' + customerModel.cartTotal().toFixed(2)"></th>
            </tr>
        </tfoot>
    </table>
</div>

<div class="text-center">
    <button class="btn btn-primary"
            data-bind="click: setView.bind($data, 'list')">Continue Shopping</button>
    <button class="btn btn-primary"
            data-bind="click: setView.bind($data, 'checkout'),
                enable: customerModel.cartCount() > 0">Check Out</button>
</div>
The main part of the view is a table that lists the selected products, and there are buttons that use Knockout click bindings to return the customer to the product list and proceed to the checkout stage. Figure 7-6 shows the cart once some products have been selected.
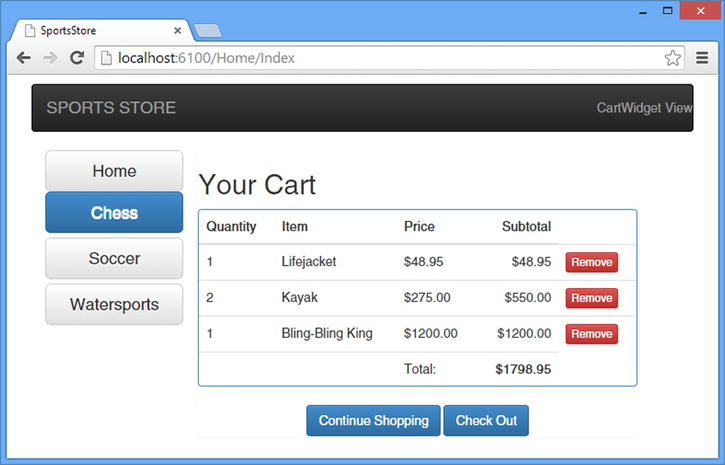
Figure 7-6. Displaying a summary of the cart
![]() Tip I have not included support for varying the quantity of a product in the cart, but you can return to the product list and select a product repeatedly to increase the quantity.
Tip I have not included support for varying the quantity of a product in the cart, but you can return to the product list and select a product repeatedly to increase the quantity.
Creating the Cart Widget
The CartWidget view is responsible for displaying a summary of the customer’s product selections at the top of the page, along with a button that begins the checkout process. Listing 7-23 shows the changes I made to the CartWidget.cshtml file to define this functionality.
Listing 7-23. Displaying a Summary of the Cart in the CartWidget.cshtml File
<div class="navbar-right" style="margin: 0 10px">
    <button class="btn btn-default btn-xs navbar-btn"
            data-bind="click: setView.bind($data, 'checkout'),
                enable: customerModel.cartCount() > 0">
        Checkout
    </button>
</div>

<div class="navbar-text navbar-right">
    <b>Your cart:</b>
    <span data-bind="text: customerModel.cartCount()"></span> item(s),
    <span data-bind="text: '$' + customerModel.cartTotal().toFixed(2)"></span>
</div>
This view displays data values from the model and provides a button that moves to the checkout view. The button is disabled if there are no items in the cart. Figure 7-7 shows the cart widget.
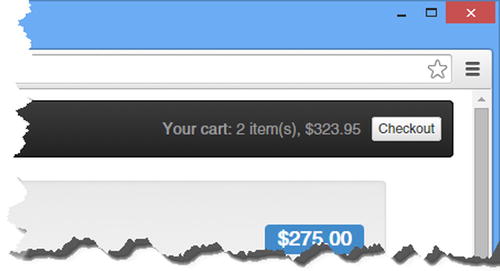
Figure 7-7. Summarizing the cart
Creating the Checkout View
The final view to create is the one that lets the client check out and place their order. Listing 7-24 shows the changes that I made to the Checkout.cshtml file.
Listing 7-24. Placing an Order in the Checkout.cshtml File
<h2>Your Order</h2>

<div class="form-group">
    <label>Enter your name</label>
    <input class="form-control" data-bind="value: model.username" />
</div>

<div class="panel panel-primary">
    <table class="table">
        <thead>
            <tr>
                <th>Quantity</th>
                <th>Item</th>
                <th>Price</th>
                <th class="text-right">Subtotal</th>
            </tr>
        </thead>
        <tbody data-bind="foreach: customerModel.cart()">
            <tr>
                <td data-bind="text: $data.count"></td>
                <td data-bind="text: $data.product.Name"></td>
                <td data-bind="text: '$' + $data.product.Price.toFixed(2)"></td>
                <td class="text-right"
                    data-bind="text: '$'
                        + ($data.count * $data.product.Price).toFixed(2)">
                </td>
            </tr>
        </tbody>
        <tfoot>
            <tr>
                <td colspan="2"></td>
                <td>Total:</td>
                <th class="text-right"
                    data-bind="text: '$' + customerModel.cartTotal().toFixed(2)"></th>
            </tr>
        </tfoot>
    </table>
</div>

<div class="text-center">
    <button class="btn btn-primary"
            data-bind="click: setView.bind($data, 'list')">Cancel</button>
    <button class="btn btn-danger"
            data-bind="click: placeOrder.bind($data)">Place Order</button>
</div>
I need only the customer’s name and a list of their products to be able to send an order to the web service because I defined a simple Order model class in Chapter 5. In this view, I show an input element to collect the name and display a summary of the cart, as shown in Figure 7-8.
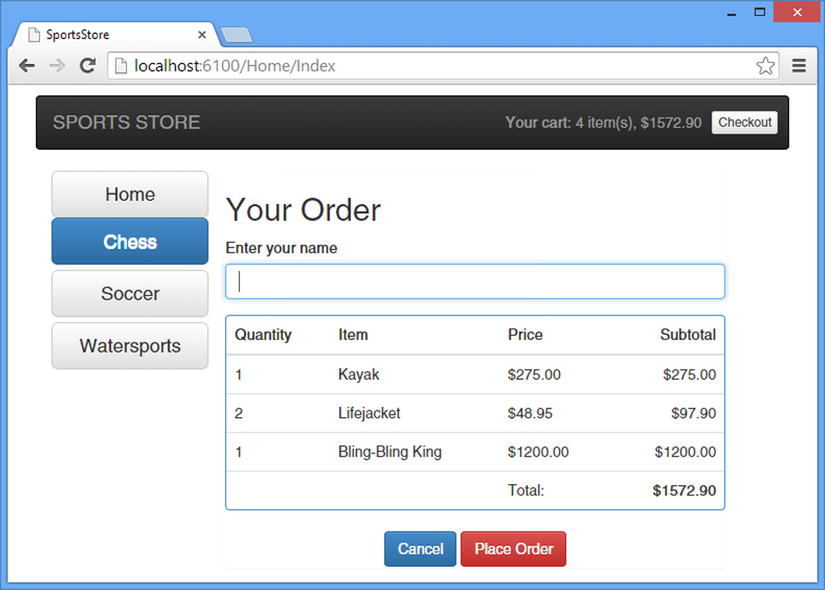
Figure 7-8. Checking out
If you click the Place Order button without entering a name, you will see the rudimentary error handling at work, as illustrated by Figure 7-9. This is not a useful message for customers of most applications, but for this book it demonstrates the way in which the web service has responded to a request.
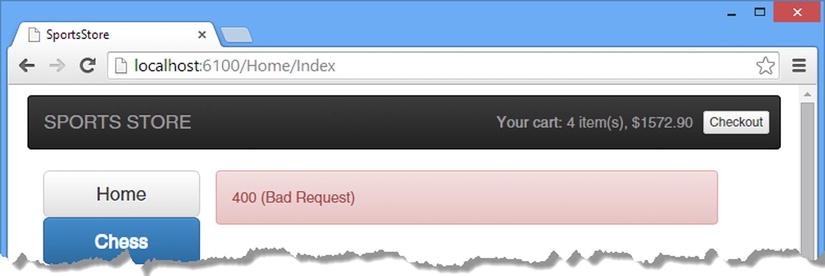
Figure 7-9. The result of server-side validation error
The web service sent the 400 (Bad Request) response because the data I sent to the web service failed the validation tests for the Order object. If you use the browser F12 tools to examine the response, you will see that it included the following data:
{"Message":"The request is invalid.",
 "ModelState": {
     "order.Customer":["The Customer field is required."]
  }
}
I explain how the model validation process works in Chapter 18 and how you can take control of the data sent in error responses in Chapter 25. If you choose, you can use the data in the response to present a more meaningful message to the user or—better still—apply client-side validation to ensure that the request isn’t sent unless the data is valid. Client-side validation isn’t a replacement for validation in the web service, but using both together can help improve the user experience and reduce the number of bad requests that your web services have to process.
![]() Tip There is a client-side validation library for Knockout available at https://github.com/Knockout-Contrib/Knockout-Validation, and I describe the built-in MVC framework client-side validation in Pro ASP.NET MVC 5, which is also published by Apress.
Tip There is a client-side validation library for Knockout available at https://github.com/Knockout-Contrib/Knockout-Validation, and I describe the built-in MVC framework client-side validation in Pro ASP.NET MVC 5, which is also published by Apress.
If you enter a name into the input element and click the Place Order button again, the data sent to the web service will pass validation, and the ThankYou.cshtml view will be displayed, as illustrated by Figure 7-10.
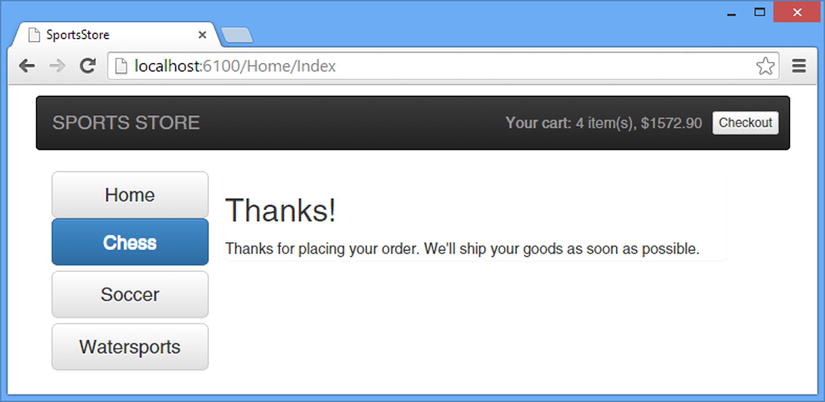
Figure 7-10. Successfully placing an order
Creating the Administration Client
The administration client is simpler than the one required for the customer. I build on the common code I created at the start of the chapter to authenticate the user and provide support for viewing, creating, and deleting products and viewing and deleting orders. In the following sections, I create the model, controller, and views required for the admin client using the same approach I took for the customer client.
![]() Tip I am not going to create placeholders for the views for this client, which means that the administration client will not work until you reach the “Testing the Administration Client” section.
Tip I am not going to create placeholders for the views for this client, which means that the administration client will not work until you reach the “Testing the Administration Client” section.
Creating the Admin Model
The admin client doesn’t need to filter data by category, which means it can work directly with the data in the common model. The result is that the admin client model is small and simple. Listing 7-25 shows the contents of the storeAdminModel.js file, which I added to the Scripts folder.
Listing 7-25. The Contents of the storeAdminModel.js File
var adminModel = {
    currentView: ko.observable("signin"),
    listMode: ko.observable("products"),
    newProduct: { name: ""}
}
The currentView property is used to control the top-level content displayed to the user, which will switch between a sign-in screen and the administration display. The user can see the products or orders in the repository, and this choice is stored using the listMode property. The newProduct property is where I will gather the details for new products that the user wants to add to the repository.
![]() Tip I do not have to define properties for the newProduct object because they will be set by the Knockout bindings that I attach to input elements when I define the views. However, I have added one property—name—so that jQuery will always send request data to the server as part of its POST request, even if the user submits the product without entering any data into the input elements.
Tip I do not have to define properties for the newProduct object because they will be set by the Knockout bindings that I attach to input elements when I define the views. However, I have added one property—name—so that jQuery will always send request data to the server as part of its POST request, even if the user submits the product without entering any data into the input elements.
The admin client requires a few functions to manage its views and to act as intermediaries between the data that will be available to Knockout bindings and the data required by the common controller functions. (For example, the removeProduct function will be passed a complete product object by Knockout, but the underling deleteProduct function operates on the Id property value.) Listing 7-26 shows the contents of the storeAdminController.cs file, which I added to the Scripts folder.
Listing 7-26. The Contents of the storeAdminController.cs File
var setView = function (view) {
    adminModel.currentView(view);
}

var setListMode = function (mode) {
    console.log("Mode: " + mode);
    adminModel.listMode(mode);
}

var authenticateUser = function() {
    authenticate(function () {
        setView("productList");
        getProducts();
        getOrders();
    });
}

var createProduct = function () {
    saveProduct(adminModel.newProduct, function () {
        setListMode("products");
    })
}

var removeProduct = function (product) {
    deleteProduct(product.Id);
}

var removeOrder = function (order) {
    deleteOrder(order.Id);
}
Creating the Views
The administration client requires only four views: the top-level container, a list of products, a list of orders, and a set of input elements needed to create new products. In the sections that follow, I’ll show you how I defined each of them.
Defining the MVC Controller and Top-Level View
I have created a separate MVC framework controller to deliver the administration client. Listing 7-27 shows the contents of the AdminController.cs file, which I added to the Controllers folder.
Listing 7-27. The Contents of the AdminController.cs File
using System.Web.Mvc;

namespace SportsStore.Controllers {

    public class AdminController : Controller {

        public ActionResult Index() {
            return View();
        }
    }
}
The controller contains an Index action method that will render the Index.cshtml file I created in the Views/Admin folder. Listing 7-28 shows the content of the view file.
Listing 7-28. The Contents of the Views/Admin/Index.cshtml File
@section Scripts {
    <script src="~/Scripts/storeAdminModel.js"></script>
    <script src="~/Scripts/storeAdminController.js"></script>
}

<div class="navbar navbar-inverse" role="navigation">
    <a class="navbar-brand" href="#">SPORTS STORE</a>
</div>

<div class="alert alert-danger text-center"
     data-bind="visible: model.gotError(), text: model.error()">
</div>

<div>
    <div class="text-center" data-bind="visible: adminModel.currentView() == 'signin'">
        <div class="form-group">
            <label>Username</label>
            <input data-bind="value: model.username" />
        </div>
        <div class="form-group">
            <label>Password</label>
            <input type="password" data-bind="value: model.password" />
        </div>
        <button class="btn btn-primary"
            data-bind="click: authenticateUser">Sign In</button>
    </div>

    <div data-bind="visible: adminModel.currentView() == 'productList'">

        <div id="categories" class="col-xs-3">
            <button class="btn btn-block btn-default btn-lg"
                    data-bind="click: setListMode.bind($data, 'products')">
                Products
            </button>
            <button class="btn btn-block btn-default btn-lg"
                    data-bind="click: setListMode.bind($data, 'orders')">
                Orders
            </button>
        </div>

        <div class="col-xs-8" data-bind="visible: adminModel.listMode() == 'products'">
            @Html.Partial("AdminProductList")
        </div>

        <div class="col-xs-8" data-bind="visible: adminModel.listMode() == 'addProduct'">
            @Html.Partial("AdminProductAdd")
        </div>

        <div class="col-xs-8" data-bind="visible: adminModel.listMode() == 'orders'">
            @Html.Partial("AdminOrderList")
        </div>
    </div>
</div>
![]() Tip This view relies on the same _Layout.cshtml file that I used for the customer client.
Tip This view relies on the same _Layout.cshtml file that I used for the customer client.
This is similar to the structure that I used for the customer client, with the addition of an embedded sign-in view that gathers credentials for the user in order to authenticate the client.
Defining the Product List View
For the administration client, I display a simplified version of the product list but have added buttons to delete individual products and to create new ones. Listing 7-29 shows the contents of the AdminProductList.cshtml file, which I added to the Views/Admin folder.
Listing 7-29. The Contents of the AdminProductList.cshtml File
<div class="panel panel-primary">
    <table class="table table-striped">
        <thead>
            <tr><th>ID</th><th>Name</th><th>Category</th><th>Price</th><th></th></tr>
        </thead>
        <tbody data-bind="foreach: model.products()">
            <tr>
                <td data-bind="text: $data.Id"></td>
                <td data-bind="text: $data.Name"></td>
                <td data-bind="text: $data.Category"></td>
                <td data-bind="text: '$' + $data.Price.toFixed(2)"
                    class="text-right"></td>
                <td>
                    <button class="btn btn-xs btn-danger"
                            data-bind="click: removeProduct">Remove</button>
                </td>
            </tr>
        </tbody>
    </table>
</div>

<div class="text-center">
    <button class="btn btn-primary"
            data-bind="click: setListMode.bind($data, 'addProduct')">
        Add Product
    </button>
</div>
Defining the Order List View
To display details of the orders, I have used the same table structure that I created in Chapter 5 when I was writing the web services. The difference is that the elements are generated through Knockout bindings rather than Razor. Listing 7-30 shows the contents of the AdminOrderList.cshtml file, which I added to the /Views/Admin folder.
Listing 7-30. The Contents of the AdminOrderList.cshtml File
<div class="panel panel-primary">
    <div class="panel-heading">
        Orders
    </div>
    <table class="table table-striped">
        <thead>
            <tr>
                <th>ID</th>
                <th>Customer</th>
                <th colspan="3"></th>
                <th>Total Cost</th>
                <th></th>
            </tr>
        </thead>
        <tbody data-bind="foreach: model.orders()">
            <tr>
                <td data-bind="text: $data.Id"></td>
                <td data-bind="text: $data.Customer"></td>
                <td colspan="3"></td>
                <td data-bind="text: '$' + $data.TotalCost.toFixed(2)"></td>
                <td>
                    <button class="btn btn-xs btn-danger"
                            data-bind="click: removeOrder">Remove</button>
                </td>
            </tr>
            <tr>
                <th colspan="2"></th>
                <th>Product</th>
                <th>Quantity</th>
                <th>Price</th>
                <th colspan="2"></th>
            </tr>
            <!-- ko foreach: $data.Lines -->
                <tr>
                    <td colspan="2"></td>
                    <td data-bind="text: $data.Product.Name"></td>
                    <td data-bind="text: $data.Count"></td>
                    <td data-bind="text: '$' + $data.Product.Price.toFixed(2)"></td>
                    <td colspan="2"></td>
                </tr>
            <!-- /ko -->
        </tbody>
    </table>
</div>
I have used the Knockout comment feature to generate some of the rows in the table, but otherwise this view contains entirely standard HTML and Knockout data bindings.
Defining the Create Product View
The final view I require allows the user to enter details for a new product. Listing 7-31 shows the contents of the AdminProductAdd.cshtml file, which I added to the View/Admin folder.
Listing 7-31. The Contents of the AdminProductAdd.cshtml File
<h2>Add Product</h2>

<div class="form-group">
    <label>Name</label>
    <input class="form-control" data-bind="value: adminModel.newProduct.name" />
</div>

<div class="form-group">
    <label>Description</label>
    <input class="form-control" data-bind="value: adminModel.newProduct.description" />
</div>

<div class="form-group">
    <label>Category</label>
    <input class="form-control" data-bind="value: adminModel.newProduct.category" />
</div>

<div class="form-group">
    <label>Price</label>
    <input class="form-control" data-bind="value: adminModel.newProduct.price" />
</div>

<div class="text-center">
    <button class="btn btn-primary"
            data-bind="click: setListMode.bind($data, 'products')">Cancel</button>
    <button class="btn btn-danger" data-bind="click: createProduct">Create</button>
</div>
This is a simple set of input elements that use Knockout bindings to set values on the newProduct object in the data model. There is a Create button that calls the createProduct function to trigger the Ajax request and a Cancel button that returns to the list of products.
As with the customer client, I have not implemented any client-side validation so that all requests are sent to the web service, even when the data they contain won’t pass the validation checks.
Testing the Admin Client
All that remains is to test the client, which you can do by starting the application and using the browser to navigate to the /Admin/Index URL. The first view obtains the credentials required for authentication. Enter Admin as the username and secret as the password, as shown in Figure 7-11.
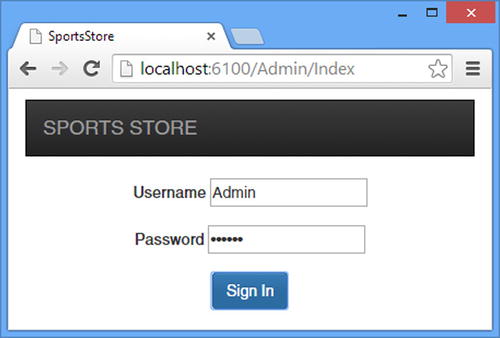
Figure 7-11. Providing credentials to the admin client
Click the Sign In button to authenticate the client, and you will be presented with the product list view, as illustrated by Figure 7-12.
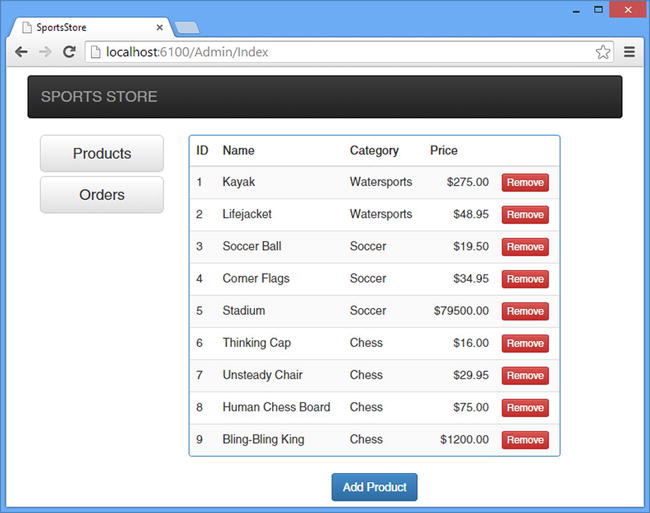
Figure 7-12. The admin product list
You can delete products from the repository by clicking the Remove buttons or create a new product by clicking the Add Product button. Clicking Add Product allows you to enter the details of the product you want to create, as shown in Figure 7-13. You can remove individual orders by clicking the Remove buttons or return to the product list by clicking the Products button at the left side of the window.
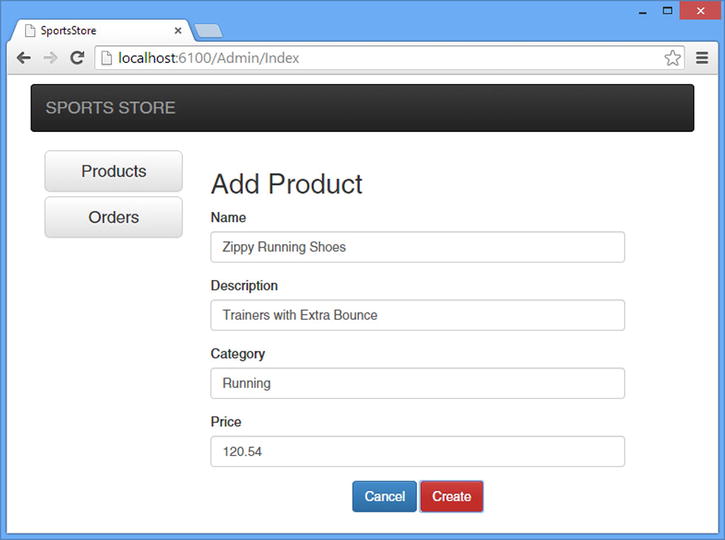
Figure 7-13. Creating a new product
Clicking the Create button will send an Ajax request to the server and then update the product data, ensuring that the new product is displayed in the list. The final view is shown by clicking the Orders button at the left side of the window, which shows a list of the orders in the repository, as illustrated by Figure 7-14.
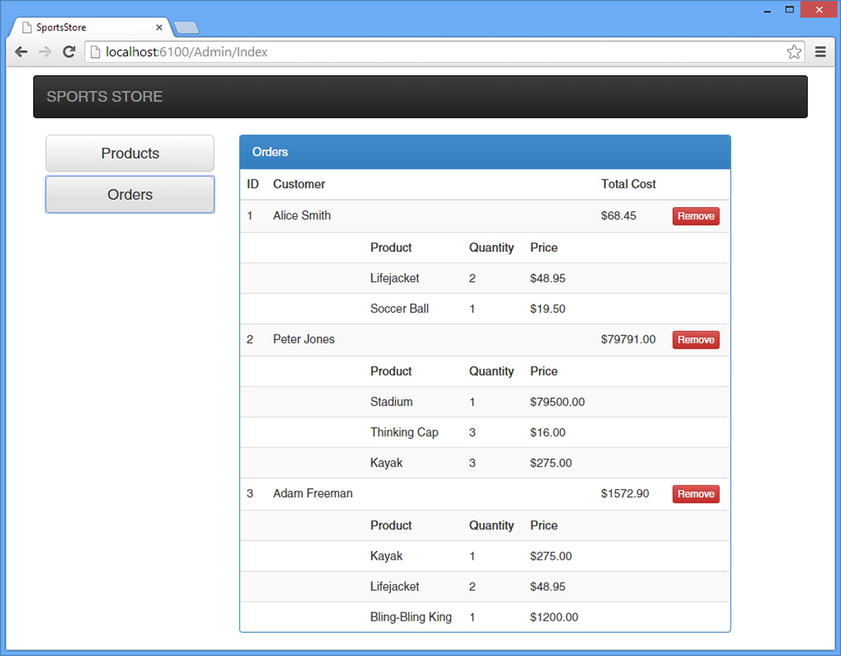
Figure 7-14. The admin orders list
Summary
In this chapter, I completed the development of the SportsStore application by creating clients for customers and administrators. I built a common foundation of client code, following the model/controller approach I used on the server side. I used this foundation to build clients that offer different functionality from the pair of Web API web services I created in Chapter 6. I covered a lot of ground without going into too much detail because the client-side development—especially the creation of view—is not directly related to Web API, but you can see how the overall structure of the client shows the use of the single-page application model in practice. In the next chapter, I show you how to deploy the SportsStore application to Microsoft Azure.