
![]()
Model Validation
The way that Web API binds complex types is useful and flexible, but Web API is a little too trusting and tries to carry on to the point where the action method can be executed, even if the data that has been sent to the client can’t be used to bind to the parameters that the action method requires or if the data cannot be used within the application.
Three main problems arise when processing client data: under-posting, over-posting, and unusable data. In this chapter, I describe each in turn and explain why it presents a problem in web service development before showing you the Web API features you can use to guard against them. Table 18-1 summarizes this chapter.
Table 18-1. Chapter Summary
Problem | Solution | Listing |
|---|---|---|
Check the validity of a model object passed as a parameter to an action method. | Read the IsValid property of the ModelStateDictionary class to get the overall validity and enumerate the Keys and Values collections to get details of specific validation errors. | 1–9 |
Protect against under- and over-posting. | Use the binding control attributes. | 10, 11 |
Protect against bad data. | Use the validation attributes or create a self-validating model object. | 12–14 |
Validate data as the model object is created. | Use the IFormatterLogger object in a custom media type formatter. | 15–17 |
Preparing the Example Project
I am going to continue working with the ExampleApp project I created in Chapter 10 and have been using for examples since. For this chapter, I am going to add a simple form that sends data to the web service using an Ajax POST request so that I can demonstrate how model validation works. My first change is to add a new action method to the Home controller so that I can render an MVC Razor view to produce the HTML form, as shown in Listing 18-1.
Listing 18-1. Adding an Action Method to the HomeController.cs File
using System.Web.Mvc;
using ExampleApp.Models;

namespace ExampleApp.Controllers {
    public class HomeController : Controller {
        IRepository repo;

        public HomeController(IRepository repoImpl) {
            repo = repoImpl;
        }

        public ActionResult Index() {
            return View(repo.Products);
        }

        public ActionResult Formats() {
            return View();
        }

        public ActionResult Bindings() {
            return View();
        }

        public ActionResult Validation() {
            return View();
        }
    }
}
Listing 18-2 shows the contents of the Validation.cshtml view file that I created in the Views/Home directory. This is the view file that will be rendered when the Validation action method in the MVC Home controller is invoked.
Listing 18-2. The Contents of the Views/Home/Validation.cshtml File
@{ ViewBag.Title = "Model Validation"; }

@section Scripts {
    <script src="~/Scripts/validation.js"></script>
}

<div class="alert alert-success" data-bind="css: { 'alert-danger': gotError }">
    <span data-bind="text: response()"></span>
</div>
<div class="form-group">
    <label>ProductID</label>
    <input class="form-control" data-bind="value: viewModel().productID" />
</div>
<div class="form-group">
    <label>Name</label>
    <input class="form-control" data-bind="value: viewModel().name" />
</div>
<div class="form-group">
    <label>Price</label>
    <input class="form-control" data-bind="value: viewModel().price" />
</div>
<button class="btn btn-primary" data-bind="click: sendRequest">Send Request</button>
This view contains a set of input elements that update a Knockout observable object and a script element that imports the validation.js file from the Scripts folder. This is the file that contains the JavaScript code that sends the Ajax request to the web service, as shown in Listing 18-3.
Listing 18-3. The Contents of the Scripts/validation.js File
var viewModel = ko.observable({
    productID: 1,
    name: "Emergency Flare",
    price: 12.99
});

var response = ko.observable("Ready");
var gotError = ko.observable(false);

var sendRequest = function (requestType) {
    $.ajax("/api/products", {
        type: "POST",
        data: viewModel(),
        success: function (data) {
            gotError(false);
            response("Success");
        },
        error: function (jqXHR) {
            gotError(true);
            response(jqXHR.status + " (" + jqXHR.statusText + ")");
        }
    });
};

$(document).ready(function () {
    ko.applyBindings();
});
The JavaScript code sends a POST request to the /api/products URL and updates the HTML content based on the response. The final step is to create the action method on the Products controller that will be invoked when the Ajax request is received by the web service, as shown in Listing 18-4.
Listing 18-4. Defining an Action Method in the ProductsController.cs File
using System.Collections.Generic;
using System.Web.Http;
using ExampleApp.Models;

namespace ExampleApp.Controllers {
    public class ProductsController : ApiController {
        IRepository repo;

        public ProductsController(IRepository repoImpl) {
            repo = repoImpl;
        }

        public IEnumerable<Product> GetAll() {
            return repo.Products;
        }

        public void Delete(int id) {
            repo.DeleteProduct(id);
        }

        public void Post(Product product) {
            repo.SaveProduct(product);
        }
    }
}
The Products method is a RESTful Web API controller, which means that the Post method will be invoked when Web API receives an HTTP POST request that targets the /api/products URL. I explain how RESTful controllers work—and how Web API URLs are defined—in Part 3 of this book.
Testing the Changes
To test the changes, start the application and navigate to the /Home/Validation URL. The Validation.cshtml view will be rendered to generate the HTML form shown in Figure 18-1, with the input elements populated with the defaults that I defined in the validation.js file.
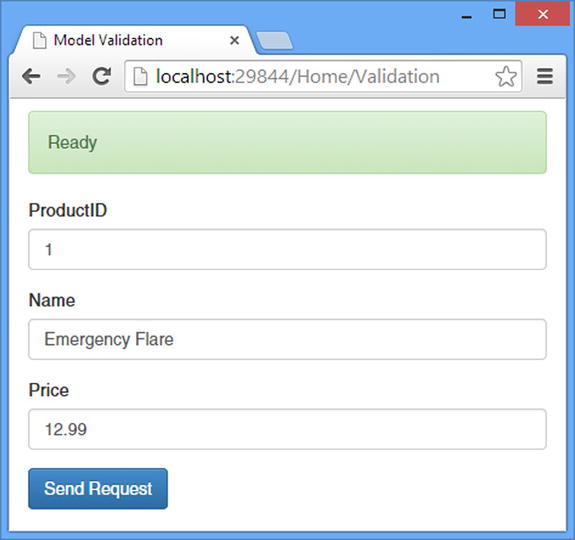
Figure 18-1. The HTML form rendered by the Validation.cshtml view
Clicking the Send Request button will send an Ajax request that targets the new Post method in the Products controller. This will trigger the model binding process so that the Post method can be passed a Product object, which is then added to the model via the repository.
You can check to see whether the product has been created by using the browser to navigate to the /Home/Index URL, which displays the contents of the repository, as illustrated by Figure 18-2.
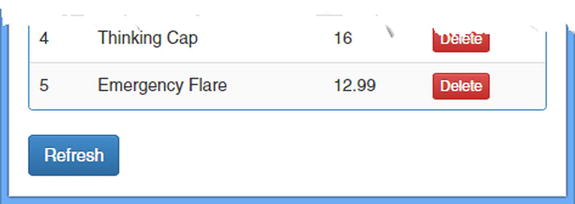
Figure 18-2. Adding a new product to the repository
Understanding Common Data Problems
You will face three main problems when dealing with data in a web service: too little data (under-posting), too much data (over-posting), and bad data (as good a term as any). I describe and demonstrate each kind of problem in the sections that follow before showing you the Web API features that can be used to handle them.
Under-posting occurs when the request doesn’t contain values for all of the properties defined by a model object. This usually occurs because the client doesn’t validate the data provided by the user, but it can also be a deliberate attack that aims to take advantage of ill-chosen default values.
The underlying problem is that the model binding process has no inherent understanding of the way in which model objects are used. An instance of the model class required for a parameter is created, and values for all of the properties it defines are sought from the request. No error is reported if there are properties for which the request doesn’t provide a value and if the default value for the property type will be used. To demonstrate under-posting, I have changed the data that the client sends to the web service so that the Price property isn’t provided. Listing 18-5 shows the changes to the validation.js file.
Listing 18-5. Under-Posting in the validation.js File
var viewModel = ko.observable({
    productID: 1,
    name: "Emergency Flare",
    price: 12.99
});
![]() Tip Don’t forget to clear the browser cache when you make changes to the validation.js file; otherwise, the changes may not take effect, and you won’t get the expected results.
Tip Don’t forget to clear the browser cache when you make changes to the validation.js file; otherwise, the changes may not take effect, and you won’t get the expected results.
var response = ko.observable("Ready");
var gotError = ko.observable(false);

var sendRequest = function (requestType) {
    $.ajax("/api/products", {
        type: "POST",
        data: { productID: viewModel().productID, name: viewModel().name },
        success: function (data) {
            gotError(false);
            response("Success");
        },
        error: function (jqXHR) {
            gotError(true);
            response(jqXHR.status + " (" + jqXHR.statusText + ")");
        }
    });
};

$(document).ready(function () {
    ko.applyBindings();
});
To test the effect of the omission, start the application and use the browser to navigate to the /Home/Validate URL. Click the Send Request button to trigger the Ajax request, which will cause the model binding feature to create an instance of the Product object and seek values from the request for the Product properties. Since there is no value for the Price property, the default value for the Price property type that was assigned when the instance was created will be left unchanged when the action method is invoked. The default value for decimal values is zero, and you can see the result by using the browser to navigate to the /Home/Index URL, which will display the list of Product objects in the repository, as illustrated in Figure 18-3.
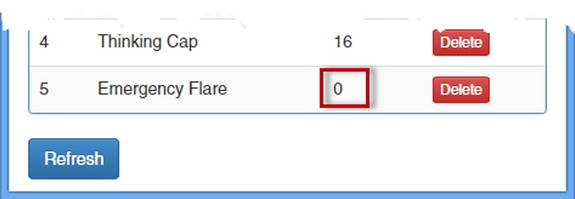
Figure 18-3. The effect of under-posting on the repository
The impact of under-posting depends on the type of the properties that are affected and the way that the model object is used. For a storefront application, allowing a product to be added to the catalog with a zero price is a quick way to lose money on profitless sales. The most troublesome problems arise when default values infer some kind of special status on a request, such as an IsAdminUser property that defaults to true.
Over-posting occurs when the request contains values for model properties that the developer expected to come from elsewhere. This typically occurs when the model object contains a property that confers special status on the request, such as the IsAdminUser property I described for under-posting. The default binding process will look for request values for all the objects in a model object, even if you expected the values to be set elsewhere in the application. As a demonstration, Listing 18-6 shows the addition of a property that I added to the Product class that indicates the discount rate for the price.
Listing 18-6. Adding a Property in the Product.cs File
namespace ExampleApp.Models {
    public class Product {
        public int ProductID { get; set; }
        public string Name { get; set; }
        public decimal Price { get; set; }
        public bool IncludeInSale { get; set; }
    }
}
My application may expect to set the IncludeInSale property entirely separately from the process of populating the repository, but the Web API binding process has no way to know that and will set the property if there is a corresponding value in the request. Listing 18-7 shows the change I made to the client-side code to include a value for the new property.
Listing 18-7. Over-Posting Data in the validation.js File
var viewModel = ko.observable({
    productID: 1,
    name: "Emergency Flare",
    price: 12.99
});

var response = ko.observable("Ready");
var gotError = ko.observable(false);

var sendRequest = function (requestType) {

    var requestData = viewModel();
    requestData.IncludeInSale = true;

    $.ajax("/api/products", {
        type: "POST",
        data: requestData,
        success: function (data) {
            gotError(false);
            response("Success");
        },
        error: function (jqXHR) {
            gotError(true);
            response(jqXHR.status + " (" + jqXHR.statusText + ")");
        }
    });
};

$(document).ready(function () {
    ko.applyBindings();
});
Over-posting isn’t always malicious and can occur when clients send values for all the properties defined by a model object even when the user hasn’t directly provided a value. The impact can vary from inconsistent data—products that are on sale when there is no sale, for example—to security breaches, where accounts or request are given elevated access to the application.
![]() Tip Although I show you how to deal with over-posting using the Web API validation features, the best solution is to avoid defining model properties that cause problems, which prevents requests from being able to cause unwanted effects. If you can’t separate out the safe and unsafe properties in your model classes, then consider using a data transfer object (DTO), which is a class used solely as an action method parameter and contains only the safe properties. The binding process will set the DTO properties, which you can then copy to an instance of the model class within the action method.
Tip Although I show you how to deal with over-posting using the Web API validation features, the best solution is to avoid defining model properties that cause problems, which prevents requests from being able to cause unwanted effects. If you can’t separate out the safe and unsafe properties in your model classes, then consider using a data transfer object (DTO), which is a class used solely as an action method parameter and contains only the safe properties. The binding process will set the DTO properties, which you can then copy to an instance of the model class within the action method.
The final category of problem is bad data, where the client sends data values that cannot be used, either because the values cannot be parsed to the types required by the data model or because the values do not make sense. Most bad data arises because the user has made a mistake, but it can also represent a deliberate attempt to get the web service to act in unexpected or unpredictable ways.
To see the effect of a value that cannot be parsed into a model property, start the application, use the browser to navigate to the /Home/Validation URL, and change the value of the Price property so that it isn’t a numeric value. Click the Send Request button and navigate to the /Home/Index URL to see the effect, which is illustrated by Figure 18-4.
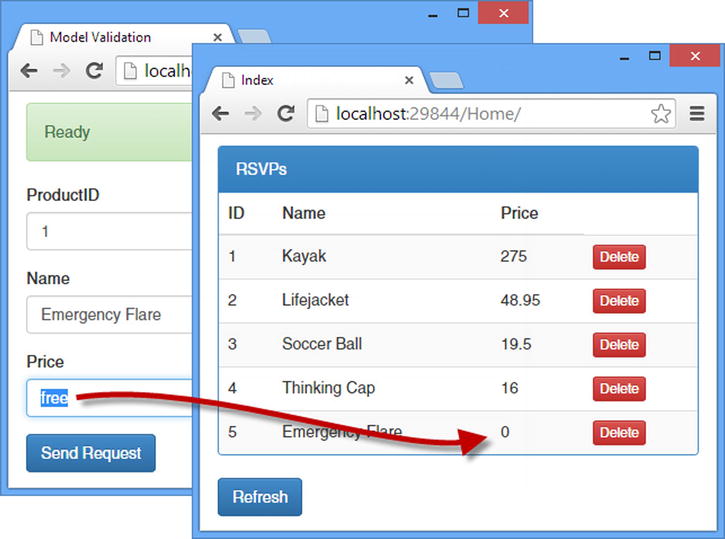
Figure 18-4. The effect of a data value that cannot be parsed to a model property value
The Web API binding process doesn’t throw an exception when it tries to use the value in the request (free in this example) to set the Price property of the Product object. Instead, it just fails quietly, and the default value for the property type is used (zero in this case since the Price property is a double).
The other kind of bad data problem arises when the request contains a value that can be parsed into the right type but doesn’t make sense. To see the effect of this kind of problem, repeat the process to create a new product, but set the Price field to -1, as shown in Figure 18-5.
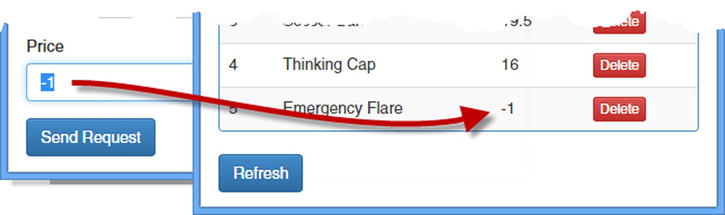
Figure 18-5. The effect of a data value that can be parsed but is still invalid
The binding process has no insight into the meaning of the properties that it is setting and has no understanding that a negative value for a price doesn’t make sense. The effect of this kind of problem tends to manifest itself elsewhere in the application, such as when the total cost of a basket of products is calculated.
Using Web API Model Validation
To help manage the process of validating data, Web API keeps track of the model state, which contains details of any problems that were encountered during the binding process and which can be checked and handled in the action method. By default, the model state will contain details of only basic errors—such as problems converting a value into a property type—but Web API provides an extensible mechanism for defining different kinds of validation that can be used to detect and report more complex problems. Table 18-2 puts Web API model validation in context.
Table 18-2. Putting Web API Model Validation in Context
Question | Answer |
|---|---|
What is it? | Model validation is the process by which data received from the client is checked to guard against under-posting, over-posting, and bad data. |
When should you use it? | You should always validate data received from clients. |
What do you need to know? | Web API provides information about the model validation process through the model state. |
Understanding Model State
The model state for a request is described with an instance of the ModelStateDictionary class, which is defined in the System.Web.Http.ModelBinding namespace. There are two distinct parts to the life of a ModelStateDictionary object. When you are writing action methods, you will use the ModelStateDictionary object to check the overall state of the validation process and to get details about individual errors. For these tasks, the ModelStateDictionary class defines the properties described in Table 18-3.
Table 18-3. The Properties Defined by the ModelStateDictionary Class Used to Check Validation
Name | Description |
|---|---|
IsValid | Returns true if there are no validation errors |
Count | Returns the number of validation errors |
Keys | Returns the collection of property names for which there are validation errors |
Values | Returns an enumeration of ModelState objects for the specific property name |
The ModelStateDictionary also provides an array-style indexer, which provides an alternative way of accessing the ModelState objects that are used to represent validation errors. This is the most common way to obtain validation errors that arise when processing a request.
Listing 18-8 shows how I have changed the Post action method in the Products controller so that I check for model state errors, enumerate them, and vary the response for requests that contain invalid data.
Listing 18-8. Using Model State in the ProductsController.cs File
using System.Collections.Generic;
using System.Web.Http;
using ExampleApp.Models;
using System.Diagnostics;
using System.Web.Http.ModelBinding;

namespace ExampleApp.Controllers {
    public class ProductsController : ApiController {
        IRepository repo;

        public ProductsController(IRepository repoImpl) {
            repo = repoImpl;
        }

        public IEnumerable<Product> GetAll() {
            return repo.Products;
        }

        public void Delete(int id) {
            repo.DeleteProduct(id);
        }

        public IHttpActionResult Post(Product product) {
            if (ModelState.IsValid) {
                repo.SaveProduct(product);
                return Ok();
            } else {
                foreach (string property in ModelState.Keys) {
                    ModelState mState = ModelState[property];
                    IEnumerable<ModelError> mErrors = mState.Errors;
                    foreach (ModelError error in mErrors) {
                        Debug.WriteLine("Property: {0}, Error: {1}",
                            property, error.ErrorMessage);
                    }
                }
                return BadRequest(ModelState);
            }
        }
    }
}
I have made the Post action method more complex than it would be in a real application so that I can describe all of the types involved in the model state; I’ll show you a more typical usage in the “Removing the Debug Output Code” section.
The ApiController class is the default base class for Web API controllers, and the ModelStateDictionary object is exposed through its ModelState property. Within the Post action method, I check the ModelState.IsValid property to see whether there have been any validation errors when the request was processed. If there are no validation errors, I add the new Product object to the repository and call the Ok method to generate the result from the method.
![]() Tip When working with model validation, you need to return an IHttpActionResult from the action method even if you don’t want to return data to the client. This allows the action method to differentiate between requests that were processed correctly and those for which there were validation errors.
Tip When working with model validation, you need to return an IHttpActionResult from the action method even if you don’t want to return data to the client. This allows the action method to differentiate between requests that were processed correctly and those for which there were validation errors.
If there are validation errors, indicated when the IsValid property returns false, then I use the ModelStateDictionary.Keys property to get an enumeration of the property names for which there were problems.
Each property is represented by a ModelState object. The ModelState class is separate from the ModelState property that the ApiController class defines, but the fact that the same name is used twice leads to this confusing statement:
...
ModelState mState = ModelState[property];
...
The ModelState property returns the ModelStateDictionary object, which defines the array-style indexer that returns instances of the ModelState class. The ModelState class defines the properties shown in Table 18-4.
Table 18-4. The Properties Defined by the ModelState Class
Name | Description |
|---|---|
Errors | Returns a collection of ModelError objects representing the validation errors for a property |
Value | Returns the ValueProviderResult associated with the property |
Individual validation errors are represented by instances of the ModelError class, which defines the properties shown in Table 18-5.
Table 18-5. The Properties Defined by the ModelError Class
Name | Description |
|---|---|
ErrorMessage | Returns an error message that describes the validation problem |
Exception | Returns an exception associated with the validation problem |
I use the ModelState and ModelError classes in the Post action method to enumerate any validation errors that were encountered during the binding process and write a description of each of them to the Visual Studio Output window.
To test the model state, start the application and use the browser to navigate to the /Home/Validation URL. Change the value of the Price field to free and click the Send Request button.
The model binding process will try to use free as a value for the Product.Price property and fail, since free cannot be converted to a double. There is little built-in validation in Web API, but problems converting values are reported by default, and the ModelState.IsValid property will return true, triggering my validation problem handling code. In the Visual Studio Output window, you will see the following output:
Property: product.Price, Error: The value 'free' is not valid for Price.The response sent back to the client will contain the 400 (Bad Request) status code. If you use the browser F12 tools to examine the HTTP response, you will see that it contains a JSON object that contains the same error information that I wrote to the Output window.
{"Message":"The request is invalid.",
 "ModelState": { "product.Price":["The value 'free' is not valid for Price."] }}
There is no standard format for expressing data validation errors in HTTP responses, but clients that are written specifically for a Web API web service can parse the JSON object and display appropriate error messages to the user.
![]() Tip The JSON object that is included in the response is part of the broader Web API error-handling functionality, which I describe in detail in Chapter 25.
Tip The JSON object that is included in the response is part of the broader Web API error-handling functionality, which I describe in detail in Chapter 25.
Removing the Debug Output Code
I included the code to write out details of the validation errors in the Post action method so that I could explain how the ModelState and ModelError classes are used. In Listing 18-9, you can see how I have removed this code from the action method, leaving a much simpler and easier-to-read action method.
Listing 18-9. Removing the Debug Code from the ProductsController.cs File
...
public IHttpActionResult Post(Product product) {
    if (ModelState.IsValid) {
        repo.SaveProduct(product);
        return Ok();
    } else {
        return BadRequest(ModelState);
    }
}
...
This is the typical pattern for dealing with validation errors: check the ModelState.IsValid property and respond by performing the operation and returning a 200 (OK) response or by reporting an error to the client with a 400 (Bad Request) response.
Using the Binding Control Attributes
The simplest way to guard against under- and over-posting is to use one of the attributes that Web API provides to control the binding process. The attributes are defined in the System.Web.Http namespace and are described in Table 18-6.
Table 18-6. The Binding Control Attributes
Name | Description |
|---|---|
HttpBindNever | This attribute tells the built-in model binder to ignore any request values for the property to which it has been applied to. |
HttpBindRequired | This attribute reports a validation error if the request does not contain a value for the property to which it has been applied. |
Listing 18-10 shows how I applied these attributes to the Product model class to prevent under-posting for the Price property and over-posting for the IncludeInSale property.
Listing 18-10. Applying the Binding Control Attributes in the Product.cs File
using System.Web.Http;

namespace ExampleApp.Models {

    public class Product {

        public int ProductID { get; set; }
        public string Name { get; set; }

        [HttpBindRequired]
        public decimal Price { get; set; }

        [HttpBindNever]
        public bool IncludeInSale { get; set; }
    }
}
To test the attributes, I changed the data that the client-side code sends in the Ajax request, as shown in Listing 18-11.
Listing 18-11. Changing the Request Data in the validation.js File
...
var sendRequest = function (requestType) {

    $.ajax("/api/products", {
        type: "POST",
        data: { Name: viewModel().name, IncludeInSale: true },
        success: function (data) {
            gotError(false);
            response("Success");
        },
        error: function (jqXHR) {
            gotError(true);
            response(jqXHR.status + " (" + jqXHR.statusText + ")");
        }
    });
};
...
The request contains no value for the Price property, which will trigger a validation error, and the IncludeInSale property, which will be ignored.
Performing Validation with Validation Attributes
The binding control attributes are an effective way of dealing with under- and over-posting, but they don’t address the bad data problem. The simplest way to increase the amount of validation that is performed is to apply the attributes defined in the System.ComponentModel.DataAnnotations namespace, which work exactly as they do in the MVC framework. The attributes are applied to the model class to restrict the range of acceptable values, and the results of the validation can then be checked within the action method. Table 18-7 puts data validation attributes in context.
Table 18-7. Putting Data Validation Attributes in Context
Question | Answer |
|---|---|
What is it? | The data validation attributes allow you to guard against bad data in requests. |
When should you use it? | You should use the validation attributes whenever the application is unable to process the complete range of values for a property type. |
What do you need to know? | The validation attributes will not report a validation error if there is no value in the request for the property to which it has been applied. |
Using the Built-in Validation Attributes
There is a set of built-in validation attributes that can be used to perform common validation tasks, as described in Table 18-8. Some of the built-in attributes can be configured when they are applied, so I have included a usage example for each of them.
Table 18-8. The Built-in Validation Attributes
Name | Example | Description |
|---|---|---|
Compare | [Compare("OtherProperty")] | This attribute reports a validation error if the property it is applied to does not have the same value as the property whose name is specified as the configuration string: OtherProperty in this case. This attribute is useful for e-mail addresses and passwords. |
CreditCard | [CreditCard] | This attribute reports a validation error if the value for the property to which it has been applied is not a credit card number. This attribute just checks the format of the number and not whether the card itself is valid. |
[Email] | This attribute reports a validation error if the value for the property to which it has been applied is not a valid e-mail address. Only the format is checked and not whether the address exists and can accept e-mail. | |
Enum | [Enum(typeof(MyEnum)] | This attribute reports a validation error if the value for the property to which it has been applied cannot be parsed into a value for the specified enum. |
MaxLength | [MaxLength(10)] | This attribute is applied to string properties and reports a validation error if the value exceeds the specific number of characters (10 in the example). |
MinLength | [MinLength(2)] | This attribute is applied to string properties and reports a validation error if the number of characters in the value is less than the specific value (2 in the example). |
Range | [Range(10, 20)] | This attribute is applied to numeric properties and reports a validation error if the value falls outside the specified limits. |
RegularExpression | [RegularExpression("blue|green")] | This attribute reports a validation error if the value doesn’t match the specific regular expression. |
Required | [Required] | This attribute reports a validation error if no value has been supplied for the property to which it has been applied. This is functionally equivalent to the HttpBindRequired attribute. |
StringLength | [StringLength(10)] | This attribute is applied to string properties and reports a validation error if the value contains more than the specific number of characters. |
The HttpBindRequired binding control attribute ensures that the request contains a value for a model property, but it doesn’t place any limits on what the value is. To guard against bad data, some of the other validation attributes must be used. In Listing 18-12, you can see how I applied the Range attribute to constrain the set of acceptable values for the Price property defined by the Product class.
Listing 18-12. Limiting the Range of Valid Values in the Product.cs File
using System.Web.Http;
using System.ComponentModel.DataAnnotations;

namespace ExampleApp.Models {
    public class Product {
        public int ProductID { get; set; }
        public string Name { get; set; }

        [HttpBindRequired]
        [Range(1, 20000)]
        public decimal Price { get; set; }

        [HttpBindNever]
        public bool IncludeInSale { get; set; }
    }
}
I applied the Range attribute to limit the acceptable range of values from 1 to 20,000 (these are inclusive so that 1 and 20,000 are both valid). To test the change, I need to change the client-side JavaScript code so that it sends a value for the Price property, as shown in Listing 18-13.
Listing 18-13. Restoring the Price Property in the validation.js File
...
var sendRequest = function (requestType) {

    $.ajax("/api/products", {
        type: "POST",
        data: viewModel(),
        success: function (data) {
            gotError(false);
            response("Success");
        },
        error: function (jqXHR) {
            gotError(true);
            response(jqXHR.status + " (" + jqXHR.statusText + ")");
        }
    });
};
...
To test the combined attributes, start the application, use the browser to navigate to the /Home/Validation URL, enter a value for the Price field, and click the Send Request button. The model will be valid if the value falls between 1 and 20,000 and the request will succeed, but a 400 (Bad Request) response will be sent for values outside of that range.
![]() Caution Always take care to combine attributes from Table 18-8 with the HttpBindRequired or Required attribute. The other attributes perform validation only if there is a value in the request for the property to which they are applied, which means that under-posting doesn’t cause a validation error to be added to the ModelStateDictionary unless the HttpBindRequred or Required attribute is used as well.
Caution Always take care to combine attributes from Table 18-8 with the HttpBindRequired or Required attribute. The other attributes perform validation only if there is a value in the request for the property to which they are applied, which means that under-posting doesn’t cause a validation error to be added to the ModelStateDictionary unless the HttpBindRequred or Required attribute is used as well.
Creating a Self-validating Model Class
An alternative to using attributes is to put the validation logic into the model class and implement the IValidatableObject interface, which is defined in the System.ComponentModel.DataAnnotations namespace. The IValidatableObject interface defines the Validate method, which receives a ValidationContext object and returns an enumeration of the validation errors, expressed as ValidationResult objects.
The ValidatonContext and ValidatonResult objects don’t provide any functionality that is specific to Web API validation, but implementing the Validate method provides an opportunity to inject validation logic that is specific to the model class. In Listing 18-14, you can see how I have removed the validation attributes from the Product class and implemented the IValidatableObject interface.
Listing 18-14. Applying the IValidatableObject Interface in the Product.cs File
using System.ComponentModel.DataAnnotations;
using ExampleApp.Infrastructure;
using System.Collections.Generic;

namespace ExampleApp.Models {

    public class Product : IValidatableObject {

        public int ProductID { get; set; }
        public string Name { get; set; }
        public decimal Price { get; set; }
        public bool IncludeInSale { get; set; }

        public IEnumerable<ValidationResult> Validate(ValidationContext
                validationContext) {

            List<ValidationResult> errors = new List<ValidationResult>();

            if (Name == null || Name == string.Empty) {
                errors.Add(new ValidationResult(
                    "A value is required for the Name property"));
            }

            if (Price == 0) {
                errors.Add(new ValidationResult(
                    "A value is required for the Price property"));
            } else if (Price < 1 || Price > 2000) {
                errors.Add(new ValidationResult("The Price value is out of range"));
            }

            if (IncludeInSale) {
                errors.Add(new ValidationResult(
                    "Request cannot contain values for IncludeInSale"));
            }
            return errors;
        }
    }
}
This technique works best when the validation logic is unlikely to be used on other model objects. If the validation logic is reusable, then I recommend creating custom validation attributes instead.
Performing Validation in a Media Type Formatter
In Chapter 17, I showed you how to create a custom media type formatter that reads model objects from requests. The base class for media type formatters, MediaTypeFormatter, provides its subclasses with access to the model validation feature, which means you can perform validation as the model object is being created. Table 18-9 puts performing validation in a custom media type formatter in context.
Table 18-9. Putting Media Type Formatter Validation Context
Question | Answer |
|---|---|
What is it? | The media type formatter base class provides support for reporting validation errors when creating a model object. |
When should you use it? | You should perform basic validation for each model property that you set in a custom media type formatter. |
What do you need to know? | The binding control attributes are implemented by the default complex model formatter and are not automatically applied in custom classes. |
Creating a Validating Media Type Formatter
Listing 18-15 shows the contents of the ValidatingProductFormatter.cs file that I added to the Infrastructure folder and used to create a custom media formatter that reports validation errors.
Listing 18-15. The Contents of the ValidatingProductFormatter.cs File
using System;
using System.IO;
using System.Linq;
using System.Net.Http;
using System.Net.Http.Formatting;
using System.Net.Http.Headers;
using System.Text;
using System.Threading.Tasks;
using ExampleApp.Models;
using Newtonsoft.Json.Linq;

namespace ExampleApp.Infrastructure {
    public class ValidatingProductFormatter : MediaTypeFormatter {
        long bufferSize = 256;


        public ValidatingProductFormatter() {
            SupportedMediaTypes.Add(new MediaTypeHeaderValue("application/json"));
            SupportedMediaTypes.Add(new MediaTypeHeaderValue("text/json"));
        }

        public override bool CanReadType(Type type) {
            return type == typeof(Product);
        }

        public override bool CanWriteType(Type type) {
            return false;
        }

        public async override Task<object> ReadFromStreamAsync(Type type,
            Stream readStream, HttpContent content,
                IFormatterLogger formatterLogger) {

            byte[] buffer = new byte[Math.Min(content.Headers.ContentLength.Value,
              bufferSize)];
            string jsonString = Encoding.Default.GetString(buffer, 0,
                await readStream.ReadAsync(buffer, 0, buffer.Length));

            JObject jData = JObject.Parse(jsonString);


            if (jData.Properties().Any(p =>
                    string.Compare(p.Name, "includeinsale", true) == 0)) {
                formatterLogger.LogError("IncludeInSale",
                    "Request Must Not Contain IncludeInSale Value");
            }

            return new Product {
                Name = (string)jData["name"],
                Price = (decimal)jData["price"]
            };
        }
    }
}
The ReadFromStreamAsync method is called to parse data from the request and is passed an IFormatterLogger parameter. The IFormatterLogger interface is defined in the System.Net.Http.Formatting namespace and defines the methods shown in Table 18-10.
Table 18-10. The Methods Defined by the IFormatterLogger
Name | Description |
|---|---|
LogError(name, message) | Registers a validation error for the specified property name and message |
LogError(name, exception) | Registers a validation error for the specified property name and exception |
In the listing, I use the IFormatterLogger parameter to register a validation error if the request contains a value for the IncludeInSale property. (This isn’t something I recommend you do in real projects—see the “Rewarding Bad Behavior with Error Messages” sidebar).
REWARDING BAD BEHAVIOR WITH ERROR MESSAGES
In Listing 18-15, I reject requests that contain a value for the IncludeInSale property and report a descriptive error. This is a different approach to using the HttpBindNever attribute, which quietly ignores values for the properties to which it is applied.
There is a difficult balance to be struck when it comes to validation messages. On one hand, you want to provide meaningful messages so that users and third-party developers can figure out what is going wrong. On the other hand, you don’t want to reveal anything about the internal structure of your application to deliberate over-posters.
There is no absolutely right answer, but my advice is to report errors when it comes to validating the properties that you have publically described and quietly ignore attempts to over-post by using the HttpBindNever attribute. That said, silence is not a proper defense against a determined attack, and you should also consider using professional penetration testers to ensure that your application is not susceptible to obvious security weaknesses.
Registering and Using the Custom Media Type Formatter
I need to register the media type formatter before I can test it. Listing 18-16 shows the change I made to the WebApiConfig.cs file.
Listing 18-16. Registering a Media Type Formatter in the WebApiConfig.cs File
using System.Web.Http;
using System.Web.Http.ModelBinding;
using System.Web.Http.ModelBinding.Binders;
using System.Web.Http.ValueProviders;
using ExampleApp.Infrastructure;
using ExampleApp.Models;
using System.Web.Http.Controllers;

namespace ExampleApp {
    public static class WebApiConfig {
        public static void Register(HttpConfiguration config) {

            config.DependencyResolver = new NinjectResolver();

            config.MapHttpAttributeRoutes();

            config.Routes.MapHttpRoute(
                name: "Binding Example Route",
                routeTemplate: "api/{controller}/{action}/{first}/{second}"
            );

            config.Routes.MapHttpRoute(
                name: "DefaultApi",
                routeTemplate: "api/{controller}/{id}",
                defaults: new { id = RouteParameter.Optional }
            );

            config.Services.Add(typeof(ValueProviderFactory),
                new HeaderValueProviderFactory());

            config.Services.Insert(typeof(ModelBinderProvider), 0,
                new SimpleModelBinderProvider(typeof(Numbers), new NumbersBinder()));

            config.Formatters.Add(new XNumbersFormatter());
            config.Formatters.Insert(0, new UrlNumbersFormatter());
            config.Formatters.Insert(0, new JsonNumbersFormatter());
            config.Formatters.Insert(0, new XmlNumbersFormatter());
            config.Formatters.Insert(0, new ValidatingProductFormatter());

            config.Services.Replace(typeof(IActionValueBinder),
                new CustomActionValueBinder());
        }
    }
}
I also need to change the format of the data that the client sends in the Ajax request so that my validating media type formatter will be used to bind the model object. Listing 18-17 shows the changes that I made so that the data is formatted as JSON.
Listing 18-17. Sending JSON Data in the validation.js File
var viewModel = ko.observable({
    productID: 1,
    name: "Emergency Flare",
    price: 12.99
});

var response = ko.observable("Ready");
var gotError = ko.observable(false);

var sendRequest = function (requestType) {

    $.ajax("/api/products", {
        type: "POST",
        data: JSON.stringify(viewModel()),
        contentType: "application/json",
        success: function (data) {
            gotError(false);
            response("Success");
        },
        error: function (jqXHR) {
            gotError(true);
            response(jqXHR.status + " (" + jqXHR.statusText + ")");
        }
    });
};


$(document).ready(function () {
    ko.applyBindings();
});
When you test the changes, validation will be performed by the media type formatter and by the attributes applied to the Product class. Being able to mix and match validation techniques allows you to create flexible validation polices that mix the generic (such as an acceptable range of values) with the specific (such that a request doesn’t attempt to set a property value).
Summary
In this chapter, I described the different ways in which you can perform validation to protect your model objects from the three most common web service data problems: under-posting, over-posting, and bad data. In Part 3 of this book, I describe the Web API request dispatch process and provide the context in which the features I have described so far exist.