
![]()
Putting It All Together
Each previous chapter has aimed to discuss the various components of the Web that circulate around JSON. Owing to this common thread, they are typically paired, rather than considered in isolation. In this chapter, I will piece together the various concepts discussed throughout this book as building blocks for an actual project. Each component will play its own critical role.
Within this chapter, I will use JavaScript, JSON, CORS, Node.js, CouchDB, Handlebars, and, finally, Ajax to harness the data from the social media powerhouse that is Twitter.
For those who live under a rock, Twitter is the latest social trend enabling users to communicate via a short, 140-character message. For all intents and purposes, Twitter can be thought of as the modern-day soapbox. Registered users can read and respond to other users’ messages. But even more important is that unregistered users can still read and search the tweets of all registered users. This is because Twitter stores in a database every tweet and publicizes them, thereby allowing all the world to view the voices of the many.
Furthermore, Twitter has crafted a simple API that welcomes web developers to harness their database, to power the simplest or most complex campaign initiatives. While there are many ways to utilize Twitter’s API, this chapter seeks to extract, at near-real-time, broadcast tweets that contain a specific hashtag or phrase. At the time of writing, the iPhone 6 had just been released, and the hashtag #bendgate instantly trended. For this chapter, I will make use of the hashtag #bendgate, but feel free to replace any #bendgate reference with one that is trending today.
Twitter Apps
Much as with all modern-day social APIs, in order to leverage Twitter’s API, we must register a Twitter app. This is easily accomplished by visiting http://apps.twitter.com and clicking the Create New App button, as shown Figure 14-1.

Figure 14-1. Create New App button
If you are not greeted with a page that resembles that in Figure 14-1, it may be that Twitter has either updated this page or that you have yet to sign in with your Twitter account. Take this opportunity to click “Sign in to twitter,” if you have an existing account with Twitter, or click “Sign up now” to create one. As a registered Twitter user, you are allowed to create as many apps as you see fit. Let’s begin by creating an app. Clicking Create New App will direct us to a page enabling us to create an application, as seen in Figure 14-2.
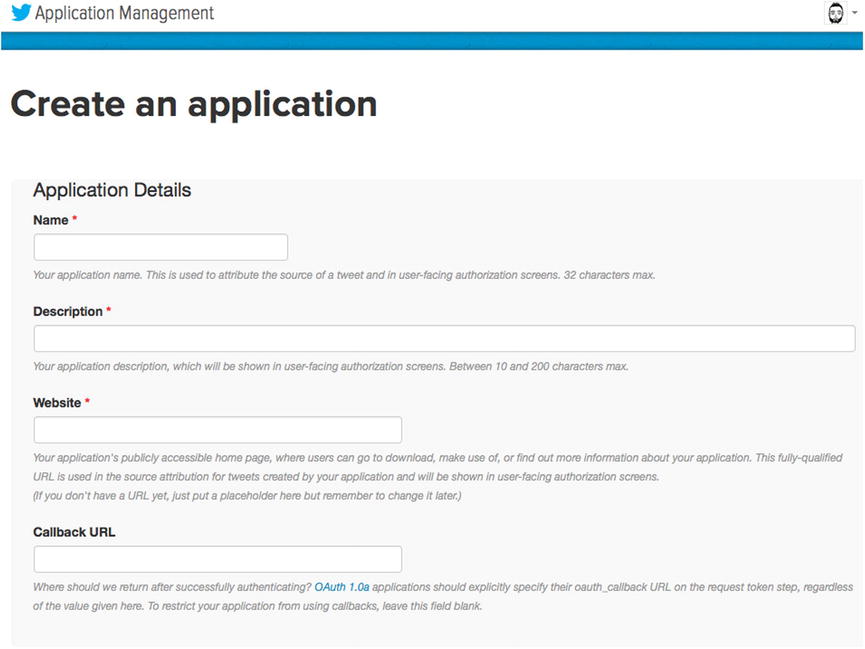
Figure 14-2. Application Details form
In the fields shown in Figure 14-2, we will need to provide some required information. First is the provision of a name for our application. Normally this field is presented to the end user, to approve the application to use the Twitter account. However, the app we will be creating is strictly for our own purposes. That being said, you can fill out any name that is not already in use by other Twitter developers. I have labeled my application “BeginningJSON.”
The second field seeks a description defining the behavior of our application. What is it for? What are its intentions? Again, this is another user-facing field. However, as it’s an internal project, we can call it whatever we wish. I have supplied the following description: “crawls the search API.”
The third field is used to provide authority to the source of the application. If your application creates tweets on behalf of a user who authorized your app, the URL you provide here will be listed as the source attribute for the tweet. Our app will not be making any tweets on anyone’s behalf; therefore, we can provide a placeholder, in order to satisfy the requirement of the field. I have listed http://127.0.0.1 as my web site.
The final field, which is not required, is mandated by the OAuth authorization protocol. As we will not be making use of this field, we can leave it blank.
The last step in creating a Twitter app requires that we read and acknowledge the policies surrounding the use of the Twitter API. If you agree to the rules laid out by Twitter, then click “Yes, I agree,” then click the button labeled “Create your Twitter application.”
If the form did not possess any errors, upon its submission, you will be navigated to a portal from which you can manage the particulars of your app. The landing page for your application is the Details page, which provides the overview of your application. Your details should reflect those shown in Figure 14-3.
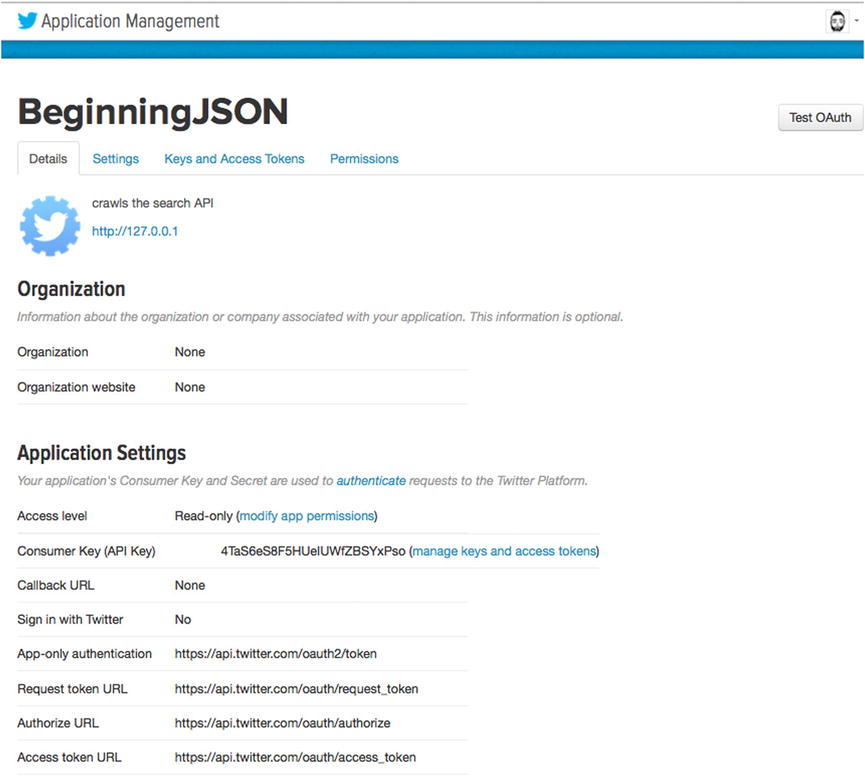
Figure 14-3. Application Details page
Figure 14-3 displays the basic details for our recently created application. The major difference between your app and mine begins with the presented name of the application. In the top left-hand corner, you can see that my app is labeled “BeginningJSON.” Further below, our application’s settings are listed. Here is yet another obvious difference between your app and mine. Where it states Consumer Key (API Key), the number that appears on your Details page is guaranteed to be that of a different value. This is necessary for your app and my app to be recognized as two separate applications. I’ll talk more about this shortly.
By default, all applications are enabled to provide “Read-only” status from Twitter. This is evident, as the first field within the Application Settings section reveals our access level. To the right of “Access level” are the following words: “Read-only.” This is always the default value, as it is the safest for any user who wants to use your application. If your application requires write privileges, the existing permissions will require modification. However, for the purposes of this chapter, we will continue to leave the permission set to Read-only. At this point, let’s click the Keys and Access Tokens tab within the topmost navigation.
Keys and Access Tokens
This section pertains to our application/user tokens and is integral to a Twitter application. In fact, it’s integral to nearly every API out there today. You see, the Twitter application for which we are creating strictly adheres to the OAuth 2.0 protocol. As the topic of OAuth is far beyond the topic of this book, I will simply explain that OAuth is an industry standard for allowing a third party access to your first-party data, while ensuring that the service requesting your data remains ignorant of your credentials. In this particular case, that service would be Twitter. In order to keep all parties isolated, thereby not exposing a user’s password to the application creator, a series of access tokens are used and exchanged instead.
Every Twitter application is provided a Consumer Key upon its creation. It is this Consumer Key that distinguishes my application from your application. Furthermore, it is used to establish the identity of my application with Twitter. Much like a Twitter handle, I have the option of changing my application name at any point in time. However, the Consumer Key will always remain the same, that is, unless I regenerate them or change the app permissions, which would provide my app with a brand-new Consumer Key. A change in Consumer Keys, then, represents a different app and, therefore, requires anyone who has previously authorized your app to do so once again. This ensures that users who authorize your read-only app today cannot be taken advantage of tomorrow, without having to authorize any changes made to your app.
While the Consumer Key is intended to be public information, all Public Keys are paired with a secret key that must be safeguarded at all times. For this reason, I have blurred mine out from Figure 14-4.
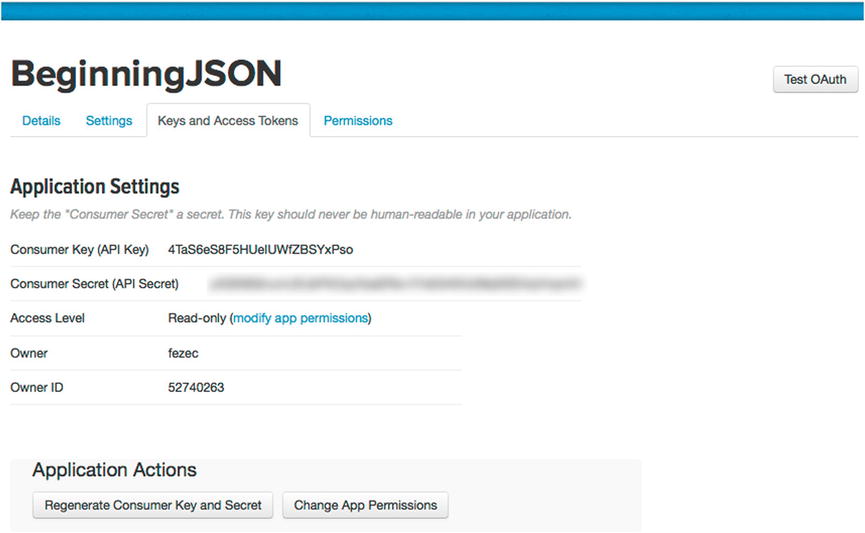
Figure 14-4. Application Keys and Access Tokens tab
If anyone ever obtains a secret key, he/she can impersonate your app. These two keys, when paired, establish the rightful ownership. Therefore, make certain that the Private Key you are provided remains a secret from anyone.
![]() Tip The safest way to utilize the Private Key is on the server side.
Tip The safest way to utilize the Private Key is on the server side.
At this point, we have successfully registered a read-only Twitter application that can be used to begin interacting with the Twitter API. All that is required is the understanding of the Twitter API. The Twitter API is bountiful and has loads of methods for us to tap into. To cover them all requires a book in itself; however, now that we have created an app, you may find it interesting to discover the potential that Twitter can offer. Feel free to learn about the various API methods from the online documentation at https://dev.twitter.com/overview/documentation.
The clear and concise documentation outlines the methods we can make use of, the type of authorization required, whether or not there is a limit to how many times it can be called, and the response format to be expected. While not every method will provide different answers, what remains a constant is that all response formats will be provided as JSON.
The interaction that this chapter will make use of is the public stream’s statuses/filter, and its resource information is provided in Figure 14-5.
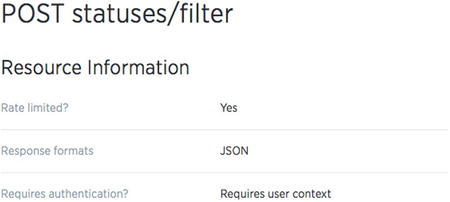
Figure 14-5. Public stream’s Resource Information page
The pubic stream, as defined on the Twitter web site, provides “developers low latency access to Twitter’s global stream of tweet data.” This is achieved by devising a socket between our server and Twitter’s, so they can post to our servers public tweets as they receive them.
As I mentioned earlier, both registered and unregistered users have the same ability to view Tweets. However, only registered users have the ability to perform more specialized operations. As shown in Figure 14-5, you can see that the type of authorization required for the public stream is that of a user context. Unlike the Consumer Keys, which we currently have, in order to use this interface, we will require a User Key as well. Fortunately for us, in order to create a Twitter application, one must have access to a registered Twitter account. In other words, we can generate a User Key for our account and pair it to work with our Twitter application.
Your User Access Token
One thing that Twitter provides us from the Keys and Access Tokens menu is the ability to generate an access token that can be authorized to work with our application. In order to obtain an access token, simply click “Create my access token,” just below the CTA “Token Actions,” shown in Figure 14-6. This will generate an access key for this particular application, thereby satisfying the requirements of the public stream interface.
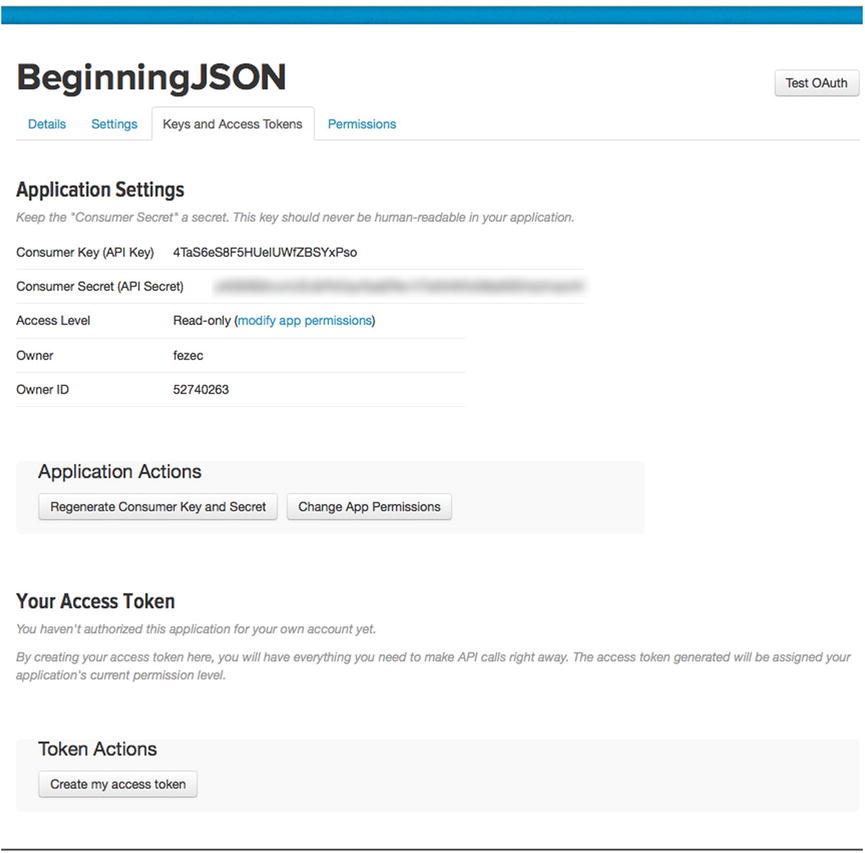
Figure 14-6. Generated user token
As shown in Figure 14-6, clicking “Create my access token” will generate an access token as well as its access token secret counterpart. Never reveal this access token secret to anyone; otherwise, he/she can use it to access your account via the Twitter API. By clicking “Generate My Access Token,” Twitter will authorize your account with your Twitter app. If you were to navigate to https://twitter.com/settings/applications, you would find a list of all the applications that you have authorized. The most recent application should reflect yours, just as Figure 14-7 reveals mine.

Figure 14-7. Authoring our account to make use of our application
At this point, we have all the credentials we require to monitor in near-real time the Twitter database for the tweets of our choosing.
Now that we have the required keys to consume data from the Twitter stream, all that remains is the implementation for our application. But what exactly are we building? you ask. We are going to build an application that monitors, as close to real time as possible, a topic that is currently trending. Furthermore, because the trend may be gone tomorrow, we will store within a database the data received from the stream. This will allow us the ability to filter, sort, or search for particular tweets even after the trend subsides.
Last, because the data will be locked away within a database, we will devise a way to extract the data and incorporate it within an HTML document. In order to present the data as a tweet, we will stylize the extracted data upon its inclusion within the HTML document. For this, you will have to use your gleanings from each preceding chapter.
The first piece of the puzzle is creating a server from which we can interchange data between our application and Twitter. In order to make our lives easier, we will leverage a Node module, which will conceal our application from the nitty-gritties of the Twitter API. For this challenge, we will leverage the npm Twitter module. You can read more about it at the following site: www.npmjs.org/package/twitter.
In order to utilize the Twitter module, we must first install it as a module with Node.js. In order to do so, we will follow the practices similar to those that were employed with Cradle, discussed in Chapter 12.
Simply use the command-line interface to navigate to the top directory, which contains the chapter14 source code. For me, that would be the following locations:
//PC
C:UsersUrZADocumentsAptana Studio 3 WorkspaceBeginningJSONchapter14
//Mac
/Users/FeZEC/Documents/Aptana Studio 3 Workspace/BeginningJSON/chapter14/
Open Terminal for Mac or CMD for PC, and simply type cd, followed by the location of your chapter14 directory and hit Enter. Next, type in the following command and hit Return on your keyboard.
npm install twitter
This will initiate the installation process for our Twitter module. Remember that to install a module, you may require administration rights.
Incorporating the Twitter Module
Once the Twitter module has been successfully installed into our top-level directory, we can begin working with it, by incorporating it into a Node application via require(). As outlined at www.npmjs.org/package/twitter, the setup for our Twitter application requires a mere eight lines of code, as shown in Listing 14-1.
Listing 14-1. Twitter Module Setup
1 var util = require('util'),
2 var twitter = require('twitter'),
3 var twitr = new twitter({
4    consumer_key        : "REPLACE_WITH_YOUR_CONSUMER_KEY",
5    consumer_secret     : "REPLACE_WITH_YOUR_CONSUMER_KEY_SECRET",
6    access_token_key    : "REPLACE_WITH_YOUR_CONSUMER_ACCESS_TOKEN",
7    access_token_secret : "REPLACE_WITH_YOUR_CONSUMER_ACCESS_TOKEN_SECRET"
8   });
As I hinted at earlier, a Twitter application relies on an exchange among keys. This is why the setup requires us to insert the appropriate keys that reflect the application we are devising. The module then utilizes these keys to generate the proper calls to Twitter’s API. Because this logic is complex, we are leveraging our module to perform this labor.
Now, as it currently stands, the code from Listing 14-1 simply configures our application to properly access the Twitter API with the appropriate credentials. It does not begin to make any requests or receive any data. For that, we must utilize the relevant methods of the module.
The Twitter module has a few methods that we can tap into; however, for the purposes of this chapter, we will make sole use of the Streaming API. The Streaming API is a wrapper to accessing Twitter’s public streams. As you can learn from Twitter’s documentation on public streams, https://dev.twitter.com/streaming/public, there are three possible end points. We will use statuses/filter.
Statuses/Filter
The documentation for the statuses/filter URI states: “Returns public statuses that match one more filter predicates.” In other words, the end point, stream.twitter.com/1.1/statuses/filter, will monitor for public tweets that match any of the delimited terms or hashtags that we specify. Furthermore, because our application will be listening to a stream, Twitter will provide us data in near real time.
In order to specify the terms or tags that our application requires, we will use the track property. Simply put, track is a parameter that can be provided phrases or keywords. Multiple phrases or keywords can be separated by the comma (,) token. Listing 14-2 reveals the eight lines of code required to devise a connection to the status/filter stream.
Listing 14-2. Incorporating the Stream API
  8 //..truncated code
  9 var hashTag= "REPLACE_WITH_A_COMMA_DILIMITED_SET_OF_HASHTAG(s)";
 10 twitr.stream('statuses/filter', {
 11     track : hashTag
 12  }, function(stream) {
 13     stream.on('data', function(data) {
 14          console.log(data);  //outputs JSON
 15     });
 16  });
Listing 14-2 shows all the code we will require for devising a stream for the chosen list of hashtags or phrases. I, however, have chosen to monitor the single hashtag knows as “#BendGate” (the latest trend following the iPhone 6). Incorporating Listing 14-2 with Listing 14-1 and replacing all references appropriately is all that remains to make this Node application fully operational.
If you were to execute the code from the command-line interface, via the node command, depending on the topic you had chosen to monitor, you would notice JSON being output to the console immediately. If the topic was truly trending, you might find it impossible to determine one tweet from another. Remember: We are streaming data, which means that everything is happening in real time or as close to it as it can.
![]() Note The stream outputs JSON and not raw data, because the Twitter module parses it.
Note The stream outputs JSON and not raw data, because the Twitter module parses it.
Because it’s coming in at near-real time, we will have to save the incoming data, lest it never reappear in our application, that is, unless it is re-tweeted by another user. In order to ensure that we retain the incoming tweets of the stream, we must incorporate a database on which we can persist them.
There is an expression, “You could not step twice into the same river,” that is used to imply that things change. The tweets provided to our application may wind up being deleted by the originator of the tweet moments after they are published. This tweet will, for all intents and purposes, no longer be obtainable by public searches. By applying the preceding expression to our Twitter stream, the incoming tweets will be lost to our HTML document unless we devise a way to capture and store them for later use. For this, we will incorporate CouchDB.
Incorporating the Cradle Module
As you should already have CouchDB installed on your machine, the only thing that will be required of our application is the installation of the Cradle module into our current working directory. This can be achieved by typing cd, followed by the location of your chapter14 directory, and hitting Enter. Next, type in npm install twitter. Remember: You may require administration privileges to do so.
Once the Cradle module is installed, all that remains is to incorporate it into our existing Node application. Listing 14-3 reflects in bold the code required.
Listing 14-3. Incorporation of Cradle into Our Node Application
 1 var util = require('util'),
 2 var twitter = require('twitter'),
 3 var cradle = require('cradle'),

 4 var twitr = new twitter({
    consumer_key        : "REPLACE_WITH_YOUR_CONSUMER_KEY",
    consumer_secret     : "REPLACE_WITH_YOUR_CONSUMER_KEY_SECRET",
    access_token_key    : "REPLACE_WITH_YOUR_CONSUMER_ACCESS_TOKEN",
    access_token_secret : "REPLACE_WITH_YOUR_CONSUMER_ACCESS_TOKEN_SECRET"
   });

 5 var hashTag= "REPLACE_WITH_A_COMMA_DILIMITED_SET_OF_HASHTAG";

 6 var couchDB = new (cradle.Connection)('127.0.0.1', 5984, {
      cache : true,
      raw : false,
     forceSave : true
   });
 7 var twitterDataBase = couchDB.database('twitter'),
 8 twitterDataBase.exists(function(err, exists) {
 9     if (err) {
10         console.log('error', err);
11     } else if (exists) {
12         console.log('the twitter db exists'),
13     } else {
14         console.log('twitter database does not exists.'),
15    twitterDataBase.create();
16    }
17 });
18 twitr.stream('statuses/filter', {
       track : hashTag
      }, function(stream) {
         stream.on('data', function(data) {
            twitterDataBase.save( data, function(err, res) {
                if (!err) {
                  console.log(res);  //logs out saved couchDB _id
                }
            });
         });
   });
Listing 14-3 outlines in bold the inclusion of CouchDB via the Cradle module. As you can see in lines 5 through 16, we establish a connection to our CouchDB service and determine the existence of the database labeled “twitter.” If a database of that name does not currently exist, we create it via the create method.
Once our database is devised, and with a reference to it, we can pipe the incoming JSON into our database. Because the Twitter module converts any data read from the stream into JSON, we can simply provide it as the body to Cradle’s save method.
If you don’t currently have the CouchDB service running on port 5984, take this opportunity to start the CouchDB application. Once you have verified that CouchDB is running via the Futon interface, go ahead and restart our Node application. In lieu of Twitter data being outputted to the console, you should now be viewing JSON data returned by CouchDB. This data, as you may remember, represents the individual documents used to persist the provided JSON. Feel free to allow this application to run for a short while, in order to fill our twitter database. Before long, you will surely see an abundant amount of tweets that will have been saved to our database.
When you are satisfied, navigate your browser to the Futon Overview (http://127.0.0.1:5984/_utils) to bear witness to the fruits of your labor. As revealed in Figure 14-8, I managed to receive a total of 7,173 tweets before deciding to shut down my application. This amounted to nearly 50 megs in saved documents. While hard-drive space is nearly infinite for the penny these days, my desire to save 50 megs’ worth of people complaining about their bent phone is sadly finite.
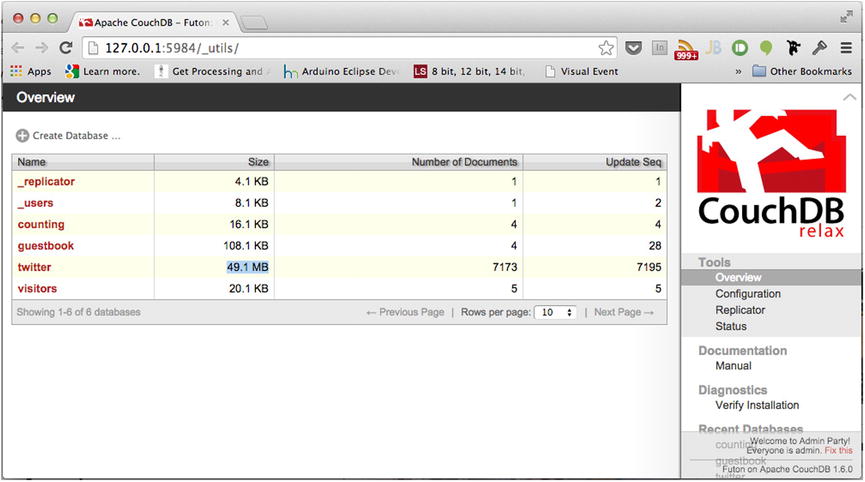
Figure 14-8. Overview of my Twitter database
Because Twitter does not understand what attributes our app may or may not wish to utilize, each JSON document saved possesses an exuberant amount of information. Such information addresses whom the tweet is in reply to or the location from which the tweet originated, etc. Feel free to delve into your Twitter database and observe at random a single document. As you will undoubtedly find, there is an expansive amount of information pertaining to the captured tweet. As this will be less than ideal for HTTP transport, we will have to create a view that reflects the sole aspects required by this chapter.
Creating a View
As was seen in Chapter 12, creating a view entails the creation of a design document, for which the map function we devise will reflect the rows for this particular view. For the purpose of our application, we will require a mere fraction of the values held within each JSON document. These values are the following: message, profile_pic, handle, full_name, created_time, media, and tweet_id. Each of these aforementioned labels will play an integral role in the presentation of the tweet.
Last, as the key that will be used to sort our results, our map function will reference the captured timestamp of the tweet. Referencing this value as the primary key to our view will enable the ability to sort tweets by their creation time. Currently, the creation time is represented as a string rather than as a number. However, we can easily convert the timestamp to a number via the built-in JavaScript function Number(string), as seen in Listing 14-4.
Listing 14-4. Devising a Tweet map Function
function(doc) {
var mediaURL=undefined;
if(doc.extended_entities){
   mediaURL=doc.extended_entities.media[0].media_url;
};
emit( Number(doc.timestamp_ms), {
                                    "message"      :doc.text,
                                    "profile_pic"  :doc.user.profile_image_url,
                                    "handle"       :doc.user.screen_name,
                                    "full_name"    :doc.user.name,
                                    "created_time" :doc.created_at,
                                    "media"        : mediaURL,
                                    "tweet_id"     :doc.id_str
                                 });
}
Listing 14-4 reveals the map function that will be used to create the data set that will be used within our HTML document. As you can see, the emit function obtains the reference to our document and, from it, captures only the properties our application requires. Because media will not accompany every tweet, I have also created a condition in which the mediaURL is set to undefined if media does not exist. This will effectively remove the media key from the returned JSON. This will be important to remember when we devise our template.
With our map function devised, click the Run button to extract our data set against the entries within our Twitter database. Once the operation completes, you should witness the results of your query, as shown in Figure 14-9. The amount of time required to query the existing database will vary. Remember that the initial render is the slowest, and subsequent rendering of the same query only occurs on recently added/removed or updated documents.
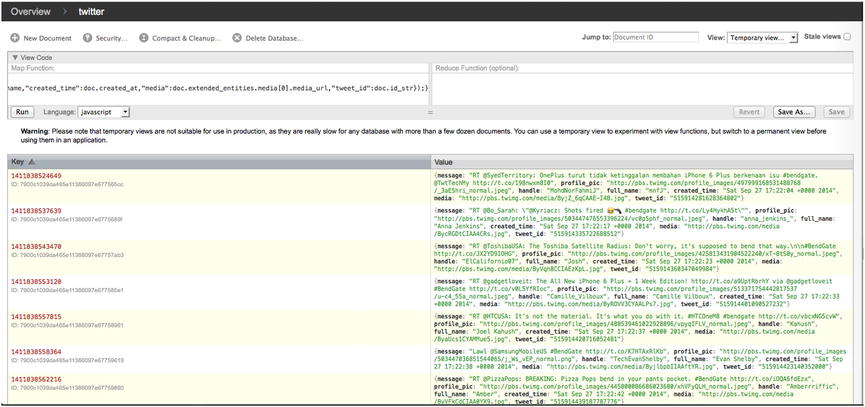
Figure 14-9. Specialized query
Once your view has successfully resulted in a valid data set, you will want to save it. You may recall that this is achieved by clicking the Save As... button, which will display the Save View As... dialog box shown in Figure 14-10.
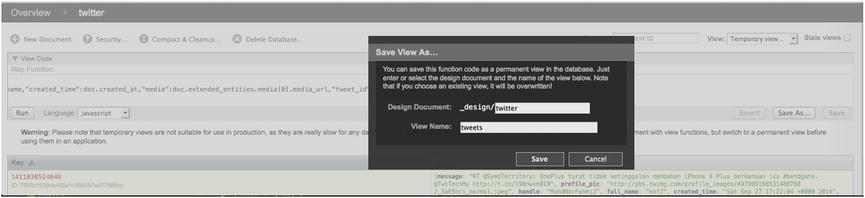
Figure 14-10. Save dialog for a temporary view
I have labeled my design document “twitter” and the view’s name “tweets.” Once the fields are properly filled in, click Save, so that we can now reference our view via the following URL: http://127.0.0.1:5984/twitter/_design/twitter/_view/tweets. Visiting this URL reveals JSON to be the data set captured by our query.
If we wish our HTML application to obtain and utilize the preceding JSON resource, we will require the use of Ajax. However, because CouchDB runs on a specific port, any and all Ajax requests that do not get initiated from within Futon will be denied, per the same-origin policy.
However, as CouchDB invites us to modify its configurations, we can enable CORS with ease. Navigating to http://127.0.0.1:5984/_utils/config.html reveals, via a Futon interface, the ability for us to modify, add, and alter the default configurations of CouchDB.
By default, CouchDB disables CORS, to ensure that data captured within remains safeguarded. However, enabling CORS is as simple as scrolling to the httpd section and locating the enable_cors option. While it may appear that the value is uneditable, double-clicking the value will reveal an input box, thereby allowing us to replace the current value with that of true. (See Figure 14-11.)

Figure 14-11. Configuring CouchDB with CORS capability
Once we have configured CouchDB to utilize CORS, we will have to include the proper CORS headers within the CORS section. By default, the CORS section does not possess any CORS headers as an option and, therefore, will have to be added. This is achieved by locating, at the bottom of the interface, the button labeled “Add a new section,” as seen in Figure 14-12.

Figure 14-12. Adding a new section button
On clicking this button, a dialog box will appear, as shown in Figure 14-13, and to it, we specify a key/value pair into a given section.
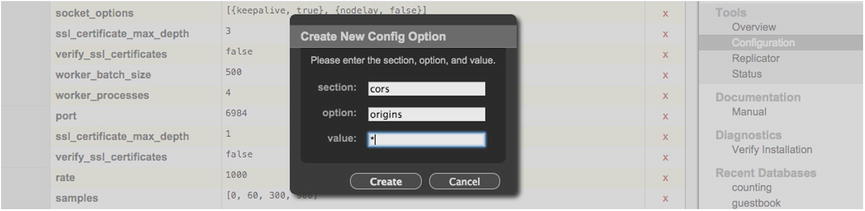
Figure 14-13. Configuring the origins header
For the purposes of this chapter, our application will only initiate a GET request for the Twitter view. Per the CORS specification, in order to authorize GET requests for data from origin A to a source origin B, we must use the origins header. As its value, we must configure any and all approved origins. To make things easy, we can use the wildcard after all the information we are exposing is already public on Twitter. On clicking Create, we will have successfully configured our data set from being obtained via varying origins.
Ajax
In order to fetch the JSON data from CouchDB, we must configure the Ajax request accordingly. This can be as simple as configuring an xhr object and defining the request line, as shown in Listing 14-5.
Listing 14-5. Ajax Request to Obtain Tweets
var ajax = new XMLHttpRequest();
    ajax.open("GET", "http://127.0.0.1:5984/twitter/_design/twitter/_view/tweets");
    ajax.responseType = "json";
    ajax.onload = function() {
        console.log(this.response);
    };
    ajax.send();
Listing 14-5 initializes an XMLHttpRequest object and configures the request line to make a GET request for the Twitter design document. Submission of the request, provided the CORS headers are properly configured in CouchDB, should result in the output of the received JSON data to the developer’s console. At this point, all that would remain is to append our JSON to the document.
![]() Note To keep things simple, Listing 14-5 solely makes use of XMLHttpRequest Level 2.
Note To keep things simple, Listing 14-5 solely makes use of XMLHttpRequest Level 2.
If you were to open a simple HTML document, make reference to the external Ajax.js file, and run it within a browser with the developer’s network pane opened, you would be able to witness a successful Ajax request. If your database is as bountiful as mine, you might have witnessed that your request received an incredibly large number of tweets. Receiving this many tweets will require the viewer of our document to wait until the transmission/parsing of JSON has been fulfilled, which is less than ideal.
For our Ajax to be prompt and provide a good user experience, we will incorporate into our URI the following recognized parameters of CouchDB: descending, limit, startkey, and skip. These parameters can be used to inform CouchDB to return a subset of data. This will allow us to paginate our data rather than receive it in one lump sum. Each parameter will provide a specific functionality in defining the range of our subset. Let’s begin with the descending parameter.
var url="http://127.0.0.1:5984/twitter/_design/twitter/_view/tweets?descending=true";
ajax.open("GET",url);
As you can see from the preceding code, I have appended the descending parameter to the end of our resource URI. Furthermore, I have specified the value of the descending parameter as true. This will ensure the sorting order of the original data set, from which we will define our subset. Next, we will utilize the parameter limit.
var url="http://127.0.0.1:5984/twitter/_design/twitter/_view/tweets?descending=true&limit=20;
ajax.open("GET",url);
Appending the limit parameter to our resource will allow us to cap the amount of rows returned by the view. In this particular case, I have specified the value of 20. If you were to navigate to the preceding URI, you would note that only 20 rows are presented. Furthermore, those 20 rows are sorted in the order they were extracted, that order being descending order.
By default, the 20 values being returned will simply reflect the first 20 rows that appear, beginning with the most recent. However, we can manipulate the starting index with the incorporation of our next parameter, startkey.
var url="http://127.0.0.1:5984/twitter/_design/twitter/_view/tweets?descending=true&limit=20
         &startkey=1412433722297";
ajax.open("GET",url);
Use of startkey invites us to specify a known key as the index from which our subset begins. In this case, I have specified the key 1412433722297. However, as you may or may not have a tweet that reflects this key, it’s best to make this value dynamic. This, of course, can be obtained easily from each Ajax request. We simply obtain the key from the very last row of JSON in our data set. I will demonstrate this shortly.
Because we will use the last key to indicate the key from which we begin our subset, we will undoubtedly obtain in each subset a tweet that has already been provided in our previous subset. Therefore, the final parameter we will utilize will inform CouchDB to skip over a specified number before beginning our subset. That parameter is, of course, skip.
var url="http://127.0.0.1:5984/twitter/_design/twitter/_view/tweets?descending=true&limit=20
         &startkey=1412433722297&skip=1";
ajax.open("GET",url);
Providing the value of 1 to our skip parameter informs CouchDB to offset our subset by one from the established startkey. This will effectively skip the row identified by the startkey from being provided in this data set.
Now that we have a firm understanding of the parameters involved, all that remains are the operations that can manipulate our URI accordingly. Such operations can be seen in Listing 14-6.
Listing 14-6. js/mylibs/ajaxRange.js Incorporates the Pagination of Tweets
 1 var url = 'http://127.0.0.1:5984/twitter/_design/twitter/_view/tweets';
 2 var lastKey = null;

 3 function render() {
 4 var ajax = new XMLHttpRequest();
 5     ajax.open("GET", incrementRange( lastKey ));
 6     ajax.responseType = "json";
 7     ajax.onload = function() {
 8         var data = (this.response);
 9         var rows = data.rows;
10         lastKey = rows[rows.length - 1].key;
11         console.log(data);
12     };
13     ajax.send();
14 }

15 function incrementRange(lastCount) {
16   var range = "?descending=true";
17   var limit = 20;
18   if (lastCount) {
19     range += "&startkey=" + lastCount.toString()+"&skip=1";
20   };
21   range += "&limit=" + limit;
22   return url + range;
23 };
Listing 14-6 incorporates the use of two functions to append the appropriate parameters and their values that enable the appropriate and linear subset of the original data contained in our twitter database.
The first function, labeled “render,” is the main entry into our Ajax request. This function is responsible for the actual request that will take place. However, the render function will defer to our second function, labeled “incrementRange,” which is responsible for appending the appropriate parameters for the Ajax call. As discussed earlier, three of our four parameters are known constants. We will always work in descending order; we will limit our data set to 20 rows; and, last, we will always skip one. However, what varies is the key that will represent our starting index, from which our subset is derived.
In order to satisfy the startkey parameter, we must retain the key value from the last row provided in each data set to a variable that can be referenced by the incrementRange function. The variable that will be assigned the key value is that of lastKey (line 10). With each data set returned, we must access the final collection in the array and obtain the value of key.
With each call to render, lastKey will be provided as an argument to incrementRange, where, if and only if the value is not null, will it be set as the value to startkey. Next, startkey and the skip parameter are appended to the current URI, along with limit.
With each invocation to render, the data set will continue to be incremented by the next 20 rows in the database. To make it easy to request a data set, we could easily bind the render function to that of a button in our HTML, as shown in Listing 14-7.
Listing 14-7. HTML Document’s Incorporation of Our ajaxRange Script
<!DOCTYPE html>
<html lang="en">
 <head>
  <meta charset="utf-8">
 </head>
 <body>
  <input type="submit" value="load tweets"  onclick="return render()"/>
  <script src="js/mylibs/ajaxRange.js"></script>
 </body>
</html>
![]() Tip Scripts should always be referenced at the end of your document, to increase page load.
Tip Scripts should always be referenced at the end of your document, to increase page load.
If we were to run the document from Listing 14-7, we would only be able to witness on the page a Submit button that reads “load tweets.” Although clicking the button does initiate the appropriate Ajax request, we have yet to perform any options that would insert the returned data into our page.
The final piece of the puzzle is the incorporation of our template, which will not only apply presentation to our data but also insert our data into the document. To assist in our template creation, it will be of great use to know exactly what the composition of our data is. Listing 14-8 reveals the composition of a data whose range is limited to the return of two rows.
Listing 14-8. A Subset of Our Data Context Received from CouchDB
{
 "total_rows":3976,
 "offset":0,
 "rows":[
   {
    "id":"83f4b7105a3aad630fb06e036600176b",
    "key":1412433722297,
    "value":{
       "message":"truncated",
       "profile_pic":"truncated.jpeg",
       "handle":"truncated",
       "full_name":"truncated",
       "created_time":"truncated",
       "media":truncated.jpg",
       "tweet_id":"518410721529307136"
      }
   },{
    "id":"83f4b7105a3aad630fb06e03660016cb",
    "key":1412433721956,
    "value":{
       "message":"truncated",
       "profile_pic":"truncated.jpeg",
       "handle":"truncated",
       "full_name":"truncated",
       "created_time":"truncated",
       "media":truncated.jpg",
       "tweet_id":"518410719986216960"}
   }
 ]
}
Listing 14-8 reveals that each tweet is a collection of key/value pairs, held sequentially within the ordered list labeled rows. Because our context is made up of collections and ordered lists, our template will have to rely on block expressions and block helpers to traverse the contexts appropriately. Listing 14-9 reflects the template I have chosen to represent our tweets.
Listing 14-9. index.html Handlebar-Tweet-Template
<!DOCTYPE html>
<html lang="en">
<head>
<meta charset="utf-8">
 <link href='css/tweet.css' rel='stylesheet' type='text/css'>
</head>
<body>
<section id="tweets">
 <script type="application/x-handlebars" id="Handlebar-Tweet-Template">
   {{#each rows}}  //for each item contained within rows
   {{#value}}      //set the current context to value
   <div class="social-article">
    <a target="_blank" href="{{profile_pic}}" class="profile-pic">
       <img alt="twitter icon" src={{profile_pic}}>
    </a>
    <div class="social-text">
     <p class="socialprofilelink">
      <a target="_blank" href="https://twitter.com/{{handle}}">{{full_name}}</a>
      <a target="_blank" href="https://twitter.com/{{handle}}">{{handle}}</a>
     </p>
     <a target="_blank" href="https://twitter.com/{{handle}}/status/{{tweet_id}}"
             class="created-time">{{created_time}}</a>
     <p>{{message}}</p>
    </div>
    {{#if media}}   //if a media is supplied add it
     <a href={{media}} target="_blank"><img class="media" src="{{media}}"></a>
    {{/if}}
    <div id="twitter-actions">
     <a target="_blank" href="https://twitter.com/intent/tweet?in_reply_to={{tweet_id}}"
             title="Reply" id="intent-reply" class="intent"></a>
     <a target="_blank" href="https://twitter.com/intent/retweet?tweet_id={{tweet_id}}"
             title="Retweet" id="intent-retweet" class="intent"></a>
     <a target="_blank" href="https://twitter.com/intent/favorite?tweet_id={{tweet_id}}"
             title="Favorite" id="intent-fave" class="intent"></a>
    </div>
   </div>
   {{/value}}   //return to the original context
   {{/each}}
 </script>
</section>
<input type="submit" value="load tweets"  onclick="return render()"/>
<script src="js/libs/handlebars-v2.0.0.js"></script>
<script src="js/mylibs/ajaxRange.js"></script>
</body>
</html>
If you were to open the HTML document within a browser, all that would be shown at this point is what appears in Figure 14-14. Furthermore, clicking the “load tweets” button continues to make Ajax requests; however, it will not insert any tweets into our page.
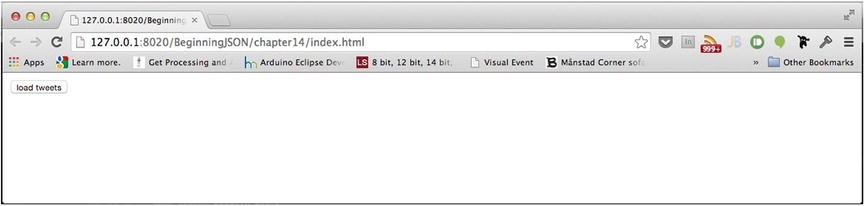
Figure 14-14. Only a “load tweets” button is rendered to the page
This is because we have yet to supply our data to our template. However, before we are able to do so, we must compile our template, so that we can reference it as a function, as seen in Listing 14-10.
Listing 14-10. js/mylibs/engine.js Incorporates the Template with ajaxRange.js
 1 var initialTemplateWrapper = document.getElementById("Handlebar-Tweet-Template");
 2 var initialTemplateContent = initialTemplateWrapper.innerHTML;
 3 var templateFunction = Handlebars.compile(initialTemplateContent);

 4 var url = 'http://127.0.0.1:5984/twitter/_design/twitter/_view/tweets';
 5 var lastKey = null;

 6 function render() {
 7  var ajax = new XMLHttpRequest();
 9  ajax.open("GET", incrementRange(lastKey));
10  ajax.responseType = "json";
11  ajax.onload = function() {
12   var data = (this.response);
13   var rows = data.rows;
14   lastKey = rows[rows.length - 1].key;
15     document.getElementById("tweets").innerHTML += templateFunction( data );
16  };
17  ajax.send();
18 }

19 function incrementRange(lastCount) {
20  var range = "?descending=true";
21  var limit = 20;
22  if (lastCount) {
23   range += "&startkey=" + lastCount.toString() + "&skip=1";
24  };
25  range += "&limit=" + limit;
26  return url + range;
27 };
Listing 14-10 begins by prepending into our ajaxRange JavaScript file the necessary lines both to obtain and compile our Handlebar-Tweet-Template into a JavaScript function. We begin first by obtaining a reference to the HTML <script> element whose ID is that of Handlebar-Tweet-Template (line 1). From there, we extract the value within via the element’s innerHTML attribute (line 2). Once we have a reference to the template markup, we can supply it as the argument to Handlebars.compile (line 3). This will result in the transformation of our template into a function, which can be assigned for later reference. In this particular instance, I have labeled that reference templateFunction. The variable templateFunction, when called, can be provided with our data set to produce the markup that can be added to our document. The final touch is then to invoke the templateFunction with our returned JSON data (line 15).
At this point, if we were to open our HTML document within a browser and click the “load tweets” button, our document would render each returned tweet with the appropriate presentation, as seen in Figure 14-15.
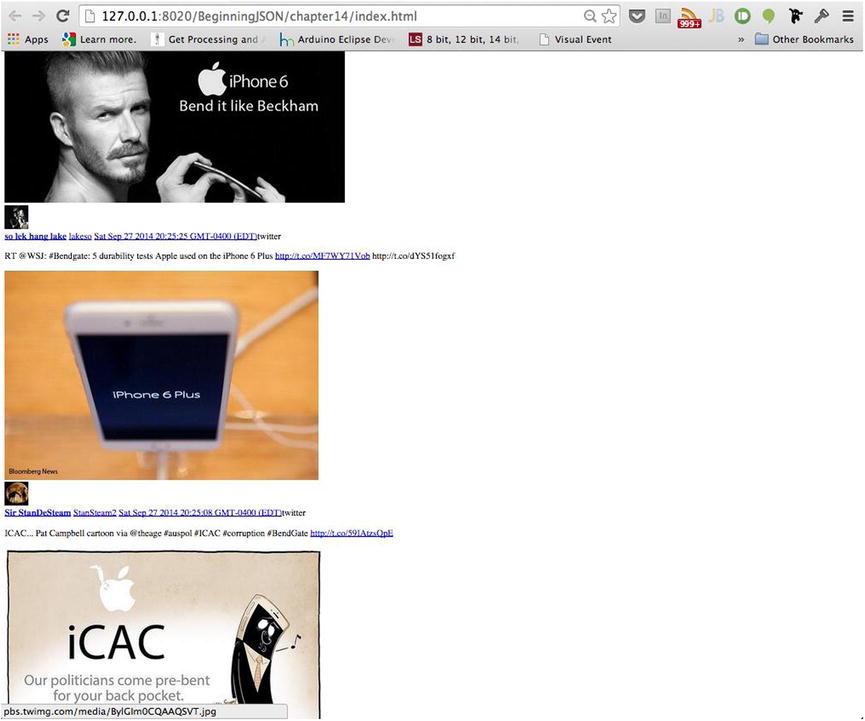
Figure 14-15. Handlebars automates the presentation
As you can see from Figure 14-15, each tweet is clearly added to the document. All that remains is the incorporation of the appropriate styling. The styling, much like the template, can take on any form. The styling I have chosen to apply can be seen in Listing 14-11, resulting in the rendering of Figure 14-16.
Listing 14-11. css/tweet.css Provides Style to Coincide with Our Template
@import url("//fonts.googleapis.com/css?family=Open+Sans+Condensed:300|Open+Sans");

#tweets {
    font-family: 'Open Sans' sans-serif;
    width: 30%;
    margin: auto;
    overflow: hidden;
}
.recent-activity img, img {
    border: 0 none;
}
a img.media {
    width: 100%;
    height: auto;
    margin: 10px 0;
    -webkit-border-radius: 7px;
    -moz-border-radius: 7px;
    border-radius: 7px;
}
.social-article {
    border-top: 1px slategray dotted;
    width: 100%;
    padding: 8px 0px 8px 0px;
    margin: 0 0 10px 0;
    position: relative;
    overflow: hidden;
}
.social-article .profile-pic a {
    position: absolute;
    z-index: 99;
    float: left;
}

.profile-pic {
    position: absolute;
}
.profile-pic img {
    float: left;
    border: none;
    -webkit-border-radius: 20px;
    -moz-border-radius: 20px;
    border-radius: 20px;
    width: 42px;
    height: 42px;
}
.social-article .social-text {
    width: 100%;
    float: left;
    font-size: 11px;
    padding-left: 52px;
    -moz-box-sizing: border-box;
    -webkit-box-sizing: border-box;
    box-sizing: border-box;
    position: relative;
}
.social-article .social-text p {
    margin: 0px;
    min-height: 1em;
    line-height: 15px;
    -ms-word-break: break-all;
    word-break: break-all;
    /* Non standard for webkit */
    word-break: break-word;
    -webkit-hyphens: auto;
    -moz-hyphens: auto;
    -ms-hyphens: auto;
    hyphens: auto;
}
.social-article .social-text a, .social-article .social-text h1 a {
    color: #00acee;
    text-decoration: none;
}
.social-article .social-text a:hover, .social-article .social-text h1 a:hover {
    text-decoration: underline;
    color: #00acee;
}

.created-time {
    font-size: 10px;
    color: #878787;
    clear: both;
    display: block;
    margin: 0 0 5px 0;
}
.created-time a, .created-time a:hover {
    color: #878787;
}
.socialprofilelink a, .socialprofilelink a:hover {
    color: #444;
}

/* -------- FEED  ACTIONS ------*/
#twitter-actions {
    width: 75px;
    float: right;
    position: relative;
    margin-right: 5px;
    display: block;
}
.intent {
    width: 16px;
    height: 16px;
    float: left;
}
.intent a {
    width: 16px;
    height: 16px;
    display: block;
    background-image: url(../img/everything-spritev2.png);
    float: left;
}

#intent-retweet a { background-position: 48px 0px; }
#intent-retweet a:hover { background-position: 32px 0px; }
#intent-fave a { background-position: 95px 0px; }
#intent-fave a:hover { background-position: 79px 0px; }
#intent-reply a { background-position: 0px 0px; }
#intent-reply a:hover { background-position: -16px 0px; }

Figure 14-16. Fully stylized #bendgate tweets
Summary
As this chapter has shown, JSON is not simply a data format but, rather, the kernel from which modern-day applications blossom. Owing to its convenience, simplicity, and ability to maintain the hierarchical structure of data, JSON has become the substance that fuels the Web.
It is true that we could have transmitted XML in lieu of JSON. However, the convenience of working with JSON far outweighs the tediousness and bloat that comes with XML.