
At this stage we have our Oracle Fusion Applications Environment ready and running. Before we begin with Fusion Applications administration, you must understand the Fusion Applications interface if you are not already aware of it. If you are aware of Fusion Applications interface, this chapter will provide a quick reference for you to various sections of the screens and will explore the common functionality provided with every Fusion Applications product. Since this is an intermediate chapter between Fusion Applications installation and administration, we will only have a quick look at the various features.
Getting Started with Fusion Applications Interface
As we saw earlier, Oracle Fusion Applications was built by incorporating the best practices and processes of various existing ERPs from Oracle. Fusion Applications interface also incorporates the best of the possible features from these application suites, including Oracle E-Business Suite, PeopleSoft, Siebel, JD Edwards, and so on. If you have been working on any of the ERPs from Oracle, then you are familiar with specific interface of the ERP you have used. These interfaces differ a lot and are based on different technologies, including Oracle Forms, OA Framework, Java, and many other web based technologies. If your organization is using multiple ERP suites for different products then the user must learn all these interfaces. Fusion Applications provides the best features of these ERPs in a unified interface, which eliminates the need for using different tools for business transactions, reporting, analytics, and so on. We will look at these features of Fusion Applications interface in the next section.
Figure 11-1 provides a glimpse at the various Oracle interfaces, including PeopleSoft, Siebel, E-Business Suite, JD Edwards, and so on, and still does not include all the interface types for these application suites. As mentioned earlier, all these application suites were built on numerous development technologies, so they vary from each other drastically. That is, until Oracle acquired these companies over a period of time. Oracle has constantly tried to bring synergy to these interfaces by evolving the look and feel of these products to at least a similar theme. The latest releases of all these ERPs have a similar layout, including similar UI areas and color combinations. However, the functionalities and processes still carry the legacy of the original products. Fusion Applications aims at providing a consolidated view of these different processes in unified application dashboards. Since the Fusion Applications interface was built from ground up, Oracle has been able to invest ample time in building the Fusion Applications user interface (UI) around the new user experience (UX) strategy. We will look at these concepts in the upcoming section.

Figure 11-1. Interfaces of various ERPs from Oracle
We can see in Figure 11-1 that the enterprises use different interfaces for selected modules from various ERPs. For example, if your organization is using PeopleSoft for HRMS, Oracle EBS for financials, and so on, you may have been using different interfaces that are built on different frameworks. Each of these products also provides multiple interfaces including web, desktop client, forms-based interfaces, and so on. Oracle Fusion Applications is developed on a flexible UI shell based on ADF and WebCenter, which encompasses the best of the products and interface features of these products.
Now let’s look at Figure 11-2, which shows the major differences between a traditional applications suite product and the Oracle Fusion Applications interface.

Figure 11-2. Other ERPs versus the Oracle Fusion Applications interface
Even if we look at a single ERP product like E-Business Suite, Siebel, PeopleSoft, and so on, we have to go through different screens for common functionalities like search, reports/analytics, collaboration, and the main work area/transaction related pages. So we must navigate from one page to another in order to have a holistic view of the business area. But Oracle has made an impressive user interface keeping the user experience in mind, which allows you to have a consolidated view of business area in single screen. That single screen is divided into multiple sections covering transactions, reports/analytics, and collaboration within the organization and Enterprise search features. This eliminates the need to navigate through a number of screens to complete a particular business task.
Fusion Applications User Interface Layout
Before going through the common functionalities available in the Fusion Applications interface, let’s first look at the Fusion Applications UI shell areas. These are the logical sections of the screen where a developer may place different functional blocks like Tasks, Search, Cart, Business Intelligence reports, and so on. Not all of these areas are mandatory in all the screens of Fusion Applications, but all the objects on the Applications screen will fall into one of these categories.
The following are the important goals of these UI areas.
Provide consistency across the entire application suite by placing the functional blocks in the same logical place across various screens to improve familiarity and simplicity of the interface.
Minimize the need to go through multiple pages to complete single tasks or business functions. Ideally the users can initiate any task in Fusion Applications using a maximum of 2-3 clicks and complete the tasks in same screen with different regions and panes.
Provide role-based interface by dynamically populating relevant application dashboards, reports, and collaboration tools depending on the applications and management role of the user.
Provide an exception-based interface, which will alert the user about the pending tasks instead of the user having to go through tedious methods of locating the tasks of importance. This applies for reporting where exception-based reports and analysis provide a quick overview of the business goals and related actions to be taken. Management by exception drastically improves the productivity of the users or specialists by focusing only on what needs to be done instead of monitoring a large number of business objects and transactions.
Figure 11-3 shows an example page of Fusion Applications along with the classification of various user interface areas.

Figure 11-3. Oracle Fusion Applications user interface layout
Let’s look at the Fusion Applications UI shell areas, as shown in Figure 11-3.
Global area: This area covers the top of the screen across its full width. It generally remains static across all screens for the user or for the particular product-related pages. It contains global functional controls and menus that drive the contents of remaining areas of the screen. The major UI elements in the Global area are application branding (the default is Oracle Fusion Applications but we can customize the logo and color scheme based on organization’s branding patterns), navigator, application home, favorites/recent items, notifications, logged on username (with Global area context menu for personalization, help and sign out), global search (optional), Watchlist, accessibility, and so on. We will discuss these elements in the coming sections.
Work Area Information area: This area occupies a narrow panel with a full-screen width below the Global area. It contains text labels, including the current page’s work area title as well as any relevant information about the work area.
Regional area: This area is the collapsible left panel of the screen under Work Area Information panel. Most of the screens will have a Regional area, except the some dashboard screens. This area contains tasks related to the application role. These tasks define and control the content being populated on the Local area. Certain tasks may be in navigation tree format if there are any sub-tasks available in the main category. It may also contain a Regional Search pane as well as collaboration tools. The Regional Search may have additional tabs in the Local area. Certain screens for the application administrator or manager roles may have high-level analytics panes as well in this area.
Local area: This area is the default and most important area of any Fusion Applications screen. This is where the users will perform most of their activities, analysis, and transactions. The Local area contains all related control buttons and links to complete the entire task without referring back to Regional area most of the time since the user can collapse the Regional area during the routine operation. The Local area may have static tabs and dynamic tabs. The dynamic tabs could be generated based on the flow from the Local area or based on a search from the Regional area. The Local area may have multiple regions for various activities, including local search (with search by example option), analytics related to particular task, collaboration panels, and so on. Sections of the Local area may be derived from saved searches as well. We will look at these functions in the coming sections.
Contextual area: This area occupies the right panel of the Fusion Applications screen. This is an optional area and available in specific screens only. The contents of this area are dependent on the selected context in the Local area. For example, it may contain an analytics or Business Intelligence pane that may be populated based on the data in local area. In Fusion UI context, it may contain consolidated data or container like a shopping cart for external facing websites, and so on. The content of this area is driven by the Local area and it might not be part of the overall workflow of a task but may be used as a reference. This panel can be collapsed if it’s not required during the regular functional tasks.
Logging into Oracle Fusion Applications
Before we start looking at the Oracle Fusion Applications interface, let’s first see how to log in to the Fusion Applications and launch the homepage. If you are the administrator and are trying to access the applications just after the provisioning is complete, use the FAAdmin or whichever super user you had selected during provisioning process. If the administrator gave you a login account, then use it to log on to the applications interface. The login URL for launching the Fusion Applications homepage is similar to the following.
https://<host name or load-balancer name>:<port>/homePage
Note that the homepage login URL depends on your selection of load balancer, internal/external URLs, and so on, and it was displayed in the post-provisioning summary screen. If you have not captured the URL then you can get the details from the saved summary file provisioning-<timestamp>.summary file located at <FRAMEWORK_LOCATION>/provisioning/bin. If you selected the different summary filename and location, check the respective file and locate the link.
Home Page
Host: fahost.paramlabs.com
Managed Server Port: 7006
Application URLs
https://fahost.paramlabs.com:10634/homePage
https://fahost.paramlabs.com:10634/homePageApi
As you can see, the URL for the Fusion Applications homepage in this example is https://fahost.paramlabs.com:10634/homePage . Locate the URL corresponding to your setup and launch it. We have already seen the Fusion Applications Login screen and homepage screen example in the previous chapter.
Common Features Across Fusion Applications
In this section we look at the common features and functionalities available throughout the Fusion Applications interface regardless of the product family. Most of these features are available to all users so we will discuss these common features here. This will help you understand and navigate through the applications interface for effective administration.
Oracle Fusion Applications interface is built using Oracle WebCenter technology, which provides a powerful and highly customizable user interface using WebCenter UI shell components. It also provides a desktop integration for power Excel users and seamless integration to and from Excel worksheets. Figure 11-4 provides a summary of the common features of the Fusion Applications interface.

Figure 11-4. Example of Fusion Applications common features
Note
The Fusion Applications interface got a major facelift from Oracle Fusion Applications 11g, Release 8 (11.1.8) onward. The common functionalities were available as a menubar in Global area until release 7, but from release 8 onward, these are available as a set of icons on top-right portion of the Global area.
These common features allow you to answer the most important questions related to the user interface, such as what the user’s role is related to the business based on the applications dashboards and worklist notifications, how the task needs to be done (using Fusion Applications embedded help and activity guides), what the user should know (exceptions on based reports and watchlist), and who can help from within the organization or team to resolve issues (using collaboration tools like discussion forums, activity streams, and so on).
Settings and Actions Menu
You can use the Settings and Actions menu to access many of the features discussed here. This menu is always available in the Global area of any screen. You can access this menu by clicking on the currently logged on user name on right corner of Global area. This menu contains links to user specific Settings and Actions for Personalization, Administration, and Troubleshooting. We will discuss the individual contents of this menu in the next section. This menu also contains the Log Out link, so you may need to access this menu and then click on Sign Out on top-right corner in order to log out of the applications.
Figure 11-5 shows an example of Settings and Actions menu in the Global area.

Figure 11-5. Fusion Applications Settings and Actions menu
Help
The Fusion Applications Help Feature has been integrated throughout the applications interface. This eliminates the need for the user to go through user documentation while using the applications functionalities.
Tip
Help-related pages are served by a dedicated WebLogic cluster in the common domain named HelpPortalServerCluster. If this service is down then some help-related features may not work.
You can access Fusion Applications Help either manually using Global Area ➤ Settings Menu ➤ Applications Help or directly using integrated help features in the transaction window. Let’s first look at the Fusion Applications Help home screen, which is displayed when you use the Applications Help link in the Global Area menu. Figure 11-6 provides a glimpse of the Fusion Applications Help home screen when launched from the Global Area menu.

Figure 11-6. Fusion Applications help
Fusion Applications online help provides quick access to all the application functionalities right from the Applications interface, without needing to go through offline documentation. You can use the Search functionality to look up specific subjects or use the left panel to select a specific task or business process and look up the help topics related to it.
Now let’s look at the integrated help features in the Fusion Applications Work areas. The built-in help integration provides you a means to look up contextual help based on the active transaction window. Let’s understand these integrated help options using an example screen of a journals-related work area and the types of help features available in the example screen, as shown in Figure 11-7.
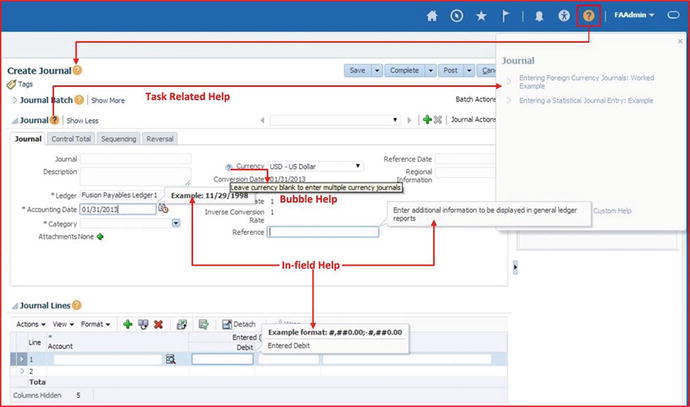
Figure 11-7. Fusion Applications user help features
As you can see in Figure 11-7, the transaction screen has multiple options to look up help related to the tasks, fields, and types of values to be entered.
Task-related help: When you click the Help icon in the Global area on any page, you will see a yellow Help icon in front of every section of the screen. Clicking on this icon will bring up the Fusion Applications help frame with a list of related tasks.
Bubble help: Some fields have dedicated help icons to provide additional information or notes about the field. Bubble help pops up when you mouse over the built-in Help icon next to the field.
In-field help: Clicking in the blank area of the field pops up an in-field help, which provides example of valid values for the specific field along with the format of the value to be entered.
Dashboards
Fusion Applications dashboards provide you with a one-stop overview of all that you need to know for the relevant business role for example manager, administrator, specialist, analyst, and so on. Once you log in to Fusion Applications you will notice a tabbed interface where each tab links to the dashboard for the particular product and application role.
The default dashboard is the Welcome Dashboard and it’s available with every Fusion Applications user regardless of the application roles. This dashboard provides you with important notifications through the watchlist and quick access to tasks that you may need to complete or reports of importance using the worklist. It also provides quick access to collaboration events within the organization using activity streams. We will look at all these elements next. Now let’s look at the application-specific dashboard example, as shown in Figure 11-8.

Figure 11-8. Dashboard without Regional area
A dashboard might not have Regional area since the purpose of dashboard is to give you an overview of all critical activities that fall under your responsibility. Figure 11-8 shows an example of a product-specific dashboard without a Regional area. You can see multiple collapsible blocks here to give a quick access to the areas of interest depending on the application role assigned to the user.
Now let’s look at an example dashboard with a Regional area as well. Figure 11-9 shows an example dashboard with a Regional area. As you can see the specific application role requires the user to perform certain tasks related to general accounting often, so the dashboard provides quick links to those tasks for the users in order to reduce the number of pages they have to navigate to perform day-to-day functional tasks.

Figure 11-9. Dashboard with Regional area
Navigator
The Navigator is available throughout the Fusion Applications interface. The Navigator provides quick links to application-specific work areas depending on your assigned roles and responsibilities. Since a user may have multiple application roles, you may see various application-related links grouped under corresponding product names. Let’s look at how to access the Navigator and see how it works.
Figure 11-10 shows how to access the Navigator menu in any screen by clicking on the Navigator icon in the Global area. This will bring up a menu with various task-related links specific to the roles assigned to the user. The navigator has a few common tasks that are always available to each user created in Fusion Applications and the remaining tasks are specific to the application roles. For example, scheduled processes or reports are available to all users having an employee role assigned to them. We can also customize the Navigator menu by using Manage Customization task. The Manage Customization task allows you to add, remove, hide, or display certain menu items. We will look at how to locate and execute such administrative tasks in the administration-related chapters.

Figure 11-10. Fusion Applications Navigator menu
Watchlist
The Watchlist is an additional navigation feature available in the Oracle Fusion Applications user interface. The Watchlist region is available on the Fusion Applications welcome dashboard for all users. It allows you to have a quick look at the important counts related to your business role based on predefined criteria. Practically speaking, Watchlist links are predefined count-based searches that provide a shortcut to relevant work areas, allowing you to monitor your areas of interest. For example, a manager needs to see the expense reports submitted by the team for approval so instead of going to the expenses screen every time, he would prefer to see the number of pending expense reports in the Watchlist and, if the count of pending requests is more than zero, then only go to the relevant screen by clicking on the link. Depending on the application roles assigned to the user there will be set of predefined Watchlist items already populated for the user. But the user can always create custom saved searches in the application and add the saved search as a Watchlist item using the Set Watchlist Options administrative task. Figure 11-11 shows an example of a Watchlist on the welcome screen.

Figure 11-11. Watchlist example
You can use the Preferences ➤ Watchlist personalization option to select or deselect the items you want to display in the Watchlist.
Worklist and Notifications
The Worklist region is available on the welcome page and it displays new notifications and approvals specific to the currently logged on user ordered by the notification creation date. While the Watchlist presents the counts of important tasks or alerts, the Worklist provides individual workflow alerts and notifications as and when they are available. When you click on an individual worklist item, it will take you to the related work area for viewing the details or taking an action on the workflow. You may find a lot of similarities between the Worklist and Watchlist with the difference being that the Worklist has dynamic content based on the availability of new notifications while the Watchlist will always have the saved searches displayed regardless of the result count (unless you have selected the option to hide non-zero results in the Watchlist personalization preferences).
While the Worklist is available on the home dashboard for the user, for all other screens Fusion Applications provides a Notification icon in the Global area. Clicking on the Notification icon in any screen will bring up a drop-down menu with list of recent unread notifications. When you click on the More link, it shows a list of all available notifications, as shown in Figure 11-12. With the default settings, any new notifications will automatically appear in the Global area.
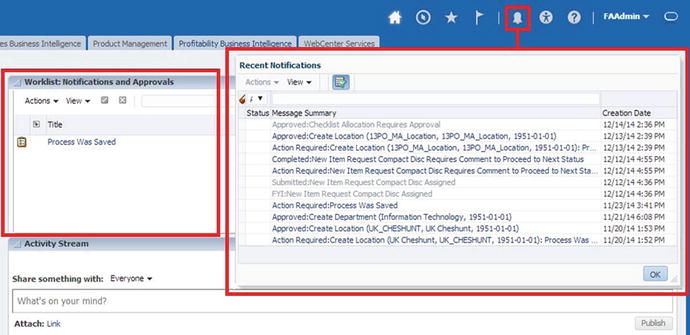
Figure 11-12. Worklist and notifications
Figure 11-12 shows the example of the Worklist as well as the Notification drop-down menu, which shows up after you click on the Notification icon and then click on the More link.
Note
Note that after 14 days each notification is considered read and you can find each notification in this list only up to 30 days. After that point, the notification is automatically deleted from this list and you may need to manually access the relevant work area to access the pending workflow tasks and approvals.
Personalization
As the name suggests, the Personalization area allows you to customize the layout display by adding, removing, or modifying panels or regions, setting language preferences and accessibility preferences, or changing the way the tables show up on specific pages, including the default search criteria. All these changes affect only the user performing the personalization and not the application in general. Certain personalization tasks are effective at the global level for the user so they will be applicable throughout every screens of the application, whereas other personalization options are specific to the pages that you personalize. We will look at each of the personalization option available in Fusion Applications. Before that let’s look at how to access the personalization options in the Fusion Applications common interface.
Figure 11-13 provides a glimpse at the Personalization section of the Settings and Actions menu in the Global area.

Figure 11-13. Personalization options in the Global area
When you click on the username in the Global area, you can see the following main commands related to personalization.
Set Preferences
Edit Current Page
Reset to Default Content and Layout
Let’s understand each of these commands one-by-one since as an Applications user or even an administrator you will be required to use these options often. Note that other than the Global menu, there is an additional icon next to notification for bringing up the Accessibility screen, which is also related to personalization. We will discuss that when we talk about the Accessibility feature.
Preferences
The Oracle Fusion Applications Preferences page allows you to set user preferences for a number of categories, including choice of default language, regional formats, as well as many function-specific preferences. The left pane of the Preferences page has two sections. The first section contains common preferences categories including regional, language, accessibility, password, and so on. The second section contains application-specific preferences, for example, expense preferences, sales preferences, calendar and appointments preferences, and so on.
Figure 11-14 shows an example of the landing page when you choose Set Preferences in the Global area Settings menu. This takes you to the General Preferences screen.

Figure 11-14. Language Preferences screen
By default, the General Preferences page contains language-specific preferences, and this is essentially the same screen as when you click the Language link in the Tasks region on the left. This allows you to choose a display language for the current session or set the default language option for the currently logged on user.
The other preferences you can set are as follows:
Regional: Allows you to personalize regional settings like date format, currency, and so on.
Password: Allows you to change your Fusion Applications password. Clicking on this link will take you to the Oracle Identity Management Password screen.
Proxies: The Proxies Personalization option allows you to add a list of people who can act as your proxy in your absence. These people will have access to your roles and can perform certain activities on your behalf.
Activity Stream Services: Allows you to select and follow any of the activities that are visible to you and you may want to see those activities on your homepage under the Activity Streams region.
Watchlist: The Watchlist preferences allow you to select the list of important count-related queries in your user specific Watchlist in the welcome dashboard. For all the enabled Watchlist items, the result will be displayed even if the count is 0. If you want to monitor only those items or saved searches for which there are non-zero results, you can select the Hide Items With no Results Found checkbox at the bottom of the Watchlist preferences screen. Figure 11-15 shows the Watchlist Preferences screen.

Figure 11-15. Watchlist Preferences screen
Accessibility: The Fusion Applications interface provides Accessibility preferences via a dedicated Accessibility icon in the Global area as well as through the Global Settings menu. It allows you to optimize the screen-viewing experience for people with disabilities or visual difficulties. Figure 11-16 shows the Accessibility screen, which can be invoked using either of these links.

Figure 11-16. Accessibility preferences
It allows you to select if the user is using assistive Screen Reader technology while using Fusion Applications interface. It may also provide additional shortcuts for Screen Reader users if this option is selected. The other available accessibility options are Color Contrast and Font Size. The Color Contrast preference allows the user to select high contrast along with operating system high contrast mode, which will dim the background images for easier readability. The Font Size preference allows the user to let Fusion Applications interface display the content according to the browser’s large font setting since this setting scales up the complete layout. This preference will allow Fusion Applications interface to render in accordance with the browser’s large font settings. If you are not using large font settings in your browser, leave this preference at medium.
Edit Current Page
The Personalization settings that we have discussed so far are applicable at the global level for the given user, regardless of the screen the user is accessing. But at times the user needs to customize certain screens or dashboards according to user’s personalization requirements. Although Fusion Applications interface supports ad hoc changes in table width, layout, and so on, any such changes applied without using personalization options might not persist when the user logs off, depending on what was modified. The Edit Current page link in the Global area settings brings up the customization screen for the current page.
This personalization option allows you to design a custom layout of your page, as shown in Figure 11-17. It displays the title of the page being edited along with the user’s details for which the page layout is being personalized. You can choose the regions to be displayed or hidden, add new regions, or modify the placement of the panels. Once you have made the required changes, you can save the preferences for the particular page and these changes will persist even after logoff.

Figure 11-17. Edit Current Page screen
In addition to the Edit Current Page option, you can also customize the default search queries to be run when the specific page loads. For this, you can create a Saved Search and then set the search criteria as the default for the page. We will cover Saved Search when we look at the Search feature next.
The last option in the Personalization section of the Global Settings menu is Reset to Default Content and Layout. You can use this option to reset all customizations done by the user for every customized page. However, this does not affect the Saved Searches or if any page has any Saved Search set as the default or set to run automatically on page load.
Favorites and Recent Items
The Favorites and Recent Items menu is another Fusion Applications navigation-related feature. These features allow you to refer to your most visited links quickly as compared to navigating to them manually or through the Navigator menu. The Favorites feature is particularly more useful for the important daily tasks that are not part of the Navigator menu. Adding those tasks to the Favorites menu helps you gain quick access to the specific task screen without accessing the application dashboard and then subsequent task links.
By default, the Favorites menu has no predefined items. To add any page to the Favorites menu, first open the page that needs to be added and then click on the Favorites icon in the Global area. Once it brings up the Favorites menu, click on Add to Favorites to add the current page in the list. Similar to a browser favorites menu, in Fusion Applications you can add a page directly under the Favorites menu or add it under an existing folder. You can also create a new folder if you want to group the favorites by product families, roles, or any other classification. In the example shown in Figure 11-18, we created a demo folder and added the Manage Implementation Projects page to it.

Figure 11-18. Adding a page to the Favorites list
Once you have added the required pages to the Favorites menu, let’s now look at the menu. Figure 11-19 shows an example of the Favorites menu. Notice that the recently created folder appears as a drop-down menu with the list of pages added to that folder.

Figure 11-19. Favorites menu example
Favorites can be modified at any time during the regular use of the application and the changes come into effect immediately. Also the scope of this menu is limited to the user and it does not affect the other application users.
Note
For Fusion Applications release 7 and earlier, Favorites, Recent Items, and Tags were separate menus, while from release 8 onward, Favorites and Recent Items are part of single menu with two separate tabs. Tags is at the bottom of the same menu.
Now let’s look at the second tab of the same menu, which is Recent Items. This list is also specific to the user only and does not affect the other application users. Unlike Favorites, this list cannot be modified manually but is populated every time you visit an application page by putting the recently visited page on the top. This helps you quickly refer to the most used pages even if they are not in your Favorites list. Figure 11-20 shows an example of Recent Items list. If you want to go back to one of the previously visited page, you may be want to use browser’s Back button, but I strongly recommend you to use this feature since, this way, the application remains aware that you are navigating away from the current transaction and will display appropriate messages if any action needs to be taken on the current page before navigating to a different page.

Figure 11-20. Recent Items menu example
Search
The Oracle Fusion Applications Search is based on the Oracle Secure Enterprise Search (SES) product. Oracle SES provides sub-second query performance for enterprise-wide content search. The Internet-like features of the Oracle Fusion Applications search also provide quick suggestions based on the partially entered query terms. The Search feature allows you to use various options including, wildcard, begins with, contains, and so on, to retrieve specific results.
Note
Since Oracle has a strategy to use Secure Enterprise Search as the indexing technology for its applications suite products only, as of early 2014 Oracle is no longer selling Oracle Secure Enterprise Search as a standalone product (with some exceptions). Oracle Fusion Applications licensing includes a restricted uses license for SES.
Fusion Application Search can be available in the Global, Regional, and Local areas, depending on the page content and context. For example, Figure 11-21 shows an example of items related the Work area, which has a Regional as well as a Local area. In this example, it allows you to directly search for the items from the regional area, which will take you directly to an item-specific page in the Local area.

Figure 11-21. Fusion Applications Search example
The Local area search provides a more specific search based on more criteria than those available in the Global area. A Local area search provides the capability to query by example. Siebel interface users may be aware of a similar functionality. In this case you can enter one or more values or part of a value for multiple columns and it will immediately update the table beneath the search box with the rows matching those values or patterns.
Generally the search in the Regional area overwrites or refreshes the current search conditions in the Local area, including the query by example values. This is because most search results update the existing screen content of the Local area. However, certain Regional area search results may appear in an additional tab instead of overwriting the Local area content.
Note
Note that Fusion Applications search results are not realtime since the search-related indexes are updated at certain intervals. As an administrator, you can set the indexing frequency and make sure it does not affect the application’s performance.
The Oracle Fusion Applications interface also allows you to save a search query that you are using often as part of your job. These types of queries are called Saved Searches. The Saved Search feature does not contain any actual data but only the search criteria so every time it is run the results may not be the same. You can also personalize Saved Searches by adding them to the Watchlist. You can select any Saved Search as the default for the page as well, so whenever the default search runs manually you may see the results retried by the saved search query. Fusion Applications also allows you to run the Saved Search automatically, provided it is set to default. In this case as soon as you launch the page containing this Saved Search, it will automatically run the Saved Search and retrieve the query results. Figure 11-22 shows an example of creating a Saved Search.

Figure 11-22. Creating a Saved Search
Analytics/Reports
Oracle Business Intelligence Reports and Analytics are embedded in various work areas of Oracle Fusion Applications interface. Since the reporting and analysis functionality is based on the Oracle Business Intelligence Enterprise Edition (OBIEE) and the Oracle BI Applications (OBIA), it allows users to access relevant analytical information in graphical format on the application dashboards as well as transaction pages wherever applicable. This allows the data to be presented in a meaningful format for end users. The same reports are also available from Oracle Business Intelligence Analytics homepage as well. This can be accessed from the Global area using Navigator ➤ Tools ➤ Reports and Analytics.
If the report is available in a dashboard, then you will be allowed to open it in the same work area or use More link to open it to the Oracle Business Intelligence screen, where the user will be allowed more actions including editing and copying the report. If the report is accessed from the Reports and Analytics screen then you may also see an option to edit the report using OBIEE or edit the analysis using BI Composer. Figure 11-23 shows the Create Analysis screen.

Figure 11-23. Fusion Applications Create Analysis example
ADF Desktop Integration
ADF Desktop Integration is one of the optional but salient features of Oracle Fusion Applications user interface. This allows users to have a desktop-like interface for using spreadsheets and such for uploading or editing the data in the Fusion Applications Transactional screens. There are many users who feel more comfortable using desktop spreadsheet software like Microsoft Excel to enter or edit transaction data. ADF Desktop Integration comes in the form of a Microsoft Excel plugin. In order to use this feature you must run the ADF Desktop Integration installer. This installer can either be downloaded from the Navigator menu ➤ Tools ➤ Download Desktop Integration Installer or as an administrator you can share the installer on a network drive from where the users can run the installer.
Collaboration
Fusion Applications provides a lot of collaboration tools that allow users to interact with other users in the organization, including share information, participate in discussions and receive updates, and so on. It is important to note that these collaboration-related objects might not be associated with Fusion Applications business objects. This allows the enterprise users to use Fusion Applications as single platform for business transactions as well as social interaction with other users based on projects or special interest groups.
Let’s look at some of the collaboration options available in Fusion Applications.
Spaces
The Fusion Applications Spaces feature is provided through the integrated WebCenter Spaces service. It allows the users to create their own collaborative pages by using various WebCenter Portal Services based on many available page templates. Although it is not the only collaboration method available, the Spaces feature is the preferred method of collaborating in Fusion Applications. Although Spaces can be used as independent pages, a developer can also integrate Spaces content in the work area. Figure 11-24 shows an example of the Spaces screen, which can be accessed through the WebCenter Services tab, the Global Settings menu, dashboards, or even from transactional screens.

Figure 11-24. Fusion Applications Spaces screen
The following are some of the collaboration components that can be used in WebCenter Spaces. Each of these components is part of Oracle WebCenter Portal Services:
Announcements: Provides a mechanism to communicate with a group of people about important events and activities. Announcements can be sent immediately or scheduled for a specific time.
Discussions: Facilitates discussion-based communication with the users within the application or those subscribed to the specific space. It allows quick resolution of issues by forum-like community discussions as well as a searchable knowledge base.
Documents: Enables storing, sharing, and attaching documents in a content repository. Documents are only available within the spaces.
Events: Provides group calendar services to enable sharing of appointments, meetings, and important activities within the team.
Lists: Provides a generic mechanism to create a list of items, ideas, to-do tasks, meeting activities, and a number of other possible actions. Lists are also only available within spaces.
Links: Enables sharing any other related or unrelated WebCenter components mentioned in this list on a page in the form of related links. For example, you can link to knowledge base lists, wikis, discussions, documents, and so on, in your page, blog, or portal.
Wiki: Allows users collaborative publishing and editing of knowledge base documents specific to the application or product using a WYSIWYG editor.
Tags: Allows users to mark/tag related contents with custom labels. This allows them to quickly locate the relevant information.
Space Templates
Fusion Applications users can use any of these collaboration components to build a social Space page. These pages can be public or set up by invitation basis only (visible or hidden from search). The following are the default available templates for creating a new space.
Blog: Use this template to publish and share knowledge, events, and opinions on various topics with other members in the organization.
Discussion Site: Use this template to create a forum-type discussion board to allow users to exchange ideas and discuss various topics in a thread-based model.
Document Exchange: Use this template to publish and share project-related or other documents within the group of individuals using attachments and sharable links.
Portal Site: Use this template to create a portal-like interface for the page with a number of subsections.
Project Site: Use this template to create a collaboration page for the specific project. This allows the team to access a common project calendar to share events and schedules.
Team Site: Use this template to create a collaboration page for a group of people working in a team by allowing document sharing, wiki pages, announcements, and discussion forums.
Activity Stream
Activity Stream provides a social networking collaboration feature for Fusion Applications users. Activity Stream is by default available on the Welcome dashboard for all Fusion Applications users. Similar to Internet-based social networks, Activity Stream allows users to connect to other people within or outside the application group, share information with all or selected people, view the updates, like or share other’s updates from other users, and so on, from Fusion Applications interface. It also allows users to attach media via links while sharing updates with others. Figure 11-25 shows an example of the Activity Stream region on the Fusion Applications welcome dashboard.

Figure 11-25. Activity Stream region
Scheduled Processes
Scheduled Processes are similar to concurrent requests in the Oracle E-Business Suite. In the E-Business Suite, the concurrent requests and processes are managed by the Concurrent Manager, while in Oracle Fusion Applications, this task is completed by the Oracle Enterprise Scheduler. Oracle Enterprise Schedule provides a robust mechanism to execute, control, monitor, and schedule the user’s jobs. Each product domain has a dedicated Enterprise Scheduler WebLogic cluster that handles the relevant jobs. We will look at Enterprise Scheduler in more detail in the administration chapters. Let’s explore the Scheduled Processes from a user’s point of view first.
During implementation and the day-to-day operations with Fusion Applications, every user or administrator needs to run various scheduled jobs or batches of jobs. For example, as an administrator you might need to retrieve the latest LDAP changes from OIM after a user is assigned roles using Oracle Identity Manager that are either delayed or failed due to any reason. Although all users created in Fusion HCM are always being created in Oracle Identity Management, there will be many cases when you need to manually send any pending LDAP requests to Identity Management and eventually to the identity store. For example, if you select a future date for de-provisioning for a user in HCM, it needs to be reflected in OIM. Figure 11-26 shows an example of two LDAP-related Scheduled Processes—Send Pending LDAP Requests and Retrieve Latest LDAP Changes—which may help you in completing these tasks.

Figure 11-26. LDAP-related Scheduled Process example
Let’s look at how to view, monitor, or run a Scheduled Process using the Fusion Applications interface. All the users with the Employee role will have a link titled Scheduled Processes in the Navigator menu under the Tools category. Clicking on this link will launch the Scheduled Processes home screen, as shown in Figure 11-27.

Figure 11-27. Scheduled Processes home screen
The Scheduled Processes screen allows you to monitor previously executed or scheduled processes as well as schedule a new process. The default search covers the last 24 hours, so the search will display the list of processes executed in the last 24 hours along with the current status. The status could be Wait, Ready, Running, Succeeded, Error, and so on. Clicking on the status value will display more information about that specific process. You can alternatively specify other search filters like name or processes with Wait or Error status to monitor the scheduled jobs.
To run or schedule a new process, click the Schedule a New Process button. This will bring up a pop-up window, as shown in Figure 11-28. First you must first select whether you want to run a scheduled job or job set and use the Search box to type the name of the job/job set or use the automatic search suggestion based on a partial query. If you do not find the job listed here, it will invoke the search interface where you can provide filters to locate the job or job set.

Figure 11-28. Schedule a new process
The Fusion Applications Scheduled Process (based on a job) and Process Set (based on a job set) commands are comparable to the Oracle E-Business Suite’s Concurrent Request (based on a concurrent program) and Request Set (based on a set of concurrent programs). A job contains a single task that will run independently of other jobs. A job set is a group of multiple other jobs that need to be run in a specific order to achieve a specific result. A job set can contain other nested job sets as well. A job set is considered the parent process for the included jobs or job sets so when you switch the Scheduled Processes Search result view to Hierarchy view, you will see the job set ID as the parent ID while the included jobs will display in the same hierarchy.
Once you have selected a job or job set to be run or scheduled, you will see Process Details screen, as shown in Figure 11-29, in order to provide the runtime parameters for the job being submitted.

Figure 11-29. Process details
You can either schedule the process to run as soon as possible, schedule it at a later date/time, or define a regular interval schedule for the job. This screen provides various options to receive notification, output formats, and so on. Once you submit the process it goes to Wait status if it is scheduled for a later time. Once the process is ready to run, it goes to Ready status, followed by Running and eventually Successful or Error status. We will look at these statuses in more detail during the Fusion Applications Administration chapters.
Summary
This chapter provided a bird’s eye view of Fusion Applications interface. Understanding the common interface features enables you to use the Fusion Applications interface efficiently for business-related tasks as well as administrative tasks. You saw how Fusion Applications differs from other traditional application suites and how it helps you increase your productivity by bundling various reporting/analytical, social, and business objects together in a single interface.
At this point you should be able to identify and use the navigation icons and menus in the Fusion Applications Global area. Although you have not yet seen how to assign the application roles to the users (which you will explore in upcoming chapters), you should be able to use the application dashboards once you have been assigned the appropriate application roles and dashboards are populated on the screen. You have also seen the importance of Scheduled Processes and how they map to Oracle E-Business Suite equivalent concurrent requests. You should now be able to schedule a new request as well as monitor it. We will look at Enterprise Scheduled in detail in upcoming chapters.
With Fusion Applications installed in earlier chapters and having seen the Fusion Applications interface in this chapter, at this stage you should be ready to move to Fusion Applications administration. The next chapters discuss monitoring, troubleshooting, diagnosing, and patching Fusion applications.