
The earlier chapters of this book provided an overview of the end-to-end provisioning of an Oracle Fusion Applications instance in your environment, whether on-premise or via a private cloud. The last chapter brought a logical switch to the contents of this book from installation to management of the installed applications where you got an idea of the basic interface of Fusion Applications and how the screen elements and UI components are placed in the common interface and their importance in the overall application suite. If you have followed the chapters sequentially, you should have your own Fusion Applications instance running on your servers depending on the topology you selected. You are also aware of how to navigate through various logical sections of the applications interface and know how to locate the important functionalities.
This and the next few chapters will focus on the day-to-day administration of Fusion Applications. This chapter includes only a part of the overall Administration tasks and the further chapters will continue to complement the discussion related to the day-to-day administration of Fusion Applications. In this chapter, we will focus on the most obvious and common administration tasks, for example starting and stopping the complete Fusion Applications and Identity Management environment, understanding the implementation process, creating new users and assigning required roles, managing important components of Fusion Applications, and so on. The next chapters will focus on other important administration tasks like monitoring, diagnosing, and troubleshooting, patching fusion applications components, and so on. Because of the complexity of the Fusion Applications environment due to the number of components involved, despite covering these mentioned topics, there will be many administration tasks that may remain left out from our discussion so we will not define the boundaries of Fusion Applications Administration only by the topics discussed in this and the next few chapters.
Starting Fusion Applications Environment
Once the Fusion Applications installation is complete, by default all the application and middleware components would be running and you can browse through the applications interface. However you need to create and document a procedure for shutting down and starting up the complete Fusion Applications environment including Identity Management and corresponding databases. We will discuss many of the recommended options of starting up and shutting down the components; however, there are many additional component specific ways to start/stop the components. At the logical end of each tier discussion, I will also provide consolidated scripts to automate the startup or shutdown procedure. You may want to integrate the startup and shutdown procedures with your existing operations downtime scripts, integrate them with a backup infrastructure, or any other documented bounce procedures specific to your enterprise.
Before proceeding to the actual management of Fusion Applications services, let’s first understand how the dependencies between the components affect the startup sequence. Note that the shutdown sequence is exactly opposite of this; however, the methods used can vary since Fusion Applications components shutdown is relatively quicker than startup, which usually takes a reasonable amount of time. Figure 12-1 illustrates a high-level understanding of Fusion Applications components startup sequence.

Figure 12-1. Fusion Applications Environment startup sequence
Figure 12-1 shows the components located at each logical tier of your environment. As you can see, the database tier including both IDM and FA databases can be started first since they don’t have any dependencies. There are a few components like Oracle HTTP Server that can be started out of sequence also but then you may see false alerts on console and browser until all the other components have started successfully. Be patient during Fusion Applications startup since, unlike Oracle E-Business suite and other applications suites, it takes much longer time to start up due to large number of WebLogic Managed Servers. If some component’s startup times out through seeded scripts, it may still be starting up in the background so make sure to clean up existing processes before attempting another startup.
At the same time, keep monitoring the server resources including CPU, memory, and so on, since you may see a temporary spike in CPU usage during components startup. Depending on the speed of IO devices, you may see some wait events as well. It may take some time to get used the startup procedure along with estimated time it may take for your environment.
Note
From Fusion Applications 11g, release 9 onward Oracle recommends you use Enterprise Manager Cloud Control as the administrative interface for managing Fusion Applications. Although in this chapter you may see references to Enterprise Manager Cloud Control, its installation and configuration is explained in Chapter 14 due to relevance with the content. Any references to EM in this chapter assume that it has already been configured in your environment.
We will look at the Fusion Applications environment startup in following steps.
Starting Identity Management Database
Starting Identity Management Middle Tier Components
Starting Fusion Applications Transaction Database
Starting Fusion Applications Middle Tier Components
Starting Identity Management Database
Oracle Database is the first component to be started for Identity Management or Fusion Applications Nodes startup. Although starting the database through the command line is the generally preferred option for most database administrators, we will see the command line and the EM Cloud Control here since EM Cloud Control can start the entire technology stack involved in Fusion Applications environment and at times it may be handy to start up everything from a single interface.
At some point during the following discussion you may feel that the explanation is more detailed for the startup methods which are common between Identity Management and Fusion Applications components. So we will discuss them in detail during Identity Management startup but skip the detailed explanation when a similar startup method is explained later for Fusion Applications components.
Using the Command-Line Interface
Let’s start the Identity Management database using the command-line interface (which most database administrators prefer). The advantage of the command-line interface methods is that they can be automated using consolidated scripts. If you are using GUI interface like Enterprise Manager, the procedure remains largely manual.
Setting Up Environment Variables
In order to start Oracle Database or a listener service, we must set the mandatory environment variables like ORACLE_HOME, PATH, ORACLE_SID, and so on, in order to identify the database name and location of the binaries. We can set the environment variables using any of the following methods.
1. Setting the environment variables in the current session.
You can set the temporary environment variable in the current startup session as follows.
a. Set the ORACLE_HOME variable to the full path of the Oracle Database home directory. Use the set command for the Windows host and the export command for Linux/Unix host. For example:
[fusion@idmhost ∼]$ export ORACLE_HOME=/app/database/product/11.2.0/dbhome_1
b. Append the <ORACLE_HOME>/bin directory to the existing PATH environment variable. Note that you must append this path in the beginning instead of the end since the PATH variable is searched by the operating system in sequential order. For example:
[fusion@idmhost ∼]$ export PATH=$ORACLE_HOME/bin:$PATH
c. Set the ORACLE_SID and ORACLE_UNQNAME variables pointing to the Local Oracle System Identifier (SID) of the database (local instance name in case of RAC) and unique name of the database, respectively. ORACLE_SID is used by the commands like sqlplus to identify the local instance for administering the database without using the net service name, while ORACLE_UNQNAME is used by Enterprise Manager commands like emctl to identify the unique database identifier. For example:
[fusion@idmhost ∼]$ export ORACLE_SID=idmdb
[fusion@idmhost ∼]$ export ORACLE_UNQNAME=idmdb
d. Set JAVA_HOME to point to the Java home directory that we created earlier. This may not be required for database startup/shutdown, but it is always good practice to set the JAVA_HOME environment variable. For example:
[fusion@idmhost ∼]$ export JAVA_HOME=/app/oracle/jdk6
2. Using a custom profile setup script.
You can also put these environment variables in a single environment setup script that can be sourced within a session or from another script. For example, we have created a script named dbprofile.sh that sets these variables.
#!/bin/bash
# Script name: dbprofile.sh v1.0_TT
# Change the following path to the actual path in your environment
ORACLE_HOME=/app/database/product/11.2.0/dbhome_1
export ORACLE_HOME
PATH=$PATH:$ORACLE_HOME/bin
export PATH
ORACLE_SID=idmdb
export ORACLE_SID
# Change the following path to the actual path in your environment
JAVA_HOME=/app/oracle/jdk6
export JAVA_HOME
Let’s assign execute permission for this script so that this file can be sourced from any other script.
[fusion@idmhost ∼]$ chmod +x dbprofile.sh
We can source this profile using the following command whenever required considering the profile was created in the home directory of the user.
[fusion@idmhost ∼]$ . $HOME/dbprofile.sh
or
[fusion@idmhost ∼]$ . ∼/dbprofile.sh
3. Appending the variables assignment in the user’s default login profile Alternatively we can add the same environment variables in the user’s default login profile, for example .bash_profile (for users with bash as the default login shell).
Starting Up Oracle Database and Listener
Assuming that the database is created using the Provisioning wizard, it will be single-node database initially. Hence, the following procedure applies to a single-node database. For RAC databases, use srvctl commands to start the database and the listener.
1. Start the IDM database listener service.
First let’s set the environment variables related to the IDM database as discussed in an earlier section.
[fusion@idmhost ∼]$ . $HOME/dbprofile.sh
Start the listener now. Make sure to pass the correct listener name. If you are not sure about the listener name, refer to <ORACLE_HOME>/network/admin/listener.ora for the correct name.
[fusion@idmhost ∼]$ lsnrctl start listener_idmdb
2. Start the IDM database.
Considering that the database is a single-node DB, environment variables are already set in the current session and the OS user is the database owner. Start the database now.
[fusion@idmhost ∼]$ sqlplus / as sysdba
SQL> statup
Consolidated Startup Script for IDM Listener and Database
To keep it simple, let’s create a single startup script for both the database and listener in order to start them using a single command. The following is an example of such script. Save it as startDB.sh.
#/bin/bash
# Script Name: startDB.sh v1.0_TT
# Source the db environment file created in previous step
. /home/fusion/dbprofile.sh
echo "Starting database listener"
lsnrctl start listener_idmdb
echo "Starting Database"
sqlplus / as sysdba << EOF
startup
exit;
EOF
Remember to add execute permission for the user to this script. After that you can run this script from a shell prompt or within another script as follows.
[fusion@idmhost ∼]$ ./startDB.sh
Using Oracle Enterprise Manager Cloud Control
As mentioned in an earlier section, Oracle recommends you use the Enterprise Manager Cloud Control to manage and administer the Fusion Applications environment since it provides a single interface to manage, monitor, and troubleshoot your complete Oracle infrastructure. Assuming that you already have EM installed and configured to manage the Identity Management and Fusion Applications nodes, let’s explore how you can use it to start the database tier components. Refer to Chapter 14 for how to install and configure EM Cloud Control.
In order to start the listener service, log in to Oracle Enterprise Manager Cloud Control using the SYSMAN user, click on the Targets menu, and select the Listener target type in the left panel. The screen will now look as shown in Figure 12-2.

Figure 12-2. List of configured listeners
In this screen you will see the list of configured listeners, which are IDM and FA listeners in our case. Click on the IDM listener to open the IDM listener home screen, as shown in Figure 12-3.

Figure 12-3. Starting up the listener using EM Cloud Control
Click on the Oracle Listener menu followed by Control Submenu. You can see Startup/Shutdown options here. You need to select this option even if you want to start up or shut down the service. This will lead to the Host Login details screen, as shown in Figure 12-4.

Figure 12-4. Host credential screen for listener startup/shutdown
In the Host Credential screen, you will be prompted to enter the login details of the database owner user on database host. This is mandatory in order to allow the enterprise manager agent to start the database listener service on the local host. Such credentials are not only asked for listener startup/shutdown but for all the Oracle components that we will see in the coming sections. Let me explain each of these options for providing host credentials in reverse order for better understanding.
New: Whenever you are performing any administrative action on a component, you must provide the host login details for the first time since there are no default stored credentials. Once you select New and enter the login details, you can save the credential with a user-defined name and set as preferred credential if required.
Named: After you save the host credential in a user defined name, you need not enter it again but you can select the Named option and then select the credential from the drop-down menu, as shown in Figure 12-4. Use this option when you have stored the login details in the user defined name but have not yet selected it as the preferred credential.
Preferred: After a named credential is set as preferred one, you need not select new or named credentials, but just use the preferred credentials screen to go with the default value for the component and move to next screen immediately. Until the preferred credentials are set, the screen will display the message “Default preferred credentials are not set.”
Once you select appropriate credential in this screen, click Login. Confirm the action on the next screen in order to let the EM perform the required action (start the listener in this case) on the host.
Now let’s look at how to start up the IDM database using the EM Cloud Control interface. On any screen of EM, click on Targets menu followed by the Databases menu option. This will launch the Databases dashboard, as shown in Figure 12-5.
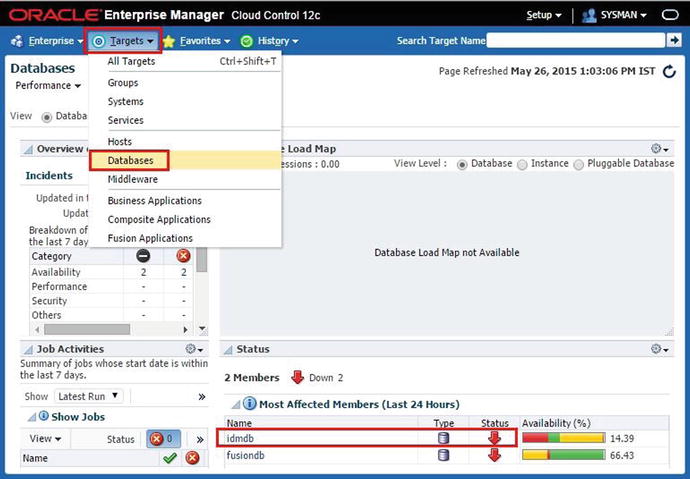
Figure 12-5. Databases common dashboard
This screen shows a consolidated summary of all the Oracle Databases configured with Enterprise Manager along with the status, availability in the last 24 hours, any critical incidents noticed in the last seven days, and so on. You may notice the list of databases configured with EM in the database status region of the screen. As you can see, the current status of the database is Down. Click on the database name idmdb to launch the home screen of the idmdb database, as shown in Figure 12-6.

Figure 12-6. IDM database startup through EM
The database home screen may display an expected error at the top, suggesting that the agent can’t establish a connection to the database. Choose the Oracle Database ➤ Control menu. You can see Startup/Shutdown as well as blackout-related options in this submenu. A blackout is required during any maintenance period to inform the Enterprise Manager Cloud Control agent to stop collecting statistics during this period. If you shut down the database using EM earlier, then a blackout would have already been there which will be removed upon startup. We will look at blackouts in detail in the next chapter where we will discuss Fusion Applications monitoring. Click on the Startup/Shutdown from the submenu to launch the Host and Database Credential screen, as shown in Figure 12-7.

Figure 12-7. Host and database credential screen for database startup/shutdown
We have seen the Host Credential screen earlier during the Listener startup where it prompted for only host OS user login details since listener startup commands are executed directly in the host shell. However in order to start the database you will need database credentials in addition to the host credential. The host credential is used to execute the commands like sqlplus in the host default shell. Database credentials are required to connect to the database instance or to bring up the database prompt in order to execute startup/shutdown commands.
You are also prompted for preferred, named, or new credentials. Regardless of whether it is host, database, or WebLogic credential, the types of credentials remain the same, as explained earlier. Create the new or use existing credential for the host and database. Make sure you select a database user with sysdba privilege for the startup/shutdown tasks.
The next screen will show the SQL being executed in the background (which is essentially STARTUP only) followed by the screen that allows you to select specific startup options like Restricted mode or STARTUP FORCE, which can abort the running instance that’s hung and start it up. (Use this with caution and only when there is no other option available.) You can also specify a custom parameter file if you want to troubleshoot some issue.
This concludes the database startup on the IDM database tier. Now let’s move on to Identity Management components startup.
Starting Identity Management Middle Tier Components
Before you proceed to the Identity Management Middle Tier components, the Identity Management database and listener must be started. Since the Fusion Applications Transaction database does not have any dependency with other components, it can be started along with Identity Management. The following is the sequence of starting up Identity Management middle tier components manually. Even if you are using automation script, this is the same order in which the script will start components on the respective server. We will see how to start each of these in the coming sections.
1. Oracle Internet Directory (OID)
2. Node Manager
3. WebLogic Administration Server
4. WebLogic Managed Servers
a. Oracle Directory Service Manager (ODSM)
b. Oracle SOA
c. Oracle Identity Manager (OIM)
d. Oracle Access Manager (OAM)
e. Oracle Identity Federation (OIF) (if configured)
5. Oracle HTTP Server instance (OHS)
6. Oracle Directory Service Manager EM Agent
7. Oracle Identity Federation EM Agent (if OIF is configured)
Manual Startup
Although Oracle suggests you use startall.sh and stopall.sh scripts (generated during the provisioning process) in order to start or stop the Identity Management environment, we must also see how to start the components manually. We will explain the pros and cons of each methods at the end of the startup section. You may also prefer to use the script we provided in this section or create your own to start the environment.
Oracle Internet Directory
Since Oracle Internet Directory is the default identity store, it must be started up first in order to authenticate the bootstrap users before starting the WebLogic domain. The provisioning process installs the OID in IDM_BASE/products/dir/oid directory and creates a local instance of it named oid1 in the IDM_CONFIG directory. We need to start up OID from the instance directory. The syntax to start up OID using the command line is as follows. Execute this command on the host where Directory Services are installed. Since we have installed Identity Management components on the same node, we will run it on the IDM host. Depending on the number of hosts used in your environment, you need to run these commands on the appropriate hosts.
<IDM_CONFIG>/instances/<OID_Instance>/bin/opmnctl startall
For example:
[fusion@idmhost ∼]$ /app/oracle/config/instances/oid1/bin/opmnctl startall
opmnctl startall: starting opmn and all managed processes...
Once the command completes successfully without error, proceed to the next startup task.
Node Manager
Although in theory Node Manager is an optional component, it is mandatory if you want to start WebLogic Managed Servers using Administration Console or using EM Cloud Control. However, if you are starting the instance using default WebLogic scripts, then Node Manager may not be required. In that case you will lose the monitoring and automatic restart functionality. You can start the Node Manager from the Node Manager home directory or from the local configuration directory. The syntax to start up Node Manager is as follows. Node Manager must be started on each host where WebLogic managed servers are configured.
Note
You must use the nohup command on the Linux/Unix platform to start the components or else, once you close the current session, the process may terminate depending on the operating system. This will create a file named nohup.out, which captures the output from this command.
cd <IDM_CONFIG>/nodemanager/<hostname>
nohup ./startNodeManagerWrapper.sh &
For example:
[fusion@idmhost ∼]$ cd /app/oracle/config/nodemanager/idmhost.paramlabs.com/
[fusion@idmhost idmhost.paramlabs.com]$ nohup ./startNodeManagerWrapper.sh &
If you want to start from the WebLogic home then you can use following syntax.
cd <IDM_BASE>/products/app/wlserver_10.3/server/bin
nohup ./startNodeManager.sh &
For example:
[fusion@idmhost ∼]$ cd /app/oracle/products/app/wlserver_10.3/server/bin
[fusion@idmhost bin]$ nohup ./startNodeManager.sh &
Caution
If the WebLogic servers were not shut down gracefully earlier, the Node Manager will automatically start all those servers up. So monitor the Node Manager output file to show a line similar to "Plain socket listener started on port 5556" before proceeding to manual startup of WebLogic servers to avoid duplicate startup commands.
Oracle WebLogic Server Domain for Identity Management
In an environment where Oracle Enterprise Manager Cloud Control is not installed, WebLogic Administrator Server must be started using the command line. However, the managed servers can be started using the Administrator console as well.
WebLogic Administration Server
We must start the IDM Domain Administration Server first on the node where Admin Server has been configured. Since in this case we have all IDM domain components configured on the same node we will start the same on IDM host but you may need to make sure in your environment which host is configured to run the admin server.
To start admin server, run the startWebLogic.sh script from <IDM_CONFIG>/domains/IDMDomain/. As mentioned earlier, we need to use the nohup command to let it run after leaving the session as well. You can monitor the nohup.out log file for the progress of the startup command.
[fusion@idmhost ∼]$ cd /app/oracle/config/domains/IDMDomain/bin
[fusion@idmhost ∼]$ nohup ./startWebLogic.sh &
Note that we can start up the WebLogic domain including the administration and managed servers using Enterprise Manager as well. We will see the same in the next section of starting up the WebLogic Managed Servers.
WebLogic Managed Servers
By default the following four managed servers are configured for the Identity Management domain. If you have created a high available setup then you may have more than one managed server for each WebLogic cluster. By default, the Oracle Identity Federation (wls_oif1) managed server remains down unless you have enabled and configured it.
1. Oracle Directory Service Manager (wls_ods1)
2. Oracle SOA (wls_soa1)
3. Oracle Identity Manager (wls_oim1)
4. Oracle Access Manager (wls_oam1)
We have three options to start these managed servers up manually. Of course if you use automatic startup script (startall.sh) explained later in this section, you need not use any of these manual methods
1. Using the command-line interface.
We can use the default WebLogic scripts to start up the managed servers. The prerequisite for using this method is to have the boot identity file called boot.properties present in the IDMDomain/server/<ManagedServer>/security directory to allow the script to run in the background without prompting for WebLogic server username and password. Since this file contains encrypted credentials, it is safe to keep the credentials stored in this file. If the boot identity file does not exist for any managed server then you can choose any of the following methods to create one.
a. Copy the existing boot.properties from a different directory.
You can copy the existing boot.properties file from the <ManagedServer>/data/nodemanager directory or from the AdminServer/security directory to the <ManagedServer>/security directory. This file already has encrypted credentials to start up the managed server and the same file can be copied safely.
b. Create a new boot.properties file.
If there is no existing boot.properties file, then you can simply create a new file with the following content.
username=weblogic_idm
password=<passwordof the weblogic_idm user>
Save this content as the boot.properties file. After you start the managed server the first time, it will automatically encrypt the values in the file. Now let’s start each managed server one by one. The advantage of using this method is that you need not wait for one managed server to start up completely before proceeding to the next one. Make sure to use nohup and & in order to let it run in background after you leave the session. Use the startManagedWebLogic.sh script in the <IDM_CONFIG>/domains/IDMDomain/bin directory to start the managed servers. Although Oracle’s automated startup script uses the following order to start the managed servers, you can start in any order.
[fusion@idmhost ∼]$ cd /app/oracle/config/domains/IDMDomain/bin
Let’s first start Oracle Directory service manager.
[fusion@idmhost ∼]$ nohup ./startManagedWebLogic.sh wls_ods1 &
Now start Oracle SOA.
[fusion@idmhost ∼]$ nohup ./startManagedWebLogic.sh wls_soa1 &
Now let’s start Oracle Identity Manager.
[fusion@idmhost ∼]$ nohup ./startManagedWebLogic.sh wls_oim1 &
Finally, start the Oracle Access Manager.
[fusion@idmhost ∼]$ nohup ./startManagedWebLogic.sh wls_oam1 &
You must allow some time for the managed servers to start up. You can refer to the log file nohup.out as well as the individual managed server log file at the IDMDomain/servers/<ManagedServer>/log directory to check the status until it shows the message, “Server started in RUNNING mode.”
2. Using the Oracle WebLogic administration console.
You can use Oracle WebLogic administration console to start or restart an individual managed server. But when you need to start all the managed servers then this is not the recommended method since it requires Admin Server and OAM Managed Server to be running due to the admin console’s integration with Access Manager. Additionally it requires Oracle HTTP server to be running since Oracle Access Manager SSO Login page uses HTTP server as front end. At the same time you also need to make sure that the Node Manager has been started on the hosts. However using the WebLogic admin console is very handy while manually stopping or starting individual managed servers and most administrators find this interface a simple and quick way to manage WebLogic managed servers.
Log in to the administration console at http://<AdminHost>:<AdminPort>/console as the administration user. For example, log in to http://idmhost.paramlabs.com:7777/console using the weblogic_idm user. Once you’re logged in, you will see the WebLogic Administration console homepage. Click on the Servers link in the main area or in the left panel under Domain Structure region using IDMDomain ➤ Environment ➤ Servers. You will see the summary of all WebLogic servers in the IDMDomain, as shown in Figure 12-8.

Figure 12-8. Starting up the managed servers using the administration console
As you can see, AdminServer and wls_oam1 are already started. You can start other managed servers from here by selecting them and clicking on the Start button. The next screen will prompt for confirmation to start the selected managed servers.
3. Using Oracle Enterprise Manager Cloud Control.
Once you have configured Oracle Identity Management environment with Enterprise Manager Cloud Control, you can manage each of its components using EM. Note that this includes all middleware components including HTTP Server, OID, OVD and so on, as well and not just WebLogic servers. In this example, let’s see how to start up IDM WebLogic domain using EM Cloud Control. The advantage of this method is that we need not start the administration server in advance since starting through EM provides us an option to start the complete WebLogic domain including the admin server at the same time.
Log in to Enterprise Manager Cloud Control URL at http://<em_host>:<em_port>/em using EM Administration user SYSMAN. Once you have logged on to EM, click on the Middleware link from the Targets menu. You will see Middleware summary screen, as shown in Figure 12-9.

Figure 12-9. Selecting a IDM domain target in Enterprise Manager
You will see all the configured and monitored WebLogic domains in the Details table. Click on the IDMDomain target in this list to bring up the Identity Management homepage.
The Identity Management homepage allows you start up, shut down, and manage the complete WebLogic domain, individual WebLogic managed servers, application deployments, directory services, and even web tiers. You will use this screen very often during monitoring, troubleshooting, and day to day administration of Identity Management components. This example shows you how to start the complete WebLogic domain called IDMDomain, including the administration server as well as managed servers that are enabled for startup.
In the Target Navigation region, click on the WebLogic domain followed by the IDMDomain node of the navigation tree. You can see individual managed servers under IDMDomain but we will select IDMDomain only at this moment. It will bring up the home screen for IDM WebLogic domain, as shown in Figure 12-10.

Figure 12-10. Starting up IDM domain using EM
From the IDM domain homepage, choose WebLogic Domain ➤ Control. This will bring up the Startup/Shutdown and Create/End Blackout options. Click on Startup to initiate the startup of the WebLogic domain. Alternatively you can also click the Startup button located at top of the page. This will lead to Startup options and Credentials screen, as shown in Figure 12-11.

Figure 12-11. IDM domain startup options and credentials screen
Let’s look at the important startup options required in the domain startup screen.
End Blackout After Starting Up: By default it is checked. If you are planning to perform further maintenance even after starting up then you can uncheck this. Remember to manually end the blackout using the Control Submenu ➤ End Blackout option.
Include Administration Server: This is very useful option since unlike the WebLogic administration console, EM allows you to start up the domain including admin server. This is also mandatory option while selecting Administration Server Process Control Method discussed next. The same option is available while shutting down as well so you can choose whether to keep admin server running after shutting down the managed servers or not.
Process Control Method: Since Enterprise Manager effectively runs the commands at the host using EM agent, the process control method defines the set of commands to be executed in order to start the domain up. It provides the following three process control methods to choose from.
Administration Server: This is the default method that uses the currently running administration server to manage startup of the managed servers. You need to make sure that admin server is already running or the checkbox Include Administration Server is selected.
Default Script: If you want to use the default WebLogic scripts like startWeblogic.sh and startManagedWebLogic.sh to start up the domain. Make sure that the boot.properties file is available for each managed server and if the file is not available then you can create one as discussed in earlier section.
Custom Script: You can also create your own custom script to start up the managed servers. For example, if you want to add custom logging information or you have some pre- and post-scripts to be executed along with managed servers, you can do so here.
Host Credentials: Similar to what we have seen in database and listener startup, here also you need to specify the IDM host credentials regardless of the process control method selected. In this example we have configured the idmhost as the IDMDomain host. It requires the credentials for this host in order to start the WebLogic server. Here also we need to select from the Preferred or Named credentials as discussed earlier. If no stored credential is available (for first time startup) then you can create a New stored named credential.
Oracle WebLogic Domain Credentials: This frame shows up only when you have selected Administration Server as the Process Control method for starting up the managed servers. You need to specify the WebLogic administration server credentials (weblogic_idm user in this case) and save it as a Named or Preferred credential for future startup tasks.
ODSM EM Agent
Although starting ODSM managed servers will allow you to use the Oracle Directory Services Manager URL to manage OID or OVD instances, you also need to start ODSM agent process in order to manage the ODSM instance through Fusion Middleware control. The command to start ODSM process manager instance is as follows.
<IDM_CONFIG>/odsm/bin/opmnctl startall
For example:
[fusion@idmhost ∼]$ /app/oracle/config/instances/odsm/bin/opmnctl startall
opmnctl startall: starting opmn and all managed processes...
OIF EM Agent
If you have configured and enabled Oracle Identity Federation (OIF) then you need to start the OIF EM agent service in order to manage the OIF instance through middleware control. This is an optional service. The command to start the OIF instance through process manager is as follows.
<IDM_CONFIG>/oif_inst/bin/opmnctl startall
For example:
[fusion@idmhost ∼]$ /app/oracle/config/instances/oif_inst/bin/opmnctl startall
opmnctl startall: starting opmn and all managed processes...
Oracle HTTP Server
Although Oracle HTTP Server can be started any time and out of sequence as well, it is recommended to start it last to allow Oracle Access Manager to start up completely due to Oracle HTTP Server integration with Access Manager through WebGate. If you start it before Access Manager (wls_oam1 managed server) has completed startup, you may see false errors on the Unix console similar to the following. Although these messages can be annoying while working on the Unix shell, you can ignore them until OAM is completely started and the status changes to RUNNING. If these message continue to appear even after OAM is started then it may need further troubleshooting.
"Exception thrown during WebGate initialization"
"The AccessGate is unable to contact any Access Servers."
The syntax of starting the Oracle HTTP Server (OHS) instance is as follows.
<IDM_CONFIG>/<OHS_INSTANCE>/bin/opmnctl startall
For example:
[fusion@idmhost ∼]$ /app/oracle/config/instances/ohs1/bin/opmnctl startall
opmnctl startall: starting opmn and all managed processes...
Automated Startup
Having seen the manual methods of starting Identity Management components, let’s now look at the automated and simpler methods of starting the components. Why did we look at the manual methods first? The answer is that because in automated startup we are simply going to put the manual methods in automation scripts so it is important to understand the manual startup first followed by understanding the automated startup.
We have two options to start up the Identity Management environment automatically or by calling a single script. The first option is provided by Oracle itself while the second option is to create your own automated startup script. Why do we need to create automated startup script? Well, you will see the advantage of one method over the other soon.
Using the Startup Script Generated During Provisioning
From Oracle Fusion Applications Release 7 onward, the Identity Management environment installation is done by the IDM provisioning process, which generates the automated startup and shutdown scripts at the end of the provisioning process. We can use the same script to cleanly start up or shut down the Identity Management environment. The advantage of this method is that the script already includes all the enabled managed servers and instance details in your environment and it is aware of the dependencies between components. At the same time the drawback is that this script runs in serial mode by completing each task before moving forward with the next one. If one startup task has failed, it will not proceed to the next task by default.
The syntax of the startall.sh script is as follows.
<IDM_CONFIG>/scripts/startall.sh [<Node Manager Password> <WebLogic Admin Password>]
Note that the passwords can either be specified on the command-line or can be entering manually when the script prompts for them. For automated startup you need to specify the passwords in the command line. The following is the example startup log for the startall.sh script. You can see in which order the script starts the IDM components. The log files for the startup/shutdown operations are available from the <IDM_CONFIG>/scripts/logs directory.
[fusion@idmhost ∼]$ cd /app/oracle/config/scripts/
[fusion@idmhost scripts]$ ./startall.sh
Enter NodeManager Password:
Enter Weblogic Admin Password:
Executing on host :idmhost.paramlabs.com
Starting Instance : /app/oracle/config/instances/oid1 of Instance Type :OID on machine : idmhost.paramlabs.com
Starting Instance : /app/oracle/config/nodemanager/idmhost.paramlabs.com of Instance Type :NM on machine : idmhost.paramlabs.com
Starting Instance : AdminServer of Instance Type :AS on machine : idmhost.paramlabs.com
Starting Instance : /app/oracle/config/instances/odsm of Instance Type :ODSM_OPMN on machine : idmhost.paramlabs.com
Starting Instance : wls_ods1 of Instance Type :ODSM on machine : idmhost.paramlabs.com
Starting Instance : wls_soa1 of Instance Type :SOA on machine : idmhost.paramlabs.com
Starting Instance : wls_oim1 of Instance Type :OIM on machine : idmhost.paramlabs.com
Starting Instance : wls_oam1 of Instance Type :OAM on machine : idmhost.paramlabs.com
Starting Instance : /app/oracle/config/instances/ohs1 of Instance Type :OHS on machine : idmhost.paramlabs.com
Using Custom Scripts with Consolidated Manual Startup
As you saw, the automated script takes longer to start up the all components since it waits for the current component startup to finish before proceeding with the next component even if the server resources are idle. At the same time if one component startup fails, it will stop processing further even if the error is ignorable due to a false alert. In such cases you may want to create a custom startup script to start the components in the same order and at the same time by allowing multiple managed servers to start in parallel. The following is an example of a custom script we have created. Save this script as startIDM.sh and then provide execute permission to this script using the chmod +x startIDM.sh command.
#!/bin/bash
# Script Name: startIDM.sh v1.0_TT
# Start OID
echo "Starting Oracle Internet Directory (OID)"
/app/oracle/config/instances/oid1/bin/opmnctl startall
# Start Node Manager
echo "Starting Node Manager"
# Change this path as per your environment
cd /app/oracle/config/nodemanager/idmhost.paramlabs.com
nohup ./startNodeManagerWrapper.sh &
# Start WebLogic Domain Services
cd /app/oracle/config/domains/IDMDomain/bin
echo "Starting Weblogic Admin Server"
nohup ./startWebLogic.sh &
echo "Starting ODSM Agent service"
app/oracle/config/instances/odsm/bin/opmnctl startall
echo "Starting Managed Servers"
nohup ./startManagedWebLogic.sh wls_ods1 &
nohup ./startManagedWebLogic.sh wls_soa1 &
nohup ./startManagedWebLogic.sh wls_oim1 &
nohup ./startManagedWebLogic.sh wls_oam1 &
cd /app/oracle/products/app/wlserver_10.3/server/bin
echo "Waiting for 180 seconds to start Web server to avoid getting false WebGate alerts on console"
sleep 180
# Start Web Server
echo "Starting Oracle HTTP Server (web)"
/app/oracle/config/instances/ohs1/bin/opmnctl startall
# Display informative messages
echo "Now you can monitor the status of Weblogic services startup by executing following command"
echo "tail -f /app/oracle/config/domains/IDMDomain/bin/nohup.out"
echo "Once you see RUNING in following 2 log files, you can check the status at http://`hostname`:7777/console orhttp://`hostname`:7777/em"
echo "/app/oracle/config/domains/IDMDomain/servers/AdminServer/logs/AdminServer.log"
echo "/app/oracle/config/domains/IDMDomain/servers/wls_oam1/logs/wls_oam1.log"
Tip
Note that the database must be started before running this script. You may want to create another consolidated script that calls the database startup script startDB.sh (created earlier) and IDM startup script startIDM.sh sequentially.
Validating the Identity Management Nodes OS Processes
Once you have issued startup commands for the Identity Management components, you must make sure that the components have indeed started up. If you are starting the components manually, you could validate each component immediately after staring up but if you are starting up using single consolidated script then you can validate the OS processes one by one, as follows.
Validating OID
Run the following command to make sure that the OID has been started successfully. Depending on the number of server processes configured, you may see multiple processes of oid1 component, an OVD process and EM Agent process for OID. If any of these components status is not Alive, then you need to troubleshoot the cause.
<IDM_CONFIG>/instances/<OID_INSTANCE>/bin/opmnctl status
For example:
[fusion@idmhost scripts]$ /app/oracle/config/instances/oid1/bin/opmnctl status
Processes in Instance: oid1
---------------------------------+--------------------+---------+---------
ias-component| process-type | pid | status
---------------------------------+--------------------+---------+---------
ovd1 | OVD| 20959 | Alive
oid1 | oidldapd | 21222 | Alive
oid1 | oidldapd | 21116 | Alive
oid1 | oidldapd | 21050 | Alive
oid1 | oidmon | 20958 | Alive
EMAGENT| EMAGENT| 20957 | Alive
You can also telnet to the OID host with port 3060 (or the OID port in your environment) to make sure the process is already listening to requests on the specified port.
Validating ODSM EM Agent
Run the following command to make sure that the ODSM EM agent has started successfully. This is not a mandatory process for the Identity Management to work properly but if this is not started, the Middleware Control may not get updated status information about the Oracle Directory Service Manager.
<IDM_CONFIG>/instances/<ODSM_INSTANCE>/bin/opmnctl status
For example:
[fusion@idmhost scripts]$ /app/oracle/config/instances/odsm/bin/opmnctl status
Processes in Instance: wls_ods1
---------------------------------+--------------------+---------+---------
ias-component| process-type | pid | status
---------------------------------+--------------------+---------+---------
EMAGENT| EMAGENT| 22297 | Alive
Validating Oracle HTTP Server
Since we are only validating the OS processes here, run the following command to make sure that Oracle HTTP Server component has started successfully. However, in realtime you may be able to validate it by launching OHS static homepage as well. Run this command on the node where the Oracle HTTP server is configured to run.
<IDM_CONFIG>/instances/<OHS_INSTANCE>/bin/opmnctl status
For example:
[fusion@idmhost scripts]$ /app/oracle/config/instances/ohs1/bin/opmnctl status
Processes in Instance: ohs1
---------------------------------+--------------------+---------+---------
ias-component| process-type | pid | status
---------------------------------+--------------------+---------+---------
ohs1 | OHS| 28854 | Alive
You can also telnet the web host to port 7777 (or the OHS port in your environment) to make sure the HTTP server is accepting requests.
Validating Node Manager
In order to validate Node Manager, you can simply run a grep command on the running processes to make sure that Node Manager is running.
[fusion@idmhost scripts]$ ps -ef | grep NodeManager
fusion 20652 20620 31 01:01 pts/300:00:03 /app/oracle/products/app/jdk6/bin/java -jrockit -Xms128m -Xmx256m -Dcoherence.home=/app/oracle/products/app/coherence_3.7 -Dbea.home=/app/oracle/products/app -DNodeManagerHome=/app/oracle/config/nodemanager/idmhost.paramlabs.com -Xverify:none -Djava.security.policy=/app/oracle/products/app/wlserver_10.3/server/lib/weblogic.policy -Dweblogic.nodemanager.javaHome=/app/oracle/products/app/jdk6 weblogic.NodeManager –v
You can telnet to each host with WebLogic servers configured with port 5556 to make sure that the node manager is reachable.
Validating WebLogic Server Processes
While we can simply log in to the WebLogic administration console to see the current status of all processes, you may want to validate the OS process in order to validate the correctness of the status derived from Node Manager state information or to troubleshoot issues with the WebLogic server. The OS processes for the WebLogic servers are individual JVM processes with the name of Managed Server as the value for the argument -Dweblogic.Name.
For example, to find the OS process for Admin Server, we can simply run grep for all running processes with the AdminServer value as follows. The full ps command output is long, so here is a truncated example.
[fusion@idmhost scripts]$ ps -ef | grep AdminServer
fusion 10652 103109 Mar06 ?02:27:56 /app/oracle/products/app/jdk6/bin/java -jrockit -Xms768m -Xmx1536m -Dweblogic.Name=AdminServer
Similarly you can run look for other managed server processes as well. For example for OAM Managed Server we can look for process with wls_oam1 argument. The same way you can search for wls_ods1, wls_oim1, and wls_soa1.
[fusion@idmhost scripts]$ ps -ef | grep wls_oam1
fusion 10650 103265 Mar06 ?01:35:47 /app/oracle/products/app/jdk6/bin/java -jrockit -Xms768m -Xmx1536m -Dweblogic.Name=wls_oam1
Comparison of Different Startup Options for Identity Management
At this stage you have learned about the various methods of starting up an Identity Management environment. While all of these methods are valid and applicable for starting up the components, you may want to choose one option for your routine operations. Table 12-1 shows a quick comparison of the methods with the pros and cons of each. You may want to choose one of the methods based on your priorities and organizational practice.
Table 12-1. Comparison of Different Startup Options for Identity Management
Startup Option | Advantages | Disadvantages |
|---|---|---|
Command Line | 1) Runs the startup tasks in background in parallel. 2) Commands can be placed in a consolidated automation script. | Post-execution status of components must be checked through the graphical interface or through lengthy log files. |
WebLogic Administration Console | Simple interface with automatic refresh of current status. | 1) Needs Admin Server and OAM to be started beforehand. 2) Cannot start HTTP Server and OID (since both are prerequisites to start the console). |
EM Cloud Control | Single interface to start all IDM and FA components. | Manual task. Needs to navigate to relevant components pages. |
Common Startup Script (startall.sh) | Completely automated startup of all IDM middle tier and web tier components. | Runs the startup tasks sequentially. Takes longer since it waits until the previous action completes. |
Starting Fusion Applications Transaction Database
You must start the Fusion Applications transaction database before proceeding with the Fusion Applications components startup. Since we have already discussed database and listener startup options while looking at the IDM database, we will quickly go through the Fusion Applications database startup options without going into much details.
Using the Command-Line Interface
Once again, similar to the Identity Management database, we can comfortably start the Fusion Applications Transaction database using the command-line interface. This is the method that most database administrators prefer depending on whether the database is single node or RAC. Let’s quickly go through the steps followed by the consolidated startup scripts.
Setting Up the Environment Variables
In order to start Oracle Database or the Listener service, we must set the mandatory environment variables like ORACLE_HOME, PATH, ORACLE_SID, and so on, in order to identify the database name and the location of the binaries. We can set the environment variables using any of the following methods.
Let’s create a script to set minimum required environment variables on the database tier before starting the database and listener manually. Save it as dbprofile.sh on the FA database node.
#!/bin/bash
# Script name: dbprofile.sh v1.0_TT
# Change the following path to the actual path in your environment
ORACLE_HOME=/app/database/product/11.2.0/dbhome_1
export ORACLE_HOME
PATH=$PATH:$ORACLE_HOME/bin
export PATH
ORACLE_SID=fusiondb
export ORACLE_SID
# Change the following path to the actual path in your environment
JAVA_HOME=/app/oracle/jdk6
export JAVA_HOME
Let’s assign execute permission to this script so that this file can be sourced from any other script.
[fusion@idmhost ∼]$ chmod +x dbprofile.sh
Starting Up Oracle Database and Listener
Assuming that the database is created using the Provisioning wizard, it will be a single node database initially. Hence, the following procedure applies to single node database. For RAC databases use srvctl commands to start database and listener. You already know how to start up database and listener services. So we will directly go ahead with creating the consolidated startup script for Fusion Applications Transactional DB.
Startup Script for Fusion Applications Database and Listener
Let’s create a script to start the Fusion Applications Transaction database and listener together. Save this as startDB.sh on the Fusion Applications Database server.
#!/bin/bash
# Script Name: startDB.sh v1.0_TT
. /home/fusion/dbprofile.sh
echo "Starting database listener"
lsnrctl start listener
echo "Starting Database"
sqlplus / as sysdba << EOF
startup
exit;
EOF
Remember to add execute permission for the user to this script. After that you can run this script from a shell prompt or within another script as follows.
[fusion@idmhost ∼]$ ./startDB.sh
Using the Oracle Enterprise Manager Cloud Control
Assuming that you have already configured Fusion Applications database and other components with Enterprise Manager Cloud Control 12c and you have already gone through the database and middleware startup using EM in previous section, we will keep the sections related to EM-based startup compact to avoid any repetition.
In order to start the Fusion Applications database listener service, log in to Oracle Enterprise Manager Cloud Control using SYSMAN, click on the Targets menu and select Listener target type in the left panel. Select LISTENER_FUSIONDB_<DBHOST> from the list of targets. It will take you to the FUSIONDB listener home screen, as shown in Figure 12-12.

Figure 12-12. Fusion Applications Database Listener startup screen
Click on the Oracle Listener menu followed by the Control submenu. You can see the Startup/Shutdown options here. You need to select this option even if you want to start up or shut down the service. This will lead to the Host Login details screen, as we saw earlier during the IDM Database startup. The Host Credential screen prompts for the database owner and again we have option to select from Preferred, Named, or New credential. You can refer to the IDM Database startup section if you want to review the details of the types of credentials prompted in this screen.
Let’s now move on to Fusion Applications Transaction Database startup using the Enterprise Manager Cloud Control interface. Click on the Targets menu in the Global area of EM screen and then click on the Databases menu option. This will lead to the Database summary screen, which will display all configured databases in your environment. You will see that IDM database is already running and the fusiondb database is currently down. Click on fusiondb to launch Fusion Applications Database Home screen, as shown in Figure 12-13.

Figure 12-13. Fusion Applications Transaction database startup using EM
You may see an expected error on top suggesting the agent is unable to establish a connection to the database, which is expected since the database is down. Click on the Oracle Database menu, followed by the Control submenu, as shown in Figure 12-13. Click on Startup/Shutdown from the submenu to launch the Host and Database Credential screen. The Host/Database credentials screen is identical to what we have seen in IDM Database startup. Specify the database owner credentials as well as database user credentials with SYSDBA privilege.
In the next screen, you may see advanced startup options for the database, including specifying a custom parameters file, specifying different startup options for maintenance or force startup, and so on. Refer to the IDM Database startup section if you need more information about these screens. This concludes the startup of Fusion Applications transaction database and listener. Let’s move on to understanding the Fusion Applications Components startup.
Starting Fusion Applications Middle Tier Components
We mentioned earlier that the startup of complete Fusion Applications environment takes quite a long time compared to traditional ERPs you have used, but you may have noticed that so far all the components started came up very quickly and we are already at the last phase of startup. Note that most of the time taken for the Fusion Applications environment is spent during Fusion Applications middle tier components. You should try to parallelize the startup tasks as much as possible and make maximum use of server resources for startup but at the same time you must monitor the server resources usage during startup and take necessary action if the CPU remains unavailable for startup processes. Let’s look at each component’s startup one by one along with the recommended as well as alternate methods.
Node Manager
Starting the Node Manager on each configured host is a prerequisite to WebLogic domains startup for all Fusion Applications startup methods that we are going to discuss. Each host has an instance directory for Node Manager already configured with a list of WebLogic managed servers to be monitored and controlled by the specific Node Manager. The following is the syntax to start up the Node Manager:
cd <APPLICATIONS_BASE>/instance/nodemanager/<hostname>
nohup ./ startNodeManagerWrapper.sh &
For example:
[fusion@fahost ∼]$ cd /app/oracle/instance/nodemanager/fahost
[fusion@fahost fahost]$ nohup ./startNodeManagerWrapper.sh &
You can check the output file called nohup.out for following line to make sure that the Node Manager has completed startup.
INFO: Secure socket listener started on port 5556
Oracle WebLogic Server Domains for Each Product Family
Unlike Oracle E-Business Suite R12.2 or Oracle Identity Management products, the Fusion Applications environment is comprised of dedicated WebLogic Server domains for each product family to allow dedicated resources, administration, and manageability for each product family. But this also means multiple managed servers for similar tasks for different product families. Although there is a slight overhead in starting up all these number of WebLogic domains and managed servers, eventually it helps a lot in the day-to-day operations. Depending on the number of products provisioned, your environment may have 25 to 65 managed servers. Since it may take quite some time to start them all up, using the default WebLogic scripts is not recommended since invoking startup script for all of them at same time can put a lot of load on the server CPUs. We will rely on Oracle’s specialized scripts or Enterprise Manager. Let’s look at the recommended methods of starting up the Fusion Applications WebLogic domains.
Using the fastartstop Utility
The fastartup utility provided by Oracle can start or stop most of the components of Fusion Applications environment even if they are configured on more than one server. We can either use the same utility to manage all services or use fastartstop to manage WebLogic servers while other methods for remaining components. In fact we have multiple options of starting WebLogic managed servers as well, the fastartstop utility is most versatile and recommended method of all. The most obvious reason is that the fastartstop utility provided by Oracle is aware of internal dependencies of domains so it can start the managed servers in appropriate order. It also controls the load on CPU by staring the services in batches instead of starting all of them together.
Although fastartstop has many optional switches, the following is the compact and simplified syntax of the utility that administrators use most of the time. The script is located at <AD_TOP>/bin. Note that with the Windows platform the utility name is fastartstop.cmd.
<AD_TOP>/bin/fastartstop.sh
-Start | -Stop | -Bounce
-all
| -domains <comma separated domain names>
| -domains "<domain_name>(server:all | <managed_server> | AdminServer)"
| -componentType <OHS | BI | GOP | OSN>
[-username <FA Admin User name>]
-fa_oracle_home <FA Oracle Home location>
[-adminServersOnly | -startAdminServer <true | false>]
The following sections will help you understand the fastartstop utility, including its available switches, and when to use which options or parameters.
Starting All WebLogic Domains
Since Oracle Fusion Applications involves multiple Oracle WebLogic domains for more than one product family, using default scripts to start up the domains would be a tedious and time-consuming job. Hence Oracle has provided a special startup utilities that can start all the domains configured on multiple physical servers instead of logging on to each server manually. This also eliminates the need to configure individual boot.properties file manually in the secure directory of each managed server.
Note
Some documents suggest that using the -all switch with the fastartstop.sh script starts all the components including the WebLogic domains as well as OPMN-based components, but as of the current release, this does not start the OPMN-based components like OHS, BI, and so on. You need to specify the -componentType switch manually in order to start these components.
Use the following command in order to start the WebLogic domains for all the configured product families. Remember to use only -all and not -domains in the script.
<AD_TOP>/bin/fastartstop.sh -Start -all -username <FA Administration user>
-fa_oracle_home <FA Oracle Home path> [-adminServersOnly | -startAdminServer <true | false>]
For example:
[fusion@fahost ∼]$ cd /app/oracle/fusionapps/applications/lcm/ad/bin
[fusion@fahost bin]$ ./fastartstop.sh -Start -all -username FAADMIN -fa_oracle_home
/app/oracle/fusionapps/applications -startAdminServer true
Now let’s look at the two optional arguments in the command.
- adminServersOnly: This option only starts up the administration servers for all WebLogic domains. This allows you to log in to the Administration console of each WebLogic domain manually to perform any required maintenance. The default value is false , which means it will start all managed servers as well in addition to administration servers.
-startAdminServer: By default the value of this option is false, which means the administration servers for each domain are only used to bring the managed servers up. Upon completion of the Start/Stop command, the administration servers are stopped. If you set this parameter to true, the administration servers will remain up after completion of the fastartstop.sh script execution.
Starting Specific Domains
In many cases you may want to only start or bounce specific WebLogic domains. In this case, instead of using the -all option, you need to use the -domain option with a comma-separated list of domain names that you want to start. Use the following syntax to start specific domains using the command line:
<AD_TOP>/bin/fastartstop.sh -Start -domains <Comma Separated list of Domains>
-username <FA Administration user> -fa_oracle_home <FA Oracle Home path>
[-adminServersOnly | -startAdminServer <true | false>]
For example:
[fusion@fahost bin]$ ./fastartstop.sh -Start -domains CommonDomain,HCMDomain
-username FAADMIN -fa_oracle_home /app/oracle/fusionapps/applications -startAdminServer true
Starting Specific Managed Servers
If you want to start, stop, or bounce one or more specific managed servers of one or more product family domains, then the fastartstop utility is flexible enough to allow you to do this. All you need to do is to specify the -domains switch with a comma-separated list of domains to be started with comma-separated names of managed servers for each domain. Use the following syntax to start the specific managed servers using the command line.
<AD_TOP>/bin/fastartstop.sh -Start
-domains "<domain_name>(server:all | <managed_server> | AdminServer)"
-username <FA Administration user> -fa_oracle_home <FA Oracle Home path>
[-adminServersOnly | -startAdminServer <true | false>]
For example:
[fusion@fahost bin]$ ./fastartstop.sh -Start -domains
"CommonDomain(server:HomePageServer_1)" -username FAADMIN -fa_oracle_home
/app/oracle/fusionapps/applications -startAdminServer true
Note that you can use the all option for some domains for which you want to start all managed servers, while for other domains you can specify the specific list of managed servers to be started.
Using Enterprise Manager Cloud Control
As you now know, Enterprise Manager Cloud Control can start all the configured components in your environment including database, middleware, OPMN managed components and so on. However starting components through EM may be time consuming due to the number of screens to navigate through for multiple WebLogic domains and large number of managed servers. It is generally recommended to limit the use of EM Cloud Control based startup for specific domains or managed servers only but technically you can start up each domains manually using EM interface.
We have already seen Identity Management domain startup using EM Cloud Control interface and the Fusion Applications Domains startup is no different. We will quickly go through how to navigate to specific WebLogic domains and start up complete domain or specific WebLogic cluster manually using EM interface.
Log in to EM Cloud Control using the SYSMAN account and navigate to the Targets ➤ Fusion Applications Global menu item. You will see the Fusion Applications Summary screen, as shown in Figure 12-14.

Figure 12-14. Fusion Applications EM Summary screen
You can see the name of the Fusion Applications Instance Target in the Details region of the screen. In this example we have configured the same with FA_11192, as shown in Figure 12-14. You can expand the tree to see the list of product families domains installed in your environment. Click on the product domain which you want to manage and it will navigate to the Product Family home screen. Now you can click on the Target Domain name on the left panel (FA_11192_FinancialDomain in this example) followed by the WebLogic Domain ➤ <ProductDomain> sub-tree entry (FinancialDomain in this example) to bring up the specific domain’s home screen, as shown in Figure 12-15.

Figure 12-15. Fusion Applications product domain startup using EM
Either click on the Startup button located on top of the screen or use the WebLogic Domain ➤ Control ➤ Startup menu option to initiate startup of the domain. Similar to IDM domain startup screens, you will be prompted for host credentials as well as WebLogic domain credentials. Make sure you enter FAADMIN or equivalent Domain Administration username under WebLogic credentials and save the Named or Preferred credentials for future administration of the domain through EM.
Apart from starting up the complete product family WebLogic domain, Enterprise Manager also allows you to start up a specific WebLogic cluster, managed server, or even deployed Fusion cluster application (which may span across one or more WebLogic clusters). You can explore the Product Family EM Home screen for all such options. Figure 12-16 shows an example of starting up a specific WebLogic cluster (FinancialCommonCluster) using Enterprise Manager. As you can see, when you expand the product domain sub-tree, you will see the list of WebLogic clusters under that domain. Click on the cluster that you want to start up, which will bring up the home screen for that cluster. Click Startup or choose the WebLogic Cluster ➤ Control ➤ Startup menu option in order to start the cluster on all the nodes where it is configured to run.

Figure 12-16. Starting up the specific WebLogic server cluster using EM
Oracle HTTP Server
Fusion Applications web tier can be started at any point after the Identity Management environment has been started. However it is recommended to startup web tier (Oracle HTTP Server) after all the product domains have been started to restrict users from trying to access the application when it is not yet completely started. The HTTP server in Fusion Applications web tier is also integrated with Oracle access manager through WebGate plugin and all the applications related URLs are protected by the access manager. You can refer to the Oracle HTTP Server Virtual Host configuration files for each product family with the name FusionVirtualHost_<product_family>.conf at the following location. These files will include the Oracle HTTP Server aliases and WebLogic redirection rules. You can refer to these files for troubleshooting redirection related issues.
<APPLICATIONS_BASE>/instance/CommonDomain_webtier/config/OHS/ohs1/moduleconf/
Now let’s see how to start up the Oracle HTTP Server on the Fusion Applications web host. We have the following two options for OHS startup.
Using Oracle Process Manager
Starting Oracle HTTP Server using OMPN (Oracle Process Manager and Notification Server) is the simplest and recommended method of starting it up. Run the following command on the web tier to start OHS up.
<APPLICATIONS_BASE>/instance/CommonDomain_webtier/bin/opmnctl startall
For example:
[fusion@fahost ∼]$ /app/oracle/instance/CommonDomain_webtier/bin/opmnctl startall
opmnctl startall: starting opmn and all managed processes...
Now let’s make sure that the process has started up successfully.
[fusion@fahost ∼]$ /app/oracle/instance/CommonDomain_webtier/bin/opmnctl status
Processes in Instance: CommonDomain_webtier
---------------------------------+--------------------+---------+---------
ias-component| process-type | pid | status
---------------------------------+--------------------+---------+---------
ohs1 | OHS|6474 | Alive
Using the fastartstop Utility
Although we can start Oracle HTTP Server using the fastartstop utility, it is not a straightforward procedure since it needs the OPMN server to be up in order to start the OHS server. So it is more practical to start OPMN as well as OHS together instead of starting them up in two steps. However, if you want to keep the components startup uniform by using the fastartstop utility, you can use this startup method. The following is the syntax to start OHS using this utility. Note that it does not require the -username argument.
[fusion@fahost ]$ ./fastartstop.sh -Start -componentType OHS
-appbase /app/oracle/fusionapps/applications
In case of the OPMN server is not already started then you may see following error.
Failed to create secure socket for OPMN at fahost.paramlabs.com:7043; OPMN server might be down on fahost, please start OPMN server
In that case you may need to first execute the following command before running the fastartstop utility.
[fusion@fahost bin]$ /app/oracle/instance/CommonDomain_webtier/bin/opmnctl start
This will only start the OPMN server not the OHS process, as you can see here.
[fusion@fahost bin]$ /app/oracle/instance/CommonDomain_webtier/bin/opmnctl status
Processes in Instance: CommonDomain_webtier
---------------------------------+--------------------+---------+---------
ias-component| process-type | pid | status
---------------------------------+--------------------+---------+---------
ohs1 | OHS| N/A | Down
Now you can start the HTTP server process using the fastartstop utility, as you saw.
Oracle Business Intelligence Components
Oracle BI Instance can be started in a similar manner as we started OHS in the previous section. Here also we have two options to start up the Oracle BI processes with OPMN being the recommended option.
Using Oracle Process Manager
Run the following command on the web tier to start up the Oracle BI instance using the OPMN server.
<APPLICATIONS_BASE>/instance/ BIInstance/bin/opmnctl startall
For example:
[fusion@fahost bin]$ /app/oracle/instance/BIInstance/bin/opmnctl startall
opmnctl startall: starting opmn and all managed processes...
Let’s check the status of the processes after startup.
[fusion@fahost bin]$ /app/oracle/instance/BIInstance/bin/opmnctl status
Processes in Instance: BIInstance
---------------------------------+--------------------+---------+---------
ias-component| process-type | pid | status
---------------------------------+--------------------+---------+---------
coreapplication_obips1 | OracleBIPresentat∼ | 17656 | Alive
essbaseserver1 | Essbase| 17659 | Alive
coreapplication_obiccs1| OracleBIClusterCo∼ | 17661 | Alive
coreapplication_obisch1| OracleBIScheduler∼ | 17658 | Alive
coreapplication_obijh1 | OracleBIJavaHostC∼ | 17657 | Alive
coreapplication_obis1| OracleBIServerCom∼ | 17662 | Alive
Using fastartstop Utility
If you want to use single utility for all components startup, use the fastartstop.sh script to start the BI instance up as follows.
[fusion@fahost bin]$ ./fastartstop.sh -Start -componentType BI
-appbase /app/oracle/fusionapps/applications
This command may fail if the corresponding OPMN server is down so run the following command in that case.
[fusion@fahost bin]$ /app/oracle/instance/BIInstance/bin/opmnctl start
Global Order Promising (GOP): Only if Using Supply Chain Management (SCM)
If you have provisioned Oracle Fusion Supply Chain Management (SCM) products, then you may need to start the Global Order Promising (GOP) component. Note that although the fastartstop utility supports stopping the GOP component, it does not support startup of GOP as of the current release (Release 9). If you try to start up GOP using fastartstop.sh, you may see following error.
[Warning:1] [oracle.apps.startstop.cli.CLIParser: validateCommandLineArguments.793] [tid:10] Option Start not supported for GOP
The only supported method to start the GOP service is using OPMN-based startup as follows.
<APPLICATIONS_BASE>/instance/<gop_instance>/bin/opmnctl startall
For example:
[fusion@fahost bin]$ /app/oracle/instance/gop_1/bin/opmnctl startall
Oracle Social Network (OSN): Only If Configured
If you have configured the Oracle Social Network (OSN) then you can start it up as well using the fastartstop utility. Use the following command to start up OSN.
[fusion@fahost bin]$ ./fastartstop.sh -Start -componentType OSN
-appbase /app/oracle/fusionapps/applications
Informatica Identity Resolution (IIR): Only If Using CRM
If you have provisioned Oracle Fusion CRM modules, then you need to start up the Informatica Identity Resolution (IIR) component manually. Use the following commands to start up IIR on the CRM node. Note that IIR needs the DISPLAY variable to be set and the VNC server to be running on the selected port.
[fusion@fahost ∼]$ export DISPLAY=fahost:0
[fusion@fahost ∼]$ cd /app/oracle/InformaticaIR/bin/
[fusion@fahost bin]$ . ./setfusionEnv.sh
[fusion@fahost bin]$ ./liup
[fusion@fahost bin]$ ./idsup
[fusion@fahost bin]$ ./idsconc -a
Validating the Fusion Applications Nodes OS Processes
Of course you would have been making sure that each component has started up completely after startup. If you want to troubleshoot any false “component down alerts” and make sure that the OS process is indeed running, you can locate each process as follows.
Oracle WebLogic Server Processes
You can simply run the process status command and look for the specific administration server or WebLogic managed server processes as follows. You should see a Java process with the -Dweblogic.Name parameter pointing to the managed server name.
ps -ef | grep <DomainName> | grep <ManagedServer_Name>
For example:
[fusion@fahost ∼]$ ps -ef | grep CommonDomain | grep FunctionalSetupServer_1
This should show an output as follows (truncated for better readability):
fusion 24848 215407 Mar08 ?02:15:22 /app/oracle/fusionapps/jdk6/bin/java -jrockit -Xms512m -Xmx2048m -Xgc:genpar -XX:+HeapDumpOnOutOfMemoryError -XX:HeapDumpPath=/app/oracle/instance/debug -XX:+ExitOnOutOfMemoryError -Xverbosedecorations=level,module,timestamp,millis,pid -Xverbose:gc -Dweblogic.Name= FunctionalSetupServer_1
...
OPMN-Based Components Processes
As seen earlier, after starting up the OPMN-based components we can check the status using the opmnctl status command but at times due to some issues it may continue to show process status even if the process has ended or become defunct in background. In this case first run the status command, then pick up the OS process ID (pid) from the output and then manually check for the PID using the Process Status command.
For example:
[fusion@fahost ∼]$ /app/oracle/instance/CommonDomain_webtier/bin/opmnctl status
Processes in Instance: CommonDomain_webtier
---------------------------------+--------------------+---------+---------
ias-component| process-type | pid | status
---------------------------------+--------------------+---------+---------
ohs1 | OHS| 27999 | Alive
Now let’s look up for the process ID mentioned under the pid column using the process status (ps) command. You will notice the process as well as all the child processes spawned by the main component process. The following is the truncated output of the same with a few HTTP processes only.
[fusion@fahost ∼]$ ps -ef | grep 27999
fusion 27999 279554 23:12 ?00:00:01 /app/oracle/webtier_mwhome/webtier/ohs/bin/httpd.worker -DSSL
fusion 28008 279990 23:12 ?00:00:00 /app/oracle/webtier_mwhome/webtier/ohs/bin/odl_rotatelogs -l /app/oracle/instance/CommonDomain_webtier/diagnostics/logs/OHS/ohs1/ohs1-%Y%m%d%H%M%S.log 10M 70M
fusion 28009 279990 23:12 ?00:00:00 /app/oracle/webtier_mwhome/webtier/ohs/bin/odl_rotatelogs /app/oracle/instance/CommonDomain_webtier/diagnostics/logs/OHS/ohs1/access_log 43200
fusion 28010 279990 23:12 ?00:00:00 /app/oracle/webtier_mwhome/webtier/ohs/bin/odl_rotatelogs -l /app/oracle/instance/CommonDomain_webtier/diagnostics/logs/OHS/ohs1/deflate_log-%Y%m%d 86400
fusion 28018 279990 23:12 ?00:00:00 /app/oracle/webtier_mwhome/webtier/ohs/bin/odl_rotatelogs /app/oracle/instance/CommonDomain_webtier/diagnostics/logs/OHS/ohs1/weblogic.log 43200
...
fusion 28020 279990 23:12 ?00:00:00 /app/oracle/webtier_mwhome/webtier/ohs/bin/httpd.worker -DSSL
fusion 28023 279990 23:12 ?00:00:00 /app/oracle/webtier_mwhome/webtier/ohs/bin/httpd.worker -DSSL
...
Consolidated Startup/Shutdown Script Example
Having looked at all the methods of staring up the Fusion Applications environment, it is clear that starting the environment using the command-line interface is the best option since the fastartstop utility takes care of all the required dependencies within the products’ WebLogic domains. So let’s create a consolidated startup script to start all these components using a single script for quick and comfortable Fusion Applications environment startup. Feel free to customize this script if your OPMN components are hosted on different hosts. Also change the paths and passwords in the script as per your environment.
#!/bin/bash
# Script name: startFA.sh v1.0_TT
echo "Starting Node Manager Process"
cd /app/oracle/instance/nodemanager/fahost
nohup ./startNodeManagerWrapper.sh &
# Wait for Node Manager to complete the startup
sleep 30
# Start Product Domains
cd /app/oracle/fusionapps/applications/lcm/ad/bin/
echo "Starting all Fusion Applications Domains"
./fastartstop.sh -Start -all -username FAADMIN -appbase
/app/oracle/fusionapps/applications -startAdminServer true <<EOF_PASS
MyPassword
EOF_PASS
# Start OPMN based components
echo "Starting Web server"
/app/oracle/instance/CommonDomain_webtier/bin/opmnctl startall
echo "Starting BI services"
/app/oracle/instance/BIInstance/bin/opmnctl startall
echo "Starting informatica IR services"
#If idsconc exists with X display error then run vncserver :0 and xhost + as root and then rerun the command
export DISPLAY=fahost:0
# Start IIR only if CRM is provisioned or else comment these lins
cd /app/oracle/InformaticaIR/bin/
. ./setfusionEnv.sh
./liup
./idsup
./idsconc -a
echo "All components started"
Save this script as startFA.sh and add execute permission to the script so that you can run it from other wrapper scripts as well.
[fusion@fahost scripts]$ chmod +x startFA.sh
Comparison of Different Startup Options for Fusion Applications
While you may find one startup/shutdown method more suitable than other, all methods have certain advantages and disadvantages. Table 12-2 lists the major differences between these methods. You may decide on one method and implement it in your organization best practices accordingly since it is always recommended that everyone in the organization follow the same process to manage the applications services. Running multiple commands at same time in such a complex environment may cause unexpected issues.
Table 12-2. Comparison of Different Startup Options for Fusion Applications
Startup Option | Advantages | Disadvantages |
|---|---|---|
Command line using fastartstop script | 1) Can start all domains using a single command. 2) Multiple startup commands can be placed in consolidated automation script. | Must wait for the current fastartstop script execution to complete before further commands can be executed. |
Command line using default WebLogic scripts | Multiple WebLogic servers can be started in parallel without waiting for the previous one to complete. | 1) The boot.properties file must be created for all managed severs. 2) Can only start on WebLogic servers. |
WebLogic Administration Console | Simple interface. Multiple domains can be started without waiting for other domains to start up. | 1) Administration server must be started beforehand. 2) Cannot start the HTTP server and BI instance. |
Oracle Enterprise Manager Cloud Control | Single interface to start all IDM and FA components. | Manual task. Need to navigate to relevant domains and components. |
Stopping Fusion Applications Environment
You should stop the Fusion Applications environment in reverse order of the startup sequence. The following is the shutdown sequence we will follow in order to stop all the components in Fusion Applications environment. Of course, Oracle Enterprise Manager Cloud Control provides a simple interface to stop all products using a single interface but it should be noted that stopping the Fusion middleware components takes a fraction of the time as compared to startup so you may choose to go with seeded shutdown scripts instead of going with manual shutdown procedure. The following is the generic sequence for shutting down all components involved in a Fusion Applications environment. Depending on your custom integrations and dependencies you may want to add or modify these steps.
1. Stop Fusion Applications tier components.
a. Oracle HTTP Server
b. BI, GOP, ONS, IIR components
c. WebLogic Server domains for each product family
d. Node Manager
2. Stop Fusion Applications transaction database and listener.
3. Stop Identity Management tier components.
a. Oracle HTTP Server
b. OIF, ODSM EM Agents
c. IDM WebLogic Domain
d. Oracle Internet Directory
e. Node Manager
4. Stop Identity Management database and listener.
Stopping Fusion Applications Middle Tier Components
Let’s take a quick look at the steps to stop the Fusion Applications Tier components. The steps for shutting down are very similar to start up, so we will not go into details of each method again but simply run through the commands. Replace /app/oracle with the actual value of APPLICATIONS_BASE in your environment. We will first start with OPMN-based components followed by WebLogic domains. Note that all these components can be stopped using Enterprise Manager Cloud Control in a similar manner as we have seen their startup using EM.
Informatica Identity Resolution (IIR): Only if Using CRM
If you have provisioned CRM modules then you need to shut down the Informatica Identity Resolution component. Use the following commands to stop IIR;
[fusion@fahost ∼]$ cd /app/oracle/InformaticaIR/bin/
[fusion@fahost bin]$ . ./setfusionEnv.sh
[fusion@fahost bin]$ ./idsdown
[fusion@fahost bin]$ ./lidown
Oracle Social Network (OSN): Only if Configured
If you have configured Oracle Social Network (OSN), then you can stop it using the fastartstop utility as follows.
[fusion@fahost bin]$ ./fastartstop.sh -Stop -componentType OSN
-appbase /app/oracle/fusionapps/applications
Global Order Promising (GOP): Only if Using Supply Chain Management (SCM)
If you have provisioned the Oracle Fusion SCM modules, then you must stop the Global Order Promising (GOP) component. The recommended way to stop the GOP component is to use the Oracle Process Manager (OPMN) as follows.
[fusion@fahost bin]$ /app/oracle/instance/gop_1/bin/opmnctl stopall
opmnctl stopall: stopping opmn and all managed processes...
Unlike the startup of GOP, shutdown is already supported by the fastartstop utility. We can simply provide componentType as GOP as an argument to stop the component.
[fusion@fahost bin]$ ./fastartstop.sh -Stop -componentType GOP -username FAADMIN -appbase /app/oracle/fusionapps/applications
Oracle Business Intelligence Components
Unlike starting up an Oracle BI instance, the shutdown is relatively quick. The BI components can be stopped using either OPMN or the fastartstop utility but OPMN is the recommended option to shut down the Oracle BI components. Use the following command to stop it using OPMN.
[fusion@fahost bin]$ /app/oracle/instance/BIInstance/bin/opmnctl stopall
opmnctl stopall: stopping opmn and all managed processes...
If you want to use the fastartstop.sh script then you can specify BI as the -componentType argument, as shown in the following example.
[fusion@fahost bin]$ ./fastartstop.sh -Stop -componentType BI
-appbase /app/oracle/fusionapps/applications
Oracle HTTP Server
Ideally, Oracle HTTP Server should be stopped as soon as you plan to bring the complete Fusion Applications Environment down in order to prevent users from logging into the application. OPMN is the recommended method to stop the Oracle HTTP Server quickly. The following is the command to stop OHS using OPMN. However if you are planning to start it later using the fastartstop script then you can only stop OHS component and leave OPMN running.
[fusion@fahost ∼]$ /app/oracle/instance/CommonDomain_webtier/bin/opmnctl stopall
opmnctl stopall: stopping opmn and all managed processes...
Use the following command in order to stop OHS using the fastartstop utility instead.
[fusion@fahost ]$ ./fastartstop.sh -Stop -componentType OHS
-appbase /app/oracle/fusionapps/applications
Oracle WebLogic Server Domains for Each Product Family
We have already seen how to start WebLogic domains for all product families, selected product families as well as only a selected managed servers of specific WebLogic domains. The shutdown of WebLogic server domains can also be done in exactly same way by simply replacing -Start with the -Stop argument while running the fastartstop.sh script. Since we have already discussed multiple uses of the fastartstop utility to manage WebLogic Server domains, we will only look at how to stop all product domains. You can always manage selected servers by providing -domains argument as we have seen during startup. Note that this utility can stop the WebLogic domains on each Fusion Applications host where a product domain or WebLogic cluster is configured to run. Make sure that the Node Manager on each node is running before running this command.
[fusion@fahost bin]$ ./fastartstop.sh -Stop -all -username FAADMIN -fa_oracle_home
/app/oracle/fusionapps/applications
This will prompt for the WebLogic Servers Administration user specified above. If you want to leave the Administration Servers running then you can specify the -startAdminServer true argument at the end of the command. If you are going to restart the physical servers then you should not specify this argument.
Node Manager
Once all the WebLogic Server domains have been stopped, if you are planning to restart the servers then you can stop the Node Manager processes on each Fusion Applications host. If you are only going to bring up the components up after maintenance without restarting the physical servers then you can leave this running since you will need the Node Manager to be up in next startup cycle. At this moment there is no command to shut down Node Manager so we need to locate the background process for Node Manager and kill the process using the kill command. Following is the single-line command to do both these tasks.
[fusion@fahost ]$ ps -ef | grep NodeManager | awk '{print $2}' | xargs kill -9
Consolidated Script for Stopping the Fusion Applications Tier
For your convenience, we have created following consolidated script for stopping all the Fusion Applications components. Make sure you change the paths and password to actual ones, as per your environment. Feel free to modify the script to your requirements.
#!/bin/bash
# Script Name: StopFA.sh v1.0_TT
# StopOPMN Based Components
echo "Stopping informatica IR services"
cd /app/oracle/InformaticaIR/bin/
. ./setfusionEnv.sh
./idsdown
./lidown
echo "Stopping BI services"
/app/oracle/instance/BIInstance/bin/opmnctl stopall
echo "Stopping Web Server"
/app/oracle/instance/CommonDomain_webtier/bin/opmnctl stopall
# Stop WebLogic Server Domains
cd /app/oracle/fusionapps/applications/lcm/ad/bin/
echo "Stopping all Fusion Applications Domains"
./fastartstop.sh -Stop -all -username FAADMIN -appbase /app/oracle/fusionapps/applications <<EOF_PASS
MyPassword
EOF_PASS
# Stop Node Manager
echo "Killing Node Manager process"
ps -ef | grep NodeManager | awk '{print $2}' | xargs kill -9
echo "All components stopped"
Save this script as stopFA.sh and provide execute permission for this file as follows so that this file can be run from other wrapper scripts as well.
[fusion@fahost scripts]$ chmod +x stopFA.sh
Manual Shutdown Using Enterprise Manager Cloud Control
We have already seen how to start up Identity Management components using Enterprise Manager so we will skip a detailed discussion of the EM interface here. In order to shut down IDM components, follow these steps:
1. Log in to EM Cloud Control 12c with SYSMAN user.
2. On the home screen, click Targets menu ➤ Fusion Applications. This will open the Fusion Applications summary screen.
3. Expand the configured Fusion Applications instance in the targets details region. This will show the list of Fusion Applications Product Families configured with Enterprise Manager under the given Fusion instance. Click on any product family that you want to shutdown or manage. This will launch the Product Family Home screen.
4. In the Product Family Home screen, you can stop the entire WebLogic domain, specific WebLogic clusters, or even specific application deployments by selecting from the Regional area menu.
Stopping the Fusion Applications Transaction Database
Once the Fusion Applications Application and Web Tier components have been stopped, you can shut down the FUSIONDB database and listener. You can use Enterprise Manager to stop the database in a similar way as we have seen the database and listener startup. Since the screen is exactly the same we will not repeat the walkthrough here.
Shut down the database using the shutdown immediate command or if you are using RAC database then use srvctl stop database -d fusiondb to stop the database. Similarly stop listener using the lsnrctl stop command or for RAC use the srvctl stop listener -l <listener_name> command to stop the listener. Alternatively, you can use following script to stop the database and listener in one go. Make sure to change the listener name as per your environment.
#!/bin/bash
# Script Name: stopDB.sh v1.0_TT
# Source the database environment file
. /home/fusion/dbprofile.sh
echo "Stopping Database"
sqlplus / as sysdba << EOF
shutdown immediate;
exit;
EOF
echo "Stopping database listener"
lsnrctl stop listener
Save this script as stopDB.sh and provide execute permission to the script in order to use it in consolidated shutdown scripts in your organization.
Stopping Identity Management Middle Tier Components
Unlike the startall.sh script, which takes a long time to complete due to serial execution of startup tasks, the stopall.sh script completes quite quickly since the shutdown tasks do not take a long time. Hence the recommended method to stop all Identity Management components is to use the stopall.sh script created during the provisioning process. However during day-to-day administration of the environment you may need to stop certain components only. In that case, the stopall.sh script does not help so we will have a look at how to manually shut down the individual Identity Management components.
Automatic Shutdown Using the stopall.sh Script
The seeded shutdown script is already created by the Provisioning wizard at <IDM_CONFIG>/scripts. You can run the script as follows in order to shut down the Identity Management application and web tier components sequentially. Note that the password arguments are optional so if you do not specify them on the command line then the script will prompt you for them. If you are planning to run the script inside the consolidated shutdown script, you need to provide the passwords as an argument but you must check your IT security policy before specifying passwords in the plaintext script file.
<IDM_CONFIG>/scripts/stopall.sh <Node Manager Password> <WebLogic Administrator Password>
In following example, we are not specifying the passwords on the command line.
[fusion@idmhost ∼]$ cd /app/oracle/config/scripts/
[fusion@idmhost scripts]$ ./stopall.sh
Enter NodeManager Password:
Enter Weblogic Admin Password:
Manual Shutdown Using Command Line
If you want to stop all the Identity Management components manually or if you want to stop only a few selected components, then use the following manual shutdown methods.
Oracle HTTP Server
You must stop Oracle HTTP Server first if you are planning to shut down the complete Identity Management environment manually in order to reject any requests to the Identity Management components while they are still shutting down. The syntax for stopping Oracle HTTP Server (OHS) instance is as follows.
<IDM_CONFIG>/<OHS_INSTANCE>/bin/opmnctl stopall
For example:
[fusion@idmhost ∼]$ /app/oracle/config/instances/ohs1/bin/opmnctl stopall
opmnctl stopall: stopping opmn and all managed processes...
OIF EM Agent
If you have configured the component Oracle Identity Federation (OIF), you need to shut down the OIF EM agent as follows.
<IDM_CONFIG>/<OIF_INSTANCE>/bin/opmnctl stopall
For example:
[fusion@idmhost ∼]$ /app/oracle/config/instances/oif_inst/bin/opmnctl stopall
opmnctl stopall: stopping opmn and all managed processes...
ODSM EM Agent
Stop Oracle Directory Service Manager EM agent using the following command. Note that this command does not stop the ODSM service but only the EM agent.
<IDM_CONFIG>/<ODSM_INSTANCE>/bin/opmnctl stopall
For example:
[fusion@idmhost ∼]$ /app/oracle/config/instances/odsm/bin/opmnctl stopall
opmnctl stopall: stopping opmn and all managed processes...
IDM WebLogic Server Domain
Now let’s go ahead and stop the IDM WebLogic Server domain (IDMDomain), including all managed servers as well as the administration server. We will use the default WebLogic scripts in order to shut down these servers. Make sure not to run these commands in the background and also stop the administration server at the end. This allows the managed servers to shut down sequentially and lets them communicate with the admin server while they are going down.
stopManagedWebLogic.sh <ManagedServer_Name>
Stop the managed servers (ODSM, OIM, SOA, and OAM sequentially as follows). For example:
[fusion@idmhost ∼]$ cd /app/oracle/config/domains/IDMDomain/bin/
[fusion@idmhost bin]$ ./stopManagedWebLogic.sh wls_ods1
[fusion@idmhost bin]$ ./stopManagedWebLogic.sh wls_oim1
[fusion@idmhost bin]$ ./stopManagedWebLogic.sh wls_soa1
[fusion@idmhost bin]$ ./stopManagedWebLogic.sh wls_oam1
If you have configured Oracle Identity Federation then you need to stop the OIF managed server as follows.
[fusion@idmhost bin]$ ./stopManagedWebLogic.sh wls_oif1
If you have not configured the encrypted boot identity file boot.properties for any managed server then it may prompt for WebLogic Server credentials. Once all the managed servers have shut down successfully, you can shut down the Administration Server as follows.
[fusion@idmhost bin]$ ./stopWebLogic.sh
Node Manager
Similar to Fusion Applications hosts Node Manager, we should manually kill the Node Manager process in the IDM hosts since there is no script to shut down the Node Manager at the moment. If you are not going to restart the physical server during the maintenance then you can leave the process running. The following is an example of identifying and ending the running node manager process using the Unix command kill -9.
[fusion@idmhost ∼]$ ps -ef | grep NodeManager | awk '{print $2}' | xargs kill -9
Oracle Internet Directory (OID)
Oracle Internet Directory is the last application tier component that should be stopped since all the components communicate with OID directly or indirectly. Once you have stopped all other components, you can go ahead and stop OID using the following OPMN command.
<IDM_CONFIG>/instance/<OID_instance>/bin/opmnctl stopall
For example:
[fusion@idmhost ∼]$ /app/oracle/config/instances/oid1/bin/opmnctl stopall
opmnctl stopall: stopping opmn and all managed processes...
Consolidated Script for Stopping Identity Management Components
Once again, here is the consolidated script to stop all the Identity Management components using the manual method. If you have configured Oracle Identity Federation then you can uncomment the OIF shutdown line from the script. Make sure to modify the paths as per your environment.
#!/bin/bash
# Script Name: stopIDM.sh v1.0_TT
. /home/fusion/.bash_profile
# Stop OPMN Based components
echo "Stopping Oracle HTTP Server (web)"
/app/oracle/config/instances/ohs1/bin/opmnctl stopall
echo "Starting ODSM Agent service"
app/oracle/config/instances/odsm/bin/opmnctl stopall
# Stop IDM WebLogic Server Domain
echo "Stopping Managed Servers"
cd /app/oracle/config/domains/IDMDomain/bin/
./stopManagedWebLogic.sh wls_ods1
./stopManagedWebLogic.sh wls_oim1
./stopManagedWebLogic.sh wls_soa1
./stopManagedWebLogic.sh wls_oam1
#./stopManagedWebLogic.sh wls_oif1
echo "Stopping Weblogic Admin Server"
./stopWebLogic.sh
# Stop OID
echo "Stopping Oracle Internet Directory (OID)"
/app/oracle/config/instances/oid1/bin/opmnctl stopall
# Stop Node Manager
echo "Manually killing Node Manager process"
ps -ef | grep NodeManager | awk '{print $2}' | xargs kill -9
Save the script as stopIDM.sh and provide execute permission to the script for the reason explained earlier.
Manual Shutdown Using Enterprise Manager Cloud Control
We have already seen how to start up Identity Management Components using Enterprise Manager so we will skip a detailed discussion of EM interface here. In order to shut down IDM components, follow these steps:
1. Log in to EM Cloud Control 12c with the SYSMAN user.
2. On the home screen, choose Targets menu ➤ Middleware. This will open the Fusion Applications Middleware targets summary screen.
3. From the Oracle Fusion Middleware Farm targets listed in the main screen, click on the IDM Middleware farm. This will open IDM Middleware targets home screen.
4. In the IDM Middleware targets screen you can stop the WebLogic domain, directory server, Oracle HTTP server and so on.
Stopping Identity Management Database
Once all the IDM and FA nodes components have been stopped, you can shut down the IDMDB database and listener. You can use the Enterprise Manager to stop the database in a similar way as we have seen the database and listener startup.
Shut down the database using the shutdown immediate command or if you are using RAC database then use srvctl stop database -d idmdb to stop the database. Similarly, stop listener using the lsnrctl stop command or for RAC use srvctl stop listener -l <listener_name> to stop the listener. Alternatively you can use following script to stop the database and listener in one go. Make sure to change the listener name as per your environment.
#!/bin/bash
# Script Name: stopDB.sh v1.0_TT
# Source the database environment file
. /home/fusion/dbprofile.sh
echo "Stopping Database"
sqlplus / as sysdba << EOF
shutdown immediate;
exit;
EOF
echo "Stopping database listener"
lsnrctl stop listener_idmdb
Save the file as stopDB.sh and assign execute permission to this script using the chmod +x stopDB.sh command.
Overview of the Fusion Functional Setup Manager
The first functionality that you may access after provisioning an Oracle Fusion Applications environment is the Oracle Functional Setup Manager. The name Functional Setup Manager doesn’t do justice to the incredible functionalities and importance of this manager in the functional implementation and ongoing maintenance of the Fusion Applications environment. It is probably the most important feature introduced in Fusion Applications as compared to traditional ERP systems, especially for those who have already worked on E-Business Suite applications.
Note
Since the Oracle Fusion Functional Setup Manager is one of the key applications that’s used not only by administrators but also by functional implementers, application specialists, users, and application developers, this section is important for all the audiences of this book. For most of the users this is the starting point of their interaction with Oracle Fusion Applications interface.
Let’s first understand what the Fusion Functional Setup Manager is all about. By definition, the Functional Setup Manger is a single interface that allows multiple lines of business to setup and implement the required product offering in the most agile, efficient, and transparent way. However, apart from the setup-related tasks, the Functional Setup Manager also provides an interface to perform day-to-day administrative maintenance tasks as well, hence the work area is not just Setup but Setup and Maintenance. The Functional Setup Manager allows you to manage the end-to-end lifecycle of the Fusion Applications implementation right from planning, configuring the products to be implemented, creating an implementation plan, running implementation tasks, deploying the setup artifacts from one system to another, and thus managing the application implementation like a full-fledged project.
Navigating Through the Functional Setup Manager
Figure 12-17 shows how to navigate to the Fusion Functional Setup Manager work area. Log in to the Fusion Applications homepage using the super user FAAdmin (the one selected during the provisioning process). Choose Navigator Menu ➤ Tools Category ➤ Setup and Maintenance or click on the Username in Global area followed by choosing Settings and Actions menu ➤ Administration category ➤ Setup and Maintenance to launch the Fusion Functional Setup Manager home screen.

Figure 12-17. Navigating through the Oracle Fusion Functional Setup Manager
Note
Fusion Functional Setup Manager is deployed on the FunctionalSetupServer_1 WebLogic managed server of CommonDomain. If this managed server is not running or having issues, then you may not be able to access any of the pages related to the Functional Setup Manager.
Once you launch the Functional Setup Manager work area, you will see a fixed Regional area along with a variable Local area screen based on which functionality of Setup and Maintenance you are working on. Use the Tasks list in the Regional area to navigate to various functionalities during Fusion Applications Implementation. The Tasks search box at the bottom provides access to a number of maintenance tasks after the implementation is complete. We will look at each of these functionalities in the upcoming sections of this chapter.
Fusion Applications Implementation Overview
Functional Setup Manager is the primary interface that you will require in order to plan, configure, implement, deploy, and maintain the Fusion Applications Setup. Functional Setup Manager is independent of any product family and is usable out of the box. Hence, it can manage any product implementation as a management and control point. In this section, we will see how we can use Functional Setup Manger to understand the Fusion Applications product offerings, review the list of implementation tasks involved, select offerings to be implemented along with optional features, run functional setup tasks, and oversee end-to-end implementation processes as projects.
Figure 12-18 shows the mapping of Fusion Applications implementation process with the relevant screens of the Oracle Fusion Functional Setup Manager. You can see that each step of the implementation processes corresponds to a functionality available through the Functional Setup Manager.

Figure 12-18. Oracle Fusion Functional Setup Manager overview
Planning for an Implementation
If you are navigating to Fusion Functional Setup work area for the first time or if you have not created an implementation project, then you will be presented with the default Getting Started with Oracle Fusion Applications screen. Once you have initiated or completed an applications implementation project, the default screen will change to the All Tasks screen. We will look at that later. For now, let’s see what the Getting Started screen has to offer.
Figure 12-19 shows an example of the Getting Started screen in Oracle Fusion Applications 11g, Release 9. Except for a small difference, in general all the regional area tasks list between 11.1.9 and earlier releases are the same. This introductory screen provides a quick overview of the implementation process flow at the top of the page. Clicking on each step of the flow leads to the appropriate work areas for those tasks.

Figure 12-19. Getting started with Fusion Functional Setup Manager
This screen also allows you to learn about the Fusion Applications’ product offerings regardless of whether they are selected for provisioning or not. As we know already, offerings are the highest level of grouping of application functionalities that can be selected for provisioning. So offerings are the initial decision point for Fusion Applications installation and implementation. Offerings include multiple business processes, which are represented as a one or more functionalities of the particular offering.
You can navigate to any of the offerings displayed in the lower panel to access documents specific to that offering. As you can see in Figure 12-20, the Documents page provides a number of documents for each of the product offering displayed. You can download the documents in PDF, HTML, or Excel formats. These documents immensely help an implementer understand the product features, dependencies, and the complete list of tasks involved in implementation process. By reviewing these documents, you can collect business requirements for the upcoming implementation project.

Figure 12-20. Offering specific documents
Table 12-3 displays the list of documents available in this screen along with their importance.
Table 12-3. List of Documents Available in Offering Specific Pages
Document Title | Description |
|---|---|
Offering Content Guide | Provides detailed contents of the offering based on the current version of the application. |
Associated Features | This report helps make decisions about options and features for the selected offering. |
Setup Task Lists and Tasks | Lists all the implementation Tasks and Task Lists that will be generated if this offering is selected for implementation. |
Related Business Objects | Lists all the business objects that this offering uses for functional setup and transactions. |
Related Enterprise Applications | This report provides list of Enterprise Applications this offering requires for setup and transactional tasks. |
Configuring Products for Implementation
Once you have provisioned a number of product offerings and gone through the implementation steps and other documents in Offerings Documentation page, you can go ahead and select the provisioned offerings or selected functional areas of an offering for implementation. You can launch the Configure Offerings section of the Functional Setup Manager by using the link in the process flow diagram shown on the Getting Started page or from the list of tasks in the Regional area of Setup and Maintenance application.
Figure 12-21 shows an example of Configure Offerings screen with financials, Fusion accounting hub, and HCM products provisioned. This screen displays the following information for each of these offerings for the current version of Fusion Applications.
Offering: Name of Fusion Applications product offering with optional functional areas.
Description: Clicking on this icon will launch a small pop-up with more details of the offering.
Provisioned: By default the field remains blank. If the product offering has been provisioned as part of the Fusion Applications provisioning process, then it will show the value as Yes.
Enable for Implementation: By default, all checkboxes are unchecked including those offerings that are already provisioned. Select this option if you are planning to include this product offering in your upcoming implementation plan. This will enable this product specific implementation tasks to be generated.
Implementation Status: This field tracks the status and progress of the specific offering’s implementation. Initially all values are set to Not Started. Once the implementation is complete, it will change to Implemented.
Select Feature Choices: This option allows you to select from a list of optional feature choices available for that specific offering. Note that the feature choices may be different for individual offerings.

Figure 12-21. Configure offerings screen
Select the checkmark against each offering and functional area that you want to implement, select, or modify the optional feature choices (explained in next section) and click the Save button to freeze the selection. Figure 12-22 shows an example of Feature Choices selection for one example offering Compensation Management.

Figure 12-22. Select Feature Choices screen
The offering includes a set of business processes that need to be implemented, whereas features are optional or alternative business rules for the selected offering. There are two types of features.
Single feature option selection: When you must select only one feature out of a list of options, then the list is provided as a set of radio buttons to restrict the selection to one only.
Multiple features option selection: When you are allowed to select more than one options for one feature then the list is provided as a set of checkboxes that allow multiple selections.
As you can see in Figure 12-22, in the Select Feature Choices screen you may notice a button titled Lock All Selections. Once you have selected the features, you can click this button which replaces checkboxes with text or tick marks suggesting whether the feature has been selected. Once the Feature Choices are selected, you will return to the previous screen or offering selection. Click Save once you’re finished selecting offerings and feature choices for each of the offerings.
Creating an Implementation Project
Although creating and managing an implementation project is role of Application Implementation Manager, at times it is a collaborative activity between Fusion Applications Administrators and Application Implementation Managers when it comes to creating an implementation project or necessary initial setup.
Creating and managing implementation project features are one of the biggest improvements in Fusion Applications as compared to traditional ERPs, including Oracle E-Business Suite. Fusion Applications provides a completely automated and still customizable process of creating an implementation plan for your organization’s functional setup of product offerings. Based on the offerings we have selected for implementation in earlier sections, you can automatically generate a completely transparent end-to-end implementation project that can be later driven by the implementation manager and assigned to a project team based on specific tasks and individual skillsets.
In order to create a new implementation project, you need to navigate to the Manage Implementation Projects option in the list of tasks in the Regional area first. We will discuss this screen in the next section of managing an implementation project. As shown in Figure 12-23, click on the Create icon to proceed to the Create an Implementation Project screen.

Figure 12-23. Creating a new implementation project
Creating an implementation project begins with specifying a name, description, start and end dates, and so on, for the project, as shown in Figure 12-24. The code or internal name of the project will be generated automatically based on the name provided. As you will see in next section, implementation project is managed in a typical project management methodology and you may assign the project to a specific Implementation manager and assign project deadlines here. However, the deadline can be assigned or changed later as well. Click Next once you have entered this information to proceed with selecting offerings for this implementation project. Figure 12-25 shows an example of the Offerings selection page for a new implementation project.

Figure 12-24. New Implementation Project details screen

Figure 12-25. Select offerings to implement
Based on the offerings that you have selected for implementation in an earlier screen, you may include all or some of those offerings for this implementation project. You may select all or selected functional areas of an offering as well if you do not need to use some business processes in your organization.
Once you select the offerings and click Save and Open Project, it will automatically generate a list of all end-to-end functional and technical tasks for implementing the selected offerings. If there are any tasks required to be performed on other offerings that are not selected here but the current offerings have dependency on them, then those related tasks are also added in the implementation plan.
Managing an Implementation Project
Once an implementation project has been created, you can search for it from Manage Implementation Project work area. This functionality of Functional Setup Manager immensely helps functional implementers as well as system administrators manage the implementation as a full-fledged project with assigned resources, timeframe, dependency rules, task status, management, and reporting of the complete application implementation cycle. The following are a few of the salient features of implementation project management using the Fusion functional setup manager.
A complete project management suite to create, assign, track, share and manage the end-to-end implementation project.
Completely automated and transparent generation of all required setup tasks.
Single and guided tasks lists for multiple offerings.
All prerequisites and dependencies automatically are taken in account during the tasks list generation.
Customizable tasks list to suite organization requirements to add or remove specific task to take care of exception cases.
Eliminates the need of looking up user guides and documentation to understand the tasks involved in an implementation.
Allows you to navigate to the assigned task directly from the tasks list.
Graphical interface provides a summary of the implementation project at a glance.
Let’s look at one example of implementation project. Figure 12-26 shows an implementation project for the Fusion accounting hub.

Figure 12-26. Manage implementation project
As you can see, the list of implementation tasks has been generated along with individual tasks as well as the grouping of task (also called a task list) along with current status of the task and other information like number of predecessors and name of one or resources assigned the task. Note that the automatically generated tasks list is based on the offerings that you have selected for this specific project only and not all the enabled offerings.
As mentioned earlier, the generated tasks list is aware of inter-product dependencies as well as prerequisites, so it follows a specific pattern for generating the tasks list. Figure 12-27 explains how the tasks list is generated based on multiple offerings selected from more than one product families.

Figure 12-27. Generic sequence of implementation tasks
As you can see in Figure 12-27, all the common setup tasks are listed in the beginning and gradually remaining dependent tasks are listed in order. Once the common tasks for an offering, product family, or complete selection are listed, the individual offerings related tasks are generated in sequential order. Any dependency information is also updated in the implementation plan so that the implementation manager can monitor the progress of dependency tasks accordingly.
Now the Application Implementation manager needs to assign individual tasks from the generated list to functional specialists or technical administrators based on the type of task and where it needs to be performed. However, assigning each task is not mandatory but it is recommended practice in order to make sure the project management summary provides correct status information about overall progress of the implementation project. Before assigning any task you can verify the list of roles which are allowed to perform the specific task by clicking on the Authorized Roles icon next to the task name. Figure 12-28 shows an example of authorized roles for the Run User and Roles Synchronization Process task. A user with any of the listed roles can be assigned this task.

Figure 12-28. Authorized roles for the selected process
Once you have identified the roles required for the functional users, the Fusion Applications Security Administrator can create users with such privileges and then you can assign tasks to the newly created users. While assigning tasks we can also add notes to share important project information with other resources who are part of the same implementation project. We will look at user creation and role assignment in the next chapter.
Migrate and Deploy Configuration on Other Instances
While many administrators and implementers may find the automatic implementation tasks list generation as the most useful feature of the Fusion Functional Setup Manager, especially those moving from other ERPs to Fusion, a large number of implementers may find the Migration and Deployment features of Functional Setup Manager the most useful. The prime reason is the simplicity of migrating the functional setup from one environment to another. This results in a great deal of cost savings mainly due to the amount of time saved in production deployment.
Unlike traditional ERPs, Fusion Applications allows you to export complete setup data from the development or staging instance to production for initial implementation of Fusion Applications. This process is highly customizable and we can exclude or include selected setup data during the migration. This also eliminates the need of cloning complete environments when we only need to deploy setup and configuration-related data.
Once you have completed the basic implementation on a non-production environment and you want to deploy the same setup on production, you can create a new configuration package in order to export the setup data to a downloadable file. You can begin by clicking on the Manage Configuration Packages task from the regional area of Functional Setup Manager followed by clicking the Create New Configuration package icon. This will launch the basic information screen for the New Configuration package, as shown in Figure 12-29.

Figure 12-29. Create Configuration Package: Basic Information screen
From the list of existing implementation packages, select the project you want to export to the new environment. You can select only the Setup Tasks List or include Setup Data in this package depending on your requirement. The remaining details are populated automatically but you can change them if required. Click Next to proceed to the next screen where we can select objects for inclusion in the configuration package.
Figure 12-30 shows an example of the selection section for exporting setup objects. You should leave the export sequence as is unless you have a strong reason to change it. The checkbox next to each object can be selected or deselected for inclusion or exclusion from the configuration export.

Figure 12-30. Select objects to be exported in the configuration package
Once you have created the configuration package, it is ready to be exported and you can look it up under the Manage Configuration Packages work area. In order to export the Configuration package, search for the existing packages, select the one you want to export, and click the Export Setup Data button to initiate the package export.
Note that you can export the same setup information with updated data as many times as you want. Every time you run the export process, a new version of the export file is generated. You can download the latest export file in a zipped format which contains a series of XML files. This file eventually needs to be moved to a target system where it will be imported. Once the downloaded file has been copied to the target system, it will show up in the search results on the same page in the target system. You can click on Import Setup Data to initiate the setup tasks as well as the data (if exported) import. Import will insert the new data from the export file to the target. If any setup data exists in the target, it updates the existing data while leaving the data on target unchanged.
While export or import is running, you can monitor the progress using manage export and import processes task from regional area of Functional Setup Manager. Figure 12-31 shows an example of the Manage Configuration Packages screen, which shows an exported configuration file. As you can see, once the file has been exported successfully, the status changes to Locked.

Figure 12-31. Export or import configuration packages
Introduction to Maintenance Tasks
As mentioned earlier, Functional Setup Manager has two major functionalities—functional setup of and ongoing maintenance of the applications. The maintenance tasks can be accessed from the Tasks Search panel in the Regional area or from the All Tasks tab under the Maintain Implementation Projects work area. Once you have created an implementation project, the default landing page for the Functional Setup Manager changes from Getting Started page to the All Tasks page. So whenever you access the Setup and Maintenance work area from Navigator it will launch the All Tasks page first. This is appropriate since once functional setup is completed, you need to have maintenance tasks as your default screen.
Figure 12-32 shows the default tab for Maintenance Tasks, which allows you to search and execute various administrative, functional, and developer related tasks from a single interface. You will notice that these tasks are not new for you since we have already seen setup related tasks that were automatically generated as part of implementation project, while in this case you will manually search and execute the relevant maintenance task.

Figure 12-32. Search a specific administrative task
As you can see in Figure 12-32, I have searched for the very commonly used Administrative task called Run User and Roles Synchronization Process by using a partial name in the search query. Similar to the tasks in the implementation project, you can see the Authorized Roles for the selected task. The column Permitted shows whether you already have one of the Authorized roles or not by showing tick or cross mark. You may click on Go to Task in order to navigate to the task-specific page.
Summary
This introductory chapter to Fusion Applications administration gave you a glimpse of what is the immediate next step after the installation is complete. This includes how to start and stop Fusion Applications Services and how to use Oracle Fusion Functional Setup Manager. You saw the various ways of managing Identity Management as well as Fusion Applications environment services, including command-line tools, Oracle Enterprise Manager Cloud Control, and the local management tools. You should now also know how to collaborate with other functional implementation teams and which ones are the common areas of interest in Functional Setup Manager for the administration and application implementation teams.
In the next chapter, you will see how to prepare initial security setup, including provisioning of necessary users and roles for administration, implementation, and regular operations. The remaining chapters will talk more about Fusion Applications administration including monitoring, troubleshooting, diagnosing, patching, and so on.