
“Testing is Hard.”
This is something you may have heard before. Experienced developers have heard it a number of times over their careers. Testing, be it unit testing or end-to-end testing, seems to have fluctuated in and out of vogue with many developers over the years. But testing has always been important. The ability to test an application in an automated way is an invaluable asset to individual developers and Enterprise teams alike.
Since you are reading this chapter, we will assume you have already decided that testing your Electron application is a great idea. We agree. And, so it would seem, the developers on the Electron team agree, as well, because Spectron, a test harness for Electron, was created to assist Electron developers with their testing practice. Spectron allows developers a practical way to load their application and test your implementation of the Electron API as well as your own code. Spectron has a robust API that allows developers to test properties of windows created, the webContents object, and anything else you would like to use from the Electron API to test your application.
As we have stated in earlier chapters, we are focused on providing examples of code for Electron; so in this chapter we will not be discussing testing of your web-standard application, the code that runs in the Renderer Process. The assumption is that you will be unit testing your own code externally to Electron, which is advisable (having more automated tests is always a good thing). This chapter will focus on testing the Main Process and then adding some simple code to our Renderer Process as an example of a Renderer to Main Process test.
In this chapter, we will set up Spectron and use Mocha and Chai to run a few simple tests on elements of the Electron API and on custom methods. We will use Spectron as our test runner, the library that controls our tests. Mocha is the testing framework, the library that gives us a defined structure for our tests, which we will use for our tests. You will see methods named “describe,” “beforeEach,” and “it,” which are the fundamental methods of Mocha. Chai is the assertion library we will use inside Mocha’s “it” methods and is the meat of our tests. Chai assists us by validating the conditions that we are testing. You will see how these three libraries work as we move through this exercise.
Getting Started
As with each of these examples, we are using the Electron Quick Start example. We will use git clone to create a new copy of the quick start in a new folder, in this case named spectron-test-example. First, open the terminal and navigate to the folder where you would like to place your code.
git clone https://github.com/electron/electron-quick-start spectron-test-exampleNext, change your active directory to the new directory:
cd spectron-test-exampleNow, we need to install the dependencies:
npm installFinally, reset Git with this command:
git initNow we need to install Spectron, the testing harness that will allow us to run tests on Electron projects. We’ll install Spectron into our project as a developer dependency using the --save-dev setting. Type this command into your terminal and hit enter:
npm install --save-dev spectronSpectron is very flexible in that it allows you to use any number of testing frameworks to run your tests. For this chapter, we will be adding Mocha and Chai. From the Mocha Website at https://mochajs.org/ Mocha is described as “a feature-rich JavaScript test framework running on Node.js and in the browser.” We’ve checked with many Node developers who recommend Mocha as an industry standard. If you’ve done some testing in the past, you may have already installed Mocha globally. We’ll install Mocha in the project as a developer dependency by running the following command in the terminal application:
npm install --save-dev mochaIf you’d like, you may choose to install Mocha globally with this command:
npm install -g mochaChai is an assertion library, a tool that verifies that the assumptions used in testing Node and browser corrections are correct. In testing, assertions will look like expect(1).toEqual(1), except where you see the first number 1, a test would provide an application’s condition, then along with the expected condition (the second number 1). In between the conditions, in this case toEqual, is a phrase that expresses the test for those conditions. Chai allows developers to more easily test their code and has three different assertion styles: expect, should, and assert. These styles make Chai very flexible for developers. We’ll be using expect in our testing, which you will see later. Install Chai into the project as developer dependencies using this command:
npm install --save-dev chaiNow that you have our example project installed, type npm start into your terminal application just to make sure the application loads and runs as expected.
Let’s take a moment to modify this package.json file to match our own by updating some nodes.
Change the name node to “spectron-test-example.”
Change the version number to “0.0.1” since we are just starting out.
In the description let’s use something like “A sample Electron application to demonstrate testing using Spectron.”
Remove the repository node. If you decide to put your results in a repository, you can change re-add this node with the correct address.
Keywords can be “Electron,” “Spectron,” “Testing,” “Mocha,” “Chai.”
“author”: Your name goes here.
Let’s change the “license” node to “MIT.”
Since we have the package.json open, let’s add one more important element that will assist us in running our tests. In the "scripts" section, add the "test" line in the package.json file as you see below:
"scripts": {"start": "electron .","test": "mocha"},
This is a really simple line that calls Mocha, which will run our tests. We invoke this script by typing npm test into our terminal application. Of course, you could just type mocha into the terminal and get the same result, but the practice of creating a script item is enforced here because often testing requires more steps than just invoking Mocha.
We aren’t ready to run our test script yet, but before moving forward, now would be a good time to run the npm start command again to make sure that our application starts and everything is working.
Adding a Test File
Now that we have our application set up, let’s get our testing set up . When you invoke Mocha this way, Mocha expects to find a test file, named test.js by default, in the current working folder. Add a new file to the root of our project and name it “test.js”. In your own projects you can move the file to another folder, but if you do, you will need to change the “test” script in the package.json file to reflect that change. For instance, mocha /testing/test.js would be the required change if you moved the test file into a folder named “testing.”
Add the following code to the “test.js” file:const electron = require('electron')const Application = require('spectron').Applicationconst expect = require('chai').expectdescribe('SPECTRON EXAMPLE', function() {this.timeout(10000)global.app = nullbefore(() => {app = new Application({path: electron,args: ['.'],})return app.start().then(() => {app.client.waitUntilWindowLoaded()app.browserWindow.show()return app})})after(() => {if(app && app.isRunning()) {return app.stop()}})})
At the top of our file we require the modules required for testing to work. First, we create an electron variable. Next, we add Spectron’s Application module, which will allow us to create a link to our application. We use the electron variable to create the path to the install location of Electron (inside our node_modules folder) when we use our Application variable to create our test application. The next line creates an expect variable giving us the expect style support from Chai.
The rest of the code is typical testing boilerplate using describe, before and after, to control our test. The describe function is the main structure of the test. When we run our test, the test title 'SPECTRON EXAMPLE' will appear in the terminal as a visual cue. You will see how it works. Inside the describe we first create a timeout variable for Mocha and Spectron that sets the amount of time they will wait for tests to run. We have set this variable to 10000, which translates to 10 seconds. When testing your application in the future, you may need to adjust this time higher if, for instance, your application loads a lot of data from the Internet. Next, we create a global variable called app that we create inside the beforeEach method and use throughout the tests. We create our application using the Application module we added earlier. Note the path property inside the argument being passed to Application, which we mentioned earlier. The args property at the bottom of the before you see we run app.start which starts our application. This means that before any test runs, we start our application. This is what is called “stand up,” or standing up our application.
In the after method we test to see if the application exists and that the application is still running, and if so, we stop it. This is called “tear down,” or tearing down our application.
It is important to understand what this means to us from an experiential aspect. When we run tests, what we will see is the application’s window open and then close fairly quickly. The tests we will be running are very fast, so the application will only appear for a moment.
There are two monumentally important items to remember about this code. First, note the structure within the before method. See how it is using Promises to run the app.start process? We will be using this type of syntax throughout our tests. Second, note that we are using the arrow syntax, which is, () => , in our before and after methods. This modern JavaScript syntax assists us in providing easier scoping for our code. But, look at the describe method. It is not using an arrow function. It is actually using an anonymous function. Why is that? Because there is a bug in Spectron that will make your testing not work. So, please remember this and avoid the hours of pain we experienced.
Now that we have our structure set up, let’s add an actual test. Inside the describe method and below and outside of the after method, add the following code:
it('should open a window', () => {return app.client.waitUntilWindowLoaded().getWindowCount().then( count => {expect(count).to.equal(1)})})
Here we are testing to see if a window is opened by our application. If you remember from earlier examples that are based on electron-quick-start, opening a window is the first thing that happens. Note the title “should open a window.” Coupled with the title in the describe method, it should read like a sentence: “SPECTRON EXAMPLE” “should open a window.” This is standard testing practice and will make more sense once you see the test running.
Notice the structure inside our it method. Since we are building a Promise chain, the first line begins with return. Here we use the app.client.waitUntilWindowLoaded method from the Spectron API to wait for the application to load before we begin our test. The app, of course, is the Application instance we created earlier in our before method. The app.client is a reference to the client property of the Application instance, which is an instance of WebDriverIO, a great library that allows developers to control browsers and mobile applications. Finally, the waitUntilWindowLoaded does exactly what it name says: waits for the window to load. This is a helpful best practice that will avoid a test trying to run before the application is fully loaded.
In the next line, the getWindowCount method is called, which returns a Promise that is captured inside our then method’s code. Then the actual test is performed using the expect style of testing provided by Chai. Note the syntax of the expect chain. Chai’s syntax makes testing a little easier. It reads like a sentence. “Expect (the count) to equal 1.” Makes sense?
Before we run our test, please take note that we have not changed our application’s code as of yet. We know that the application runs because we set it up and tested it using the npm start command. We will need to modify our application’s code, but for now we are ready to run our test. In the terminal, enter the following command:
npm testFigure 14-1 shows the results of our test inside the terminal.
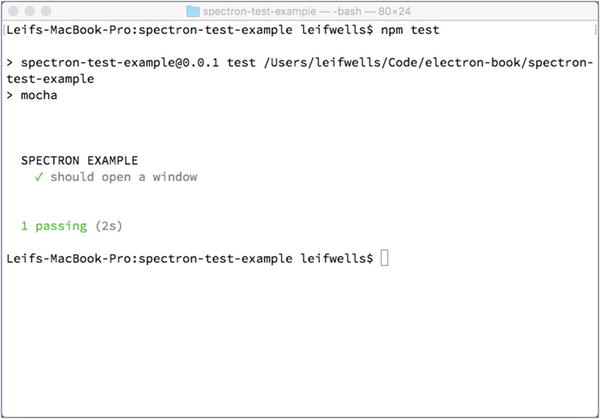
Figure 14-1. Our first passing test
Note, again, how the results appear in the terminal and can be read like sentences. The green check and the end results of “1 passing (2s)” in green means we have successfully passed our single test.
We should break our test so we can see it fail. In the expect line, change the 1 to 2 like so:
expect(count).to.equal(2);Now, run npm test again and you should see results like those in Figure 14-2, although you will probably have to scroll up to see it. Notice how the structure of the output has changed to give you information about why the test failed.
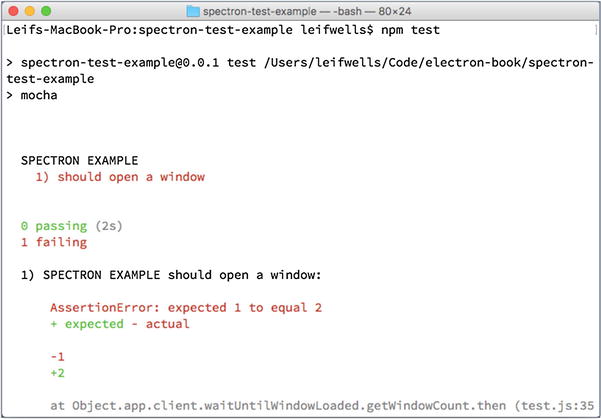
Figure 14-2. Our first test did not pass!
“AssertionError: expected 1 to equal 2” matches the syntax of our test, “Expect (the count) to equal 2.” See how it all comes together?
One important note to Windows users: You may see an extra terminal window appear over your application when you run your tests. It is annoying, but not harmful. There appears to be a bug in either Electron or Spectron and there have been issues filed about it. Hopefully this bug will be removed by the time this book is published.
Using Spectron’s browserWindow API
Now that we have tested the existence of the application’s window and set it to fail, revert that code so that we have a passing test and we will add more tests.
expect(count).to.equal(1)Add the following test below our first test. We’ve added the first test here to remind you what it should look like as a passing test:
it('should open a working window', () => {return app.client.waitUntilWindowLoaded().browserWindow.isVisible().then(res => {expect(res).to.be.true}).browserWindow.isFocused().then(res => {expect(res).to.be.true}).browserWindow.isMinimized().then(res => {expect(res).to.be.false}).browserWindow.isDevToolsOpened().then(res => {expect(res).to.be.false})})
Our “should open a working window” test makes sure that the window we create is visible, is focused, is not minimized and does not have Dev Tools open. Let’s see how that works. First, we again are waiting until the application window has loaded with Spectron’s app.client.waitUntilWindowLoaded call. After that, we have chained together several calls to the browserWindow API to get some information. First, we call browserWindow.isVisible that returns a promise in which we run our test. Next, we call browserWindow.isFocused to assess whether the window is focused. Next, browserWindow.isMinimized is called to test whether the window has been minimized on launch. And, finally, we use browser.isDevToolsOpened to make sure the Dev Tools aren’t opened. Coinicidentally, this is a very practical test seeing as you might run these tests before checking your code into a repository. It would prevent you from committing code that displays the Dev Tools.
Let’s run our tests and see the output in the terminal application. Save the test file and run the npm test command (Figure 14-3).
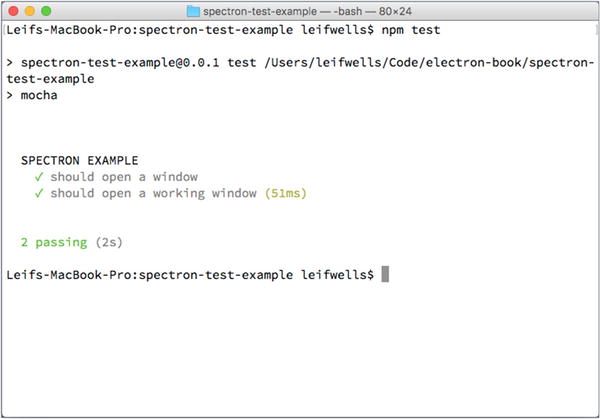
Figure 14-3. Our second test passes
Awesome! You passed two tests. But, sometimes testing can make you paranoid. Did we really pass these tests? Let’s add a few console calls to the code so we can see them in the terminal window to relieve our stress:
it('should open a working window', () => {return app.client.waitUntilWindowLoaded().browserWindow.isVisible().then(res => {console.log('visible:', res)expect(res).to.be.true}).browserWindow.isFocused().then(res => {console.log('focused:', res)expect(res).to.be.true}).browserWindow.isMinimized().then(res => {console.log('minimized:', res)expect(res).to.be.false}).browserWindow.isDevToolsOpened().then(res => {console.log('devTools:', res)expect(res).to.be.false})})
As you can see, we are logging the result (the res variable, “res” for response) received with each call. We should see this output in the terminal window when we run the npm test command. The output should look like that in Figure 14-4.
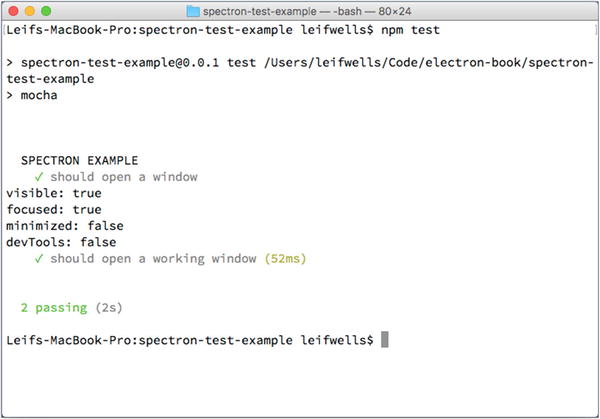
Figure 14-4. Our second test passing with log messages
Great. Now you know how you can use the console command to assist with debugging your tests. You may want to remove or comment the console calls as we move forward to our next task, testing the size of our browserWindow.
Another important note that can trip you up. Open your main.js file in the root of our project and uncomment (remove the two slashes in front of the line) of the following line and turn on the DevTools.
mainWindow.webContents.openDevTools()Now, run the npm test command again and see what happens. There is not a lot of information in Figure 14-5 to make you understand what is actually making our test fail. Basically, there is a bug in Spectron ( https://github.com/electron/spectron/issues/174 ) that makes the test throw errors when the DevTools are open.
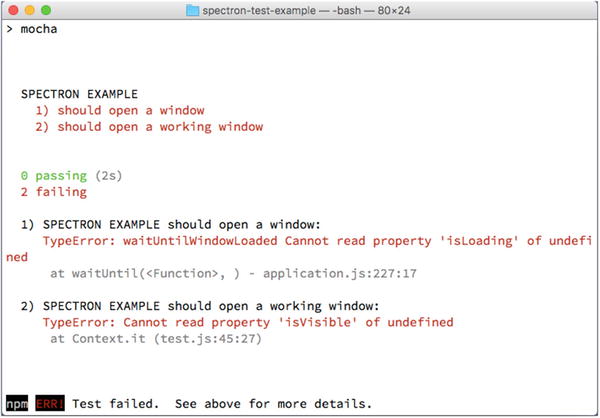
Figure 14-5. Tests fail when DevTools are open
Since end-to-end testing like this should be done with production-level code, you would never test with the DevTools open. So, hopefully, if you run into this, you’ll remember our tip.
Testing the Size of the browserWindow
Another practical test would be to test the properties of the window we are opening. Your application may open a window that opens windows and dynamically sets their size based on the computer’s screen size . If so, you will need to test that. In the following simplified test, we are going to check the bounds of the window, the left, top, width, and height of the window, to test if they are as expected.
Take a quick look inside your main.js file. Inside the createWindow method you will see this line:
mainWindow = new BrowserWindow({width: 800, height: 600})From this line we can tell that our window will be 800 by 600 pixels in size. Inside your test.js file, add the following test below the previous test at the bottom of the code inside our describe method.
it('should open a window to correct size', () => {return app.client.waitUntilWindowLoaded().browserWindow.getBounds().then(res => {console.log('bounds:', res)expect(res.width).to.equal(800)expect(res.height).to.equal(600)})})
Again, we begin with applying the best practice of waiting for our window to load with waitUntilWindowLoad. After the window loads, the browserWindow.getBounds API call gets us the bounds object. The browserWindow part of that line represents the Application instance’s browserWindow property, which is a reference to the window object that has been created. The getBounds method returns an object via a Promise, which, again, we capture in our then method. Then, we are console logging the results before testing the width and height, and then we are testing those values. Let’s run the npm test command again to see if our test passes (Figure 14-6).
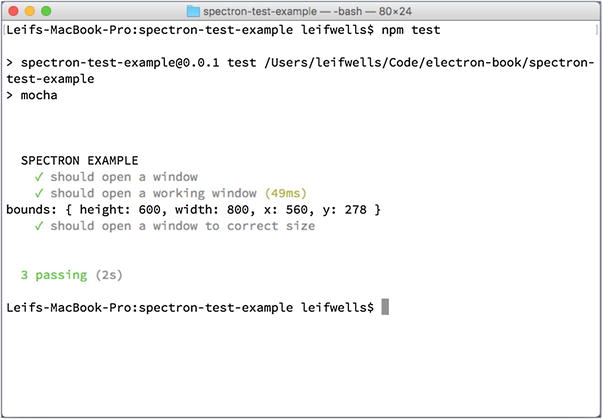
Figure 14-6. Our third test passing with log statement showing the bounds object
Notice the output from the console log command we added for the result listed in the terminal: bounds: { height: 600, width: 800, x: 560, y: 278 }. We added that line of code to reveal what the bounds object returned from the browserWindow.getBounds API call. It has four properties: x and y for the location of the upper left corner of the window, and width and height for the width and height of the window. These properties can be used many ways in our tests.
Testing Interactions in the Renderer Process
Testing our application, specifically the part of the project that runs in the Renderer Process , is the next part of our example. In your own Electron applications you will create an application using HTML, CSS, and JavaScript. Our example is built upon the electron-starter project, which is just an HTML file that doesn’t really do much, so there isn’t very much to test.
Make the Example Interactive
Let’s start by updating our HTML. In the root of the project , open the index.html file and add a button to the bottom of the body tag like you see below.
<body><h1>Hello World!</h1><!-- All of the Node.js APIs are available in this renderer process. -->We are using Node.js <script>document.write(process.versions.node)</script>,Chromium <script>document.write(process.versions.chrome)</script>,and Electron <script>document.write(process.versions.electron)</script>.<button id="foobarButton">Get Foobar</button></body>
A simple button with the id of “foobarButton” has been added. It also displays the label “Get Foobar.” Next, we need to make this button do something. Open the renderer.js file and add the following code:
const ipcRenderer = require('electron').ipcRendererconst foobarButton = document.getElementById('foobarButton')foobarButton.addEventListener('click', () => {ipcRenderer.send('foobar', ['hello'])})ipcRenderer.on('barfoo', (event, args) => {foobarButton.innerText = args})
Let’s carefully review this code. First, we are adding Electron’s Inter-Process Communication (IPC) module , which allows the Renderer Process and Main Process to communicate with each other. You can find out more about how IPC works in an earlier chapter of this book. Next, we identify the button with the id of “foobarButton” and save it as the variable foobarButton. In the next section, we add a click event listener to our button, which uses the IPC send method to send an event named “foobar” to the Main Process along with the string “hello” inside the argument array. Finally, we create an IPC listener for the “barfoo” event. This event expects an event and an argument to be coming from our Main Process. We use the argument string to change the text of our button.
So, to recap, we’ve added a button that, when clicked, sends a message “hello” to the Main Process and then waits for the Main Process to send a message back, which we use to change the button’s label. Take a moment and run the npm start command just to make sure you do not receive errors and it lays out like Figure 14-7.
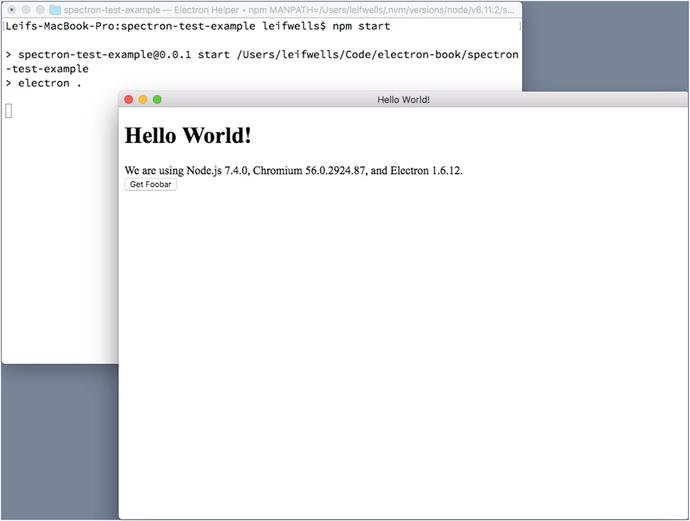
Figure 14-7. Our new button renders properly
Now, let’s add code to our Main Process to make this actually work. Open the main.js file on your project’s root and add the following line near the top of the file, specifically after the electron constant is created:
const { ipcMain } = electronJust like the ipcRenderer instance we created in the renderer.js file, the ipcMain gives us access to IPC so that we can send and receive events with the Renderer Process. We use it in the next bit of code we need to place at the bottom of our main.js file:
ipcMain.on('foobar', (event, args) => {event.sender.send('barfoo', args[0] + '!')})
This piece of code creates an event listener on the ipcMain instance, listening for the “foobar” event coming from the Renderer Process, the event that is sent when the “foobarButton” is clicked. The listener receives an event and arguments. If you remember from the code we placed into the renderer.js file earlier, the arguments are in an array. We use the received event as a reference to send back a message, “barfoo” along with the first item in the argument array. The capturing of the event is important and should not be overlooked. While you could keep a reference to the windows you create (just like the electron-starter code we are using creates the mainWindow variable) and call window.webContents.send , the best practice would be to ensure that you are responding to the proper window. Consider if you want to send the “foobar” event from multiple windows. Capturing and using the event from that window and using that event to communicate back to that specific “sender” will mean only that window would receive the response.
Now, before we build our test for this interaction, we should run the npm start command to make certain the code we’ve assembled runs properly. Run the code, click the button, and you should see the button label change (Figure 14-8).

Figure 14-8. After clicking the button, the button label changes to “hello!”
Great, now let’s build a test for our new feature. Open the test.js file and add the following code to the bottom of our describe, just below the last test:
it('should call foobar', () => {return app.client.waitUntilWindowLoaded().then(() => {return app.client.getText('#foobarButton')}).then(text => {expect(text).to.equal('Get Foobar')console.log(text)return app.client.click('#foobarButton')}).then(() => {return app.client.getText('#foobarButton')}).then(text => {console.log(text)expect(text).to.equal('hello')})})
Now, this code requires careful review because it is a little different that the previous tests. In this test we are chaining together several Promises. Notice that inside each of the then methods, there is a return? That is because we want the code to continue to the next then(). Let’s walk through the code and explain what is happening.
We start with the app.client.waitUntilWindowLoaded call that returns a Promise. We capture that Promise and then return the app.client.getText WebDriverIO API call for the id “foobarButton” (the “#” in front of the name means that we are asking for the id). WebDriverIO, the library we are using to control the browser and help get information about what the browser is displaying, can use CSS class names as well as the id attributes as identifiers, so you won’t necessarily need to add ids to all the elements with which you are planning to interact. The getText method returns a Promise that we capture and then test that the text returned is “Get Foobar” (which we also log to the console). Next, we return the Promise from the click method. When we pass the id to the click method, WebDriverIO will simulate the clicking action on the element matching that id. We capture the results of the click method , then getText for the “foobarButton” once more, and in the final then we test to see if the message we sent, the string “hello,” is returned.
Now that we understand the code for our test, let’s run the npm test command and get the results of our test. You’ll notice in Figure 14-9 that we are seeing the console logs “Get Foobar” and “hello,” so we are capturing the button label, but wait. How did our new test fail? We sent “hello,” but we are receiving “hello!”? That’s right. We tricked you. We failed to mention that our code alters the string before sending it back.
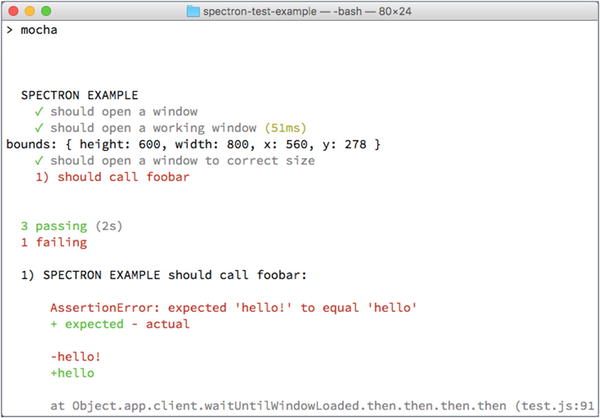
Figure 14-9. Our final test fails because “hello!” does not equal “hello.”
Take a look at this line of code inside your main.js file:
event.sender.send('barfoo', args[0] + '!')See where we added an exclaimation point to the end of the sent string? Let’s fix that by adding an exclaimation to this line of the test:
expect(text).to.equal('hello!')You should also remove the console.log calls to make our output clean. Now you should see all your tests pass (Figure 14-10).
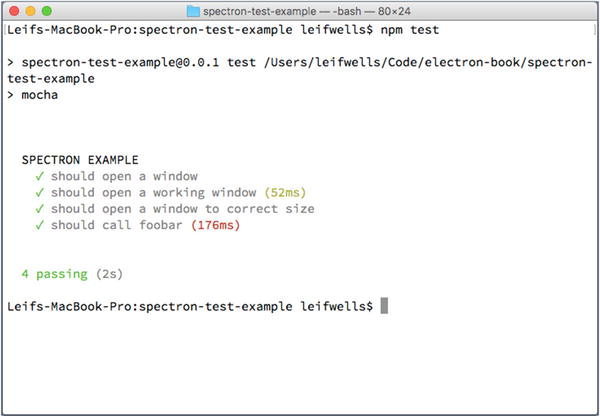
Figure 14-10. All our tests have passed!
Summary
In this chapter, we installed Spectron, Mocha, and Chai to test our Electron application. We added two new scripts to our package.json so that we can build and test our application. We used the Spectron API in our first test to test if our application created a window, in a second test to check that the window was working as expected, and in a third test to check the window size. We then learned how to access custom functions in the Main Process by setting an environment variable using Spectron and then checking for that variable in our Main Process.
We hope that this chapter is helpful to you in many ways. Do you feel more comfortable with setting up testing for an Electron application? Using the Spectron API for testing an Electron application with Mocha and Chai is reasonably straightforward, right?
Maybe now you will say, “Testing is fun!”