The package we’ve created so far has a relatively basic script interface and no extensibility. The majority of applications do not need a way to be extended; it is often easier to package all optional code together rather than go to the trouble of maintaining plugins that are distributed apart from the main codebase. However, it can be very appealing to use a plugin architecture to manage (for example) optional features of an application.
If your direct users are other programmers, then it might be a good idea to provide a plugin architecture to make their jobs easier. This is often the case for open source frameworks, where external developers may create additional features, either for their own use or through consulting agreements for their clients. If you’re working on an open source project and are unsure if you should use a plugin architecture, I’d err on the side of including it. People will extend your code either way; it’s easier to make sense of bug reports that include well-defined plugins than it is for forks of your software that add additional features.
The users of our sensor tool aren’t necessarily programmers; they’re people that want to get information on a given system. However, it’s possible that they’ll want custom information for their particular use case, in which case they may well engage a programmer to add a new feature.
We’re already well on our way to being able to offer a plugin architecture; we have a well-defined class that describes the behavior of our sensors in the form of our Sensor[type] generic base class. Aside from a well-defined interface, we need a way of enumerating the sensors that we have available to us. We do this in the show_sensors function , which hard-codes all the sensors in the file. This works perfectly well for applications that don’t need a plugin architecture, where all the sensors are written by the same developers and distributed as a single group. It fails as soon as we expect third parties to be writing custom sensors.
Writing a sensor plugin
For a moment, let’s think about what we’d want from this tool as a user. As well as the temperature and humidity sensors that many people might use, there are a few things I’d like to monitor that very few other people would find useful. One of them is the output of my roof-mounted solar panels. I have a script to pull readings over Bluetooth from my inverter, which uses an existing open source command-line tool to do the hard work of collecting and interpreting the data. I’d like to be able to incorporate this into my data collection.
As integration with a specific brand and model of solar panel inverter is not a useful component for most people, I am not going to integrate it into the core apd.sensors package . Instead, I’ll create a stand-alone plugin, as users might for their custom logic.
Solar panel output isn’t a useful addition for the vast majority of people; it’s better as an optional component that users can install if needed. I wouldn’t even run this on all of the Raspberry Pi nodes that I have set up, as only one is connected to the solar panel inverter.
If you are building a server monitoring setup with this code, you likely need a few different sets of plugins. While you may have CPU and RAM usage figures on all machines, there are application-specific metrics for some server roles, for example, job queue length for machines that handle asynchronous tasks, the number of blocked hosts for a web application firewall server, or connection statistics for a database server.
There are two broad approaches as to how to deal with the fact that this requires an outside tool. Firstly, I could create a Python distribution that includes the C code for the tool that I require. I would then have to arrange for that to be compiled and linked when my Python package is installed. I’d need to include error handling for problems with this tool not being installable and document its requirements. Once it’s installed, I could use that binary using either its existing script interface or directly with Python’s support for calling native code.
Alternatively, I could document that my sensor only works if that tool is installed and make the code assume that it is present. This massively simplifies the process for me, the developer, but makes installation harder for end-users. As I don’t envision this being generally useful, this is by far the most appealing choice. There is no sense in building something perfect over something good enough, especially when you have very few users.
I choose the path of assuming that the existing tool is in place, and my code will not return a result if that program is missing. The standard library function subprocess.check_output(...) is very useful for this, as it makes it simple to call another process, wait for it to finish, and read both its output status and what was printed.
Developing the plugin
Developing this sensor is another great opportunity to use Jupyter notebooks for prototyping. We need a remote environment on a Raspberry Pi server, as discussed in Chapter 1, with the apd.sensors package installed into it. This allows us to connect through our local Jupyter instance and be able to import the Sensor base class from the version of apd.sensors installed on the server.
Prototype for extracting solar power
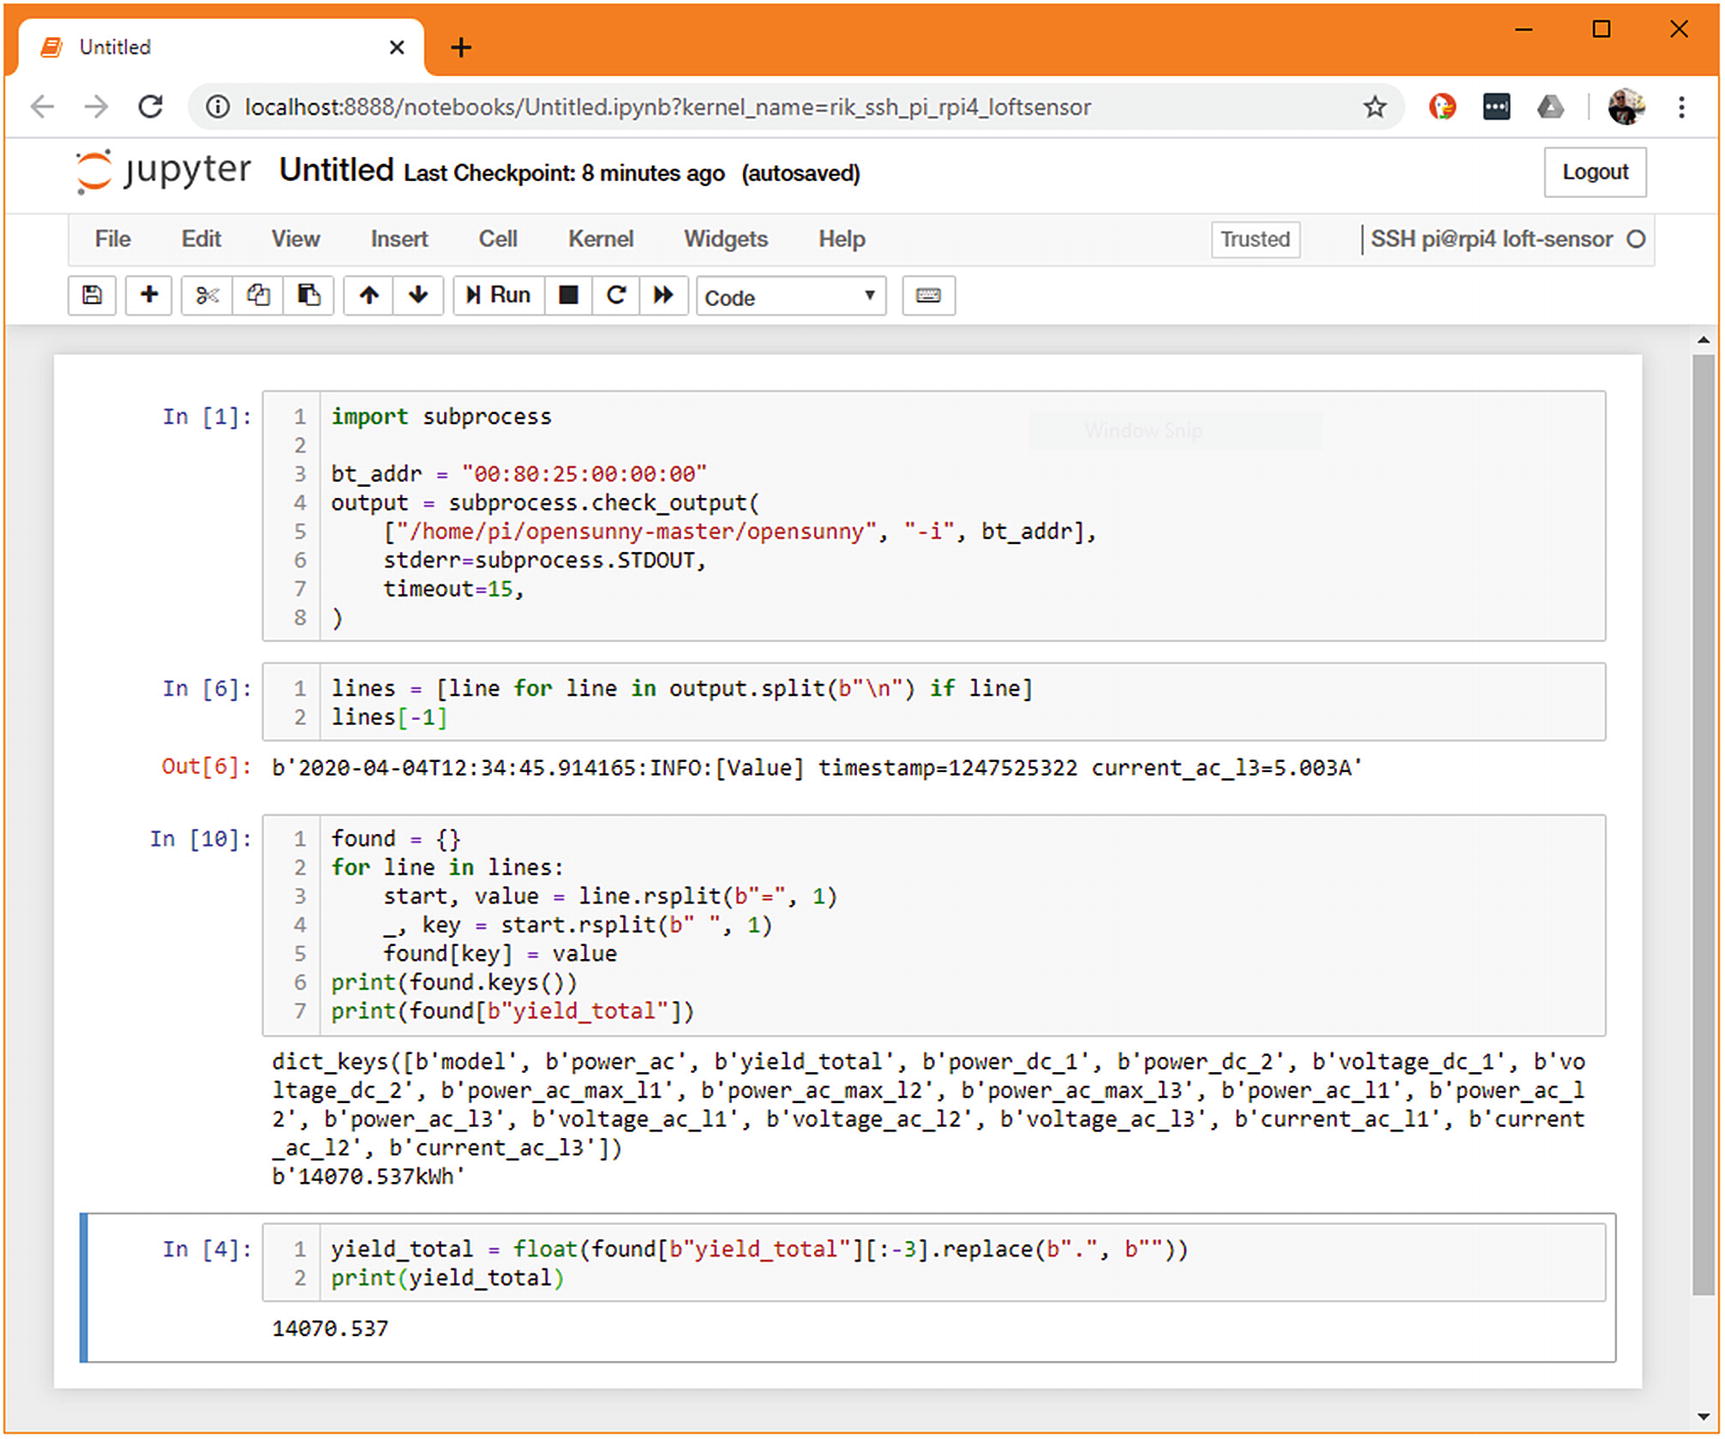
We can then build that up to contain a cell with the whole sensor subclass in and then “kick the tires” by checking that str(SolarCumulativeOutput) and similar function calls behave as expected. You may also like to take this opportunity to write some test bodies in Jupyter cells. There are a few projects that attempt to integrate pytest directly in jupyter, such as ipytest, but very few of your tests should need to be run on the target host. Any that do require specific host hardware should be marked with @pytest.mark.skipif(...) decorators when converted to standard Python files. You should only write enough testing code in the notebook to make sure you’ve not made an error in the raw data collection.
The relevant cell of the prototyping can be brought into a sensor.py file, as shown in Listing 4-2.
apd/sunnyboy_solar/sensor.py
Even for this one-shot sensor, I’d strongly recommend creating a package, following the same approach as in Chapter 3. A package makes it easy to distribute the sensor code to our servers and to keep them up to date. You could write a single package that contains multiple custom sensors if you’d like to reduce the overhead involved, but don’t be tempted to work around the packaging system and just have free-floating Python files.
Once we’ve written our sensor, we include the relevant details in its setup.cfg and the same setup.py from our apd.sensors package and build and can publish a distribution to our local index server. Alternatively, if we were not entirely confident that we’d covered all the edge cases during development, we might choose to install an editable checkout from version control on the server in question. That would allow us to run its tests and potentially make tweaks without having to round-trip code from a local machine to the remote host.
Adding a new command option
We’ve just created a new package that includes a single sensor, but we don’t have any way of viewing its data from the command-line tool that we created in the previous chapter. That tool has a few built-in sensors and iterates over them when generating its output. We need to modify the script so that it can also show the values of sensors in other Python files.
To begin with, we can add a new option to apd.sensors that loads a sensor by its Python import location. That is, given the name of the sensor and the module it’s defined in, it would load that sensor and display its results. This is inspired by the --develop option in the pre-commit script for loading a hook by its path, for ease of testing.
With this option in place, we will be able to specify that we want the value of our solar power sensor instead of the built-in sensors, meaning we don’t have to write a special command to handle this sensor specifically.
Subcommands
We currently have a show_sensors function that includes the sensors to show as a hard-coded list. In this case, we’d want to do the same processing but change the way the list is generated to accept command-line arguments. There are two broad approaches that we could take, either we could create subcommands or we could add command-line flags.
Subcommands might not be a term you’ve heard before, but you’ve certainly used them. Tools like Git make heavy use of subcommands, where the git command on its own has no meaning. In fact, the commands git, git --help, and git help are synonyms: they all print a usage guide to the terminal. The more common invocations of git, such as git add, git clone, and git commit, are all examples of subcommands. The Git process does not have a single function that implements all the behaviors of the program; it uses subcommands to group similar functionality together. Some git commands even use multiple levels of subcommand, such as git bisect start.1
We could adopt this approach by moving the existing show_sensors(...) function to be a subcommand called show and add a new develop subcommand.
Click provides infrastructure called parameters for this purpose; you can add options and/or arguments to functions, which are exposed as part of the command-line interface. You should think of arguments as always being present, even though the end-user may not specify a value for them. If the user doesn’t supply a value, then a default value would be used. Arguments are the core bits of data that a function operates on.
On the other hand, options are flags that are not always passed. They can change the behavior merely by being present, or they can contain optional values similar to arguments.
Here, the entrypoint into the system is no longer a show_sensors() command, it is a sensors() group. The show_sensors() function has been renamed to show() and is now declared with @sensors.command rather than @click.command. The change in the command decorator is what connects this command to the group named sensors.
Just like when we first added the console_scripts declaration, this change only takes effect during the installation of the package. You can force this by running pipenv install -e . which is useful when you’re experimenting with different approaches. Once you’ve incremented the version number in __init__.py and re-run pipenv lock, Pipenv notices this change and automatically reinstalls the package. You can take advantage of this and set a version number like 1.1.0dev1. The dev marker lets you increment the version number without any risk of using a version number that you later use for a real release.
I would recommend incrementing the VERSION attribute to a dev release for features such as this unless there are only a small number of developers working on the code and they have no barriers to communication (such as timezone differences).
However, the transition to subcommands does mean that the command pipenv run sensors no longer behaves as it did previously. To get the data we expect for the preset sensors, we now need to run pipenv run sensors show. Because of this change, users cannot safely upgrade from an old version to a new one without changing the way they interact with the software. The upshot of this is that we need a large bump to the version number to communicate this change’s importance to our users.
If we consider the principles of the semantic versioning policy, we are considering a change that adds a feature and breaks backward compatibility. Breaking backward compatibility implies we should change the major version number, making any release of the software with this new subcommand layout be version 2.0.0. Some developers may find this unintuitive, as there is not a large conceptual change between versions 1.0.0 and 2.0.0. However, this is often borne out of a desire to avoid large major version numbers from a sense of aesthetics. I would strongly advise you don’t shy away from incrementing version numbers when there is a backward compatible change, as it really does help users reason about what upgrades are safe to apply.
Command options
The other way of looking at this feature is that displaying a single sensor’s output is fundamentally the same task as displaying the output of all sensors, albeit with some different preferences. This is the core of the decision you need to make when deciding between subcommands and options: is the feature you’re adding another logical feature of the application, or is it a different behavior for an existing feature?
There is no hard-and-fast rule for how to differentiate the two; in our case, there are arguments to be made each way. In my opinion, changing either the sensors that are being read or the format of the output are all arguments to the same underlying “show” function. My implementation uses the “option” approach, but this is a subtle difference that depends very much on how you view the tool that you’re creating.
To use the option approach, we need to add a @click.option line to the existing show_sensors(...) function that represents the path to the sensor that we should use instead of the hard-coded sensor list.
Error handling
The program we’ve written has, thus far, not had a real implementation of get_sensor_by_path(...), which is vital for it to be usable in the real world. We could write a naïve function that implements this, for example:
This implementation has some significant flaws. Firstly, we are assuming that sensor_path always contains a colon. If this isn’t true, a ValueError is raised for insufficient values to unpack on the first line. Then, the next line could raise an ImportError and the third line an AttributeError. Those errors would be shown to the user as tracebacks, which is not very user-friendly. The more useful error messages we want to offer to the user, the more conditions we need to add.
That isn’t the biggest problem with this implementation, in any case. On the final line of this function, we want to instantiate the sensor that the user has selected, but we don’t know that it’s a sensor subclass. If the user ran pipenv run sensors --develop=sys:exit, then the command would call sys.exit() and immediately terminate. If they ran pipenv run sensors --develop=http.server:test, then the command would block and an unconfigured HTTP server would start up listening on port 8000 on all addresses.
These aren’t serious security vulnerabilities, as anyone who could run the sensor script could presumably run Python themselves and invoke these functions themselves. However, there is no good reason to allow users to do things that are clearly wrong and potentially damaging. It’s essential to consider the safety of such code every time you write it, as the trade-offs are always different.
The following implementation of get_sensor_by_path(...) traps all the common errors that could be caused by bad user input and reraises as a RuntimeError3 with the appropriate user message.
It’s worth paying attention to the type annotations of both versions of this function. The first version had no check to see if the specified component was a sensor, so we declared it as returning Any.
The parser cannot tell what type the class in the class_ variable is, as it would need to execute the particular code in import_module and getattr(...) to find what object is returned. In the preceding example, both of these are hard-coded, but if one or both of these strings were supplied by user input, then it would be impossible without knowing what the user input would be in advance. Therefore, as far as mypy is concerned, class_ and sensor can be any type.
It is possible to force an instance to be considered as Sensor[Any] manually by using typing.cast(Sensor[Any], sensor), but this is rarely necessary and can potentially mask some errors.
This prints the value of the RuntimeError in bold red text to the standard error stream and then exits the script with a known exit code. Exit codes are a handy feature of console scripts in Unix-like environments. It allows for scripted calling of the program that can handle error cases without having to parse the resultant errors.
Many tools use low numbers and numbers approximately equal to 255 to define their own internal errors, so picking an offset of 16 makes it unlikely that our return codes would conflict with any others that our tools raise. In particular, we should not use 1 as anything but a general failure code. I have picked 17 as the exit code to represent errors where the arguments passed to the program mean that parsing could not succeed.
Off-loading parsing to Click with argument types
Click supports decoding the values passed in as parameters automatically. For some argument types, this makes intuitive sense; it is easier to declare that a parameter is a number (or a boolean value, etc.) than always to pass on a string and have the command parse the value itself.
There are built-in types in Click that can be used to improve the usability of command-line tools. The simple types click.STRING, click.INT, click.FLOAT, and click.BOOL do relatively straightforward parsing of their input values, converting the norms of command-line invocations to Python values. For example, click.FLOAT calls float(...) on the input, and click.BOOL checks the input against a short list of known values that mean True or False, such as y/n, t/f, 1/0, and so on. It is possible to specify these types by using the Python type (i.e., str, int, float, bool) directly as a shorthand, and if no type is specified, Click attempts to guess the type.
Using these types ensures that data passed to your functions is valid and that end-users get useful error messages. It also significantly reduces the amount of parsing and validation logic you have to write. This can be especially useful with the most complex of all the types Click offers, click.File. This type allows you to specify that an open file reference should be passed to the function and closed properly after the function has finished executing. It also allows for specifying - to mean that the standard input and standard output streams should be used instead of files on the drive, which is a feature that many command-line tools offer and usually has to be added as a special case.
Perhaps the most surprisingly useful type is click.Choice, which takes a tuple of strings to check the value against. For example, click.Choice(("red", "green", "blue"), case_sensitive=False) provides a type validator that only accepts the strings “red”, “green”, and “blue”. Additionally, if your user has enabled autocomplete for your program, then these values can be suggested automatically if a user hits tab during this argument.
Custom click argument types
New types can be added to Click’s parsing system , which allows for programs that need to do the same command-line parsing regularly to split this out into a single reusable function and trust the framework to invoke it.
In our case, we only have one place where we expect a reference to a Python class to be passed as an argument so there is no practical reason to implement Python class as a type that functions can expect. It’s relatively rare for this to be the right approach, but it’s certainly possible that you’ll need to do this for a project in future.
I mentioned click.Choice earlier in this chapter, which provides support for autocompleting the values of certain options. It is possible to provide a callback for any option parameter to allow custom autocompletion.
It isn’t feasible to write a perfect autocomplete implementation for the --develop flag, as it involves autocompleting Python module names. It would be too difficult to scan the environment to determine all possibilities.
However, it is much easier to write an autocomplete implementation that completes the class part once the module has been entered. There is an example of one such implementation in the accompanying code for this chapter; try writing one yourself before looking at it.
The autocompletion method is enabled for an option by adding autocompletion=AutocompleteSensorPath as an argument.
You need to manually enable autocompletion because autocomplete configuration is usually handled by a package installer and varies wildly between operating systems. The _SENSORS_COMPLETE=source_bash environment variable tells click to generate a bash autocomplete configuration instead of the normal handling. In the preceding example, this is processed immediately using eval, but you could also save the result in a file and then include that in your shell’s profile. You should check what the recommended approach is for your particular operating system and shell combination.
In addition, the : character may cause some shells to abort autocompletion. In this case, enclose the argument to --develop in quotation marks and try again.
Canned options
Another frequently desired function is --version, which prints the version of the command that is installed on the user’s computer. Like --help, this is implemented internally as an option with is_flag=True and is_eager=True, as well as having a specialized callback method. Options that have is_flag set do not have an explicit value attached, they are either present or not, which is represented by their value being either True or False.
The is_eager parameter marks an option as being important to parse early on in the process of parsing the command-line options. It allows the --help and --version commands to implement their logic before the other arguments to the function have been parsed, which helps the program to feel quick and responsive.
The version parameter is applied using the @click.version_option(...) decorator. The decorator takes the options prog_name to specify the name of the current application and version to specify the current version number. These are both optional: if prog_name is not set, then the name the program was invoked with is used. If the version parameter is omitted, then the currently installed version is looked up from the Python environment. As such, it’s usual not to need to override either of these values. The standard way to add this option is therefore to add the decorator: @click.version_option().
For some operations, such as deletions, you may want to get explicit confirmation from the user before continuing. This can be implemented with @click.confirmation_option(prompt="Are you sure you want to delete all records?"). The prompt= option is optional: if it is omitted, the default prompt of “Do you want to continue?” is used. Users can also skip the prompt by passing the command-line flag --yes.
Finally, there is a @click.password_option decorator, which prompts the user for a password immediately after the application starts. This defaults to asking the user for their password and to then confirm it, as though a password is being set, but the confirmation step can be disabled with confirmation_prompt=False. The password itself is not shown in the terminal, preventing it from being read by people near the computer at the time. If you use this option, you should ensure that the underlying command takes a password= option, so you have access to the password the user entered.
Allowing third-party sensor plugins
Now that we’ve upgraded the command-line tool to allow for testing our external sensor and we’ve completed an implementation that returns useful data, we have covered the rarer of two use cases: helping developers write new plugins. The more common case is that of end-users – people who have installed a plugin sensor and want it to “just work.” It would not be appropriate to have these users need to specify Python paths on every command-line invocation. We need a way of dynamically generating the list of available sensors.
There are two broad approaches that we can take to this problem: autodetection and configuration. Autodetection involves sensors registering themselves with the command-line tool in such a way that a list of all installed sensors is available at runtime. Alternatively, configuration relies on users maintaining a file that points to what sensors they want to install, which is then parsed at runtime.
Comparison of configuration and autodetection of sensor types
Comparison | Configuration | Autodetection |
|---|---|---|
Ease of installation | Install package and edit configuration file | Install package |
Reorder plugins | Possible | Not possible |
Override built-in plugin with a new implementation | Possible | Not possible |
Exclude installed plugin | Possible | Not possible |
Plugins can have parameters | Possible | Not possible |
User-friendliness | Requires that users be comfortable editing configuration files | No additional steps are required |
Using a configuration-based system allows for a lot more control over the details of the plugin system. It is very well suited for plugin architectures that are likely to be used by developers or systems integrators as it allows them to configure the exact environment they want and to store this in version control. An example of this is the Django apps system. Apps are installed into the local environment but do not affect the website until they have been added to the settings.py file, at which point they can have plugin-specific settings added.
This approach is appropriate for Django and other systems where a customized deployment is created by mixing and matching third-party code and specially developed software. It is common to want to use a subset of the features offered by apps that have been installed, for example, by omitting some middleware options or setting up different URL schemes. This complexity stands in stark contrast to systems like WordPress, where installation of a plugin is intended to be well within the capabilities of nontechnical users. In this case, installing the plugin is sufficient itself, and more complex configuration is handled by the application rather than a central configuration file.
Theautodetection method is significantly easier for nontechnical end-users, as they do not need to edit configuration files. It also makes the system less sensitive to typographical errors. For our use case, it’s unlikely that we would need to disable plugins, as users can ignore any data they don’t require. The ordering of plugins is similarly unimportant.
Overriding plugins with a new implementation may seem useful at first glance, but it would mean that collected values might have slightly different meanings depending on which version is used. For example, we might want to add a “Temperature” sensor that returns the system temperature rather than the ambient temperature. For some use cases, these might be interchangeable, but it’s best to keep the distinction in the data. We can always draw an equivalence when analyzing the data if required.
The one feature that a configuration-based system has that would be useful for this program is the ability to pass configuration values through to the sensors themselves. So far we have three sensors that would very much benefit from configuration: the temperature and humidity sensors are hard-coded to expect the sensor to be on IO pin D4 of the system they’re running on, and the solar panel sensor is hard-coded to a specific Bluetooth hardware address.
Both of these are acceptable for private plugins that we don’t expect to work for other people (such as the solar panel monitor), but the temperature and humidity sensors are a more general-purpose sensor that we would expect a range of users to be interested in installing. The temperature and humidity sensors need to have minimal configuration options for end-users.
Plugin detection using fixed names
The vars(custom_sensors) function here is the most unusual part of the code. It returns a dictionary of all things defined in that module where the keys are the variable names and the values the contents of the variable.
The vars(...) function is helpful when debugging. If you have a variable obj and call vars(obj), you get a dictionary of the data set on that object.5 The related function dir(obj) returns a list of all attribute names resolvable on that instance. If you want to learn about an object during a debugging session, these are both very useful.
Using Python as the configuration has the advantage of being very simple, but writing a custom Python file is a very technical approach that most users wouldn’t like to use. Users would have to manually copy the sensor code into this file (or import it from elsewhere) and manage any dependencies themselves. I cannot recommend this as a plugin architecture system for any circumstance, but the idea of having a python file be importable through being in a working directory is sometimes useful as a means of configuration, as we will see toward the end of this book.
Plugin detection using entrypoints
For our use case, I think that the ease of use is the most important consideration, so we should adopt an approach that does not rely on configuration files for plugin detection. Python has a feature for implementing this type of autodetection that we briefly mentioned in a previous chapter. It’s called entrypoints . The entrypoint feature was what we used to declare that a function should be exposed as a console script (in fact, that is by far the most common use of the feature), but any Python code can use the entrypoint system for its own plugins.
A Python package can declare that it provides entrypoints, but as they’re a feature of the packaging tools, entrypoints cannot be set up from anywhere but a Python package’s metadata. When a Python distribution is created, much of the metadata is split out into files in a metadata directory. This is distributed along with the actual code. This parsed version of the metadata is what is scanned when code requests the registered values for an entrypoint. If a package provides entrypoints, then they can be enumerated as soon as the package is installed, making for a very effective way for code to discover plugins across packages.
Entrypoints are registered in a two-level namespace. The outer name is the entrypoint group, which is a simple string identifier. For the automatic generation of command-line tools, this group name is console_scripts (and, less commonly, gui_scripts for graphical tools). These group names do not have to be preregistered, so your packages can provide entrypoints that other software may use. If your end-user does not have that software installed, then they are ignored. The group name can be any string, which can then be used to query all the things referred to by the entrypoint.
The preceding example shows that there are nine different groups of entrypoints in use on my computer. Most of these are involved in Python package management, but three are other plugin systems installed on my computer. nbconvert.exporters is part of the Jupyter suite of tools; in the first chapter, we used nbconvert to convert our notebook to a standard Python script. That converter was found by checking this entrypoint, meaning that it would be possible for us to write our own exporters if desired. pygments.lexers is part of the pygments code formatting library; these entrypoints allow for new languages to be supported by pygments, and babel.extractors are entrypoints to help the i18n tool babel find translatable strings in different types of source code.
The second layer of namespacing is the name of the individual entrypoint. These must be unique within a group and are not inherently meaningful. You can search for a particular entrypoint name with iter_entry_points(group, name), but it’s more common to get all entrypoints within a group, with iter_entry_points(group).
The cast here is not strictly necessary. We could also use the isinstance(...) guarding7 that we looked at for the --develop option; however in this case, we’re willing to trust that plugin authors only create entrypoints that refer to valid sensors. Previously we were relying on command-line invocations, where the chance of errors is rather higher. The effect of this is that we’re telling the typing framework that anything we get from loading an apd_sensors entrypoint and calling the result is a valid sensor.
Like with the console_scripts entrypoints, we need to reinstall both of these packages to make sure that the entrypoints are processed. For real releases of the script, we would increment the minor version number as we’ve introduced a new feature that doesn’t break backward compatibility, but as we’re working with a development installation, we would re-run pipenv install -e . to force the installation.
Configuration files
The alternative approach, which we dismissed earlier, was to write a configuration file. Python’s standard library supports parsing ini files, which are relatively easy for users to edit. Alternatively, a configuration format like YAML or TOML may make parsing easier, but editing would be less familiar for users.
Generally speaking, I would recommend using the ini format for configuration due to the benefits of its familiarity to end-users.8 We also need to decide where to keep the ini files; they could be in a working directory, perhaps explicitly included as a command-line argument if appropriate, or in a well-known default directory for the current operating system.
Wherever we decide to store the files, we would create a new argument to the command line that accepts the location of a configuration file to use; only the default behavior would differ. We would also need to create a function that reads the configuration file and instantiates the sensors using any relevant configuration data.
This shows some of the power of a configuration system, as this configuration file only loads two of the sensors, which greatly speeds up execution time. Less obvious is the fact that the sensor configuration blocks do not need to have the same name as the sensor classes from which they’re derived, for example, IPAddress vs. IPAddresses. The same sensor class can be listed multiple times in this way, making it possible to have a configuration that defines multiple instances of the same sensor with different parameters, and collects data from each.9 A sensor could also be removed from the plugins line to disable it temporarily without needing to delete its configuration.
The parser for this config file maps the plugins line of the [config] section to the key config.plugins. Our code must check this value, extract the names, and then iterate over the sections to which it refers. It’s a good idea to keep the parsing and the sensor instantiation as independent functions, as this dramatically improves the testability of each. The testability would be slightly better if reading the config and parsing it were distinct functions, but as configparser provides this functionality, it makes sense to reduce the amount of file handling code we need to write ourselves and leave that to configparser.
For some applications, you may want to provide more standardized loading of configuration files, in which case we can take advantage of the fact that configparser can handle a list of potential paths to pass in all possible config file locations.10 A simple way of doing this would be to include /etc/apd.sensors/config.cfg and ~/.apd_sensors/config.cfg in the code, but this would not work on Windows. The Python package installer pip follows the configuration pattern. It has a very sophisticated code path for determining where config files could be, correctly implementing the expected locations for a range of platforms. As pip is MIT licensed, which is compatible with apd.sensors’s license, we can make use of those functions to make the sensors command feel more like a well-behaved citizen of those different operating system ecosystems. An example of this is included in the accompanying code for this chapter.
Of course, changing the way that plugins are loaded has a knock-on effect for the tests of apd.sensors, meaning that some new fixtures and patches are required to support the substantive changes in cli.py. This does also allow us to be more flexible in our tests, by including configuration files that set up dummy sensors that are only ever used to test the infrastructure of the program.
Environment variables
These could be set on the command line; however, the easiest way to define them when using pipenv is to use the “dotenv” standard, that is, creating a file called .env in the root of your pipenv installation that contains the relevant definitions. The pipenv run command loads this file and sets any variables defined every time a program is run. In this case, the file would look something like
Managing environment variables can be difficult on some platforms. This .env file paradigm allows us to treat them like a minimal configuration file, which makes them a good choice for very minimal configuration. There is a similar trade-off to the one we looked at for command-line parameters; we are choosing a simpler solution that offers no automatic parsing for configuration, rather than the more involved parsing for arguments, because unlike the argument parsing, these decisions have a substantial effect on the usability of the program.
Approach for apd.sensors vs. similar programs
While there are arguments for using a comprehensive configuration filesystem, for my particular use case, I want something that works out of the box with minimal effort from end-users. People following along who are thinking of, say, server status aggregation may find themselves coming down on the other side of this decision. It very much depends on the user interface that you want to offer, with it being possible to write more and more complex code to support your exact desires.
For example, some tools that make use of the subcommand style of command invocation actually define a config command to assist users in managing their config files, rather than having them edit them directly. The version control software git is an example of this, where any user-facing setting can be set using the git config command , specifying which of various configuration files should be read.
For apd.sensors, at this stage, the path of least resistance is to use entrypoints to enumerate the plugins and environment variables to configure them, disregarding any possibility to ignore installed plugins or reorder them.
Summary
Much of the rest of this chapter has covered general software engineering topics, such as configuration file management and command-line tool user experience. The tools available to us in Python offer a lot of flexibility in these regards, so we can focus on making the best decision for our users, rather than being pushed toward an approach by limitations of the software.
The plugin system requirement is where Python really shines, however. The tool we’re building is somewhat unusual, in that it’s designed to allow other code to extend it. Although it’s common for developer frameworks to use plugin systems, most software that you write is a stand-alone application. This makes it all the more surprising that Python’s entrypoint system is so good. It is a fantastic way of defining simple plugin interfaces; it deserves to be more well known.
The overall approach that we’ve taken with the software during the course of this chapter is to opt for the simplest user interface that we can offer to users. We have looked at alternatives that we may choose to introduce in future, but have decided that the features they offer are not important at this stage.
Our command-line tool is effectively complete. We have a working plugin interface that allows for configuration of individual sensor parameters and for application-specific sensors to be installed. The program is a stand-alone Python application that can be installed on the various computers we want to monitor. The best way of doing this is to use a new Pipfile , as the one we have been using so far is intended to build a development environment of the code.
The new Pipfile will use a released version of apd.sensors and the private distribution server we created to house releases. We can create this on a Raspberry Pi and then distribute the Pipfile and Pipfile.lock to all other Raspberry Pis that we want to install on.
Additional resources
The Python Packaging Authority documentation has a section onenumerating plugins using other methods, such as finding modules that match a given name. If you’re interested in other ways of discovering code, take a look at https://packaging.python.org/guides/creating-and-discovering-plugins/.
The TOML language specification document may be of interest if you’re looking to write a configuration file–based system. https://github.com/toml-lang/toml. A Python implementation is available at https://pypi.org/project/toml/.
Developers using Windows may find the following Microsoft page describing how to manage environment variables in PowerShell to be useful: https://docs.microsoft.com/en-us/powershell/module/microsoft.powershell.core/about/about_environment_variables (Linux and macOS users have it easier with NAME=value and echo $NAME).
Some more information on setting up autocomplete for your click-based programs can be found in the Click documentation, at https://click.palletsprojects.com/en/7.x/bashcomplete.