
Chapter 6. Server-Side Functionality and External Clients
Beyond reading and writing data, configuring tables, and securing data, Accumulo has a few additional concepts that can be used to add functionality to tables, and for performing some computation on the server side. These mechanisms are optional but can have a drastic impact on application performance, depending on the access patterns and updates that an application requires.
Constraints
Tables can apply logic to data that is about to be written to determine if a given mutation should be allowed. This logic is implemented by creating a constraint. Constraints are classes that implement a simple filtering function that is applied to every mutation before writing it to a table.
Constraints can be used to ensure that all data in a table conforms to some specification. This helps simplify applications, because they can then assume that the data read from this table has already been checked for conformity.
For example, we can choose to constrain the values inserted into a table to be of a certain type, such as a number. This allows applications to avoid having to check the type of values returned.
If a mutation fails a constraint’s criteria, the mutation will be rejected and a code returned, indicating which criterion was violated. For example:
try{writer.addMutation(m);}catch(MutationsRejectedExceptione){List<ConstraintViolationSummary>violations=e.getConstraintViolationSummaries();for(ConstraintViolationSummaryv:violations){System.out.println(v.getConstrainClass()+" "+v.getNumberOfViolatingMutations()+" "+v.getViolationDescription());}}
If a constraint is violated, we only see how many mutations were involved and which criterion failed. Applications will need to examine the mutations submitted to determine which mutations failed and which did not and were submitted successfully. Retrying the mutations that violate constraints will result in another exception.
Constraints can be used to help debug new clients without the chance for corrupting data in the table, or for limiting dynamic data inserted to that which conforms to the constraints—perhaps saving off the data that fails to another place for inspection.
For example, if we are ingesting data from another database and we expect it to conform to a specific schema but the schema has since changed, our constraint that enforces the expected schema will immediately detect the change. This will halt our ingest process until we can figure the situation out. Relational databases operate this way and some applications may want to do this.
Other applications can take advantage of Accumulo’s flexibility in storing any type of value and any set of columns to write data that is not well understood to a table where it can be explored.
Constraint Configuration API
To add a constraint to a table, use the addConstraint() method of the TableOperations object:
TableOperationsops=conn.tableOperations();ops.addConstraint("myTable",MyConstraint.class.getName());
A table can have several constraints applied.
To see the list of constraints for a table, use the listConstraints() method:
Map<String,Integer>constraints=ops.listConstraints("myTable");
This will return the name of the constraint as well as a unique ID number assigned to the constraint.
This number can be used to remove a constraint via the removeConstraint() method:
ops.removeConstraint("myTable",2);
By default, tables in Accumulo 1.6 have the DefaultKeySizeConstraint enabled.
This constraint rejects mutations that contain keys larger than 1MB in size.
This can prevent a tablet server from running out of memory when loading RFile indexes containing very large keys.
Constraint Configuration Example
In this example, we’ll create a mutation that violates the DefaultKeySizeConstraint.
It will fail.
Then we’ll disable the constraint and apply the mutation successfully.
First, we’ll look at the table constraint configuration:
Connectorconn=ExampleMiniCluster.getConnector();TableOperationsops=conn.tableOperations();ops.create("testTable");for(Map.Entry<String,Integer>c:ops.listConstraints("testTable").entrySet()){System.out.println(c);}
This shows the constraint and its ID number:
org.apache.accumulo.core.constraints.DefaultKeySizeConstraint=1
Now we’ll try to insert a key with a 5 MB column qualifier, which exceeds the constraint’s criterion of all keys being under 1 MB. When we try to flush to the table, an exception will be thrown and we can see what constraint violations occurred:
// create a column qualifier that is 5MB in sizeStringBuildersb=newStringBuilder();for(inti=0;i<1024*1024;i++){sb.append("LARGE");}StringlargeColQual=sb.toString();BatchWriterwriter=conn.createBatchWriter("testTable",newBatchWriterConfig());Mutationm=newMutation("testRow");m.put("",largeColQual,"");try{writer.addMutation(m);writer.flush();System.out.println("successfully written");}catch(MutationsRejectedExceptionex){List<ConstraintViolationSummary>violations=ex.getConstraintViolationSummaries();for(ConstraintViolationSummaryv:violations){System.out.println(v.getConstrainClass()+" "+v.getNumberOfViolatingMutations()+" "+v.getViolationDescription());}}
The output is:
org.apache.accumulo.core.constraints.DefaultKeySizeConstraint
1
Key was larger than 1MB
Now we’ll disable the constraint and try again.
Caution
In particular, it is a good idea to leave the DefaultKeySizeConstraint enabled, because it will help prevent large data elements from causing memory issues in tablet servers. Data elements larger than 1 MB are likely best suited for storage as the value of a key-value pair and not in the key.
// remove constraint and try againops.removeConstraint("testTable",1);for(Map.Entry<String,Integer>c:ops.listConstraints("testTable").entrySet()){System.out.println(c);}writer=conn.createBatchWriter("testTable",newBatchWriterConfig());try{writer.addMutation(m);writer.flush();System.out.println("successfully written");}catch(MutationsRejectedExceptionex){List<ConstraintViolationSummary>violations=ex.getConstraintViolationSummaries();for(ConstraintViolationSummaryv:violations){System.out.println(v.getConstrainClass()+" "+v.getNumberOfViolatingMutations()+" "+v.getViolationDescription());}}
Now we see that there are no constraints on the table when we list them, and the output shows:
successfully written
Creating Custom Constraints
To create a constraint, create a class that implements the Constraint interface:
publicinterfaceConstraint{StringgetViolationDescription(shortviolationCode);List<Short>check(Environmentenv,Mutationmutation);}
Next we’ll show a custom constraint example.
Custom Constraint Example
Let’s say we have an application that keeps track of personal information, such as age, height, and weight. We’d like to make sure that every time we track weight, we track height too, and vice versa. Further, height and weight should be restricted to sensible values. At the very least they should be nonnegative.
We can create a constraint to apply these restrictions to all mutations before they are committed to the table. Any application that reads our table is then guaranteed that if it finds a height column in a row, the weight column can also be found. Applications also don’t have to check whether the values are negative, because our constraint will have done that for us.
The code for our example constraint consists primarily of two methods. One is for checking a new mutation, and the other is for mapping violation codes to human-readable explanations. First, we’ll implement our check() method:
privatestaticfinalshortINVALID_HEIGHT_VALUE=1;privatestaticfinalshortINVALID_WEIGHT_VALUE=2;privatestaticfinalshortMISSING_HEIGHT=3;privatestaticfinalshortMISSING_WEIGHT=4;finalstaticList<Short>NO_VIOLATIONS=newArrayList<>();finalstaticbyte[]heightBytes="height".getBytes();finalstaticbyte[]weightBytes="weight".getBytes();@OverridepublicList<Short>check(Environmentenv,Mutationmutation){List<Short>violations=null;List<ColumnUpdate>updates=mutation.getUpdates();booleanhaveHeight=false;booleanhaveWeight=false;for(ColumnUpdateupdate:updates){// check height updateif(equalBytes(update.getColumnQualifier(),heightBytes)){haveHeight=true;if(!isNonNegativeNumberString(update.getValue())){if(violations==null)violations=newArrayList<>();violations.add(INVALID_HEIGHT_VALUE);}}// check weight updateif(equalBytes(update.getColumnQualifier(),weightBytes)){haveWeight=true;if(!isNonNegativeNumberString(update.getValue())){if(violations==null)violations=newArrayList<>();violations.add(INVALID_WEIGHT_VALUE);}}}// if we have height, we must also have weightif(haveHeight&&!haveWeight){if(violations==null)violations=newArrayList<>();violations.add(MISSING_WEIGHT);}// if we have weight, we must also have heightif(haveWeight&&!haveHeight){if(violations==null)violations=newArrayList<>();violations.add(MISSING_HEIGHT);}returnviolations==null?NO_VIOLATIONS:violations;}
Next we’ll implement getViolationDescription() to map violation codes to strings:
@OverridepublicStringgetViolationDescription(shortviolationCode){switch(violationCode){caseINVALID_HEIGHT_VALUE:return"Invalid height value";caseINVALID_WEIGHT_VALUE:return"Invalid weight value";caseMISSING_HEIGHT:return"Missing height column";caseMISSING_WEIGHT:return"Missing weight column";}returnnull;}
We have a few helper methods, too. In particular, when looking for a column qualifier, we want to compare byte arrays rather than converting byte arrays to strings. We also write a method for checking the type and range of values:
privatebooleanequalBytes(byte[]a,byte[]b){returnValue.Comparator.compareBytes(a,0,a.length,b,0,b.length)==0;}// return whether the value is a string representation of a non-negative numberprivatebooleanisNonNegativeNumberString(byte[]value){try{doubleval=Double.parseDouble(newString(value));returnval>=0.0;}catch(NumberFormatExceptionnfe){returnfalse;}}
Now we can test our constraint by writing some mutations to a test table. First, we’ll create a table and enable our constraint on it (see “Deploying JARs” for information on deploying a JAR in production):
TableOperationsops=conn.tableOperations();ops.create("testTable");// add our custom constraintops.addConstraint("testTable",ValidHeightWeightConstraint.class.getName());for(Map.Entry<String,Integer>c:ops.listConstraints("testTable").entrySet()){System.out.println(c);}
We can see our constraint in the list of table constraints printed out:
com.accumulobook.advanced.ValidHeightWeightConstraint=2
org.apache.accumulo.core.constraints.DefaultKeySizeConstraint=1
Now we’ll try to write a mutation that we know will fail—a row with just a height column and no weight column:
BatchWriterwriter=conn.createBatchWriter("testTable",newBatchWriterConfig());// create an invalid mutation with only a height updateMutationm=newMutation("person");m.put("","height","6.0");writeAndReportViolations(writer,m);
We get an exception with the information:
com.accumulobook.advanced.ValidHeightWeightConstraint
1
Missing weight column
Now we’ll add a weight column, but give it a negative value:
// create a mutation with a valid height but// an invalid weight valuem=newMutation("person");m.put("","height","6.0");m.put("","weight","-200.0");// try to writewriter=conn.createBatchWriter("testTable",newBatchWriterConfig());writeAndReportViolations(writer,m);
This results in the output:
com.accumulobook.advanced.ValidHeightWeightConstraint
1
Invalid weight value
Finally, we create a sensible mutation, with both height and weight, and valid values for both:
// create a valid mutation this timem=newMutation("person");m.put("","height","6.0");m.put("","weight","200.0");writer=conn.createBatchWriter("testTable",newBatchWriterConfig());writeAndReportViolations(writer,m);
Our output now shows:
successfully written
We can also check to make sure mutations that are missing both height and weight can succeed:
// write a mutation that has nothing to do with weight or heightm=newMutation("person");m.put("","name","Joe");writer=conn.createBatchWriter("testTable",newBatchWriterConfig());writeAndReportViolations(writer,m);
successfully written
Iterators
Accumulo provides a server-side programming framework called iterators, which can be used to customize a table’s behavior. An iterator is a simple function applied on the server that can apply logic to one or more key-value pairs. Because Accumulo is doing work to ensure that key-value pairs are always kept in sorted order, there is a convenient opportunity to apply additional logic to these key-value pairs.
An iterator can be applied to filter out certain key-value pairs based on some criteria, or to combine, aggregate, or summarize the values of several related key-value pairs. Some iterators transform the value of a key-value pair into a new value.
Imagine the case in which we have several versions of the same key-value pair. We can configure an iterator to choose the version with the maximum numerical value. Or we can choose to sum across or append the values to produce a composite value. We’ll get into the specifics of these types of iterators in the following sections.
Iterators are applied in succession so that each iterator uses, as its source data, another iterator’s output. Each iterator’s output consists of sorted key-value pairs. To determine the order in which the iterators are applied, each iterator is assigned a priority. In each scope, the iterators are applied successively from the lowest priority to the highest.
Tablet servers apply several iterators by default to all key-value pairs for functions such as basic merge-sorting, selecting key-value pairs based on column family and column qualifiers specified in scanner options, skipping deleted data, and filtering out key-value pairs that the user is not authorized to see (Figure 6-1).
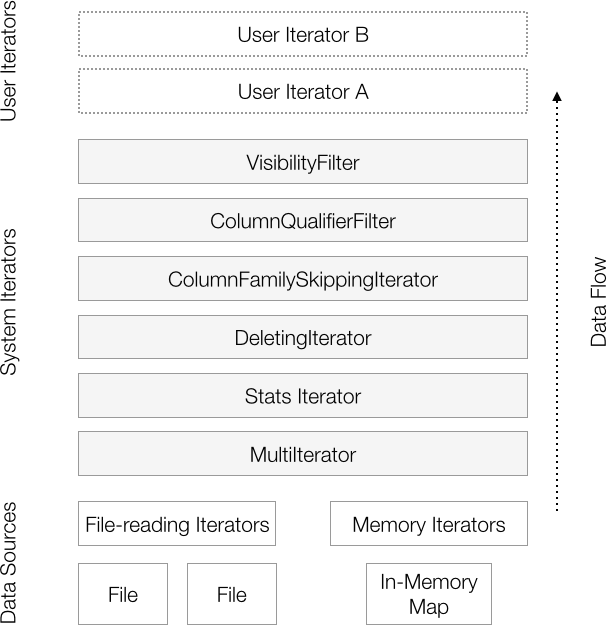
Figure 6-1. Iterators are applied in a stack
Each iterator has an opportunity to filter out key-value pairs, collect information, or transform values. User-configured iterators are applied after all the system iterators have processed key-value pairs.
A series of iterators is applied in the three scopes in which a tablet server processes data:
- Minor compaction
-
When flushing the sorted in-memory map to a sorted file on disk
- Major compaction
-
When combining some number of sorted files into a single file
- Scan
-
When reading all of its sorted in-memory and on-disk structures to answer a scan query
These scopes are labeled minc, majc, and scan, respectively.
Iterators applied at minc and majc time permanently change the data stored in Accumulo. Scan-time iterators can be applied for all scans of a table, or on a per-scan basis.
Iterator Configuration API
To configure an iterator through the Java API, create an IteratorSetting object.
At a minimum, provide the iterator’s priority and its class.
The priority determines the order in which iterators are applied; the lower the number, the earlier the iterator is applied.
You can also provide a shorthand name for the iterator. If this isn’t provided, the simple name for the class will be used as its name.
Once the object is created, the convention is for parameters specific to a given iterator to be set via static methods of that iterator. Then the iterator can be added to the table or to a particular scanner.
For example, to configure an age-off filtering iterator, we could use the following code:
intpriority=15;IteratorSettingsetting=newIteratorSetting(priority,AgeOffFilter.class);AgeOffFilter.setTTL(setting,3600000);TableOperationsops=connector.tableOperations();ops.attachIterator(tableName,setting);
By default, this adds the iterator to all scopes, but which scopes to use can be supplied with an EnumSet passed to the attachIterator() method.
The following would apply the iterator to all future scans of the table:
ops.attachIterator(tableName,setting,EnumSet.of(IteratorScope.scan));
To configure the iterator to be used only for a particular scanner, use the following:
scanner.addScanIterator(setting);
Before adding an iterator to a table, we can use the checkIteratorConflict() method to check if there are any potential conflicts with the way we’ve set up our iterator.
This will report whether any existing iterators have the same name or priority as the iterator described in the IteratorSetting object:
ops.checkIteratorConflicts(tableName,setting,scopes)
Note
Iterator priorities determine the order in which they are applied. The lower the priority value, the earlier the iterator is applied to a key-value pair.
The VersioningIterator, for example, is enabled by default at priority 20, so any iterator added with a priority less than 20 will be applied before the VersioningIterator and will see all versions of key-value pairs that might exist.
An iterator with a priority value higher than 20 will be applied after the VersioningIterator and so will only see key-value pairs that have passed through the VersioningIterator filter logic.
The checkIteratorConflicts() method just described will help avoid adding an iterator with the same priority as an existing iterator.
We can use the listIterators() method to see which iterators are configured on a given table.
This will list the names and scopes of all iterators configured on the table:
Map<String,EnumSet<IteratorScope>>iterators=ops.listIterators(tableName);
To see specific options for a configured iterator, use the getIteratorSetting() method:
IteratorSettingsetting=ops.getIteratorSetting(tableName,name,scope);
Iterators configured on a table can be removed via the removeIterator() method. The iterator will only be removed for the scopes specified:
conn.tableOperations().removeIterator(tableName,name,scopes);
For details on configuring iterators via shell commands, see “Configuring iterators”.
We’ll now look at an example of setting up the VersioningIterator.
VersioningIterator
The VersioningIterator is the only programmable iterator that is configured for all Accumulo tables by default.
Each Accumulo key has a timestamp that is used for versioning.
Let’s say you insert a key with value a. If you insert the same key at a later time with value b, Accumulo considers the second key-value pair to be a more recent version of the first. By default, only the latest timestamped version will be kept.
The VersioningIterator can be configured to keep a different number of versions, or you can remove it to keep all versions.
Here we look at the effects of configuring the VersioningIterator on a table.
Iterator Configuration Example
In this example we’ll create a table, which will have the VersioningIterator configured by default. Then we’ll alter the configuration to see the effects of iterators on our example data.
First we’ll insert several versions of the same key and see how the VersioningIterator applies:
Connectorconn=ExampleMiniCluster.getConnector();TableOperationsops=conn.tableOperations();ops.create("testTable");// insert some dataBatchWriterwriter=conn.createBatchWriter("testTable",newBatchWriterConfig());Mutationm=newMutation("row");m.put("","col","1");writer.addMutation(m);m=newMutation("row");m.put("","col","2");writer.addMutation(m);m=newMutation("row");m.put("","col","3");writer.addMutation(m);writer.flush();// look at the key-value pair we insertedSystem.out.println(" view with versioning iterator on");Scannerscanner=conn.createScanner("testTable",Authorizations.EMPTY);for(Map.Entry<Key,Value>e:scanner){System.out.println(e.getKey()+": "+e.getValue());}
Our output looks like this:
view with versioning iterator on
row :col [] 1409449409924 false: 3
Note that there is only one version, the last one we inserted.
The others are being suppressed by the VersioningIterator.
If we were to flush this table, the other versions would disappear completely.
As it is now, they are all still lurking in memory, and the VersioningIterator is filtering out all but the latest when we do a scan.
Now we’ll look at how the VersioningIterator is set up:
// list all iteratorsSystem.out.println(" iterators");Map<String,EnumSet<IteratorUtil.IteratorScope>>iters=ops.listIterators("testTable");for(Map.Entry<String,EnumSet<IteratorUtil.IteratorScope>>iter:iters.entrySet()){System.out.println(iter.getKey()+": "+iter.getValue());}// look at the settings for the versioning iteratorIteratorSettingsetting=ops.getIteratorSetting("testTable","vers",IteratorScope.scan);System.out.println(" iterator options");for(Map.Entry<String,String>opt:setting.getOptions().entrySet()){System.out.println(opt.getKey()+": "+opt.getValue());}
Our output is:
iterators
vers:  [majc, minc, scan]
iterator options
maxVersions: 1
This shows that the VersioningIterator is the only one configured, and that it applies to all three scopes: major compaction, minor compaction, and scans.
The options show that it is configured to keep one version of each key-value pair.
Now we’ll disable the VersioningIterator and see if we can retrieve all versions we inserted:
// disable the versioning iterator for all scopesops.removeIterator("testTable","vers",EnumSet.allOf(IteratorScope.class));// look at our table againSystem.out.println(" view with versioning iterator off");for(Map.Entry<Key,Value>e:scanner){System.out.println(e.getKey()+": "+e.getValue());}
Now we see all versions:
view with versioning iterator off
row :col [] 1409449409924 false: 3
row :col [] 1409449409924 false: 2
row :col [] 1409449409924 false: 1
Finally, we’ll enable a different kind of iterator, the SummingCombiner, which will add up the values of all versions of our key and return the sum:
// enable the SummingCombiner iterator on our tableIteratorSettingscSetting=newIteratorSetting(15,"sum",SummingCombiner.class);// apply combiner to all columnsSummingCombiner.setCombineAllColumns(scSetting,true);// expect string representations of numbersSummingCombiner.setEncodingType(scSetting,SummingCombiner.Type.STRING);ops.checkIteratorConflicts("testTable",scSetting,EnumSet.of(IteratorScope.scan));// attach the iteratorops.attachIterator("testTable",scSetting,EnumSet.of(IteratorScope.scan));// look at our table nowSystem.out.println(" view with summing combiner iterator on");for(Map.Entry<Key,Value>e:scanner){System.out.println(e.getKey()+": "+e.getValue());}
Now we only see one version, but the value represents the sum of all three versions we inserted :
view with summing combiner iterator on
row :col [] 1409449409924 false: 6
Adding Iterators by Setting Properties
Iterators are configured like all other table options: by setting properties specific to a table.
To configure an iterator via properties, use the setProperty() method.
Doing this requires knowing what properties exist and what their acceptable settings are.
Also, iterator conflicts are not checked when properties are set directly.
For these reasons, setting iterators with IteratorSetting objects through the API described in the previous section is preferable and recommended.
However, it is good to be aware of the table properties associated with your iterators:
connector.tableOperations().setProperty("table.iterator.majc.ageoff.opt.ttl","3600000");connector.tableOperations().setProperty("table.iterator.majc.ageoff","10,org.apache.accumulo.core.iterators.user.AgeOffFilter");
When setting up iterators this way it is a good idea to set the options first, to keep the iterator from being instantiated before it is properly configured.
Filtering Iterators
Filters are iterators that simply decide whether or not to include existing key-value pairs. They do not alter the key-value pairs in any way.
We’ll look at the filters supplied with Accumulo and then how to create our own.
Built-in filters
Some useful filters are provided with Accumulo:
AgeOffFilter-
Removes keys when their timestamps differ from the current time by more than a specified parameter (in milliseconds).
ColumnAgeOffFilter-
Stores a separate age-off parameter for each column, to age off columns at different rates.
TimestampFilter-
Only keeps keys with timestamps earlier and/or later than given start and end parameters.
RegExFilter-
Returns key-value pairs that match a Java regular expression in a particular portion of the key or value (the row, column family, column qualifier, or value). Regular expressions can be provided for any subset of these four, and matches can be determined by ORing or ANDing together the results of each individual regular expression.
GrepIterator-
An iterator that matches exact strings to all key-value pairs scanned. This is great for doing one-time scans of a table. If you find yourself using this iterator frequently you might want to look into secondary indexes, as described in “Secondary Indexing”.
ReqVisFilter-
Removes keys with empty column visibilities.
LargeRowFilter-
Suppresses entire rows that have more than a configurable number of columns. It buffers the row in memory when determining whether or not it should be suppressed, so the specified number of columns should not be too large.
RowFilter-
An abstract iterator that decides whether or not to include an entire row. Subclasses of
RowFiltermust implement anacceptRow()method that takes as a parameter aSortedKeyValueIterator<Key,Value>(which will be limited to the row being decided upon) and returns a Boolean. This allows you to decide to include a row based on several features of the row, such as the presence of two or more columns or a relationship between values.
All filters can be configured to reverse their logic by using the setNegate() method:
IteratorSettingsetting;booleannegate=true;MyFilter.setNegate(setting,negate);
Custom filters
Custom filters can be written by extending org.apache.accumulo.core.iterators.Filter. Subclasses of Filter must implement an accept() method that takes Key and Value as parameters and returns a boolean.
The interface is as follows:
publicabstractclassFilterextendsWrappingIteratorimplementsOptionDescriber{.../*** @return <tt>true</tt> if the key/value pair is accepted by the filter.*/publicabstractbooleanaccept(Keyk,Valuev);}
We’ll walk through an example next to see how to make our own custom filter.
Custom filtering iterator example
Here we’ll create a custom filtering iterator that returns key-value pairs only if the value, interpreted as a number, is greater than a user-provided threshold.
First we create our filter class by extending Filter and defining our accept() method:
publicclassGreaterThanFilterExampleextendsFilter{privatestaticfinalStringGREATER_THAN_CRITERION="greaterThanOption";privatelongthreshold=0;@Overridepublicbooleanaccept(Keyk,Valuev){try{longnum=Long.parseLong(newString(v.get()));returnnum>threshold;}catch(NumberFormatExceptionex){// continue and return false}returnfalse;}...}
We need to write a few other methods to make users aware of the required threshold setting:
@OverridepublicIteratorOptionsdescribeOptions(){IteratorOptionsopts=super.describeOptions();opts.addNamedOption(GREATER_THAN_CRITERION,"Only return values greater than given numerical value");returnopts;}@OverridepublicbooleanvalidateOptions(Map<String,String>options){if(!super.validateOptions(options)||!options.containsKey(GREATER_THAN_CRITERION)){returnfalse;}StringgtString=options.get(GREATER_THAN_CRITERION);try{Long.parseLong(gtString);}catch(NumberFormatExceptione){returnfalse;}returntrue;}
Also, the convention is for iterators to provide static methods for filling out options on IteratorSetting objects.
We’ll add one for our threshold:
publicstaticvoidsetThreshold(finalIteratorSettingsetting,finalintthreshold){setting.addOption(GREATER_THAN_CRITERION,Integer.toString(threshold));}
Next we want to fetch the threshold from the iterator options whenever our iterator is used.
Iterator classes are set up and torn down at the discretion of the tablet server.
The init() method will allow us to perform some setup before the accept() method is called:
@Overridepublicvoidinit(SortedKeyValueIterator<Key,Value>source,Map<String,String>options,IteratorEnvironmentenv)throwsIOException{super.init(source,options,env);if(options.containsKey(GREATER_THAN_CRITERION)){StringgtString=options.get(GREATER_THAN_CRITERION);threshold=Long.parseLong(gtString);}}
Finally, we can test our filter.
We’ll use the ExampleMiniCluster to create a test table and apply our iterator to it:
Randomrandom=newRandom();Connectorconn=ExampleMiniCluster.getConnector();TableOperationsops=conn.tableOperations();ops.create("testTable");// insert some dataBatchWriterwriter=conn.createBatchWriter("testTable",newBatchWriterConfig());for(inti=0;i<30;i++){introwNum=random.nextInt(100);intcolNum=random.nextInt(100);intvalue=random.nextInt(100);Mutationm=newMutation("row"+rowNum);m.put("","col"+colNum,Integer.toString(value));writer.addMutation(m);}writer.flush();
Now that our test table is full of values with random numbers between 0 and 100, we’ll add our iterator and scan:
IteratorSettingsetting=newIteratorSetting(15,"gtf",GreaterThanFilterExample.class.getName());GreaterThanFilterExample.setThreshold(setting,80);conn.tableOperations().attachIterator("testTable",setting);// we could, instead, set our iterator just for this scan//scanner.addScanIterator(setting);// check for the existence of our iteratorfor(Map.Entry<String,EnumSet<IteratorUtil.IteratorScope>>i:conn.tableOperations().listIterators("testTable").entrySet()){System.out.println(i);}
Checking for our iterator on the table shows:
gtf=[majc, minc, scan]
vers=[majc, minc, scan]
The only thing left to do is to scan our table and check the output:
// scan whole tableScannerscanner=conn.createScanner("testTable",Authorizations.EMPTY);for(Map.Entry<Key,Value>e:scanner){System.out.println(e);}

Note that using an iterator to scan an entire table is not scalable to large tables, but is good enough for our test here.
The output we get should show no values under our threshold, 80:
row0 :col1 [] 1409452474218 false 95
row13 :col94 [] 1409452474218 false 91
row32 :col70 [] 1409452474218 false 84
row34 :col56 [] 1409452474218 false 92
row49 :col94 [] 1409452474218 false 95
row59 :col86 [] 1409452474218 false 92
row93 :col60 [] 1409452474218 false 91
Caution
It may be tempting to write complicated filtering iterators to apply arbitrary query logic. Keep in mind that filtering data is expensive, especially in a big data context. An application that requires good performance at scale will limit filtering to the absolute minimum.
To deploy this iterator to a production cluster, we’ll need to build a JAR that contains our class and place it where server processes can load it. See “Deploying JARs” for details.
Combiners
Combiners are iterators that combine all the versions of a key-value pair into a single key-value pair, instead of keeping the most recent versions of a key-value pair as the VersioningIterator does.
Combiners work on sets of keys that only differ in their timestamp.
If you want to combine key-value pairs that do not all have the same row, column family, qualifier, and visibility, you’ll have to write a different custom iterator.
All combiners can be set to run on one or more particular columns or all columns:
intpriority=35;IteratorSettingsetting=newIteratorSetting(priority,"mycombiner",MyCombiner.class);List<IteratorSetting.Column>columns=newArrayList<>();// can be applied to all columns in a familycolumns.add(newIteratorSetting.Column("attributes"));// and a specific columncolumns.add(newIteratorSetting.Column("orders","amount"));MyCombiner.setColumns(setting,columns);
To set a combiner to apply to all columns, use the setCombineAllColumns() method:
MyCombiner.setCombineAllColumns(setting,true);
If a combiner is configured to apply to all columns, any columns passed to the setColumns() method are ignored.
Combiners for incrementing or appending updates
Combiners can help when an application calls for doing updates in which new values should be appended or otherwise combined with existing values. In many systems this requires reading the existing values first, applying the combination logic, and writing back the combined value. Accumulo can combine updates very efficiently by allowing multiple partially combined values to coexist until the finalized answer is needed—for example when a value is read by a client performing a scan. This allows these types of updates to be applied to a table with the same performance as simple inserts or overwriting updates.
For example, if we would like to update a numerical value by adding a new amount to the existing value, we don’t have to somehow lock the row and column, read out the old value, add our new amount to it, and write it back. We can simply insert the amount to be added and instruct the server to add up all the existing values for that row and column. When the server writes values to disk it always writes the combined value to cut down on the partial values that are stored.
Tip
Being able to perform inserts without reading data can mean the difference between a few hundred insert operations per second and potentially hundreds of thousands of insert operations per second. It is certainly worth the effort to investigate the possibility of using combiners to help your application carry out updates.
To illustrate the difference, consider the following scenario. Let’s say we are maintaining a summary of the number of times we have seen each word in a corpus. When we would like to update results we have two choices. One approach is to have the application read the old value, add the new value, and write the combined value back (Figure 6-2).
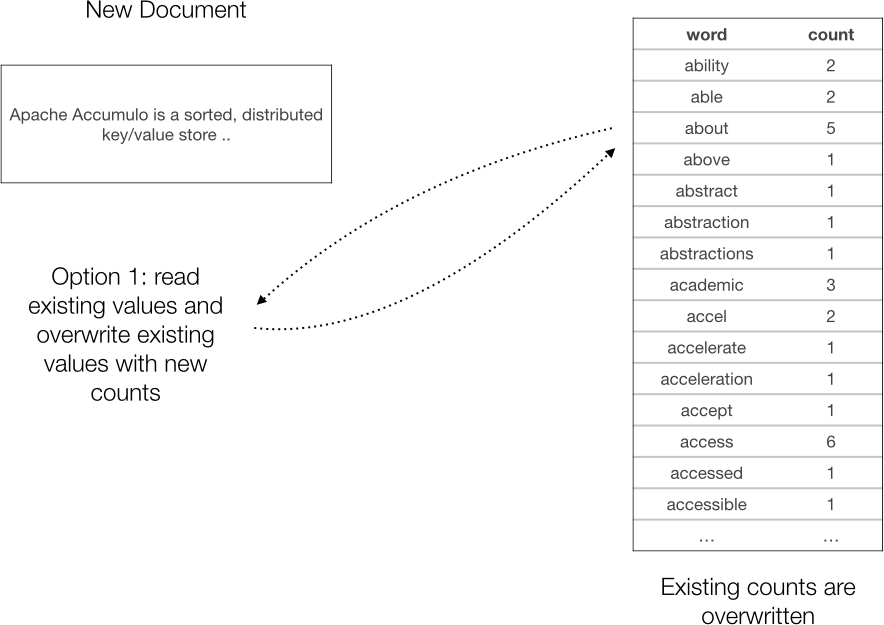
Figure 6-2. Update by performing a read then an overwrite
Another, much faster approach is to do a simple insert of the additional counts, and let a combiner do the final summation (Figure 6-3).
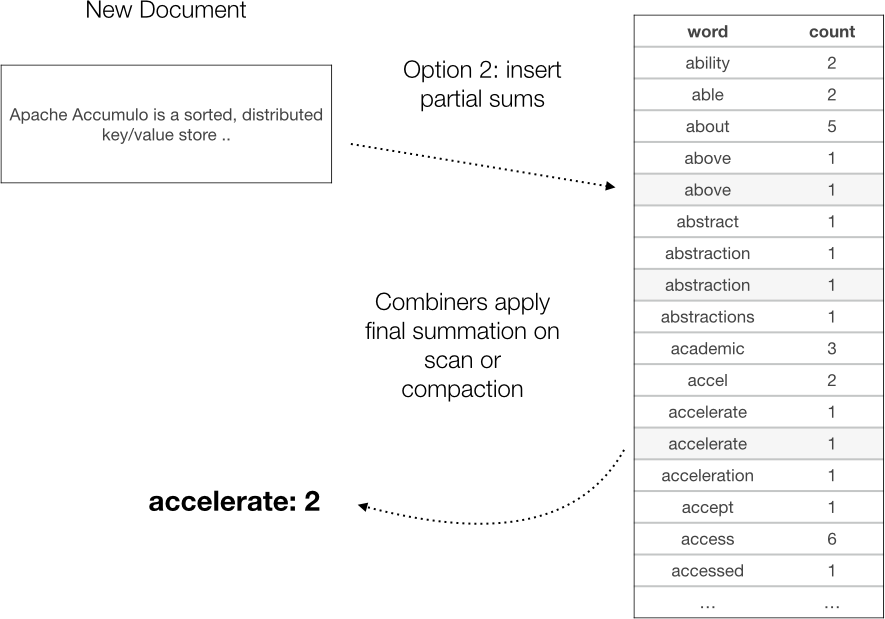
Figure 6-3. Update by performing an insert and letting combiner do final summation
Built-in combiners
Accumulo comes with a number of combiners.
These are in the org.apache.accumulo.core.iterators.user package:
LongCombiner-
An abstract combiner that interprets Accumulo
Values as JavaLongobjects. It comes with three possible encoding types:STRING, which prints and parses the number as a string;LONG, which encodes the number in exactly 8 binary bytes; andVARNUM, which uses a variable-length binary encoding.MaxCombiner-
Extends the
LongCombiner, interpreting values asLongs, and returns the maximumLongfor each set of values. MinCombiner-
Extends the
LongCombiner, interpreting values asLongs, and returns the minimumLongfor each set of values. SummingCombiner-
Extends the
LongCombiner, interpreting values asLongs, and returns the sum of the set of values.
SummingArrayCombiner-
Interprets
Valuesas an array ofLongs, and returns an array of sums. If the arrays are not the same length, the shorter arrays are padded with zeros to equal the length of the largest array. BigDecimalCombiner-
An abstract combiner that interprets Accumulo values as
BigDecimals.
An additional example combiner is the StatsCombiner in the org.apache.accumulo.examples.simple.combiner package.
Use of this combiner is illustrated in Accumulo’s README.combiner example.
We saw an example of setting up the SummingCombiner via the API in “Iterator Configuration Example”.
Next we’ll look at writing our own combiner.
Custom combiners
Custom combiners can be written by extending org.apache.accumulo.core.iterators.Combiner.
Subclasses of Combiner must implement a reduce() method that takes Key and Iterator<Value> as parameters and returns a Value:
publicabstractValuereduce(Keykey,Iterator<Value>iter);
If the values are always interpreted as a particular Java type, the TypedValueCombiner<V> can be used.
This combiner uses an Encoder to translate the type V to and from a byte array.
Subclasses of TypedValueCombiner implement a typedReduce() method that takes Key and Iterator<V> as parameters and returns an object of type V:
publicabstractclassTypedValueCombiner<V>extendsCombiner{...publicabstractVtypedReduce(Keykey,Iterator<V>iter);}
A combiner that extends TypedValueCombiner should also have a class implementing the Encoder interface for converting values to byte arrays and back:
publicabstractclassTypedValueCombiner<V>extendsCombiner{...publicinterfaceEncoder<V>{byte[]encode(Vv);Vdecode(byte[]b)throwsValueFormatException;}...}
Custom combiner example
We’ll implement a combiner that keeps track of the number of items seen and the sum of the items seen in order to produce an average. We can’t simply store the average because we’ll lose information about the number of items seen so far and won’t know how much relative weight to apply to new items.
First, we’ll implement an Encoder to store a Long and a Double, for the number of items seen, and the partial total:
publicclassRunningAverageCombinerextendsTypedValueCombiner<Pair<Long,Double>>{...publicstaticclassLongDoublePairEncoderimplementsEncoder<Pair<Long,Double>>{@Overridepublicbyte[]encode(Pair<Long,Double>v){Strings=Long.toString(v.getFirst())+":"+Double.toString(v.getSecond());returns.getBytes(StandardCharsets.UTF_8);}@OverridepublicPair<Long,Double>decode(byte[]b)throwsValueFormatException{Strings=newString(b,StandardCharsets.UTF_8);String[]parts=s.split(":");returnnewPair<>(Long.parseLong(parts[0]),Double.parseDouble(parts[1]));}}...}
This class will allow us to write string values representing a count and a running total to be averaged.
Now we’ll define our reduce() function, which will tell tablet servers how to combine multiple versions of values for a key.
In our case, we simply keep track of the number of items we’ve seen, and a running total.
At any given time, a client can divide the running total by the number of items seen to get the current average:
...@Overridepublicvoidinit(SortedKeyValueIterator<Key,Value>source,Map<String,String>options,IteratorEnvironmentenv)throwsIOException{super.init(source,options,env);setEncoder(newLongDoublePairEncoder());}@OverridepublicPair<Long,Double>typedReduce(Keykey,Iterator<Pair<Long,Double>>iter){Longcount=0L;Doublesum=0.0;while(iter.hasNext()){Pair<Long,Double>pair=iter.next();count+=pair.getFirst();sum+=pair.getSecond();}returnnewPair<>(count,sum);}...
Be sure to initialize the encoder to be used here.
Now we can test our combiner on a table.
First we’ll create a table, remove the VersioningIterator so that our combiner receives all versions of each key, and set our custom combiner:
Connectorconn=ExampleMiniCluster.getConnector();TableOperationsops=conn.tableOperations();ops.create("testTable");// remove versioning iteratorops.removeIterator("testTable","vers",EnumSet.allOf(IteratorScope.class));// configure our iteratorIteratorSettingsetting=newIteratorSetting(10,"rac",RunningAverageCombiner.class);RunningAverageCombiner.setCombineAllColumns(setting,true);RunningAverageCombiner.setLossyness(setting,false);// attach to table for all scopesops.attachIterator("testTable",setting);
Give our combiner a priority of 10, name it
rac, and provide the class.
Set our combiner to operate on all columns.

Instruct the combiner to throw exceptions when values fail to decode with the given encoder, instead of silently discarding those values.
Now we can insert some test data. We’ll generate random numbers in a particular range and insert them as multiple versions of the same key. This means the row ID, column family, column qualifier, and column visibility must be the same. Values in different keys will not be combined together, only values representing multiple versions of the same key.
We’ll generate numbers uniformly at random between 4.5 and 6.5. Our average should be somewhere around 5.5:
BatchWriterwriter=conn.createBatchWriter("testTable",newBatchWriterConfig());// begin writing numbers to our tableRandomrandom=newRandom();for(inti=0;i<5;i++){Mutationm=newMutation("heights");m.put("","average","1:"+(random.nextDouble()*2+4.5));writer.addMutation(m);}writer.flush();
Now we’ll perform a scan on our table. This will cause our combiner to examine the key-value pairs we’ve written and give it a chance to combine them before returning any to our client.
We’ll use the same LongDoublePairEncoder to decode values into our count and running total.
Then we’ll divide the total by the count and print out the average:
LongDoublePairEncoderenc=newLongDoublePairEncoder();Scannerscanner=conn.createScanner("testTable",Authorizations.EMPTY);for(Map.Entry<Key,Value>e:scanner){Pair<Long,Double>pair=enc.decode(e.getValue().get());doubleaverage=pair.getSecond()/pair.getFirst();System.out.println(average);}
Our output consists of one number:
5.975622642042859
Next we write one hundred more versions of our key. After scanning again our average is a little closer to 5.5:
5.329055520715937
To load this combiner into tablet servers in a production cluster we’ll need to package our combiner class and encoder class into a JAR file and deploy it to all the servers. See “Deploying JARs” for details. Be sure to compile your combiner against the same version of Accumulo that is running on your cluster.
Other Built-in Iterators
Accumulo provides a few other built-in iterators for doing things other than simple filtering and combining:
IndexedDocIterator-
This is an iterator for doing indexing by document-based partitioning. This iterator allows a query to scan the first half of a row, which contains a term index, for document IDs that contain particular terms; to combine sets of matching document IDs together logically in set operations; and finally to scan the second half of the row to retrieve the full documents that satisfy all query criteria. We cover this iterator in depth in “Index Partitioned by Document”.
IntersectingIterator-
The base class extended by
IndexedDocIterator, theIntersectingIteratorperforms the operations to find selected document IDs without returning the documents themselves. It will scan a term index within a row to find document IDs containing search terms, and intersect sets of matching document IDs to find documents that contain all the search terms. RowDeletingIterator-
Uses a special marker to indicate that an entire row should be deleted. The marker consists of a row ID, empty column family, qualifier and visibility, and a value of
DEL_ROW. TransformingIterator-
Typically an iterator will only read key-value pairs and decide to filter some out, as in filters, or to combine the values some way, as in combiners. The transforming iterator is an abstract iterator that allows parts of the keys to be transformed also. In implementing a transforming iterator, care should be taken to ensure that sorted key order is preserved.
WholeColumnFamilyIterator-
The
WholeColumnFamilyiterator bundles up key-value pairs within the same column family in a row together and returns them to the client as a single key-value pair. The client can then decode the key-value pair into the constituent key-value pairs within that one row and column family. WholeRowIterator-
This iterator encodes all the key-value pairs within one row into a single key-value pair and sends it to the client as a coherent object. Clients can then decode the key-value pair to restore the original key-value pairs in the row. This is convenient for processing sets of columns and values one row at a time. It is possible to fetch a subset of the columns and still get the set of columns per row returned to the client bundled together. See the example in the next section.
WholeRowIterator example
When a table is scanned, key-value pairs are streamed back to the client in sorted order, one after another.
Sets of key-value pairs with the same row ID are considered to be the same row.
Clients must examine the row ID to determine which key-value pairs belong in which row, unless they are grouped using the RowIterator described in “Grouping by Rows”.
If all the key-value pairs in a row can fit in memory comfortably, we can choose to use the WholeRowIterator to get a set of key-value pairs for one row grouped together in a convenient data structure.
For this example, we’ll create a test table with 100 rows containing 100 columns each. Each row will be read into client memory completely, and we can decode it into separate columns and access them in any order we choose:
Connectorconn=ExampleMiniCluster.getConnector();TableOperationsops=conn.tableOperations();ops.create("testTable");BatchWriterwriter=conn.createBatchWriter("testTable",newBatchWriterConfig());for(inti=1;i<=100;i++){Mutationm=newMutation("row"+String.format("%02d",i));for(intj=1;j<=100;j++){m.put("","col"+j,Integer.toString(i*j));}writer.addMutation(m);}writer.flush();
Next we’ll create a scanner and add the WholeRowIterator to it:
Scannerscanner=conn.createScanner("testTable",Authorizations.EMPTY);scanner.setRange(newRange("row50","row60"));IteratorSettingsetting=newIteratorSetting(30,"wri",WholeRowIterator.class);scanner.addScanIterator(setting);
The WholeRowIterator has a decode() method that will unpack one row’s worth of data for us into a SortedMap<Key,Value> object.
We’ll use some convenience methods for grabbing the row ID and creating a map of just column names to values:
privatestaticbyte[]getRow(SortedMap<Key,Value>row){returnrow.entrySet().iterator().next().getKey().getRow().getBytes();}privatestaticSortedMap<String,Value>columnMap(SortedMap<Key,Value>row){TreeMap<String,Value>colMap=newTreeMap<>();for(Map.Entry<Key,Value>e:row.entrySet()){Stringcf=e.getKey().getColumnFamily().toString();Stringcq=e.getKey().getColumnQualifier().toString();colMap.put(cf+":"+cq,e.getValue());}returncolMap;}
Now we can perform our scan and operate on one row’s worth of data at a time, grabbing columns in whatever order we want:
Scannerscanner=conn.createScanner("testTable",Authorizations.EMPTY);scanner.setRange(newRange("row50","row60"));// we could choose a subset of columns via fetchColumn() tooIteratorSettingsetting=newIteratorSetting(30,"wri",WholeRowIterator.class);scanner.addScanIterator(setting);for(Map.Entry<Key,Value>e:scanner){SortedMap<Key,Value>rowData=WholeRowIterator.decodeRow(e.getKey(),e.getValue());byte[]row=getRow(rowData);SortedMap<String,Value>columns=columnMap(rowData);System.out.println(" row "+newString(row));System.out.println(":col31 "+columns.get(":col31"));System.out.println(":col15 "+columns.get(":col15"));}
Decode the key-value pair to get the row’s columns.
Running our code produces the following output, showing the out-of-order access of columns within each row:
row  row50
:col31 1550
:col15 750
row  row51
:col31 1581
:col15 765
...
row  row60
:col31 1860
:col15 900
Low-level iterator API
Filtering iterators and combiners are special cases of general iterators. There is a low-level iterator API that can be used to create new types of iterators. It is much more complicated than the API for implementing new filters and combiners, however.
Lower-level iterators at the very least implement the SortedKeyValueIterator<Key,Value> interface:
publicinterfaceSortedKeyValueIterator<KextendsWritableComparable<?>,VextendsWritable>{voidinit(SortedKeyValueIterator<K,V>source,Map<String,String>options,IteratorEnvironmentenv)throwsIOException;booleanhasTop();voidnext()throwsIOException;voidseek(Rangerange,Collection<ByteSequence>columnFamilies,booleaninclusive)throwsIOException;KgetTopKey();VgetTopValue();SortedKeyValueIterator<K,V>deepCopy(IteratorEnvironmentenv);}
Some iterators choose to extend the WrappingIterator or SkippingIterator classes.
Caution
Some developers have been tempted to write iterators that don’t simply alter the data read as it is returned to the client but also write out data, potentially to other tablet servers. Although this is theoretically possible, a few issues make it difficult.
First, tablet servers build up and tear down the iterator stack at their own discretion, and it is not guaranteed that iterator classes will be long-lived, or able to maintain state for a particular amount of time. The other issue is that Accumulo client classes can use a lot of resources, and lifecycle management of these resources would need to be altered for use within a tablet server context.
Google implemented a different solution, called coprocessors, for allowing some writes or reads to tablet servers to trigger writes to other tablet servers. Coprocessors are described in the paper “Large-scale Incremental Processing Using Distributed Transactions and Notifications”.
Some Accumulo developers are working on a similar implementation called Fluo.
We’ll implement a simple iterator that takes advantage of one of the features of the lower-level API: the ability to seek ahead to a new key-value pair. Our iterator will simply return the first column and its value for each row we scan. After reading the first column for a row, it will seek to the next row.
Accumulo already has an implementation of an iterator that performs this same function and includes some additional optimization: the FirstEntryInRowIterator.
The code for our iterator will begin at the WrappingIterator, rather than simply implementing SortedKeyValueIterator.
This will help guarantee that we don’t call methods out of order.
We’ll first create our class:
publicclassFirstColumnIteratorextendsWrappingIterator{privateRangerange;privatebooleaninclusive;privateCollection<ByteSequence>columnFamilies;privatebooleandone;publicFirstColumnIterator(){}publicFirstColumnIterator(FirstColumnIteratoraThis,IteratorEnvironmentenv){super();setSource(aThis.getSource().deepCopy(env));}@Overridepublicvoidinit(SortedKeyValueIterator<Key,Value>source,Map<String,String>options,IteratorEnvironmentenv)throwsIOException{super.init(source,options,env);}...
We need a public default constructor because this is the constructer Accumulo will use to instantiate the iterator.
Additional constructors are optional but may be helpful in implementing the
deepCopymethod.
Next we’ll implement just the seek(), next(), hasTop(), and deepCopy() methods.
seek() is called first by the tablet server, and we’ll use it to store off some variables we’ll need to do our seeking later.
It will also handle the case in which a seek is made to the middle of a row.
next() is called to prepare the next key-value pair for retrieval by getTopKey() and getTopValue(), if the key-value pair exists.
hasTop() indicates whether a key-value pair exists for retrieval.
We call on our superclass, the WrappingIterator, to seek to the next row in our source iterator.
Every iterator has a source that ultimately goes back to files and in-memory data structures holding key-value pairs.
Our iterator simply advances the source iterator past all but the first column of each row and notes when the end of the range is reached:
@Overridepublicvoidnext()throwsIOException{if(done){return;}// create a new range to seek toKeynextKey=getSource().getTopKey().followingKey(PartialKey.ROW);if(range.afterEndKey(nextKey)){done=true;}else{RangenextRange=newRange(nextKey,true,range.getEndKey(),range.isEndKeyInclusive());getSource().seek(nextRange,columnFamilies,inclusive);}}@OverridepublicbooleanhasTop(){return!done&&getSource().hasTop();}@Overridepublicvoidseek(Rangerange,Collection<ByteSequence>columnFamilies,booleaninclusive)throwsIOException{this.range=range;this.columnFamilies=columnFamilies;this.inclusive=inclusive;done=false;KeystartKey=range.getStartKey();RangeseekRange=newRange(startKey==null?null:newKey(startKey.getRow()),true,range.getEndKey(),range.isEndKeyInclusive());super.seek(seekRange,columnFamilies,inclusive);if(getSource().hasTop()){if(range.beforeStartKey(getSource().getTopKey()))next();}}@OverridepublicSortedKeyValueIterator<Key,Value>deepCopy(IteratorEnvironmentenv){returnnewFirstColumnIterator(this,env);}
This method will get a key that has the first possible row ID after the current key.
Check to see if we’ve reached the end of the range requested by the user and return if so.
Create a range almost exactly like the one that was first given to us by the
seek()method.
Advance the source iterator past all the columns of this row to the first column of the next row.

Return
falseifnext()determined the end of the range has been reached, or if there is no more data in the source iterator.
Save these seek parameters off for doing seeks in our
nextmethod.
Construct a range that starts at the beginning of the row containing our start key, and seek our superclass, which will seek the source iterator.

Skip to the next row if the top key is before our start key, meaning that we received a seek to the middle of a row.
Caution
Handling a seek to the middle of a row is an important condition every iterator must address. Even if an application always seeks to the beginning of a row, Accumulo can internally seek to the middle of row when performing a long scan that involves pulling multiple batches of key-value pairs from tablet servers to a client.
Now we can apply our iterator to data in a table. First, we’ll create a simple table of 100 rows with 100 columns each. This will make it easy to see if our iterator is working:
Connectorconn=ExampleMiniCluster.getConnector();TableOperationsops=conn.tableOperations();ops.create("testTable");BatchWriterwriter=conn.createBatchWriter("testTable",newBatchWriterConfig());for(inti=0;i<100;i++){Mutationm=newMutation("row"+String.format("%02d",i));for(intj=0;j<100;j++){m.put("",String.format("col%02d",j),i+" "+j);}writer.addMutation(m);}writer.flush();
Now we’ll scan the table and just count the key-value pairs without our iterator so we’ll have something to compare our iterator results to:
Scannerscanner=conn.createScanner("testTable",Authorizations.EMPTY);// count items returnedintreturned=0;for(Map.Entry<Key,Value>e:scanner)returned++;System.out.println("items returned: "+returned);
Our output shows:
items returned: 10000
Now we’ll apply our iterator and see if we only see the first column for every row:
IteratorSettingsetting=newIteratorSetting(30,"fci",FirstColumnIterator.class);scanner.addScanIterator(setting);returned=0;for(Map.Entry<Key,Value>e:scanner){System.out.println(e);returned++;}System.out.println("items returned: "+returned);
Now our output shows the rows and columns returned, with only the first column of each row, and a total count of 100:
row00 :col00 [] 1409608777713 false 0 0
row01 :col00 [] 1409608777713 false 1 0
row02 :col00 [] 1409608777713 false 2 0
...
row98 :col00 [] 1409608777713 false 98 0
row99 :col00 [] 1409608777713 false 99 0
items returned: 100
Thrift Proxy
In addition to the standard Accumulo processes, there is an option to start up a proxy service (Figure 6-4). This service provides an Apache Thrift API for interacting with Accumulo. Accumulo comes compiled with C++, Python, and Ruby clients for interacting with the Thrift API.
Thrift provides a compiler to generate serialization code and remote procedural call (RPC) clients and servers in a particular language. The structures and services are defined in files in an interface description language (IDL). Clients for other languages can be generated, as we describe in “Generating Client Code”. The details of the API can be found in the Accumulo IDL file at accumulo/proxy/thrift/proxy.thrift.
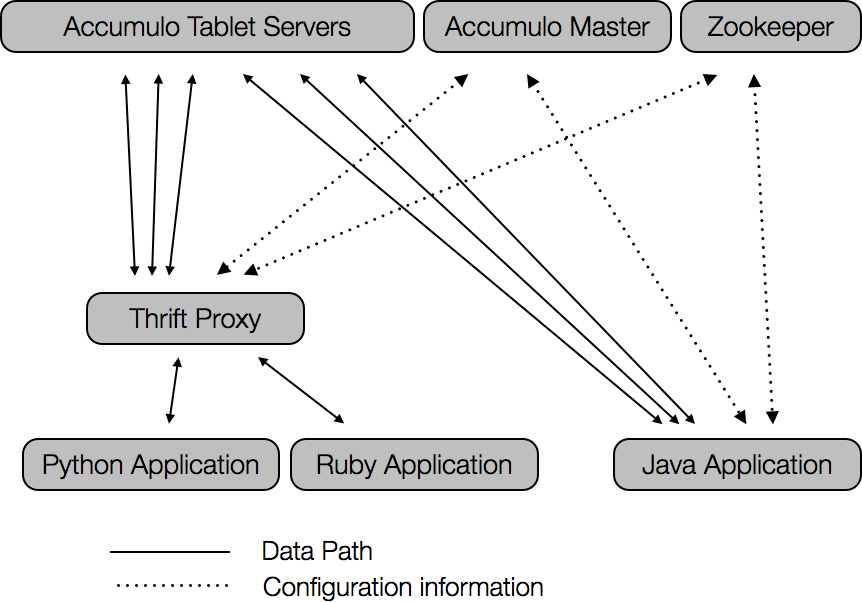
Figure 6-4. Applications with Accumulo proxy
Starting a Proxy
You must pass a configuration file to the proxy process when starting it up. An example configuration file is included with Accumulo at accumulo/proxy/proxy.properties. To start the proxy service, run:
accumulo proxy -p /path/to/proxy.properties
When using Thrift proxies, it is common to run one proxy process per proxy client (Figure 6-5). The proxy could be run on the same machine as the proxy client to eliminate network usage between proxies and their clients.
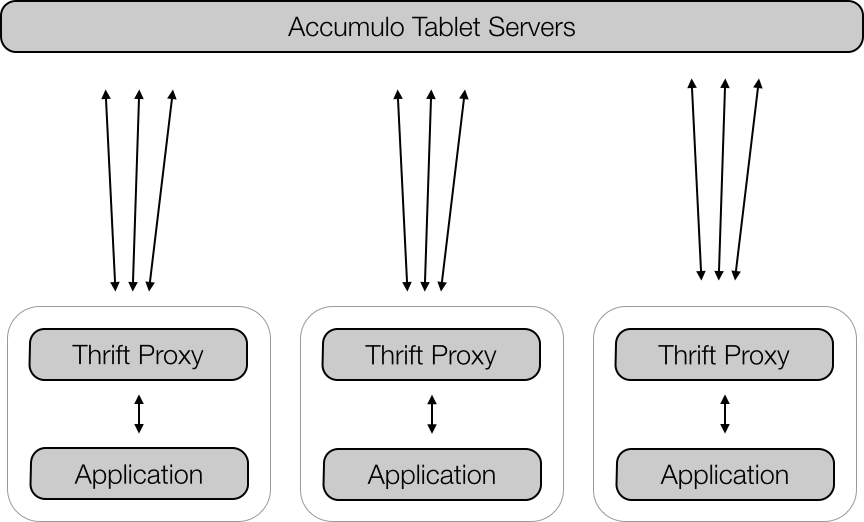
Figure 6-5. Example proxy deployment
Python Example
For this example we’ll write some example code in Python. Python is a popular cross-platform, high-level, interpreted, object-oriented language. It ships with some operating systems and runs on Linux, Mac OS X, and Microsoft Windows.
We’ll use the precompiled Python bindings that ship with Accumulo 1.6 in the accumulo/proxy/gen-py directory. We’ve included the Thrift libraries for Python in the example code, at src/main/python.
In this example, we’ll generate a simple REST API for talking to Accumulo using Python and the Flask library.
To connect to the Accumulo Thrift proxy, we’ll use the following code:
fromthriftimportThriftfromthrift.transportimportTSocketfromthrift.transportimportTTransportfromthrift.protocolimportTCompactProtocolfromaccumuloimportAccumuloProxyfromaccumulo.ttypesimport*defconnect():globalclientgloballogintransport=TSocket.TSocket('localhost',42424)transport=TTransport.TFramedTransport(transport)protocol=TCompactProtocol.TCompactProtocol(transport)client=AccumuloProxy.Client(protocol)transport.open()login=client.login('root',{'password':'password'})
This port is defined in the proxy.properties file.
Next we’ll use the Flask notations to define some REST methods on our service. Our simple REST service will include the following methods:
http://host/tables GET List existing tables
http://host/tables/_tableName_ POST Creates a table
http://host/tables/_tableName_ DELETE Deletes a table
http://host/tables/_tableName_/rows POST Insert a mutation
http://host/tables/_tableName_/rows?range=_startRow_:_stopRow_
    &cols=_FamA:QualA,FamB:QualB_ GET Scan a portion of the rows of a table
In Python and Flask syntax, our methods will look like the following:
@app.route('/tables',methods=['GET'])deflistTables():tables=client.listTables(login)returnjson.dumps({'tables':list(tables)})@app.route('/tables/<table>/rows',methods=['POST'])definsert(table):row=request.form.get('row','')colFam=request.form.get('colFam','')colQual=request.form.get('colQual','')colVis=request.form.get('colVis','')value=request.form.get('value','')m={row:[ColumnUpdate(colFam,colQual,colVis,value=value)]}try:client.updateAndFlush(login,table,m)exceptExceptionase:returnjson.dumps({'success':False,'message':str(e)})returnjson.dumps({'success':True})
Notice how when we’re inserting a single value we simply create a Python dict with a single field name, representing the row ID, and a list of ColumnUpdate objects:
m={row:[ColumnUpdate(colFam,colQual,colVis,value=value)]}
See the src/main/python/restapi.py file for more details.
The Thrift proxy can be started as described previously, or for this example we can run the ExampleMiniThriftProxy.java class included in the example code.
With the Thrift proxy running, we can start our REST service (HTTP response codes have been removed from the following transcript for readability):
$ python restapi.py &
 * Running on http://127.0.0.1:5000/
 * Restarting with reloader
$ curl "http://127.0.0.1:5000/tables"
{"tables": ["accumulo.root", "accumulo.metadata"]}
$ curl -d "" "http://127.0.0.1:5000/tables/test"
{"success": true}
$ curl "http://127.0.0.1:5000/tables"
{"tables": ["accumulo.root", "testTable", "accumulo.metadata"]}
$ curl -d "row=title&colFam=metadata&colQual=author&value=Joe%20Jones"
  "http://127.0.0.1:5000/tables/test/rows"
{"success": true}
$ curl -d "row=title&colFam=content&value=This%20is%20an%20example%20article"
  "http://127.0.0.1:5000/tables/test/rows"
{"success": true}
$ curl "http://127.0.0.1:5000/tables/test/rows"
{"results": [
  ["title", "content", "", 1407815024740, "This is an example article"],
  ["title", "metadata", "author", 1407814986048, "Joe Jones"]
]}
$ curl "http://127.0.0.1:5000/tables/test/rows?cols=content:"
{"results": [["title", "content", "", 1407815024740,
 "This is an example article"]]}
$ curl "http://127.0.0.1:5000/tables/test/rows?cols=metadata:author"
{"results": [["title", "metadata", "author", 1407814986048, "Joe Jones"]]}
$ curl -X DELETE "http://127.0.0.1:5000/tables/test"
{"success": true}
$ curl "http://127.0.0.1:5000/tables"
{"tables": ["accumulo.root", "accumulo.metadata"]}
Generating Client Code
The Thrift compiler can generate client code for many languages that will allow applications to communicate with the Accumulo proxy.
As of this writing Thrift supports the following languages:
-
C++
-
C#
-
Cocoa
-
D
-
Delphi
-
Erlang
-
Haskell
-
Java
-
JavaScript
-
OCaml
-
Perl
-
PHP
-
Python
-
Ruby
-
Smalltalk
If, for example, we want to develop a new application in PHP, we can run the Thrift compiler on the Accumulo IDL file:
thrift-0.9.0/compiler/cpp/thrift -gen php accumulo/proxy/thrift/proxy.thrift
This will create a directory called gen-php that contains the code a PHP application would need to connect and talk to the Accumulo Thrift proxy.
Language-Specific Clients
Accumulo provides an Apache Thrift proxy that enables clients to be written in any language that Thrift supports. For details on running the proxy, see “Thrift Proxy”.
A few developers have created language-specific client libraries to make it easier to use Accumulo in these languages. This list will likely become out of date very quickly, so we encourage you to search GitHub and follow the Accumulo blog:
- Python
-
Python is a popular scripting language. The pyaccumulo project supports language bindings for Python.
- Erlang
-
Erlang is a functional programming language that is popular for building distributed systems. The erlaccumulo project provides the client code for Erlang.
- C++
-
C++ is a popular high-performance object-oriented language. The accumulo-cpp project provides the C++ client code.
- Clojure
-
Clojure is a functional programming language that runs on the JVM. The clojure-accumulo project uses Clojure on top of the Java API.
- Scala
-
Scala, another JVM language, combines object-oriented and functional programming. You can evaluate a couple of Scala wrappers around the Java API for your use. One is available from the scala-accumulo project and the other from the accumulo-scala project.
- Node.js JavaScript
-
The nodeulo project provides a JavaScript client suitable for inclusion in code meant to run in a Node.js server.
Integration with Other Tools
A rich and quickly evolving ecosystem surrounds big data technologies. Many of these other software projects can be used with Accumulo as a part of a broader solution. In this section we touch on best practices for using Accumulo with some of these technologies.
Apache Hive
Apache Hive is a popular tool for executing SQL queries on distributed applications within the Apache Hadoop ecosystem. Hive can execute a subset of the SQL specification, which is sometimes referred to as the Hive Query Language (HQL) to distinguish it from the full capabilities of SQL.
Hive queries can be executed as MapReduce jobs, and recent efforts allow Hive queries to be carried out in more low-latency execution frameworks such as Apache Tez.
Hive integration with Accumulo was first added in Hive version 0.14 and is designed to work with Accumulo 1.6. To configure Hive to work with Accumulo, you must specify four configuration parameters:
accumulo.instance.name
accumulo.zookeepers
accumulo.user.name
accumulo.user.pass
These can be applied to a Hive session via -hiveconf options:
hive -hiveconf accumulo.instance.name=accumulo
  -hiveconf accumulo.zookeepers=zoo1 -hiveconf accumulo.user.name=hive
  -hiveconf accumulo.user.pass=hive
Table options
The columns of Hive tables are mapped to columns in Accumulo when an Accumulo table is created. One of the original columns of the Hive table can be used as the row ID of the Accumulo table. This will enable queries over ranges of values for this column to be performed efficiently.
If a Hive table is to be created with columns named name, age, and height, we might choose to map these to Accumulo by storing the name column as the row ID, and the other columns in a common column family.
This can be specified via the WITH SERDEPROPERTIES() function during table creation.
Our use of this function can look like the following:
CREATE TABLE people(name STRING, age INT, height INT)
STORED  BY 'org.apache.hadoop.hive.accumulo.AccumuloStorageHandler'
WITH SERDEPROPERTIES('accumulo.columns.mapping' =
                     ':rowid,attributes:age,attributes:height'),
The column mapping relies on the order of fields in the Hive table specification, assigning the first Accumulo column name to the first Hive table column and so on.
By default the Accumulo table name is the same as the Hive table name.
This can be overridden via the WITH TBLPROPERTIES() function:
WITH TBLPROPERTIES ("accumulo.table.name" = "hive_people")
A table created with CREATE TABLE will be considered managed by Hive, meaning it will be created and destroyed along with the Hive table.
To map a Hive table to an existing Accumulo table without tying the lifecycle of the Accumulo table to the Hive table, use the EXTERNAL keyword.
If we simply want to inform Hive of a table we have already created in Accumulo, we can do something like the following:
CREATE EXTERNAL TABLE people(name STRING, age INT, height INT)
STORED  BY 'org.apache.hadoop.hive.accumulo.AccumuloStorageHandler'
WITH SERDEPROPERTIES('accumulo.columns.mapping' =
                     ':rowid,attributes:age,attributes:height'),
Serializing values
Values in Hive tables can be of various types.
By default, values are serialized as strings when stored in Accumulo.
Values can also be stored using a binary serialization by adding #b to the end of a field name in the mapping.
For example, if we want to store the age field using binary serialization we can specify it as attributes:age#b.
To explicitly specify string serialization, #s can be used.
Additional options
Additional behavior can be controlled via the following options:
accumulo.iterator.pushdown-
Use iterators to execute filter predicates. True by default.
accumulo.default.storage-
Set the serialization method to be used by default when no method is specified. The default is
string. accumulo.visibility.label-
A visibility label to be applied to records written to Accumulo. By default this is empty.
accumulo.authorizations-
A list of authorizations, separated by commas, to be applied when scanning Accumulo tables. Blank by default.
accumulo.composite.rowid.factory-
The name of a Java class that can be used to customize behavior when constructing
LazyObjectsfrom the row ID without changing theObjectInspector. accumulo.composite.rowid-
Apply custom parsing of the row ID column into a
LazyObject. accumulo.table.name-
The name of the Accumulo table to use. By default this is the same as Hive table name.
accumulo.mock.instance-
Use an instance of
MockAccumulofor testing instead of an actual Accumulo instance. Default isfalse.
Hive example
To explore how Hive and Accumulo can be used together, we’ll import some data about storm fatalities from the National Oceanic and Atmospheric Administration’s (NOAA) National Climatic Data Center website into a table in Accumulo and manipulate the data using HQL queries to answer ad-hoc questions:
$ wget http://www1.ncdc.noaa.gov/pub/data/swdi/stormevents/csvfiles/
  StormEvents_fatalities-ftp_v1.0_d2014_c20141022.csv.gz
$ gunzip StormEvents_fatalities-ftp_v1.0_d2014_c20141022.csv.gz
We can start Hive with the options that allow it to connect to a local Accumulo instance. In this example we’re using Hortonworks’ HDP 2.1 sandbox VM:
$ hive -hiveconf accumulo.instance.name=hdp
  -hiveconf accumulo.zookeepers=localhost -hiveconf accumulo.user.name=root
  -hiveconf accumulo.user.pass=secret
We’ll create a regular Hive table for loading the storm fatalities data from the comma-separated value (CSV) file we downloaded. Hive does not yet support loading data directly into a native table like Accumulo, so we’ll populate a Hive table and then transfer it into Accumulo:
hive> CREATE TABLE storm_fatalities(fat_yearmonth INT, fat_day INT, fat_time INT,
      fatality_id STRING, event_id STRING, fatality_type STRING,
      fatality_date DATE, fatality_age int, fatality_sex STRING,
      fatality_location string, event_yearmonth int) row format delimited fields
      terminated by ',' stored as textfile;
hive> load data local inpath
      './StormEvents_fatalities-ftp_v1.0_d2014_c20141022.csv'
      into table storm_fatalities;
Copying data from
    file:/home/hive/StormEvents_fatalities-ftp_v1.0_d2014_c20141022.csv
Copying file: file:/home/hive/StormEvents_fatalities-ftp_v1.0_d2014_c20141022.csv
Loading data to table default.storm_fatalities
Table default.storm_fatalities stats: [numFiles=1, numRows=0, totalSize=28337,
    rawDataSize=0]
OK
Time taken: 1.72 seconds
We can run a query to check our data against the Accumulo table after loading:
hive> select avg(fatality_age) from storm_fatalities;
OK
44.875
Time taken: 13.12 seconds, Fetched: 1 row(s)
Now we’ll set up the Accumulo table, similar to the Hive table, but also specifying the mapping:
hive> CREATE TABLE acc_storm_fatalities(fat_yearmonth INT, fat_day INT,
      fat_time INT, fatality_id STRING, event_id STRING, fatality_type STRING,
      fatality_date DATE, fatality_age int, fatality_sex STRING,
      fatality_location string, event_yearmonth int)
      STORED BY 'org.apache.hadoop.hive.accumulo.AccumuloStorageHandler'
      WITH SERDEPROPERTIES('accumulo.columns.mapping' =
          'time:yearmonth,time:day,time:time,:rowid,event:id,fatality:type,
           time:date,person:age,person:sex,fatality:location,event:yearmonth'),
hdfs://sandbox.hortonworks.com:8020/user/hive/warehouse/acc_storm_fatalities
OK
Time taken: 1.542 seconds
Let’s copy our storm data into the Accumulo table:
hive> INSERT OVERWRITE TABLE acc_storm_fatalities SELECT * FROM storm_fatalities;
OK
Time taken: 8.082 seconds
Looking in the Accumulo shell we can see the data in our table:
accumulo shell -u user
Password: ******
Shell - Apache Accumulo Interactive Shell
-
- version: 1.5.1.2.1.5.0-695
-
user@hdp> tables
!METADATA
acc_storm_fatalities
test
trace
user@hdp> table acc_storm_fatalities
user@hdp acc_storm_fatalities> scan
21149 event:id []    482017
21149 event:yearmonth []    201401
21149 fatality:location []    "Vehicle/Towed Trailer"
21149 fatality:type []    "D"
21149 person:sex []    "F"
21149 time:day []    6
21149 time:time []    0
21149 time:yearmonth []    201401
21186 event:id []    482572
21186 event:yearmonth []    201401
21186 fatality:location []    "Vehicle/Towed Trailer"
21186 fatality:type []    "I"
21186 person:age []    2
21186 person:sex []    "M"
21186 time:day []    6
21186 time:time []    0
21186 time:yearmonth []    201401
We can now perform queries over our Accumulo table as we would with a regular Hive table:
hive> SELECT AVG(fatality_age) FROM acc_storm_fatalities;
Total MapReduce CPU Time Spent: 3 seconds 260 msec
OK
44.875
Time taken: 30.656 seconds, Fetched: 1 row(s)
hive> SELECT count(1),fatality_location FROM acc_storm_fatalities
      GROUP BY fatality_location;
Total MapReduce CPU Time Spent: 3 seconds 160 msec
OK
1  "Boating"
1  "Business"
4  "Camping"
1  "Golfing"
2  "Heavy Equipment/Construction"
58 "In Water"
1  "Long Span Roof"
18 "Mobile/Trailer Home"
9  "Other"
87 "Outside/Open Areas"
45 "Permanent Home"
6  "Permanent Structure"
5  "Under Tree"
100  "Vehicle/Towed Trailer"
1  FATALITY_LOCATION
Time taken: 29.797 seconds, Fetched: 15 row(s)
Optimizing Hive queries
Hive works best for ad-hoc analytical queries on data stored in a columnar format. This allows Hive to only read the columns involved in a query and leave other columns unread on disk. Because Accumulo supports locality groups, we can achieve the same performance gains as other columnar storage formats (see “Column Families” and “Locality Groups”).
In our example, we might want to put the data about personal details and time into their own locality groups, leaving all other columns in the default locality group:
user@hdp acc_storm_fatalities> getgroups
user@hdp acc_storm_fatalities> setgroups person=person time=time
user@hdp acc_storm_fatalities> getgroups
time=time
person=person
We can compact to apply our changes to the files on disk:
user@hdp acc_storm_fatalities> compact
user@hdp acc_storm_fatalities>
Enabling block caching for our tables can also assist in keeping frequently accessed data blocks in memory:
user@hdp acc_storm_fatalities> config -s table.cache.block.enable=true
A query involving the field stored in the Accumulo row ID will use a Scanner configured only over the range specified. For example, the following query scans over a single row, so it would return much faster than an entire table scan:
hive> SELECT * FROM acc_storm_fatalities where event_id=500101;
OK
201404 3 0 22298 500101  "I" NULL  2 "M"
    "Permanent Home" 201404
Time taken: 0.041 seconds, Fetched: 1 row(s)
Additional notes on the Accumulo-Hive integration are available online:
Apache Pig
Apache Pig is a high-level data-processing language that compiles scripts down to a series of MapReduce jobs that can be executed on data in Accumulo tables.
As of Pig 0.13, Accumulo can be used as a Storage option.
Pig can use Accumulo as the source of data in LOAD statements and the destination in STORE statements.
To load data from an Accumulo table, use the following syntax:
dataset = LOAD 'accumulo://tableName?instance=myInstance&user=myUser
    &password=myPassword&zookeepers=myZooKeeperServers'
    USING org.apache.pig.backend.hadoop.accumulo.AccumuloStorage(
    'column specification') AS
    ('pig schema definition'),
A column specification is a comma-separated list of column identifiers. A column identifier can be *, meaning all columns, a specific column family such as myFamily:, or a specific column such as myFamily:myColumnQualifier. A column prefix can also be specified, such as myFamily:col*.
Specifying just a column family, or a prefix followed by a wildcard, requires that the columns be represented as a map[] in the associated Pig schema definition.
Individual columns in the specification can be represented as particular data types in the Pig schema definition.
Pig will load row IDs from the Accumulo table into the first element of tuples read, as a chararray by default.
In STORE statements, use the following syntax:
STORE dataset
INTO 'accumulo://tableName?instance=myInstance&user=myUser&password=myPassword
    &zookeepers=myZooKeeperServers'
USING org.apache.pig.backend.hadoop.accumulo.AccumuloStorage(
    'column specification', 'options'),
The column specification is the same as for the LOAD statement.
Options to be specified include the following:
- -c|--caster
-
The class name that implements
LoadStoreCasterto use when serializing types to and from Accumulo tables. Default isUTF8StringConverter.AccumuloBinaryConverteris an alternative. - -auths|--authorizations
-
A comma-separated list of authorizations to apply when loading data from Accumulo.
- -s|--start
-
Specifies the inclusive start row at which to begin reading when loading data.
- -e|--end
-
Specifies the inclusive row at which to stop reading.
- -buff|--mutation-buffer-size
-
The number of bytes to use when buffering data to be written to Accumulo.
- -wt|--write-threads
-
The number of threads to use when writing to Accumulo.
- -ml|--max-latency
-
The maximum number of milliseconds to wait before flushing a set of writes to Accumulo.
- -sep|--separator
-
A character used to separate column names when parsing the column specification. The default is a comma.
- -iw|--ignore-whitespace
-
Whether to strip whitespace from the column specification. The default is
true.
We’ll run through an example to make these ideas more clear.
Pig example
To communicate with Accumulo, Pig needs to know the location of the Accumulo JARs:
export PIG_CLASSPATH="$ACCUMULO_HOME/lib/*:$PIG_CLASSPATH"
We’ll use the example data provided for exploring Pig in Programming Pig by Alan Gates (O’Reilly):
wget -O NYSE_daily https://github.com/alanfgates/programmingpig/blob/master/
  data/NYSE_daily?raw=true
Let’s start Pig and load this file into a schema:
$ pig
grunt> daily = load 'NYSE_daily' as (exchange:chararray, symbol:chararray,
               sdate:chararray, open:float, high:float, low:float, close:float,
               volume:int, adj_close:float);
We’ll use Pig to generate a field that we can use as a row ID in an Accumulo table; in this case we’ll use the symbol name followed by the date. This will give us a table that supports efficiently looking up all information for a particular symbol in chronological order. We’ll also generate a new field representing the closing price times the volume:
grunt> daily_by_symbol_date = foreach daily generate CONCAT(symbol, sdate), open,
       high, low, close, volume * close;
Now we can tell Pig to store this data in a table in our local Accumulo instance:
grunt> store daily_by_symbol_date
       INTO 'accumulo://daily?instance=hdp&user=root&password=secret
       &zookeepers=localhost'
       USING org.apache.pig.backend.hadoop.accumulo.AccumuloStorage('prices:open,
       prices:high,prices:low,prices:close,calculated:voltimesclose'),
Note that we didn’t mention the first element of the tuples in daily_by_symbol_date in our column specification, because that element will be written to Accumulo as the row ID:
Success!
Job Stats (time in seconds):
JobId  Alias Feature Outputs
job_local1392295495_0002 daily,daily_by_symbol_date  MAP_ONLY
  accumulo://daily?instance=hdp&user=root&password=secret&zookeepers=localhost,
Input(s):
Successfully read records from: "file:///root/pig-0.13.0/NYSE_daily"
Output(s):
Successfully stored records in: "accumulo://daily?instance=hdp&user=root
  &password=secret&zookeepers=localhost"
Job DAG:
job_local1392295495_0002
Now we should have some data in a table in Accumulo:
root@hdp daily> scan
CA1988-07-25 calculated:voltimesclose []    5.329194E7
CA1988-07-25 prices:close []    26.52
CA1988-07-25 prices:high []    26.88
CA1988-07-25 prices:low []    26.16
CA1988-07-25 prices:open []    26.16
CA1990-12-20 calculated:voltimesclose []    1.526916E7
CA1990-12-20 prices:close []    7.6
CA1990-12-20 prices:high []    7.6
CA1990-12-20 prices:low []    7.24
CA1990-12-20 prices:open []    7.24
We can continue to work with this data in Pig via LOAD statements.
We’ll use the ability to scan a particular range to limit our data set to information for all dates for a single stock.
We can also select just a subset of the columns available.
In this example, we’ll look at only the stock CSX, and the close and voltimesclose columns:
csxinfo = LOAD 'accumulo://daily?instance=hdp&user=root&password=secret
         &zookeepers=localhost'
         USING org.apache.pig.backend.hadoop.accumulo.AccumuloStorage(
         'prices:close,calculated:voltimesclose', '-s CSX -e CSY') AS
         (symdate:chararray, close:float, voltimesclose:float);
dump csxinfo;
(CSX1988-02-18,30.12,6.0517104E7)
(CSX1988-03-02,29.25,5.87691E7)
...
(CSX2009-12-30,49.12,6.65576E7)
(CSX2009-12-31,48.49,8.255908E7)
This is much more efficient than having to read all the data and use Pig’s filter operator to limit the data.
If we want to allow Pig to use an irregular set of columns in Accumulo rows, we can use Pig maps to store whatever columns we happen to find in an Accumulo row:
csxinfo = LOAD 'accumulo://daily?instance=hdp&user=root&password=secret
         &zookeepers=localhost'
         USING org.apache.pig.backend.hadoop.accumulo.AccumuloStorage(
         '*', '-s CSX -e CSY') AS
         (symdate:chararray, allcolumns:map[]);
We can also limit the map to just those columns in a particular family:
csxinfo = LOAD 'accumulo://daily?instance=hdp&user=root&password=secret
         &zookeepers=localhost'
         USING org.apache.pig.backend.hadoop.accumulo.AccumuloStorage(
         'prices:', '-s CSX -e CSY') AS
         (symdate:chararray, prices:map[]);
As we did with Hive, we can use Accumulo’s locality groups feature to partition groups of columns into separate files on disk to make reading a particular subset of columns more efficient. Carefully generating row IDs can make accessing a subset of rows as Pig tuples dramatically more efficient.
Apache Kafka
Apache Kafka is a scalable, fast, distributed queue developed originally at LinkedIn. For this reason it is attractive as part of a larger data workflow as a way to connect different systems together. For example, a variety of applications can be made to publish their data to topics in Kafka, and a different set of other systems can be configured to read data from the topics on the Kafka queue. The applications publishing and the applications reading don’t have to be configured to talk to one another, just to talk to Kafka.
This was one powerful idea behind the push a few years ago for organizations to move to a service-oriented architecture, including a centralized queue serving as a message bus for the entire organization. Because Kafka is distributed it is a good candidate for inclusion in a big data workflow.
Accumulo clients can read from Kafka topics and write the data read to Accumulo tables. This provides other applications with the capability to push data to Accumulo tables simply by publishing data to a Kafka topic. Accumulo clients can of course be configured to listen for data pushed from other applications directly, but using a queue allows multiple consumers to read the same data without configuring complicated pipelines.
Kafka provides some guarantees around the data consumed from its topics:
-
Messages sent by a producer to a particular topic partition will be appended in the order in which they are sent. That is, if a message M1 is sent by the same producer as a message M2, and M1 is sent first, then M1 will have a lower offset than M2 and appear earlier in the log.
-
A consumer instance sees messages in the order in which they are stored in the log.
-
For a topic with replication factor N, we will tolerate up to N–1 server failures without losing any messages committed to the log.
One thing that is important for many applications is to process each message once, or sometimes at least once. Kafka can partition a topic and allow multiple consumers to be grouped within a common group ID in order for the partitions to be consumed in parallel. Each message will be delivered to a consumer group only once. Within the consumer group, individual consumers can tell a broker that they have consumed a message from a particular partition of a topic by updating an offset. From the Kafka documentation:
Our topic is divided into a set of totally ordered partitions, each of which is consumed by one consumer at any given time. This means that the position of consumer in each partition is just a single integer, the offset of the next message to consume. This makes the state about what has been consumed very small, just one number for each partition. This state can be periodically check-pointed. This makes the equivalent of message acknowledgements very cheap.
When using Accumulo to store messages read from Kafka, you can get closer to achieving this property of writing each message once in the presence of individual machine failures by synchronizing the updating of the Kafka consumer offsets with flushing batches successfully to Accumulo.
An example of code that acts as a Kafka consumer and Accumulo ingest client is as follows:
packagecom.accumulobook.integration;importcom.google.common.base.Function;importcom.google.common.collect.Iterables;importjava.util.ArrayList;importjava.util.HashMap;importjava.util.List;importjava.util.Map;importjava.util.Properties;importkafka.consumer.ConsumerConfig;importkafka.consumer.KafkaStream;importkafka.javaapi.consumer.ConsumerConnector;importkafka.message.MessageAndMetadata;importorg.apache.accumulo.core.client.BatchWriter;importorg.apache.accumulo.core.client.BatchWriterConfig;importorg.apache.accumulo.core.client.Connector;importorg.apache.accumulo.core.client.MutationsRejectedException;importorg.apache.accumulo.core.client.TableNotFoundException;importorg.apache.accumulo.core.data.Mutation;publicclassKafkaIngestClient{privatefinalProblemMessageSaversaver;publicinterfaceProblemMessageSaver{voidsave(finalList<byte[]>messages);}privatefinalKafkaStream<byte[],byte[]>stream;privatefinalBatchWriterbatchWriter;privatefinalintbatchFlushSize;privatefinalFunction<byte[],Mutation>messageConverter;privatefinalConsumerConnectorconsumerConnector;privatefinalArrayList<byte[]>messageBuffer;publicKafkaIngestClient(finalStringzookeeper,finalStringconsumerGroup,finalStringtopic,finalStringtable,finalBatchWriterConfigbwc,finalConnectorconn,finalintbatchFlushSize,finalFunction<byte[],Mutation>messageConverter,finalProblemMessageSaversaver)throwsTableNotFoundException{// create kafka consumerPropertiesprops=newProperties();props.put("zookeeper.connect",zookeeper);props.put("auto.offset.reset","smallest");props.put("autocommit.enable","false");props.put("group.id",consumerGroup);ConsumerConfigconsumerConfig=newConsumerConfig(props);consumerConnector=kafka.consumer.Consumer.createJavaConsumerConnector(consumerConfig);Map<String,Integer>topicCountMap=newHashMap<>();topicCountMap.put(topic,newInteger(1));Map<String,List<KafkaStream<byte[],byte[]>>>consumerMap=consumerConnector.createMessageStreams(topicCountMap);stream=consumerMap.get(topic).get(0);// create Accumulo batch writerbatchWriter=conn.createBatchWriter(table,bwc);this.batchFlushSize=batchFlushSize;this.messageConverter=messageConverter;this.messageBuffer=newArrayList<>();this.saver=saver;}publicvoidrun(){for(MessageAndMetadata<byte[],byte[]>mm:stream){byte[]message=mm.message();messageBuffer.add(message);if(messageBuffer.size()>=batchFlushSize){while(true){try{batchWriter.addMutations(Iterables.transform(messageBuffer,messageConverter));batchWriter.flush();consumerConnector.commitOffsets();messageBuffer.clear();break;}catch(MutationsRejectedExceptionex){// constraint violations and authorization failures// will not be solved simply by retryingif(ex.getConstraintViolationSummaries().size()>0||ex.getAuthorizationFailuresMap().size()>0){// save off these messages for examination and continuesaver.save(messageBuffer);consumerConnector.commitOffsets();messageBuffer.clear();break;}// else will retry until success}}}}}}
In the event that a machine dies, some of the messages read from the Kafka queue and batched in memory by the Accumulo client library will not yet have been written to Accumulo. Another machine starting up to take over consumption of the partition from which the failed machine was reading (or perhaps an existing client allowed by Kafka to take over consumption of the partition from the failed machine) will start reading messages from the offset of the last message known to have been written to Accumulo successfully, so that no messages will fail to be written to Accumulo.
Because it is possible for the BatchWriter to flush messages to Accumulo on its own in the background, this strategy provides at-least-once processing semantics, meaning each message will be processed once, or in the case of failure, perhaps more than once.
If the mapping of Kafka messages to key-value pairs written to Accumulo is deterministic, Accumulo’s VersioningIterator can be configured to eliminate any duplicates by keeping only the latest version of a particular row and column within a key.
This is the default configuration for all tables in Accumulo.
Integration with Analytical Tools
Many use cases call for processing data with additional analytical tools on a separate machine outside of Accumulo or on additional processes colocated with Accumulo tablet servers, such as R or OpenTDSB.
R is a popular analytical tool that implements a wide variety of statistical algorithms. Some work has gone into integrating R with Accumulo. This adapter makes it possible for R to function as an Accumulo client and to pull data into R for further analysis.
OpenTSDB is a project for storing time series in scalable databases such as Accumulo. An adapter for OpenTSDB onto Accumulo is also available.