Chapter 13. Printing, Fonts & PDFs
Technologists got pretty excited about “the paperless office” in the 1980s, but the PC explosion had exactly the opposite effect. Thanks to the proliferation of inexpensive, high-quality printers, the world generates far more paper than ever. Fortunately, there’s not much to printing from Windows 10.
And since they seem like vaguely printing-related subjects, this chapter also covers Windows’ font technologies, and one of the best features in Windows 10: the ability to turn any document into a PDF document with one click. OK, two.
Installing a Printer
A printer is a peripheral device—something outside the PC—and as such, it won’t work without a piece of driver software explaining the new hardware to Windows. In general, getting this driver installed is a simple process. It’s described in more detail in Chapter 14.
The good news, though, is that Windows comes with the drivers for thousands of printers, of all different brands, ready to be installed. Read on.
USB Printers
If the technology gods are smiling, here’s the entire set of instructions for installing a typical inkjet USB printer:
Connect the printer to the computer; turn it on.
A notification appears (Figure 13-1), and that’s it. You’re ready to print. No driver operations, no setup. Next time you print something, you’ll see the printer’s name in the Print dialog box.
The backup plan
In certain situations, the printer doesn’t “just work” when you plug it in. Maybe it’s wireless. Maybe it’s older.
In that case, here’s Plan B: Open ![]() →
→![]() →Devices→“Printers & scanners” (Figure 13-1). Choose “Add a printer or scanner.” Now Windows shows you the printer’s name; select it, hit “Add device,” and off you go.
→Devices→“Printers & scanners” (Figure 13-1). Choose “Add a printer or scanner.” Now Windows shows you the printer’s name; select it, hit “Add device,” and off you go.
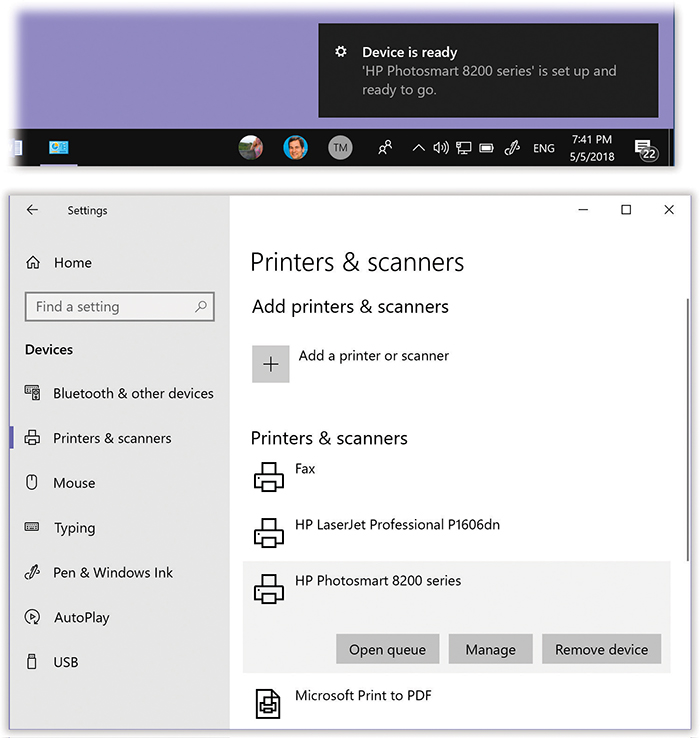
Figure 13-1. Top: When you plug in a typical inkjet printer, Windows discovers it instantly. Mission accomplished.
Bottom: Now and then, you may have to visit the “Printers & scanners” page of Settings. It lists the printers your PC already knows about.
The backup backup plan
If you have a really old printer, its drivers might not be compatible with Windows 10. Check the manufacturer’s website, such as www.epson.com or www.hp.com, or a central driver repository like www.windrivers.com to see if there’s anything newer.
In dire situations, you might have to call upon the mighty powers of the “Find a printer by other options” wizard. Open ![]() →
→![]() →Devices→“Printers & scanners,” hit “Add printer or scanner,” and then choose “The printer that I want isn’t listed,” and walk through the friendly onscreen guidance.
→Devices→“Printers & scanners,” hit “Add printer or scanner,” and then choose “The printer that I want isn’t listed,” and walk through the friendly onscreen guidance.
Network Printers
If you work in an office where people on the network share a single printer (usually a laser printer), the printer usually isn’t connected directly to your computer. Instead, it’s elsewhere on the network; your PC’s Ethernet cable or wireless antenna connects you to it indirectly.
In general, there’s very little involved in ensuring that your PC “sees” this printer. Its icon simply shows up in your Print dialog box.
Printing
Once you’ve connected a printer or three, printing is little more than a one-click operation.
After you’ve created a document you want to see on paper, start the printout. The object is simply to find the Print command; it shouldn’t be hard. For example, in Mail and the Edge browser, it’s in the More (…) menu. In Microsoft Office programs Word and Excel, it’s in the File menu. The steps differ depending on which kind of app you’re using:
Printing from Microsoft Store Apps
If you’re printing from a Microsoft Store app (“Microsoft Store Apps”), like most of the built-in Windows 10 programs, you wind up at the Print dialog box (Figure 13-2).
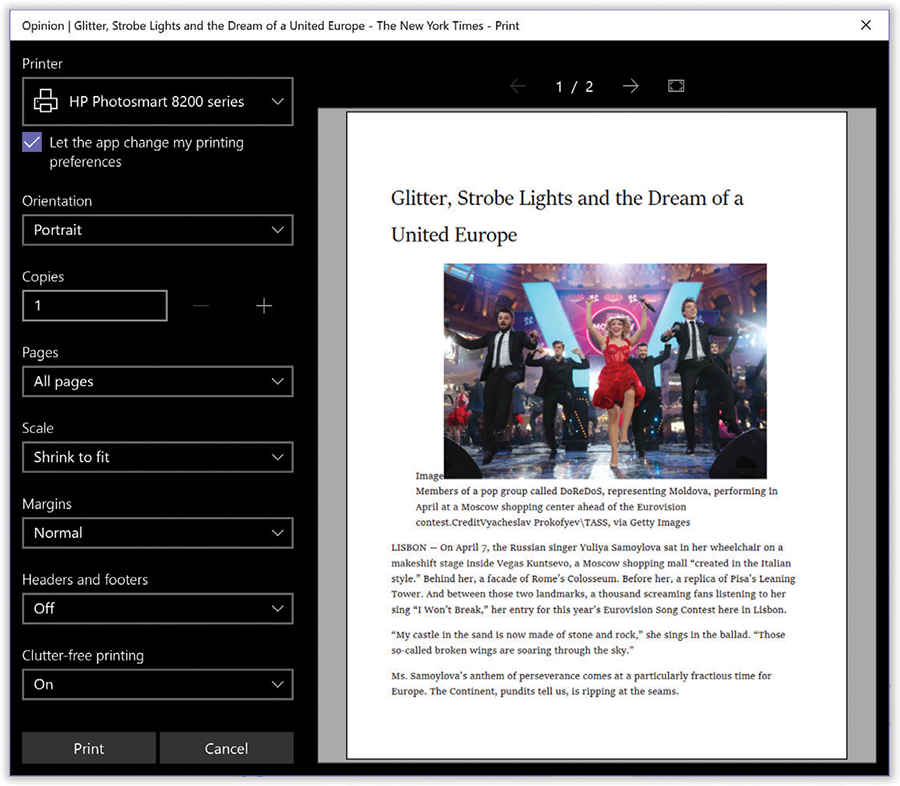
Figure 13-2. Whereas the traditional Windows Print dialog box looks like a space shuttle cockpit, there’s nothing to set up here except the printer you want to use, the number of copies you want, which pages you want to print, and what paper size you’re using.
You can use the page controls above the preview to have a glance at a different page of the preview.
To change any of the tweakier settings—page orientation, paper quality, color mode (for color printers), paper tray—hit “More settings.” But that stuff is generally hidden until you need it, which is probably rarely.
Printing from Desktop Programs
In a desktop program—a non–Microsoft Store app—choose File→Print, click the Print button on the toolbar, or press Ctrl+P. The old Print dialog box appears, as shown in Figure 13-3.
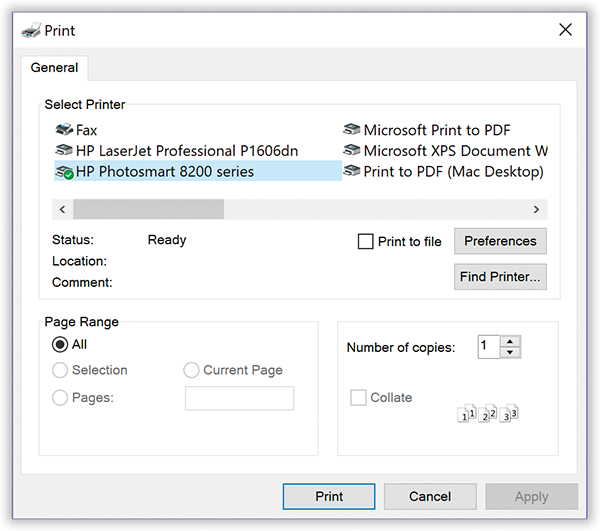
Figure 13-3. The options in the Print dialog box are different for each printer model and each program, so your Print dialog box may look slightly different. Most of the time, the factory settings shown here are what you want (one copy, print all pages). Just click OK or Print (or press Enter) to close this dialog box and send the document to the printer.
This dialog box, too, changes depending on the program you’re using—the Print dialog box in Microsoft Word looks a lot more intimidating than the WordPad version—and the printer model. But you’ll usually find these basics here: a choice of printers, number of copies, and so on. Don’t miss:
Preferences/Properties. Clicking this button opens a version of the printer’s Properties dialog box, where you can change the paper size you’re using, whether you want to print sideways on the page (landscape orientation), what kind of paper—or photo paper—you’re using, and so on. Here you’re making changes only for a particular printout; you’re not changing any settings for the printer itself. (The specific features of this dialog box depend on the program you’re using.)
Page Range. If you want to print only some of the pages, click the Pages option and type in the page numbers you want (with a hyphen, like 3-6 to print Figure I-1 through 6).
Tip:
You can also type in individual page numbers with commas—like 2, 4, 9—to print only those three pages—or even add hyphens to the mix, like this: 1-3, 5-6, 13-18.
Click Current Page to print only the page where you’ve placed the blinking insertion point. Click Selection to print only the text you selected (highlighted) before opening the Print dialog box. (If this option button is dimmed, it’s because you didn’t highlight any text—or because you’re using a program that doesn’t offer this feature.)
Print. The Print drop-down list that might appear in the lower-left section of the dialog box offers three options: “All pages in range,” “Odd pages,” and “Even pages.”
Use the Odd and Even pages options when you have to print on both sides of the paper but your printer has no special feature for this purpose. You’ll have to print all the odd pages, turn the stack of printouts over, and then run the pages through the printer again to print the even pages on the other side.
Application-specific options. The particular program you’re using may add a few extra options of its own to an Options tab in this dialog box.
When you’ve finished making changes to the print job, click OK or Print, or press Enter. You don’t have to wait for the document to emerge from the printer before returning to work on your PC. (Just don’t put your machine to sleep until it’s finished printing.)
Tip:
During printing, the tiny icon of a printer appears in your system tray. Pointing to it without clicking produces a pop-up tooltip that reveals the background printing activity.
Printing from the Desktop
You don’t necessarily have to print a document while it’s open in front of you. You can, if you wish, print it directly from the desktop or from a File Explorer window in a couple of ways:
Right-click the document icon, and then choose Print from the shortcut menu. Windows opens the program that created it—Word or Excel, for example. The document is then sent automatically to the default printer.
If you’ve opened the printer’s own print queue (Figure 13-4), then you can drag any document icon directly out of a File Explorer window into the list of waiting printouts. Its name joins the others on the list.
These methods bypass the Print dialog box and therefore give you no way to specify which pages you want to print, or how many copies. You just get one copy of the entire document.
Controlling Printouts
Between the moment you click OK in the Print dialog box and the arrival of the first page in the printer’s tray, there’s a delay. Usually, it’s brief, but when you’re printing a complex document with lots of graphics, it can be considerable.
Fortunately, the waiting doesn’t necessarily make you less productive, since you can return to work on your PC, or even quit the application and go watch TV. An invisible program called the print spooler supervises this background printing process. The spooler collects the document that’s being sent to the printer, along with all the codes the printer expects to receive, and then sends this information, little by little, to the printer.
To see the list of documents waiting to be printed—the ones that have been stored by the spooler—open the printer’s queue (Figure 13-4).
Tip:
While the printer is printing, a printer icon appears in the system tray. As a shortcut to opening the printer’s window, just double-click that icon.
This window lists the documents currently printing and waiting. They print in top-to-bottom order.
You can manipulate documents in the queue in any of these ways during printing:
Put one on hold. To pause a document, right-click its name, and then choose Pause from the shortcut menu (Figure 13-4). When you’re ready to let the paused document continue to print, right-click its listing and choose Resume.
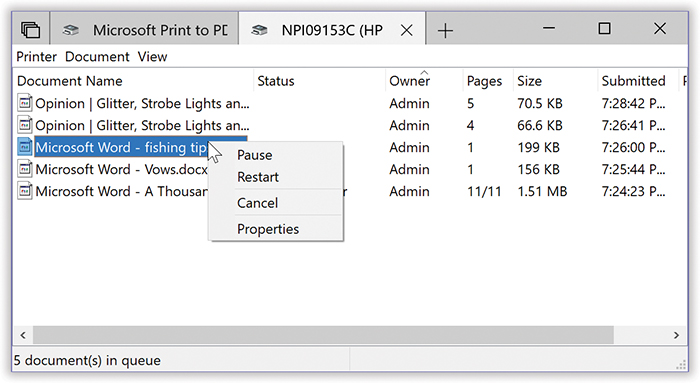
Figure 13-4. By right-clicking documents in this list, you can pause or cancel any document in the queue—or all of them at once.
Put them all on hold. To pause the printer, choose Printer→Pause Printing from the window’s menu bar. You might do this when, for example, you need to change the paper in the printer’s tray. (Choose Printer→Pause Printing again when you want the printing to pick up from where it left off.)
Add another one. As noted earlier, you can drag any document icon directly from its disk or folder window into the printer queue. Its name joins the list of printouts-in-waiting.
Cancel one. To cancel a printout, click its name and then press the Delete key. If you click Yes in the confirmation box, the document disappears from the queue; it won’t print. (Or right-click it and choose Cancel from the shortcut menu.)
Cancel all of them. To cancel the printing of all the documents in the queue, choose Printer→Cancel All Documents.
Note:
A page or so may still print after you’ve paused or canceled a printout. Your printer has its own memory (the buffer), which stores the printout as it’s sent from your PC. If you pause or cancel printing, you’re only stopping the spooler from sending more data to the printer.
Rearrange them. To rearrange the printing order, start by right-clicking the name of one of the printouts-in-waiting; from the shortcut menu, choose Properties. On the General tab, drag the Priority slider left or right. Documents with higher priorities print first.
Fancy Printer Properties
The masses of Windows owners generally slog through life choosing File→Print, clicking OK, and then drumming their fingers as they wait for the paper to slide out of the printer. But your printer can do more than that—much more. Here are just a few of the stunts that await the savvy PC fan.
The following tricks require opening the Printer Properties dialog box—an old, tiny-print leftover from the pre–Windows 10 days. You can get there in either of two ways:
In
 →
→ →Devices→“Printers & scanners,” select the printer’s icon, then Manage, and then “Printer properties.”
In
→→Devices, under “Related settings,” find the ancient “Devices and printers” dialog box. Right-click the printer’s icon; from the shortcut menu, choose “Printer properties.”
Limiting Hours of Access
If it’s just you, your Dell, and a color inkjet, then you’re entitled to feel baffled by this feature, which lets you declare your printer off-limits during certain hours of the day. But if you’re the manager of some office whose expensive color laser printer makes printouts that cost a dollar apiece, you may welcome a feature that prevents employees from hanging around after hours to print out 500 copies of their headshots.
To specify such an access schedule for a certain printer, open the “Printer properties” dialog box shown in Figure 13-5. On the Advanced tab, select “Available from,” and use the time-setting controls to specify when your underlings are allowed to use this printer from across the network. Clicking OK renders the printer inoperable during off-hours.
Add a Separator Page
If your PC is on a network whose other members bombard a single laser printer with printouts, you might find separator pages useful—the printer version of fax cover sheets. A separator page is generated before each printout, identifying the document and its owner.
This option, too, is accessible from the Advanced tab of the printer’s Properties dialog box. Click the Separator Page button at the bottom of the dialog box. In the Separator Page dialog box, click the Browse button to choose a .sep (separator page) file. Sysprint.sep is the one you probably want. Not only does this page include the name, date, time, and so on, but it also automatically switches the laser printer to PostScript mode—if it’s not already in that mode, and if it’s a PostScript printer.
Sharing a Printer
If you have more than one PC connected to a network, as described in Chapter 19, they all can use the same printer—even the cheapest little inkjet connected to a USB port.
To begin, sit down at the computer to which the printer is attached. Continue as described in Figure 13-5.
Once you’ve shared the printer, its icon shows up on all other computers on the same home network. It’s listed in their Print dialog boxes, their Printer windows, and so on.
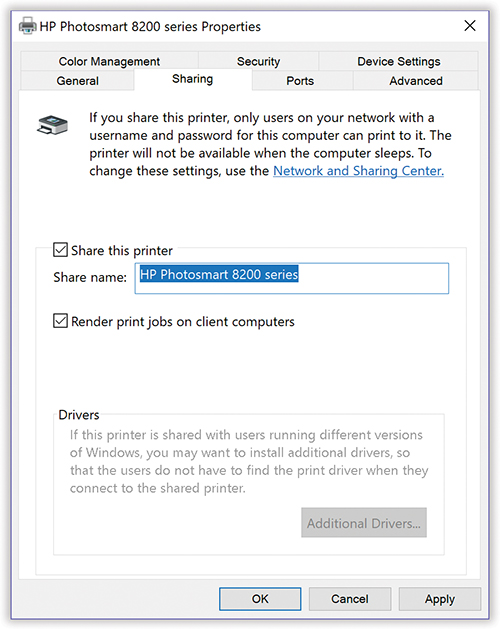
Figure 13-5. Open “Devices and printers.” Right-click the printer you want to share, and then click “Printer properties.” Click the Sharing tab. (If you see a “Change sharing options” button, click it.)
Finally, turn on “Share this printer.” Click OK.
Now this printer is available to other computers on the same network.
Printer Troubleshooting
If you’re having a problem printing, the first diagnosis you must make is whether the problem is related to software or hardware. A software problem may mean the driver files have become damaged. A hardware problem means there’s something wrong with the printer, the port, the cable, the toner, the ink, or whatever.
If you’re guessing it’s a software problem—fairly likely—reinstall the printer driver. Open ![]() →
→![]() →Devices→“Printers & scanners,” select the printer’s icon, and then choose “Remove device” from the shortcut menu. Then reinstall the printer as described at the beginning of this chapter.
→Devices→“Printers & scanners,” select the printer’s icon, and then choose “Remove device” from the shortcut menu. Then reinstall the printer as described at the beginning of this chapter.
If the problem seems to be hardware-related, try these steps in sequence:
Check the lights or the LED panel readout on the printer. If you see anything other than the normal “Ready” indicator, then check the printer’s manual to diagnose the problem.
Turn the printer off and on to clear any memory problems.
Check the printer’s manual to learn how to print a test page.
Check the cable to make sure both ends are firmly and securely plugged into the correct ports.
Test the cable. Use another cable, or take your cable to another computer/printer combination.
If none of these steps leads to an accurate diagnosis, don’t forget that Windows has its own troubleshooting tools. In ![]() →
→![]() →Devices→“Printers & scanners,” choose “Get help with your printer” to get started.
→Devices→“Printers & scanners,” choose “Get help with your printer” to get started.
Fonts
Some extremely sophisticated programming has gone into the typefaces that are listed in the Fonts dialog boxes of your word processor and other programs. They use OpenType and TrueType technology, meaning that no matter what point size you select for these fonts, they look smooth and professional—both on the screen and when you print.
Managing Your Fonts
Windows comes with several dozen great-looking fonts: Arial, Book Antiqua, Garamond, Times New Roman, and so on. But the world is filled with additional fonts. You may find them on websites or in the catalogs of commercial typeface companies. Sometimes you’ll find new fonts on your system after installing a new program, courtesy of its installer.
In the April 2018 Update, Microsoft brought font management into Settings, where it rightfully belongs. Open ![]() →
→![]() →Personalization→Fonts. You can perform three janitorial tasks here:
→Personalization→Fonts. You can perform three janitorial tasks here:
Add new fonts. Choose “Get more fonts in Microsoft Store.” Off you go to a searchable catalog of free or cheap fonts, ready to Get.
Tip:
Of course, you can also install fonts from any other source. Once you’ve downloaded one, just double-click its icon to install it.
Remove fonts. Select a font’s name to open its details page (Figure 13-6). Choose Uninstall, and then confirm.
Preview fonts. When you tap or click a font’s tile, the details page opens (Figure 13-6).
You see the changes immediately reflected in your programs’ Font dialog boxes; you don’t even have to quit and reopen them.

Figure 13-6. Top: This Settings page is the home for font management.
To see how a font looks at various sizes and styles, click or tap its sample line to open the Details page (bottom), where you can type in a sample sentence of your own composition.
You can also change the preview’s size, read details, or remove the font.
The Fonts Folder
The Fonts display in Settings is actually just a front end for the fonts folder, which is in your Local Disk (C:) ![]() Windows
Windows ![]() Fonts folder. It may not be as pretty, but it offers a more direct way to do the following:
Fonts folder. It may not be as pretty, but it offers a more direct way to do the following:
PDF Files
Many a software manual, brochure, Read Me file, and downloadable “white paper” come as PDF (portable document format) files. In the beginning, you needed the free program called Adobe Reader if you hoped to open or print these files. In Windows 10, they open up in the Edge browser, for your perusing pleasure.
In fact, in Windows 10, you can turn any document (in any program with a Print command) into a PDF file—a trick that once required a $250 program called Adobe Acrobat Distiller.
Note:
All right, technically Windows alone creates screen-optimized PDF files: compact, easy-to-email files that look good onscreen but don’t have high enough resolution for professional printing. For high-end purposes and more optimization for specific uses (web, fancy press machines, and so on), you still need a program like Adobe Acrobat, Illustrator, or InDesign.
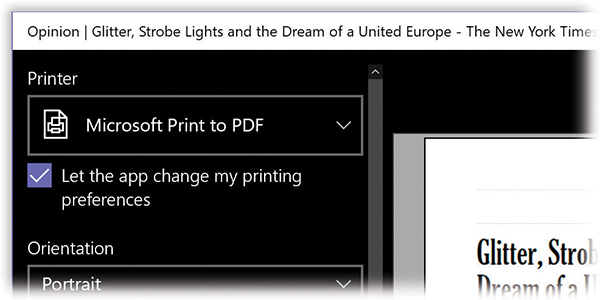
Figure 13-7. A great feature of Windows 10: You can turn any document—anything you can print to paper—into an electronic PDF file, for easy distribution to anyone with any kind of computer.
Just choose “Microsoft Print to PDF” as the printer, as shown here, and then hit Print.
Why would you want to create a PDF? Consider these advantages:
Other people see your layout. When you distribute a PDF file, other people see precisely the same fonts, colors, page design, and other elements you put in your original document. And here’s the kicker: They get to see all this even if they don’t have the fonts or the software you used to create the document.
It’s universal. PDF files are very common in the Windows, Mac, Unix/Linux, and even smartphone worlds. When you create a PDF file, you can distribute it (by email, for example) without worrying about what kinds of computers your correspondents are using.
It has very high resolution. PDF files print at the maximum quality of any printer. A PDF file prints great both on cheapo inkjets and on high-quality image-setting gear at professional print shops. (Right now you’re looking at a PDF file that was printed at a publishing plant.)
You can search it. A PDF file may look like a captured graphic, but behind the scenes, its text is still text; Spotlight can find a word in a PDF haystack in a matter of seconds. That’s an especially handy feature when you work with electronic software manuals in PDF format.
Opening PDF Files
There’s nothing to opening up a PDF file: Just double-click it. Edge takes over from there and opens the PDF file on your screen. You can scroll through it, or zoom in and out (using the Zoom commands in the … menu).
Creating PDF Files
Opening, schmopening—what’s really exciting in Windows 10 is the ability to create your own PDF files.
Just use the standard Print command as you always do—but in the spot where you’d specify which printer you want to use, choose Microsoft Print to PDF; see Figure 13-7.
Faxing
In the increasingly rare event that your PC has a built-in fax modem—and is connected to a phone line—it can serve as a true-blue fax machine. This feature works like a charm, saves money on paper and fax cartridges, and may even spare you the expense of buying a physical fax machine.
You even get a dedicated program, Windows Fax and Scan, for the purpose of managing faxes. For step-by-step instructions, find the free downloadable PDF appendix, “Faxing from Windows 10,” on this book’s “Missing CD” page at www.missingmanuals.com.
Scanning
Faxing isn’t the only technology that turns paper into digital bits. Scanning is the other—and that, too, is a talent of Windows Fax and Scan.
First, install your scanner (and its driver) as described in Chapter 14.
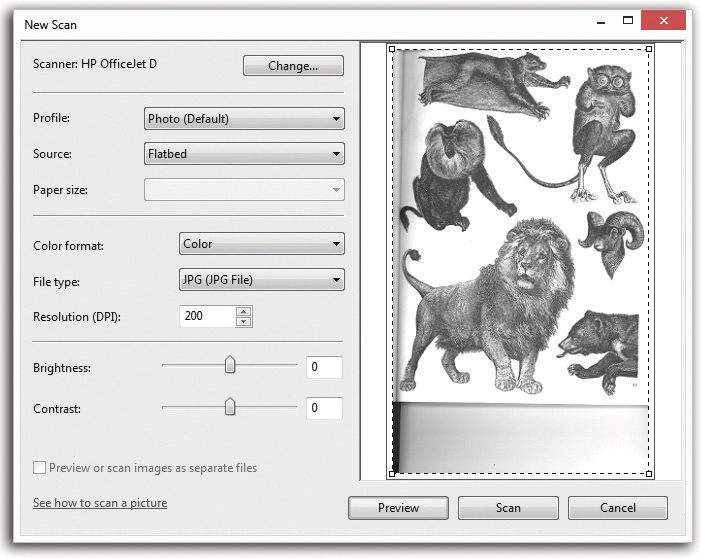
Load it up with the page you want to scan. Open the Windows Fax and Scan program. (You can find it with a quick search.)
Click New Scan. The New Scan dialog box appears. Click Preview to trigger a quick, temporary scan so you can see how the document will look after the scan (Figure 13-8). If it all looks good, click Scan.
Once the document has magically turned into a graphic in your Scan list, you can do all kinds of neat things with it: Forward it as a fax or an email attachment (click Forward as Fax or Forward as E-mail on the toolbar); export it as a JPEG, GIF, BMP, TIFF, or PNG document (click “Save as” on the toolbar); print it; or delete it.