
Chapter 19. Sharing Files on the Network
Almost every Windows machine on earth is connected to the Mother of All Networks, the one we call the Internet. But most PCs also get connected, sooner or later, to a smaller network—some kind of home or office network.
If you work at a biggish company, then you probably work on a domain network—the centrally managed type found in corporations. In that case, you won’t have to fool around with building or designing a network; your job, and your PC, presumably came with a fully functioning one (and a fully functioning geek responsible for running it).
Within your home or small office, though, you can create a smaller, simpler network that you set up yourself.
In either case, being on a network means you can share all kinds of stuff among the various PCs that are connected:
Files, folders, and disks. No matter what PC you’re using on the network, you can open the files and folders on any other networked PC, as long as the other PCs’ owners have made those files available for public inspection. That’s where file sharing comes in, and that’s what this chapter is all about.
The uses for file sharing are almost endless. It means you can finish writing a letter in the bedroom, even if you started it downstairs at the kitchen table—without having to carry a flash drive around. It means you can watch a slideshow drawn from photos on your spouse’s PC somewhere else in the house. It means your underlings can turn in articles for your company newsletter by depositing them directly into a folder on your laptop.
Tip:
File sharing also lets you access your files and folders from the road, using a laptop. See Chapter 12 for more information on this road-warrior trick.
Music and video playback. Windows Media Player can stream music and videos from one PC to another on the same network—that is, play in real time across the network, without your having to copy any files. In a family situation, it’s super-convenient to have Dad’s Mondo Upstairs PC serve as the master holding tank for the family’s entire music collection—and be able to play it using any PC in the house.
Printers. All PCs on the network can share a printer. If several printers are on your network—say, a high-speed laser printer for one computer and a color printer on another—then everyone on the network can use whichever printer is appropriate for a particular document. Step-by-step instructions start in “Fancy Printer Properties”.
Note:
Your network might include a Windows 10 PC, a couple of Windows 7, 8, XP, or Vista machines, older PCs, and even Macs. That’s perfectly OK; all these computers can participate as equals in this party. This chapter points out whatever differences you may find in the procedures.
Kinds of Networks
You can connect your PCs using any of several different kinds of gear:
Ethernet is a wired networking system—the world’s most popular. An Ethernet jack, for an Ethernet cable, is built into virtually every desktop PC and many laptops. That’s your network adapter—the circuitry that provides the Ethernet jack (Figure 19-1). If your machine doesn’t have an Ethernet jack—tablets don’t, and slim laptops usually don’t—you can add one. Adapters are available as internal cards, external USB attachments, or laptop cards.
Tip:
If you’ve got a computer that sits in one place, like a desktop PC, then you should use an Ethernet cable even if you have a wireless network.
One reason is security (wired networks are harder for the baddies to “sniff”). Another is speed. Yes, wireless technologies like 802.11ac and ax promise superfast speeds. But, first of all, the real-world speed is about a third of their published maximums; second, that speed is shared among all computers on the network. As a result, if you’re copying a big file across the network, it will probably go twice as fast if it’s going between one wireless and one wired PC than between two wireless PCs.
Wi-Fi, of course, means wireless networking. Every computer sold today has a Wi-Fi antenna built in. Wireless networking is not without its downsides. Big metal things, or walls containing big metal things (like pipes) can interfere with communication among the PCs, much to the disappointment of people who work in subways and meat lockers.
A wireless network isn’t as secure as a cabled network, either. It’s theoretically possible for some hacker, sitting nearby, armed with “sniffing” software, to intercept the email you’re sending or the web page you’re downloading. (Except secure websites, those marked by a little padlock in your web browser.)
Still, nothing beats the freedom of wireless networking, particularly if you’re a laptop lover; you can set up shop almost anywhere in the house or yard, slumped into any kind of rubbery posture. No matter where you go within your home, you’re online at full speed, without hooking up a single wire.
Phone line networks. Instead of going to the trouble of wiring your home with Ethernet cables, a few people use the wiring that’s already in the house—telephone wiring. That’s the idea behind a kind of networking gear called HomePNA. Unfortunately, the average American household has only two or three phone jacks in the entire house—and these days your house may have none at all— meaning you don’t have much flexibility in positioning your PCs.
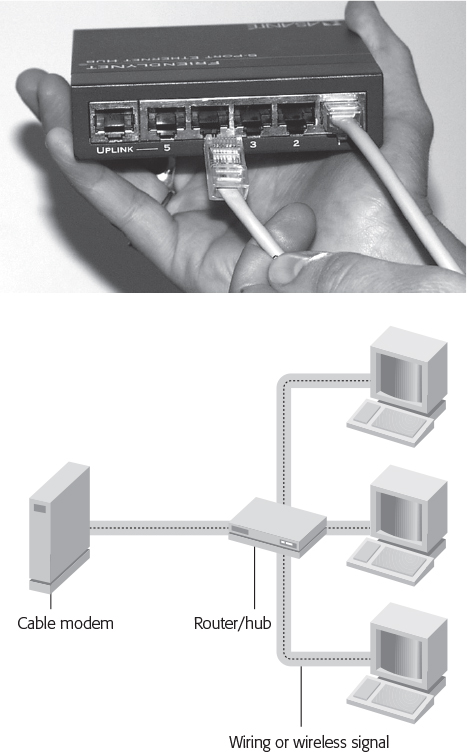
Figure 19-1. Top: The Ethernet cable is connected to a computer at one end, and the router (shown here) at the other end. The computers communicate through the router; there’s no direct connection between any two computers. The front of the router has little lights for each connector port, which light up only on the ports in use. You can watch the lights flash as the computers communicate.
Bottom: Here’s what a typical “I’ve got three PCs in the house, and I’d like them to share my cable modem” setup might look like.Power outlet networks. Here’s another way to connect your computers without rewiring the building: Use the electrical wiring that’s already in your walls. If you buy Powerline adapters (also called HomePlug adapters), you get decent speeds (from 14 Mbps up to 100 Mbps), very good range (1,000 feet), and the ultimate in installation simplicity. You just plug the Powerline adapter from your PC’s Ethernet or USB jack into any wall power outlet. Presto—all the PCs are connected.
File Sharing 1: Nearby Sharing
Setting up file sharing traditionally requires a lot of steps.
In the original editions of Windows 10, Microsoft attempted to simplify the process by creating something called HomeGroups.
Alas, HomeGroups weren’t quite simple enough. They baffled most customers so much that, in the April 2018 Update, Microsoft eliminated them. (The HomeGroups, not the customers.)
But the April 2018 Update includes a new feature called Nearby Sharing, which is a loving homage (or maybe a shameless ripoff) of a Mac feature called AirDrop.
Nearby Sharing is a breakthrough in speed, simplicity, and efficiency. There’s no setup, no passwords, nothing to email. It lets you transmit files or links to someone else’s PC up to 30 feet away, instantly and wirelessly. You don’t even need an Internet connection; it works on a flight, a beach, or a sailboat in the middle of the Atlantic. It also works if you’re on a Wi-Fi network, doing other things online.
The one catch is that Nearby Sharing works only among PCs that have the April 2018 Update (or a later version) of Windows.
Nearby Sharing Setup
To get things ready, open ![]() →
→![]() →System→“Shared experiences.” Here you have three choices to make.
→System→“Shared experiences.” Here you have three choices to make.
Nearby sharing on/off. Shocker: The feature doesn’t work unless it’s turned on.
Tip:
There’s also an on/off tile for Nearby Sharing on the Action Center (“The Action Center”), for your convenience.
I can share or receive content from. Your choices are “Everyone nearby” (including total strangers, by the way) or “My devices only” (you’ll use it only for moving files and photos among your own machines—computers that are signed into the same Microsoft account).
Paranoid note: If you choose “Everyone nearby,” it’s true that total strangers could mischievously attempt to send you files. But it’s also true that when a “Do you want to accept?” notification appears on your screen, you can always just hit Decline.
Save files I receive to. Where do you want incoming files to go? Windows, of course, proposes your Downloads folder.
All right: You’re ready to use Nearby Sharing.
Sending a File with Nearby Sharing
You begin the sending process from Windows 10’s modern Share button, which is usually marked by a ![]() . You’ll find it in two general places: at the desktop and in your apps. Here’s how you send stuff using Nearby Sharing:
. You’ll find it in two general places: at the desktop and in your apps. Here’s how you send stuff using Nearby Sharing:
Start in a File Explorer window. Right-click a file’s icon. From the shortcut menu, choose Share. The Share panel appears, as shown in Figure 19-2. (See “UP TO SPEED The Share Panel” for more on the Share panel.)
After a moment, the icons of any other Windows 10 machines show up, as shown in Figure 19-2. (Well, at least any others that are turned on, have Nearby Sharing turned on, and are within range.)
Note:
If you don’t have Nearby Sharing turned on, then the middle panel of the Share panel says “Tap to turn on nearby sharing.” Click or tap that message to get started.
Select the icon of the PC you want to receive the file you’re trying to send.
Start in an app. Nearby Sharing is also available in any app that bears a Share button (
 ), and therefore has the Share panel. That includes Photos (send pictures or videos), Edge (send links), News (send articles), Paint 3D (send your artwork), People (send someone’s contacts “card”), and Maps (send whatever place or directions you’re looking at).
Either way, a notification lets you know the other PC has yet to accept (Figure 19-2, top).
In a moment, a message appears on the other PC’s screen, asking if the owner wants to accept your file (Figure 19-2, lower left). That person can choose either Save (to save the file to that PC’s Downloads folder), Save & Open (which also opens the file), or Decline.
If the receiver opts for one of the Save buttons, then after a moment, the transaction is complete. Quick, effortless, wireless, delightful.

Figure 19-2. Top: You’re sending a file from a File Explorer window to another PC called MonsterAsus. When you choose its name in the Share panel, Windows lets you know it’s waiting for the other guy to accept (inset, top).
Bottom: On the MonsterAsus machine, a notification (left) lets you know that the SurfacePro is trying to send you a file wirelessly. You can save the incoming file, save and open it, or decline. If you hit Save, then after the transfer, a “Receiving complete” notification appears (lower right).
File Sharing 2: “Share a Folder”
Nearby Sharing is, of course, fantastically convenient in many, many situations. “Hey Casey, can you shoot me over that document?” “Oooooh, can I have that photo?” “Where are we meeting, again?”
Unfortunately, Nearby Sharing isn’t otherwise a replacement for Windows’ traditional network file-sharing system, for several reasons:
Any computers that aren’t running Windows’ 10 April 2018 Update (or later) are shut out.
Nearby Sharing requires people at both computers; you can’t grab a file from, for example, your own upstairs PC while you’re on your laptop in the kitchen.
Nearby Sharing is only for transferring files; you can’t actually open a file while it’s sitting on another PC.
In what Microsoft cleverly calls the “share any folder” method of file sharing, you can make any folder available to other people on the network. You can even set up elaborate sharing permissions that grant individuals different amounts of access to your files.
Better yet, files you share this way are available to other people on the network and other people with accounts on the same computer.
Here’s how to share a file or folder on your PC:
In a File Explorer window, open the window that contains the files or folders you want to share. On the Ribbon’s Share tab, choose the names of the people you want to share with.
The names of this PC’s other account holders all appear here, in this cramped scrolling list (Figure 19-3, top). You can click to share with one person.
Or, to share with more than one person, click “Specific people” to open the “Choose people to share with” dialog box (Figure 19-3, bottom). You wanted individual control over each account-holder’s access? You got it.
Note:
The steps for sharing a disk are different. See “Advanced Folder Sharing—and Disk Sharing”.
Choose a person’s name from the upper drop-down menu, and then click Add.
This is the list of account holders (Chapter 18)—or account-holder groups, if someone has created them.
If the person who’ll be connecting across the network doesn’t yet have an account on your machine, choose “Create a new user” from this drop-down menu. (“Create a new user” isn’t some kind of sci-fi breakthrough. You are not, in fact, going to create a human being—only an account for an existing person.)
The name appears in the list.
Now your job is to work through this list of people, specifying how much control each person has over the file or folder you’re sharing.
Click a name in the list. Click the ▾ in the Permission Level column and choose Read or Read/Write.
Read means “look but don’t touch.” This person can see what’s in the folder (or file) and can copy it, but she can’t delete or change the original.
Contributors (available for folders only—not files) have much broader access. These people can add, change, or delete files in the shared folder—but only files that they put there. Stuff placed there by other people (Owners or Co-owners) appears as “look but don’t touch” to a Contributor.
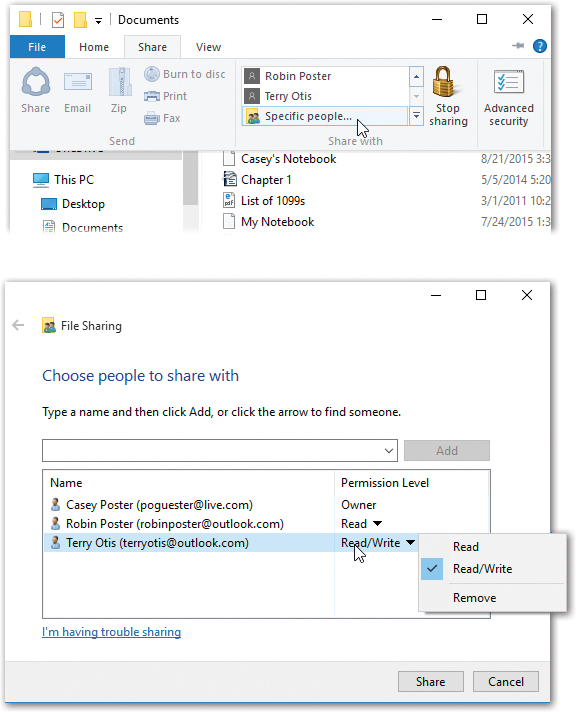
Figure 19-3. Top: The Ribbon offers insta-sharing with any individual. Or, if you want more than one person to get in on the fun, choose “Specific people” to open…
Bottom: …this box.
Use the drop-down menu at the top to choose an account holder’s name. Or type it out, if you prefer.
After each name, click Add. Then use the Permission Level drop-down menu to specify either Read (“look but don’t touch”) or Read/Write (“you can edit and even delete stuff”) permissions. Click Share when you’re finished.Read/Write means that this person, like you, can add, change, or delete any file in the shared folder.
Note:
Your name shows up here as Owner. You have the most power of all—after all, it’s your stuff.
Click Share.
The “Your folder [or file] is shared” dialog box appears. This is more than a simple message, however; it contains the network address of the files or folders you shared. Without this address, your colleagues won’t know you’ve shared stuff and will therefore have a tough time finding it.
Note:
If you’ve shared some files, you may see an interim message that appears before the “Your files are shared” box, warning you that Windows is about to adjust the access permissions to the folder that encloses them. That’s normal.
Click “e-mail” or “copy” (Figure 19-4).
The “e-mail” link opens a new, outgoing message in your email program, letting the gang know you’ve shared something and offering them a link to it. The “copy” link copies the address to the Clipboard so you can paste it into another program—which is your best bet if Mail isn’t your email program of choice.
Tip:
To stop sharing a folder or file, click it. Then, from the Share tab of the Ribbon of whatever window contains it, choose “Stop sharing.”
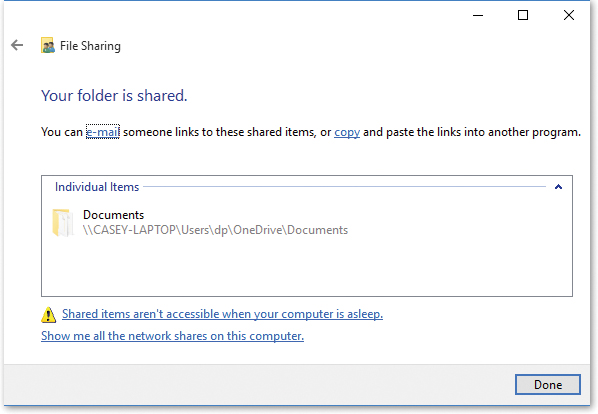
Figure 19-4. Windows wants to make absolutely sure you know what you’ve done. Wouldn’t want the wrong people sniffing around the wrong personal files, now.
Advanced Folder Sharing—and Disk Sharing
The “share any folder” wizard described in the previous pages might seem fairly complex, but look on the bright side: It replaces an older method that was even more complicated.
And guess what? That method is still available. Here’s a quick review of this alternate route (which is, by the way, the only route for sharing entire disks):
Right-click the folder or disk you want to share. If it’s a folder, choose Properties from the shortcut menu, and then click the Sharing tab. If it’s a disk, choose “Share with”→“Advanced sharing.”
At this point, you could click the Share button (if you’re operating on a folder, anyway). You’d arrive at the dialog box shown in Figure 19-3 (bottom) where you could specify the account holders and permission levels, just as described earlier. But don’t.
Click Advanced Sharing. Authenticate, if necessary.
The Advanced Sharing dialog box appears.
Turn on “Share this folder.” (See Figure 19-5, top.) Next, set up the power-user sharing options.
For example, you can limit the number of people who are browsing this folder at once. You can click Permissions to fine-tune who can do what (Figure 19-5, bottom). And you can edit the “Share name”—in fact, you can create more than one name for the same shared folder—to make it more recognizable on the network.
Notes on File Sharing
And now, the fine print on sharing files:
Sharing a folder also shares all the folders inside it, including new ones you create later.
On the other hand, it’s OK to change the sharing settings of a subfolder. For example, if you’ve shared a folder called America, you can make the Minnesota folder inside it off-limits by making it private. To do this, right-click the inner folder, choose Properties, click Sharing, click Advanced Sharing, and use the dialog box shown in Figure 19-5.
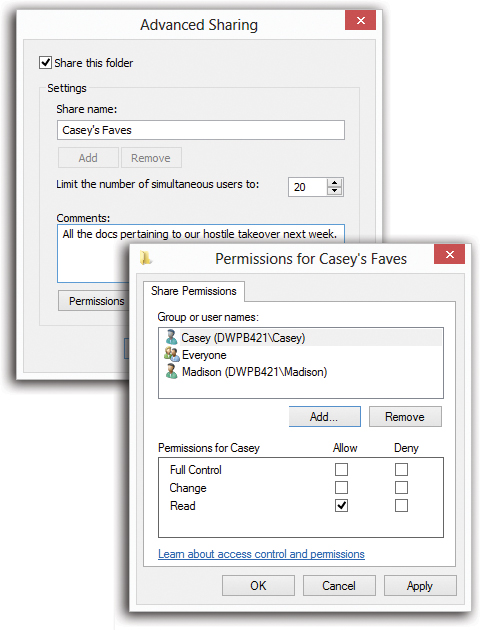
Figure 19-5. Top: Much finer-tuned sharing features are available in this more advanced box.
Bottom: For example, you can specify personalized permissions for different individuals.Be careful with nested folders. Suppose, for example, that you share your Documents folder, and you permit other people to change the files inside it. Now suppose that you share a folder inside Documents—called Spreadsheets, for example—but you turn off the ability for other people to change its files.
You wind up with a strange situation. Both folders—Documents and Spreadsheets—show up in other people’s Network windows. If they double-click the Spreadsheets folder directly, they won’t be able to change anything inside it. But if they double-click the Documents folder and then open the Spreadsheets folder inside it, they can modify the files.
Hiding Folders
If a certain folder on your hard drive is really private, you can hide the folder so that other people on the network can’t even see it. The secret is to type a $ symbol at the end of the share name.
For example, if you name a certain folder My Novel, anyone else on the network can see it (even if they can’t read the contents). But if you name the folder My Novel$, it won’t show up in anybody’s Network window. They won’t even know it exists.
Note:
Technically, there’s yet another kind of sharing: Public-folder sharing. Every PC has a Public folder. It’s free for anyone on the network to use, like a grocery store bulletin board. Super-convenient, super-easy.
Yet you should probably skip this method, for two reasons. First, you have to move files into the Public folder before anyone else can see them; you can’t leave them where they’re sitting, as you can with the other sharing methods.
Second, in Windows 7 and 8, the Public folders containing your shared files sit inside the libraries described in “Libraries”—but in Windows 10, Microsoft has hidden away the whole libraries feature. (The main Public folder still exists—but it’s in your (C:) ![]() Users folder.) The bottom line is that even if you share files by putting them into one of the Public folders, nobody on your network will be able to find them!
Users folder.) The bottom line is that even if you share files by putting them into one of the Public folders, nobody on your network will be able to find them!
Accessing Shared Folders
Now suppose you’re not you. You’re your coworker, spouse, or employee. You’re using your laptop downstairs, and you want access to the stuff that’s in a shared folder on the Beefy Main Dell computer upstairs. Here’s what to do:
Open any File Explorer window.
The navigation pane at left shows a Network heading. Click its ’ button, if necessary, to see icons for all the computers on the network (Figure 19-6, top). The same navigation pane is available in the Save and Open dialog boxes of your programs, too, making the entire network available to you for opening and saving files.
If you don’t see a certain computer’s icon here, it might be turned off, or off the network. It also might have network discovery turned off; that’s the feature that lets a PC announce its presence to the network (see the box in “UP TO SPEED Public Networks, Private Networks, and How to Switch”).
And if you don’t see any computers at all in the Network window, then network discovery might be turned off on your computer.
Double-click the computer whose files you want to open.
If you’re on a corporate domain, you may first have to double-click your way through some other icons, representing the networks in other buildings or floors, before you get to the actual PC icons.
If you don’t have an account on the PC you’re invading—an account with the same name and password as you have on your own PC—then the Connect To box now appears (Figure 19-6, bottom).
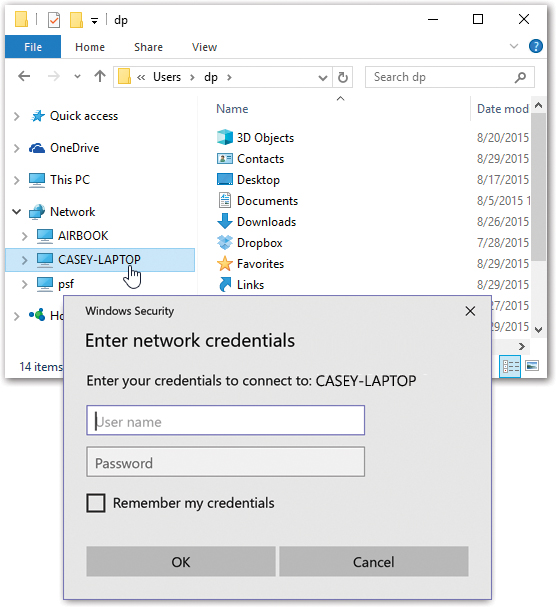
Figure 19-6. Top: The computers on your network are arrayed before you! Double-click the one you want to visit.
Bottom: Supply your account name and password as it exists on the distant PC, the one you’re trying to access.Here you have to fill in the name and password of an account on the other computer. This, of course, is a real drag, especially if you access other people’s files frequently. Fortunately, if you turn on “Remember my credentials,” then you’ll never see this box again. The next time you want to visit the other PC, you’ll be able to double-click its icon for instant access.
Tip:
In the unlikely event that you want Windows to stop memorizing your password, search for credential and select Credential Manager in the results. You see a list of every name/password Windows has memorized for you. You can use the options here to add a new memorized name/password, or expand one of the existing items in the list to remove it (“Remove from vault”) or edit it.
Click OK.
If all went well, the other computer’s window opens, presenting you with the icons of its shared folders and disks.
Tip:
Working with the same shared folders often? Save yourself a lot of time and burrowing—make a desktop shortcut of it right now!
Once you’ve opened the window that contains the shared folder, grab your mouse. Right-click the shared item and drag it to the desktop. When you release the mouse, choose “Create shortcuts here” from the shortcut menu. From now on, you can double-click that shortcut to open the shared item directly.
Once you’ve brought a networked folder onto your screen, you can double-click icons to open them, drag them to the Recycle Bin, make copies of them, and otherwise manipulate them exactly as though they were icons on your own hard drive. (Of course, if you weren’t given permission to change the contents of the shared folder, you’ll have less freedom.)
Tip:
There’s one significant difference between working with “local” icons and working with those that sit elsewhere on the network. When you delete a file from another computer on the network (if you’re allowed to do so), either by pressing the Delete key or by dragging it to the Recycle Bin, it disappears instantly and permanently, without ever appearing in the Recycle Bin.
You can even use Windows’ Search feature to find files elsewhere on the network. This kind of searching can be very slow, however.
Extra Credit: Universal Naming Convention (UNC)
For hard-core nerds, that business of double-clicking icons in the Network folder is for sissies. When they want to call up a shared folder from the network, or even a particular document in a shared folder, they just type a special address into the address bar of any folder window, or even the Edge browser—and then press the Enter key. You can also type such addresses into the Run dialog box (press ![]() +R).
+R).
It might look like this: \laptopshared documentssalaries 2019.docx.
Tip:
Actually, you don’t have to type nearly that much. The AutoComplete feature may propose the full expression as soon as you type just a few letters of it.
This path format (including the double-backslash before the PC name and a single backslash before a folder name) is called the Universal Naming Convention (UNC). It was devised to create a method of denoting the exact location of a particular file or folder on a network. It also lets network geeks open various folders and files on networked machines without having to use the Network window.
You can use this system in all kinds of interesting ways:
Open a particular folder like this: \computer namefolder name.
You can also substitute the IP address for the computer instead of using its name, like this: \192.168.1.44my documents.
You can even substitute the name of a shared printer for the folder name.
As described later in this chapter, Windows can even access shared folders that sit elsewhere on the Internet (offline backup services, for example). You can call these items onto your screen (once you’re online) just by adding http: before the UNC code and using regular forward slashes instead of backward slashes, like this: http://Computer Name/Folder Name.
Tip:
A great place to type UNC addresses is in the address bar at the top of any File Explorer window.
Mapping Shares to Drive Letters
If you access network shares regularly, you may want to consider another access technique, called mapping shares. Using this trick, you can assign a letter to a particular shared disk or folder on the network. Just as your hard drive is called C: and your floppy drive is A:, you can give your Family Stuff folder the letter F: and the backup drive in the kitchen the letter K:.
Doing so confers several benefits. First, these disks and folders now appear directly in the My PC window. Getting to them this way can be faster than navigating to the Network window.
Second, when you choose File→Open from within one of your applications, you’ll be able to jump directly to a particular shared folder instead of having to double-click, ever deeper, through the icons in the Open File dialog box. You can also use the mapped drive letter in pathnames anywhere you would use a path on a local drive, such as the Run dialog box, a File→Save As dialog box, or the Command Line.
To map a drive letter to a disk or folder, open the This PC window. (In any File Explorer window, click This PC in the navigation pane at left.) Then, on the Ribbon’s Computer tab, click “Map network drive.”
The Map Network Drive dialog box appears, as shown in Figure 19-7.
Using the drop-down list, choose a drive letter.
You can select any unused letter you like (except B, which is still reserved for the second floppy disk drive that PCs don’t have anymore).
Indicate which folder or disk you want this letter to represent.
You can type its UNC code into the Folder box, choose from the drop-down list of recently accessed folders, or click Browse.
Tip:
Most people use the mapping function for disks and drives elsewhere on the network, but there’s nothing to stop you from mapping a folder that’s sitting right there on your own PC.
To make this letter assignment stick, turn on “Reconnect at sign-in.”
If you don’t use this option, Windows forgets this assignment the next time you turn on the computer. (Use the “Connect using different credentials” option if your account name on the shared folder’s machine isn’t the same as it is on this one.)
Click Finish.
A window opens to display the contents of the folder or disk. If you don’t want to work with any files at the moment, just close the window.
From now on (depending on your setting in step 4), that shared disk or folder shows up in your navigation pane, as shown at bottom in Figure 19-7.
Tip:
If you see a red X on one of these mapped icons, it means that the PC on which one of the shared folders or disks resides is either off the network or is turned off completely.

Figure 19-7. Top: Choose a letter, any letter. Then choose a folder, any folder.
Bottom: You’ve just turned a folder into a drive, complete with its own drive letter—and added instant access to the navigation pane.
Deep-Seated Networking Options
If you’re perusing the ![]() →
→![]() →Network & Internet→Wi-Fi settings one day, and you scroll down to “Related settings,” you might wonder about some of the technical links listed here. In general, the average person isn’t supposed to need these; they’re all holdovers from much older, much fussier editions of Windows. But just in case you need them someday, here’s the rundown of what they do.
→Network & Internet→Wi-Fi settings one day, and you scroll down to “Related settings,” you might wonder about some of the technical links listed here. In general, the average person isn’t supposed to need these; they’re all holdovers from much older, much fussier editions of Windows. But just in case you need them someday, here’s the rundown of what they do.
Change Adapter Options
Click this link to view a list of all your network adapters—Ethernet cards and Wi-Fi adapters, mainly—as well as any VPNs or dial-up connections you’ve set up on your computer.
Double-click a listing to see its connection status, which leads to several other dialog boxes where you can reconfigure the connection or see more information. The toolbar offers buttons that let you rename, troubleshoot, disable, or connect to one of these network doodads.
Note:
If you right-click one of these icons and then choose Properties, you get a list of protocols that your network connection uses. Double-click “Internet Protocol Version 6” to tell Windows whether to get its IP and DNS server addresses automatically, or whether to use addresses you’ve specified. Ninety-nine times out of 100, the right choice is to get those addresses automatically. Every once in a while, though, you’ll come across a network that requires manually entered addresses.
Change Advanced Sharing Settings
This section is the master control panel of on/off switches for Windows’ network sharing features. (Most of these have on/off switches in other, more scattered places, too.) Here’s a rundown.
Note:
The options here are actually listed three times: once for Private networks (your own home or office networks), once for Public ones (coffee shops and so on), and once for All networks.
Network discovery makes your computer visible to others and allows your computer to see other computers on the network.
File and printer sharing lets you share files and printers over the network. (See “Printing”.)
Public folder sharing lets you share whatever files you’ve put in the Users
 Public folder. (See “Accessing Shared Folders”.)
Media streaming is where you listen to one PC’s music playing back over the network while seated at another (see “Kinds of Networks”). It appears here only if you’ve turned this feature on.
File sharing connections lets you turn off the super-strong security features of Windows file sharing, to accommodate older gadgets that don’t recognize it.
Password protected sharing is an on/off switch. When it’s on, the only people who can access your shared folders and printers are those who have accounts on your PC. When it’s off, anybody can access them. Details are in “File Sharing 2: “Share a Folder””.
The Network and Sharing Center
The Network and Sharing Center used to be the master control center for creating, managing, and connecting to networks of all kinds (Figure 19-8). Now that you can do most network tasks right in the Settings app, the NaSC isn’t quite as essential.
To do anything with your network, you need to click one of the links in blue. They include these.
Set up a new connection or network
Most of the time, Windows does the right thing when it encounters a new network. For example, if you plug in an Ethernet cable, it assumes you want to use the wired network and automatically hops on. If you come within range of a wireless network, Windows offers to connect to it.
Some kinds of networks, however, require special setup:
Connect to the Internet. Use this option when Windows fails to figure out how to connect to the Internet on its own. You can set up a Wi-Fi, PPPoE broadband connection (required by certain DSL services that require you to sign in with a user name and password), or even a dial-up networking connection.
Set up a new network. You can use this option to configure a new wireless router that’s not set up yet, although only some routers can “speak” to Windows in this way. You’re better off using the configuration software that came in the box with the router.

Figure 19-8. Once it’s open, the Network and Sharing Center offers links that let you connect to a network, create a new network, troubleshoot your connection, fiddle with your network or network adapter card settings, and so on.
Manually connect to a wireless network. Some wireless networks don’t announce (broadcast) their presence. That is, you won’t see a message popping up on the screen, inviting you to join the network, just by wandering into it. Instead, the very name and existence of such networks are kept secret to keep the riffraff out. If you’re told the name of such a network, use this option to type it in and connect.
Connect to a workplace. That is, set up a secure VPN connection to the corporation that employs you, as described in “Virtual Private Networking”.
Troubleshoot problems
Very few problems are as annoying or difficult to troubleshoot as flaky network connections. With this option, Microsoft is giving you a tiny head start.
When you click “Troubleshoot problems,” Windows asks what, exactly, you’re having trouble with. Click the topic in question: Internet Connections, Shared Folders, and so on. Invisibly and automatically, Windows performs several geek tweaks that were once the realm of highly paid networking professionals: It renews the DHCP address, reinitializes the connection, and, if nothing else works, turns the networking card off and on again.
If the troubleshooter doesn’t pinpoint the problem, check that all the following are in place:
Your cables are properly seated in the network adapter card and hub jacks.
Your router, Ethernet hub, or wireless access point is plugged into a working power outlet.
Your networking card is working. To check, open the Device Manager (type its name at the Start menu). Look for an error icon next to your networking card’s name. See Chapter 15 for more on the Device Manager.
If that doesn’t fix things, you’ll have to call Microsoft, your PC maker, or your local teenage PC for help.
Corporate Networks
Connecting to other machines in your house or small office is one thing. In huge companies, though, the ones that are Microsoft’s bread and butter, networking is a full-time job—for a whole staff of people. These are the network administrators, who have studied the complexities of corporate networking for years. And their work—the sprawling, building-wide (or even worldwide) company networks—are called domain networks.
The Domain
On a regular small-office network, nobody else on a workgroup network can access the files on your PC unless you’ve created an account for them on your machine. Whenever somebody new joins the department, you have to create another new account; when people leave, you have to delete or disable their accounts. If something goes wrong with your hard drive, you have to recreate all of the accounts.
If you multiply all of this hassle by the number of PCs on a growing network, it’s easy to see how you might suddenly find yourself spending more time managing accounts and permissions than getting any work done.
The solution is the network domain. In a domain, you have only a single name and password, which gets you into every shared PC and printer on the network that you’re authorized to use. Everyone’s account information resides on a central computer called a domain controller—a computer so important, it’s usually locked away in a closet or a data-center room.
Most domain networks have at least two domain controllers with identical information, so if one computer dies, the other one can take over. (Some networks have many more than two.) This redundancy is a critical safety net, because without a happy, healthy domain controller, the entire network is dead.
Without budging from their chairs, network administrators can use a domain controller to create new accounts, manage existing ones, and assign permissions. The domain takes the equipment-management and security concerns of the network out of the hands of individuals and puts them into the hands of trained professionals.
If you use Windows in a medium- to large-sized company, you probably use a domain every day. You may not have been aware of it, but that’s no big deal; knowing what’s going on under your nose isn’t especially important to your ability to get work done.
Note:
One key difference between the Home and Pro versions of Windows 10 is that computers running the Home edition can’t join a domain.
Active Directory
One key offering of these big networks—and the Windows Server software that runs them—is an elaborate program called Active Directory. It’s a single, centralized database that stores every scrap of information about the hardware, software, and people on the network.
Active Directory lets network administrators maintain an enormous hierarchy of computers. A multinational corporation with tens of thousands of employees in offices worldwide can all be part of one Active Directory domain, with servers distributed in hundreds of locations, all connected by wide-area networking links. (A group of domains is known as a tree. Huge networks might even have more than one tree; if so, they’re called—yes, you guessed it—a forest.)
Unless you’ve decided to take up the rewarding career of network administration, you’ll never have to install an Active Directory domain controller, design a directory tree, or create domain objects. However, you very well may encounter the Active Directory at your company. You can use it to search for the mailing address of somebody else on the network, for example, or locate a printer that can print on both sides of the page at once. Having some idea of the directory’s structure can help in these cases.
Three Ways Life Is Different on a Domain
The domain and workgroup personalities of Windows are quite different. Here are some of the most important differences.
Logging in
What you see when you sign into your PC is somewhat different when you’re part of a domain. The Lock screen instructs you to press Ctrl+Alt+Delete to sign in. (This step is a security precaution, described in the box below.)
You can now type your user name and password. To save you time, Windows fills in the User Name box with whatever name was used the last time somebody signed in.
Browsing the domain
When your PC is part of the domain, all of its resources—printers, shared files, and so on—magically appear in your desktop windows, the Network window, and so on.
Searching the domain
You can read all about the search box in Chapter 3. But when you’re on a domain, this tool becomes far more powerful—and more interesting.
When you open the Network window as described above, the Ribbon changes to include an option to Search Active Directory. Click it to open a special dialog box that can search the entire corporation at once.
Using this box, you can search for things like:
Users, Contacts, and Groups. Use this option to search the network for a particular person or network group. You can find out someone’s telephone number or mailing address, or see what people belong to a particular group.
Computers. This option helps you find a certain PC in the domain. It’s of interest primarily to network administrators, because it lets them manage many of the PCs’ functions by remote control.
Printers. In a large office, it’s possible you might not know where you can find a printer with certain features—tabloid-size paper, for example, or double-sided printing. That’s where this option comes in handy; it lets you find the printing features you need.