Chapter 6. Programs & Documents
When you get right down to it, an operating system is nothing more than a home base from which to launch apps (applications) (programs). And you, as a Windows person, are particularly fortunate, since more apps are available for Windows than for any other operating system on earth.
But when you open a program, you’re no longer necessarily in the world Microsoft designed for you. Programs from other companies work differently, and there’s a lot to learn about how Windows 10 handles programs that were born before it was.
This chapter covers everything you need to know about installing, removing, launching, and managing programs; using programs to generate documents; and understanding how documents, programs, and Windows communicate with one another.
Note:
In the beginning, programs were things that ran on computers; apps ran on phones and tablets. Microsoft would very much like the Great Merging of these categories to hurry up. So in Windows 10, it refers to all programs as “apps.” (Except in older dialog boxes, like the old Control Panel, where they’re still called “programs.” Sigh.) In this book, “apps” and “programs” are the same thing, and the terms appear interchangeably to spice things up.
Opening Programs
Windows lets you launch (open) programs in many different ways:
Choose a program’s name from the Start menu.
Click a program’s icon on the taskbar.
Double-click an application’s program-file icon in the This PC
 Local Disk (C:) Program Files [application] folder, or highlight the application’s icon and then press Enter.
Press a key combination you’ve assigned to be the program’s shortcut.
Press
 +R, type the program file’s name in the Open text box, and then press Enter.
Let Windows launch the program for you, either at startup (“Startup Items Revealed”) or at a time you’ve specified (see Task Scheduler, “Task Scheduler”).
Open a document using any of the above techniques; its “parent” program opens automatically. For example, if you used Microsoft Word to write a file called “Last Will and Testament.doc,” then double-clicking the document’s icon launches Word and automatically opens that file.
What happens next depends on the program you’re using (and whether or not you opened a document). Most programs present you with a new, blank, untitled document. Some, like FileMaker and Microsoft PowerPoint, welcome you instead with a question: Do you want to open an existing document or create a new one? And a few oddball programs don’t open any window at all when launched. The appearance of tool palettes is the only evidence you’ve even opened a program.
The Two Kinds of Apps
As you may recall with migraine flashbacks, Windows 8 was two operating systems in one. And it ran two different kinds of programs:
Desktop apps. These are the standard Windows programs. Photoshop, Quicken, iTunes, and 4 million others. They have menus. They have overlapping windows. They can create, open, and close documents.
Microsoft Store apps. These apps ran in TileWorld, the Windows 8 edge-to-edge touchscreen environment designed for tablets. They were an all-new class of programs that looked and acted very different. (Microsoft calls them “Microsoft Store apps,” because they’re available exclusively from the online Microsoft Store. Which, until recently, was called the Windows Store, but that won’t be on the test.)
Microsoft Store apps filled the whole screen, edge to edge. Their windows never overlapped. They had no menu bar and no drop-down menus. They had simple functions—they were like tablet apps.
Unfortunately, having to learn and master two different kinds of programs was massively confusing. Undoing this confusion was one of Microsoft’s primary goals in creating Windows 10—and it has mostly succeeded.
In Windows 10, both kinds of programs still exist (Figure 6-1). But the differences between their behavior have mostly been erased:
They both live in floating, overlapping windows. Both can go full-screen, but only at your command.
They can appear side by side in the Start menu—as tiles on the right side, or as listings on the left.
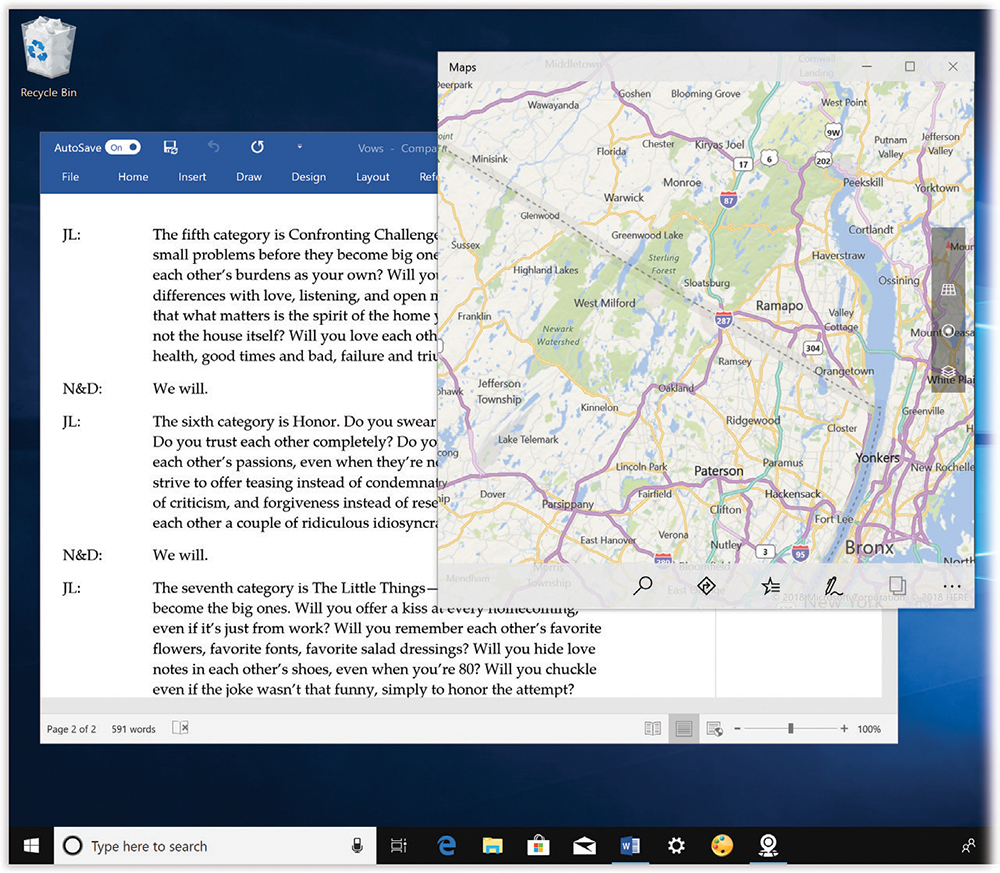
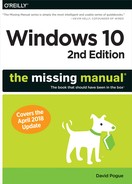
Figure 6-1. In Windows 10, desktop programs (like Word, left) and tablet-style Microsoft Store apps (like Maps, right) can coexist on the same screen at the same time.
At worst, you’ll notice how weird it is that some programs seem to have a very different design philosophy from others. But you’ll never have to wonder why they work differently or live in totally different places.They are listed as equals in the same “layer” of the app switcher (read on). There are no longer two different working worlds—one for desktop programs, one for Microsoft Store apps.
A few differences remain, though. Microsoft Store apps are vastly superior in ease of installation (there’s no installer to download), security and decency (Microsoft screens everything for viruses and pornography), updating (it’s all automatic and effortless), and removal (you just click Uninstall in the Start menu; see “Uninstalling Software”).
Traditional desktop apps, on the other hand, still have advantages of their own. They can be as complex as they ever were; they can have multiple documents open at once, even on different screens; and they’re available from many sources, not just the Microsoft Store.
It’s all kind of a headache that Microsoft brought upon itself; some apps, like Evernote, are even available in both desktop and Microsoft Store versions—both from the Microsoft Store! But you’ll get the hang of it.
The App Switcher: Alt+Tab
In its day, the concept of overlapping windows on the screen was brilliant, innovative, and extremely effective. In that era before digital photos, digital music, and the web, managing your windows was easy this way; after all, you had only about three of them.
These days, however, managing all the open windows in all your programs can be like herding cats. Fortunately, Windows offers some window-shuffling tricks:
Use the taskbar. Clicking a button on the taskbar (“Taskbar 2.0”) makes the corresponding program pop to the front.
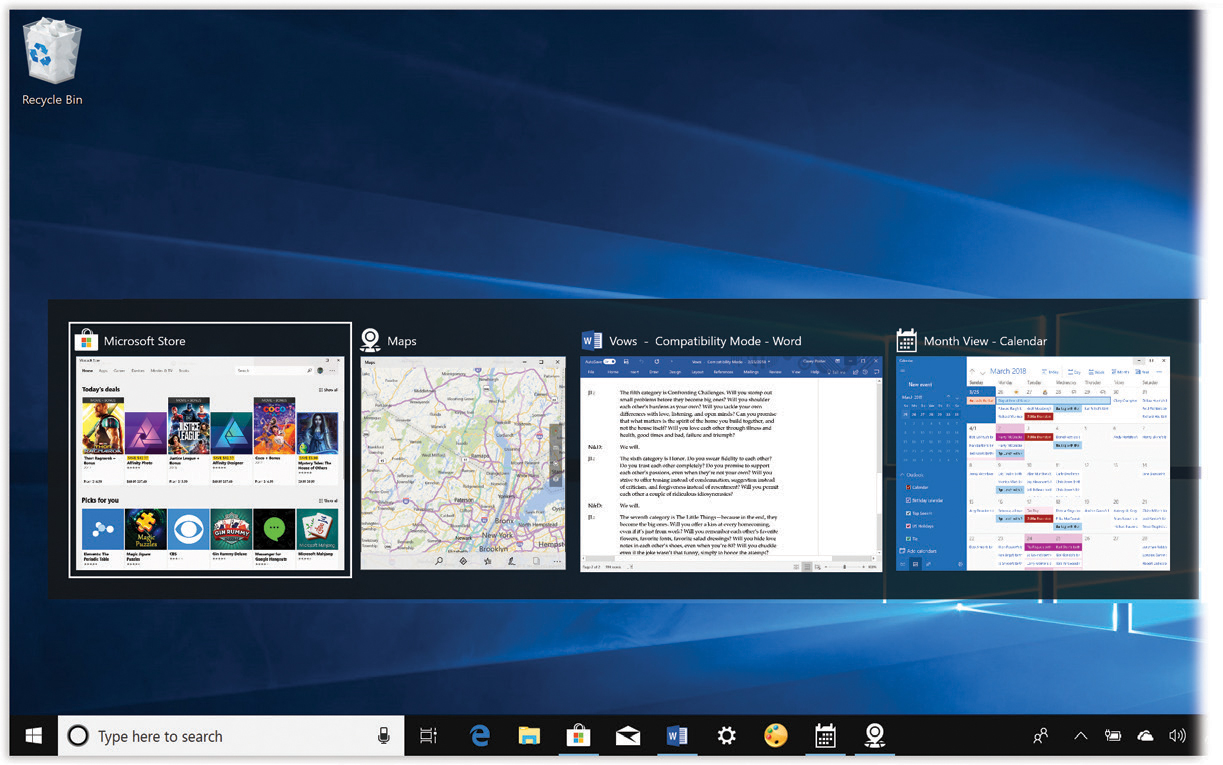
Figure 6-2. Holding down the Alt key and pressing Tab highlights successive icons; add Shift to move backward. (Add the Ctrl key to lock the display, so you don’t have to keep Alt pressed down. Tab to the icon you want; then press the space bar or Enter.)
Click the window. You can also bring any window forward by clicking any visible part of it.
Alt+Tab. It’s hard to imagine how anybody gets along without this keyboard shortcut, which offers a quick way to bring a different window to the front without using the mouse. If you press Tab while holding down the Alt key, a floating palette displays miniatures of all open windows, as shown in Figure 6-2. Each time you press Tab again (still keeping the Alt key down), you highlight the next app; when you release the keys, the highlighted program jumps to the front.
Tip:
If you just tap Alt+Tab and then release the keys, you get an effect that’s often even more useful: You jump back and forth between the last two windows you’ve had open. It’s great when, for example, you’re copying sections of a web page into a Word document.
Task View and Timeline: +Tab
The beloved Alt+Tab keystroke has been with us since Windows 1.0. But there are two huge problems with it:
It’s relatively useless on touchscreens. What are you going to do, open the onscreen keyboard every time you want to switch apps?
Microsoft’s research found that only 6 percent of Windows fans actually use Alt+Tab!
So in Windows 10, Microsoft has introduced something that’s much better, much easier to find, much more visual, and much easier to remember: Task View.
And then in the April 2018 Update, Microsoft blessed Task View with something truly fantastic: the Timeline.
Task View
As Figure 6-3 shows, Task View is a close relative to the Alt+Tab task switcher—but the window miniatures are big enough to read, and you don’t have to keep any keys pressed to look over your app world. Just click or tap the window you want; Windows switches you instantly.
Task View is so important that Microsoft offers a lot of ways to trigger it:
Mouse: Click the Task View button (
 ) on the taskbar. It’s right next to the search box. It’s a pretty good bet that this important button will be the Task View method most people use, most of the time.
Keyboard: Press
+Tab. Once Task View appears, you can press any of your arrow keys to highlight successive apps. When you press the space bar or Enter, the highlighted app pops to the front.Trackpad: Swipe upward on your trackpad with three fingers simultaneously. (Swipe down again with three fingers to exit Task View.)
Touchscreen: Swipe inward from the left edge of the screen. Then tap the app you want to open.
Task View is the gateway into the joys of Windows 10’s new virtual screens feature, too (“Virtual Screens”).
Figure 6-3. Task View, man. It’s stylish, it’s essential, it’s a joy to use. Here are all the open windows of all the open apps right now. No more floundering in window hell. Just hit the one you want to exit Task View and get to work in your new app.
The Timeline
The new Timeline takes the Task View concept and adds a time machine. Instead of showing you miniatures only for every window that’s open right now, it lets you scroll down to see every window you’ve had open in the past 30 days (see Figure 6-4).
And, even more amazingly, it includes stuff you had open on other machines. Other Windows 10 PCs, sure, but even iPhones and Android phones running Office apps.
The Timeline is addictive and powerful. It’s an answer, at last, to the old questions, “Where did I put that?” and “Where did I see that?” Now it doesn’t matter. If you worked on it in the past month, you should be able to find it here.
Well, mostly; unfortunately, apps have to be updated to work with Timeline. And at the outset, most of the Timeline-friendly programs come from Microsoft, like Word, Excel, PowerPoint, News, Sports, Money, Maps, Photos, and Edge (the browser). Fortunately, Timeline also creates a generic-looking “card” for any app you open by double-clicking a document in File Explorer.
That means, for example, that you’ll see cards for every website you open in Edge, but not in Chrome or Firefox (unless those browsers get updated).
In the meantime, here’s how to work the Timeline (Figure 6-4):
To get to the timeline, press
+Tab. That, of course, is the same keystroke you use to get to Task View—because the Timeline is part of Task View.
Tip:
On a touchscreen, you can swipe in from the left edge of the screen instead.
Select a “card” to reopen that document, program, or web page.
Windows starts out showing you a maximum of two rows of cards for each day. To see everything you did that day, hit “See all 23 activities” (or whatever the number is) next to the date. A new screen opens, showing all activities, even though you may have to scroll a lot more now. (To return to the two-rows-maximum view, use the “See only top activities” link at the top.)
Scroll back into the past by scrolling down, using the right-side scroll bar.
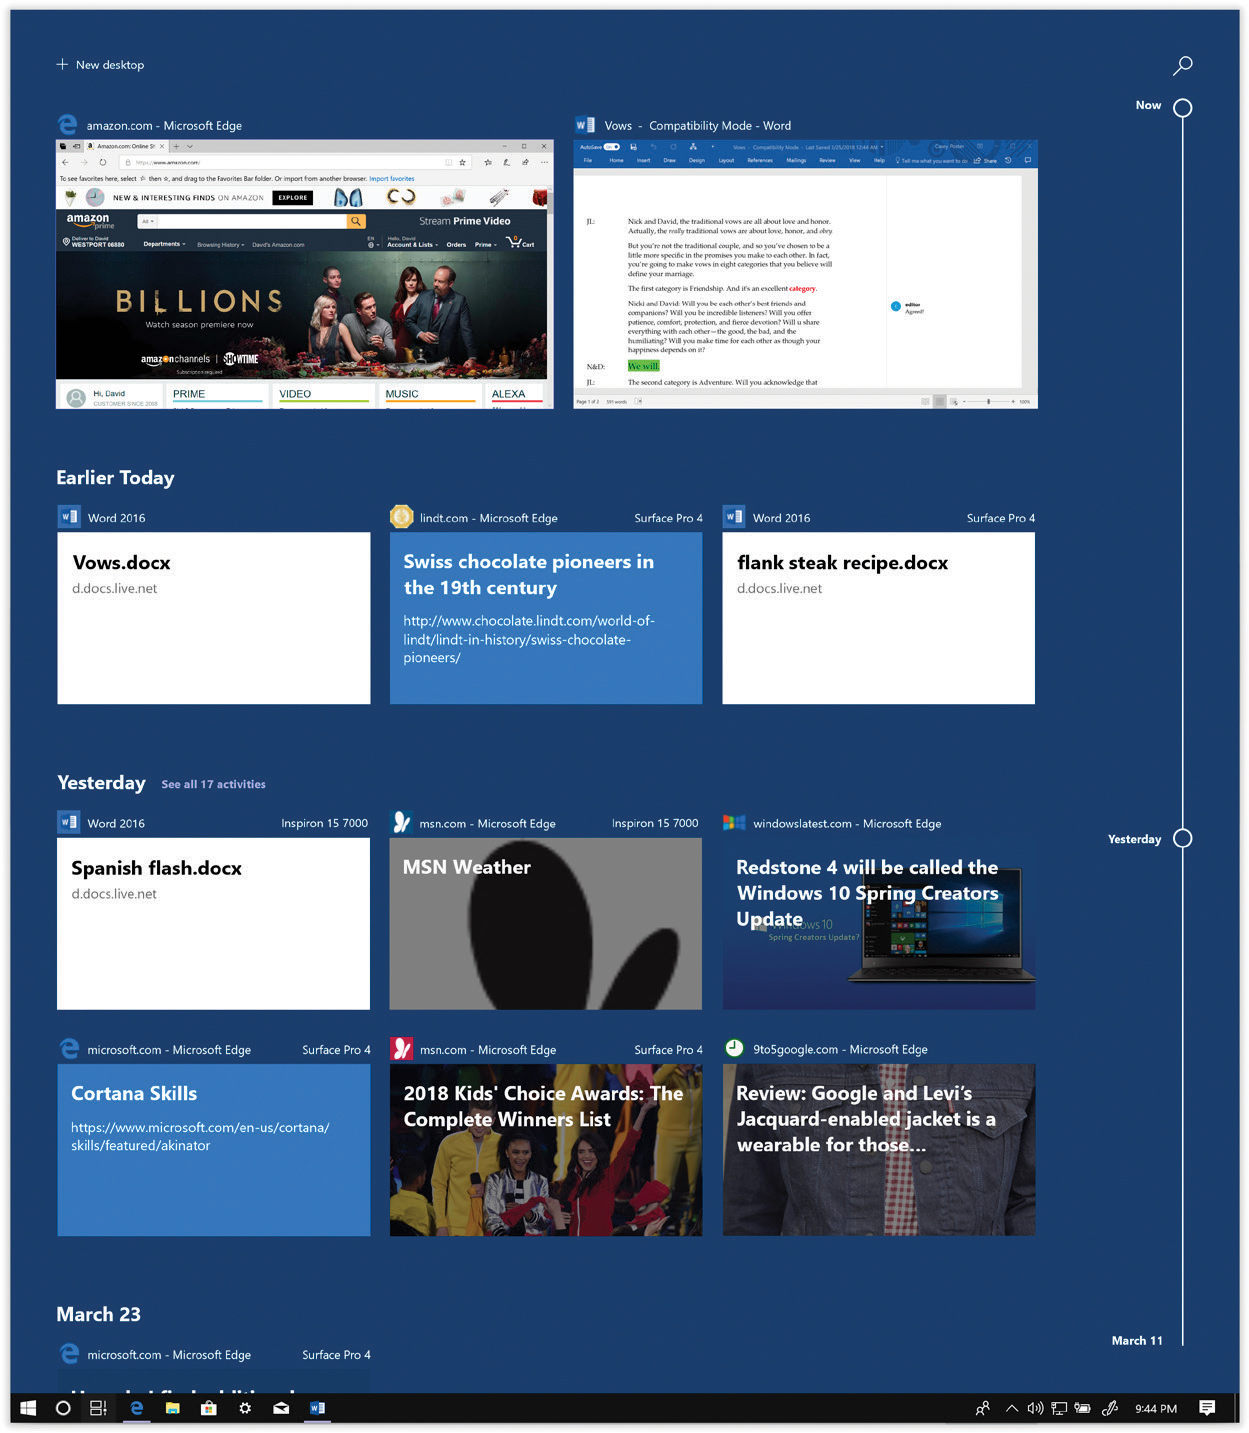
Figure 6-4. Meet the Timeline!
At top, these large window “cards” (two, in this case) represent windows that you have open right now. That’s the traditional Task View.
But the smaller cards below represent activities you performed on previous days. The small type above each card identifies the program you were in and the machine you were using at the time.Use the
 button (top right) to search all the “cards” at once, from all devices, across all 30 days.
If you have multiple Microsoft accounts set up on this computer (home and work accounts, for example), you can specify which ones’ activities appear on your Timeline. Open
→ →Privacy→“Activity history.” Turn on or off the accounts you want the Timeline to show.
You can delete a card. Right-click it; from the shortcut menu, choose Remove. Handy if you were up to something you’d rather keep to yourself.
You can delete all cards from a certain day. Right-click any card on that day; from the shortcut menu, choose “Clear all from yesterday” (or whatever day it is).
To turn off the Timeline feature entirely, open
→→Privacy→“Activity history.” Turn off “Let Windows collect my activities from this PC” (which controls the appearance of activity cards for what you do on this machine), as well as “Let Windows sync my activities from this PC to the cloud” (which prevents the activity cards from this computer showing up in the Timeline of your other Windows 10 machines).
To exit the Timeline (and Task View), press ![]() +Tab again, or hit the Esc key, or click or tap a blank spot of the background, or hit the
+Tab again, or hit the Esc key, or click or tap a blank spot of the background, or hit the ![]() icon.
icon.
Tip:
If you have multiple monitors, you’ll see that Microsoft has done the right thing. Each screen shows Task View miniatures for the apps currently on that screen, but the Timeline appears only on the screen you were using when you invoked it.
Exiting Programs
When you exit, or quit, an application, the memory it was using is returned to the Windows pot for use by other programs.
If you use a particular program several times a day, like a word processor or a calendar, you’ll save time in the long run by keeping it open all day long. (You can always minimize its window when you’re not using it.)
But if you’re done using a program for the day, exit it, especially if it’s a memory-hungry one like, say, Photoshop. Do so using one of these techniques:
Choose File→Exit.
Click the program window’s Close box, or double-click its Control-menu spot (at the upper-left corner of the window).
Right-click the program’s taskbar button; from the shortcut menu, choose Close or Close Group.
Point to the program’s taskbar button; when the thumbnail preview pops up, click the little
 button in its upper-right corner. (If the program had only one window open, then the program exits.)
Press Alt+F4 to close the window you’re in. (If it’s a program that disappears entirely when its last document window closes, then you’re home.)
Press Alt+F and then select Exit.
After offering you a chance to save any changes you’ve made to your document, the program’s windows, menus, and toolbars disappear, and you “fall down a layer” into the window that was behind it.
When Programs Die: The Task Manager
Windows 10 may be pretty stable, but that doesn’t mean that programs never crash or freeze. They crash, all right.
When something goes wrong with a program, your primary interest is usually in exiting it. But when a program locks up (the cursor moves, but menus and tool palettes don’t respond) or when a dialog box tells you a program has “failed to respond,” exiting may not be so easy. After all, how do you choose File→Exit if the File menu doesn’t open?
The solution is to open up the Task Manager dialog box (Figure 6-5).
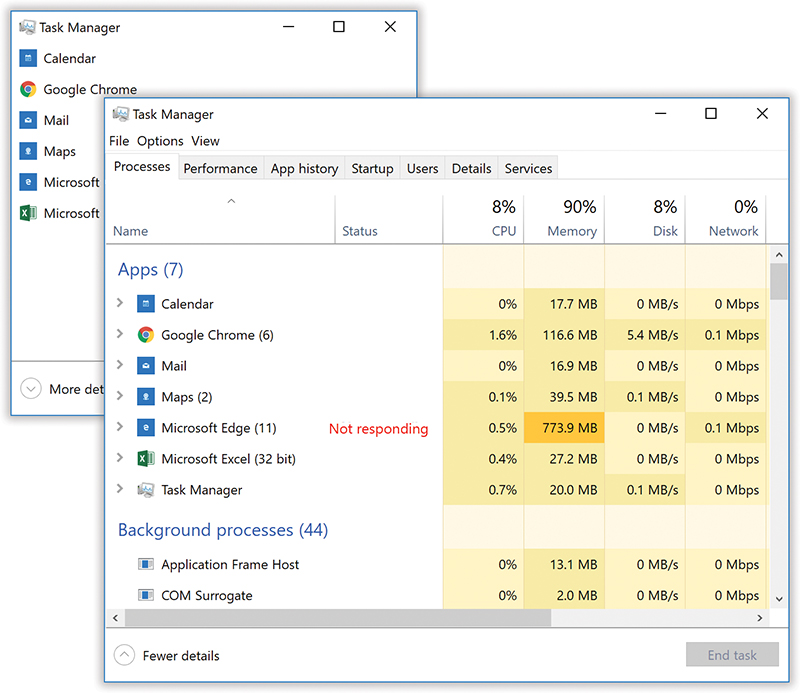
Figure 6-5. Top: Task Manager opens as a simple list of open apps whose names you should recognize. If one is frozen, you can click it and then click “End task” to exit it.
Bottom: But if you click “More details” at the lower-left corner, you get this massively informative table. The color coding and the “Not responding” tag should make it pretty clear which program is giving you problems. The flippy triangles indicate apps with more than one window open. Open the triangle to see them listed.
Tip:
Actually, there may be a quicker solution. Try right-clicking the frozen program’s taskbar button; from the shortcut menu, choose Close. This trick doesn’t always work—but when it does, it’s much faster than using the Task Manager.
Here are three ways to do it:
Invoke the new “three-fingered salute,” Ctrl+Shift+Esc.
Right-click a blank spot on the taskbar; from the shortcut menu, choose Task Manager.
Right-click the
in the lower-left corner of the screen; from the secret utilities menu, choose Task Manager.
In any case, now you see a list of every open program. In its freshly opened state, the Task Manager doesn’t let you do anything but (a) double-click a program’s name to switch to it, or (b) click a program’s name and then hit “End task” to close it.
But if you click “More details,” then, wow, are your nerd genes in for a treat. The Task Manager blossoms into a full-blown spreadsheet of details about all the programs you’re running at the moment—including invisible, background programs (“processes”) you might not even have known were there. Figure 6-5 shows the Task Manager in both its tiny and expanded states.
The Status column should make clear what you already know: One of your programs—labeled “Not responding”—is ignoring you.
Tip:
Now, “Not responding” could just mean “in the middle of crunching away at something.” If the nonresponsive program is some huge mega-hog and you just chose some command that’s going to take awhile, then give it a chance to finish before you conclude that it’s locked up.
Shutting down the troublesome program is fairly easy; just click its name and then click the “End task” button.
Note:
In the old Task Manager, you sometimes got yet another dialog box at this point, telling you, “This program is not responding.” You had to click the End Now button to put it away for good.
That no longer happens. “End task” kills a program completely and instantly—and no longer gives you the chance to save any changes.
If you click “More details” to expand the Task Manager into its beefed-up state, and you’re a power geek, then hours of fun await you. Read on.
Heat Map
Microsoft noticed that people often sorted the Task Manager by CPU (how much of your processor’s attention is dedicated to each program) or memory (how much memory each program is using). When your computer slows down, it’s often because one out-of-control program is hogging the system—and that’s how you can figure out which one.
The Task Manager’s “heat map” effect saves you the trouble. The “heat map” uses darker shades of color to flag the programs that are using the most computer resources—not just CPU cycles or memory, but also network bandwidth and disk space. In other words, you can now spot the resource hogs without having to sort the columns or even understand the numbers.
Similarly, when one resource is being gobbled up disproportionately, Task Manager darkens that column title (CPU, Memory, Disk, Network) to get your attention. If your computer has been slowing down, check that column first.
Tip:
The Task Manager tries to use plain-English names for the programs and processes it displays—a welcome change from the old days of cryptic, programmery names. But you’ll still see unfamiliar items listed here. Fortunately, you can right-click anything in the list and, from the shortcut menu, choose “Search online.” You’ll go directly to a page of Bing or Google search results to read about the mystery item.
The Other Tabs
The Task Manager offers seven tabs. They’re crammed with information that’s either really useful or really useless, depending on just how technical a person you are. Here’s a crash course:
Processes. This is the tab that most people visit most often. It lists all programs and processes (background operations) that are running right now.
Tip:
Click a column heading to sort the table by that criterion. Right-click a column heading to get a choice of additional columns you can add—including PID, the process ID (a favorite of geekheads).
Performance. Cool graphs—one each for CPU (processor time), Memory, Disk, and Network. Shows how much you’ve got, how much is in use, and what the trend is.
App history. A table that shows how much data each of your programs and apps have used for the current account. This table could tell you all kinds of things about, for example, what your kid’s been doing on the family PC. (The Metered column means “cellular connections.” Since an app that uses a lot of data over cellular connections costs you money, this is a critical tool in keeping your bills under control.)
Startup. Shows you exactly which items are starting up automatically when you turn on the computer—some you may not even know about. (This is information that used to require a trip to the user-unfriendly MSCONFIG program.)
If your computer seems to be taking an unusually long time to start up, here’s the first place you should check; Task Manager even shows you the impact of each item on your startup process.
You can turn one off by right-clicking it; from the shortcut menu, choose Disable. You can also read about something unfamiliar by choosing “Search online” from the shortcut menu.
Users. If you’ve set up multiple accounts on this machine, this little table shows which are signed in right now and how much of the computer’s resources they’re using.
Details. Stand back. This massive, nearly infinitely expandable table looks like a space shuttle cockpit. It’s a far more detailed version of the Processes tab; for example, it uses the true process names instead of the plain-English ones. You start out with seven columns, but you can add many more; right-click any column header, and from the shortcut menu, choose “Select columns.”
Services. This table lists all of Windows’ behind-the-scenes “services”—background features that run all the time. (For example, the indexing of your hard drive, to keep your Search feature up to date, is a service. So are background printing, the computer’s clock if you’ve told it to set itself, and Windows Messenger, which stays alert in case someone tries to instant-message you.)
Tip:
On any of these tabs, you can drag columns horizontally to move them around.
Saving Documents
In Calculator, Character Map, and Windows 8–style apps, you don’t actually create any documents; when you close the window, no trace of your work remains. Most desktop programs, however, are designed to create documents—files you can reopen for further editing, send to other people, back up on another disk, and so on.
That’s why these programs offer File→Save and File→Open commands, which let you save the work you’ve done onto the hard drive as a file icon so you can return to it later.
The Save As Dialog Box
When you choose File→Save for the first time, you’re asked where you want the new document stored. These days, this Save As box is a full File Explorer window, complete with taskbar, navigation pane, search box, and a choice of views (Icon/List/Details). All the skills you’ve picked up working at the desktop come into play here; you can even delete a file or folder right from within the Save As or Open box. (The Delete command is in the Organize menu.)
To give it a try, open any program that has a Save or Export command—WordPad, for example. Type a couple of words and then choose File→Save. The Save As dialog box appears (Figure 6-6).
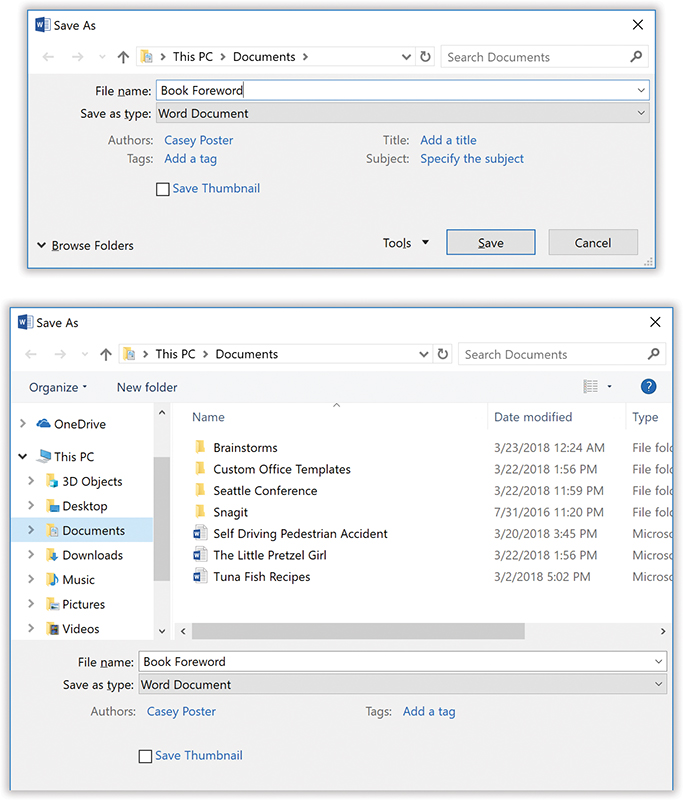
Figure 6-6. The Save As box may appear in either of two forms: the collapsed form shown at top, or the full-blown, File Explorerish view shown below.
You may notice that your OneDrive is available to receive your newly created documents—in fact, Windows may propose it as the factory setting.
Use the Hide Folders button in the lower left to collapse the big version, or the Browse Folders button to expand the collapsed version.
Type a name, choose a folder location, and specify the format for the file you’re saving.
Tip:
Some techy PC fans like to keep their files on one hard drive and Windows on another. In Windows 10, you can set that up easily. In ![]() →
→![]() →System→Storage, use the drop-down menus to indicate which drive you want to hold new documents, music, pictures, and videos. (On that drive, you’ll find a new folder, named for your account, with Documents, Music, Pictures, and Videos folders within.)
→System→Storage, use the drop-down menus to indicate which drive you want to hold new documents, music, pictures, and videos. (On that drive, you’ll find a new folder, named for your account, with Documents, Music, Pictures, and Videos folders within.)
Saving into Your Documents Folder
The first time you use the File→Save command to save a file, Windows suggests putting your new document in your OneDrive (see “OneDrive”). If you’ve turned off that option, then it proposes your Documents folder.
For many people, Documents is an excellent suggestion. First, it means your file won’t accidentally fall into some deeply nested folder where you’ll never see it again. Instead, it will be waiting in the Documents folder, which is very difficult to lose.
Second, it’s easy to make a backup of your important documents if they’re all in one folder. There’s a third advantage, too: The Documents folder is also what Windows displays whenever you use a program’s File→Open command. In other words, the Documents folder saves you time both when creating a new file and when retrieving it.
Tip:
If the Documents folder becomes cluttered, feel free to make subfolders inside it to hold your various projects. You could even create a different default folder in Documents for each program.
Saving into Other Folders
Still, the now-familiar navigation pane, address bar, and search box also appear in the Save As dialog box. (The nav pane appears only in the Save As box’s expanded form; see Figure 6-6, bottom.) You always have direct access to other places where you might want to save a newly created file.
All the usual keyboard shortcuts apply: Alt+![]() , for example, to open the folder that contains the current one. There’s even a “New folder” button on the toolbar, so you can generate a new, empty folder in the current list of files and folders. Windows asks you to name it.
, for example, to open the folder that contains the current one. There’s even a “New folder” button on the toolbar, so you can generate a new, empty folder in the current list of files and folders. Windows asks you to name it.
In fact, if on some project you often find yourself having to navigate to some deeply buried folder, then press ![]() +D to duck back to the desktop, open any Explorer window, and then drag the folder to your Favorites list. From now on, you’ll have quick access to it from the Save As dialog box.
+D to duck back to the desktop, open any Explorer window, and then drag the folder to your Favorites list. From now on, you’ll have quick access to it from the Save As dialog box.
Tip:
Many programs let you specify a different folder as the proposed location for saved (and reopened) files. In Microsoft Word, for example, you can change the default folders for the documents you create, where your clip art is stored, and so on.
Navigating the List by Keyboard
When the Save As dialog box first appears, the “File name” text box is automatically selected so you can type a name for the newly created document.
But a Windows dialog box is elaborately rigged for keyboard control. In addition to the standard Tab/space bar controls, a few special keys work only within the list of files and folders. Start by pressing Shift+Tab (to shift Windows’ attention from the “File name” text box to the list of files and folders) and then do the following:
Press various letter keys to highlight the corresponding file and folder icons. To highlight the Program Files folder, for example, you could type Pr. (If you type too slowly, your keystrokes are interpreted as separate initiatives—highlighting first the People folder and then the Rodents folder, for example.)
Press the Page Up or Page Down keys to scroll the list up or down. Press Home or End to highlight the top or bottom item in the list.
Press the
 or
or  keys to highlight successive icons in the list.
When a folder (or file) is highlighted, you can open it by pressing the Enter key (or double-clicking its icon, or clicking the Open button).
Closing Documents
You close a document window just as you’d close any window: by clicking the close box (marked ![]() ) in the upper-right corner of the window, by double-clicking the top-left corner, by clicking the
) in the upper-right corner of the window, by double-clicking the top-left corner, by clicking the ![]() in its taskbar icon’s preview thumbnail, or by pressing Alt+F4. If you’ve done any work to the document since the last time you saved it, Windows offers a “Save changes?” dialog box as a reminder.
in its taskbar icon’s preview thumbnail, or by pressing Alt+F4. If you’ve done any work to the document since the last time you saved it, Windows offers a “Save changes?” dialog box as a reminder.
Sometimes closing the window also exits the application, and sometimes the application remains running, even with no document windows open. And in a few really bizarre cases, it’s possible to exit an application (like Windows Mail) while a document window (an email message) remains open on the screen, lingering and abandoned!
The Open Dialog Box
To reopen a document you’ve already saved and named, you can pursue any of these avenues:
Open your Documents library (or whichever folder contains the saved file). Double-click the file’s icon.
If you’ve opened the document recently, choose its name from the taskbar’s jump list.
If you’re already in the program that created the document, choose File→Open. (Or check the bottom of the File menu, where many programs add a list of recently opened files.)
Type the document’s path and name into the Run dialog box (
+R) or the address bar. (You can also browse for it.)
The Open dialog box looks almost identical to the Save As dialog box. Once again, you start out by perusing the contents of your Documents folder; once again, the dialog box otherwise behaves exactly like an Explorer window. For example, you can press Backspace to back out of a folder you’ve opened.
When you’ve finally located the file you want to open, double-click it or highlight it (from the keyboard, if you like), and then press Enter.
Most people don’t encounter the Open dialog box nearly as often as the Save As dialog box. That’s because Windows offers many more convenient ways to open a file (double-clicking its icon, choosing its name from the ![]() →Documents command, and so on), but only a single way to save a new file.
→Documents command, and so on), but only a single way to save a new file.
Moving Data Between Documents
You can’t paste a picture into your web browser, and you can’t paste MIDI music into your desktop publishing program. But you can put graphics into your word processor, paste movies into your database, insert text into Photoshop, and combine a surprising variety of seemingly dissimilar kinds of data. And you can transfer text from web pages, email messages, and word-processing documents to other email and word-processing files; in fact, that’s one of the most frequently performed tasks in all of computing.
Cut, Copy, and Paste
Most experienced PC fans have learned to quickly trigger the Cut, Copy, and Paste commands from the keyboard—without even thinking.
You can cut and copy highlighted material in any of three ways. First, you can use the Cut and Copy commands in the Edit menu; second, you can press Ctrl+X (for Cut) or Ctrl+C (for Copy); and third, you can right-click the highlighted material and, from the shortcut menu, choose Cut or Copy (Figure 6-7).
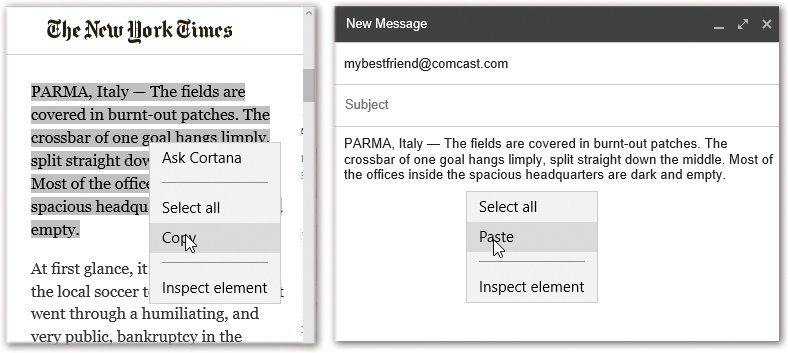
Figure 6-7. Suppose you want to email some text from a web page to a friend. Drag through it (left), and then choose Copy from the shortcut menu (or Edit→Copy).
In your email program, paste into an outgoing message (right).
When you do so, Windows memorizes the highlighted material, stashing it on an invisible Clipboard. If you choose Copy, nothing visible happens; if you choose Cut, the highlighted material disappears from the original document.
Pasting copied or cut material, once again, is something you can do either from a menu (choose Edit→Paste), from the shortcut menu (right-click and choose Paste), or from the keyboard (press Ctrl+V).
The most recently cut or copied material remains on your Clipboard even after you paste, making it possible to paste the same blob repeatedly. Such a trick can be useful when, for example, you’ve designed a business card in your drawing program and want to duplicate it enough times to fill a letter-sized printout. On the other hand, whenever you next copy or cut something, whatever was previously on the Clipboard is lost forever.
Drag and Drop
As useful and popular as it is, the Copy/Paste routine doesn’t win any awards for speed; after all, it requires four steps. In many cases, you can replace it with the far more direct (and enjoyable) drag-and-drop method. Figure 6-8 illustrates how it works.
Tip:
To drag highlighted material offscreen, drag the cursor until it approaches the top or bottom edge of the window. The document scrolls automatically; as you approach the destination, jerk the mouse away from the edge of the window to stop the scrolling.
Several of the built-in Windows programs work with the drag-and-drop technique, including WordPad and Mail. Most popular commercial programs offer the drag-and-drop feature, too, including email programs and word processors, Microsoft Office programs, and so on.
Figure 6-8. You can drag highlighted text to another place in the document—or to a different window or program.
Note:
Scrap files—bits of text or graphics that you can drag to the desktop for later—no longer exist in Windows.
As illustrated in Figure 6-8, drag-and-drop is ideal for transferring material between windows or between programs. It’s especially useful when you’ve already copied something valuable to your Clipboard, since drag-and-drop doesn’t involve (and doesn’t erase) the Clipboard.
Its most popular use, however, is rearranging the text in a single document. In, say, Word or WordPad, you can rearrange entire sections, paragraphs, sentences, or even individual letters, just by dragging them—a terrific editing technique.
Tip:
Using drag-and-drop to move highlighted text within a document also deletes the text from its original location. By pressing Ctrl as you drag, however, you make a copy of the highlighted text.
Export/Import
When it comes to transferring large chunks of information from one program to another—especially address books, spreadsheet cells, and database records—none of the data-transfer methods described so far in this chapter will do the trick. For such purposes, use the Export and Import commands found in the File menu of almost every database, spreadsheet, email, and address-book program.
These Export/Import commands aren’t part of Windows, so the manuals or help screens of the applications in question should be your source for instructions. For now, however, the power and convenience of this feature are worth noting. Because of these commands, your four years’ worth of collected names and addresses in, say, an old address-book program can find their way into a newer program, such as Mozilla Thunderbird, in a matter of minutes.
Speech Recognition and Dictation
In Windows 10, Microsoft makes a distinction between speech recognition (speaking to open programs and click buttons) and dictation (talking to type out words).
Not many people use the speech-recognition feature, which is a little old and a little complex. For a full, free online guide to using Windows Speech Recognition, download “Speech Recognition,” a PDF appendix to this chapter. It’s on this book’s “Missing CD” page at www.missingmanuals.com.
The dictation feature isn’t especially recent or accurate, either (especially when compared with pro dictation apps like Dragon NaturallySpeaking). But at least it’s no longer hidden away. In the April 2018 Update, a new keystroke, ![]() + H, opens the dictation bar so that you can begin talking to type in almost any program. (On a touchscreen, hit the
+ H, opens the dictation bar so that you can begin talking to type in almost any program. (On a touchscreen, hit the ![]() on the touchscreen keyboard instead.)
on the touchscreen keyboard instead.)
The dictation bar says “Listening” when Windows is listening (it stops listening after a few seconds, with a little chime to let you know), offers the ![]() icon to start and stop the listening, and an
icon to start and stop the listening, and an ![]() button to exit the whole feature.
button to exit the whole feature.
You can dictate punctuation. Say “peaches comma plums comma and apples” to get “peaches, plums, and apples.” (It helps if you pause before a punctuation mark.)
To dictate something with weird spelling, say “Start spelling” and then speak the letters. You can either say their names (“C, A, T”) or use the pilot’s alphabet (“Charlie, alpha, tango”). (You can capitalize a letter by saying, for example, “uppercase A.”) Say “stop spelling” when you want to resume whole-word dictation.
You can edit by voice, too. You’ll really enjoy “strike that” (or “delete that”), which nukes whatever you just uttered—handy when the transcription isn’t very good. And “Select that,” which highlights whatever you just said.
You can also select any blob of text by specifying what it is, using “previous” or “next”; a number; and “words,” “sentences,” or “paragraphs.” For example, “Select the previous five words.”
And you can highlight some text you’ve dictated (for example, to re-dictate it) by saying “select I’m really not hungry” (or whatever it is).
“Go to [a word you’ve dictated]” works, too (as in “Go to kumquat”). So do “Go after [word]” and “Go to the end of that” (meaning everything you’ve got so far).
You can trigger the Backspace, Enter, End, Home, Page Up, Page Down, and Delete keys by voice, too: “Tap Backspace.”
Again, set expectations to low, especially when it comes to editing. But at least it’s fast and free—and has its own keystroke.
Filename Extensions and File Associations
Every operating system needs a mechanism to associate documents with the applications that created them. When you double-click a Microsoft Word document icon, for example, Word launches and opens the document.
In Windows, every document comes complete with a normally invisible filename extension (or just file extension)—a period followed by a suffix that’s usually three or four letters long. Here are some common examples:
| When you double-click this icon… | …this program opens it. |
|---|---|
| Fishing trip.docx | Microsoft Word |
| Quarterly results.xlsx | Microsoft Excel |
| Home page.htm | your web browser |
| Butterfly.psd | Photoshop |
| Agenda.wpd | Corel WordPerfect |
| A home movie.avi | Windows Media Player |
Tip:
For an exhaustive list of every file extension in the world, visit www.whatis.com; click the link for File Extensions.
Behind the scenes, Windows maintains a massive table that lists every extension and the program that “owns” it. More on this in a moment.
Displaying Filename Extensions
It’s possible to live a long and happy life without knowing much about these extensions. Because file extensions don’t feel very user-friendly, Microsoft designed Windows to hide the suffixes on most icons (Figure 6-9). If you’re new to Windows, you may never have even seen them.
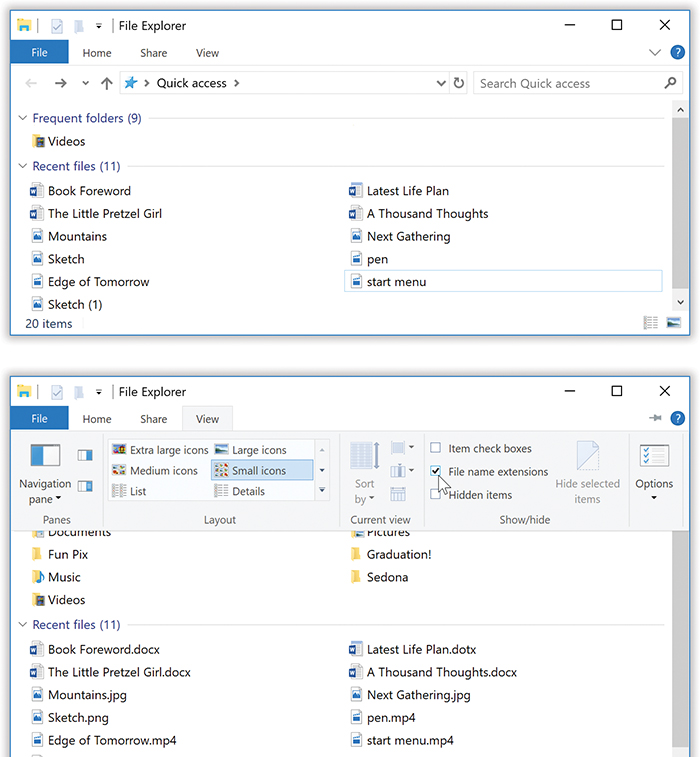
Figure 6-9. As a rule, Windows shows filename extensions only on files whose extensions it doesn’t recognize. The JPEG graphics, MP4 videos, and Word files, for example, don’t show their suffixes in the top example.
You can ask Windows to display all extensions, all the time. Just use the “File name extensions” checkbox on the Ribbon’s View tab, indicated by the cursor, at bottom.
Some people appreciate the way Windows hides the extensions, because the screen becomes less cluttered and less technical-looking. Others make a good argument for the Windows 3.1 days, when every icon appeared with its suffix.
For example, in a single File Explorer window, suppose one day you discover that three icons all seem to have exactly the same name: PieThrower. Only by making filename extensions appear would you discover the answer to the mystery: that one of them is called PieThrower.ini, another is an Internet-based software updater called PieThrower.upd, and the third is the actual PieThrower program, PieThrower.exe.
If you’d rather have Windows reveal the file suffixes on all icons, then open an Explorer window. On the Ribbon’s View tab, turn on “File name extensions,” as shown in Figure 6-9. Now the filename extensions for all icons appear.
Hooking Up an Unknown File Type
Every now and then, you might try to open a mystery icon—one whose extension is missing, or whose extension Windows doesn’t recognize. Maybe you’ve been sent some weirdo document created by a beekeeper or a banjo transcriber using a program you don’t have. What will happen when you double-click that file?
Windows asks you. It offers you two options, shown in the dialog box in Figure 6-10. First, it encourages you to go online to the Microsoft Store in hopes of finding an app that can open this file type. Good luck with that.
Usually, you’ll want to click “More apps.” As shown in Figure 6-10 at right, you see a list of all programs that are capable of opening this document. Click the name of the program you want, and then turn on “Always use this app to open [mystery filename extension] files,” if you like.
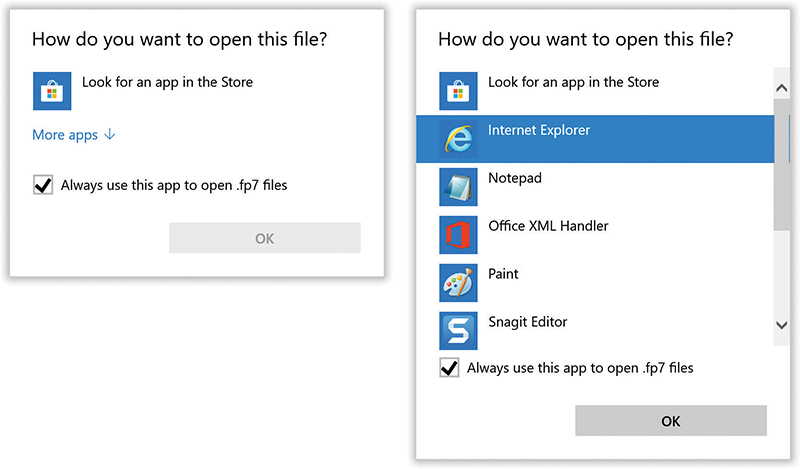
Figure 6-10. Left: If you’re pretty sure your PC has a program that can open this mystery file, then give it a little help—click “More apps.”
Right: Use this list to select a program for opening the mystery file.
Hooking Up a File Extension to a Different Program
Windows comes with several programs that can open text files with the extension .txt—Notepad and WordPad, for example. There are also plenty of programs that can open picture files with the extension .jpg. So how does Windows decide which program to open when you double-click a .txt or .jpg file?
Easy—it refers to its internal database of preferred default programs for various file types. But at any time, you can reassign a particular file type (file extension) to a different application. If you’ve just bought Photoshop, for example, you might want it to open up your .jpg files, rather than the Photos app.
This sort of surgery has always confused beginners. Yet it was important for Microsoft to provide an easy way of reprogramming documents’ mother programs; almost everyone ran into programs like RealPlayer that, once installed, “stole” every file association it could. The masses needed a simple way to switch documents back to their preferred programs.
Whether or not the three file-association mechanisms described next are actually superior to the one old one from Windows versions of old—well, you be the judge.
Method 1: Start with the document
Often, you’ll discover a misaligned file-type association the hard way. You double-click a document and the wrong program opens it. For that reason, Microsoft has added a new way of reprogramming a document—one that starts right in File Explorer, with the document itself.
Right-click the icon of the file that needs a new parent program. From the shortcut menu, choose “Open with.”
If you’re just trying to open this document into the new program this once, you may be able to choose the new program’s name from the “Open with” submenu (Figure 6-11). Windows doesn’t always offer this submenu, however.
If you choose “Choose another app” from the submenu, or if there’s no submenu at all, then the new “How do you want to open this file?” box appears, as shown in Figure 6-10. It’s supposed to list every program on your machine that’s capable of opening the document.
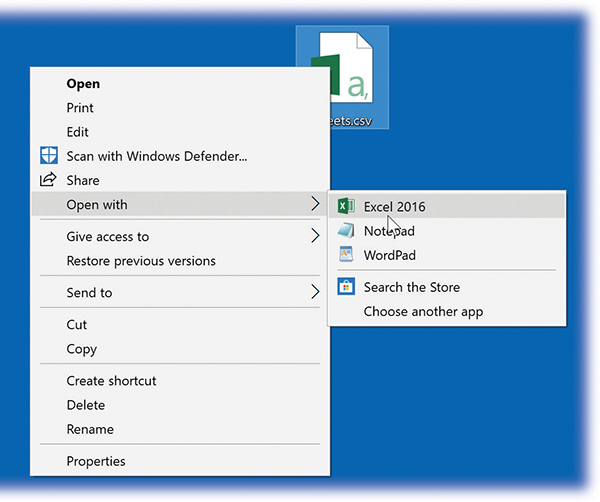
Figure 6-11. To reassign a document to a new parent program, use its “Open with” shortcut menu. If you’re lucky, you get a submenu of available programs that can open the document.
And now, a critical decision: Are you trying to make only this document open in a different program? Or all documents of this type?
If it’s just this one, then click the program you want and stop reading. If it’s all files of this type (all JPEGs, all MP3s, all DOC files…), then also turn on “Always use this app to open [filename extension] files” before you click the program name.
You should now be able to double-click the original document—and smile as it opens in the program you requested.
Note:
If the program isn’t listed, you can go find it yourself. Scroll to the very bottom of the list of proposed apps. If you see “More apps,” click that. Now scroll to the very bottom again until you see the last item: “Look for another app on this PC.” Now you’re shown a standard Open File dialog box so that you can peruse the entire contents of your Programs folder on a quest for the right software.
By the way, it’s sometimes useful to associate a particular document type with a program that didn’t create it. For example, you might prefer that double-clicking a text file created with WordPad should really open into Microsoft Word.
Method 2: Start with the program
If you’d prefer to edit the master database of file associations directly, a special control panel awaits. You can approach the problem from either direction:
Choose a program and then choose which file types you want it to take over; or
Choose a filename extension (like .aif or .ico) and then choose a new default program for it (Method 3, next).
Here’s how to perform the first technique:
Open
→→Apps→“Default apps.”You arrive on the “Default apps” page of Settings (Figure 6-12, left).
Choose “Set defaults by app.”
A curious dialog box appears, as shown at middle in Figure 6-12. It’s a list of every program on your machine that’s capable of opening multiple file types.
Select the name of a program, and then hit Manage.
For example, suppose a program named FakePlayer 3.0 has performed the dreaded Windows Power Grab, claiming a particular file type for itself without asking you. In fact, suppose it has elected itself King of All Audio Files. But you want Windows Media Player to play everything except FakePlayer (.fkpl) files.
In this step, then, you’d click Windows Media Player, and then Manage.
Now yet another dialog box opens. It lists every file type the selected program knows about (Figure 6-12, right).
For each file type, choose the program you want to be the default opener.
To do that, choose the name of the currently assigned app (“Movies & TV” in Figure 6-12 at right); from the list of alternate apps, select the one you want.
Of course, this step requires a certain amount of knowledge that comes from experience—how the heck would the average person know what, say, a .wvx file is?—but it’s here for the power geeks’ benefit.
Close Settings.
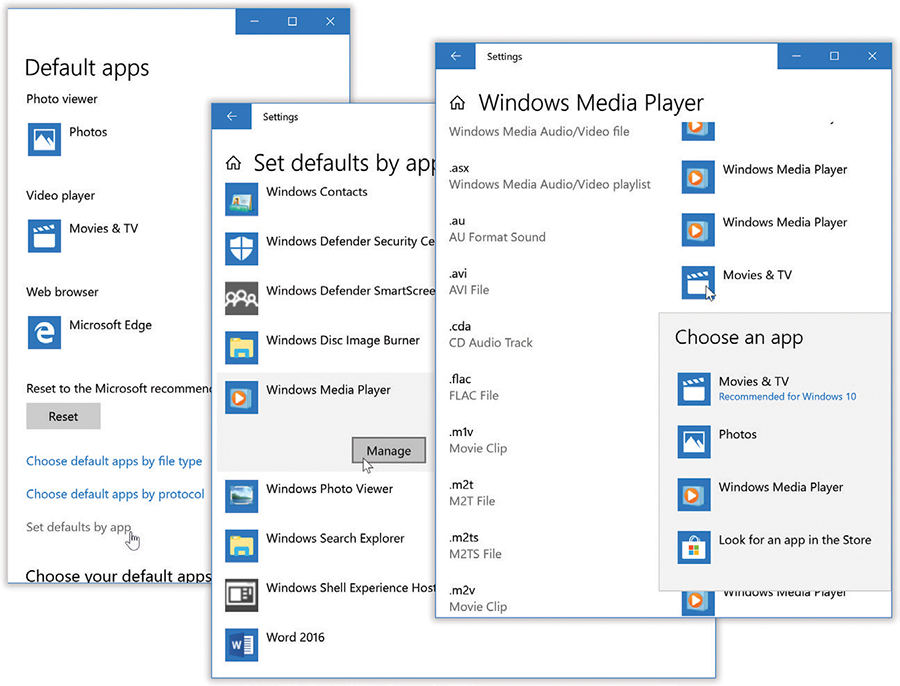
Figure 6-12. Here’s how you see the list of all file types that a certain program can open.
Start in Settings (left); hit “Set defaults by app.”
Click the app’s name, and then Manage (middle).
Now you see all the file types this program can open. Click the currently designed app’s name, and choose a new one, if you like (right).
Method 3: Start with the file type (or protocol)
Finally, you can approach the file-association problem by working through a massive alphabetical list of filename extensions (.aca, .acf, .acs, .aif, and so on) and hooking each one up to a program of your choice.
You work the “Default apps” page of Settings once again, like this:
Open
→→Apps→“Default apps.”You arrive on the “Default apps” page of Settings (Figure 6-12, left).
Choose “Choose default apps by file type.”
After a moment, a massive list of filename extensions opens, showing which program is currently assigned to open it.
Select the filename extension you want, and then click the name of the currently assigned app.
This process looks a lot like Figure 6-12 at right.
Click the name of the new default program.
Once again, if you don’t see it listed here, you can use “Look for an app in the Store,” to find it yourself.
Close Settings.
Choosing Your Default Apps
Windows comes with a web browser, a calendar app, an email program, a maps app, and players for music, photos, and videos. Very nice of Microsoft, isn’t it?
The courts—in the U.S. and Europe—didn’t think so. They thought Microsoft was stifling competition by including all these goodies in Windows. Who’d bother trying anybody else’s web browser, if Microsoft put its own right under your nose?
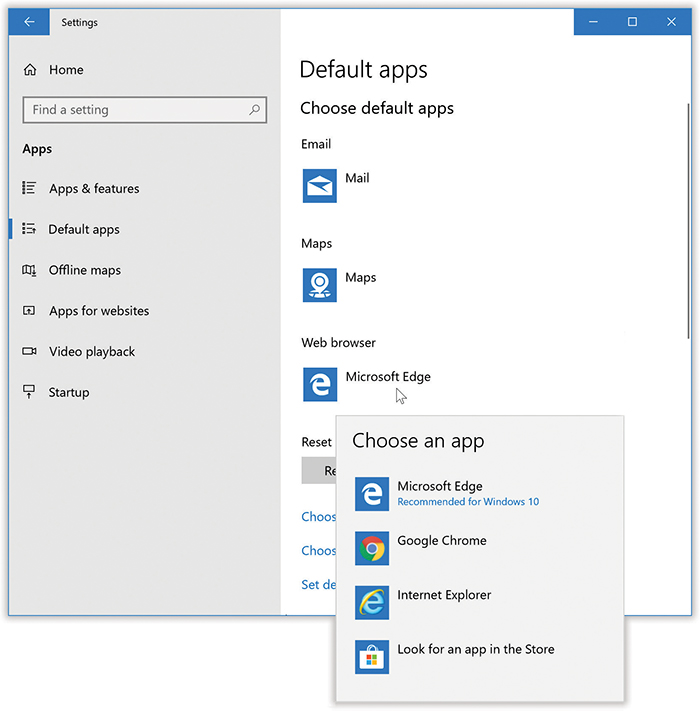
Figure 6-13. In →→Apps→“Default apps,” you can choose to replace Microsoft’s starter apps with other companies’ wares. For your web browser, for example, you might prefer Chrome, Firefox, or even Internet Explorer instead of Microsoft Edge.
To make a change, just click the name of the existing app and choose a replacement from the list that appears.
Ever since, Microsoft has included a Settings panel like the one shown in Figure 6-13. Here you can click the name of Microsoft’s program (for web browser, calendar, maps, and so on), and choose the name of a rival to use instead.
So what, exactly, is a default app? It’s the one that opens automatically. For example, if I email you a link to a cool website, the default browser is the one that will open when you click the link. It’s the photo program that opens when you double-click a picture file. And so on.
Installing New Apps
Most people don’t buy their computers from Microsoft. Most computers come from companies like Dell, HP, Acer, and Lenovo; they install Windows on each computer before customers take delivery.
Many PC companies sweeten the pot by preinstalling other programs, such as Quicken, Microsoft Works, Microsoft Office, more games, educational software, and so on. The great thing about preloaded programs is that they don’t need installing. Just double-click their desktop icons, or choose their names from the Start menu, and you’re off and working.
Sooner or later, though, you’ll probably want to exploit the massive library of Windows software and add to your collection. Today, almost all new desktop software comes to your PC from the Internet. (Software is sometimes still sold on a CD or DVD, but that happens less and less often.)
Desktop Apps
When you buy or download a standard desktop program (iTunes, Quicken, what have you), an installer program generally transfers the software files to the correct places on your hard drive. The installer also adds the new program’s name to the Start menu and tells Windows about the kinds of files (file extensions) it can open.
For best results, answer these questions before you install anything:
Are you an administrator? Windows derives part of its security and stability from handling new software installations with suspicion. You can’t install most programs unless you have an Administrator account (“Administrator accounts”).
Does it run in Windows 10? If the software or its website specifically says it’s compatible, great. Install away. If not, find out when a compatible version is due.
Tip:
See “Really Ancient Apps” in “FREQUENTLY ASKED QUESTION Really Ancient Apps” for compatibility tips.
Is the coast clear? Exit all your open programs. You should also turn off your virus-scanning software, which may take the arrival of your new software the wrong way.
Are you prepared to backtrack? If you’re at all concerned about the health and safety of the software you’re about to install, remember that the System Restore feature (“System Restore”) takes an automatic snapshot of your system just before any software installation. If the new program turns out to be a bit hostile, you can rewind your system to its former, happier working condition.
Are you darned sure? Internet downloads are the most common sources of PC virus infections. If you’re downloading from a brand-name site like Shareware.com (or a software company’s site, like Microsoft.com), you’re generally safe. But if the site is unfamiliar, be very, very afraid.
You can find thousands of Windows programs (demos, free programs, and shareware) at websites like www.download.com or www.tucows.com.
Microsoft Store Apps
Microsoft is hoping to pull an Apple here: It wants its online software store to be your one-stop software shopping mall.
The Microsoft Store is an online catalog of software from huge software companies, tiny one-person software companies, and everything in between. You can read about the apps, check out customer reviews, and, finally, download them directly to your computer. (As you may recall from Figure 6-1, the store is the only source of menuless, Windows 8–style Microsoft Store apps.)
There are some huge advantages to this system. Since there’s no box, DVD, registration card, shipping, or stocking, the software can cost a lot less. Plenty of programs in the Microsoft Store are free, and many paid ones offer a free seven-day trial.
Furthermore, Microsoft controls the transaction on both ends—it knows who you are—so there are no serial numbers to type in. The installation doesn’t have to interrupt you with warnings like “Please enter your password to install this software.” Once you click Buy, Try, or Install, the software downloads and installs itself automatically, without any interaction from you at all.
There are no disks to store and hunt down later, either. If you ever need to reinstall a program from the Microsoft Store, or if you ever get a new PC, you just re-download it; the store remembers that you’re a legitimate owner. Better yet, you’ll be downloading the latest version of that program; you won’t have to install all the “.01” patches that have come along since.
Best of all, since Microsoft knows what programs you have, it can let you know when new versions are available. You’ll see the word “Updates” in the upper-right corner of the Microsoft Store and on the updated app’s Start menu tile; the store tile on the Start menu shows how many updates await. Tap it to see the apps for which more recent versions are ready. (Tap Install to grab all of them at once.)
Navigating the store
To use the Microsoft Store, open the store tile on your Start menu. As shown in Figure 6-14 (top), the store looks like it’s been printed on an endless paper-towel roll; it scrolls for miles.
There are thousands of these apps, so Microsoft tries to bring a few choice morsels to the surface with categories like “Picks for you,” “Top free apps” (most downloaded) and “Top paid apps” (the most downloaded ones that cost money).
At the top of the Home screen: an “App categories” link. It opens a sublist of categories like Sports, Travel, Shopping, and so on—another way to dive into the app ocean.
Of course, you can also search for an app by name or by nature. To do that, click in the search box and type (piano, stocks, fantasy football, or whatever).
In general, the store here works exactly like the app store on a smartphone. Tap a program’s icon to open its details page. Here you’ll find reviews and ratings from other people, a description, screenshots of the program, and much more information to help you make a good buying decision. See Figure 6-14, bottom.
When you find an app that looks good, tap Get (if it’s free) or its price button or Free Trial button (if it’s not). When the download is complete, that button changes to say Open. You never have to enter your password, restart, unzip, or manually install anything.
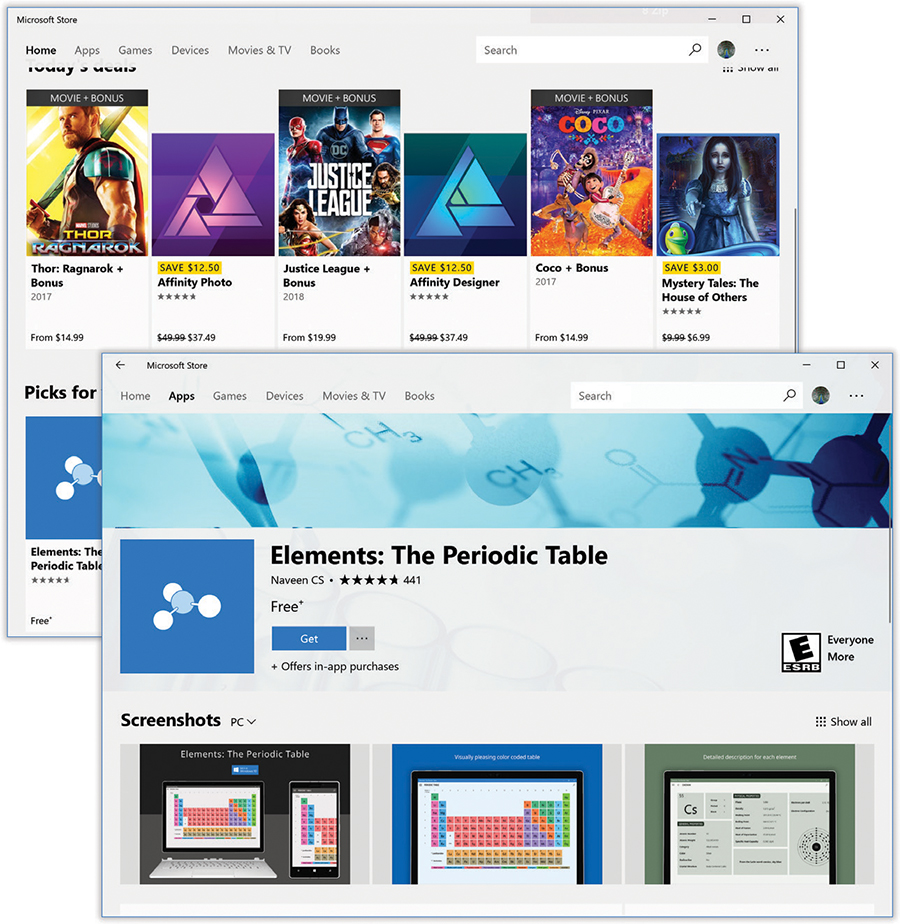
Figure 6-14. Top: The Store app is the source of all touch-friendly Microsoft Store apps.
To see a list of every app you’ve ever downloaded, click your own icon (the round one next to the search box) and choose “My library.”
Bottom: Each app has its own page—a horizontally scrolling page filled with information: photos, reviews, details, related apps, and other apps made by the same people.
Note:
The Microsoft Store lists desktop apps, too (not just Microsoft Store apps). But you don’t actually buy and download desktop apps from the Microsoft Store; you get a link to the software company’s website for that purpose. The only programs you can actually download from the Microsoft Store are, indeed, Microsoft Store apps.
Automatic updates
Software companies frequently update Microsoft Store apps, just as they do with phone and tablet apps. They fix bugs; they add new features. As it turns out, new versions of your Microsoft Store apps get installed quietly and automatically, in the background. You’re not even aware it’s happening.
Microsoft says it inspects each app to make sure Automatic App Updates doesn’t hand you something that doesn’t work right. But it does sometimes happen: You prefer the original version of some app to the “new, improved” one—and if automatic updates is turned on, you’ll never have the opportunity to object.
So: If the automatic-updates business is a little too automatic for your taste, you can turn it off. In the store app, click your own icon (the round one next to the search box); from the shortcut menu, choose Settings, and then turn off “Update apps automatically.”
Uninstalling Software
When you’ve had enough of a certain program and want to reclaim the disk space it occupies, don’t just delete its folder. The typical application installer tosses its software components like birdseed all over your hard drive; therefore, only some of the program is actually in the program’s folder.
Instead, the proper method goes like this:
Enlightened programs (released since Windows 10). Open the Start menu’s “All apps” list. Right-click the program’s name. From the shortcut menu, choose Uninstall (Figure 6-15, left).
Older programs. Open the “Apps & features” page of Settings (
→→Apps→“Apps & features”). Select the app, and then hit Uninstall (Figure 6-15, right).
You have to admit it: That is progress, is it not?
Note:
If you don’t see the name of the app you want to remove in Settings, it must be a truly ancient, creaking piece of work. You might have to open the old Control Panel and navigate to the Programs and Features page (“Programs and Features”), to remove it.
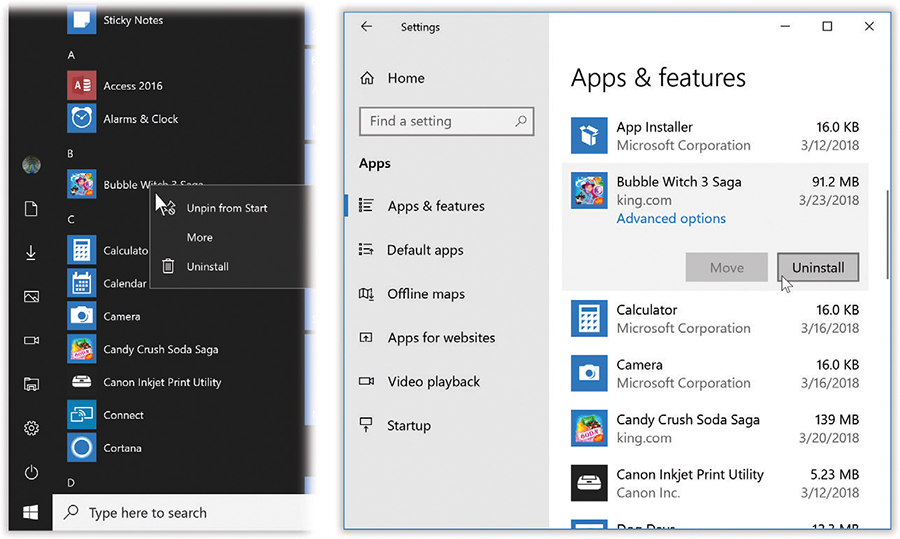
Figure 6-15. Before Windows 10, uninstalling one of your apps sometimes required a power drill, a blowtorch, and a six-volume instruction manual. Now it’s as easy as right-clicking in the “All apps list” (left) or clicking the program’s name in Settings.
Program Compatibility Mode
“You can’t make an omelet without breaking a few eggs.” If that’s not Microsoft’s motto, it should be. Each successive version of Windows may be better than the previous one, but each inevitably winds up “breaking” hundreds of programs, utilities, and drivers that used to run just fine.
In principle, programs that were written for recent versions of Windows should run fine in Windows 10. Unfortunately, some of them contain software code that deliberately sniffs around to find out what Windows version you have. These programs (or even their installer programs) may say, “Windows what?”—and refuse to open.
Fortunately, Windows’ Compatibility mode has some sneaky tricks that can fool them into running. You can use it to make “Let me run!” changes to a stubborn app either the non-techy, wizardy way (you just answer questions in a screen-by-screen interview format, and let Windows make the changes behind the scenes) or the expert way (changing compatibility settings manually).
To let Windows fix your compatibility headache, open the Start menu. Start typing compatibility until you see “Run programs made for previous versions of Windows.” Choose it.
The Program Compatibility program opens. It’s a wizard—a series of dialog boxes that interview you. On the way, you’re asked to click the name of the program you’re having trouble with. On the following screen, you have a choice of automatic or manual modes:
Try recommended settings means “Let Windows try to figure out how to make my stubborn program run. I don’t really care what it has to tinker with under the hood.”
Troubleshoot program means “Let me adjust the compatibility settings myself.”
You’ll be asked to choose from options like “The program worked in earlier versions of Windows,” “The program opens but doesn’t display correctly,” and so on. Work through the question screens the best you can. When it’s all over, you get a “Start the program” button that lets you see if the program finally runs without problems.
Whether things are fixed or not, after you’ve checked out the app, return to the troubleshooting wizard and click Next. You’ll be able to (a) save the fixed settings for the future, (b) start a new round of troubleshooting, or (c) send a report to Microsoft that you never did solve the problem.
Pick Up Where You Left Off
Microsoft has realized that we use more than one gadget through the course of the day. In fact, they may not all be Windows 10 machines. Incredibly, some people actually use Apple or Android products!
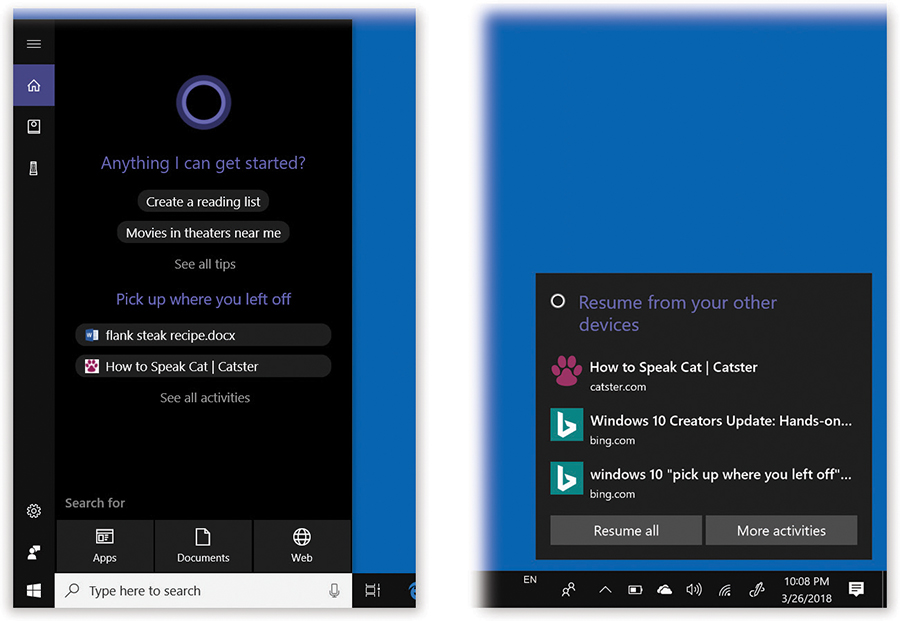
Figure 6-16. Windows offers to help you pick up where you left off (on other phones, tablets, or computers) in two places: the Cortana panel (left) and as a notification (right).
Acknowledging those factors, Microsoft has come up with something that you may find quite elegant, even if its name is not: “Pick up where you left off.”
Suppose that, on the train home from work, you do some work on your laptop (or iPhone, or Android phone) in a Microsoft Office program, and you visit a website in Microsoft Edge. When you get home, you can fire up your desktop PC—and, lo, a notification appears, offering to let you resume what you were doing on this computer! If you open the Cortana panel, you’ll see similar links there, too (Figure 6-16).
It’s all designed to make your work life more seamless.
Amazingly, these buttons also incorporate documents and websites you’ve visited using Microsoft apps on Macs, Android phones, and iPhones!
In the unlikely event that you don’t find these offers helpful, you can shut the whole thing down. Open the Cortana Notebook (“The Notebook”); click Manage Skills→“Pick up where you left off”; turn off “Show things I’ve looked at recently.”
Continue on PC
This feature is similar to “Pick up where you left off,” but different. This one lets you send any web page you’re viewing on your iPhone or Android phone directly to your Windows 10 PC, wirelessly and instantly. There’s nothing to click on the PC—the page just opens up in Edge automatically, as though a ghost were at the helm!
Start in ![]() →
→![]() →Phone→“Add a phone.” Enter your phone’s number so that Microsoft can text you a code, which you input here. The Settings page gives you a link to download a special app called Continue on PC from the iOS or Android app store.
→Phone→“Add a phone.” Enter your phone’s number so that Microsoft can text you a code, which you input here. The Settings page gives you a link to download a special app called Continue on PC from the iOS or Android app store.
Once it’s installed and you’ve signed in with your Microsoft ID, then the Share button in your phone’s browser offers a new command: Continue on PC. When you tap it, then whatever page you’re viewing magically pops up on the PC’s screen, full size and in living color!
Tip:
If you tap “Continue later” instead of the name of a PC, then a notification messages pops up briefly on your PC, and the Action Center gains a new item: “Continue from your phone,” complete with a link to the website you shared. Use that when you’re on the go and want to flag that site for your return.