

2
MAKING THINGS MOVE WITH ELECTRICITY AND MAGNETS
Big magnets attract small metal objects; small magnets stick to large metal objects. For example, refrigerator doors are usually big pieces of metal, so it’s easy cover them with tiny, decorative magnets. You’ve probably seen magnets in cartoons, too: characters like to use giant horseshoe-shaped magnets to cause mischief. You can find magnets in nature or create them with electricity. A magnet created with electricity is called an electromagnet.
You can use an electromagnet to make things move, and you don’t even have to be a superhero to do it! In fact, many things you see every day—like motors, loudspeakers, and the automatic doors in shops—work because electromagnets make something in them move.
An electromagnet is very easy to make, and in this chapter, you’ll build an electromagnet that you can turn on and off with a switch. Then, you’ll use an electromagnet to build your very own motor!
HOW MAGNETS WORK
Magnets have two poles, the north pole (N) and south pole (S), and they’re surrounded by a magnetic field.

If you place two magnets side by side, the north pole of one magnet attracts the other magnet’s south pole and repels that magnet’s north pole. Try pushing two magnets together. If you don’t force them, they should naturally attach to each other at their opposite poles. Now, try to force two of the same poles toward each other. That’s harder, isn’t it? Opposite poles are attracted to each other, and identical poles repel each other.

NOTE
Thin, flexible refrigerator magnets don’t have two distinct poles. Instead they have many poles of opposite polarity next to each other, so it’s harder to feel the magnets attract and repel.
But magnets don’t attract all materials. For example, plastic is unaffected by magnets. Try testing some metal objects around you!
Take any magnet and place it over objects made out of different materials, such as:
![]() Aluminum foil
Aluminum foil
![]() A stainless steel spoon
A stainless steel spoon
![]() A soda can
A soda can
![]() An iron nail
An iron nail
![]() A piece of metal jewelry
A piece of metal jewelry
![]() A few different coins
A few different coins
Which objects does the magnet attract or stick to? You should find that the magnet attracts some metals, but not all metals. What happens with aluminum foil?
It turns out that some metals can turn into magnets if you apply a little electricity. That’s where electromagnets come in.
MEET THE ELECTROMAGNET
When current flows through a wire, something strange happens: the current creates a magnetic field around the wire.
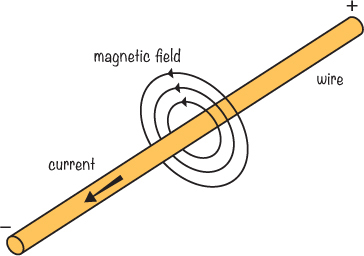
The magnetic field of one wire, however, is very weak. To make a stronger magnetic field, you need to run current through lots of wires placed next to each other. But you still need only a single wire: you can just wind that wire into many loops to make a coil, and then send a current through it. The magnetic fields from each loop in the coil overlap and combine to create a stronger magnetic field. If you wind your wire around a piece of iron—like a nail, a bolt, or a screw—you’ll get an even stronger magnetic field.
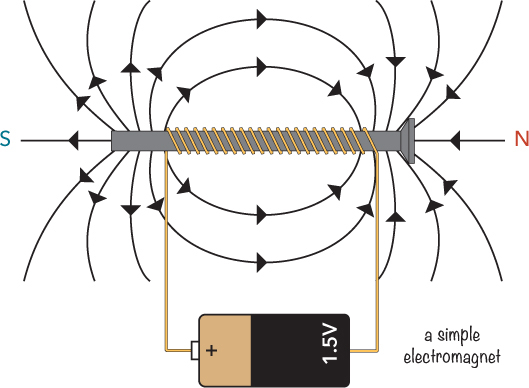
All you have to do to create an electromagnet is connect a battery to the ends of the coiled wire, making a closed circuit. When current flows through the wire, the piece of iron it’s wrapped around starts to behave like a magnet, with the south pole at one end and the north pole at the other end. Which pole is which depends on the direction of the current, as well as the direction of the coil windings. When you disconnect the battery, the current stops and the magnetic field disappears.
Building an electromagnet will help you start to understand how you can use electricity to make things like a loudspeaker in the real world, so let’s make one! With enough current, enough wire, and the right circuit, you could build a supermagnet straight out of your favorite cartoon, but for now, we’ll start with a small one.
PROJECT #3: CREATE YOUR OWN ELECTROMAGNET
You know the theory behind how to build your own electromagnet. But reading the theory isn’t the same as making something in real life, so it’s time to have some fun!
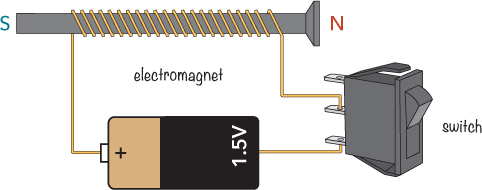
You’re going to build your own electromagnet with wire and a bolt. All you need to do is to wrap the wire around the bolt several times and connect the battery to the wire. To make it easy to turn the electromagnet on and off, you’ll also add a switch to the circuit so that you can control whether or not current flows through the wires.
Shopping List
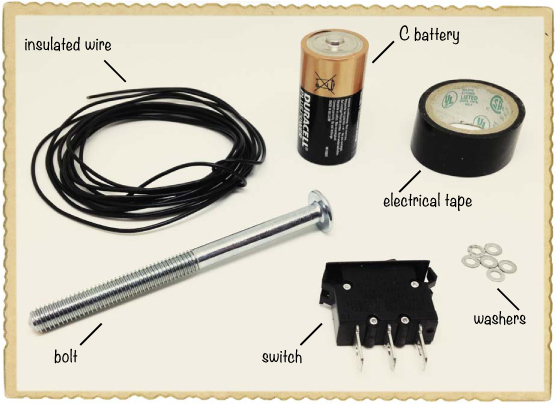
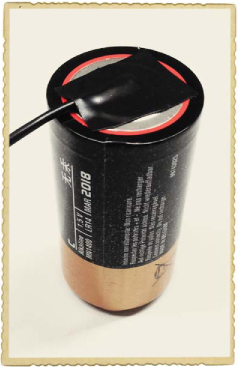
![]() A 1.5 V alkaline (C) battery (Jameco #2112428, Bitsbox #BAT040), like the big round ones used in older flashlights. Don’t use a rechargeable battery or plug-in power supply.
A 1.5 V alkaline (C) battery (Jameco #2112428, Bitsbox #BAT040), like the big round ones used in older flashlights. Don’t use a rechargeable battery or plug-in power supply.
![]() Insulated solid-core wire (Jameco #36792, Bitsbox #W106BK), about 7 feet. Standard hookup wire works fine.
Insulated solid-core wire (Jameco #36792, Bitsbox #W106BK), about 7 feet. Standard hookup wire works fine.
![]() Tape to fasten everything. You can use masking tape, electrical tape, or whatever you have.
Tape to fasten everything. You can use masking tape, electrical tape, or whatever you have.
![]() Washers or paper clips, or other small metal objects that your electromagnet can lift.
Washers or paper clips, or other small metal objects that your electromagnet can lift.
![]() A bolt to wind the wire around. Choose a big one to make room for many turns with the wire. The bolt I used was 0.3 inches thick and 4 inches long.
A bolt to wind the wire around. Choose a big one to make room for many turns with the wire. The bolt I used was 0.3 inches thick and 4 inches long.
![]() A switch (Jameco #581685, Bitsbox #SW018) to turn the electromagnet on and off.
A switch (Jameco #581685, Bitsbox #SW018) to turn the electromagnet on and off.
Tools
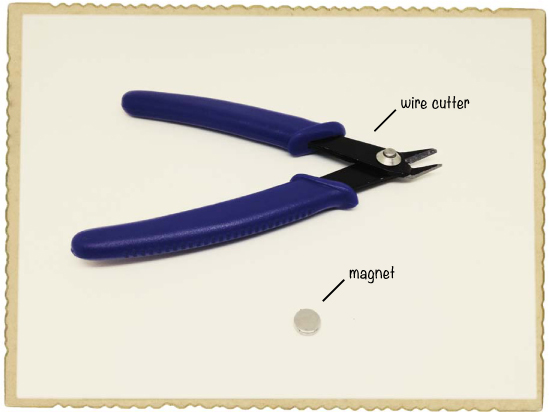
![]() A wire cutter (Jameco #35482, Bitsbox #TL008) to cut or remove the insulation from wire.
A wire cutter (Jameco #35482, Bitsbox #TL008) to cut or remove the insulation from wire.
![]() A standard magnet
A standard magnet
Step 1: Check Your Bolt
Your bolt is going to be the core of your electromagnet, making it stronger. But not all materials will work as an electromagnet’s core! Most metal bolts should work, but if you’re unlucky and find one that is made of nonmagnetic material, your electromagnet won’t be very effective.
To check whether a bolt is okay to use in this project, just hold it close to any standard magnet. If the magnet attracts the bolt, then the bolt is a good one.
Step 2: Remove Insulation from One End of the Coil Wire
To connect the coil wire to the battery and the switch, you need to expose the metal of the wire at both ends. You’ll use a wire cutter to strip away about 0.5 inches of insulation from the beginning of your wire. After you’ve wound the coil, you’ll do the same with the end of your wire. Stripping wires can be a bit difficult if you’ve never done it before, so ask a parent or teacher for help to get started.
First, gently grasp the end of the wire with the cutters.
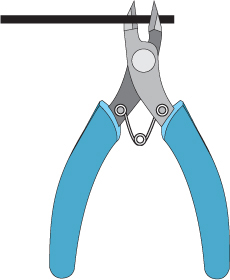
Apply just enough pressure with the wire cutter to cut the plastic around the wire, but not the wire itself. When you’ve cut through the insulation, your wire should look something like this:
Then, place the wire cutter in the cut you made. Squeeze the wire cutter enough to grip the loose plastic with the blades. Use the wire cutter to gently pull off the plastic without cutting into the metal of the wire.
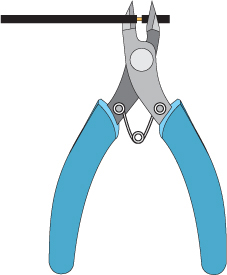
Now, you should have a wire with some exposed metal at the end, like this:
If stripping wires seems tricky in the beginning, don’t worry: it becomes much easier with practice.
Step 3: Wind the Wire
Take the wire and wrap it around your bolt 50 to 100 times. Leave about 3 inches of each end of the wire hanging loose. Make sure you don’t use all the wire; you’ll need a piece of wire about 4 inches long in a later step.
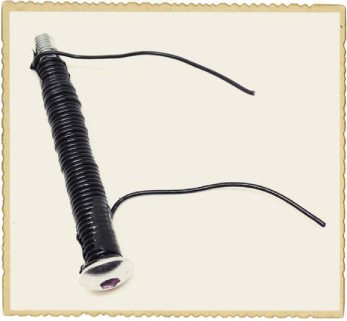
Wrap the wire as tight as possible and tape the end to make sure the turns stay in place. We call this wound wire the coil of the electromagnet.
Repeat Step 2 to strip the insulation off the other end of your coil.
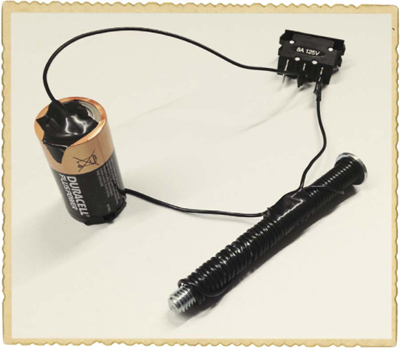
Step 4: Connect the Negative Battery Terminal to the Coil
Connect one end of the coil—it doesn’t matter which—to the negative terminal of the battery. Fasten it to the battery with tape.
WARNING
Be sure you’re using the recommended 1.5 V battery! Anything more powerful could send too much current through your coil, which could make both the battery and the coil hot enough to burn you.
Step 5: Connect the Switch
In Chapter 1, I showed you how to build your own switch and described how you can use one to turn something on and off. Now, you’re going to connect a prebuilt switch to your electromagnet to turn it on and off. A switch often has three pins that you can connect to.
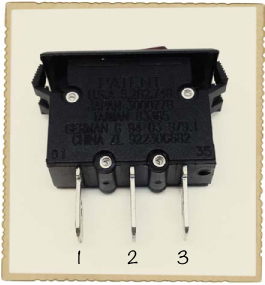
On the switch in this project’s Shopping List (page 24), pin 2 is the common pin, which is connected to either pin 1 or pin 3, depending on the position of the button. If the button is pushed toward pin 1, then pins 2 and 1 are connected. If the button is pushed toward pin 3, then pins 2 and 3 are connected.
Some switches have only two pins. In that case, the two pins are connected when the button is in one position, and not connected in the other—just like the switch you built in “Project #2: Intruder Alarm” on page 11.
Fasten the other end of the coil wire to pin 1 of the switch and make sure the button of the switch is pushed toward pin 3. Then, cut a brand-new piece of wire from your spool, about 4 inches long, and strip some insulation from both ends to expose the metal. Connect one end of the new wire to the positive battery terminal and one end to the middle pin of the switch. Use tape to make sure the wires are properly connected and stay in place.
Step 6: Test Your Super Electromagnet
That’s it for building the circuit! Now, let’s test it. If you’ve connected everything correctly, your electromagnet should be off now.
First, find a good piece of metal to attract with your electromagnet. A small metal paper clip should do the trick, though I used a little pile of steel washers. Magnets won’t attract all metals—for example, aluminum foil is not magnetic—so hold a regular magnet next to the metal you want to attract first to make sure it’s magnetic.
Then, flip your switch and place your electromagnet close to your paper clip or whatever other metal object you’re using. If you’ve found the on position, the bolt should pull the metal object toward it.
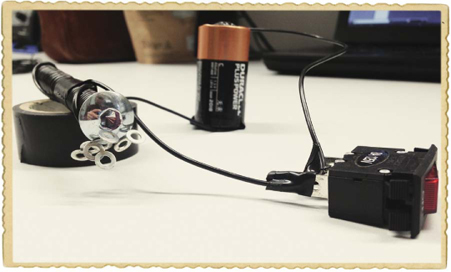
If nothing happens, press your switch into the other position; the bolt should start to pull the metal object now.
The electromagnet consumes a lot of power, so if you keep the switch flipped on for too long, your battery will drain quickly. You might also notice that the battery and the coil become hot. Try to limit the time your electromagnet is on to only a few seconds, and always disconnect the battery before you leave your circuit.
Step 7: What If the Electromagnet Isn’t Working?
Make sure you used insulated wire to make the loops around the bolt. The wire must have some kind of insulating layer on the outside of the metal; otherwise, it won’t work. The reason for this is that without the insulating layer, the current won’t follow the wire loops around the bolt. Instead, they’ll go through the bolt if the bolt is conductive or through to the neighboring wire if the loops of wire are touching. In either case, the current will function as if you had one thick wire.
Another possible problem is that your battery is dead. Try switching to a different battery that you’re sure is working.
If you’re sure you’re using insulated wire and that the battery has power, check that the connections on the switch and battery are connected, as I described in Steps 4 and 5. If you’re unsure, it might be a good idea to redo the connections.
MEET THE MOTOR
A wire with flowing current creates a magnetic field, as I described in “Meet the Electromagnet” on page 22. When powered, the coil from Project #3 will have a magnetic field with south and north poles, just like any other magnet. Like poles repel each other and opposite poles attract each other. So, if you put a magnetized coil of wire over a regular magnet with the same poles close to each other, the coil will try to twist itself around.

If you placed the wire coil on some kind of stand so that it could rotate freely over the magnet, it would flip back and forth without making a full spin. This is because when the coil has made a half spin, the opposite poles face and attract each other, which will force the coil in the opposite direction.
How can you make the coil continue to spin in one direction? You just need to find a way to disconnect the battery halfway around and turn the battery back on when the coil is back in its starting position. Then, here’s what happens. The coil starts moving when it’s powered and pushes the wire coil halfway through one round. Because you disconnect the battery halfway through, the existing motion keeps the coil moving forward. When it comes back to its original position, the battery gets reconnected and gives the coil another push forward, and it continues the same way.
Electric motors are based on this basic principle of magnetic poles attracting and repelling each other.
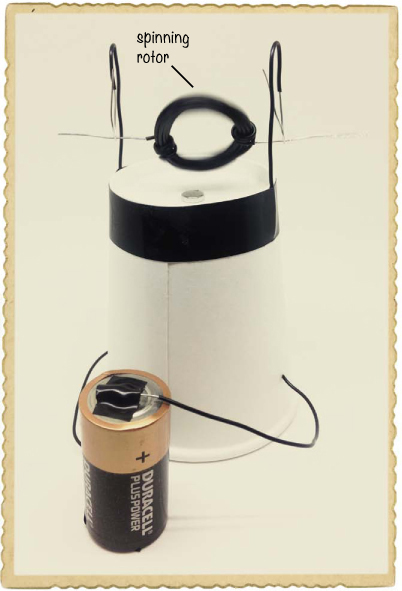
PROJECT #4: CREATE A MOTOR
In this chapter, you’ve built your own electromagnet, and you’ve learned how motors work. Now, it’s time to combine these two concepts. In this project, you’ll build your very own motor from scratch!
You’ll use a magnet together with a coil of wire. The coil will spin, and this spinning coil is called the rotor of the motor. You’re going to build the motor so that the rotor coil has current through it for only half of the spin. The magnet should push the electromagnet for half of the spin, and the rotor coil should continue around the second half of its spin with the energy it gets from the first push.
Shopping List
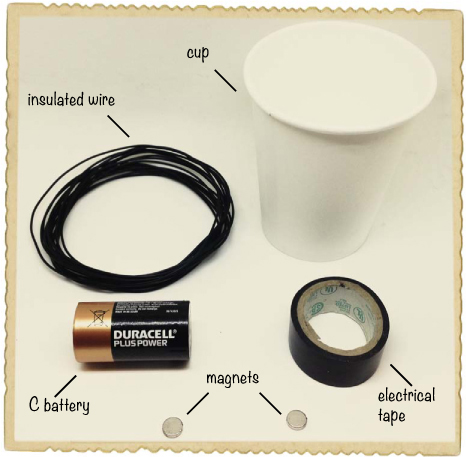
![]() A 1.5 V alkaline (C) battery (Jameco #2112428, Bitsbox #BAT040), like the big round ones used in older flashlights.
A 1.5 V alkaline (C) battery (Jameco #2112428, Bitsbox #BAT040), like the big round ones used in older flashlights.
![]() Insulated solid-core wire (Jameco #36792, Bitsbox #W106BK), about 13 feet. The stiff insulated wire will be used both for the coil and to support the coil.
Insulated solid-core wire (Jameco #36792, Bitsbox #W106BK), about 13 feet. The stiff insulated wire will be used both for the coil and to support the coil.
![]() Tape to fasten everything. You can use masking tape, electrical tape, or whatever you have.
Tape to fasten everything. You can use masking tape, electrical tape, or whatever you have.
![]() A paper or plastic cup to hold everything in place.
A paper or plastic cup to hold everything in place.
![]() Two disc magnets (Jameco #2181319, Bitsbox #HW145), the stronger the better.
Two disc magnets (Jameco #2181319, Bitsbox #HW145), the stronger the better.
WARNING
Always keep small supermagnets like these away from babies and young children. These magnets are very dangerous if swallowed.
Tools
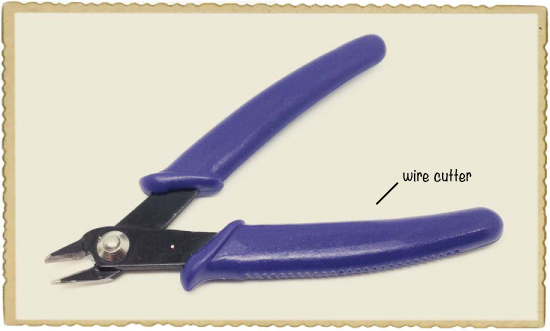
![]() A wire cutter (Jameco #35482, Bitsbox #TL008) to cut or remove the insulation from wire.
A wire cutter (Jameco #35482, Bitsbox #TL008) to cut or remove the insulation from wire.
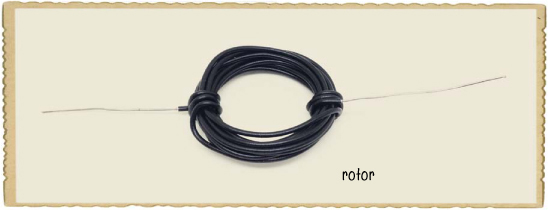
Step 1: Create the Rotor
First, we’ll create a new coil of wire; this coil will be the rotor, or spinning part, of your motor. To create the rotor, first take your spool of wire and strip the insulation from about 1.5 inches of the free end. Then, wind the wire around the battery.
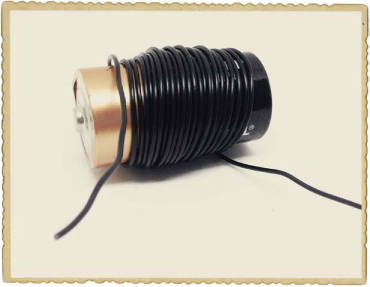
If you buy the wire I recommend in this project’s Shopping List (page 34), try making around 30 windings; if you use thinner wire, wind it more. The point is to make the coil as magnetic as possible, without making it too heavy. More windings make the rotor more magnetic, but also heavier.
Carefully slide your coiled wire off the battery. Gather the windings into a loop and wrap the ends of the wire around your loop a few times on each side so that the coils stay together. Cut your loop from the spool of wire, leaving the other end about 1.5 inches long. Then, remove the insulation from this end, too, so that the metal inside is exposed. If you’re using wires with plastic insulation, you can use a wire cutter, as described in Step 2 of Project #3 (page 26).
Step 2: Build the Motor’s Structure
Set your coil aside for now and take out your paper cup. Punch a hole in one side of the cup about 0.4 inches from the top and another one about 0.4 inches from the bottom. Pull a piece of the stiff wire around 8 inches long through these two holes. Then, do the same on the other side of the cup. Turn the cup upside down, remove the insulation from the ends of both wires, and tape the wires to the cup to ensure they stay in place.

The ends that are now on the bottom will connect to the battery, and the top ends are going to make up the connection to the rotor and support it. Bend the top ends of the two wires into two U-shapes that can hold the rotor. Make sure the bottom part of each U has exposed metal so that it will touch the exposed wires of the rotor. This U-structure will be the battery’s connection to the rotor.
Step 3: Place the Magnets
Place one magnet on top of the cup. Then place one magnet inside the cup so that the two magnets stick to each other through the cup. Place your rotor into the U-structure and adjust the position of the magnets to make sure they are at the center, just under the coil.
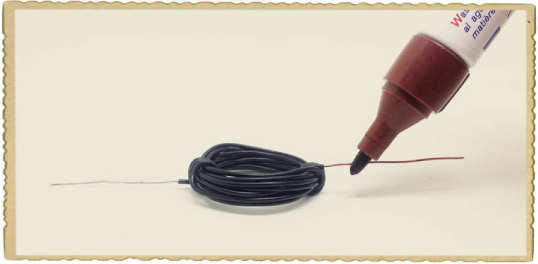
Step 4: Reinsulate Part of the Coil
If you connected the battery now, the motor wouldn’t work. With your coil rotor attached, you’d see movement, but the rotor would just be pushed back and forth in opposite directions because it’s always connected to the battery. You need a way to disconnect the coil from the battery halfway through so that it’s first pushed away from the magnet and then released until it has spun the rest of the way around. Then, it can reconnect with the magnet and get pushed again, and so on. You can make this happen by insulating the wire on one side with a permanent marker. Do this on only one arm of the rotor.

Lay your coil flat on the table and use a permanent marker to draw along the wire on one side to make it non-conductive. Draw your line so that the rotor disconnects from the battery when the loop lies horizontally above the magnet.
Step 5: Rev Up Your Motor
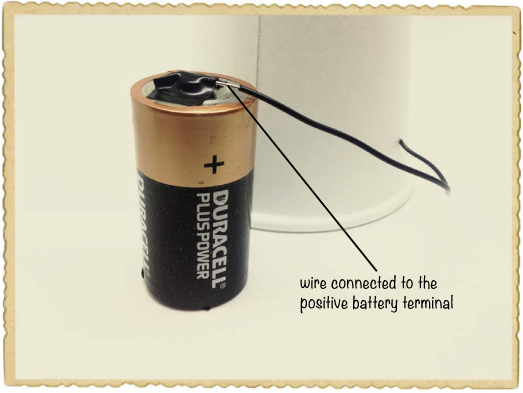
Let’s get that motor running! Connect the battery by taping the two wires to the positive and negative terminals.
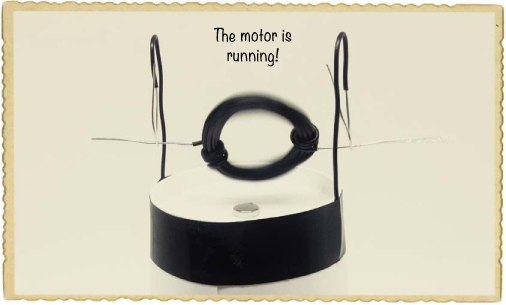
Now, place the rotor into the U-structure. The motor should start spinning. You might need to give it a little push. It won’t run any cars, but if it works, then you definitely just made something move with electricity. Congratulations!
Step 6: What If the Motor Doesn’t Work?
Can you see any movement? If you’re very lucky, it’ll work right away, but you’ll most likely need to make some adjustments. Here are some places to start:
Make sure your coil is placed so that it starts with the exposed wire—that is, not the part you covered with the marker—touching the exposed wire of the U-shaped structure. That way, when you connect the battery, the coil becomes magnetic.
Figure out which way the battery should be connected. You might find that the rotor spins better in one direction than the other, so try to connect the battery the other way around to see what’s best for your motor.
If your coil is a bit too heavy, the magnetism won’t be enough to push the coil all the way around the loop. Try unwinding a few loops to make the coil lighter.
You might need to adjust the position of the magnets under your rotor. They should be as centered as possible.
If your motor still doesn’t run, your rotor may just need a little push to get started. Try tapping it lightly with your finger to see whether that unleashes a speed demon.