Chapter 12. Jobs
So far we have focused on long-running processes such as databases and web applications. These types of workloads run until either they are upgraded or the service is no longer needed. While long-running processes make up the large majority of workloads that run on a Kubernetes cluster, there is often a need to run short-lived, one-off tasks. The Job object is made for handling these types of tasks.
A job creates Pods that run until successful termination (i.e., exit with 0). In contrast, a regular Pod will continually restart regardless of its exit code. Jobs are useful for things you only want to do once, such as database migrations or batch jobs. If run as a regular Pod, your database migration task would run in a loop, continually repopulating the database after every exit.
In this chapter we’ll explore the most common job patterns afforded by Kubernetes. We will also leverage these patterns in real-life scenarios.
The Job Object
The Job object is responsible for creating and managing Pods defined in a template in the job specification. These Pods generally run until successful completion. The Job object coordinates running a number of Pods in parallel.
If the Pod fails before a successful termination, the job controller will create a new Pod based on the Pod template in the job specification. Given that Pods have to be scheduled, there is a chance that your job will not execute if the required resources are not found by the scheduler. Also, due to the nature of distributed systems there is a small chance, during certain failure scenarios, that duplicate Pods will be created for a specific task.
Job Patterns
Jobs are designed to manage batch-like workloads where work items are processed by one or more Pods. By default, each job runs a single Pod once until successful termination. This job pattern is defined by two primary attributes of a job, namely the number of job completions and the number of Pods to run in parallel. In the case of the “run once until completion” pattern, the completions and parallelism parameters are set to 1.
Table 12-1 highlights job patterns based on the combination of completions and parallelism for a job configuration.
| Type | Use case | Behavior | completions | parallelism |
|---|---|---|---|---|
One shot |
Database migrations |
A single Pod running once until successful termination |
1 |
1 |
Parallel fixed completions |
Multiple Pods processing a set of work in parallel |
One or more Pods running one or more times until reaching a fixed completion count |
1+ |
1+ |
Work queue: parallel jobs |
Multiple Pods processing from a centralized work queue |
One or more Pods running once until successful termination |
1 |
2+ |
One Shot
One-shot jobs provide a way to run a single Pod once until successful termination. While this may sound like an easy task, there is some work involved in pulling this off. First, a Pod must be created and submitted to the Kubernetes API. This is done using a Pod template defined in the job configuration. Once a job is up and running, the Pod backing the job must be monitored for successful termination. A job can fail for any number of reasons, including an application error, an uncaught exception during runtime, or a node failure before the job has a chance to complete. In all cases, the job controller is responsible for recreating the Pod until a successful termination occurs.
There are multiple ways to create a one-shot job in Kubernetes. The easiest is to use the kubectl command-line tool:
$ kubectl run -i oneshot
  --image=gcr.io/kuar-demo/kuard-amd64:blue
  --restart=OnFailure
  -- --keygen-enable
     --keygen-exit-on-complete
     --keygen-num-to-gen 10

...
(ID 0) Workload starting
(ID 0 1/10) Item done: SHA256:nAsUsG54XoKRkJwyN+OShkUPKew3mwq7OCc
(ID 0 2/10) Item done: SHA256:HVKX1ANns6SgF/er1lyo+ZCdnB8geFGt0/8
(ID 0 3/10) Item done: SHA256:irjCLRov3mTT0P0JfsvUyhKRQ1TdGR8H1jg
(ID 0 4/10) Item done: SHA256:nbQAIVY/yrhmEGk3Ui2sAHuxb/o6mYO0qRk
(ID 0 5/10) Item done: SHA256:CCpBoXNlXOMQvR2v38yqimXGAa/w2Tym+aI
(ID 0 6/10) Item done: SHA256:wEY2TTIDz4ATjcr1iimxavCzZzNjRmbOQp8
(ID 0 7/10) Item done: SHA256:t3JSrCt7sQweBgqG5CrbMoBulwk4lfDWiTI
(ID 0 8/10) Item done: SHA256:E84/Vze7KKyjCh9OZh02MkXJGoty9PhaCec
(ID 0 9/10) Item done: SHA256:UOmYex79qqbI1MhcIfG4hDnGKonlsij2k3s
(ID 0 10/10) Item done: SHA256:WCR8wIGOFag84Bsa8f/9QHuKqF+0mEnCADY
(ID 0) Workload exiting
There are some things to note here:
-
The
-ioption tokubectlindicates that this is an interactive command.kubectlwill wait until the job is running and then show the log output from the first (and in this case only) Pod in the job. -
--restart=OnFailureis the option that tellskubectlto create a Job object. -
All of the options after
--are command-line arguments to the container image. These instruct our test server (kuard) to generate 10 4,096-bit SSH keys and then exit. -
Your output may not match this exactly.
kubectloften misses the first couple of lines of output with the-ioption.
After the job has completed, the Job object and related Pod are still around. This is so that you can inspect the log output. Note that this job won’t show up in kubectl get jobs unless you pass the -a flag. Without this flag, kubectl hides completed jobs. Delete the job before continuing:
$ kubectl delete jobs oneshot
The other option for creating a one-shot job is using a configuration file, as shown in Example 12-1.
Example 12-1. job-oneshot.yaml
apiVersion:batch/v1kind:Jobmetadata:name:oneshotspec:template:spec:containers:-name:kuardimage:gcr.io/kuar-demo/kuard-amd64:blueimagePullPolicy:Alwaysargs:-"--keygen-enable"-"--keygen-exit-on-complete"-"--keygen-num-to-gen=10"restartPolicy:OnFailure
Submit the job using the kubectl apply command:
$ kubectl apply -f job-oneshot.yaml
job "oneshot" created
Then describe the oneshot job:
$ kubectl describe jobs oneshot

Name:           oneshot
Namespace:      default
Image(s):       gcr.io/kuar-demo/kuard-amd64:blue
Selector:       controller-uid=cf87484b-e664-11e6-8222-42010a8a007b
Parallelism:    1
Completions:    1
Start Time:     Sun, 29 Jan 2017 12:52:13 -0800
Labels:	        Job=oneshot
Pods Statuses:  0 Running / 1 Succeeded / 0 Failed
No volumes.
Events:
  ... Reason             Message
  ... ------             -------
  ... SuccessfulCreate   Created pod: oneshot-4kfdt
You can view the results of the job by looking at the logs of the Pod that was created:
$ kubectl logs oneshot-4kfdt

...
Serving on :8080
(ID 0) Workload starting
(ID 0 1/10) Item done: SHA256:+r6b4W81DbEjxMcD3LHjU+EIGnLEzbpxITKn8IqhkPI
(ID 0 2/10) Item done: SHA256:mzHewajaY1KA8VluSLOnNMk9fDE5zdn7vvBS5Ne8AxM
(ID 0 3/10) Item done: SHA256:TRtEQHfflJmwkqnNyGgQm/IvXNykSBIg8c03h0g3onE
(ID 0 4/10) Item done: SHA256:tSwPYH/J347il/mgqTxRRdeZcOazEtgZlA8A3/HWbro
(ID 0 5/10) Item done: SHA256:IP8XtguJ6GbWwLHqjKecVfdS96B17nnO21I/TNc1j9k
(ID 0 6/10) Item done: SHA256:ZfNxdQvuST/6ZzEVkyxdRG98p73c/5TM99SEbPeRWfc
(ID 0 7/10) Item done: SHA256:tH+CNl/IUl/HUuKdMsq2XEmDQ8oAvmhMO6Iwj8ZEOj0
(ID 0 8/10) Item done: SHA256:3GfsUaALVEHQcGNLBOu4Qd1zqqqJ8j738i5r+I5XwVI
(ID 0 9/10) Item done: SHA256:5wV4L/xEiHSJXwLUT2fHf0SCKM2g3XH3sVtNbgskCXw
(ID 0 10/10) Item done: SHA256:bPqqOonwSbjzLqe9ZuVRmZkz+DBjaNTZ9HwmQhbdWLI
(ID 0) Workload exiting
Congratulations, your job has run successfully!
Note
You may have noticed that we didn’t specify any labels when creating the Job object. Like with other controllers (DaemonSets, ReplicaSets, deployments, etc.) that use labels to identify a set of Pods, unexpected behaviors can happen if a Pod is reused across objects.
Because jobs have a finite beginning and ending, it is common for users to create many of them. This makes picking unique labels more difficult and more critical. For this reason, the Job object will automatically pick a unique label and use it to identify the Pods it creates. In advanced scenarios (such as swapping out a running job without killing the Pods it is managing), users can choose to turn off this automatic behavior and manually specify labels and selectors.
Pod failure
We just saw how a job can complete successfully. But what happens if something fails? Let’s try that out and see what happens.
Let’s modify the arguments to kuard in our configuration file to cause it to fail out with a nonzero exit code after generating three keys, as shown in Example 12-2.
Example 12-2. job-oneshot-failure1.yaml
...spec:template:spec:containers:...args:-"--keygen-enable"-"--keygen-exit-on-complete"-"--keygen-exit-code=1"-"--keygen-num-to-gen=3"...
Now launch this with kubectl apply -f job-oneshot-failure1.yaml. Let it run for a bit and then look at the Pod status:
$ kubectl get pod -a -l job-name=oneshot

NAME            READY     STATUS             RESTARTS   AGE
oneshot-3ddk0   0/1       CrashLoopBackOff   4          3m
Here we see that the same Pod has restarted four times. Kubernetes is in CrashLoopBackOff for this Pod. It is not uncommon to have a bug someplace that causes a program to crash as soon as it starts. In that case, Kubernetes will wait a bit before restarting the Pod to avoid a crash loop eating resources on the node. This is all handled local to the node by the kubelet without the job being involved at all.
Kill the job (kubectl delete jobs oneshot), and let’s try something else. Modify the config file again and change the restartPolicy from OnFailure to Never. Launch this with kubectl apply -f jobs-oneshot-failure2.yaml.
If we let this run for a bit and then look at related Pods we’ll find something interesting:
$ kubectl get pod -l job-name=oneshot -a

NAME            READY     STATUS    RESTARTS   AGE
oneshot-0wm49   0/1       Error     0          1m
oneshot-6h9s2   0/1       Error     0          39s
oneshot-hkzw0   1/1       Running   0          6s
oneshot-k5swz   0/1       Error     0          28s
oneshot-m1rdw   0/1       Error     0          19s
oneshot-x157b   0/1       Error     0          57s
What we see is that we have multiple Pods here that have errored out. By setting restartPolicy: Never we are telling the kubelet not to restart the Pod on failure, but rather just declare the Pod as failed. The Job object then notices and creates a replacement Pod. If you aren’t careful, this’ll create a lot of “junk” in your cluster. For this reason, we suggest you use restartPolicy: OnFailure so failed Pods are rerun in place.
Clean this up with kubectl delete jobs oneshot.
So far we’ve seen a program fail by exiting with a nonzero exit code. But workers can fail in other ways. Specifically, they can get stuck and not make any forward progress. To help cover this case, you can use liveness probes with jobs. If the liveness probe policy determines that a Pod is dead, it’ll be restarted/replaced for you.
Parallelism
Generating keys can be slow. Let’s start a bunch of workers together to make key generation faster. We’re going to use a combination of the completions and parallelism parameters. Our goal is to generate 100 keys by having 10 runs of kuard with each run generating 10 keys. But we don’t want to swamp our cluster, so we’ll limit ourselves to only five Pods at a time.
This translates to setting completions to 10 and parallelism to 5. The config is shown in Example 12-3.
Example 12-3. job-parallel.yaml
apiVersion:batch/v1kind:Jobmetadata:name:parallellabels:chapter:jobsspec:parallelism:5completions:10template:metadata:labels:chapter:jobsspec:containers:-name:kuardimage:gcr.io/kuar-demo/kuard-amd64:blueimagePullPolicy:Alwaysargs:-"--keygen-enable"-"--keygen-exit-on-complete"-"--keygen-num-to-gen=10"restartPolicy:OnFailure
Start it up:
$ kubectl apply -f job-parallel.yaml
job "parallel" created
Now watch as the Pods come up, do their thing, and exit. New Pods are created until 10 have completed altogether. Here we use the --watch flag to have kubectl stay around and list changes as they happen:
$ kubectl get pods -w
NAME             READY     STATUS    RESTARTS   AGE
parallel-55tlv   1/1       Running   0          5s
parallel-5s7s9   1/1       Running   0          5s
parallel-jp7bj   1/1       Running   0          5s
parallel-lssmn   1/1       Running   0          5s
parallel-qxcxp   1/1       Running   0          5s
NAME             READY     STATUS      RESTARTS   AGE
parallel-jp7bj   0/1       Completed   0          26s
parallel-tzp9n   0/1       Pending   0         0s
parallel-tzp9n   0/1       Pending   0         0s
parallel-tzp9n   0/1       ContainerCreating   0         1s
parallel-tzp9n   1/1       Running   0         1s
parallel-tzp9n   0/1       Completed   0         48s
parallel-x1kmr   0/1       Pending   0         0s
parallel-x1kmr   0/1       Pending   0         0s
parallel-x1kmr   0/1       ContainerCreating   0         0s
parallel-x1kmr   1/1       Running   0         1s
parallel-5s7s9   0/1       Completed   0         1m
parallel-tprfj   0/1       Pending   0         0s
parallel-tprfj   0/1       Pending   0         0s
parallel-tprfj   0/1       ContainerCreating   0         0s
parallel-tprfj   1/1       Running   0         2s
parallel-x1kmr   0/1       Completed   0         52s
parallel-bgvz5   0/1       Pending   0         0s
parallel-bgvz5   0/1       Pending   0         0s
parallel-bgvz5   0/1       ContainerCreating   0         0s
parallel-bgvz5   1/1       Running   0         2s
parallel-qxcxp   0/1       Completed   0         2m
parallel-xplw2   0/1       Pending   0         1s
parallel-xplw2   0/1       Pending   0         1s
parallel-xplw2   0/1       ContainerCreating   0         1s
parallel-xplw2   1/1       Running   0         3s
parallel-bgvz5   0/1       Completed   0         40s
parallel-55tlv   0/1       Completed   0         2m
parallel-lssmn   0/1       Completed   0         2m
Feel free to study the completed jobs and check out their logs to see the fingerprints of the keys they generated. Clean up by deleting the finished Job object with kubectl delete job parallel.
Work Queues
A common use case for jobs is to process work from a work queue. In this scenario, some task creates a number of work items and publishes them to a work queue. A worker job can be run to process each work item until the work queue is empty (Figure 12-1).
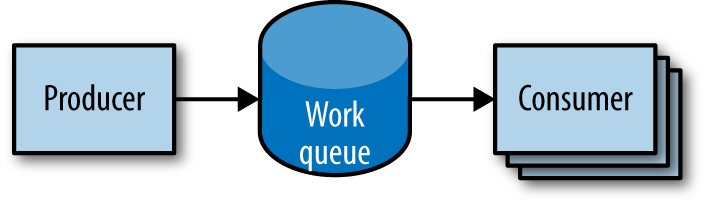
Figure 12-1. Parallel jobs
Starting a work queue
We start by launching a centralized work queue service. kuard has a simple memory-based work queue system built in. We will start an instance of kuard to act as a coordinator for all the work to be done.
Next, we create a simple ReplicaSet to manage a singleton work queue daemon. We are using a ReplicaSet to ensure that a new Pod will get created in the face of machine failure, as shown in Example 12-4.
Example 12-4. rs-queue.yaml
apiVersion:extensions/v1beta1kind:ReplicaSetmetadata:labels:app:work-queuecomponent:queuechapter:jobsname:queuespec:replicas:1template:metadata:labels:app:work-queuecomponent:queuechapter:jobsspec:containers:-name:queueimage:"gcr.io/kuar-demo/kuard-amd64:blue"imagePullPolicy:Always
Run the work queue with the following command:
$ kubectl apply -f rs-queue.yaml
At this point the work queue daemon should be up and running. Let’s use port forwarding to connect to it. Leave this command running in a terminal window:
$ QUEUE_POD=$(kubectl get pods -l app=work-queue,component=queue
    -o jsonpath='{.items[0].metadata.name}')
$ kubectl port-forward $QUEUE_POD 8080:8080
Forwarding from 127.0.0.1:8080 -> 8080
Forwarding from [::1]:8080 -> 8080
You can open your browser to http://localhost:8080 and see the kuard
interface. Switch to the “MemQ Server” tab to keep an eye on what is going on.
With the work queue server in place, we should expose it using a service. This will make it easy for producers and consumers to locate the work queue via DNS, as Example 12-5 shows.
Example 12-5. service-queue.yaml
apiVersion:v1kind:Servicemetadata:labels:app:work-queuecomponent:queuechapter:jobsname:queuespec:ports:-port:8080protocol:TCPtargetPort:8080selector:app:work-queuecomponent:queue
Create the queue service with kubectl:
$ kubectl apply -f service-queue.yaml
service "queue" created
Loading up the queue
We are now ready to put a bunch of work items in the queue. For the sake of simplicity we’ll just use curl to drive the API for the work queue server and insert a bunch of work items. curl will communicate to the work queue through the kubectl port-forward we set up earlier, as shown in Example 12-6.
Example 12-6. load-queue.sh
# Create a work queue called 'keygen'
curl -X PUT localhost:8080/memq/server/queues/keygen

# Create 100 work items and load up the queue.
for i in work-item-{0..99}; do
  curl -X POST localhost:8080/memq/server/queues/keygen/enqueue
    -d "$i"
done
Run these commands, and you should see 100 JSON objects output to your terminal with a unique message identifier for each work item. You can confirm the status of the queue by looking at the “MemQ Server” tab in the UI, or you can ask the work queue API directly:
$ curl 127.0.0.1:8080/memq/server/stats
{
    "kind": "stats",
    "queues": [
        {
            "depth": 100,
            "dequeued": 0,
            "drained": 0,
            "enqueued": 100,
            "name": "keygen"
        }
    ]
}
Now we are ready to kick off a job to consume the work queue until it’s empty.
Creating the consumer job
This is where things get interesting! kuard is also able to act in consumer mode. We can set it up to draw work items from the work queue, create a key, and then exit once the queue is empty, as shown in Example 12-7.
Example 12-7. job-consumers.yaml
apiVersion:batch/v1kind:Jobmetadata:labels:app:message-queuecomponent:consumerchapter:jobsname:consumersspec:parallelism:5template:metadata:labels:app:message-queuecomponent:consumerchapter:jobsspec:containers:-name:workerimage:"gcr.io/kuar-demo/kuard-amd64:blue"imagePullPolicy:Alwaysargs:-"--keygen-enable"-"--keygen-exit-on-complete"-"--keygen-memq-server=http://queue:8080/memq/server"-"--keygen-memq-queue=keygen"restartPolicy:OnFailure
Here, we are telling the job to start up five Pods in parallel. As the completions parameter is unset, we put the job into a worker pool mode. Once the first Pod exits with a zero exit code, the job will start winding down and will not start any new Pods. This means that none of the workers should exit until the work is done and they are all in the process of finishing up.
Now, create the consumers job:
$ kubectl apply -f job-consumers.yaml
job "consumers" created
Once the job has been created, you can view the Pods backing the job:
$ kubectl get pods
NAME              READY     STATUS    RESTARTS   AGE
queue-43s87       1/1       Running   0          5m
consumers-6wjxc   1/1       Running   0          2m
consumers-7l5mh   1/1       Running   0          2m
consumers-hvz42   1/1       Running   0          2m
consumers-pc8hr   1/1       Running   0          2m
consumers-w20cc   1/1       Running   0          2m
Note there are five Pods running in parallel. These Pods will continue to run until the work queue is empty. You can watch as it happens in the UI on the work queue server. As the queue empties, the consumer Pods will exit cleanly and the consumers job will be considered complete.
Cleaning up
Using labels, we can clean up all of the stuff we created in this section:
$ kubectl delete rs,svc,job -l chapter=jobs
CronJobs
Sometimes you want to schedule a job to be run at a certain interval. To achieve this you can declare a CronJob in Kubernetes, which is responsible for creating a new Job object at a particular interval. The declaration of a CronJob looks like:
apiVersion: batch/v1beta1
kind: CronJob
metadata:
  name: example-cron
spec:
  # Run every fifth hour
  schedule: "0 */5 * * *"
  jobTemplate:
    spec:
      template:
        spec:
          containers:
          - name: batch-job
            image: my-batch-image
          restartPolicy: OnFailure
Note the spec.schedule field, which contains the interval for the
CronJob in standard cron format.
You can save this file as cron-job.yaml, and create the CronJob with
kubectl create -f cron-job.yaml. If you are interested in the current state of
a CronJob, you can use kubectl describe <cron-job> to get the details.
Summary
On a single cluster, Kubernetes can handle both long-running workloads such as web applications and short-lived workloads such as batch jobs. The job abstraction allows you to model batch job patterns ranging from simple one-time tasks to parallel jobs that process many items until work has been exhausted.
Jobs are a low-level primitive and can be used directly for simple workloads. However, Kubernetes is built from the ground up to be extensible by higher-level objects. Jobs are no exception; they can easily be used by higher-level orchestration systems to take on more complex tasks.