
4
CREATING YOUR FIRST ANDROID APP

To build the mobile version of the Hi-Lo guessing game app, we’re going to use Android Studio. If you didn’t set this up in Chapter 1, go back to “Installing Android Studio for Mobile App Development” on page 8 and set it up. As with the GUI version of the game, we’re going to create a user interface for the app, as shown in Figure 4-1. The apps you’ve created so far could only be run on your desktop computer, but Android apps can run on any Android device, including phones, tablets, watches, TVs, and so on. If you don’t own an Android device, don’t worry—you can still code for Android, as the Android emulator that comes with Android Studio lets you simulate running a device.

Figure 4-1: The guessing game will become a mobile app in this chapter. The app runs on a simulated Android phone (left) and on an actual Android tablet (right).
Figure 4-1 shows our app running on the Android emulator, simulating how the app looks on a Nexus 6P, and on an Android tablet. Both versions are running the same code—and, even more conveniently, we can reuse a lot of the Java code we built for the previous desktop versions because Android is built on Java!
Notice that the emulator and the actual device look very similar, with some minor differences to account for the different screen sizes between the phone and the 7-inch tablet. In the same way that you can write a Java app for Windows and run it on macOS or Linux, you can write an Android mobile app in Java and run it on any of literally thousands of Android devices. Let’s get started building your first Android mobile app!
Starting a New Android Studio App Project
The first time you start Android Studio, it may take a few minutes to update and run. When it starts, you’ll see a screen like the one shown in Figure 4-2. Select the option labeled Start a new Android Studio project.
Name your new project GuessingGame, with no space. If you have a website, you can enter it in the Company Domain field, as shown in Figure 4-3. Otherwise, leave the default example domain. Next, choose a project location. I’ve set up a folder called AndroidProjects to keep things organized, and you should do the same.

Figure 4-2: Once Android Studio finishes setting up, choose Start a new Android Studio project.

Figure 4-3: Name your new Android Studio project GuessingGame, with no space.
Click Next after naming your project. Now you’ll have the opportunity to choose which Android version number your app should run on. The Android platform evolves rapidly as new devices and capabilities are developed, so we’ll need to pick a target. Fortunately, Android Studio is regularly updated with both the latest Android versions and information on how many devices still use the older versions. You’ll also need to select a software development kit (SDK) or application program interface (API) level when you choose which versions of Android to support. SDK and API levels include tools you’ll use to develop your app, but they’re tied to specific versions of Android. The Target Android Devices window, shown in Figure 4-4, allows you to choose a minimum SDK or API level for each app you develop.

Figure 4-4: Choose the Minimum SDK level for the Android devices you’re developing for.
Choose API 16 (Android 4.1, Jelly Bean) as the minimum SDK for the guessing game app. Android Studio will tell you that this runs on more than 99 percent of active Android devices. Click Next.
The New Project wizard will ask you what kind of activity you want to add to your app. An activity is just something the user can do. Each activity usually has its own screen layout with a user interface, like the ones shown in Figure 4-5.
There are lots of choices for the main activity for an app, such as Google Maps, Login, Settings, Tabbed Activities, and more. The Basic Activity will give us a great foundation for the guessing game app, so choose that option and click Next.
We’ll use the default names provided by Android Studio on the following screen (shown in Figure 4-6): MainActivity for the activity name and activity_main for the layout name. The activity file contains the Java source code that runs the app. The layout is a separate file that contains the app interface. Click Finish to complete your app project setup.
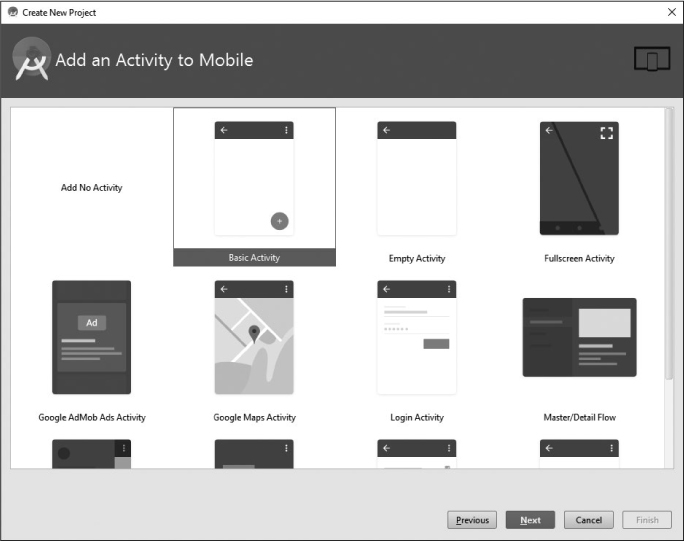
Figure 4-5: Choose Basic Activity as the basis for your app.

Figure 4-6: Leave the default values for activity name and layout name.
The project may take a few moments to build, as Android Studio creates the project files and sets up the GuessingGame app project. After it finishes loading, Android Studio will open the project to a default view that looks like Figure 4-7.

Figure 4-7: The default project view in Android Studio, complete with a GUI mobile layout view
If your project doesn’t open with this screen, click the Project tab in the upper left, expand the app folder in the Project Explorer, expand the res (short for resources) folder, expand layout, and then double-click the content_main.xml file to see a view similar to Figure 4-7.
Building the GUI Layout in Design View
Android apps separate the layout from the app code (the activity), so this app will be a little different from the desktop app we wrote in Chapter 3. The layout isn’t described in Java but in eXtensible Markup Language (XML). Fortunately, despite this difference, we can still use a drag-and-drop palette similar to Eclipse’s WindowBuilder Editor to design the GUI view. The main difference in Android Studio is that the components have been named with mobile apps in mind.
Like the WindowBuilder Editor, Android Studio has two tabs, one for the design view and one for the source code. Click the Design tab in the lower-left corner of the main window containing the content_main.xml file. You’ll see the design view shown in Figure 4-8.

Figure 4-8: Android Studio has a design view similar to the WindowBuilder Editor in Eclipse.
Figure 4-8 shows the four areas of the design view that we’ll be using the most: the Project Explorer pane ➊, the Palette pane ➋, the Preview pane ➌, and the Properties pane ➍.
In the center of the Preview pane, you’ll see a label—known as a TextView in Android terminology—reading Hello World!. Click the label and press DELETE (or right-click and select Delete from the menu) to delete it from the Preview pane. Then, click the Layouts option in the Palette pane, select a RelativeLayout, and drag it either to the Preview pane or onto the ConstraintLayout (in Figure 4-8) in the Component Tree listing just below the Palette pane. We’ll start with an empty RelativeLayout to build our guessing game GUI view.
In the Palette pane, under Widgets, select TextView. A TextView in Android is similar to a JLabel in the Swing toolkit, and widgets are what we call most of the GUI components in Android. We’ll drag and drop to place GUI components in the design preview.
Click the TextView widget and drag it over the white app background in the simulated Android phone, placing the widget near the top to serve as the title of your app.
After placing the title TextView, you’ll see options appear in the Properties pane on the right. If the pane doesn’t appear, click Properties in the upper-right corner of the Design tab to expand the Properties pane. Find the text property of the TextView widget you’ve just added. Change the text to "Your Name's Guessing Game" and change the textAppearance property to Large. Then, drag the TextView to center it at the top of the screen as shown in Figure 4-9. The gray dashed guideline helps with placement.

Figure 4-9: Placing GUI widgets/components in Android Studio is very similar to the process in Eclipse.
To add the label prompting the user to enter a number between 1 and 100, place another TextView widget onto the design preview just a small distance below the title. Change the textAppearance property to Medium in the Properties pane on the right. Then, type Enter a number between 1 and 100: in the text property for the TextView.
Next, we’ll place the text field, also known as an EditText in Android, for the user’s guess. Text fields are listed just below Widgets in the Palette pane. There are many types of text fields in Android, and each behaves differently depending on the needs of your app. For example, Plain Text is a simple text field, Password hides characters as they’re typed, Phone shows the numeric keypad and formats the input as a phone number, and E-mail shows a modified keyboard with the @ symbol.
Choose a Number text field so the user can enter their guess from a numeric keyboard on their screen. Place this field just a little below the previous label. Then, place a Button widget an equal distance below the text field and change its text property to "Guess!". Finally, place another TextView widget below the button, giving it a text property of "Enter a number, then click Guess!". If you have trouble placing the widget the same distance below the button because you’re too close to the vertical center of the screen, place it lower or higher in the Properties pane under Layout_Margin (you may need to click View all properties and then click the gray arrow next to Layout_Margin to expand the margin properties), find layout_marginTop, and change the value to 30dp. The finished GUI layout should look similar to Figure 4-10.

Figure 4-10: The finished GUI layout for the Android guessing game app in design view
We’ll make one final change before naming the GUI components. Change the width property of the numeric text field, where the user enters their guess, to 75dp; do so by clicking View all properties or the left-and-right arrow icon in the Properties pane. The original text field was too wide for a number-guessing game that uses only numbers between 1 and 100, so we’ve resized it to make it narrower.
With that small change, it’s time to start naming our GUI components so we’ll be able to find them easily in the Java code.
Naming GUI Components in Android Studio
Just as we named GUI components in Eclipse, we’ll need to name the GUI elements in Android Studio so that we can access them from the code. But in Android Studio, the names of the GUI elements themselves won’t appear in the Java source code by default. Instead, we’ll have to connect these XML GUI components to the Java code by hand before we can use them in the code.
For now, though, we just need to change the id property of the number text field, the guess button, and the bottommost label to txtGuess, btnGuess, and lblOutput, respectively. If a pop-up message asks you to update usages, click Yes. We’ll use these names for consistency and convenience. Figure 4-11 shows the renamed text field, button, and label.

Figure 4-11: Rename the EditText, Button, and TextView components (circled) by changing their id properties to txtGuess, btnGuess, and lblOutput, respectively.
One last thing we should do before we start coding in Java is hide the small floating action button (fab) icon, shown in the bottom right of the design preview in Figure 4-12. Your project may not show the fab icon, but if it does, double-click the activity_main.xml file in the Project Explorer pane ➊. Click the activity_main.xml tab above the design view ➋ and then click the fab icon ➌. Go to Properties and set the visibility property to invisible ➍.

Figure 4-12: Hide the fab icon by going to the activity_main.xml file, clicking the small envelope icon, and setting the visibility property to invisible.
I’ve chosen to set the fab icon to invisible rather than delete it entirely, because you might want to use the floating action button to add new features to your app later on. The floating action button can share info from the app to Facebook, post a tweet in Twitter about how much you like the app, send an email to a friend about the app, and more.
Next, we’ll wire up the GUI so that we can use it in Java to program the rest of the app.
Connecting the GUI to Java in Android Studio
It’s time to connect the GUI to Java so we can write the code for the guessing game app. First, let’s open the Java source code file by looking in the Project Explorer pane, under app ▸ src ▸ main ▸ java ▸ com.example.guessinggame (or your package name) ▸ MainActivity. Double-click MainActivity to open the MainActivity.java source code file.
You may have noticed the java folder in the Project Explorer has another package or two, possibly labeled the same, but with (test) or (androidTest) after the package name. These packages are used for testing in larger applications, where engineers evaluate app quality, security, and functionality for software quality assurance. We won’t tackle quality assurance, but it’s a great way to get into the software development industry.
The Java source code inside the MainActivity.java file will look something like Figure 4-13.

Figure 4-13: The Java source code for the app is called MainActivity.java by default.
Notice that in Android Studio, a package declaration appears at the very top of the file by default. Packages help us organize all the files needed in a more complex program, such as a mobile app. In this case, the package name is the company domain name from the Create New Project screen back in Figure 4-3 on page 77, but in reverse order—notice the com comes first.
Several Android import statements follow the package declaration. These work just as they do for Java on the desktop, importing existing features and functionality into the code.
The following public class MainActivity code snippet may be slightly different for you depending on the minimum API level you chose for your app, but the overall code will be similar, and the app we’re writing will work across multiple API levels. First we’ll declare our variables to connect the GUI to the program. Click just inside the opening brace for the class, on the next line down, and add these lines to declare variables for the text field, button, and output label:
public class MainActivity extends AppCompatActivity {
private EditText txtGuess;
private Button btnGuess;
private TextView lblOutput;
As you enter each new variable type, you may see a drop-down menu offering to import it (android.widget.EditText, for example). If you click the correct widget type to import, Android Studio will add the corresponding import statement for you. If you typed the three lines without clicking to accept the automatic imports, just click each widget type and then press ALT-ENTER (or OPTION-ENTER on macOS) to import any missing classes, as shown in Figure 4-14.

Figure 4-14: Android Studio enables you to automatically import classes just as Eclipse did, either as you type or afterward with a simple key combination (ALT-ENTER, or OPTION-ENTER on macOS).
The following three import statements should now appear with the others near the top of your file:
import android.widget.EditText;
import android.widget.Button;
import android.widget.TextView;
After declaring the three variables for the GUI widgets, we need to connect those variables to the XML components for each one. We’ll do this in the onCreate() method, shown at the bottom of Figure 4-14, which is the function that runs when the app is loaded. Android Studio has automatically generated the code to begin this method.
Look inside the top two or three lines of the onCreate() method, and find this line:
setContentView(R.layout.activity_main);
Right after that line, press ENTER a couple of times and type the following partial line of code to begin connecting the variable txtGuess to the EditText widget in the XML layout file:
txtGuess = (EditText) findViewById(R.id.
The findViewById() function is how we connect GUI widgets in the XML layout to the variables we’ll use to represent them in the source code. The R inside that function refers to a special file called R.java that Android Studio generates to make it possible to connect resources. The R is short for resources, usually stored in the res folder in the project. As you begin to type the preceding line, you’ll see a pop-up menu like the one shown in Figure 4-15. Find and double-click txtGuess in the drop-down list of options. If you don’t see the txtGuess option, go back to the design view for content _main.xml and make sure you gave the text field the id property of txtGuess.
Finish with the closing parenthesis followed by a semicolon, as shown in the following listing, and then set up the button and output label. The finished three lines of code inside your onCreate() method should look like this:
protected void onCreate(Bundle savedInstanceState) {
super.onCreate(savedInstanceState);
setContentView(R.layout.activity_main);
txtGuess = (EditText) findViewById(R.id.txtGuess);
btnGuess = (Button) findViewById(R.id.btnGuess);
lblOutput = (TextView) findViewById(R.id.lblOutput);
If everything has been named correctly in the layout, these lines of code should connect the variables txtGuess, btnGuess, and lblOutput to the EditText, Button, and TextView components in the GUI layout. This is a good time to stop and save your project to capture the progress you’ve made so far.

Figure 4-15: Android Studio helps us “wire up” the Java code to the GUI resources in the layout with helpful drop-down options.
Adding Methods to Check the Guess and Begin a New Game
Now, let’s work on writing the code for the checkGuess() function. We can begin writing the checkGuess() method just below the variable declarations for txtGuess, btnGuess, and lblOutput and just above the onCreate() method, as shown in Figure 4-16.
First, we need to get the user’s guess from the GUI text field and store it in a String variable:
public class MainActivity extends AppCompatActivity {
private EditText txtGuess;
private Button btnGuess;
private TextView lblOutput;
public void checkGuess() {
String guessText = txtGuess.getText().toString();
The code to get the user’s guess from the text field looks almost the same as in the desktop version of the app, except for the additional.toString() method at the end. There is a separate Text class in Android and the text that is entered into a text field is a Text object, so we have to convert that object to a String object.

Figure 4-16: Beginning to write the checkGuess() method in Java
Fortunately, the rest of the checkGuess() method can be copied and pasted directly from the Eclipse desktop GUI version of the app from Chapter 3, with no changes! The complete checkGuess() method should look like this:
public void checkGuess() {
➊ String guessText = txtGuess.getText().toString();
String message = "";
➋ try {
➌ int guess = Integer.parseInt(guessText);
if (guess < theNumber)
message = guess + " is too low. Try again.";
else if (guess > theNumber)
message = guess + " is too high. Try again.";
else {
message = guess +
" is correct. You win! Let's play again!";
newGame();
}
➍ } catch (Exception e) {
message = "Enter a whole number between 1 and 100.";
➎ } finally {
lblOutput.setText(message);
txtGuess.requestFocus();
txtGuess.selectAll();
}
}
One of the convenient features of Java is that we can reuse code across platforms. Just as we used code from the command line game to make the desktop game, we can use code from the desktop version in the Android version. Let’s review this code to understand how it will work in the Android app.
At ➊, we get the user’s guess from the text field and set up a string for the output message. At ➋, we begin a try-catch-finally statement to handle user input errors or exceptions. Inside the try block, at ➌, we parse the integer number of the user’s guess from the characters they enter. The rest of the try block contains the if-else statements that test whether the user guessed too high or too low, set the appropriate message, and start a new game. Next, the catch statement ➍ that tells the user to enter a whole number between 1 and 100. Then, the finally block ➎ sets the text on the lblOutput widget to the appropriate message, returns the cursor to the text field, and highlights the text to prepare for the user’s next guess.
You may have noticed that there are a couple of items underlined in red: theNumber and newGame(). This is because we haven’t defined them yet in this version of our app.
At the top of the MainActivity class, below the three GUI widget declarations, add a declaration for the secret number, theNumber:
public class MainActivity extends AppCompatActivity {
private EditText txtGuess;
private Button btnGuess;
private TextView lblOutput;
private int theNumber;
This is the same code we used in the desktop game, because the Java code to create an integer is the same across the command line, desktop, and Android mobile versions of the app.
The code for the newGame() method is also the same as the desktop version. Add the newGame() method just before the onCreate() statement:
public void newGame() {
theNumber = (int)(Math.random() * 100 + 1);
}
@Override
protected void onCreate(Bundle savedInstanceState) {
Creating a new game in the Android app is just like doing so in the desktop app. We just set theNumber to a random integer from 1 to 100, using the Math.random() function.
We can add a call to newGame() inside the onCreate() method after the code that connects the three GUI components:
protected void onCreate(Bundle savedInstanceState) {
super.onCreate(savedInstanceState);
setContentView(R.layout.activity_main);
txtGuess = (EditText) findViewById(R.id.txtGuess);
btnGuess = (Button) findViewById(R.id.btnGuess);
lblOutput = (TextView) findViewById(R.id.lblOutput);
newGame();
When the game starts up, the program will call the newGame() method and pick a random number for the user to guess. Now, we just need to handle the button click event and learn how to run the app on our own Android device or on the Android emulator.
Handling Events in Android
In Eclipse, we were able to add an event listener to the guess button just by double-clicking it in the design view. Unfortunately, it’s not that easy in Android Studio, because the GUI layout is separate from the source code. Fortunately, Android Studio helps us add event listeners by providing code completion options, similar to the content assist feature in Eclipse.
To add a listener for button clicks, begin typing the following partial line of code inside the onCreate() method on the next line after the call to newGame():
txtGuess = (EditText) findViewById(R.id.txtGuess);
btnGuess = (Button) findViewById(R.id.btnGuess);
lblOutput = (TextView) findViewById(R.id.lblOutput);
newGame();
btnGuess.setOn
Android Studio’s code completion feature will pop up with a list of code recommendations, as shown in Figure 4-17. Choose setOnClickListener() from the list of options and double-click to add it to your program.
Inside the parentheses for btnGuess.setOnClickListener(), type new and start typing OnClickListener. Android Studio’s code completion feature will display a list of options, as shown in Figure 4-18.
Choose OnClickListener from the list of options, and you’ll see Android Studio adds a few extra lines of code. Your event listener code for the btnGuess button should now look like the following:
btnGuess.setOnClickListener(new View.OnClickListener() {
@Override
public void onClick(View v) {
}
});
Look familiar? This is another example of an anonymous inner class. The desktop version also had an anonymous inner class, but it was named slightly differently. The two will work virtually identically. You may have noticed that Android inserts @Override in several places. This is called a compiler directive, and it tells the compiler that you’re implementing your own version of a method in the parent class.

Figure 4-17: Android Studio’s code completion feature suggests code as we type, similar to Eclipse’s content assist feature.

Figure 4-18: Use the code completion feature to create a new OnClickListener to add to the button btnGuess.
When the user clicks the Guess! button, we need to check their guess against the secret number. Add checkGuess(); inside the braces of the onClick() method.
public void onClick(View v) {
checkGuess();
}
The guessing game mobile app is now ready for its first run. The fully functional code for this first version of the guessing game is shown here. Your version may differ slightly, perhaps with a couple of extra methods for handling menu items, but because we’re not using the menu, these have been removed for space (see Chapter 5 to learn how to create options menus and settings):
package com.brysonpayne.guessinggame;
import android.os.Bundle;
import android.support.design.widget.FloatingActionButton;
import android.support.design.widget.Snackbar;
import android.support.v7.app.AppCompatActivity;
import android.support.v7.widget.Toolbar;
import android.view.View;
import android.view.Menu;
import android.view.MenuItem;
import android.widget.EditText;
import android.widget.Button;
import android.widget.TextView;
import org.w3c.dom.Text;
public class MainActivity extends AppCompatActivity {
private EditText txtGuess;
private Button btnGuess;
private TextView lblOutput;
private int theNumber;
public void checkGuess() {
String guessText = txtGuess.getText().toString();
String message = "";
try {
int guess = Integer.parseInt(guessText);
if (guess < theNumber)
message = guess + " is too low. Try again.";
else if (guess > theNumber)
message = guess + " is too high. Try again.";
else {
message = guess +
" is correct. You win! Let's play again!";
newGame();
}
} catch (Exception e) {
message = "Enter a whole number between 1 and 100.";
} finally {
lblOutput.setText(message);
txtGuess.requestFocus();
txtGuess.selectAll();
}
}
public void newGame() {
theNumber = (int)(Math.random() * 100 + 1);
}
@Override
protected void onCreate(Bundle savedInstanceState) {
super.onCreate(savedInstanceState);
setContentView(R.layout.activity_main);
txtGuess = (EditText) findViewById(R.id.txtGuess);
btnGuess = (Button) findViewById(R.id.btnGuess);
lblOutput = (TextView) findViewById(R.id.lblOutput);
newGame();
btnGuess.setOnClickListener(new View.OnClickListener() {
@Override
public void onClick(View v) {
checkGuess();
}
});
Toolbar toolbar = (Toolbar) findViewById(R.id.toolbar);
setSupportActionBar(toolbar);
}
}
In the next two sections, you’ll learn how to run the app on the Android emulator and on real Android devices.
Running the App on the Android Emulator
Now we have a working version of the Java code to run the app, but we still need to test it. Unlike the command line and desktop apps, the mobile app can’t run on a PC by itself, because PCs don’t have the Android operating system. To run your app for testing, you’ll need either an Android device or an emulator that will simulate an Android device on your PC. In this section, we’ll create an Android virtual device for testing your apps.
While viewing the MainActivity.java file, press the run button or select the menu item Run ▸ Run ‘app’. A pop-up window will ask you to select a deployment target, which is a device you want to run the app on, as shown in Figure 4-19.

Figure 4-19: To run an Android app, you must choose a target device—either an emulator or an actual device.
Click the Create New Virtual Device button to begin configuring a new Android virtual device (AVD). Let’s begin by choosing the type of device, as shown in Figure 4-20. Then click Next.

Figure 4-20: Choose a device to emulate.
We’ll select a Nexus 6P to start with, but feel free to test out other devices. If you decide to develop your own app for the Google Play Store, you’ll want to test it across a variety of screen sizes and device types, so you can try setting up several different emulators. But let’s start small for now with just one.
Next, we need to select the system image, usually either x86 or ARM. We’ll be using an ARM image, so click the Other Images tab, as shown in Figure 4-21.

Figure 4-21: You can choose either an x86 or ARM emulator; ARM is slower but tends to work more consistently on different types of processors.
If the Android version, API level, or emulator you want is displayed in a gray font, click the Download link for the version you want.
Click Next when you’ve chosen the Android emulator you want. For now, let’s use the Nougat API 24 ARM Android 7.0 version with Google APIs. You’ll see a final screen asking you to verify your configuration, including any advanced settings changes you want to make. Let’s change the name of the AVD, the device you’re emulating, to My Nexus 6P, as shown in Figure 4-22.
If you have trouble getting your emulator to run on an older computer or on a computer with less than 8 GB of RAM, click Show Advanced Settings, scroll down to Memory and Storage, and change the RAM amount to 768 MB.

Figure 4-22: Name your new AVD.
Click Finish, and your new device will be created and saved to disk. Now it’s time to start the emulator and try out your device. You should see the Select Deployment Target window again, but this time, it shows My Nexus 6P as an available emulator. Now click OK, as shown in Figure 4-23.

Figure 4-23: Choose the emulator you just created as your deployment target.
After a few moments, you’ll see the message “Starting AVD,” followed by an emulator window that looks like an Android startup screen, as shown in Figure 4-24. This could take several minutes the first time you run the emulator. When the emulator starts up, you might see a lock screen.

Figure 4-24: The Android emulator booting up (left); the Android virtual device’s home screen (right)
If your emulator shows a lock screen, click the lock at the bottom of the screen and drag it up to unlock the virtual device, similar to swiping the lock upward on an actual Android phone. You might see a welcome screen or two, but feel free to click out of those until you reach the home screen, which is shown in Figure 4-24.
Now, go back to Android Studio and press the run button again. This time, you’ll see your AVD in the Select Deployment Target dialog (see Figure 4-25). Choose your device and click OK.

Figure 4-25: The emulator appears in the list of connected devices when running.
The project will build one more time, and then it will transfer the executable version of the app to the emulator. (You may be asked to update your Android SDK Tools the first time you run the emulator.) After a few minutes, you’ll see your guessing game app running on the emulator!
We’ve coded the full app, so you should be able to play the game right away on your emulator. Take a look at Figure 4-26 to see what a round of the game might look like on the app.

Figure 4-26: The guessing game app running on the emulator screen (left), after one guess (center), and after a winning guess (right).
It works just like the desktop app, but on an Android emulator. Use your keyboard to type a guess and your mouse to click the Guess! button. There are a couple more things we’ll do to improve the user experience, just like we did with the GUI desktop app, but our Android mobile app is fully functional!
Before we improve the UX, we’ll cover how to run the app on a real Android device. For now, leave your Android emulator open. You can minimize it when you’re not using it, but leave it running in the background while programming to avoid the long startup time.
NOTE
If you don’t have an Android device, you can skip to “Improving the UX” on page 102.
Running the App on a Real Android Device
Running the app on a real Android device can take some time and preparation, but if you have a USB cable to connect your device to your computer, you’ll be up and running quickly.
Preparing Your Device
Before you can deploy your own apps to your Android device, you have to enable Developer mode on the device. You’ll also need to change a couple of settings to allow you to develop and debug apps.
On your Android device, tap Settings and then scroll to the bottom of the Settings menu to find the About tablet, About phone, or About device section. At the bottom of the About screen, you’ll find the Build number entry. Tap the build number at least seven times to enable the secret Developer mode. Developer mode allows you to test the apps you develop on your own device. Figure 4-27 shows the Settings menu (left) and the About menu (center) with Developer mode unlocked.
After you’ve unlocked Developer mode, tap the back arrow in the upper-left corner of the About screen and open Settings ▸ Developer options. Make sure the Developer options are turned On, as shown in Figure 4-27 (right). You should also turn on USB debugging.

Figure 4-27: The Settings menu on an Android Nexus 7 tablet (left), the About menu (center), and the Developer options (right).
Now you’re ready to connect an Android phone, tablet, or other device to your computer and run your app.
Connecting Your Device
To connect an Android device to your computer, you’ll need a USB cable, preferably the one that came with your phone or tablet. It should be a micro-USB cable, and it is often supplied as part of the charger for your device. Note that not all charger cables are fully functional USB cables—if your cable doesn’t work after you complete the following steps, try a different one.
Connect your device to your computer using the USB cable. After you plug in, the screen on your phone or tablet will show a window like the one in Figure 4-28 asking whether you want to allow USB debugging from the computer you just attached to. Tap OK. You can select the checkbox beside Always allow from this computer to prevent the pop-up next time you connect by USB to the same computer.

Figure 4-28: When you connect your Android device to your computer for the first time, it will ask whether you want to allow USB debugging.
Allowing USB debugging enables a couple of things. First, we’ll be able to transfer the apps we program right to the Android device by transferring an Android package file (APK). This is usually much faster than running apps on an emulator, and it’s a better way to test how the apps will behave on a real device. Also, we’ll be able to debug apps using the USB connection, meaning we’ll get information back from the Android device to help us debug. This information will include errors and other log entries that we’ll be able to read in a console-like application (called logcat in Android Studio). This is similar to the console output we used to find bugs in our command line and desktop GUI Java apps.
Now that you’ve connected a real Android device to your computer, let’s see how to run the guessing game app on it!
Running the App on Your Device
Now we’re ready to try the app on the Android device. In Android Studio, press the run button or go to Run ▸ Run ‘app’. This time, the Select Deployment Target window will show two connected devices to choose from, as shown in Figure 4-29: your emulator (My Nexus 6P) and your real Android device.

Figure 4-29: If you’ve unlocked Developer mode, enabled USB debugging, and connected your device successfully, you should be able to select your Android device to run your app.
Choose your real Android device this time and click OK. Android Studio may take a moment to build the application, but once it transfers the APK file to your device, you’ll see the guessing game app open right up on your tablet or phone. Play a round or two to verify that it works just as it did on the emulator (maybe even better, or at least faster). Very cool!
You may notice one important difference right away: the bottom part of the screen is covered by the numeric keypad, as shown in Figure 4-30.
When we placed the text field (EditText) for the user’s guess, we chose a Number text field for our input so the numeric keypad would show up. But since the emulator runs on a computer, which has its own keyboard, you probably didn’t see this when you ran your app earlier.
Now that we’re able to run Android apps on an Android phone, tablet, or other device, let’s make a few final improvements to the user experience for the guessing game app.

Figure 4-30: The app runs on your own Android device and shows the numeric keypad by default.
Improving the UX
The guessing game app works beautifully on both the Android emulator and on real Android devices, but there are a few UX items we can improve upon. First, we’ll center the user’s guess in the Number text field. Second, we’ll learn how to treat the ENTER key just like the Guess! button to make the app more intuitive to the user.
Centering the User’s Guess in the Text Field
In Android Studio, open the content_main.xml layout file again. Select the text field, called txtGuess, by clicking it in the design preview. Under the Properties pane, find textAlignment. The textAlignment property in Android is similar to the horizontalAlignment property in the desktop GUI—it allows us to change the alignment of the text the user enters.
Click the center text alignment option, the icon that looks like centered text. If you want to test it in the design preview without running the app, scroll to find the text property and enter a value of 50. The number should appear centered in the text field in the design preview pane. Be sure to delete the test value if you don’t want it to show up in the actual app.
Adding a Listener for the Enter Key
Let’s set up an event listener to handle the ENTER key the same way we handled a click on the Guess! button, with a call to checkGuess().
Go back to the MainActivity.java source code file, scroll down to the onCreate() method, and find where we added an onClickListener to the button btnGuess. (You may need to expand the event listener code by clicking the + in the left margin beside btnGuess.setOnClickListener() to make it look like the code shown here.) Right below that, we can add an event listener to the text field txtGuess to handle action events such as pressing the ENTER key. The following code adds a listener to txtGuess:
btnGuess.setOnClickListener(new View.OnClickListener() {
public void onClick(View v) {
checkGuess();
}
});
txtGuess.setOnEditorActionListener(new TextView.OnEditorActionListener() {
@Override
public boolean onEditorAction(TextView v, int actionId, KeyEvent event) {
checkGuess();
➊ return true;
}
});
The editor action we’re listening for is when the user presses the ENTER key while typing in the text field. When that event happens, we want to check the guess the user entered.
We changed the return statement to return a value of true ➊ because we want to keep the keyboard on the screen so the user can enter their next guess. The return statement tells the text field whether the event handler code we’ve provided completed the event. By returning the value true, we’ve told Android that we’ve done everything that needs to be done to check the user’s guess. If we returned false here instead, Android would finish processing the ENTER key by removing the number keypad from the screen—as it does by default when you finish typing in a form on a web page. We don’t want the keypad to disappear after every guess, so we return true.
Adding One More Finishing Touch
Run the app a few times to test it, and you’ll see the ENTER key allows you to enter and check guesses quickly and efficiently. You’ll also see your guesses centered nicely in the text field. However, when you win, depending on the API version, screen size, or density of your device, you may see an alignment problem like the one shown in Figure 4-31.
The problem is that the TextView named lblOutput resizes to show the longer “You win! Let’s play again!” text, and some older APIs may not center this correctly. You can prevent this by expanding lblOutput to the full width of the screen in the design preview and by changing the textAlignment property to center. Now you have a complete guessing game app to play on your device and to share with friends! The final version 1.0 of the app is shown running on a Nexus 7, with Font settings at Large, in Figure 4-32.

Figure 4-31: If you notice misaligned text, you may need to expand and center the TextView lblOutput.

Figure 4-32: Your finished version 1.0 of the mobile app, with all the user experience improvements in place
Wow! You’ve gone from a simple, text-based, command line number-guessing program, to a sophisticated GUI desktop game, to a fully featured mobile app that runs on real Android devices. Are you starting to see the power and flexibility of Java? And in Chapter 5, we’ll make the app even more professional with a settings menu and the ability to store user preferences!
What You Learned
You’ve seen that much of the Java code used in a text-based and GUI desktop program can build the foundation of a modern mobile app, thanks to Java’s reusability across multiple platforms. We have also picked up several new mobile-specific skills in this chapter:
• Starting a new Android Studio app project
• Building the GUI layout in design view in Android Studio, including changing the properties of various elements in the Properties pane
• Naming GUI components in a layout for easy use in Java code
• Connecting the Android GUI layout elements to your Java code
• Adding your own methods, such as checkGuess() and newGame(), to an Android app
• Reusing Java code in an Android app
• Handling events in Android, including button clicks and keyboard/editor actions such as pressing the ENTER key
• Testing apps by running them on an Android virtual device using the Android emulator
• Running an app on an Android phone, tablet, or other device by enabling Developer mode and USB debugging
• Improving the user experience by changing widget properties and adding user-friendly finishing touches
Programming Challenges
Try these programming challenge exercises to review and practice what you’ve learned and to expand your programming skills by trying something new. If you get stuck, visit https://www.nostarch.com/learnjava/ to download sample solutions.
#1: “Toast”-ing to the Number of Tries
In the programming challenges for
Chapter 3, you changed the winning message to tell the user how many tries they took to win:
62 is correct! You win after 7 tries!
Let’s do something similar for the Android version, with a twist—or, should I say, a Toast? A Toast is an Android widget for creating pop-up message windows. Toast pop-ups are a convenient way to show a quick notice, such as an error or a note telling the user they’ve won the game. See the Toast message near the bottom of the screen in Figure 4-33.

Figure 4-33: A Toast message pops up on the screen to alert the user to important information.
You can create a Toast message popup with the Toast.makeText() method. Here’s a sample to help you add a Toast pop-up to the else statement for winning the game:
else {
message = guess +
" is correct. You win after " + numberOfTries + " tries!";
Toast.makeText(MainActivity.this, message,
Toast.LENGTH_LONG).show();
newGame();
}
The Toast message in this code will pop up over the MainActivity (our guessing game), displaying the String message for a few seconds thanks to Toast.LENGTH_LONG. There’s also a Toast.LENGTH_SHORT, but it pops up and disappears so quickly that it can be hard to read. The .show() method at the end does the important part, showing the Toast on the screen.
As with the GUI desktop version, to accomplish this task, you’ll need to create a new variable at the top of your class (like int numberOfTries = 0;), add to the number of tries every time the checkGuess() method runs successfully, and change the output message to display the number of tries to the user when they win, both in a Toast pop-up and in the lblOutput field. After counting the number of tries, add the features you learned in Chapter 3 for running out of tries or losing. Give the user seven tries and tell them how many tries are left after each guess.
#2: Adding Visual Appeal
Explore some of the more aesthetic properties of the GUI components in Android Studio, including background colors, foreground colors, fonts, textSize, and more. Move components in your guessing game app around to make the interface more visually appealing. For an example of one way you could customize your game, see Figure 4-34.
You can even add a custom background image (add an image file to the app ▸ res ▸ drawable folder and then select it as the background property for your layout or for a button or other component). Play with various settings—you can always undo by pressing CTRL-Z!

Figure 4-34: Changing the colors, fonts, text size, and arrangement of the components in your app can make it stand out!
#3: Creating a MadLibs Mobile App
Look back at the MadLibGUI.java program you built in Chapter 3 (Programming Challenge #3 on page 74). Now create a mobile version of your MadLibs app that prompts the user for several words in a GUI with labels and text fields, such as txtBigAnimal, txtPastTenseVerb, txtSmallContainer, and txtFood. Add a button that the user can press to generate their own MadLibs-style story. It may be a nice touch to include some default or initial text in each text field, just to give the user an idea of how the program works.
When the user clicks the button, the program should display the completed MadLibs story in a TextView or in an EditText widget—the EditText makes it possible to copy and paste the user’s funny story if they wish to share it. Play with the colors, fonts, and layout until you’re happy with the result and then share your creation with a friend!
HINT
To make a TextView or EditText show multiple lines, use the escape character sequence to insert a new line in the String message you display using the setText() method, like so: "Once upon a time... There was a buffalo princess who lived in a soup can." This quote will span three lines, separated by new lines wherever the escape sequence appears.