3
Modify the structure and appearance of text
In this chapter
Documents contain text that conveys information to readers, but the appearance of the document content also conveys a message. You can provide structure and meaning by formatting the text in various ways. Word 2019 provides a variety of simple-to-use tools that you can use to apply sophisticated formatting and create a navigational structure.
In a short document or one that doesn’t require a complex navigational structure, you can easily format words and paragraphs so that key points stand out and the structure of your document is clear. You can achieve dramatic flair by applying predefined WordArt text effects. To keep the appearance of documents and other Microsoft Office files consistent, you can format document elements by applying predefined sets of formatting called styles. In addition, you can change the fonts, colors, and effects throughout a document with one click by applying a theme.
This chapter guides you through procedures related to applying character and paragraph formatting, structuring content manually, creating and modifying lists, applying styles to text, and changing a document’s theme.
Apply paragraph formatting
A paragraph is created by entering text and then pressing the Enter key. A paragraph can contain one word, one sentence, or multiple sentences. Every paragraph ends with a paragraph mark, which looks like a backward P (¶). Paragraph marks and other structural characters (such as spaces, line breaks, and tabs) are usually hidden, but you can display them. Sometimes displaying these hidden characters makes it easier to accomplish a task or understand a structural problem.
You can change the look of a paragraph by changing its indentation, alignment, and line spacing, in addition to the vertical space before and after it. You can also place borders around it and shade its background. Collectively, the settings you use to vary the look of a paragraph are called paragraph formatting.
You can modify a paragraph’s left and right edge alignment and vertical spacing by using tools on the Home tab of the ribbon, and its left and right indents from the Home tab, the Layout tab, or the ruler. The ruler is often hidden to provide more space for the document content.

The left indent can be changed from the Home tab, the Layout tab, or the ruler
If you modify a paragraph and aren’t happy with the changes, you can restore the original paragraph and character settings by clearing the formatting to reset the paragraph to its base style.
![]() SEE ALSO
SEE ALSO
For information about working with hidden structural characters, see “Structure content manually,” later in this chapter. For information about styles, see “Apply built-in styles to text” later in this chapter.
When you want to make several adjustments to the alignment, indentation, and spacing of selected paragraphs, it is sometimes quicker to make changes in the Paragraph dialog box than to select buttons and drag markers.

The Paragraph dialog box
Configure alignment
The alignment settings control the horizontal position of the paragraph text between the page margins. There are four alignment options:
Align Left This is the default paragraph alignment. It sets the left end of each line of the paragraph at the left page margin or left indent. It results in a straight left edge and a ragged right edge.
Align Right This sets the right end of each line of the paragraph at the right page margin or right indent. It results in a straight right edge and a ragged left edge.
Center This centers each line of the paragraph between the left and right page margins or indents. It results in ragged left and ragged right edges.
Justify This alignment adjusts the spacing between words so that the left end of each line of the paragraph is at the left page margin or indent and the right end of each line of the paragraph (other than the last line) is at the right margin or indent. It results in straight left and right edges.
The icons on the alignment buttons on the ribbon depict the effect of each alignment option.
To open the Paragraph dialog box
On the Home tab or the Layout tab, in the Paragraph group, select the Paragraph Settings dialog box launcher.
On the Home tab, in the Paragraph group, select the Line and Paragraph Spacing button and then Line Spacing Options.
To set paragraph alignment
Position the cursor anywhere in the paragraph, or select all the paragraphs you want to adjust. Then do either of the following:
On the Home tab, in the Paragraph group, select the Align Left, Center, Align Right, or Justify button.
Open the Paragraph dialog box. On the Indents and Spacing tab, in the General area, select Left, Centered, Right, or Justified in the Alignment list.
Configure vertical spacing
Paragraphs have two types of vertical spacing:
Paragraph spacing The space between paragraphs, defined by setting the space before and after each paragraph. This space is usually measured in points.
Line spacing The space between the lines of the paragraph, defined by setting the height of the lines either in relation to the height of the text (Single, Double, or a specific number of lines) or by specifying a minimum or exact point measurement.
The default line spacing for documents created in Word 2019 is 1. 08 lines (Single). Changing the line spacing changes the appearance and readability of the text in the paragraph and, of course, also changes the amount of space it occupies on the page.

The effect of changing line spacing
You can set the paragraph and line spacing for individual paragraphs and for paragraph styles. You can quickly adjust the spacing of most content in a document by selecting an option from the Paragraph Spacing menu on the Design tab. (Although the menu is named Paragraph Spacing, the menu options control both paragraph spacing and line spacing. ) These options, which are named by effect rather than by specific measurements, work by modifying the spacing of the Normal paragraph style and any other styles that depend on the Normal style for their spacing. (In standard templates, most other styles are based on the Normal style. ) The Paragraph Spacing options modify the Normal style in only the current document, and do not affect other documents.
The following table describes the effect of each Paragraph Spacing option on the paragraph and line spacing settings.
Paragraph spacing option |
Before paragraph |
After paragraph |
Line spacing |
Default |
Spacing options are controlled by the style set |
||
No Paragraph Space |
0 points |
0 points |
1 line |
Compact |
0 points |
4 points |
1 line |
Tight |
0 points |
6 points |
1. 15 lines |
Open |
0 points |
10 points |
1. 15 lines |
Relaxed |
0 points |
6 points |
1. 5 lines |
Double |
0 points |
8 points |
2 lines |
To quickly adjust the spacing between and within all paragraphs in a document
On the Design tab, in the Document Formatting group, select Paragraph Spacing to display the Paragraph Spacing menu.

Each paragraph spacing option controls space around and within the paragraph
Select the option you want to apply to all the paragraphs in the document.
To adjust the spacing between paragraphs
Select all the paragraphs you want to adjust.
On the Layout tab, in the Paragraph group, adjust the Spacing Before and Spacing After settings.

The settings in the Spacing boxes are measured in points
To adjust spacing between the lines of paragraphs
Position the cursor anywhere in the paragraph, or select all the paragraphs you want to adjust.
To make a quick adjustment to selected paragraphs, on the Home tab, in the Paragraph group, select the Line And Paragraph Spacing button, and then select any of the line spacing commands on the menu.

You can choose from preset internal line spacing options or adjust paragraph spacing
 Tip
TipYou can also adjust the space before and after selected paragraphs from the Line And Paragraph Spacing menu. Selecting one of the last two options adds or removes a preset amount of space between the selected paragraphs.
Or
Position the cursor anywhere in the paragraph, or select all the paragraphs you want to adjust.
Open the Paragraph dialog box. On the Indents and Spacing tab, in the Spacing area, make the adjustments you want to the paragraph spacing, and then select OK.
Configure indents
In Word, you don’t define the width of paragraphs and the length of pages by defining the area occupied by the text; instead, you define the size of the white space—the left, right, top, and bottom margins—around the text.
![]() SEE ALSO
SEE ALSO
For information about setting margins, see “Preview and adjust page layout” in Chapter 12, “Finalize and distribute documents,” of Microsoft Word 2019 Step by Step by Joan Lambert (Microsoft Press, 2018).
Although the left and right margins are set for a whole document or for a section of a document, you can vary the position of the paragraphs between the margins by indenting the left or right edge of the paragraph.
A paragraph indent is the space from the page margin to the text. You can change the left indent by selecting buttons on the Home tab, or you can set the indents directly on the ruler. Three indent markers are always present on the ruler:
Left Indent This defines the outermost left edge of each line of the paragraph.
Right Indent This defines the outermost right edge of each line of the paragraph.
First Line Indent This defines the starting point of the first line of the paragraph.
The ruler indicates the space between the left and right page margins in a lighter color than the space outside of the page margins.

The ruler displays the indent markers for the active paragraph
The default setting for the Left Indent and First Line Indent markers is 0. 0", which aligns with the left page margin. The default setting for the Right Indent marker is the distance from the left margin to the right margin. For example, if the page size is set to 8. 5" wide and the left and right margins are set to 1. 0", the default Right Indent marker setting is 6. 5".
You can arrange the Left Indent and First Line Indent markers to create a hanging indent or a first line indent. Hanging indents are most commonly used for bulleted and numbered lists, in which the bullet or number is indented less than the main text (essentially, it is outdented). First line indents are frequently used to distinguish the beginning of each subsequent paragraph in documents that consist of many consecutive paragraphs of text. Both types of indents are set by using the First Line Indent marker on the ruler.
![]() Tip
Tip
The First Line Indent marker is linked to the Left Indent marker. Moving the Left Indent marker also moves the First Line Indent marker to maintain the first line indent distance. You can move the First Line Indent marker independently of the Left Indent marker to change the first line indent distance.
To display the ruler
On the View tab, in the Show group, select the Ruler check box.
TipIn this book, we show measurements in inches. If you want to change the measurement units Word uses, open the Word Options dialog box. On the Advanced page, in the Display area, select the units you want in the Show Measurements In Units Of list. Then select OK.
To indent or outdent the left edge of a paragraph
Position the cursor anywhere in the paragraph, or select all the paragraphs you want to adjust. Then do any of the following:
On the Home tab, in the Paragraph group, select the Increase Indent or Decrease Indent button to move the left edge of the paragraph in 0. 25" increments.
TipYou cannot increase or decrease the indent beyond the margins by using the Increase Indent and Decrease Indent buttons. If you do need to extend an indent beyond the margins, you can do so by setting negative indentation measurements in the Paragraph dialog box.
Open the Paragraph dialog box. On the Indents and Spacing tab, in the Indentation area, set the indent in the Left box, and then select OK.
On the ruler, drag the Left Indent marker to the ruler measurement at which you want to position the left edge of the body of the paragraph.
To create a hanging indent or first line indent
Position the cursor anywhere in the paragraph, or select all the paragraphs you want to adjust.
Open the Paragraph dialog box. On the Indents and Spacing tab, in the Indents area, select First line or Hanging in the Special box.
In the By box, set the amount of the indent, and then select OK.
Or
Set the left indent of the paragraph body.
On the ruler, drag the First Line Indent marker to the ruler measurement at which you want to begin the first line of the paragraph.
To indent or outdent the right edge of a paragraph
Position the cursor anywhere in the paragraph, or select all the paragraphs you want to adjust. Then do either of the following:
On the ruler, drag the Right Indent marker to the ruler measurement at which you want to set the maximum right edge of the paragraph.
Open the Paragraph dialog box. On the Indents and Spacing tab, in the Indentation area, set the right indent in the Right box, and then select OK.
TipUnless the paragraph alignment is justified, the right edge of the paragraph will be ragged, but no line will extend beyond the right indent or outdent.
Configure paragraph borders and shading
To make a paragraph really stand out, you might want to put a border around it or shade its background. (For real drama, you can do both. ) You can select a predefined border from the Borders menu or design a custom border in the Borders And Shading dialog box.

You can customize many aspects of the border
After you select the style, color, width, and location of the border, you can select Options to specify its distance from the text.
Structure content manually
At times it’s necessary to manually position text within a paragraph. You can do this by using two different hidden characters: line breaks and tabs. These characters are visible only when the option to show paragraph marks and formatting symbols is turned on.
The hidden characters have distinctive appearances:
A line break character looks like a bent left arrow (↩)
A tab character looks like a right-pointing arrow (→)
You can use a line break, also known as a soft return, to wrap a line of a paragraph in a specific location without ending the paragraph. You might use this technique to display only specific text on a line, or to break a line before a word that would otherwise be hyphenated.
![]() Tip
Tip
Inserting a line break does not start a new paragraph, so when you apply paragraph formatting to a line of text that ends with a line break, the formatting is applied to the entire paragraph, not only to that line.
![]() SEE ALSO
SEE ALSO
For information about page and section breaks, see “Control what appears on each page” in Chapter 12, “Finalize and distribute documents,” of Microsoft Word 2019 Step by Step by Joan Lambert (Microsoft Press, 2018).
A tab character defines the space between two document elements. For example, you can separate numbers from list items, or columns of text, by using tabs. You can then set tab stops that define the location and alignment of the tabbed text.

You can align text in different ways by using tabs
You can align lines of text in different locations across the page by using tab stops. The easiest way to set tab stops is directly on the horizontal ruler. By default, Word sets left-aligned tab stops every half inch (1. 27 centimeters). (The default tab stops aren’t shown on the ruler. ) To set a custom tab stop, start by selecting the Tab button (located at the intersection of the vertical and horizontal rulers) until the type of tab stop you want appears. Left tab Center tab Right tab Decimal tab Bar tab The tab settings

The tab settings
You have the following tab options:
Left Tab Aligns the left end of the text with the tab stop
Center Tab Aligns the center of the text with the tab stop
Right Tab Aligns the right end of the text with the tab stop
Decimal Tab Aligns the decimal point in the text (usually a numeric value) with the tab stop
Bar Tab Draws a vertical line at the position of the tab stop
If you find it too difficult to position tab stops on the ruler, you can set, clear, align, and format tab stops from the Tabs dialog box.
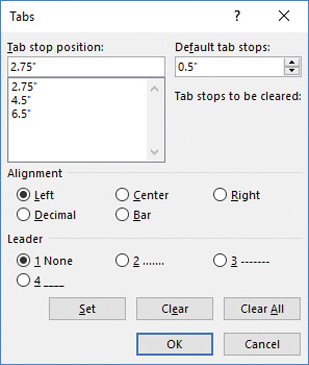
You can specify the alignment and tab leader for each tab
You might also work from this dialog box if you want to use tab leaders—visible marks such as dots or dashes connecting the text before the tab with the text after it. For example, tab leaders are useful in a table of contents to carry the eye from the text to the page number.
When you insert tab characters, the text to the right of the tab character aligns on the tab stop according to its type. For example, if you set a center tab stop, pressing the Tab key moves the text so that its center is aligned with the tab stop.
To display or hide paragraph marks and other structural characters
On the Home tab, in the Paragraph group, select the Show/Hide ¶ button.
Press Ctrl+Shift+* (asterisk).
To insert a line break
Position the cursor where you want to break the line. Then do either of the following
On the Layout tab, in the Page Setup group, select Breaks and then Text Wrapping.
Press Shift+Enter.
To insert a tab character
Position the cursor where you want to add the tab character, and then press the Tab key.
To open the Tabs dialog box
Select any portion of one or more paragraphs that you want to manage tab stops for.
Open the Paragraph dialog box.
In the lower-left corner of the Indents and Spacing tab, select the Tabs button.
To align a tab and set a tab stop
Select any portion of one or more paragraphs that you want to set the tab stop for.
Select the Tab button at the left end of the ruler to cycle through the tab stop alignments, in this order:
Left
Center
Right
Decimal
Bar
When the Tab button shows the alignment you want, select the ruler at the point where you want to set the tab.
TipWhen you manually align a tab and set a tab stop, Word removes any default tab stops to the left of the one you set.
Or
Open the Tabs dialog box.
In the Tab stop position box, enter the position for the new tab stop.
In the Alignment and Leader areas, set the options you want for this tab stop.
Select Set to set the tab, and then select OK.
To change the position of an existing custom tab stop
Drag the tab marker on the ruler.
Or
Open the Tabs dialog box.
In the Tab stop position list, select the tab stop you want to change.
Select the Clear button to clear the existing tab stop.
Enter the replacement tab stop position in the Tab stop position box, select Set, and then select OK.
To remove a custom tab stop
Drag the tab marker away from the ruler.
In the Tabs dialog box, select the custom tab stop in the Tab stop position list, select Clear, and then select OK.
Apply character formatting
The appearance of your document helps to convey not only the document’s message but also information about the document’s creator—you. A neatly organized document that contains consistently formatted content and appropriate graphic elements, and that doesn’t contain spelling or grammatical errors, invokes greater confidence in your ability to provide any product or service.
Earlier in this chapter, you learned about methods of applying formatting to paragraphs. This topic covers methods of formatting the text of a document. Formatting that you apply to text is referred to as character formatting. In Word documents, you can apply three types of character formatting:
Individual character formats including font, font size, bold, italic, underline, strikethrough, subscript, superscript, font color, and highlight color
Artistic text effects that incorporate character outline and fill colors
Preformatted styles associated with the document template, many of which not only affect the appearance of the text but also convey structural information (such as titles and headings)
When you enter text in a document, it is displayed in a specific font. By default, the font used for text in a new blank document is 11-point Calibri, but you can change the font of any element at any time. The available fonts vary from one computer to another, depending on the apps installed. Common fonts include Arial, Verdana, and Times New Roman.
You can vary the look of a font by changing the following attributes:
Size Almost every font has a range of sizes you can select from. (Sometimes you can set additional sizes beyond those listed. ) The font size is measured in points, from the top of the ascenders (letter parts that go up, as in h) to the bottom of the descenders (letter parts that drop down, as in p). A point is approximately 1/72 of an inch (about 0. 04 centimeters).
Style Almost every font has a range of font styles. The most common are regular (or plain), italic, bold, and bold italic.
Effects Fonts can be enhanced by applying effects, such as underlining, small capital letters (small caps), or shadows.
Character spacing You can alter the spacing between characters by pushing them apart or squeezing them together.
Although some attributes might cancel each other out, they are usually cumulative. For example, you might use a bold font style in various sizes and various shades of green to make words stand out in a newsletter.
You apply character formatting from one of three locations:
Mini Toolbar Several common formatting buttons are available on the Mini Toolbar that appears when you select text.

The Mini Toolbar appears temporarily when you select text, becomes transparent when you move the pointer away from the selected text, and disappears if not used
Font group on the Home tab This group includes buttons for changing the font and most of the font attributes you are likely to use.

The most common font formatting commands are available on the Home tab
Font dialog box Less-commonly applied attributes such as small caps and special underlining are available from the Font dialog box.

Font attributes that aren’t available on the Home tab can be set in the Font dialog box
In addition to applying character formatting to change the look of characters, you can apply predefined text effects (sometimes referred to as WordArt) to a selection to add more zing. The available effects match the current theme colors.

You can apply any predefined effect in the gallery or define a custom effect
These effects are somewhat dramatic, so you’ll probably want to restrict their use to document titles and similar elements to which you want to draw particular attention.
To change the font of selected text
On the Mini Toolbar or in the Font group on the Home tab, in the Font list, select the font you want to apply.
To change the font size of selected text
Do any of the following on the Mini Toolbar or in the Font group on the Home tab:
In the Font Size list, select the font size you want to apply.
In the Font Size box, enter the font size you want to apply (even a size that doesn’t appear in the list). Then press the Enter key.
To increase the font size in set increments, select the Increase Font Size button, or press Ctrl+>.
To decrease the font size in set increments, select the Decrease Font Size button, or press Ctrl+<.
To format selected text as bold, italic, or underlined
On the Mini Toolbar, select the Bold, Italic, or Underline button.
On the Home tab, in the Font group, select the Bold, Italic, or Underline button.
Press Ctrl+B to format the text as bold.
Press Ctrl+I to format the text as italic.
Press Ctrl+U to underline the text.
TipTo quickly apply a different underline style to selected text, select the arrow next to the Underline button on the Home tab, and then in the list, select the underline style you want to apply.
To cross out selected text by drawing a line through it
On the Home tab, in the Font group, select the Strikethrough button.
To display superscript or subscript characters
Select the characters you want to reposition.
On the Home tab, in the Font group, do either of the following:
Select the Subscript button to shift the characters to the bottom of the line.
Select the Superscript button to shift the characters to the top of the line.
To apply artistic effects to selected text
On the Home tab, in the Font group, select the Text Effects and Typography button, and then do either of the following
In the Text Effects and Typography gallery, select the preformatted effect combination that you want to apply.
On the Text Effects and Typography menu, select Outline, Shadow, Reflection, Glow, Number Styles, Ligatures, or Stylistic Sets. Then make selections on the submenus to apply and modify those effects.
To change the font color of selected text
On the Home tab, in the Font group, select the Font Color arrow to display the Font Color menu.
In the Theme Colors or Standard Colors palette, select a color swatch to apply that color to the selected text.
TipTo apply the current Font Color button color, select the button (not its arrow). To apply a color not shown in the Theme Colors or Standard Colors palette, select More Colors. Then in the Colors dialog box, select the color you want in the honeycomb palette on the Standard page, or select the color gradient or enter color values on the Custom page.
To change the case of selected text
On the Home tab, in the Font group, select the Change Case button and then Sentence case, lowercase, UPPERCASE, Capitalize Each Word, or tOGGLE cASE.
Press Shift+F3 repeatedly to cycle through the standard case options (Sentence case, UPPERCASE, lowercase, and Capitalize Each Word).
 IMPORTANT
The case options vary based on the selected text. If the selection ends in a period, the options do not include Capitalize Each Word. If the selection does not end in a period, the options do not include Sentence case.
To highlight text
Select the text you want to change, and then do either of the following
On the Mini Toolbar or in the Font group on the Home tab, select the Text Highlight Color button to apply the default highlight color.
On the Mini Toolbar or in the Font group on the Home tab, select the Text Highlight Color arrow, and then select a color swatch to apply the selected highlight color and change the default highlight color.
Or
Without first selecting text, do either of the following:
Select the Text Highlight Color button to select the default highlight color.
Select the Text Highlight Color arrow, and then select a color swatch to select that highlight color.
When the pointer changes to a highlighter, drag it across one or more sections of text to apply the highlight.
Select the Text Highlight Color button or press the Esc key to deactivate the highlighter.
To copy formatting to other text
Select anywhere in the text that has the formatting you want to copy.
On the Home tab, in the Clipboard group, do either of the following:
If you want to apply the formatting to only one target, select Format Painter once.
If you want to apply the formatting to multiple targets, double-click Format Painter.
When the pointer changes to a paintbrush, select or drag across the text you want to apply the copied formatting to.
If you activated the Format Painter for multiple targets, repeat step 3 until you finish applying the formatting. Then select the Format Painter button once, or press the Esc key, to deactivate the tool.
To repeat the previous formatting command
Select the text to which you want to apply the repeated formatting. Then do either of the following to repeat the previous formatting command:
On the Quick Access Toolbar, select the Repeat button. n l
Press Ctrl+Y.
Press F4.
To open the Font dialog box
On the Home tab, in the Font group, select the Font dialog box launcher.
Press Ctrl+Shift+F.
To remove character formatting
Select the text from which you want to clear the formatting. Then do any of the following:
Press Ctrl+Spacebar to remove only manually applied formatting (and not styles).
On the Home tab, in the Font group, select the Clear All Formatting button to remove all styles and formatting other than highlighting from selected text.
IMPORTANTIf you have selected an entire paragraph, selecting Clear All Formatting will clear character and paragraph formatting from the paragraph and reset it to the default paragraph style.
On the Home tab, in the Font group, select the Text Highlight Color arrow and then, on the menu, select No Color to remove highlighting.
To change the character spacing
Select the text you want to change.
Open the Font dialog box, and then select the Advanced tab to display character spacing and typographic features.
In the Spacing list, select Expanded or Condensed.
In the adjacent By box, set the number of points you want to expand or condense the character spacing.
In the Font dialog box, select OK.
Create and modify lists
Lists are paragraphs that start with a character (usually a number or bullet) and are formatted with a hanging indent so that the characters stand out on the left end of each list item. Fortunately, Word takes care of the formatting of lists for you. You simply indicate the type of list you want to create. When the order of items is not important—for example, for a list of people or supplies—a bulleted list is the best choice. And when the order is important—for example, for the steps of a procedure— you will probably want to create a numbered list.
You can format an existing set of paragraphs as a list or create the list as you enter information into the document. After you create a list, you can modify, format, and customize the list as follows:
You can move items around in a list, insert new items, or delete unwanted items. If the list is numbered, Word automatically updates the numbers.
You can modify the indentation of the list. You can change both the overall indentation of the list and the relationship of the first line to the other lines.
For a bulleted list, you can sort list items into ascending or descending order, change the bullet symbol, or define a custom bullet (even a picture bullet).
For a numbered list, you can change the number style or define a custom style, and you can specify the starting number for a list.
To format a new bulleted or numbered list as you enter content
With the cursor at the position in the document where you want to start the list, do either of the following
To start a new bulleted list, enter * (an asterisk) at the beginning of a paragraph, and then press the Spacebar or the Tab key before entering the list item text.
To start a new numbered list, enter 1. (the number 1 followed by a period) at the beginning of a paragraph, and then press the Spacebar or the Tab key before entering the list item text.
When you start a list in this fashion, Word automatically formats it as a bulleted or numbered list. When you press Enter to start a new item, Word continues the formatting to the new paragraph. Typing items and pressing Enter adds subsequent bulleted or numbered items. To end the list, press Enter twice; or select the Bullets arrow or Numbering arrow in the Paragraph group on the Home tab, and then in the gallery, select None.
TipIf you want to start a paragraph with an asterisk or number but don’t want to format the paragraph as a bulleted or numbered list, select the AutoCorrect Options button that appears after Word changes the formatting, and then in the list, select the appropriate Undo option. You can also select the Undo button on the Quick Access Toolbar or press Ctrl+Z.
To convert paragraphs to bulleted or numbered list items
Select the paragraphs that you want to convert to list items.
On the Home tab, in the Paragraph group, do either of the following:
Select the Bullets button to convert the selection to a bulleted list.
Select the Numbering button to convert the selection to a numbered list.
To create a list that has multiple levels
Start creating a bulleted or numbered list.
When you want the next list item to be at a different level, do either of the following:
To create the next item one level lower (indented more), press the Tab key at the beginning of that paragraph before you enter the lower-level list item text.
To create the next item one level higher (indented less), press Shift+Tab at the beginning of the paragraph before you enter the higher-level list item text.
In the case of a bulleted list, Word changes the bullet character for each item level. In the case of a numbered list, Word changes the type of numbering used, based on a predefined numbering scheme.
TipFor a multilevel list, you can change the numbering pattern or bullets by selecting the Multilevel List button in the Paragraph group on the Home tab and then selecting the pattern you want, or you can define a custom pattern by selecting Define New Multilevel List.
To modify the indentation of a list
Select the list items whose indentation you want to change, and do any of the following
On the Home tab, in the Paragraph group, select the Increase Indent button to move the list items to the right.
In the Paragraph group, select the Decrease Indent button to move the list items to the left.
Display the horizontal ruler, and drag the indent markers to the left or right.
![]() Tip
Tip
You can adjust the space between the bullets and their text by dragging only the Hanging Indent marker.
![]() SEE ALSO
SEE ALSO
For information about paragraph indentation, see “Apply paragraph formatting” earlier in this chapter.
To sort bulleted list items into ascending or descending order
Select the bulleted list items whose sort order you want to change.
On the Home tab, in the Paragraph group, select the Sort button to open the Sort Text dialog box.
In the Sort by area, select Ascending or Descending. Then select OK.
To change the bullet symbol
Select the bulleted list whose bullet symbol you want to change.
On the Home tab, in the Paragraph group, select the Bullets arrow.
In the Bullets gallery, select the new symbol you want to use to replace the bullet character that begins each item in the selected list.
To define a custom bullet
In the Bullets gallery, select Define New Bullet.
In the Define New Bullet dialog box, select the Symbol, Picture, or Font button, and make a selection from the wide range of options.
Select OK to apply the new bullet style to the list.
To change the number style
Select the numbered list whose number style you want to change.
On the Home tab, in the Paragraph group, select the Numbering arrow to display the Numbering gallery.
Make a new selection to change the style of the number that begins each item in the selected list.
To define a custom number style
In the Numbering gallery, select Define New Number Format.
In the Define New Number Format dialog box, do either of the following:
Change the selections in the Number Style, Number Format, or Alignment boxes.
Select the Font button, and make a selection from the wide range of options.
Select OK to apply the new numbering style to the list.
Format text as you type
The Word list capabilities are only one example of the app’s ability to intuit how you want to format an element based on what you type. You can learn more about these and other AutoFormatting options by exploring the AutoCorrect dialog box, which you can open from the Proofing page of the Word Options dialog box.
The AutoFormat As You Type page shows the options Word implements by default, including bulleted and numbered lists.

You can select and clear options to control automatic formatting behavior
One interesting option in this dialog box is Border Lines. When this check box is selected, typing three consecutive hyphens (-) or three consecutive underscores (_) and pressing Enter draws a single line across the page. Typing three consecutive equal signs (=) draws a double line, and typing three consecutive tildes (~) draws a zigzag line.
To start a list or part of a list at a predefined number
Place the cursor within an existing list, in the list paragraph whose number you want to set.
Display the Numbering gallery, and then select Set Numbering Value to open the Set Numbering Value dialog box.
Do either of the following to permit custom numbering:
Select Start new list.
Select Continue from previous list, and then select the Advance value (skip numbers) check box.
In the Set value to box, enter the number you want to assign to the list item. Then select OK.

You can start or restart a numbered list at any number
Apply built-in styles to text
You don’t have to know much about character and paragraph formatting to be able to format your documents in ways that will make them easier to read and more professional looking. With a couple of mouse clicks or screen taps, you can easily change the look of words, phrases, and paragraphs by using styles. More importantly, you can build a document outline that is reflected in the Navigation pane and use it to create a table of contents.
![]() SEE ALSO
SEE ALSO
For information about tables of contents, see “Create and modify tables of contents” in Chapter 13, “Reference content and content sources,” of Microsoft Word 2019 Step by Step, by Joan Lambert (Microsoft Press, 2018).
Apply styles
Styles can include character formatting (such as font, size, and color), paragraph formatting (such as line spacing and outline level), or a combination of both. Styles are stored in the template attached to a document. By default, blank new documents are based on the Normal template. The Normal template includes a standard selection of styles that fit the basic needs of most documents. These styles include nine heading levels, various text styles including those for multiple levels of bulleted and numbered lists, index and table of contents entry styles, and many specialized styles such as those for hyperlinks, quotations, placeholders, captions, and other elements.
By default, most common predefined styles are available in the Styles gallery on the Home tab. You can add styles to the gallery or remove those that you don’t often use.

The Styles gallery in a new, blank document based on the Normal template
Styles stored in a template are usually based on the Normal style and use only the default body and heading fonts associated with the document’s theme, so they all go together well. For this reason, formatting document content by using styles produces a harmonious effect. After you apply named styles, you can easily change the look of an entire document by switching to a different style set that contains styles with the same names but different formatting.
![]() SEE ALSO
SEE ALSO
For information about document theme elements, see “Change the document theme,” later in this chapter.
Style sets are available from the Document Formatting gallery on the Design tab.

Pointing to a style set in the gallery displays a live preview of the effects of applying that style set to the entire document
![]() Tip
Tip
Style sets provide a quick and easy way to change the look of an existing document. You can also modify style definitions by changing the template on which the document is based. For more information about styles and templates, see Chapter 15, “Create custom document elements,” of Microsoft Word 2019 Step by Step, by Joan Lambert (Microsoft Press, 2018).
To open the Styles pane
On the Home tab, select the Styles dialog box launcher.
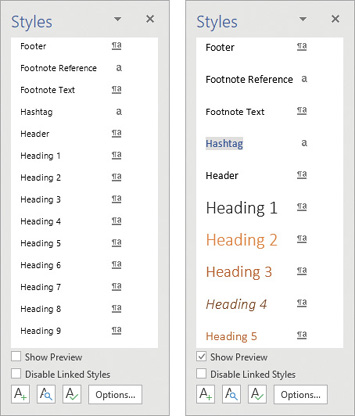
The Styles pane can display style names and previews
![]() Tip
Tip
If the Styles pane floats above the page, you can drag it by its title bar to the right or left edge of the app window to dock it.
To change which styles are displayed in the Styles pane
Open the Styles pane, and then select Options.
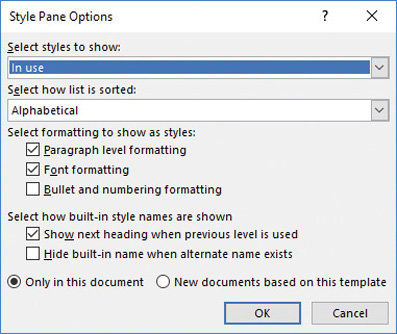
To make it easier to find specific styles, sort the list alphabetically
In the Style Pane Options dialog box, do any of the following, and then select OK:
In the Select styles to show list, select one of the following:
Recommended Displays styles that are tagged in the template as recommended for use
In use Displays styles that are applied to content in the current document
In current document Displays styles that are in the template that is attached to the current document
All styles Displays built-in styles, styles that are in the attached template, and styles that were brought into the document from other templates
In the Select how list is sorted list, select Alphabetical, As Recommended, Font, Based on, or By type.
In the Select formatting to show as styles area, select each check box for which you want to display variations from named styles.
In the Select how built-in style names are shown area, select the check box for each option you want to turn on.
To display or hide style previews in the Styles pane
Open the Styles pane, and then select or clear the Show Preview check box.
To add a style to the Styles gallery
In the Styles pane, point to the style, select the arrow that appears, and then select Add to Style Gallery.
To remove a style from the Styles gallery
In the Styles pane, point to the style, select the arrow that appears, and then select Remove from Style Gallery.
In the Styles gallery, right-click the style, and then select Remove from Style Gallery.
To apply a built-in style
Select the text or paragraph to which you want to apply the style.
TipIf the style you want to apply is a paragraph style, you can position the cursor anywhere in the paragraph. If the style you want to apply is a character style, you must select the text.
In the Styles gallery on the Home tab, or in the Styles pane, select the style you want to apply.
To change the style set
On the Design tab, in the Document Formatting group, select the More button if necessary to display all the style sets.
Point to any style set to preview its effect on the document.
Select the style set you want to apply.
Manage outline levels
Styles can be used for multiple purposes: to affect the appearance of the content, to build a document outline, and to tag content as a certain type so that you can easily locate it.

Heading styles define a document’s outline
Each paragraph style has an associated Outline Level setting. Outline levels include Body Text and Level 1 through Level 9. (Most documents make use only of body text and the first three or four outline levels. )

Most documents use only two to four of the outline levels
Paragraphs that have the Level 1 through Level 9 outline levels become part of the hierarchical structure of the document. They appear as headings in the Navigation pane and act as handles for the content that appears below them in the hierarchy. You can collapse and expand the content below each heading and move entire sections of content by dragging the headings in the Navigation pane.
To display the document outline in the Navigation pane
In the Navigation pane, select Headings to display the document structure.
TipOnly headings styled with the document heading styles appear in the Navigation pane.
To expand or collapse the outline in the Navigation pane
In the Navigation pane, do either of the following
If there is a white triangle to the left of a heading, select it to expand that heading to show its subheadings.
If there is a downward-angled black triangle to the left of a heading, select it to collapse the subheadings under that heading.
TipIf there is no triangle next to a heading, that heading does not have subheadings.
To expand or collapse sections in the document
In a document that contains styles, point to a heading to display a triangle to its left. Then do either of the following
If the triangle is a downward-angled gray triangle, select the triangle to hide the content that follows the heading.
If the triangle is a white triangle, select the triangle to display the hidden document content.
Change the document theme
Every document you create is based on a template, and the look of the template is controlled by a theme. The theme is a combination of coordinated colors, fonts, and effects that visually convey a certain tone. To change the look of a document, you can apply a different theme from the Themes gallery.

The default installation of Word 2019 offers 34 themes to choose from
Each theme has a built-in font set and color set, and an associated effect style.
Each font set includes two fonts—the first is used for headings and the second for body text. In some font sets, the heading and body fonts are the same.
Each color in a color set has a specific role in the formatting of styled elements. For example, the first color in each set is applied to the Title and Intense Reference styles, and different shades of the third color are applied to the Subtitle, Heading 1, and Heading 2 styles.
If you like the background elements of a theme but not the colors or fonts, you can mix and match theme elements.

Word 2019 offers thousands of different combinations for creating a custom theme that meets your exact needs
![]() Tip
Tip
In addition to colors and fonts, you can control subtler design elements, such as paragraph spacing and visual effects, associated with a theme.
If you create a combination of theme elements that you would like to use with other documents, you can save the combination as a new theme. By saving the theme in the default Document Themes folder, you make the theme available in the Themes gallery. However, you don’t have to store custom themes in the Document Themes folder; you can store them anywhere on your hard disk, on removable media, or in a network location.
![]() Tip
Tip
The default Document Themes folder is stored within your user profile. On a default freestanding installation, the folder is located at C:Users<user name> AppDataRoamingMicrosoftTemplatesDocument Themes. In a corporate environment with managed computer configurations, the user profile folder might be located elsewhere.
By default, Word applies the Office theme to all new, blank documents. In Word 2019, the Office theme uses a primarily blue palette, the Calibri font for body text, and Calibri Light for headings. If you plan to frequently use a theme other than the Office theme, you can make that the default theme.
![]() Tip
Tip
If multiple people create corporate documents for your company, you can ensure that everyone’s documents have a common look and feel by assembling a custom theme and making it available to everyone. Use theme elements that reflect your corporate colors, fonts, and visual style, and then save the theme to a central location or send the theme file by email and instruct your colleagues to save it to the default Document Themes folder.
To apply a built-in theme to a document
On the Design tab, in the Document Formatting group, select the Themes button, and then select the theme you want to apply.
TipIf you have manually applied formatting to document content, the theme does not override the manual formatting. To ensure that all document elements are controlled by the theme, select Reset To The Default Style Set on the Document Formatting menu.
To change theme elements in a document
On the Design tab, in the Document Formatting group, do any of the following
Select Colors (the ScreenTip says Theme Colors), and then select the color set you want to apply.
Select Fonts (the ScreenTip says Theme Fonts), and then select the font set you want to apply.
Select Effects (the ScreenTip says Theme Effects), and then select the effect you want to apply.
To save a custom theme
Apply a base theme, and then modify the theme colors, fonts, and effects as you want them.
On the Design tab, in the Document Formatting group, select Themes.
At the bottom of the Themes menu, select Save Current Theme to display the contents of the Document Themes folder in the Save Current Theme dialog box.
In the File name box, replace the suggested name, and then select Save.
To apply a custom theme
Display the Themes menu. If you have created a custom theme, the Themes menu now includes a Custom area that contains your theme.
Select the theme to apply it to the document.
To change the default theme
In the document, apply the theme you want to use as the default theme.
On the Design tab, in the Document Formatting group, select Set as Default.
To apply a theme from a nonstandard location
On the Design tab, in the Document Formatting group, select Themes.
At the bottom of the Themes menu, select Browse for Themes.
In the Choose Theme or Themed Document dialog box, browse to and select the theme you want to apply, and then select Open.
To find the location of your Document Themes folder
On the Design tab, in the Document Formatting group, select Themes.
At the bottom of the Themes menu, select Save Current Theme.
In the Save Current Theme dialog box, select the icon at the left end of the address bar to display the full path to the Document Themes folder.
To delete a custom theme
Open File Explorer, browse to the Document Themes folder, and delete the theme file.
In Word, display the Themes menu, right-click the custom theme, and then select Delete.
Note that the second method removes the theme choice from the gallery but does not remove the theme file from your Themes folder.
Key points
You can format many aspects of a paragraph, including its indentation, alignment, internal line spacing, preceding and following space, border, and background. Within a paragraph, you can control the structure of the content by using hidden line breaks and tabs, and the appearance of the content by changing the size, color, style, effects, and spacing of the text.
You can apply paragraph and character formatting manually, or you can format multiple elements of a paragraph, and control the outline level of the content, by using styles.
You can change the formatting applied by all the styles within a document by changing the document theme or any individual element of the theme, such as the theme colors, theme fonts, or theme effects.
To make a set of items or instructions stand out from the surrounding text, you can format it as an ordered (numbered) or unordered (bulleted) list. Key points
 Practice tasks
Before you can complete these tasks, you need to copy the book’s practice files to your computer. The practice files for these tasks are located in the Office2019SBSCh03 folder. You can save the results of the tasks in the same folder.
The introduction includes a complete list of practice files and download instructions.
Apply paragraph formatting
Open the FormatParagraphs document, display formatting marks, and then complete the following tasks:
Display the rulers and adjust the zoom level to display most or all of the paragraphs in the document.
Select the first two paragraphs (Welcome! and the next paragraph) and center them between the margins.
Select the second paragraph, and apply a first line indent.
Select the third paragraph. Format the paragraph so that the edges of the paragraph are flush against both the left and right margins. Then indent the paragraph by a half inch on the left and on the right.
Indent the Be careful paragraph by 0. 25 inches.
Simultaneously select the Pillows, Blankets, Towels, Limousine winery tour, and In-home massage paragraphs. Change the paragraph spacing to remove the space after the paragraphs.
At the top of the document, apply an outside border to the Please take a few minutes paragraph.
Save and close the document.
Structure content manually
Open the StructureContent document, display formatting marks, and then complete the following tasks:
Display the rulers and adjust the zoom level to display most or all of the paragraphs in the document.
In the second paragraph (We would like...), insert a line break immediately after the comma and space that follow the word cottage.
Select the Pillows, Blankets, Towels, and Dish towels paragraphs. Insert a left tab stop at the 2 inch mark and clear any tab stops prior to that location.
In the Pillows paragraph, replace the space before the word There with a tab marker. Repeat the process to insert tabs in each of the next three paragraphs. The part of each paragraph that follows the colon is now aligned at the 2-inch mark, producing more space than you need.
Select the four paragraphs containing tabs, and then do the following:
Change the left tab stop from the 2 inch mark to the 1.25 inch mark.
On the ruler, drag the Hanging Indent marker to the tab stop at the 1.25 inch mark (the Left Indent marker moves with it) to cause the second line of the paragraphs to start in the same location as the first line. Then press the Home key to release the selection so you can review the results.
At the bottom of the document, select the three paragraphs containing dollar amounts, and then do the following:
Set a Decimal Tab stop at the 3 inch mark.
Replace the space to the left of each dollar sign with a tab to align the prices on the decimal points.
Hide the formatting marks to better display the results of your work.
Save and close the document.
Apply character formatting
Open the FormatCharacters document, and then complete the following tasks:
In the second bullet point, underline the word natural. Then repeat the formatting command to underline the word all in the fourth bullet point.
In the fourth bullet point, select anywhere in the word across. Apply a thick underline to the word in a way that also assigns the Thick underline format to the Underline button. Then apply the thick underline to the word departments.
Select the Employee Orientation heading, and apply bold formatting to the heading.
Copy the formatting, and then paint it onto the Guidelines subtitle, to make the subtitle a heading.
Select the Guidelines heading, and apply the following formatting:
Change the font to Impact.
Set the font size to 20 points.
Apply the Small caps font effect.
Expand the character spacing by 10 points.
Change the font color of the words Employee Orientation to Green, Accent 6.
Select the Community Service Committee heading, and apply the following formatting:
Outline the letters in the same color you applied to Employee Orientation.
Apply an Offset Diagonal Bottom Left outer shadow. Change the shadow color to Green, Accent 6, Darker 50%.
Fill the letters with the Green, Accent 6 color, and then change the text outline to Green, Accent 6, Darker 25%.
You have now applied three text effects to the selected text by using three shades of the same green.
In the first bullet point, select the phrase the concept of service and apply a Bright Green highlight.
In the fifth bullet point, simultaneously select the words brainstorming, planning, and leadership and change all the letters to uppercase.
Save and close the document.
Create and modify lists
Open the CreateLists document, display formatting marks and rulers, and then complete the following tasks:
Select the first four paragraphs below The rules fall into four categories. Format the selected paragraphs as a bulleted list. Then change the bullet character for the four list items to the one composed of four diamonds.
Select the two paragraphs below the Definitions heading. Format the selected paragraphs as a numbered list.
Select the first four paragraphs below the General Rules heading. Format the paragraphs as a second numbered list. Ensure that the new list starts with the number 1.
Format the next three paragraphs as a bulleted list. (Notice that Word uses the bullet symbol you specified earlier. ) Indent the bulleted list so that it is a subset of the preceding numbered list item.
Format the remaining three paragraphs as a numbered list. Ensure that the list numbering continues from the previous numbered list.
Locate the No large dogs numbered list item. Create a new second-level numbered list item (a) from the text that begins with the word Seeing. Then create a second item (b) and enter The Board reserves the right to make exceptions to this rule.
Create a third list item (c). Promote the new list item to a first-level item, and enter All pets must reside within their Owners’ Apartments. Notice that the General Rules list is now organized hierarchically.
Sort the three bulleted list items in ascending alphabetical order.
Save and close the document.
Apply built-in styles to text
Open the ApplyStyles document in Print Layout view, and then complete the following tasks:
Scroll through the document to gain an overview of its contents. Notice that the document begins with a centered title and subtitle, and there are several headings throughout.
Open the Navigation pane. Notice that the Headings page of the Navigation pane does not reflect the headings in the document, because the headings are formatted with local formatting instead of styles.
Open the Styles pane and dock it to the right edge of the app window.
Set the zoom level of the page to fit the page content between the Navigation pane and the Styles pane.
Apply the Title style to the document title, All About Bamboo.
Apply the Subtitle style to the Information Sheet paragraph.
Apply the Heading 1 style to the first bold heading, Moving to a New Home. Notice that the heading appears in the Navigation pane.
Hide the content that follows the heading. Then redisplay it.
Apply the Heading 1 style to Staying Healthy. Then repeat the formatting to apply the same style to Keeping Bugs at Bay.
Scroll the page so that both underlined headings are visible. Select the Mites and Mealy Bugs headings. Then simultaneously apply the Heading 2 style to both selections.
Configure the Styles pane to display all styles, in alphabetical order.
In the Navigation pane, just above the headings, select the Jump to the beginning button to return to the document title.
In the first paragraph of the document, select the company name Wide World Importers, and apply the Intense Reference style.
In the second paragraph, near the end of the first sentence, select the word clumping, and apply the Emphasis style. Then, at the end of the sentence, apply the same style to the word running.
Close the Navigation pane and the Styles pane. Then configure the view setting to display both pages of the document in the window.
Apply the Basic (Elegant) style set to the document. Change the view to Page
Width and notice the changes to the styled content.
Save and close the document.
Change the document theme
Open the ChangeTheme document, and then complete the following tasks:
Apply the Facet theme to the document.
Change the theme colors to the Orange color scheme.
Change the theme fonts to the Georgia theme set.
Save the modified theme in the default folder, as a custom theme named My Theme. Verify that the custom theme is available on the Themes menu.
Save and close the document.