
CHAPTER 3
Plan and implement a Microsoft 365 solution
Microsoft 365 provides enterprises and businesses a comprehensive solution, enabling user productivity while simplifying the IT management, security and administration for Windows, Windows 10 Mobile, iOS, and Android devices. You can manage enterprise devices and bring your own device (BYOD) devices together in the same cloud-based console. Microsoft 365 provides a bundle of essential tools, services, and support, offering a complete solution for your organization.
Windows 10 and Office 365 are at the heart of Microsoft 365. Complementing the productivity core of Microsoft 365, Intune provides remote policies and device management such as remote wipe and lock, application and software update deployment, and inventory and reporting. This chapter reviews how to plan and implement Microsoft 365 in preparation for the exam.
Skills in this chapter:
![]() Skill 3.1: Support mobile devices
Skill 3.1: Support mobile devices
![]() Skill 3.2: Deploy software updates by using Microsoft Intune
Skill 3.2: Deploy software updates by using Microsoft Intune
![]() Skill 3.3: Manage devices with Microsoft 365 Solution
Skill 3.3: Manage devices with Microsoft 365 Solution
![]() Skill 3.4: Configure Information Protection
Skill 3.4: Configure Information Protection
Skill 3.1: Support mobile devices
Windows 10 supports several features for mobile devices that enable greater control over and manageability of mobile devices. Devices that are often disconnected from the corporate network and used in a variety of physical locations warrant special consideration regarding device security, remote management, data access, connectivity, and administration. In addition, you’ll learn how to configure and support standalone Windows 10 devices and devices that have been enrolled into Microsoft 365.
This section covers how to:
![]() Support mobile device policies
Support mobile device policies
![]() Support mobile access and data synchronization
Support mobile access and data synchronization
![]() Support broadband connectivity
Support broadband connectivity
![]() Support Mobile Device Management by using Microsoft Intune
Support Mobile Device Management by using Microsoft Intune
Support mobile device policies
Unlike traditional device management, modern mobile devices are not necessarily members of an Active Directory domain. Enterprise BYOD and choose your own device (CYOD) allows for diversity in hardware. A modern device can be a smartphone, tablet, laptop, desktop PC, or IoT device.
Mobile Device Management (MDM) requires that administrators manage a wide range of devices and disparate operating systems including Windows, Windows 10 Mobile, iOS, and Android. Only domain-joined Microsoft devices can be managed using Group Policy. So, you must understand how to support other devices that can be configured and controlled using Microsoft Intune policies. If a connected device has been enrolled into your MDM authority, it can be managed remotely using Intune policies.
Think of Intune policies as a group of settings that can be configured to control features on a device. Policy templates are available within the Azure Intune administration portal and can be applied to individual devices, or groups of devices.
Intune provides policies for hundreds of device settings across multiple platforms. Group Policy, however, can configure thousands of settings for Windows and Server operating systems. Vendors add functionality to devices on a regular basis, and Microsoft Intune manages this functionality with available policies.
The Microsoft Intune policies fall into five categories (described in Table 3-1). These policies can be accessed by signing into the Intune Classic admin portal at https://manage.microsoft.com/ and then navigating to the Policy node on the left hand side.
TABLE 3-1 Microsoft Intune policies
Intune policy category |
Description |
Configuration Policies |
Manage security settings and features on your devices. Include deploying language settings, or a custom firewall rule |
Device Compliance Policies |
Define the rules and settings which you want a device to comply with. Can be used with conditional access policy rules so you can monitor whether your devices are compliant. |
Conditional Access Policies |
Conditional Access Policies (or CAPs) can be used to allow or restrict access to a particular service or resource, such as network access or access to Exchange Online, or a specific app installed on a device. There are specific templates for you to manage access to Microsoft Exchange Online, Microsoft Dynamics CRM Online, Skype for Business Online, and Microsoft SharePoint Online. |
Corporate Device Enrollment Policy |
Used to specify how devices are to be enrolled and allow administrators to deploy an enrollment profile to Apple devices. |
Resource Access Policies |
Most commonly deployed policies. Similar to configuration Policies providing access to company files and resources. There are four types of resource access policies available:
|
 EXAM TIP
Microsoft has stated that the Intune Classic portal will be retired starting on April 2, 2018 for customers using Intune standalone. Therefore, you should familiarize yourself with the modern Azure Intune portal.
Intune Policy Templates
In the Intune classic portal there are a number of templates built into the Intune policy nodethat are used to deliver settings to enrolled devices. The templates are listed in categories and they’re split based on the operating system and device type.
For the exam, you should review the available templates and note that not all settings and policies are available for each vendor or device type.
When configuring a device, it is advisable to start with a pre-configured template because they contain recommended settings. It may be more efficient to use an existing template as a starting point, and then customize the settings and deploy them to your managed devices. The list of templates available is shown in Figure 3-1.

All templates allow you to create a new custom policy based on the table of settings within the template. Three of the template types provide recommended settings for you to deploy to your devices. These are: Software, Computer Management and Mobile Device Settings templates. The Software templates are used by Android and iOS devices. The Computer Management templates cater to Windows Intune and Firewall settings on Windows devices. The Mobile Device Settings templates are used for configuring Exchange ActiveSync and also all common security settings such as password length, complexity, and device encryption settings.
Computer management templates
The Computer Management Intune Policies are some of the most used when creating a default configuration on a device running Windows. Within Computer Management you can configure:
![]() Microsoft Intune Agent Settings
Microsoft Intune Agent Settings
![]() Microsoft Intune Center Settings
Microsoft Intune Center Settings
![]() Windows Firewall Settings
Windows Firewall Settings
Some of the settings contained in the Microsoft Intune Agent Settings template relate to Windows 8.1 and earlier operating systems. For these devices the Microsoft Intune Agent must be installed. Most of these settings are built into Windows 10 and therefore can be configured using the Windows and Mobile Device Security templates.
The Microsoft Intune Agent Settings template allows you to configure Endpoint Protection, updating and configuring real-time protection settings, including the real-time protection and scan schedules. By default, the service is set to check for and receive updates every 8 hours, but this can be modified.
Since this policy affects the Endpoint Protection service running on the operating system, you can only assign this template to device groups containing computers.
For older devices, you can use the Microsoft Intune Center Settings to provide users of enrolled devices with contact information, such as support contacts, website URL, and support instructions.
With the Windows Firewall Settings template you can configure Windows Firewall settings for each type of network profile: domain, private, and public on a device.
Typical settings include firewall activation, block or allow all incoming connections (overrides existing allowed programs), and notifying whenever Windows Firewall blocks a new program. There are dozens of predefined Windows Firewall exceptions to specific services that you can enable or disable using policy.
Some of the items that can be configured are shown in Table 3-2.
TABLE 3-2 Sample of predefined Windows Firewall exceptions
Exception name |
Description |
Connect to a Network Projector |
Users can connect to projectors over wired or wireless networks to project presentations. |
File and Printer Sharing |
Users can share local files and printers with other users on the network using NetBIOS, Link Local Multicast Name Resolution (LLMNR), Server Message Block (SMB) protocol, and RPC. |
Key Management Service |
Provides a license compliance within enterprise environments. |
Netlogon Service |
Provides a security channel between domain clients and a domain controller for authenticating users and services using RPC. |
Network Discovery |
Computers can discover other devices on the network. This setting uses FDResPub Services and SSDP, NetBIOS, LLMNR, and UPnP network protocols. |
Remote Administration |
The remote administration of the computer. |
Remote Assistance |
Users of managed computers can request remote assistance from other users on the network. Uses SSDP, Peer Name Resolution Protocol (PNRP), Teredo, and UPnP network protocols. |
Remote Desktop |
The computer can use Remote Desktop to remotely access other computers. |
Remote Event Log Management |
Client event logs can be viewed and managed remotely. Uses Named Pipes and RPC. |
Windows Remote Management (Windows 8 or later) |
Enables remote management of managed computers with WS-Management, a Web services-based protocol for remote management of operating systems and devices. |
For effective policy you need to apply it to a device, or group of devices. The device receives the policy settings only after it has been configured and connected to the MDM service.
Mobile Device Security Policies
The Mobile Device Security Policy template allows you to define and deploy password lengths and encryption for all supported devices. The settings available are dependent on whether the feature is available on the device and if the vendor allows this to be controlled using MDM.
There are many settings available with this policy. Table 3-3 shows some example settings.
TABLE 3-3 Mobile Device Security Policy
Setting |
Example Settings |
Security settings |
Password length, history, duration, complexity, reuse of previous passwords, picture passwords, allow fingerprint unlock |
Encryption settings |
Require encryption on mobile device, require encryption on storage cards |
Malware settings |
Require network firewall, enable SmartScreen |
System settings |
Require automatic updates, allow screen capture, User Account Control |
Cloud settings – documents and data, accounts and synchronization |
Allow backup to iCloud, sync to iCloud, Require encrypted backup, Allow Google backup. Allow Microsoft account, Allow Google account auto sync |
Application settings – Email, browser, Apps |
Make Microsoft account optional in Windows Mail application, Allow custom email accounts. Allow web browser, Allow pop-up blocker, Allow application store |
Device capabilities settings – hardware and features |
Allow camera, Allow Wi-Fi, Allow Wi-Fi tethering, Allow data roaming, Allow voice assistant, Allow copy and paste |
In the new Microsoft Intune portal hosted in Microsoft Azure, you are not offered a set of pre-defined policies to choose from. Instead you are required to create your own policy. The settings available for each policy are platform specific, allowing you to choose from: Android, Android for Work, iOS, macOS, Windows Phone 8.1, Windows 8.1 and later, and Windows 10 and later.
Depending on which platform is chosen, you can build a policy that offers compatible settings that are allowable by the platform vendor as shown in Figure 3-2.

Previously, the Mobile Device Security Policy was a useful “catch all” security policy. Intune now includes separate configuration policies for each device platform, which should be used in preference to the Mobile Device Security Policy.
EXAM TIP
Microsoft has stated that the Mobile Device Security Policy will be removed in the future and they will focus their feature development within the platform specific policies.
Support mobile access and data synchronization
Users that have devices disconnected from the corporate network often require access to corporate documents and data. Windows 10 provides features that enable administrators to make corporate data available while a device is disconnected from the network, or completely offline.
Supporting Work Folders
Work Folders provides the ability to synchronize data between a mobile device and a folder hosted on a corporate network file server. Work Folders enable synchronization for devices that are either domain-joined on non-domain-joined, so BYOD users can have access to corporate files without requiring a device that is joined to the domain. You can control the behavior of Work Folders with Group Policy, or configure it from Work Folders in Control Panel, as shown in Figure 3-3.

EXAM TIP
Work Folders was introduced in Windows 8.1 and Windows Server 2012 R2. To use Work Folders, your client and file server operating system must use Windows 8.1 or later and Windows Server 2012 R2 or later. In environments where file servers are older versions of Windows Server, or where users have devices running Windows 8 or earlier, your users can’t use Work Folders to provide offline file access for those users.
CONFIGURING WORK FOLDERS IN CONTROL PANEL
To configure Work Folders, users must complete the following steps:
If you have an iPad or iPhone, install the Work Folders app from the App Store and then follow the setup instructions.
If you have an Android device, install the Work Folders app from the Google Play Store and then follow the setup instructions.
On a Windows 8.1 or Windows 10 device click Set Up Work Folders in Control Panel.
Enter a corporate email address or a Work Folders universal resource locator (URL).
Accept or change the local path for Work Folders storage.
Review and accept the security policies.
CONFIGURING WORK FOLDERS BY USING GROUP POLICY
You can also configure domain-joined Windows devices to use Work Folders by using Group Policy. There are two Group Policy settings used to configure Work Folders:
![]() Specify Work Folders settings This setting is found in User ConfigurationAdministrative TemplatesWindows ComponentsWork Folders. When you enable this setting, you also specify a Work Folders URL that will be used by Windows to configure Work Folders for the user. You can also select the Force Automatic Setup option, which will set up Work Folders automatically for any users affected by the policy. Users will not be able to choose whether or not they use Work Folders, and the default value for the local Work Folders location (%USERPROFILE%Work Folders) will be used.
Specify Work Folders settings This setting is found in User ConfigurationAdministrative TemplatesWindows ComponentsWork Folders. When you enable this setting, you also specify a Work Folders URL that will be used by Windows to configure Work Folders for the user. You can also select the Force Automatic Setup option, which will set up Work Folders automatically for any users affected by the policy. Users will not be able to choose whether or not they use Work Folders, and the default value for the local Work Folders location (%USERPROFILE%Work Folders) will be used.
![]() Force Automatic Setup For All users This setting is found in Computer ConfigurationAdministrative TemplatesWindows ComponentsWork Folders. When you enable this option, domain-joined computers will use the settings specified in Specify Work Folders settings to configure Work Folders.
Force Automatic Setup For All users This setting is found in Computer ConfigurationAdministrative TemplatesWindows ComponentsWork Folders. When you enable this option, domain-joined computers will use the settings specified in Specify Work Folders settings to configure Work Folders.
When Work Folders is configured for a Windows 10 computer, the Work Folders folder is available in File Explorer under This PC.
Supporting mobile access with Sync Center
Sync Center enables domain-joined computers to synchronize local copies of network files for offline use. Sync Center, in combination with Offline Files, can provide offline file access for client computers running any version of Windows as far back as Windows XP.
A sync partnership is the functional component within Sync Center. A sync partnership defines the network location where the files are located along with specific synchronization details. You can define sync partnerships within Sync Center in Control Panel, pictured in Figure 3-4. Sync Center offers several options for configuring and monitoring sync partnerships and Offline Files.

SCHEDULING SYNCHRONIZATION
In Sync Center, after a sync partnership is configured, you can either synchronize everything by clicking Sync All, or you can select the Offline Files folder, click Schedule, and use the wizard provided to configure sync settings. You can use two scheduling options:
![]() At a scheduled time For example, every Monday at 11 A.M. or every day at 2 A.M.
At a scheduled time For example, every Monday at 11 A.M. or every day at 2 A.M.
![]() When an event occurs For example, every time you log on to your computer.
When an event occurs For example, every time you log on to your computer.
You can configure additional scheduling options, such as preventing syncing, unless the computer has been idle for a specific amount of time or the computer is running on external power. You can also trigger synchronization based on an event in the operating system, such as when the user signs in, when the user locks Windows, or when the user unlocks Windows.
Support broadband connectivity
Windows 10 devices are often connected to corporate networks for access to Internet and corporate network infrastructure. However, as devices become more mobile, users need to connect to resources from locations outside of the corporate network. In many cases, Wi-Fi networks can provide the connectivity required, but in the absence of these, many users opt to use broadband mobile access from personal hotspots or a tethered connection from a mobile phone.
These connections warrant different considerations because data usage is usually tracked and charged back by Internet Service Providers (ISPs). This type of connection is referred to as a metered network. Windows 10 offers several options to control data usage when connected to a metered network.
Supporting broadband tethering and metered networks
Some Windows 10 laptop devices now have cellular SIM or LTE functionality, which allows devices to connect to the Internet using their mobile data using a Wi-Fi enabled or a wired network.
Once connected to a mobile data connection you can create a mobile hotspot that can be shared with up to 10 other devices. This transforms the device into an Internet sharing communications hotspot. Nearby devices will be able to connect to your PC or smartphone’s data connection via the network center, listed as either an available Wi-Fi or Bluetooth connection. In both cases you will need to provide the correct password or passphrase set by the sharing device, to join to the connection.
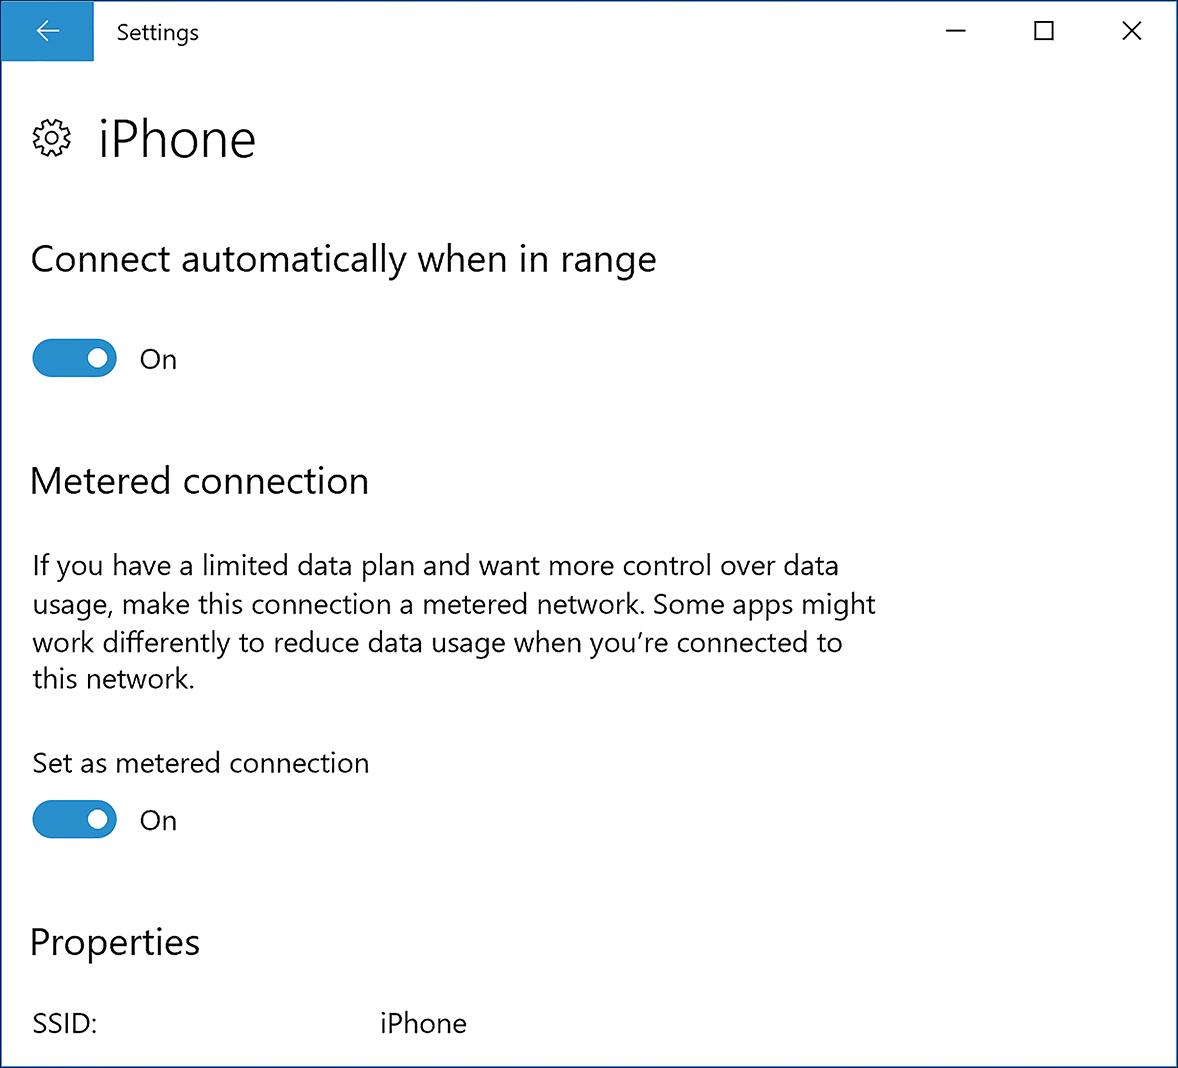
When a connection has restrictions on the amount of data, such as quotas or limits, it is called a metered Internet connection. If you use a tethered connection, for example, you may want to categorize the connection as metered. Enabling this feature informs Windows that lower priority data requirements such as updates and OneDrive synchronization tasks will be deferred until using a non-metered connection. You can also manually pause OneDrive synchronization for up to 24 hours by right clicking the OneDrive icon in the notification area and selecting pause syncing.
To mark a Wi-Fi network connection as metered, perform these steps while you are online:
From the Start menu, select the Settings app.
Select Network & Internet.
Select the Wi-Fi connection.
On the connection properties page, toggle the switch to Set As Metered Connection, as shown in Figure 3-5.
Support Mobile Device Management by using Microsoft Intune
Mobile Device Management (MDM) enables the administration of remote mobile devices across multiple platforms. Microsoft Intune supports MDM for managing remote mobile devices. Microsoft Intune supports direct management by using MDM for the following devices and associated requirements for enrollment:
Apple
![]() Apple iOS 9.0 and later
Apple iOS 9.0 and later
![]() Mac OS X 10.9 and later
Mac OS X 10.9 and later
![]() Obtain an Apple Push Notification service certificate. This enables Microsoft Intune to communicate securely with iOS devices.
Obtain an Apple Push Notification service certificate. This enables Microsoft Intune to communicate securely with iOS devices.
![]() Android 4.4 and later (including Samsung KNOX Standard 4.4 and higher)
Android 4.4 and later (including Samsung KNOX Standard 4.4 and higher)
![]() Android for Work
Android for Work
Download the Microsoft Intune Company Portal app from the Google Play store.
Microsoft
![]() Windows 10 (Home, S, Pro, Education, and Enterprise versions)
Windows 10 (Home, S, Pro, Education, and Enterprise versions)
![]() Windows 10 Mobile
Windows 10 Mobile
![]() Devices running Windows 10 IoT Enterprise (x86, x64)
Devices running Windows 10 IoT Enterprise (x86, x64)
![]() Devices running Windows 10 IoT Mobile Enterprise
Devices running Windows 10 IoT Mobile Enterprise
![]() Windows Holographic & Windows Holographic Enterprise
Windows Holographic & Windows Holographic Enterprise
![]() Windows Phone 8.1, Windows 8.1 RT, PCs running Windows 8.1 (Sustaining mode)
Windows Phone 8.1, Windows 8.1 RT, PCs running Windows 8.1 (Sustaining mode)
If direct enrollment is not possible, for example with older versions of Windows, you can install the Microsoft Intune software client from the Intune classic portal. The Intune software client can be used to manage Windows 7 and later PCs (except Windows 10 Home edition).
You can use Microsoft Intune to perform several management tasks for these devices in several different areas.
App management
![]() App deployment
App deployment
![]() App restrictions
App restrictions
![]() Mobile application management
Mobile application management
Device security and configuration
![]() Configuration policies
Configuration policies
![]() Password management
Password management
![]() Remote wipe and lock
Remote wipe and lock
![]() Custom policies
Custom policies
Company resource access
![]() VPN profiles
VPN profiles
![]() Wi-Fi profiles
Wi-Fi profiles
![]() Email profiles
Email profiles
![]() Certificate profiles
Certificate profiles
![]() Conditional access profiles
Conditional access profiles
Inventory and reporting
![]() Hardware inventory
Hardware inventory
![]() Application inventory
Application inventory
![]() Reporting
Reporting
Currently different administrative tasks within Intune require that you use one of the following administrative websites:
![]() Office 365 portal (https://www.office.com)
Office 365 portal (https://www.office.com)
![]() Azure portal (https://portal.azure.com)
Azure portal (https://portal.azure.com)
The following browsers are supported for these portals:
![]() Microsoft Edge (latest version)
Microsoft Edge (latest version)
![]() Microsoft Internet Explorer 11
Microsoft Internet Explorer 11
![]() Safari (latest version, Mac only)
Safari (latest version, Mac only)
![]() Chrome (latest version)
Chrome (latest version)
![]() Firefox (latest version)
Firefox (latest version)
The Intune classic portal requires Silverlight browser support and therefore only these browsers offer Silverlight support:
![]() Internet Explorer 10 or later
Internet Explorer 10 or later
![]() Google Chrome (versions prior to version 42)
Google Chrome (versions prior to version 42)
![]() Mozilla Firefox with Silverlight enabled
Mozilla Firefox with Silverlight enabled
Configuring MDM for Microsoft Intune
To support Mobile Device Management (MDM) in Microsoft Intune, you must first configure the MDM authority. Microsoft Intune can provide an MDM authority, or you can use System Center 2012 R2 Configuration Manager or Office 365 as your MDM authority. If MDM has not been previously set to Microsoft Intune, you can configure MDM by performing the following steps:
Sign into the Azure portal at https://portal.azure.com.
Choose More Services then Monitoring + Management, then select Intune.
Select the orange banner at the top to open the Mobile Device Management Authority setting.
Under Mobile Device Management Authority, choose your MDM authority from the following options as shown in Figure 3-6:
Intune MDM Authority
Configuration Manager MDM Authority
None
Click the Intune MDM Authority option.
A message indicates that you have successfully set your MDM authority to Intune.

Enrolling devices
You enable MDM management for devices by enrolling them. The enrollment process is different for each platform, and each platform has a specific set of requirements, mentioned earlier in this chapter.
For Windows devices, there is an existing trust relationship between the device operating system and Intune, so enrollment can be automatic. For iOS and Android devices, a certificate must be created and then installed on each device. The following list provides the enrollment process for each platform:
![]() Windows 7 & Windows 8 Install the Microsoft Intune client. The Company Portal app is not available.
Windows 7 & Windows 8 Install the Microsoft Intune client. The Company Portal app is not available.
![]() Windows 8.1 or Windows RT 8.1 On the device, tap Settings, then PC Settings, then Network and Workplace, then enter your credentials and click Join. Turn on device management.
Windows 8.1 or Windows RT 8.1 On the device, tap Settings, then PC Settings, then Network and Workplace, then enter your credentials and click Join. Turn on device management.
![]() Windows 10 If users sign into the device using their corporate credentials, their account is added to Azure Active Directory and the device is then managed with Intune.
Windows 10 If users sign into the device using their corporate credentials, their account is added to Azure Active Directory and the device is then managed with Intune.
![]() iOS - “bring your own device” or BYOD iPads, iPhones, and Mac computers. A MDM Push certificate is required for Intune to manage iOS and Mac devices. Then install the Company Portal app from the App Store. Open the app and follow the enrollment wizard.
iOS - “bring your own device” or BYOD iPads, iPhones, and Mac computers. A MDM Push certificate is required for Intune to manage iOS and Mac devices. Then install the Company Portal app from the App Store. Open the app and follow the enrollment wizard.
![]() iOS - Company-owned devices For bulk enrollments, you can use the following methods:
iOS - Company-owned devices For bulk enrollments, you can use the following methods:
![]() Apple’s Device Enrollment Program (DEP)
Apple’s Device Enrollment Program (DEP)
![]() Apple School Manager
Apple School Manager
![]() Apple Configurator Setup Assistant enrollment
Apple Configurator Setup Assistant enrollment
![]() Apple Configurator direct enrollment
Apple Configurator direct enrollment
![]() Intune device enrollment manager account
Intune device enrollment manager account
![]() Android and Samsung Knox Standard devices Users must enroll their devices by downloading the Intune Company Portal app from Google Play.
Android and Samsung Knox Standard devices Users must enroll their devices by downloading the Intune Company Portal app from Google Play.
Skill 3.2: Deploy software by using Microsoft Intune
Microsoft Intune provides you with an alternative method of managing software updates for devices that are outside of the corporate network. You can use Microsoft Intune to approve or decline updates, configure installation methods, deploy updates, or monitor the progress of these deployments.
This section covers how to:
![]() Use reports and In-Console Monitoring to identify required updates
Use reports and In-Console Monitoring to identify required updates
![]() Approve or decline updates
Approve or decline updates
![]() Configure automatic approval settings
Configure automatic approval settings
![]() Configure deadlines for update installations
Configure deadlines for update installations
![]() Deploy third-party updates
Deploy third-party updates
Use reports and In-Console Monitoring to identify required updates
Microsoft Intune provides dashboard reporting for updates required by managed devices. There are several locations from which you can obtain information about updates, but the Updates page, shown in Figure 3-7, is the most comprehensive.

The classic Intune portal still provides extensive reporting capabilities relating to software updates for operating systems that you install with the Intune client. The client is no longer required for managing devices running Windows 10 because these can be auto enrolled and managed using Azure Active Directory, and reflects the new modern way that Windows 10 receives security and feature updates on an automatic basis.
If you want to manage software updates on Windows 10 devices, using Intune, you will need to install the Intune client and use the classic portal.
The Updates page contains a dashboard view displaying the overall update status for devices managed by Microsoft Intune. It also groups updates according to type and provides links to view updates by those groups. When you click any group, Microsoft Intune displays the updates corresponding to the group. To obtain more detailed information, you can create and view a report by clicking the View Update Reports link in the Overview section of the Updates page. After clicking View Update Reports, you are presented with the Update Reports page, from where you can configure report settings and generate a report to view specific updates as shown in Figure 3-8.

To generate a report, you should specify the specific criteria of updates you want to see, including the following:
![]() Update classification
Update classification
![]() Update status
Update status
![]() Microsoft Security Response Center (MSRC) rating
Microsoft Security Response Center (MSRC) rating
![]() Effective approval
Effective approval
![]() Device group (if configured)
Device group (if configured)
When the parameters of the report have been set, you can generate and view the report by clicking View Report. The report is generated and displayed in a new window and can be printed or exported.
Approve or decline updates
To deploy updates to Microsoft Intune clients, you must approve them in the classic Intune Administration console. To choose how to handle an update, perform the following steps:
In the classic Intune Administration console, click the Updates workspace.
In the All Updates node, select the update(s) that you want to approve.
Click Approve or Decline in the toolbar, depending on how you want the update handled.
On the Select Groups page, shown in Figure 3-9, select the groups to which you want the update deployed, click Add, and then click Next.
On the Deployment Action page, shown in Figure 3-10, select the approval status for the update. You can choose from among Required Install, Not applicable, Available Install, and Uninstall.
Click Finish.


Configure automatic approval settings
Automatic approval rules enable you to configure Microsoft Intune to approve updates automatically, based on product category and update classification. When you configure an automatic approval rule, the update will be deployed automatically rather than requiring an administrator to perform manual approval. For example, you might configure an automatic approval rule for Windows 10 operating system updates that are classified as critical or security.
Any Windows 10 operating system update that Microsoft publishes that has the critical or security classification will automatically be deployed to Microsoft Intune clients.
EXAM TIP
Remember that approval rules will only apply if Microsoft Intune manages the product and classification that are the subject of the rule. There’s no sense in configuring an approval rule for Windows 10 updates if Microsoft Intune isn’t configured to manage updates for Windows 10 devices.
To create an automatic approval rule, perform the following steps:
Select the Admin workspace of the classic Intune Administration console.
Click Updates. Scroll to Automatic Approval Rules, and then click New.
On the General page of the Create Automatic Approval Rule Wizard, create a name and provide a description for the rule, and then click Next.
On the Product Categories page, select the products to which the automatic approval rule applies, and then click Next.
On the Update Classifications page, select the update classifications for which the rule will perform an automatic approval, and then click Next.
On the Deployment page, select the Intune groups for which the automatic approval rule will approve the update. If you scroll down, you can also configure an installation deadline for updates approved by this rule. Click Add, and then click Next to proceed.
On the Summary page, click Finish to complete the installation of the updates.
Configure deadlines for update installations
In the previous steps for configuring automatic approval, you had the option to choose an installation deadline for updates. In order to choose an installation deadline, you must first select the check box labeled Enforce An installation Deadline For These Updates. Once this check box has been selected, you can choose from the available options to enforce the deadline for installation:
![]() 1 Day After Approval
1 Day After Approval
![]() 3 Days After Approval
3 Days After Approval
![]() 7 Days After Approval
7 Days After Approval
![]() 14 Days After Approval
14 Days After Approval
![]() 21 Days After Approval
21 Days After Approval
![]() 28 Days After Approval
28 Days After Approval
If the update is not installed, or if the computer is not restarted before the deadline configured for the update, the update will be automatically installed when the deadline passes and the computer will be automatically restarted, if required by the update.
Deploy third-party updates
You can also use Microsoft Intune to deploy updates from third parties. You do this by manually uploading the update files, which can be in MSI, MSP, or EXE format. To upload and configure a third-party update to Microsoft Intune, perform the following steps:
In the Updates workspace of the classic Intune Administration console, click the Add Updates item on the right side, under Tasks.
On the Before You Begin page, click Next.
On the Update Files page, select the file you want to upload, and click Next.
On the Update Description page, complete the fields describing the update, and then click Next.
Select a classification. You can choose from among Updates, Critical Updates, Security Updates, Update Rollups, or Service Packs. Click Next.
On the Requirement page, select the operating system and architecture (x86 or x64) requirements for the update, and then click Next.
On the Detection Rules page, specify how Microsoft Intune can check whether the update has already been deployed on the Microsoft Intune client. This check can be performed by looking for an existing file, an MSI product code, or a specific registry key. Click Next.
On the Prerequisites page, identify any prerequisite software required for update installation and then click Next. You can specify None if no prerequisites are required or specify an existing file, an MSI product code, or a specific registry key.
On the Command Line Arguments page, specify any command-line arguments required to deploy the update and then click Next.
On the Return Codes page, specify how Intune should interpret return codes the update installation generates. Click Next. Finally, click Upload to complete.
After the update is uploaded to Intune, you can approve it using the same method you use to approve other software updates.
Skill 3.3: Manage devices with Microsoft 365 Solution
You can use Microsoft 365 to extend traditional device management beyond the corporate network and into the public Internet. With the cloud-based nature of the Microsoft 365 components, devices will be secure, productive and manageable from any location, with the only specific requirement being an Internet connection. This skill will review the management capabilities of Microsoft 365 and how you can use those capabilities to manage devices in your organization.
This section covers how to:
![]() Provision user accounts
Provision user accounts
![]() Enroll devices
Enroll devices
![]() View and manage all managed devices
View and manage all managed devices
![]() Configure the Microsoft Intune subscriptions
Configure the Microsoft Intune subscriptions
![]() Configure the Microsoft Service Connection Point role
Configure the Microsoft Service Connection Point role
![]() Manage user and computer groups
Manage user and computer groups
![]() Configure monitoring and alerts
Configure monitoring and alerts
![]() Manage policies
Manage policies
![]() Manage remote computers
Manage remote computers
Provision user accounts
Microsoft 365 is a solution that integrates several products providing the combination of Office 365, Windows 10, security, and device management capabilities. With the range of features included, each licensed Microsoft 365 user will be able to be more productive, while at the same time protecting the business from the malicious attacks and potential data loss.
User accounts are an important part of Microsoft 365 functionality. You can control the application of Microsoft 365 management functionality for specific users, depending on how they are configured, and to which groups they belong.
You can add users to Microsoft 365 in several ways including:
![]() Create users manually in the Microsoft 365 Admin Center.
Create users manually in the Microsoft 365 Admin Center.
![]() Synchronize user accounts with Active Directory Domain Services.
Synchronize user accounts with Active Directory Domain Services.
![]() Import users from a comma-separated values (CSV) file.
Import users from a comma-separated values (CSV) file.
Creating users manually
You can create users manually within the Microsoft 365 Admin Center by entering the information about each user. To create a user account in Microsoft 365 Admin Center, perform the following steps:
Sign into Microsoft 365 using https://www.office.com, and click the Admin tile.
On the Admin center Home page, click Add a User in the Users area.
On the New user complete the fields (Display Name and User Name, Product licenses, are required fields) and then click Next.
Click Add.
Synchronizing user accounts with Active Directory Domain Services
Microsoft 365 can integrate with Active Directory Domain Services (AD DS) to provide user account synchronization from AD DS to Microsoft 365. This synchronization process enables you to avoid duplicate account creation and information by leveraging the information already stored in your on-premises Windows Server Active Directory (AD DS), and importing it into Microsoft 365 through the synchronization process. Microsoft 365 uses Azure Active Directory (AAD) to store user information, which can also be used with other Microsoft cloud products such as Microsoft Azure and Office 365.
The primary component required by the synchronization process is the Azure Active Directory (AD) Connect tool, which provides integration between AD DS and AAD. Once configured, Azure AD Connect will synchronize selected AD DS user accounts and information to Microsoft 365. You can synchronize Microsoft 365 with AD DS by using Azure AD Connect in two primary ways:
![]() Azure AD Connect sync Azure Active Directory Connect synchronization services (Azure AD Connect sync) synchronizes identity data between your on-premises environment and Azure AD. Optionally, password information is synchronized from AD to AAD to enable the users to maintain a single user account and password. An alternative to password synchronization is passthrough authentication, where authentication requests are forwarded back to Azure AD Connect on-premises.
Azure AD Connect sync Azure Active Directory Connect synchronization services (Azure AD Connect sync) synchronizes identity data between your on-premises environment and Azure AD. Optionally, password information is synchronized from AD to AAD to enable the users to maintain a single user account and password. An alternative to password synchronization is passthrough authentication, where authentication requests are forwarded back to Azure AD Connect on-premises.
![]() Azure AD Connect and federation This method of synchronization leverages Active Directory Federation Services (ADFS) to provide a single sign-on environment between Azure Active Directory and your on-premises Active Directory Federation Services (AD FS). With federation sign-in, users can sign in to Azure AD based services with their on-premises passwords.
Azure AD Connect and federation This method of synchronization leverages Active Directory Federation Services (ADFS) to provide a single sign-on environment between Azure Active Directory and your on-premises Active Directory Federation Services (AD FS). With federation sign-in, users can sign in to Azure AD based services with their on-premises passwords.
There are many situations in which you do not have Active Directory Domain Services, or you might have access to user information from another source such as another directory service or a human resources database. In these cases, the information from the source can usually be exported to a comma separated value (CSV) file, which can be used to create the users in Microsoft 365.
To import users from a CSV file, perform the following steps:
Sign into Microsoft 365 using https://www.office.com, and click the Admin tile.
On the Admin center Home page, click Add a User in the Users area.
Click Users in the navigation pane.
On the Users page, click New, type Import into the search bar and click the Search icon.
In the results pane, select Import Multiple Users.
In the Import Multiple Users screen click Browse, locate the CSV file you want to use, and optionally click Verify.
After the file has been selected, click Next.
On the Set User Options page, choose whether the users can sign-in the the account, select their geographical location and allocate any product licenses that need to be allocated to the user. (If you do not want to allocate a product license at this time, select the option to Create user without product license).
Click Next.
On the View your results page you can choose to download the import results or email them. Read the warning, that the initial system generated passwords for the new users will be contained in the result reports.
Click Send and close.
Enroll devices into Microsoft 365 Business
When you enroll devices into Microsoft 365 Business, they must be running Windows 10 Pro, version 1703 (Creators Update) or later. If you have any Windows devices running Windows 7 Pro, Windows 8 Pro, or Windows 8.1 Pro, the Microsoft 365 Business subscription entitles you to upgrade them to Windows 10 Pro.
Microsoft 365 Business includes a set of device management capabilities powered by Microsoft Intune, but not the full Intune solution, which is available with the Microsoft 365 Enterprise subscription.
To enroll a brand new device running Windows 10 Pro into Microsoft 365 Business follow these steps:
Go through Windows 10 device setup until you get to the How Would You Like To Set Up? page as shown in Figure 3-11.
Choose Set up for an organization and then enter your username and password for Microsoft 365 Business subscription (the new user account not the tenant admin account.)
Finish Windows 10 device setup.
The device will be registered and connected to your organization’s Azure AD.
You can verify the device is connected to Azure AD by signing into the device and clicking the Windows logo, and then the Settings icon.
In Settings, go to Accounts.
On Your info page, click Access Work Or School.
You should see that the device is Connected to your organization. Click your organization name to expose the buttons Info and Disconnect.
Click on Info to get your synchronization status.
To verify that the device has been upgraded to Windows 10 Business edition, clicking the Windows logo, and type About.
Confirm that the Edition shows Windows 10 Business as highlighted in Figure 3-12.


Even though Microsoft 365 Business does not include the full Intune support or provide a link from the Microsoft 365 Business Admin portal, you do have access to Intune App Protection in the Azure portal. This allows you to view app protection settings for Windows 10, Android, and iOS devices.
To access the Intune App Protection blade follow these steps:
Sign into the Azure portal at https://portal.azure.com with your Microsoft 365 Business admin credentials.
Choose More Services, then type Intune into the filter, selecting Intune App Protection.
Select App Policy.
Enroll devices into Microsoft 365 Enterprise
For larger organizations, with over 300 users and devices, the Microsoft 365 Enterprise solution includes Microsoft Intune for device & app management. Microsoft Intune supports enrollment in a number of different ways, depending on the device being enrolled as described in the section related to enrolling devices into Intune.
When enrolling devices into Microsoft 365 Enterprise, they must be running Windows 10 Enterprise, version 1703 (Creators Update) or later. Devices running an earlier version of Windows, are able to upgrade to Windows 10 Enterprise as part of the Microsoft 365 Enterprise licensing.
If you want to enroll a large number of devices in an enterprise scenario, you can use the Device Enrollment Manager (DEM) account in Microsoft Intune. The DEM is a special account in Microsoft Intune that allows you to enroll up to 1,000 devices (By default standard users can manage and enroll up to five devices). For security reasons, the DEM user should not also be an Intune administrator. Each enrolled device will require a single Intune license.
By default, there is no device enrollment account user present in Microsoft Intune. You can create a device enrollment account by performing the following steps:
In the Azure portal, choose More Services > Monitoring + Management > Intune.
On the Intune blade, choose Device Enrollment, and then under Manage, choose Device Enrollment Managers.
Select Add.
On the Add User blade, enter the username for the DEM user, and select Add. The user is promoted to the DEM role.
Close the Add User blade.
The list of Device Enrollment Managers now contains the new user as shown in Figure 3-13.

View and manage all managed devices
For Microsoft 365 Business subscription administrators, you can manage your enrolled devices directly from the Microsoft 365 Business Admin portal Home screen as shown in Figure 3-14.

On the Microsoft 365 Business Admin portal Home screen, you have tiles available to perform the following tasks related to devices:
![]() Manage Device Policies Including Add policy, Edit policy and Delete policy.
Manage Device Policies Including Add policy, Edit policy and Delete policy.
![]() Manage Device Actions Including Deploy Windows with Autopilot, Remove company data, Factory reset, and Manage Office Deployment.
Manage Device Actions Including Deploy Windows with Autopilot, Remove company data, Factory reset, and Manage Office Deployment.
![]() Perform Windows 10 Upgrade Including Install upgrade, Share the download link, create installation media, and troubleshoot installation.
Perform Windows 10 Upgrade Including Install upgrade, Share the download link, create installation media, and troubleshoot installation.
For Microsoft 365 Enterprise and businesses with a Microsoft Intune subscription managed devices can be viewed from several different pages in either the classic Intune portal or from Intune in the Azure portal.
The Groups page, in the classic Intune console, as shown in Figure 3-15, contains views for devices based on Microsoft Intune group membership. The following default views will provide access to a list of devices that correspond with the definition of that view:
![]() All Devices
All Devices
![]() All Corporate Pre-enrolled devices
All Corporate Pre-enrolled devices

From these views, you can manage and interact with the devices listed, including retire or wipe a device, and perform tasks, such as remotely lock the device.
In the modern Intune portal, in Azure, you can navigate to the devices pane, and view the devices you manage, and perform remote tasks on those devices.
To access the devices workplace perform these steps:
Sign into the Azure portal at https://portal.azure.com.
Choose More Services > Monitoring + Management > Intune.
In Intune, choose Devices.
View information about devices and perform the remote device actions as follows:
 Overview A snapshot of the enrolled devices you can manage. All devices A list of the enrolled devices you manage. Select a device to view device inventory. Azure AD devices A list of the devices registered or joined with Azure Active Directory (AD) as shown in Figure 3-16. Device actions This option provides a history of the remote actions performed on enrolled devices including the action taken, its status, time and who initiated the action.

Configure Microsoft Intune subscriptions
Microsoft Intune subscriptions dictate the capability and number of users that an instance of Microsoft Intune can support. You configure several options for subscription management on the Microsoft 365 Admin center in the Billings section of the Microsoft 365 Admin center.
![]() Subscriptions This page displays the active subscriptions and includes a summary of licenses available and assigned for each subscription. For each subscription, the renewal date (or expiration date for trial subscriptions) is shown. There is also an Add subscription link will redirect you to the Purchase Services page where you can purchase additional licenses.
Subscriptions This page displays the active subscriptions and includes a summary of licenses available and assigned for each subscription. For each subscription, the renewal date (or expiration date for trial subscriptions) is shown. There is also an Add subscription link will redirect you to the Purchase Services page where you can purchase additional licenses.
![]() Bills From the Bills page, you can view bills and charges for your tenant for anytime in the previous 12 months. You can then print or save a PDF copy of the invoice.
Bills From the Bills page, you can view bills and charges for your tenant for anytime in the previous 12 months. You can then print or save a PDF copy of the invoice.
![]() Licenses The Licenses page displays which licenses have been attached to the Microsoft 365 subscription, as shown in Figure 3-17. To add more licenses, you need open the Subscriptions page, then choose the subscription that you want to add licenses to and then the Add/Remove licenses.
Licenses The Licenses page displays which licenses have been attached to the Microsoft 365 subscription, as shown in Figure 3-17. To add more licenses, you need open the Subscriptions page, then choose the subscription that you want to add licenses to and then the Add/Remove licenses.

![]() Purchase Services This page, allows you can purchase additional licenses.
Purchase Services This page, allows you can purchase additional licenses.
![]() Billing notifications Allows you to configure how your billing statement is sent. You can configure each administrator to receive a separate email with the billing statement.
Billing notifications Allows you to configure how your billing statement is sent. You can configure each administrator to receive a separate email with the billing statement.
Configure the Microsoft Service Connection Point role
The System Center Configuration Manager service connection point is a role that allows an instance of System Center Configuration Manager (Current Branch) to use Microsoft Intune as a management point for Configuration tasks.
The Microsoft Intune Connection Point role is installed on System Center Configuration Manager and communicates with the Microsoft Intune service to enable administration for Microsoft Intune managed devices from the System Center Configuration Manager console, thereby extending the scope of your System Center Configuration Manager environment to the Internet.
The service connection point can operate in either online or offline mode:
![]() Online mode The service connection point automatically checks every 24 hours for updates. If updates for your current infrastructure and product version are available these are downloaded and made available in the Configuration Manager console.
Online mode The service connection point automatically checks every 24 hours for updates. If updates for your current infrastructure and product version are available these are downloaded and made available in the Configuration Manager console.
![]() Offline mode You must manually use the Service Connection Tool for System Center Configuration Manager to import available updates.
Offline mode You must manually use the Service Connection Tool for System Center Configuration Manager to import available updates.
To configure the Microsoft Intune Connection Point role in System Center Configuration Manager, perform the following steps:
In the Configuration Manager console, click Administration.
In the Administration workspace, expand Sites, and then click Servers and Site System Roles.
Add the Service connection point role to a new or existing site system server:
New site system server On the Home tab, in the Create group, click Create Site System Server to start the Create Site System Server Wizard. Existing site system server Click the server on which you want to install the service connection point role. On the Home tab, in the Server group, click Add Site System Roles to start the Add Site system Roles Wizard.On the System Role Selection page, select Service connection point, click Next.
Complete the wizard.
Manage user and computer groups
Groups are an important organizational component in Microsoft Intune. You can use groups to group computers or users together into logical units for management and administration tasks in a more effective manner.
By default, Intune groups are now managed as groups in the Azure Active Directory in the Azure Portal. Some of the Intune tasks that work with groups include: Alerts, Software Updates, Endpoint Protection, Policies and Software Management.
Group membership can include users or devices, or other existing groups within Azure AD. Once a group has been created, the membership can consist of assigned members, or dynamically assigned members based on their Azure AD properties.
Users and devices can belong to multiple groups. In Azure Active Directory, you can allocate members by using assigned membership or dynamically:
![]() Criteria Membership These allow you to create advanced rules to enable attribute-based dynamic memberships to include or exclude users or devices as members. These criteria use security groups and other information synchronized from your local Active Directory. When the security group or data that is synchronized changes, the group membership can change.
Criteria Membership These allow you to create advanced rules to enable attribute-based dynamic memberships to include or exclude users or devices as members. These criteria use security groups and other information synchronized from your local Active Directory. When the security group or data that is synchronized changes, the group membership can change.
![]() Assigned Membership These are static rules that explicitly add or exclude user or devices as members. The membership list is static.
Assigned Membership These are static rules that explicitly add or exclude user or devices as members. The membership list is static.
Creating an Assigned User or Device group
To create a group membership using an assigned membership, use these steps:
Sign into the Azure portal at https://portal.azure.com with an account that is a global administrator or a user account administrator.
Choose More Services > Monitoring + Management > Intune.
In Intune, choose Groups.
Select All groups, and select New group.
On the Group blade, add a name and description for the group.
On the membership type drop down box, select Assigned.
Under the Members item, click the > and select members.
Type the name of users, groups or devices and select them to add members.
Select Create on the Group blade to create the group.
Creating a Dynamic User or Device group
To create a group membership using an advanced rule, use these steps:
Sign into the Azure portal at https://portal.azure.com with an account that is a global administrator or a user account administrator.
Choose More Services > Monitoring + Management > Intune.
In Intune, choose Groups.
Select All groups, and select New group.
On the Group blade, choose a name and description for the new group.
Select a membership type of either Dynamic User or Dynamic Device (depending on whether you want to create a rule for users or devices).
Next select Add dynamic query. (You can use the rule builder to build a simple rule, or enter the advanced rule yourself).
After creating the rule, select Add query at the bottom of the blade.
Select Create on the Group blade to create the group.
EXAM TIP
Groups often come up in exam questions as part of a scenario. While the question might not be specifically directed at groups, group membership is typically an important part of the answer. To learn more about groups in Microsoft Azure Active Directory, visit https://docs.microsoft.com/azure/active-directory/active-directory-groups-create-azure-portal.
Configure monitoring and alerts
You can use the classic Microsoft Intune portal to monitor your managed devices. There are two primary ways that you can monitor the status of your Microsoft Intune environment:
![]() Reports You can use reports to monitor the status of devices including software update status, software installed, and certificate compliance.
Reports You can use reports to monitor the status of devices including software update status, software installed, and certificate compliance.
![]() Alerts You can use alerts to provide notifications based on Microsoft Intune events or status parameters.
Alerts You can use alerts to provide notifications based on Microsoft Intune events or status parameters.
Using reports
Reports can provide information about both past and future events in Microsoft Intune, and they can help to forecast future needs and confirm the current state of your environment.
There are several types of reports available in Microsoft Intune as shown in Figure 3-18:
![]() Update reports Shows the software updates that succeeded on computers in your organization, in addition to the updates that failed, are pending updates, or if updates are needed.
Update reports Shows the software updates that succeeded on computers in your organization, in addition to the updates that failed, are pending updates, or if updates are needed.
![]() Detected software reports Shows software installed on computers in your organization and includes the software versions. You can filter the information that displays based on the software publisher and the software category. You can expand the updates in the list to show more detail (such as the computers on which it is installed) by clicking the directional arrow next to the list item.
Detected software reports Shows software installed on computers in your organization and includes the software versions. You can filter the information that displays based on the software publisher and the software category. You can expand the updates in the list to show more detail (such as the computers on which it is installed) by clicking the directional arrow next to the list item.
![]() Computer inventory reports Shows information about managed computers in your organization. Use this report to plan hardware purchases and to understand more about the hardware needs of users in your organization.
Computer inventory reports Shows information about managed computers in your organization. Use this report to plan hardware purchases and to understand more about the hardware needs of users in your organization.
![]() Mobile device inventory reports Shows information about the mobile devices in your organization. You can filter the information that displays based on groups, whether the device is a jailbroken or rooted device, and by operating system.
Mobile device inventory reports Shows information about the mobile devices in your organization. You can filter the information that displays based on groups, whether the device is a jailbroken or rooted device, and by operating system.
![]() License purchase reports Shows the software titles for all licensed software in selected license groups, based on their licensing agreements.
License purchase reports Shows the software titles for all licensed software in selected license groups, based on their licensing agreements.
![]() License installation reports Shows reports that compare installed software on computers in your organization with your current license agreement coverage.
License installation reports Shows reports that compare installed software on computers in your organization with your current license agreement coverage.
![]() Terms and conditions reports Show whether users accepted terms and conditions you deployed, and which version they accepted. You can specify up to 10 users whose acceptance of any terms and conditions that were deployed to them are shown, or show the acceptance status for a particular term deployed to them.
Terms and conditions reports Show whether users accepted terms and conditions you deployed, and which version they accepted. You can specify up to 10 users whose acceptance of any terms and conditions that were deployed to them are shown, or show the acceptance status for a particular term deployed to them.
![]() Noncompliant apps reports Shows information about the users who have apps installed that are not on your lists of compliant appa or on your list of noncompliant apps. Use this report to find users and devices that are not in compliance with your company app policies.
Noncompliant apps reports Shows information about the users who have apps installed that are not on your lists of compliant appa or on your list of noncompliant apps. Use this report to find users and devices that are not in compliance with your company app policies.
![]() Certificate compliance reports Show which certificates have been issued to users and devices through the Network Device Enrollment Service. Use this report to find certificates that are issued, expired, and revoked.
Certificate compliance reports Show which certificates have been issued to users and devices through the Network Device Enrollment Service. Use this report to find certificates that are issued, expired, and revoked.
![]() Device history reports Show a historical log of retire, wipe, and delete actions. Use this report to see who initiated actions on devices in the past.
Device history reports Show a historical log of retire, wipe, and delete actions. Use this report to see who initiated actions on devices in the past.

Once a report has been created, it can be saved, printed or exported. The report criteria can also be loaded from a previously saved report.
Creating a report
To create a report use these steps: In the classic Microsoft Intune administrator console, click the Reports workspace.
Select the report type you want to generate.
On the Create New Report page, accept the default values or customize them to filter the results that will be returned by the report. (For example, you can select that only software published by Microsoft will be displayed in the detected software report).
Click View Report to open the report in a new window.
Using alerts
Alerts provide notification based on Microsoft Intune status events. You can use alerts in several ways in Microsoft Intune:
![]() View all recent alerts to obtain a high-level view of device health.
View all recent alerts to obtain a high-level view of device health.
![]() Identify specific issues that are occurring in your environment with regard to timing, and scope.
Identify specific issues that are occurring in your environment with regard to timing, and scope.
![]() Use filter alerts to target specific events or issues in your environment.
Use filter alerts to target specific events or issues in your environment.
There are several alert categories available in Microsoft Intune including:
![]() Endpoint protection Informs you when computers have malware warnings, are not protected, or have malware that requires action. These alerts also notify you when malware is seen for the first time or has been recently resolved.
Endpoint protection Informs you when computers have malware warnings, are not protected, or have malware that requires action. These alerts also notify you when malware is seen for the first time or has been recently resolved.
![]() Monitoring Informs you when a service is stopped, disk space is too low, or disk fragmentation is high.
Monitoring Informs you when a service is stopped, disk space is too low, or disk fragmentation is high.
![]() Notices Informs you about configuration tasks that need to be performed (such as configuring automatic approvals for updates) and service announcements that display on the Notice Board on the System Overview page.
Notices Informs you about configuration tasks that need to be performed (such as configuring automatic approvals for updates) and service announcements that display on the Notice Board on the System Overview page.
![]() Policy Informs you when a device is unable to apply one or more policy settings.
Policy Informs you when a device is unable to apply one or more policy settings.
![]() Remote Assistance Informs you when a user on a managed computer has initiated a request for remote assistance.
Remote Assistance Informs you when a user on a managed computer has initiated a request for remote assistance.
![]() System Informs you when client deployments have failed. Also contains a sub-category of Mobile Device Management, which informs you when mobile device issues occur, including Exchange connectivity.
System Informs you when client deployments have failed. Also contains a sub-category of Mobile Device Management, which informs you when mobile device issues occur, including Exchange connectivity.
![]() Updates Informs you when specific updates are waiting for approval, such as Security Updates or Critical Updates.
Updates Informs you when specific updates are waiting for approval, such as Security Updates or Critical Updates.
Creating a new notification rule
To create a notification rule use these steps:
In the classic Microsoft Intune administrator console, click the Admin workspace.
Click Alerts and Notifications, click Notification Rules, and then Create New Rule.
In the Create Notification Rule Wizard, enter a Name for the notification rule.
Select the Categories and Severity for the notification rule, and then click Next.
If presented with the Select Device Groups page, select the device groups to which this rule will apply, then click Next.
On the Select Email Recipients page, (if you have previously added a notification recipient), select an email address and then click Save.
Close the wizard.
The rule now appears in the Notification Rules.
Troubleshoot Microsoft Intune
In addition to reports and alerts, the new Intune portal in Azure allows you to access a troubleshooting portal to view user information to address user help requests.
From the troubleshooting portal, Intune shows useful data including:
![]() User status
User status
![]() Assignments
Assignments
![]() Compliance issues
Compliance issues
![]() Device not responding
Device not responding
![]() Device not getting VPN or Wi-Fi settings
Device not getting VPN or Wi-Fi settings
![]() App installation failure
App installation failure
To access and review troubleshooting details for a user, follow these steps:
Sign into the Azure portal.
Choose More Services > Monitoring + Management > Intune.
On the Intune blade, choose Troubleshoot.
Click Select user.
Select a user by typing the name or email address, and click Select.
The troubleshooting information for the user shows in the Troubleshooting blade (Figure 3-19).

Manage policies
You can use Microsoft Intune policies to enforce functionality, compliance, and security related features on enrolled devices. Policies are managed from the Policy workspace in the classic Microsoft Intune and from the Device Compliance blade in the Azure Intune portal. To help understand which portal you should use, consider the guidance:
![]() In the Azure portal, the compliance policies are created separately for each supported platform.
In the Azure portal, the compliance policies are created separately for each supported platform.
![]() In the Intune classic portal, one device compliance policy is common to all supported platforms.
In the Intune classic portal, one device compliance policy is common to all supported platforms.
Exploring classic Intune policies
The Microsoft Intune Policy page is broken down into several sections:
![]() Overview The Overview page provides a dashboard view of current policy status, shortcuts to common policy-related tasks, and links to relevant help topics.
Overview The Overview page provides a dashboard view of current policy status, shortcuts to common policy-related tasks, and links to relevant help topics.
![]() Policy Conflicts This page shows conflicts where Intune policy was not applied according to configuration. Each conflict is listed with relevant details including where and when the conflict occurred.
Policy Conflicts This page shows conflicts where Intune policy was not applied according to configuration. Each conflict is listed with relevant details including where and when the conflict occurred.
![]() Configuration Policies On this page, you can create and manage policies that configure Windows computers and mobile devices. A large portion of Intune policies are configured from this page.
Configuration Policies On this page, you can create and manage policies that configure Windows computers and mobile devices. A large portion of Intune policies are configured from this page.
![]() Compliance Policies The Compliance Policies page provides the ability to create and manage policies related to compliant devices and enforcing compliance.
Compliance Policies The Compliance Policies page provides the ability to create and manage policies related to compliant devices and enforcing compliance.
![]() Conditional Access On this page, you can control access to Microsoft Exchange, Exchange Online and SharePoint Online for managed devices.
Conditional Access On this page, you can control access to Microsoft Exchange, Exchange Online and SharePoint Online for managed devices.
![]() Corporate Device Enrollment On this page, you can create a device enrollment profile to enable enrollment for iOS based devices.
Corporate Device Enrollment On this page, you can create a device enrollment profile to enable enrollment for iOS based devices.
![]() Terms and Conditions On this page, you can create policies to explain how enrollment, access to work resources, and how using the company portal affect devices and users. Users must accept the terms and conditions before they can use the company portal to enroll and access their work resources.
Terms and Conditions On this page, you can create policies to explain how enrollment, access to work resources, and how using the company portal affect devices and users. Users must accept the terms and conditions before they can use the company portal to enroll and access their work resources.
EXAM TIP
Microsoft Intune policies feature similar functionality and some of the same settings as Group Policy. In the case of a settings conflict between Intune policy and Group Policy, Group Policy takes precedence and will be applied instead of the Intune policy.
Configuring Microsoft Intune policies in the Azure Portal
You need to be comfortable with creating policies in both the classic Intune portal and the Azure portal. Unlike the classic portal, when you create a policy in the Azure portal, the process is wizard driven and only the options that are applicable for the platform, setting, or policy are made available in the wizard.
To create a device compliance policy in the Azure portal, follow these steps:
Sign into the Azure portal at https://portal.azure.com with an account that is a global administrator or a user account administrator.
Choose More Services > Monitoring + Management > Intune.
In Intune, choose Device compliance.
In the Device compliance blade, under Manage, choose Create Policy.
Type a name, description and choose the platform that you want this policy to apply to.
Click the Settings and then choose the compliance requirements required. Depending on which platform you choose, you can specify various options that may include Email, Device Health, Device Properties and System Security settings.
When you are done, choose Ok.
On the Create Policy blade, click Create.
DEPLOY A POLICY
The newly created policy will not provide any functionality until it is deployed to a Group. Follow these steps to assign a device compliance policy to a group:
In Intune, choose the Device compliance blade.
In the Device compliance blade, select Policies and on the policy blade select the policy you want to assign.
The policy blade appears. Click Assignments to open the Assignments blade.
Select the groups to include or exclude.
In the Azure AD Groups, type the name of the group required.
Select the groups from the list and click Select.
Click Save, and close the blade.
On the Policies blade, notice that the policy now shows that it is assigned.
After assignment is complete, you can make changes to the policy configuration by selecting the policy, choosing properties, and then modifying the settings and actions.
Manage remote computers
You can use Microsoft Intune to manage several aspects of functionality for managed computers. The user interface for these actions is found where one or more devices is listed.
You can manage devices from Intune using these interfaces:
![]() Classic Intune Admin portal: Groups Workspace - Devices
Classic Intune Admin portal: Groups Workspace - Devices
![]() Intune Azure portal: All Devices Workspace
Intune Azure portal: All Devices Workspace
![]() Microsoft 365 Business home page
Microsoft 365 Business home page
Not all of the following actions are available on all device types or platforms. These actions are determined by the device platform, and the configuration of the device, and also by the MDM and vendor.
![]() Remote Lock Lock supported devices, even if you do not have the device in your possession.
Remote Lock Lock supported devices, even if you do not have the device in your possession.
![]() Reset passcode Force the end user to reset the passcode on supported devices.
Reset passcode Force the end user to reset the passcode on supported devices.
![]() Sync Force the selected device to immediately check in with Intune and receive any pending actions or policies that have been assigned to it.
Sync Force the selected device to immediately check in with Intune and receive any pending actions or policies that have been assigned to it.
![]() Retire/Wipe When you choose this option, you are given two options:
Retire/Wipe When you choose this option, you are given two options:
![]() Selective Wipe / Remove Company Data This option removes only company data managed by Intune, leaving personal data intact. The type of company data removed varies by platform and includes profiles, applications, policies and the Intune Endpoint Protection software.
Selective Wipe / Remove Company Data This option removes only company data managed by Intune, leaving personal data intact. The type of company data removed varies by platform and includes profiles, applications, policies and the Intune Endpoint Protection software.
![]() Full Wipe/Factory Reset This option wipes the device and return it to its factory default settings by removing all data, including user personal data, from the device.
Full Wipe/Factory Reset This option wipes the device and return it to its factory default settings by removing all data, including user personal data, from the device.
![]() Delete This command removes the device from Microsoft Intune, but does not modify device settings or software.
Delete This command removes the device from Microsoft Intune, but does not modify device settings or software.
![]() Run A Full Malware Scan This command runs a full malware scan by using Microsoft Intune Endpoint Protection on the selected device.
Run A Full Malware Scan This command runs a full malware scan by using Microsoft Intune Endpoint Protection on the selected device.
![]() Run A Quick Malware Scan This command runs a quick malware scan by using Microsoft Intune Endpoint Protection on the selected device.
Run A Quick Malware Scan This command runs a quick malware scan by using Microsoft Intune Endpoint Protection on the selected device.
![]() Restart Computer This command restarts the remote device.
Restart Computer This command restarts the remote device.
![]() Fresh start Removes any apps that were installed on a Windows 10 PC running the Creators Update (version 1703) or later, then updates the PC to the latest version of Windows. After Fresh start, devices are unenrolled from Intune.
Fresh start Removes any apps that were installed on a Windows 10 PC running the Creators Update (version 1703) or later, then updates the PC to the latest version of Windows. After Fresh start, devices are unenrolled from Intune.
![]() Update Malware Definitions This command initiates an update of malware definitions for the Microsoft Intune Endpoint Protection client.
Update Malware Definitions This command initiates an update of malware definitions for the Microsoft Intune Endpoint Protection client.
![]() Refresh Policies This command requests a manual refresh of the client policies from the Microsoft Intune site.
Refresh Policies This command requests a manual refresh of the client policies from the Microsoft Intune site.
![]() Refresh Inventory This command requests updated inventory information to be sent from the device to Microsoft Intune.
Refresh Inventory This command requests updated inventory information to be sent from the device to Microsoft Intune.
![]() Remote Assistance Session Use the TeamViewer software to give remote assistance to your users who are running the Intune software client.
Remote Assistance Session Use the TeamViewer software to give remote assistance to your users who are running the Intune software client.
Skill 3.4: Configure information protection
Regardless of business size and industry, all companies have data that they consider sensitive. Microsoft aims to protect your corporate data from being lost, stolen, or getting into the wrong hands with their Information Protection solutions built into Office 365, Windows, Azure, and across the Microsoft Cloud.
Information protection is a huge issue for many enterprises, and some are bound by law and regulations, which stipulate how data should be protected and for how long it must be safeguarded before secure deletion. Let’s examine new solutions from Microsoft and see how they can be configured and deployed to protect your data.
This section covers how to:
![]() Manage and configure Office 365 Data Loss Prevention
Manage and configure Office 365 Data Loss Prevention
![]() Windows Information Protection and BitLocker
Windows Information Protection and BitLocker
![]() Azure Information Protection
Azure Information Protection
![]() Microsoft Cloud App Security
Microsoft Cloud App Security
![]() Office 365 Advanced Security Management
Office 365 Advanced Security Management
Manage and configure Office 365 Data Loss Prevention
Office 365 offers businesses an integrated solution with many popular features such as email, Office, SharePoint and OneDrive for Business. Yet hidden away is a full data protection suite which allows businesses to comply with industry regulations and laws that require organizations to protect sensitive information, such as personally identifiable information (PII), and prevent its inadvertent disclosure. Leaks of sensitive information can have huge negative impact on businesses. This can include sizable fines and lost goodwill.
Following the Health Insurance Portability and Accountability Act (HIPAA) in the USA, which aims to ensure protection for individually identifiable health data, officers in charge of running the business that lose PII can be jailed for not ensuring adequate safeguards are in place.
With a data loss prevention (DLP) policy in place using the Office 365 Security & Compliance Center, you can identify, monitor, and automatically protect sensitive information across the Office 365 suite of products. This includes Exchange Online, SharePoint Online, and OneDrive for Business.
A DLP policy can help in the following ways:
![]() Identify sensitive information in Exchange Online, SharePoint Online, and OneDrive for Business.
Identify sensitive information in Exchange Online, SharePoint Online, and OneDrive for Business.
![]() Prevent the accidental sharing of sensitive information.
Prevent the accidental sharing of sensitive information.
![]() Monitor and protect sensitive information in Office 2016 – Word, Excel, and PowerPoint.
Monitor and protect sensitive information in Office 2016 – Word, Excel, and PowerPoint.
![]() Help train users to stay compliant with their work.
Help train users to stay compliant with their work.
![]() View DLP compliant reports.
View DLP compliant reports.
With Office 365, you can create and manage DLP policies in the Security & Compliance Center.
A DLP policy can be configured on one of the Office 365 locations mentioned above, and then you need to establish rules that will protect the content. These are comprised of:
![]() Conditions The content monitored by the DLP must match the conditions in place for the rule to be enforced.
Conditions The content monitored by the DLP must match the conditions in place for the rule to be enforced.
![]() Actions These are the actions that you want the rule to take when the conditions are met. For example, the action could block access to the document and send an email notification to the compliance team.
Actions These are the actions that you want the rule to take when the conditions are met. For example, the action could block access to the document and send an email notification to the compliance team.
Office 365 includes over 40 ready-to-use templates containing rules that you can use or customize to meet your organization’s compliance requirements.
There are DLP policy templates that can be used to help with the compliance requirements for the following industry regulations and legislations:
![]() Gramm-Leach-Bliley Act (GLBA)
Gramm-Leach-Bliley Act (GLBA)
![]() Payment Card Industry Data Security Standard (PCI-DSS)
Payment Card Industry Data Security Standard (PCI-DSS)
![]() United States Personally Identifiable Information (U.S. PII)
United States Personally Identifiable Information (U.S. PII)
![]() United States Health Insurance Act (HIPAA)
United States Health Insurance Act (HIPAA)
Create a DLP policy from a template
To create a DLP policy from a template follow these steps:
Sign in to Office 365 at https://office.com and click the Security & Compliance tile. (Alternatively sign in directly at https://protection.office.com.)
The homepage of the Office 365 Security & Compliance Center appears, as shown in Figure 3-20.
On the Security & Compliance Center homepage, click Data loss prevention.
Click Policy and then click +Create a policy.
Choose one of the DLP policy templates–we will click Privacy template covering U.S. Personally Identifiable Information (PII) Data, as shown in Figure 3-21, and then click Next.
Provide the policy a name and click Next.
Choose the locations that you want the DLP policy to protect. We will choose Let Me Choose Specific Locations and click Next.
On the Choose Locations page, you can fine tune the locations, accounts, and sites. Click Next.
On the Policy settings page view the options to customize the type of content that the U.S. PII Data template looks for and then click Next. (You can modify the rule conditions and actions by clicking the Advanced option on the Policy settings page).
On the What Do You Want To Do If We Detect Sensitive Info? Page, review the options and then click Next.
On the next page, there are three options. Choose whether to turn on the rule, test it out first, or leave the rules disabled and click Next.
Review your settings for this policy and then click Create.
Click Close.


Depending on the size of your organization, you should consider rolling your DLP policies out gradually to assess their impact and test their effectiveness. A DLP policy can unintentionally block access to documents that staff require for their daily work. It is therefore recommended that you initially pilot the deployment of DLP policies, and initially limit the location and scope.
Once the initial test deployment is successful, you can roll them out to a wider audience. Throughout the process you should monitor the DLP reports, the incident reports, and any notifications to make sure that the results are what you intend.
Windows Information Protection and BitLocker
Built into Windows 10, are tools that allow businesses to protect data, contain data, and prevent data leakage when it is both shared internally and externally outside of an organization. The key pillars of information protection are shown in Figure 3-22.
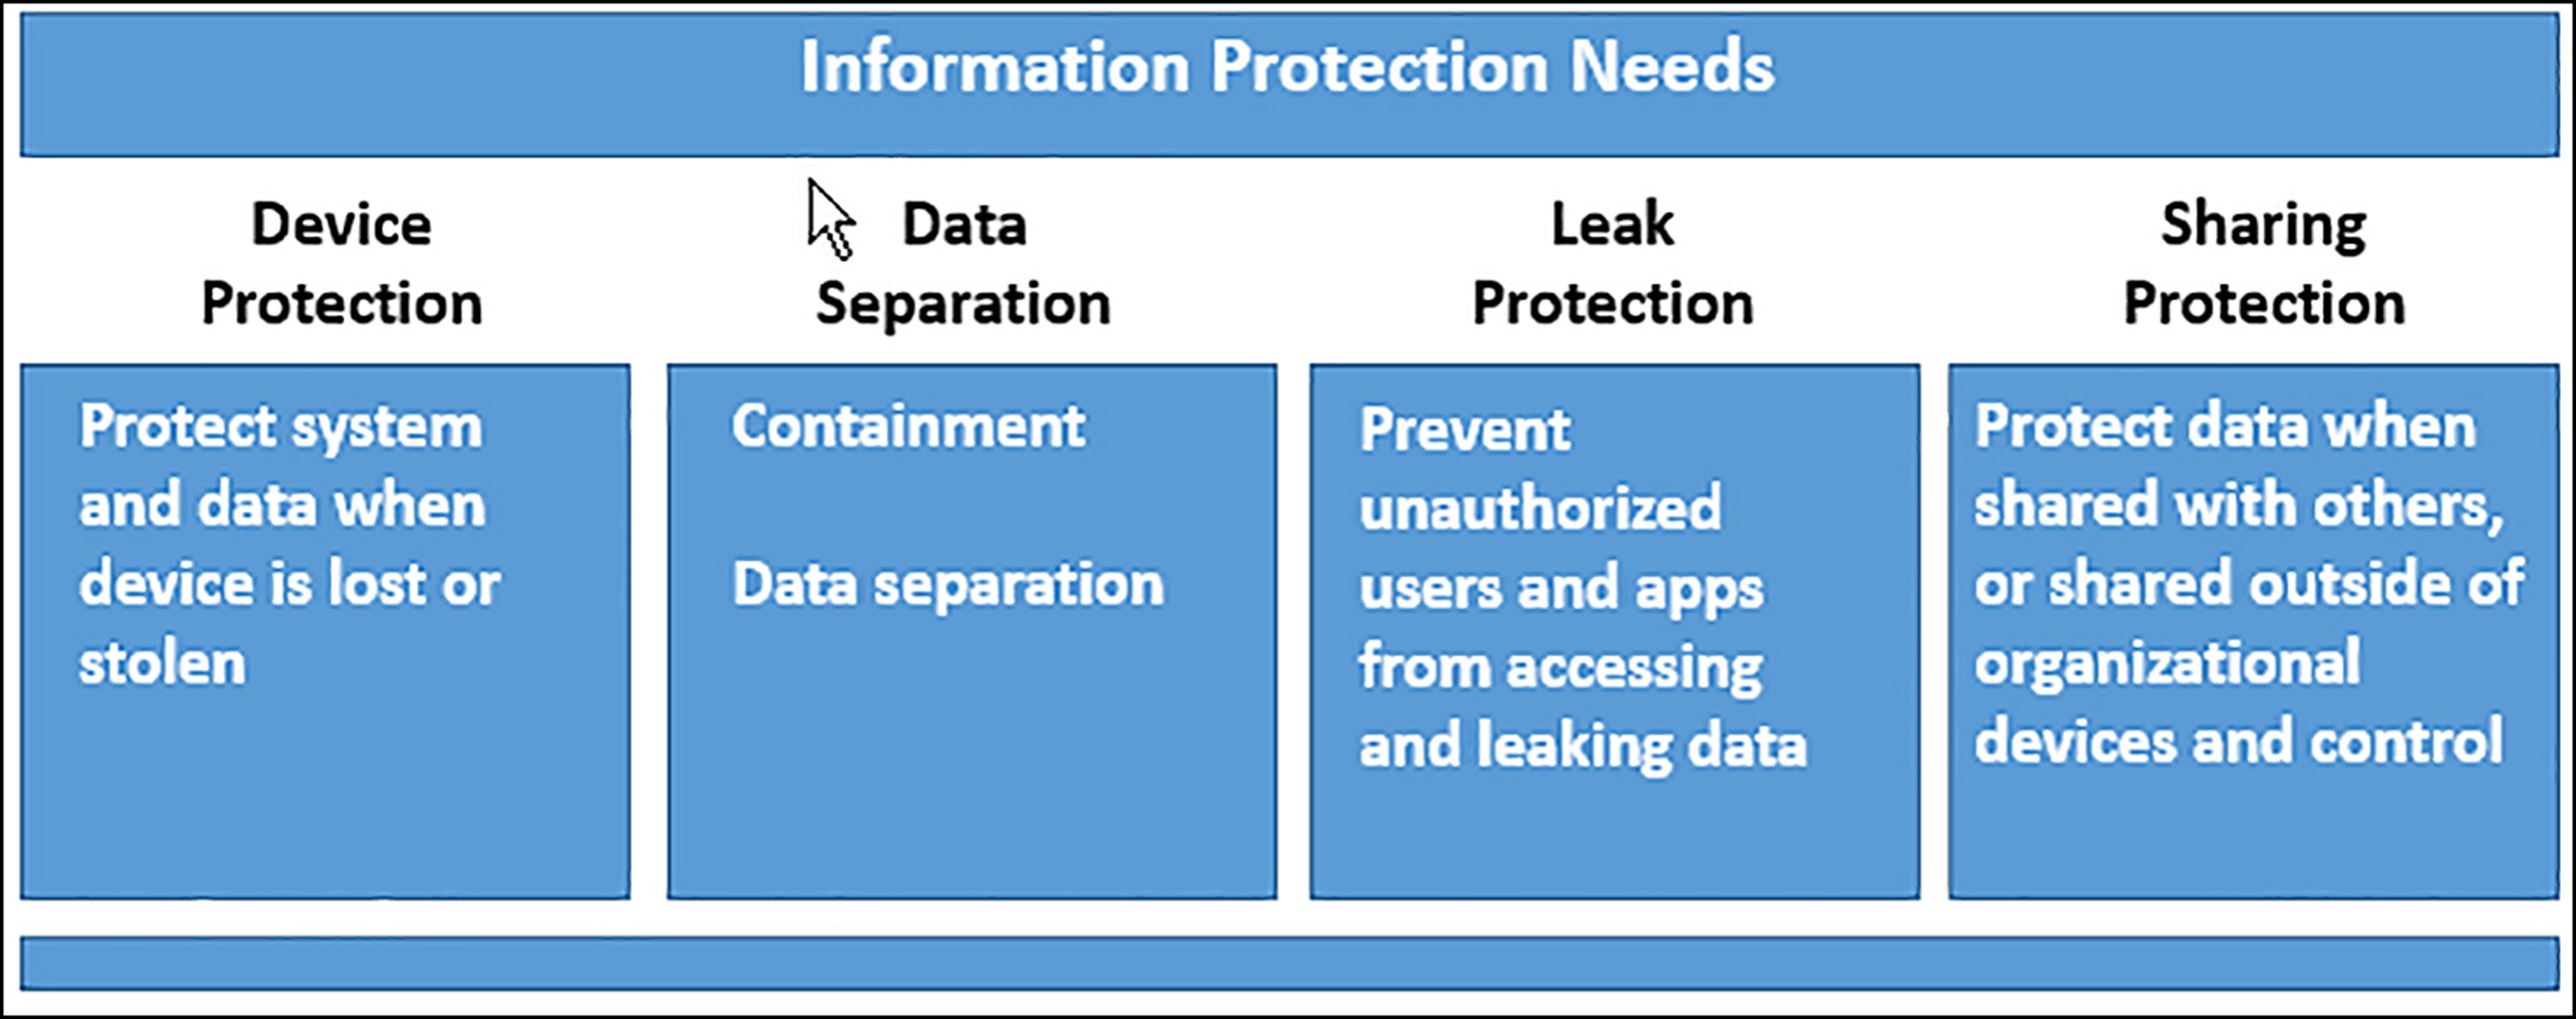
Windows Information Protection is the inclusion of many of the above needs, being incorporated directly into the information protection stack within Windows.
Windows 10 caters for Device Protection with BitLocker, which protects your data while it’s at rest on the device, even if the device is lost or stolen. If the hard drive is removed from the device, all data is encrypted and unreadable.
The separation of data allows for administrators to identify personal vs. corporate data. As you’ve seen with Microsoft Intune, it is possible to contain data into these categories and securely wipe business data from a device remotely on demand. This is also possible within the operating system by having the Windows 10 Anniversary Update installed.
Next, Windows 10 contains capabilities to prevent business data from leaking out of the organization. For example, you can post data from a corporate Word document to a non-corporate location such as Facebook or Twitter. Make sure that only authorized apps have access to business data, employing copy and paste restrictions where needed.
The last pillar requirement is to help ensure that business data can be shared with others within and outside of their organization in a secure way. For example, corporate documents can be emailed to authorized colleagues, with controls on who can view or edit the document, with the ability to revoke permissions as needed.
If you use Microsoft 365, or Microsoft Intune, there are policies available within your MDM or System Center Configuration Manager to configure WIP remotely. An example of WIP in action using Intune is to enforce a Windows 10 device compliance policy to require that BitLocker is used, and reported through the Windows Health Attestation Service.
Create a WIP policy within Intune
If you use Intune in your organization, you can create a WIP-specific policy through the Azure portal. To create a WIP policy use these steps:
Sign into the Azure portal at https://portal.azure.com with an account that is a global administrator or a user account administrator.
Choose More Services > Monitoring + Management > Intune.
In Intune, choose Mobile Apps.
In the Mobile Apps blade, under manage, click the App protection policies.
Choose Add A Policy.
Enter the following values:
Name Type a name for your new policy. Description Type an optional description. Platform From the drop down, select Windows 10. Enrollment state Choose without enrollment.Click the Allowed apps, and then choose Add apps. The Add apps blade opens, showing you all apps that are currently available that are allowed to access your enterprise data.
Select Microsoft Edge and click OK twice.
Click the Configure Required Settings. Here you will apply a protection mode as shown in Figure 3-23. Choose Silent or Allow Overrides if this is a pilot or test, because this setting will permit WIP breaches. If you want to enforce WIP, change the setting to Hide Overrides.
Choose whether you want to pin to dashboard, and click OK.
Choose Create.

To deploy the policy to Windows 10 devices running the Creators Update and later, open the policy and assign it to AAD user groups.
BitLocker
BitLocker Drive Encryption has improved consistently since the version that shipped with Windows Vista, and it is now widely adopted and highly regarded in the marketplace. Businesses have usage rights to BitLocker with the Windows 10 Pro, Education, and Enterprise SKUs. For consumers running Windows 10 Home, their devices use Device Encryption, which offers the same level of encryption and data protection, but without access to the BitLocker Drive Encryption Tools and management tools.
BitLocker is simple to provision, with or without a Trusted Platform Module (TPM) chip, and most Microsoft own brand devices since Surface 3, includes device encryption as soon as a user signs into the device with administrative privileges right out of the box.
BitLocker has developed management tools including Microsoft BitLocker Administration and Monitoring (MBAM) for enterprises, which allows administrators to provision at scale, monitor and report on compliance, and provide user and help desk capabilities for helping recovery scenarios.
If devices contain a TPM chip, they can securely run BitLocker without the need for a PIN (password) or USB drive, which allows them to harness pre-boot authentication and SSO, making encryption more streamlined for users.
You will learn more about BitLocker in Chapter 5 covering configuring storage.
Azure Information Protection
Azure Information Protection continues the protection of information by helping classify, label, and protect documents and emails. Because this uses Azure, it is a cloud-based solution that requires no on premise infrastructure. The technology uses Azure Rights Management (Azure RMS), which allows administrators to define rules and conditions that then automatically add classification to the data, or users can manually add the classification to their files.
Organizations with one of the following Office 365 subscriptions include Azure RMS:
![]() Office 365 Enterprise E3, E4 or E5
Office 365 Enterprise E3, E4 or E5
![]() Office 365 Education A3, A4, or A5
Office 365 Education A3, A4, or A5
![]() Office 365 Government G3 or G4
Office 365 Government G3 or G4
Administrators can track and control classified content and how it is used. This includes monitoring data flows, tracking access to documents, and preventing data leakage or misuse.
The labels in Azure Information Protection are not the same as the labels available in Office 365 Security & Compliance. AIP labels let you apply classification and protection policy for documents and emails. The Office 365 Security & Compliance labels are used to classify documents and emails for auditing and retention purposes within Office 365 services.
Documents and emails use labels to apply classification, which stays with the resources at all times, regardless of where the data is stored or if it is shared. The labels are visible to the user. Metadata embedded into the files and email headers is stored in clear text which ensures that other services, such as data loss prevention solutions, can view the classification and take appropriate action.
With the technology being cloud-based, it is integrated with Office 365 and Azure Active Directory. Developers and software vendors can use the Graph APIs to extend Azure RMS to work with 3rd party information protection solutions both on-premises, or in the cloud.
The Azure information protection solution keeps you in control of your data by using encryption, identity, and authorization policies. There are default templates within the Azure Rights Management service that you can use to restrict data access to users within your organization.
Configure Azure Information Protection
In order to use or evaluate Azure Information Protection, you need the following prerequisites:
![]() A subscription that includes Azure Information Protection.
A subscription that includes Azure Information Protection.
![]() A global administrator account or security administrator account to sign in to the Azure portal and configure the Azure Information Protection policy.
A global administrator account or security administrator account to sign in to the Azure portal and configure the Azure Information Protection policy.
![]() A computer running Windows (minimum of Windows 7 with Service Pack 1), with Office installed.
A computer running Windows (minimum of Windows 7 with Service Pack 1), with Office installed.
Activate the Azure Rights Management service
The first stage in configuring Azure Information Protection is to activate the Azure Rights Management service by using the following steps:
Sign in to the Azure portal as a global admin or security admin at https://portal.azure.com.
On the Azure hub menu, click +New, and then, from the Marketplace list, select Security + Identity and select Azure Information Protection from the list on the right side.
On the Azure Information Protection blade, click Create.
The information on the Quick start page appears.
On the Azure Information Protection blade, select Protection activation.
On the Protection activation select Activate.
Explore Azure Information Protection policies
Azure Information Protection comes with a default policy called Global Policy that you can use without modification, or you can customize. Let’s take a look at the default policy.
On the Azure Information Protection blade, select the Global Policy item.
Review the information and expand the confidential label displayed on the Global Policy blade as shown in Figure 3-24.
To set the default label and prompt the user for justification when setting a lower classification label, select the General label and ensure that the label is enabled. .
Toggle the Users Must Provide Justification To Set A Lower Classification label, Remove A Label, Or Remove Protection option to On.
You should explore the policy further, creating a new label for protection, visual markers, and create a condition to prompt the user for classification.
If you have made any changes, click Save.
In order for the policy to be available to users, it needs to be published. Click Publish, and click Yes to confirm.

Install the Azure Information Protection client
Earlier in the Windows Information Protection and BitLocker section, we discovered that Windows 10 has the WIP framework built into the operating system. When you install the Azure Information Protection client, Windows will communicate to Azure and display the labels in Office applications.
To install the Azure Information Protection client, follows these steps:
On the client PC, ensure that Office has been installed, and that the user has signed into the Office application.
Quit all running Office apps and download the Azure Information Protection client (AzInfoProtection.exe), from the Microsoft download center at https://www.microsoft.com/download/details.aspx?id=53018.
Run the Azure Information Protection client and follow the prompts to install the client.
Open Word and create a new, blank document.
You should see a Congratulations page with basic instructions. Read the instructions and then click Close.
After the new document loads, you should see on the Home tab a new Protection group, a Protect button. , and a new bar under the ribbon. This is the Information Protection bar, which displays the labels that you saw in the Azure portal as shown in Figure 3-25.

Create documents and protect them using Azure Information Protection to see how labeling works. Try other settings using Excel, PowerPoint, and Outlook, which support Azure Information Protection.
Microsoft Cloud App Security
You have seen how Microsoft provides information security for Windows 10 and your data through WIP and Azure RMS. This level of control and protection can also be provisioned for your cloud based apps, allowing you to protect critical data across cloud applications.
The Cloud App Security (CAS) framework consists of three layers that include:
![]() Cloud Discovery This layer is concerned with the discovery of the cloud usage within your organization.
Cloud Discovery This layer is concerned with the discovery of the cloud usage within your organization.
![]() Data Protection This allows you to monitor and control your cloud data by establishing visibility, enforcing data loss prevention (DLP) policies, alerting and investigating data.
Data Protection This allows you to monitor and control your cloud data by establishing visibility, enforcing data loss prevention (DLP) policies, alerting and investigating data.
![]() Threat Protection Once you have visibility, you need to look for and detect abnormal use and identify any security incidents. This layer uses behavioral analytics and advanced investigation tools to intelligently identify threats and mitigate risk. By tuning the threat protection, you can reduce the disruption caused by false positives and any performance burden over network cloud traffic.
Threat Protection Once you have visibility, you need to look for and detect abnormal use and identify any security incidents. This layer uses behavioral analytics and advanced investigation tools to intelligently identify threats and mitigate risk. By tuning the threat protection, you can reduce the disruption caused by false positives and any performance burden over network cloud traffic.
Software vendors and developers can integrate their apps within the Cloud App Security framework by using ready-made app connectors and APIs. Administrators can sanction or deny access to apps in your cloud. At the time of writing this book, Microsoft has a catalog of over 15,000 cloud apps that can be integrated using the service.
You saw earlier how legislation and industry standards are involved in data protection. Cloud App Security is officially certified with Microsoft Compliance for ISO, HIPAA, CSA STAR, and EU model clauses. Additional certifications and compliance can be sought as they are developed.
An example of how to use Cloud App Security, even if your organization does not use cloud apps, is to upload your firewall traffic logs to the CAS service and allow CAS to scan and discover unapproved apps, and activity. Data passing through the Cloud App Security service is not retained or stored by Microsoft, although metadata, alerts and activity logs are retained for up to six months. All data is scanned using a sophisticated heuristic anomaly detection engine that corresponds to your security policy.
Explore Microsoft Cloud App Security
To access and explore the Cloud App Security service, use the following steps:
If you have a license to use Cloud App Security, navigate to https://portal.cloudappsecurity.com.
If you have a Microsoft 365 Enterprise or Office 365 Enterprise E5 subscription, you can access the portal by using the Office 365 Admin center at https://office.com, then click the Admin tile, and click the Cloud App Security within the list of Admin centers.
To set up Cloud Discovery, upload traffic logs from your firewall to Cloud App Security, as follows:
Click the Settings Cog in the top right corner.
Select Cloud Discovery settings.
Choose Upload log automatically.
On the Data sources tab, click Add data source and then upload your firewall traffic logs.
On the Log collectors tab, configure the log collector.
The General dashboard will display activities being monitored, any discovered issues or actions taken, along with alerts that are under investigation. Review the information contained in the Cloud App Security general dashboard shown in Figure 3-26.

The alerts center gathers alerts from a wide variety of categories, including threat detection, privileged accounts and compliance violations.
The alerts center is displayed by clicking on the Alerts menu item. This center gathers all of the red flag items identified by Cloud App Security as shown in Figure 3-27. You can see that a user has triggered an anomaly alert by downloading a large amount of data. You can click on each alert and drill down to look at the activity log details for the activity. The alert can then be dismissed, marked as unread, or used to adjust the CAS policy.

Office 365 Cloud App Security
Office 365 Advanced Security Management has been renamed to Office 365 Cloud App Security and features a subset of the features available within the Microsoft Cloud App Security, which you saw in the previous section. The main differences between the Office 365 version of the Cloud App Security is scope and scale.
Microsoft Cloud App Security is available for organizations as a standalone subscription or as part of an enterprise Office 365 subscription.
The Office 365 Cloud App Security will provide insight into suspicious activity within your Office 365 subscription only and can help with all of the following areas:
![]() View how your organization’s data stored in Office 365 is accessed and used.
View how your organization’s data stored in Office 365 is accessed and used.
![]() Create policies that trigger alerts for typical or suspicious activities.
Create policies that trigger alerts for typical or suspicious activities.
![]() Suspend user accounts exhibiting suspicious activity.
Suspend user accounts exhibiting suspicious activity.
![]() Require users to sign in to Office 365 apps after an alert has been triggered.
Require users to sign in to Office 365 apps after an alert has been triggered.
View the Office 365 Cloud App Security portal
If you have an Office 365 Enterprise E5 subscription, or E5 trial, you can perform the following steps to open the Office 365 Cloud App Security portal:
Open https://protection.office.com and sign in a global or security administrator.
The Security & Compliance Center is displayed.
Click Alerts in the navigation sidebar.
Click Manage advanced alerts to display the landing page, which allows you to turn on Office 365 Cloud App Security as shown in Figure 3-28.
Select the checkbox to turn on Office 365 Cloud App Security, and then click the Go to Office 365 Cloud App Security button.
The Cloud App Security homepage now appears.
If your firewall logs or data source is supported and you have already connected them to Office 365 Cloud App Security, you can now view the analysis results.
Click the Discover menu item and select Cloud Discovery Dashboard, which shows information about cloud app usage within your organization, which is based on firewall logs that you upload. The cloud service analyzes the data and presents a dashboard view similar to the one shown in Figure 3-29. You can view information about apps, users, traffic, transactions, and more.
In addition to the Cloud Discovery Dashboard, you should review the Activity Logs and App permissions, by selecting the Investigate Menu item, followed by Activity log or App Permissions.
There are dozens of readymade cloud management policy templates that you can use that trigger alerts for specific activities that happen or happen too frequently. Click the Control menu item and then click Templates.
Finally, the Alerts dashboard allows you to react to anomaly detection policies and activity policies. To view alerts for your subscription, choose Alerts in the Navigation menu.


Thought experiments
In these thought experiments, demonstrate your skills and knowledge of the topics covered in this chapter. You can find the answers to these thought experiments in the next section.
Scenario 1
Your organization has 500 employees and has implemented a bring your own device (BYOD) strategy that enables users to use their personal mobile phones and tablets for corporate purposes, as long as they comply with company policy regarding security and management features. After consulting an employee survey, you find that the users in your organization have either iOS, Android, or Windows Phone devices.
You have been asked to provide two aspects of functionality for the users in your organization: Ensure that devices can be managed and monitored centrally by IT staff, and provide a method for users to access files on company file servers.
What technology should you use to manage the devices?
What can you use to give the users access to their data on all of the platforms listed above?
What additional configuration or requirements are necessary for company file servers?
Scenario 2
You are responsible for managing software updates for remote clients at Contoso. All remote clients use the Windows 10 operating system and run the same suite of third-party applications. You want to ensure that any security and critical updates are deployed as soon as possible. You will review other updates before deciding to deploy them. With this information in mind, answer the following questions:
What subscription service would you recommend for remote management of the devices?
How can you ensure that Windows 10 security and critical updates are installed as soon as possible?
What steps must you take to deploy updates for the suite of third-party applications?
Scenario 3
You have been asked to provide a method for configuration of one hundred Windows 8.1 laptop computers in your organization. These laptops are used by travelling sales representatives who connect to the Internet and run a custom-developed sales web app. They are very rarely connected to the corporate intranet. You are required to ensure that the sales representatives’ laptops have Windows Firewall enabled, and that future changes to the required policy happen as soon as possible.
What would be the most effective way to apply this policy?
What policy template should be used?
If the company wanted to subscribe to Microsoft 365 Business, what is the edition of Windows 10 required, and how could the company acquire it?
Scenario 4
You have recently started work at a healthcare enterprise that is regulated by the HIPPA. You need to ensure that all of the data is protected from data theft when at rest, and from data leakage when patient files are shared by staff. The enterprise uses Windows 10 for all employees and you understand that they are very trustworthy.
What versions of Windows 10 supports fully encrypting the hard drive?
What technology do you recommend to protect from data theft when at rest?
What cloud based subscription technology would you recommend to protect against data leakage relating to files being shared by staff?
Thought experiment answer
This section provides the solutions for the tasks included in the thought experiment.
Scenario 1
Microsoft Intune with Mobile Device Management enabled.
Work Folders. OneDrive for Business would not provide access to files on the company file servers.
File servers must be Windows Server 2012 R2 or later and have the Work Folders feature enabled.
Scenario 2
Microsoft Intune.
Create an automatic approval rule that approves all critical and security updates for computers running Windows 10.
Import third-party updates into Intune and then approve them for distribution.
Scenario 3
Microsoft Intune would work very well for deploying this policy. Microsoft Intune contains policy settings that enable control of Windows Firewall, and the policy settings will be applied whenever the clients are connected to the intranet, so policy changes will apply quickly.
You should use the General Configuration (Windows 8.1 and later) policy to enable this configuration.
For Microsoft 365 Business, you need to use Windows 10 Pro. A Microsoft 365 Business subscription provides licenses for Windows 10 Pro, version 1703 (Creators Update) therefore uses could perform an in-place upgrade to Windows 10.
Scenario 4
Windows 10 Pro, Education and Enterprise editions support BitLocker Drive Encryption. Windows 10 Home edition supports Device Encryption, but this is not licensed for business use and lacks management features.
BitLocker Drive Encryption
Azure Information Protection
Chapter summary
![]() You can use Work Folders and Sync Center to support mobile data access in Windows 10.
You can use Work Folders and Sync Center to support mobile data access in Windows 10.
![]() Broadband Wi-Fi hotspots and tethered connections can be used to provide network access in Windows 10. These connections can be configured to support metered services and reduced data usage over a metered service.
Broadband Wi-Fi hotspots and tethered connections can be used to provide network access in Windows 10. These connections can be configured to support metered services and reduced data usage over a metered service.
![]() Mobile Device Management in Microsoft Intune can allow administrators to remotely manage devices on several different platforms without requiring corporate network connectivity.
Mobile Device Management in Microsoft Intune can allow administrators to remotely manage devices on several different platforms without requiring corporate network connectivity.
![]() You can use the Microsoft Intune Updates page to view available and required updates. You can also generate reports to obtain more specific information about Microsoft Intune updates.
You can use the Microsoft Intune Updates page to view available and required updates. You can also generate reports to obtain more specific information about Microsoft Intune updates.
![]() You can use Microsoft Intune to approve or decline updates for groups of managed devices.
You can use Microsoft Intune to approve or decline updates for groups of managed devices.
![]() You can configure automatic approval for updates through the Microsoft Intune console
You can configure automatic approval for updates through the Microsoft Intune console
![]() Microsoft Intune allows for deployment of third-party updates in MSI, MSP, or EXE format.
Microsoft Intune allows for deployment of third-party updates in MSI, MSP, or EXE format.
![]() You use user accounts in Microsoft Intune to deploy software, policies and group devices in the environment.
You use user accounts in Microsoft Intune to deploy software, policies and group devices in the environment.
![]() When you enroll devices, they are manageable by Microsoft Intune.
When you enroll devices, they are manageable by Microsoft Intune.
![]() Microsoft Intune has several different views available to see and interact with the devices in your environment.
Microsoft Intune has several different views available to see and interact with the devices in your environment.
![]() Microsoft Intune subscriptions govern the functionality and the number of users that can be created in Microsoft Intune.
Microsoft Intune subscriptions govern the functionality and the number of users that can be created in Microsoft Intune.
![]() The Microsoft Intune connector site is configured in System Center 2012 Configuration Manager to provide integration with Microsoft Intune and to enable management of Microsoft Intune devices with System Center 2012 Configuration Manager.
The Microsoft Intune connector site is configured in System Center 2012 Configuration Manager to provide integration with Microsoft Intune and to enable management of Microsoft Intune devices with System Center 2012 Configuration Manager.
![]() User and computer groups are used to establish logical collections of users and devices.
User and computer groups are used to establish logical collections of users and devices.
![]() You can configure and view reports and alerts to obtain information about your Microsoft Intune environment.
You can configure and view reports and alerts to obtain information about your Microsoft Intune environment.
![]() Microsoft Intune policies enable greater control and management of Microsoft Intune-managed devices.
Microsoft Intune policies enable greater control and management of Microsoft Intune-managed devices.
![]() Data loss prevention policy can prevent the accidental loss or sharing of sensitive information and help users to stay compliant with their work.
Data loss prevention policy can prevent the accidental loss or sharing of sensitive information and help users to stay compliant with their work.
![]() The Office 365 Security & Compliance Center provides ready to use DLP Policy templates that help your organization stay compliant with many industry and regulatory requirements.
The Office 365 Security & Compliance Center provides ready to use DLP Policy templates that help your organization stay compliant with many industry and regulatory requirements.
![]() Windows Information Protection is built into Windows and allows applications and services including Microsoft Intune to enforce compliance policies such as requiring that devices are BitLocker encrypted.
Windows Information Protection is built into Windows and allows applications and services including Microsoft Intune to enforce compliance policies such as requiring that devices are BitLocker encrypted.
![]() Azure Information Protection advances the protection of information by removing the complexity and requirement of on premises infrastructure. With Azure RMS and the Azure Information Protection client, organizations can classify, label, and protect sensitive documents and emails.
Azure Information Protection advances the protection of information by removing the complexity and requirement of on premises infrastructure. With Azure RMS and the Azure Information Protection client, organizations can classify, label, and protect sensitive documents and emails.
![]() Cloud App Security is offered in two variants, Microsoft Cloud App Security for large enterprises purchasing the service as a standalone subscription, and the Office 365 variant for businesses with an existing Office 365 Enterprise E5 subscription.
Cloud App Security is offered in two variants, Microsoft Cloud App Security for large enterprises purchasing the service as a standalone subscription, and the Office 365 variant for businesses with an existing Office 365 Enterprise E5 subscription.
![]() Both versions of Cloud App Security provide insights into suspicious activity within your Office 365 subscription only and can help with all of the following areas:
Both versions of Cloud App Security provide insights into suspicious activity within your Office 365 subscription only and can help with all of the following areas:
![]() View how your organization’s data stored in Office 365 is accessed and used
View how your organization’s data stored in Office 365 is accessed and used
![]() Create policies that trigger alerts for atypical or suspicious activities
Create policies that trigger alerts for atypical or suspicious activities
![]() Suspend user accounts exhibiting suspicious activity
Suspend user accounts exhibiting suspicious activity
![]() Require users to sign in to Office 365 apps after an alert has been triggered
Require users to sign in to Office 365 apps after an alert has been triggered
![]() You need connect or upload your web traffic log files and data sources to Office 365 Cloud App Security so that the service can provide analysis, alerts and warn you of atypical or suspicious activities.
You need connect or upload your web traffic log files and data sources to Office 365 Cloud App Security so that the service can provide analysis, alerts and warn you of atypical or suspicious activities.