
Chapter 2. Configuration Fundamentals
Refer to the following sections for information about these topics:
• 2-1: User Interface—Discusses the command-line interface (CLI) methods that an administrative user can use to connect to and interact with a firewall.
• 2-2: Firewall Features and Licenses—Covers the license activation keys that can be used to unlock firewall functions.
• 2-3: Initial Firewall Configuration—Presents a brief overview of the methods that can be used to start configuring a firewall.
2-1 User Interface
A Cisco firewall, like any other networking device, offers several ways for the administrative user to connect to and interact with the firewall. Users usually need to make changes to the firewall’s security policies and configuration, monitor firewall activity, and troubleshoot traffic handling. All interaction with a firewall is based on a common user interface, which can be described as follows:
• A Cisco firewall supports user access by these methods:
— Command-line interface (CLI) by an asynchronous console connection
— CLI by a Telnet session
— CLI by Secure Shell (SSH) version 1.x or 2 (Adaptive Security Appliance [ASA] and Firewall Services Module [FWSM])
— Adaptive Security Device Manager (ASDM) through a web browser for ASA and FWSM platforms, and PIX Device Manager (PDM) for PIX platforms running 6.3 or earlier releases
— Cisco Security Manager (CSM)
— VPN/Security Management Solution (VMS) Firewall Management Center
• A firewall also provides a user interface to the ROM monitor bootstrap code when the operating system is not running.
• Users can execute commands from the user level or from the privileged level. The user level offers basic system information commands. The privileged level offers complete access to all firewall information, configuration editing, and debugging commands.
• A help system offers command syntax and command choices at any user prompt.
• A history of executed firewall commands can be kept. As well, command lines can be edited and reused.
• The output from a command can be searched and filtered so that useful information can be found quickly.
Note
Only the CLI itself is covered in this section. The mechanisms to reach it (Telnet, SSH, and so on) are covered in Chapter 4, “Firewall Management,” Section 4-4, “Managing Administrative Sessions.”
Tip
The Catalyst 6500 Firewall Services Module (FWSM) does not have an accessible console connection or other physical interface. However, you can still access an FWSM from the Catalyst 6500 native IOS CLI, as if you were connected to its console. Use the following Catalyst EXEC command to connect to the FWSM in chassis slot number slot:
Switch# session slot slot processor 1
User Interface Modes
The user interface of a Cisco firewall consists of several modes, each providing a different level of administrative capability and a different function. The user interface modes are as follows:
• User EXEC mode
Administrative users can connect to a firewall via the console port, Telnet session, or SSH session. By default, the initial access to a firewall places the user in user EXEC mode and offers a limited set of commands. When you connect to the firewall, a user-level password is required. A firewall designates user EXEC mode with a prompt of this form:
Firewall>
• Privileged EXEC mode
As soon as a user gains access to user EXEC mode, the enable command can be used to enter privileged EXEC or enable mode. Full access to all the executable commands is available. To leave privileged EXEC mode, use the disable, quit, or exit command. The syntax for entering privileged EXEC mode is as follows:
Firewall> enable
password: password
Firewall#
Notice that the pound, or number, sign (#) is used to designate privileged EXEC mode.
• Configuration mode
From privileged EXEC mode, you can enter configuration mode. From this mode, you can issue firewall commands to configure any feature that is available in the operating system. In PIX 6.x, all configuration is performed in one global configuration mode. Later releases, however, offer a global configuration mode and many submodes, much like the Cisco IOS software. To leave configuration mode and return to EXEC mode, enter exit or press Ctrl-z. You can also use the exit command to exit a submode and return to global configuration mode.
The syntax for entering global configuration mode is as follows:
Firewall# configure terminal
Firewall(config)#
User Interface Features
Within an administrative session, you can enter commands and get helpful information about entering commands. As well, you can filter the information that a firewall displays in a session as a result of a command. These mechanisms are discussed in the following sections.
Entering Commands
To enable a feature or parameter, enter the command and its options normally. To disable a command that is in effect, begin the command with no, followed by the command. You need to include enough options to identify the command uniquely, as it exists in the firewall session or configuration. For example, the following configuration commands enable and then disable the embedded HTTP server:
Firewall(config)# http server enable
Firewall(config)# no http server enable
You can see the configuration commands that are in effect by using one of the following commands:
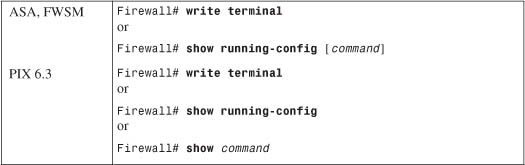
Notice that the ASA and FWSM platforms allow you to specify a command keyword in the show running-config command. If it is included, only the related configuration commands are shown, rather than the entire configuration. PIX 6.3 shows specific configuration commands by omitting the running-config keyword with the show command syntax.
Tip
Some ASA and FWSM configuration commands and their options are not shown if they use their default values. To see every configuration command that is enabled or active, even if it is a default, you can use the show running-config all [command] syntax.
Commands and their options can be abbreviated with as few letters as possible without becoming ambiguous. For example, to enter configuration mode, the command configure terminal can be abbreviated as conf t.
ASA and FWSM platforms also offer a keyword completion function. If you enter a shortened or truncated keyword, you can press the Tab key to make the firewall complete the keyword for you. Keyword completion can be useful when you are entering keywords that are very long and hyphenated. For example, pressing the Tab key after entering show ru produces the completed command show running-config:
Firewall# show ru[Tab]
Firewall# show running-config
This works only if the truncated keyword is unambiguous; otherwise, the firewall cannot decide which one of several similar keywords you want. If you press Tab and the keyword stays the same, you know you have not entered enough characters to make it unambiguous.
You can edit a command line as you enter it by using the left and right arrow keys to move within the line. If you enter additional characters, the remainder of the line to the right is spaced over. You can use the Backspace and Delete keys to make corrections.
Tip
Sometimes the firewall might display an informational or error message while you are entering a command line. To see what you’ve entered so far, you can press Ctrl-l (lowercase L) to redisplay the line and continue editing.
For example, suppose an administrator is trying to enter the hostname configuration command to set the firewall’s host name. Before he or she can enter the command, the firewall displays a logging message that interrupts the command line:
pix-c# config t
pix-c(config)# hostnNov 15 2004 00:34:08 single_vf : %PIX-7-111009:
User 'enable_15' executed cmd: show interface [user presses Ctrl-l here]
pix-c(config)# hostn
Pressing Ctrl-l displays the line again without all the clutter.
Command Help
You can enter a question mark (?) after any keyword in a command line to get additional information from the firewall. Entering the question mark alone on a command line displays all available commands for that mode (configuration or EXEC).
You can also follow a command keyword with a question mark to get more information about the command syntax. Doing this in PIX 6.3 displays the command syntax of all commands that use that keyword. For example, entering arp ? causes the firewall to show the syntax of the arp command, as well as the show arp and clear arp commands.
ASA and FWSM platforms offer context-based help, much like the Cisco IOS software. Entering a question mark after a keyword causes the firewall to list only the possible keywords or options. For example, entering show arp ? results in the following output:
Firewall# show arp ?
statistics Show arp statistics
| Output modifiers
<cr>
Firewall# show arp
Here, show arp can be followed by statistics, a pipe symbol (|), or the Enter key (<cr>).
With an ASA platform, you can also use the question mark with a partially completed command keyword if you do not know the exact spelling or form. The firewall displays all possible keywords that can be formed from the truncated word. For example, suppose you do not remember what commands can be used to configure access lists. Entering access? in configuration mode reveals the possibilities:
Firewall(config)# access?
access-group access-list
Firewall(config)# access
Notice that the truncated command keyword is displayed again, ready to be completed with more typing.
If you enter a command but use the wrong syntax, you see the following error:
Type help or ''?' for a list of available commands
ASA and FWSM platforms also display a carat (^) symbol below the command line location to point out the error. For example, suppose a user forgets and enters the command config type rather than config term:
Firewall# config type
^
ERROR: % Invalid input detected at '^' marker.
Firewall#
The carat points to the keyword type, starting at the y, where the syntax error begins.
Command History
The firewall keeps a history of the last 19 commands that were issued in each interactive session. You can see the entire history list for your current session with the show history command.
You can use the command history to recall a previous command that you want to use again. This can save you time in entering repetitive commands while allowing you to make edits or changes after you recall them.
Each press of the up arrow key (↑) or Ctrl-p recalls the next older or previous command. Each press of the down arrow key (↓) or Ctrl-n recalls the next most recent command. When you reach either end of the history cache, the firewall displays a blank command line.
When commands are recalled from the history, they can be edited as if you just entered them. You can use the left arrow key (←) or right arrow key (→) to move within the command line and begin typing to insert new characters. You can also use the Backspace or Delete key to delete characters.
Note
The arrow keys require the use of an American National Standards Institute (ANSI)-compatible terminal emulator (such as the VT100).
Searching and Filtering Command Output
A show command can generate a long output listing. If the listing contains more lines than the terminal session can display (set using the pager command, whose default is 24 lines), the listing is displayed a screenful at a time, with the following prompt at the bottom:
<---More--->
To see the next screen, press the spacebar. To advance one line, press the Enter key. To exit to the command line, press the q key.
You can use a regular expression (reg-expression) to match against lines of output. Regular expressions are made up of patterns—either simple text strings (such as permit or route) or more complex matching patterns. Typically, regular expressions are regular text words that offer a hint to a location in the output of a show command. You can use the following command structure to perform a regular-expression search:
Firewall# show command ... | {begin | include | exclude | grep [-v]} reg-expression
To search for a specific regular expression and start the output listing there, use the begin keyword. This can be useful if your firewall has a large configuration. Rather than using the spacebar to eventually find a certain configuration line, you can use begin to jump right to the desired line.
To display only the lines that include a regular expression, use the include (or grep) keyword. To display all lines that do not include a regular expression, use the exclude (or grep -v) keyword.
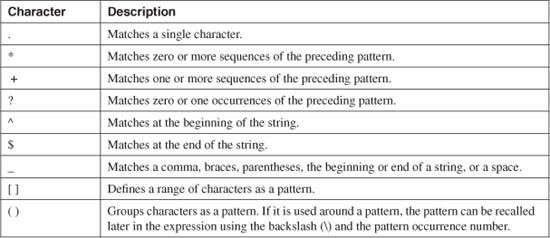
A more complex regular expression can be made up of patterns and operators. Table 2-1 lists and defines the characters that are used as operators.
Table 2-1 Regular-Expression Operators
For example, the following command can be used to display all the logging messages with message ID 302013 currently stored in the logging buffer:
Firewall# show log | include 302013
302013: Built outbound TCP connection 1788652405 for outside:69.25.38.107/80
(69.25.38.107/80) to inside:10.1.198.156/1667 (207.246.96.46/52531)
302013: Built outbound TCP connection 1788652406 for outside:218.5.80.219/21
(218.5.80.219/21) to inside:10.1.100.61/3528 (207.246.96.46/52532)
[output truncated]
Message 302013 records TCP connections built in either the inbound or outbound direction. To display only the inbound TCP connections recorded, the regular expression could be changed to include 302013, any number of other characters (.*), and the string inbound:
Firewall# show log | include 302013.*inbound
302013: Built inbound TCP connection 1788639636 for outside:216.117.177.135/54780
(216.117.177.135/54780) to inside:10.1.3.16/25 (207.246.96.46/25)
Firewall#
You might also use a regular expression to display command output that contains IP addresses within a range. For example, the following command filters the output to contain only IP addresses that begin with 10.10.5, 10.10.6, and 10.10.7:
Firewall# show log | include 10.10.[5-7].*
Terminal Screen Format
By default, all output from the firewall is displayed for a terminal session screen that is 80 characters wide by 24 lines long. To change the terminal screen width, you can use the following configuration command:
Firewall(config)# terminal width characters
Here, characters is a value from 40 to 511. You can also specify 0, meaning the full 511-character width.
To change the screen length (the number of lines displayed when paging through a large amount of output), you can use the following configuration command:
Firewall(config)# pager [lines number]
Here, number can be any positive value starting at 1. If you use only the pager keyword, the page length returns to its default of 24 lines.
You can also disable screen paging completely by using pager lines 0. This action might be useful if you are capturing a large configuration or logging message output with a terminal emulator. A more efficient practice would be to let all the output scroll by into the emulator’s capture buffer; otherwise, you would have to use the spacebar to page through the output and then later remove all the <--- More ---> prompts that were captured too.
2-2 Firewall Features and Licenses
When a Cisco firewall runs an image of the operating system, it must have the proper license activation keys to unlock the required features. To see a list of features and their current availability on a firewall, you can use the following EXEC command:
Firewall# show version
Example 2-1 shows some sample output from a PIX Firewall. The show version command displays the current version of the firewall operating system (6.3(4) in this case), the firewall’s elapsed uptime, and some information about the hardware. You can find the amount of RAM memory, Flash memory, and the MAC addresses of the physical interfaces here too. In this example, the firewall is a model PIX-525 and has 256 MB of RAM, 16 MB of Flash, two ethernet interfaces, and two gb-ethernet interfaces. (Here, ethernet implies a 10/100BASE-TX interface; Gigabit Ethernet interfaces are called gb-ethernet.)
Example 2-1. Sample Output from the PIX 6.3 show version Command
Firewall# show version
Cisco PIX Firewall Version 6.3(4)
Cisco PIX Device Manager Version 3.0(1)
Compiled on Wed 13-Aug-03 13:55 by morlee
Firewall up 252 days 7 hours
Hardware: PIX-525, 256 MB RAM, CPU Pentium III 600 MHz
Flash E28F128J3 @ 0x300, 16MB
BIOS Flash AM29F400B @ 0xfffd8000, 32KB
Encryption hardware device : IRE2141 with 2048KB, HW:1.0, CGXROM:1.9, FW:6.5
0: ethernet0: address is 0030.8587.446e, irq 10
1: ethernet1: address is 0030.8587.446f, irq 11
2: gb-ethernet0: address is 0003.4725.1f97, irq 5
3: gb-ethernet1: address is 0003.4725.1e32, irq 11
Licensed Features:
Failover: Enabled
VPN-DES: Enabled
VPN-3DES-AES: Enabled
Maximum Physical Interfaces: 8
Maximum Interfaces: 12
Cut-through Proxy: Enabled
Guards: Enabled
URL-filtering: Enabled
Inside Hosts: Unlimited
Throughput: Unlimited
IKE peers: Unlimited
This PIX has an Unrestricted (UR) license.
Serial Number: 431030631 (0x19b10167)
Running Activation Key: 0xb0751733 0xd6201f9f 0x135e15a6 0xef5e1f26
Configuration last modified by enable_15 at 22:00:46.880 EST Thu Feb 24 2005
Firewall#
The shaded text lists all the firewall features. This sample firewall has a valid license to operate as one of two firewalls in a failover pair. The firewall can use the DES, 3DES, and AES encryption methods and has four physical interfaces, with the capability to add more if needed.
However, notice that the firewall has a limit of 8 physical interfaces and a maximum of 12 interfaces. How is it possible to have up to 12 interfaces? Cisco firewalls can also support logical interfaces, in the form of virtual LANs (VLANs). A total of 12 interfaces, either physical or logical, can be configured for use.
For comparison, Example 2-2 shows the show version output from an ASA 5510 running release 8.0 of the operating system. The output format is only slightly different.
Example 2-2. Sample Output from the ASA 8.0 show version Command
Firewall# show version
Cisco Adaptive Security Appliance Software Version 8.0(0)235
Device Manager Version 6.0(0)97
Compiled on Wed 07-Mar-07 14:37 by builders
System image file is "disk0:/asa800-235-k8.bin"
Config file at boot was "startup-config"
Firewall up 3 days 23 hours
Hardware: ASA5510, 256 MB RAM, CPU Pentium 4 Celeron 1600 MHz
Internal ATA Compact Flash, 64MB
BIOS Flash AT49LW080 @ 0xffe00000, 1024KB
Encryption hardware device : Cisco ASA-55x0 on-board accelerator (revision 0x0)
Boot microcode : CN1000-MC-BOOT-2.00
SSL/IKE microcode: CNLite-MC-SSLm-PLUS-2.01
IPSec microcode : CNlite-MC-IPSECm-MAIN-2.04
0: Ext: Ethernet0/0 : address is 0016.c789.c8a4, irq 9
1: Ext: Ethernet0/1 : address is 0016.c789.c8a5, irq 9
2: Ext: Ethernet0/2 : address is 0016.c789.c8a6, irq 9
3: Ext: Ethernet0/3 : address is 0016.c789.c8a7, irq 9
4: Ext: Management0/0 : address is 0016.c789.c8a8, irq 11
5: Int: Internal-Data0/0 : address is 0000.0001.0002, irq 11
6: Int: Internal-Control0/0 : address is 0000.0001.0001, irq 5
Licensed features for this platform:
Maximum Physical Interfaces : Unlimited
Maximum VLANs : 50
Inside Hosts : Unlimited
Failover : Disabled
VPN-DES : Enabled
VPN-3DES-AES : Enabled
Security Contexts : 0
GTP/GPRS : Disabled
VPN Peers : 250
WebVPN Peers : 2
Advanced Endpoint Assessment : Disabled
This platform has a Base license.
Serial Number: JMX1014K070
Running Activation Key: 0x70092e4e 0x507e4e04 0xa8f1f16c 0x85c41864
0x4917ef91
Configuration register is 0x1
Configuration last modified by enable_15 at 00:06:07.574 EDT Thu Mar 22 2007
Firewall#
Notice that several of the licensed features are disabled, because this firewall has a Base license.
The show version output from a FWSM platform is similar, listing its licensed features. Example 2-3 shows the command output.
Example 2-3. Sample Output from the FWSM 3.2 show version Command
Firewall# show version
FWSM Firewall Version 3.1(4) <system>
Compiled on Fri 08-Dec-06 16:55 by dalecki
Firewall up 16 days 14 hours
failover cluster up 40 days 20 hours
Hardware: WS-SVC-FWM-1, 1024 MB RAM, CPU Pentium III 1000 MHz
Flash TOSHIBA THNCF128MBA @ 0xc321, 20MB
0: Int: Not licensed : irq 5
1: Int: Not licensed : irq 7
2: Int: Not licensed : irq 11
Licensed features for this platform:
Maximum Interfaces : 1000
Inside Hosts : Unlimited
Failover : Active/Active
VPN-DES : Enabled
VPN-3DES-AES : Enabled
Cut-through Proxy : Enabled
Guards : Enabled
URL Filtering : Enabled
Security Contexts : 20
GTP/GPRS : Disabled
VPN Peers : Unlimited
Serial Number: SAD0912013X
Running Activation Key: 0x2d5557af 0x85b15342 0x5cced864 0xa4e560f8
Configuration last modified by enable_1 at 04:38:10.700 EST Sun Feb 11 2007
Firewall#
Notice that the FWSM has a maximum of 1,000 interfaces. Because the FWSM has no physical interfaces to connect, all of the 1,000 interfaces are logical VLAN interfaces.
The maximum supported memory, number of interfaces, and number of concurrent connections vary across the family of Cisco firewalls. Table 2-2 shows how the models and their resources break down.
Table 2-2 Firewall Models, Licenses, and Supported Resources
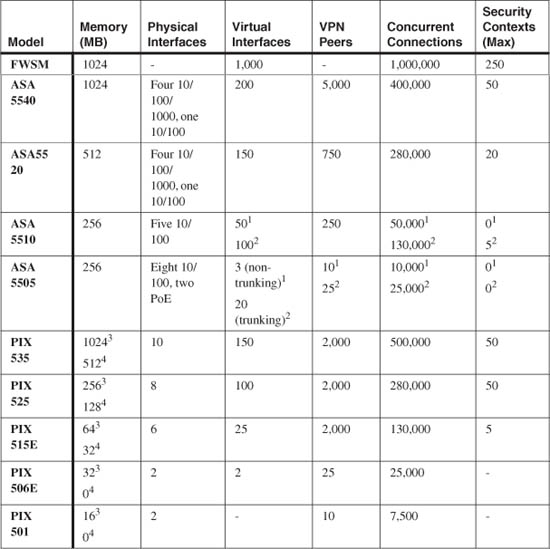
1. Base license
2. Security Plus license
3. PIX Unrestricted license
4. PIX Restricted license
Some firewall platforms can support high availability by operating in failover pairs. One firewall can run in an active mode, while the other can run in a standby mode or an active mode. The failover pair capabilities of the FWSM, ASA, and PIX are as follows:
• The FWSM platform always allows an active/active or active/standby failover pair to be configured.
• All models of ASA allow active/active or active/standby, except for the ASA 5510 and ASA 5505. Failover is not supported with the Base license. With the Security Plus license, the ASA 5510 can run in either active/active or active/standby, while the ASA 5505 can run in active/standby without keeping state information.
• PIX firewalls can operate in a failover pair with the Unrestricted (UR) license, but not with the Restricted (R) license. The PIX can also have a Failover (FO) license, allowing it to run in an active/standby pair, but not as a standalone firewall. The Failover-Active/Active (FO-AA) license allows a PIX to run in an active/active pair, but not as a standalone firewall.
Firewall features are unlocked by a license activation key. Beginning with ASA 7.0, the activation key is a 20-byte string consisting of five groups of eight hexadecimal digits each. Prior releases use a 16-byte string consisting of four groups of eight hexadecimal digits each.
Tip
The Catalyst 6500 FWSM comes standard with an Unrestricted license. Because of this, it does not use an activation key.
If your ASA or PIX firewall does not have the 56-bit Data Encryption Standard (DES), 168-bit Triple DES (3DES), or 256-bit Advanced Encryption Standard (AES) encryption methods enabled, you can obtain a free license activation key from Cisco.com. You need an active Cisco.com user ID to access the license request pages at http://www.cisco.com/go/license. Under the Licenses Not Requiring a PAK section, click on the click here for available licenses link.
Find the Cisco ASA or PIX listing under Security Products and click on the license link. You have to fill out an Encryption Software Export Distribution Authorization Form to get permission to legally download and use strong encryption technology from Cisco.
You can also register your firewall license and request an activation key to upgrade any of the other features. To do this, go to http://www.cisco.com/go/license and enter the Product Authorization Key (PAK).
When you request any type of license upgrade on Cisco.com, you must also enter your firewall serial number. You can find the serial number, programmed into the firewall hardware or the Flash memory at the factory, by issuing the show version command. The serial number is used to calculate a license activation key; therefore, the activation key works only with the firewall it was intended to support.
Upgrading a License Activation Key
A firewall keeps its activation key stored in nonvolatile Flash memory, along with an image of its operating system. The key and image are read, copied into RAM, and used when the firewall boots up.
You also can download a new key and a new operating system image to a running firewall. The new key and operating system image are immediately stored in Flash memory, because the firewall is already running from its RAM resources.
You can see the current activation key (the one copied into RAM) by issuing the following EXEC command:
Firewall# show activation-key
Example 2-4 shows a sample of the output from an ASA command. Notice that this firewall has the same key in both Flash and running (RAM) memory. This only means that the key has not been updated or changed since the firewall was booted up.
Example 2-4. Sample Output from the show activation-key Command
Firewall# show activation-key
Serial Number: 807243559
Running Activation Key: 0xc422440f 0x2eb1445a 0x46fb4413 0x74a344ee 0x4b33d295
Licensed features for this platform:
Maximum Physical Interfaces : 10
Maximum VLANs : 100
Inside Hosts : Unlimited
Failover : Active/Active
VPN-DES : Enabled
VPN-3DES-AES : Enabled
Cut-through Proxy : Enabled
Guards : Enabled
URL Filtering : Enabled
Security Contexts : 5
GTP/GPRS : Enabled
VPN Peers : Unlimited
This platform has an Unrestricted (UR) license.
The flash activation key is the SAME as the running key.
Firewall#
Before you can enter a new activation key, the firewall must be running the exact same operating system image as the one stored in Flash memory. This ensures that the features unlocked by the activation key are applicable to the most recent image present on the firewall. If the images differ, you see the following message from the show activation-key command:
The flash image is DIFFERENT from the running image.
The two images must be the same in order to examine the flash activation key.
In this case, the firewall must be reloaded so that the image in Flash is the one being run.
You can enter a new license activation key in one of two ways:
• ROM monitor mode
After an image of the firewall operating system has been downloaded via TFTP from monitor mode, the firewall asks if a new activation key is needed. The new key is added before the image is run.
• Configuration mode
Firewall# activation-key activation-key-tuples
activation-key-tuples is a string of four groups (PIX 6.3 or FWSM) or five groups (ASA) of eight hexadecimal digits each, provided by Cisco. Each tuple or group of eight digits can begin with 0x to designate hexadecimal notation, but this is not necessary.
For example, a new activation key is entered on an ASA platform as follows:
Firewall# activation-key 0xcc055f66 0xd4c45b68 0x98505048 0x8a8c5890 0x4b35d295
License Features for this Platform:
Maximum Physical Interfaces : 10
Maximum VLANs : 100
Inside Hosts : Unlimited
Failover : Active/Active
VPN-DES : Enabled
VPN-3DES-AES : Enabled
Cut-through Proxy : Enabled
Guards : Enabled
URL Filtering : Enabled
Security Contexts : 5
GTP/GPRS : Enabled
VPN Peers : Unlimited
This machine has an Unrestricted (UR) license.
Both running and flash activation keys were updated with the requested key
Firewall#
2-3 Initial Firewall Configuration
A Cisco firewall can be configured through the CLI on the console port. You can enter configuration mode with the following privileged EXEC command:
Firewall# configure terminal
Commands can then be entered one at a time. To end configuration mode and return to EXEC mode, you can press Ctrl-z or enter exit. Chapters 3 through 10 cover all the firewall features and configuration commands.
Tip
Whenever you make configuration changes to a firewall, you should always make sure the running configuration is saved to a nonvolatile location. Otherwise, if the firewall is rebooted or if power is lost, your configuration changes also are lost.
You can save the running configuration to the firewall’s nonvolatile Flash memory with the write mem command. Chapter 4 in Section 4-3, “Managing Configuration Files,” discusses this procedure in more detail.
You can use a firewall management application such as ASDM, PDM, or Firewall Management Center (Firewall MC, a part of the VMS software) to make configuration changes on a firewall. If you intend to do this, you need to give the firewall a minimal “bootstrap” configuration so that the management application can communicate with and manage it.
You can use the setup EXEC command to start the bootstrap procedure. The firewall then prompts you for the necessary values. At a minimum, the firewall needs the following parameters that are collected by the setup command:
• Enable password
• Current time (Coordinated Universal Time [UTC] or Greenwich Mean Time [GMT])
• Current date
• IP address of the firewall’s inside interface (where it reaches the management application)
• Firewall’s host name
• Firewall’s domain name (used to generate an SSL certificate for web management access)