
CHAPTER 9
ActiveX and .NET
ActiveX? .NET? In a book about programming in Excel 2007? Of course! Yes, ActiveX controls and components are still kicking around. And .NET technologies are the wave of the future for those Microsoft-centric developers among us (which is why you're reading this book, I'd assume).
ActiveX, for the uninitiated, is Microsoft's technology for component software. ActiveX comes in two flavors: components and controls. The controls we added to our Excel UserForm in Chapter 4 were ActiveX controls. If you have any experience with VB 6 or earlier, you've used ActiveX controls on your forms, and perhaps you've downloaded free controls written by other developers or purchased control libraries written by third parties. The same is true of Microsoft Access controls. ActiveX components, on the other hand, do not necessarily provide a UI, but they do expose a set of functionality you can use in your programs. Sometimes you hear these described as "COM components," a term that is somewhat correct. ActiveX is based on the Microsoft COM (Component Object Model) technology, and the two terms are often used interchangeably.
The Microsoft development world is moving away from COM and ActiveX for many reasons, but there are so many classic VB applications out there that it is still a worthwhile exercise to see what they have to offer.
The .NET tie-in comes to us via Visual Studio Tools for Office Second Edition (VSTO SE), provided by Microsoft. By adding VSTO SE to your Visual Studio installation, you receive a rich set of tools that allow you to program Microsoft Office applications from the Visual Studio programming environment. Imagine opening a new Excel project and seeing Excel within the Visual Studio 2005 development environment. There is some really neat stuff here with so many possibilities.
In this chapter, we'll look at ways to incorporate ActiveX components in our Excel projects. Then we'll take a dive into VSTO SE and explore some of the advantages that this maturing platform can give us as Office developers.
Using ActiveX Components in Your Excel 2007 Projects
We are at a technology crossroads as year 2007 draws to an end. Microsoft's .NET technologies have reached their stride and are becoming more widespread. Classic Visual Basic (VB 6) applications will be supported throughout the Windows Vista life cycle (five years). This means Microsoft will guarantee that applications and components (DLLs) created in VB 6 will continue to run in Windows Vista as they did in Windows XP. Not so for the VB 6 IDE (integrated development environment), for which extended support will be retired in April of 2008).
What does this mean for you? If you are currently using any ActiveX components, your applications should work just as they do now. The problem with VB 6 support going away as I?see it is that VBA, being a subset of VB, has similar syntax. It's easy enough to create procedures and compile your code in classic VB if you're a VBA programmer.
If you're moving your Microsoft development tools to Windows Vista, you will not have this option available to you. Given that there are still plenty of ActiveX components available (both free and for pay), and since you can still create your own if you are not moving to Vista right away, we'll take a short look at incorporating them into your Excel projects.
Are There Any Benefits?
Absolutely. Consider that the code you create in VBA is very similar to VB code. How can one be more beneficial than the other? There are two major reasons:
Better performance: Code wrapped in an ActiveX DLL is compiled code. This runs much faster than interpreted VBA code.
Greater security: Your VBA code is not very secure in the VBE. Anyone who knows how to press Alt+F11 can see and modify your code. Code in a compiled VB component cannot be seen by users or any other interested party.
Custom Functionality with ActiveX
Way back in Chapter 2, we looked at various methods of bringing data into your Excel projects. These ranged from using Excel's import methods to getting DAO and ADO recordsets and placing their data on your worksheets.
In our ActiveX example, we'll take one of these data-driven samples and see how they'd happen in a compiled component or DLL. Then we'll look at how we can use that compiled component to add custom functionality to our projects.
I'm including the VB 6 code, but don't worry if you're not a VB programmer. The DLLs are also included with the source files for this book, so you can access the functionality. You just won't have access to the code.
Note The supporting files and source code for this book are available at www.apress.com, in the Download section of this book's home page.
Using an ActiveX Component in Excel 2007
Our ActiveX example allows us to put data on the worksheet of our choice in our current workbook and pass in a SQL statement to retrieve whatever data we need. This example will mimic the functionality of our ADO example from Chapter 2 in the file DataAccessSample03.xlsm. Listing 9-1 shows the original VBA code we wrote in Chapter 2.
Listing 9-1. ADOTest Macro from Chapter 2
Sub ADOTest()

Dim cnn As New ADODB.Connection

Dim rs As ADODB.Recordset

Dim xlSheet As Worksheet

Dim sConnString As String

Dim arr_sPath(1) As String

Dim sSQL As String

Dim iFieldCount As Integer

Dim i As Integer


    arr_sPath(0) = "C:projectsExcel2007BookFiles
orthwind 2007.accdb"

    arr_sPath(1) = "C:projectsExcel2007BookFiles
orthwind.mdb"


    Set xlSheet = Sheets("Sheet1")

    xlSheet.Activate

    Range("A1").Activate

    Selection.CurrentRegion.Select

    Selection.ClearContents

    Range("A1").Select


    ' Open connection to the database

'    cnn.Open "Provider=Microsoft.Jet.OLEDB.4.0;" &

        "Data Source=" & arr_sPath(0) & ";"

    ''When using the Access 2007 Northwind database

    ''comment the previous code and uncomment the following code.

    cnn.Open "Provider=Microsoft.ACE.OLEDB.12.0;" &

        "Data Source=" & arr_sPath(0) & ";"


    Set rs = New ADODB.Recordset

    ' Open recordset based on Orders table

    rs.Open "Select * From Orders", cnn


    iFieldCount = rs.Fields.Count

    For i = 1 To iFieldCount

        xlSheet.Cells(1, i).Value = rs.Fields(i - 1).Name

    Next i


    ' Copy the recordset to the worksheet, starting in cell A2

    xlSheet.Cells(2, 1).CopyFromRecordset rs


   xlSheet.Select

   'Range("A1").Select

   Selection.CurrentRegion.Select

   Selection.Columns.AutoFit

   'Range("A1").Select


    rs.Close

    cnn.Close

    Set xlSheet = Nothing

    Set rs = Nothing

    Set cnn = Nothing

End Sub
This code dropped the result of a SQL SELECT statement onto Sheet1 in our sample file. Our ActiveX component allows us to choose which worksheet we put our data on and select which data we want, giving us a quick tool for querying the Northwind database.
The VB 6 code here is also split into a data class and a second class named cExcelNwind. The data class, cData, is doing some work this time. Its GetData method will return a recordset to the cExcelNwind class. The cExcelNwind class will do the work of placing the data on the worksheet that is passed into the ActiveX component. Listings 9-2 and 9-3 show the VB 6 code.
Listing 9-2. cData Class from the ActiveX Component
Option Explicit


Const m_sDBPathName As String = "C:BookFilesNorthwind 2007.accdb"

Private m_oCnn As ADODB.Connection

Private m_oRS As ADODB.Recordset

'


Public Function GetData(Which As String) As ADODB.Recordset

    m_oCnn.Open "Provider=Microsoft.ACE.OLEDB.12.0;" &

        "Data Source=" & m_sDBPathName & ";"


    Set m_oRS = New ADODB.Recordset


    m_oRS.Open Which, m_oCnn


    Set GetData = m_oRS

End Function


Private Sub Class_Initialize()

    Set m_oCnn = New ADODB.Connection

    Set m_oRS = New ADODB.Recordset

End Sub


Private Sub Class_Terminate()

    Set m_oCnn = Nothing

    Set m_oRS = Nothing

End Sub
Listing 9-3. cExcelNwind Class from the ActiveX Component
Option Explicit


Public Sub PlaceData(TheWorksheet As Excel.Worksheet, WhichData As String)

Dim oData As cData

Dim xl As Excel.Application

Dim rs As ADODB.Recordset

Dim iFieldCount As Integer

Dim i As Integer


    Set xl = TheWorksheet.Application 'hook into the current Excel session

    TheWorksheet.Activate

    TheWorksheet.Range("A1").Activate

    xl.Selection.CurrentRegion.Select

    xl.Selection.ClearContents

    TheWorksheet.Range("A1").Select


    Set oData = New cData

    Set rs = oData.GetData(WhichData)


    iFieldCount = rs.Fields.Count

    For i = 1 To iFieldCount

        TheWorksheet.Cells(1, i).Value = rs.Fields(i - 1).Name

    Next i


    TheWorksheet.Cells(2, 1).CopyFromRecordset rs


    TheWorksheet.Select

    xl.Selection.CurrentRegion.Select

    xl.Selection.Columns.AutoFit


    rs.Close

    Set TheWorksheet = Nothing

    Set rs = Nothing

    Set xl = Nothing

End Sub
Note Once again, the VB 6 code provided here is for reference only, showing the similarities to code we've already experienced. We will not dig into the specifics of compiling DLLs or ActiveX EXEs here.
As you'll see in this next bit of client code, accessing the data from an external component really helps keep the code on the client application simple. The compiled version of this code is available at www.apress.com in the Download section of this book's home page. It is called Nwind2Excel.dll. You must register the DLL before you can access its functionality.
Registering Nwind2Excel.dll in Windows XP or 2000
- Copy the file to a folder on your local machine.
- Click Start
 Run.
Run. - Type regsvr32.exe, followed by a space, and then the full path to
Nwind2Excel.dll. Listing 9-4 shows an example of this command.Listing 9-4. Example of Run Command to Register a DLL
regsvr32.exe C:MyComponentsNwind2Excel.dll
- Click OK to register the DLL.
- Click OK when the success message appears.
Caution In the VB code, be sure to change the path to the Northwind 2007 database to wherever it can be found on your local machine. If you are using the compiled DLL, it needs to find the Northwind database in C:ExampleDBs. You must create that folder and put the Northwind 2007 database there.
Registering Nwind2Excel.dll in Windows Vista
- Open a command prompt window by selecting Start All Programs Accessories Command Prompt.
Note This command prompt must be run using the Run as Administrator right-click menu option.
- Type regsvr32.exe, followed by a space, and then the full path to
Nwind2Excel.dll. Listing 9-4 (shown previously) shows an example of this command. - Press Enter to run the command.
- Click OK when the success message appears.
Figure 9-1 shows the success message you should see.
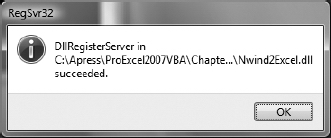
Figure 9-1. regsvr32.exe shows a success message upon registering a DLL in Windows Vista.
Now we can use the DLL in our project.
- Open a new workbook in Excel.
- Open the VBE by choosing the Developer ribbon Visual Basic or by pressing Alt+F11.
- Add a standard code module in the Project Explorer.
- Add a reference to the new DLL by selecting Tools References.
- In the References dialog box, scroll down until you see an item named !Northwind2Excel Object, as shown in Figure 9-2.
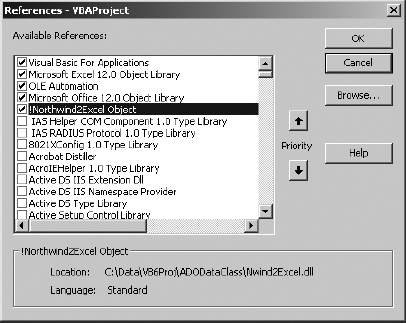
Figure 9-2. Adding a reference to !Northwind2Excel Object
Tip When you create custom objects, they tend to get lost in the list in the References dialog box. Adding the bang (!) character as a prefix helps keep your custom objects near the top of the list and makes them easier to find.
- Select it from the list and click OK to close the dialog and store the reference.
Now we are ready for a small bit of client code.
The Client Code
The really neat thing about using custom DLLs to provide functionality is that it lets us use such a tiny bit of code in our applications.
On the standard module you just created, add the following code:
Option Explicit


Sub GetNorthwindData()

Dim oNwindData As cExcelNwind


  Set oNwindData = New cExcelNwind


  oNwindData.PlaceData ThisWorkbook.Sheets("Sheet1"), "Select * From Orders"

  oNwindData.PlaceData ThisWorkbook.Sheets("Sheet2"), "Select * From Employees"


  Set oNwindData = Nothing

End Sub
That's about it. The two lines of code between the Set statements do all the work, with each line placing the result of its SQL statement on the worksheet referenced. Let's run the code.
- Return to Excel.
- Save the file.
- Open the Macros dialog box by selecting the Developer ribbon Macros command.
- Choose GetNorthwindData from the List of macros.
- Click the Run button.
Caution As noted earlier, if you are using the compiled DLL that comes with the source code for this book, you must create the path C:ExampleDBs and place the Northwind 2007 database there.
The result is shown in Figure 9-3. Sheet1 contains the order information and Sheet2 contains the employee information.
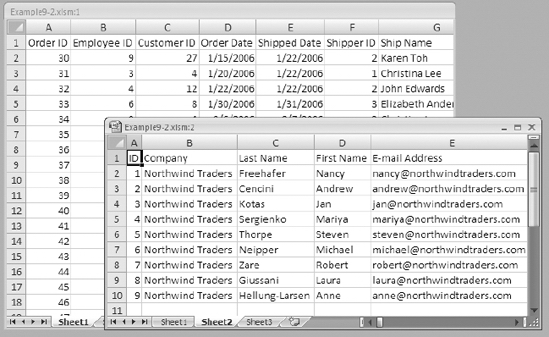
Figure 9-3. Result of GetNorthwindData macro
- Save the workbook if you like.
Note Here's one of the comparative advantages of the .NET platform vs. ActiveX. In the .NET world, we do not have to deal with registration of components like we do with ActiveX components. We can simply copy our component to any machine that has the correct version of the .NET Framework installed, and it will run.
One benefit that we see from this example is minimal code in our project. Let's take a look now at how .NET technologies can actually take the code out of our Excel projects.
Excel in the .NET World
We can't code directly in the Excel 2007 VBE to use .NET components, but we can download tools from Microsoft that will let us create Excel projects from within Visual Studio 2005. VSTO and VSTO SE each come with a suite of tools that allow us to access various functions within an Excel project.
VSTO, which interfaces with Office 2003 applications, allows direct access to an Excel workbook and gives us programmatic control within the managed code environment. VSTO project templates include the ability to create the following:
- Excel workbook projects
- Excel template projects
- Word template projects
- Word document projects
- Outlook add-in projects
Figure 9-4 shows the Visual Studio 2005 New Project dialog box for Microsoft Office 2003 projects from the original version of VSTO.
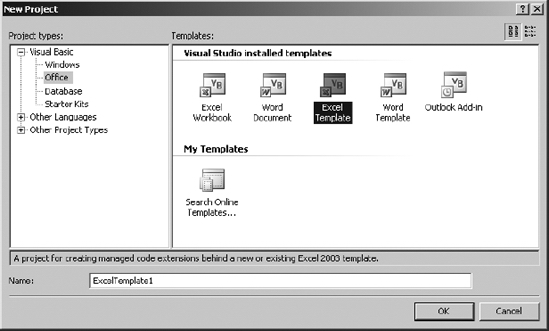
Figure 9-4. VSTO Microsoft Office projects
VSTO SE adds some new project types to the toolbox, as shown in Figure 9-5.
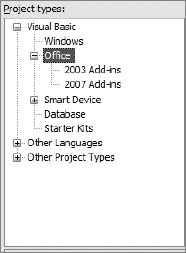
Figure 9-5. New project types included in VSTO SE
VSTO SE provides us with two new project categories, Excel 2003 Add-ins and Excel 2007 Add-ins. It adds an InfoPath template project to the Office menu, as shown in Figure 9-6 (which shows the Windows Vista interface).
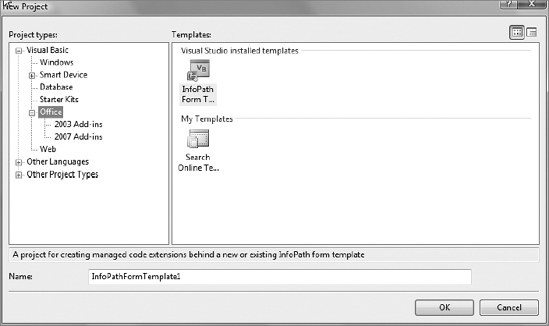
Figure 9-6. InfoPath Form Template project added in VSTO SE
Note If you already have VSTO installed, you can safely add VSTO SE. The existing Office 2003 project types will still be available. The new project types of VSTO SE will be available in addition to the original project types.
Figure 9-7 shows the VSTO SE Office 2003 Add-in projects available in the New Project dialog box.
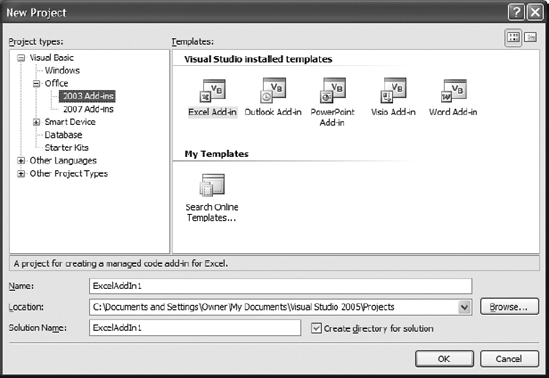
Figure 9-7. Office 2003 Add-in projects added in VSTO SE in Windows XP
Another new project category containing Office 2007 Add-in projects is also added. The new selections are shown in Figure 9-8.
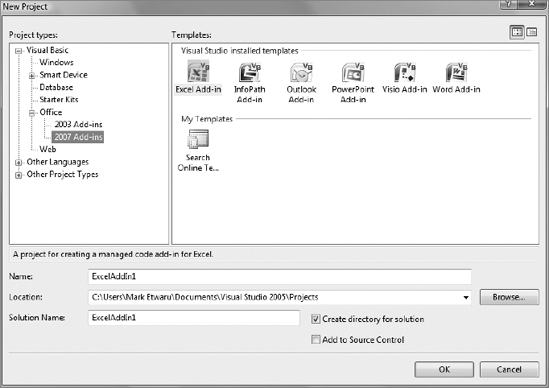
Figure 9-8. Office 2007 Add-in projects added in VSTO SE in Windows Vista
VSTO is no longer available, but if you have a copy, you can still write code for Excel 2003 that will run in Excel 2007 Compatibility mode. VSTO SE provides add-in programming only.
Note VSTO SE is available as a free download from Microsoft at www.microsoft.com/downloads/details.aspx?familyid=5E86CAB3-6FD6-4955-B979-E1676DB6B3CB&displaylang=en (if this link fails to work in the future, you can search the Web for "VSTO SE").
Managed Code in an Excel Project
We are going to look at two examples of running managed code in Excel. In our ActiveX examples, we revisited some of the functionality we'd already built directly in Excel using VBA. The first example .NET project will duplicate some of the functionality from our previous VBA projects, but you'll see how the .NET versions require absolutely no code on the Excel client workbook. Our second example will show how to create a custom task pane in an Excel 2007 Add-in project in conjunction with the .NET version of an Excel UserForm.
Caution If you do not have Visual Studio 2005, you can still run the sample workbooks as long as you have placed the Northwind 2007.accdb file in the same path that the sample code refers to. The only other rerequisite is that the .NET Framework 2.0 must be installed on your PC.
Retrieving Data Using .NET
In this example, we'll reach out to the Northwind 2007 database and populate a worksheet with data from the Employees table. The end result will look a lot like one of our early data access samples in Chapter 2, where we imported data from the Northwind database and then resized the columns using the AutoFit command. We will create a data access component and then use it from within our add-in.
- Open Visual Studio 2005, and the start page will appear.
- In the Recent Projects area (shown in Figure 9-9) in the Create section, click the Project link to open the New Project dialog box (shown previously in Figure 9-8).

Figure 9-9. Recent Projects section of Visual Studio 2005 start page
- In the Name text box, name the project NWindDataAddIn.
- Leave the "Create directory for solution" check box checked.
- Click OK.
The new project is created, as shown in Figure 9-10.
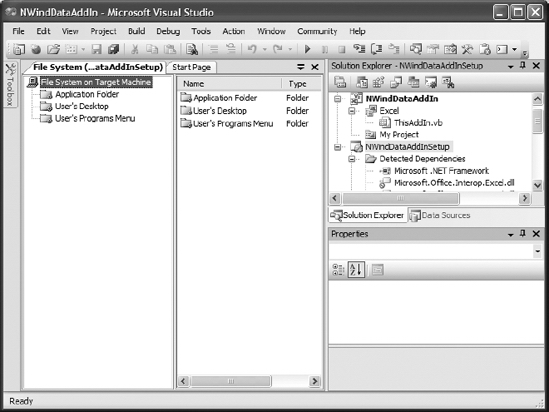
Figure 9-10. New Excel 2007 add-in project
We'll look at the default contents of the add-in project in a moment, but first let's create our data access component. We will add another project to our add-in project. Once the coding is finished, we'll have to add a reference to our data access project before we can use it.
The Data Access Component
We could add a new class directly in our add-in project, but it makes sense to put that in its own project where it will become a separate component. This gives you the option to easily use your data access layer in other projects.
- Select the NWindDataAddIn project in the Solution Explorer.
- Select File Add New Project (Figure 9-11).
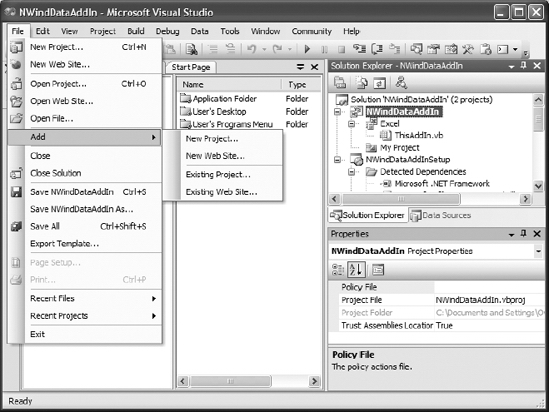
Figure 9-11. Adding a new project to the solution
- In the Add New Project dialog box, select Windows from the "Project types" list.
- Select Class Library from the Templates section.
- Name the new project NWindDataAccess, as shown in Figure 9-12.
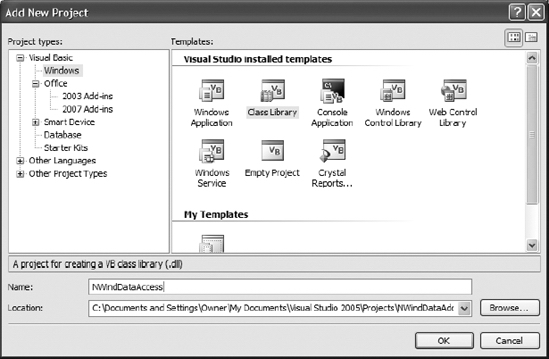
Figure 9-12. Creating a new class library project
- Click OK.
A new project is added to the Solution Explorer and an empty class module is created, as shown in Figure 9-13.
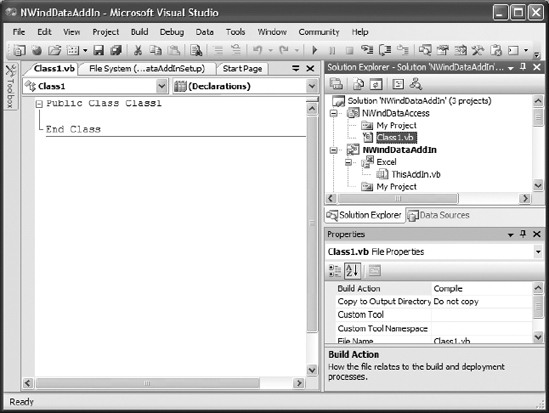
Figure 9-13. New class library project added
The default name for the new class is Class1. Let's change that.
- Select the
Class1.vbfile from the NWindDataAccess project in the Solution Explorer. - In the Properties pane (below the Solution Explorer, as shown in Figure 9-14), change the File Name property to NWindData.vb.
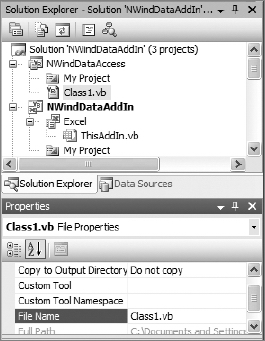
Figure 9-14. Changing the class name
Once that's done, all references to Class1 will be changed to reflect the new class, as shown in Figure 9-15.
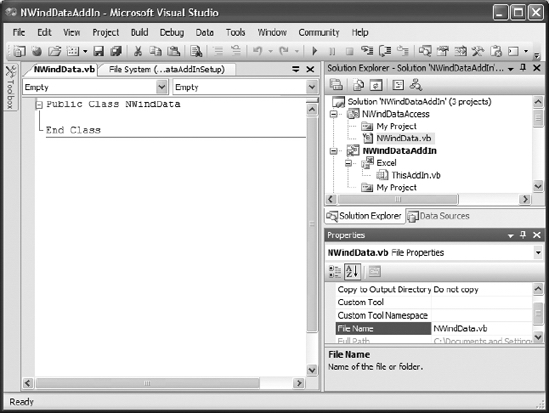
Figure 9-15. Renamed class and file name
Now we'll add some code to our class. This will be a very simple class that does nothing more than query the Northwind 2007 database for a list of employees.
- On your local PC, create a folder called
C:ExampleDBs(if you did not already do so for the ActiveX example). - Copy the
Northwind 2007.accdbfile into the new folder.
Note These two steps are more of a necessity for those who do not have Visual Studio 2005 (so the code will run from the sample files you downloaded from www.apress.com). If you are using Visual Studio 2005, you can modify the code to refer to the Northwind 2007 database from any location on your PC.
- Put your cursor in the class module code window and press Ctrl+Home to position the insertion point at the very beginning of the code.
- Press Enter.
- Add the following statement to reference the OLEDB library:
Imports System.Data.OleDb
- Move the insertion point to the blank line inside the class code.
- Add the following module-level declarations:
Const TABLE_NAME As String = "Table1"

Private m_sNwindName As String
The constant TABLE_NAME will hold the table name we'll use when we fill a DataSet from the Northwind Employees table. The sNwindName variable will hold the path to the database. Next, let's add a public property to the data access class to store and retrieve the location of the database.
- Add the following property to the NWindData class module:
Public Property NwindPathFileName() As String

    Get

        Return m_sNwindName

    End Get

    Set(ByVal value As String)

        If System.IO.File.Exists(value) Then

            m_sNwindName = value

        Else

            Throw New System.IO.FileNotFoundException

        End If

    End Set

End Property
The Property Get is very straightforward in that it's just returning the value from the private variable. The Property Set has a bit of validation code. We're checking to see if the file exists before we assign the new value to the private variable. If it does not exist, the class will throw a System.IO.FileNotFoundException error to the client code.
Note Managed code does not raise errors as classic VBA and VB did. In the .NET world, exceptions are thrown by our code and caught in exception handling blocks.
Now we'll add a method that accepts a SQL statement to get the data and returns the data in the form of a .NET DataSet object.
- Add a new function named
GetDatato theNWindDataclass, as follows:
Public Function GetData(ByVal Which As String) As DataSet
- Add the following variable declarations:
Dim dsReturn As New DataSet()

Dim cnn As OleDbConnection

Dim sConnString As String
- Create the connection to the data by adding the following code:
sConnString = "Provider=Microsoft.ACE.OLEDB.12.0;"

            & "Data Source=" & m_sNwindName & ";"

cnn = New OleDb.OleDbConnection(sConnString)
- Create a
DataAdapterto hold the data and fill theDataSetby adding the following code:
Dim da As New OleDbDataAdapter(Which, cnn)
Next, we are going to fill the DataSet from the DataAdapter. We will add exception handling to this process. As VBA programmers, we're used to using the age-old On Error Go To syntax in our error handlers. In our managed code, we use Try...Catch blocks to catch any exceptions our code throws.
- Add the following code to fill the
DataSetand watch for and handle exceptions:
Try

    da.Fill(dsReturn, TABLE_NAME)

Catch ex As Exception

    MsgBox(ex.Message)

End Try
This Try...Catch block includes the optional Finally clause. Any code inserted here will always run regardless of errors. It's a good place for cleanup code. The last thing to do is return our filled DataSet.
- Add the following code after the
Try...Catchblock:
Return dsReturn
The complete GetData function looks like Listing 9-5.
Listing 9-5. Complete GetData Function
Public Function GetData(ByVal Which As String) As DataSet

    Dim dsReturn As New DataSet()

    Dim cnn As OleDbConnection

    Dim sConnString As String


    sConnString = "Provider=Microsoft.ACE.OLEDB.12.0;"

                & "Data Source=" & m_sNwindName & ";"

    cnn = New OleDb.OleDbConnection(sConnString)


    Dim da As New OleDbDataAdapter(Which, cnn)


    Try

        da.Fill(dsReturn, TABLE_NAME)

    Catch ex As Exception

        MsgBox(ex.Message)

    Finally

        MsgBox(dsReturn.Tables("Table1").Rows.Count & " Records")

    End Try


    Return dsReturn

End Function
That completes our work on the data access component. Let's bring our attention back to the add-in project that Visual Studio 2005 created for us.
The Add-In Project
When we created our add-in project, Visual Studio 2005 created the NWindDataAddIn project, and it created a deployment project named NWindDataAddInSetup. Within the NWindDataAddIn project, we have one file, named ThisAddIn.vb. This is where we'll put the code that will run on our client Excel applications.
Before we begin, we must add a reference to our data component.
- In the Solution Explorer, select the NWindDataAddIn project.
- Right-click the project and choose Add Reference to display the Add Reference dialog box.
- On the Projects tab, select NWindDataAccess, as shown in Figure 9-16.
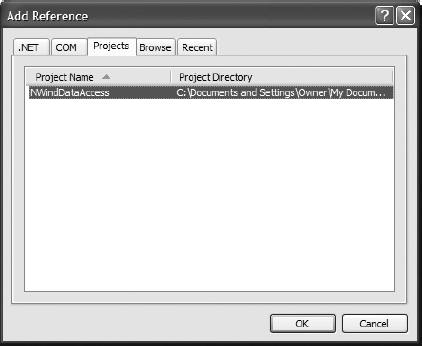
Figure 9-16. The Add Reference dialog box
- Click OK.
- In the Solution Explorer, double-click the
ThisAddIn.vbfile to open the code window.
Add-in projects include one line of code in the startup method referencing the Excel application, as shown in Figure 9-17.
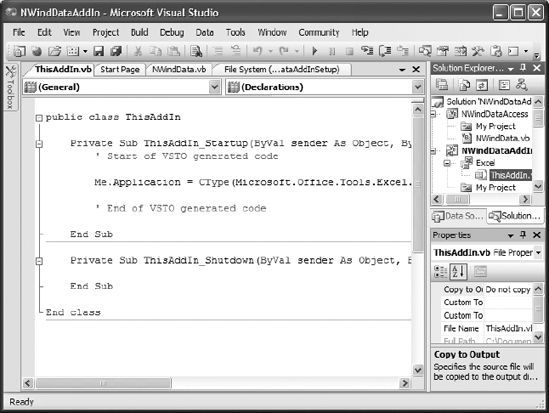
Figure 9-17. The predefined add-in project code
- Place the insertion point in the blank line above the
ThisAddIn_Startupmethod. - Add the following module-level variable declarations:
Private m_oNWind As NWindDataAccess.NWindData

Private m_oSheet As Excel.Worksheet

Private m_oDS As DataSet
Here, we create an object to hold a reference to our data component and create variables to hold references to an Excel worksheet and our DataSet.
- In the
ThisAddIn_Startupmethod, put the insertion point in the blank line under the last comment. - Add the following code:
m_oNWind = New NWindDataAccess.NWindData

m_oSheet = Me.Application.Worksheets("Sheet1")

GetData()
This code instantiates an instance of the data component, fills m_oSheet with a reference to Sheet1 in our Excel workbook, and calls a function named GetData. Visual Studio 2005 may bark at you because this function does not exist, yet but that's only temporary.
- Put the insertion point inside the
ThisAddIn_Shutdownmethod. - Add the following line of cleanup code:
m_oNWind = Nothing
Now let's create the GetData method.
Getting the Data Since we added a reference to our data access project, we can refer to its properties and methods from our add-in. The GetData method will call out to our data access layer and fill our module-level DataSet variable. Then it will push the data out to the Excel sheet.
- In the ThisAddIn class module, add a new subroutine named
GetData. - In the
GetDataprocedure, add the following variable declarations:
Dim sDB As String = "C:ExampleDBsNorthwind 2007.accdb"

Dim iCols As Integer

Dim i As Integer

Dim row As Integer
We're passing in the location of the database to the sDB String variable, and then we have the remaining Integer variables to hold our place as we walk through the DataSet and display our data.
- On the first blank line below the variable declarations, type the following line of code:
Try
- Press Enter, and Visual Studio 2005 will add a complete
Try...Catchblock for you. - Place the insertion point in the first blank line below the
Tryline of code. - Add the following code to set the file name in the data access component and call its
GetDatamethod:
With m_oNWind

    .NwindPathFileName = sDB

    m_oDS = .GetData("select * from employees")

End With
- Add the following code to walk through the
DataSetand insert the column headings in the worksheet:
For i = 0 To iCols - 1

    m_oSheet.Cells(1, i + 1).Value =

                            m_oDS.Tables("Table1").Columns(i). Caption

Next
- Place the insertion point in the blank line following the previous code, and press Enter.
- Add the following code to walk through the
DataSetand insert the employee data on the worksheet:
row = 2

For Each RowIterator As DataRow In m_oDS.Tables("Table1").Rows

    For i = 0 To iCols - 1

        m_oSheet.Cells(row, i + 1).Value =

                RowIterator(m_oDS.Tables("Table1").Columns(i). Caption)

    Next

    row = row + 1

Next
Next, we'll add the code to format the Excel worksheet by applying the AutoFit command to size each column to show its longest data entry.
- Place the insertion point in the blank line following the previous code, and press Enter.
- Add the following code:
Dim r As Excel.Range

m_oSheet.Select()

r = m_oSheet.Range("A1")

r.Select()

Application.Selection.CurrentRegion.Select()

Application.Selection.Columns.AutoFit()

r.Select()
The last thing for us to do is a bit of exception handling.
- Place the insertion point at the beginning of the line containing the
Catchstatement, and press Enter. - Move the insertion point up into the blank line you just inserted.
- Add the following code to trap for the
FileNotFoundException:
Catch ex As System.IO.FileNotFoundException

    MsgBox("File: " & sDB & " not found")
That's all the code for the GetData method. The completed subroutine looks like Listing 9-6.
Listing 9-6. Complete GetData Subroutine
Private Sub GetData()

    Dim sDB As String = "C:ExampleDBsNorthwind 2007.accdb"

    Dim iCols As Integer

    Dim i As Integer

    Dim row As Integer


    Try

        With m_oNWind

            .NwindPathFileName = sDB

            m_oDS = .GetData("select * from employees")

        End With


        iCols = m_oDS.Tables("Table1").Columns.Count

        For i = 0 To iCols - 1

            m_oSheet.Cells(1, i + 1).Value = _

                                    m_oDS.Tables("Table1").Columns(i).Caption

        Next


        row = 2

        For Each RowIterator As DataRow In m_oDS.Tables("Table1").Rows

            For i = 0 To iCols - 1

                m_oSheet.Cells(row, i + 1).Value = _

                        RowIterator(m_oDS.Tables("Table1").Columns(i).Caption)

            Next

            row = row + 1

        Next


        Dim r As Excel.Range

        m_oSheet.Select()

        r = m_oSheet.Range("A1")

        r.Select()

        Application.Selection.CurrentRegion.Select()

        Application.Selection.Columns.AutoFit()

        r.Select()

    Catch ex As System.IO.FileNotFoundException

        MsgBox("File: " & sDB & " not found")

    Catch ex As Exception


    End Try

End Sub- Save the project, and then run it by selecting Debug Start Debugging, or by pressing the F5 key.
Excel 2007 will appear with the Northwind Employees table loaded into Sheet1, as shown in Figure 9-18.
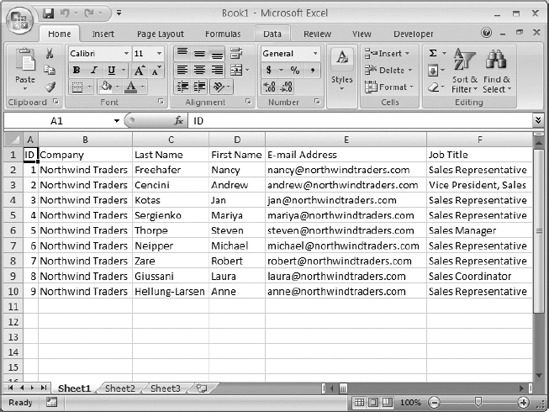
Figure 9-18. Northwind data added to the worksheet from the add-in project
I mentioned earlier that this is accomplished with no code at all in the workbook. Let's take a look at the VBE in the Excel workbook we just opened through our code.
Open the Excel VBE by selecting the Developer ribbon ![]() Code tab
Code tab ![]() Visual Basic command, or by pressing Alt+F11. Look through all of the built-in code modules and you will not find one bit of code.
Visual Basic command, or by pressing Alt+F11. Look through all of the built-in code modules and you will not find one bit of code.
Note All Excel workbooks ship with built-in code modules representing the code behind the workbook (ThisWorkbook) and its worksheets (Sheet1, Sheet2, etc.). You can find this code in the VBA IDE Project Explorer by double-clicking the item in the Project Explorer's Microsoft Excel Objects folder.
How does the workbook know where to find the data, then?
- Return to Excel and click the Office button, and then select Excel Options.
- Select Add-Ins from the left-hand navigation to display the Add-ins list, as shown in Figure 9-19.
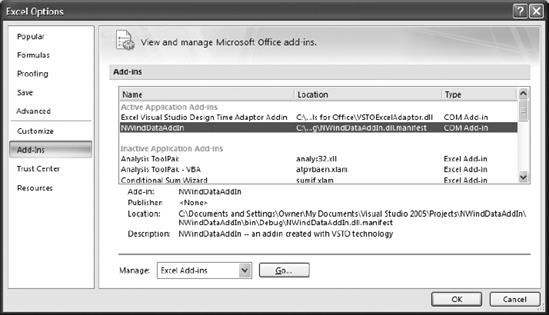
Figure 9-19. The Add-ins list in the Excel Options dialog box
This section gives you a snapshot of available and active add-in applications. Excel will leave these add-ins loaded even after you close Visual Studio. Before you close the workbook, and while the Excel Options dialog is still open, unload the add-in as follows.
- From the Manage drop-down list, choose COM Add-Ins, and then click the Go button.
- Deselect the NWindDataAddIn project, as shown in Figure 9-20.
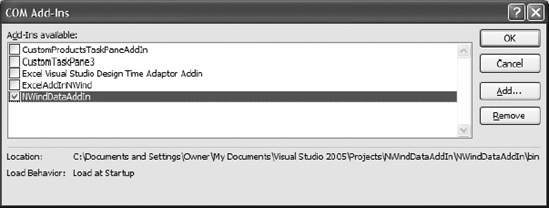
Figure 9-20. Unloading an add-in
- Click OK to unload the add-in.
- Close the workbook without saving.
- Close Visual Studio 2005.
Creating a Custom Task Pane and Data Input Form Using .NET
In this example, we'll look at a .NET project that creates a custom task pane and a simulated Excel UserForm. A task pane is a window that anchors itself to the right of an Office application and contains commands to perform various functions. A common Office task pane is the Getting Started task pane, shown in Figure 9-21.
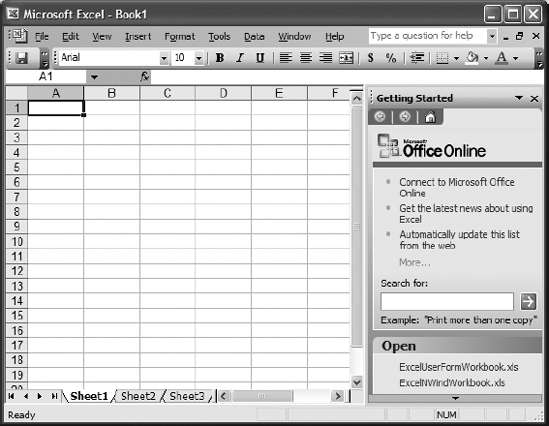
Figure 9-21. Getting Started task pane in Excel 2003
Our example task pane will contain commands used by a human resources department to enter new hire information and send that information to other groups for processing.
Creating the HR Task Pane Add-In
To begin, we'll need to add a couple of new items to our add-in project: a user control that will contain the task pane and a Windows form to act as our Excel 2007 UserForm.
- Open Visual Studio 2005.
- From the start page, create a new Microsoft Excel Add-in project.
- Name it UserFormAddIn.
- Add a new user control to the project by selecting Project Add User Control.
- In the Add New Item dialog box, name the user control HRTaskPane.vb.
- Add a new Windows form to the project by selecting Project Add Windows Form.
- In the Add New Item dialog box, name the Windows form NewEmpForm.vb.
The Custom Task Pane Our custom task pane will contain two commands. The first will open our Windows form to collect new employee information. The second will send that information to other departments who might need it.
- Open the User Control Designer by double-clicking HRTaskPane.vb in the Solution Explorer.
- Click the Toolbox (on the left side of the Visual Studio window) to unhide it (if it's not already displayed).
- Click the pin (Auto Hide) button to leave the Toolbox displayed.
- Add two Button controls from the Common Controls section (Figure 9-22) to the user control by dragging them onto the Designer.
- In the Properties pane, change the Text properties of the two buttons to New Employee and E-mail Info, respectively, as shown in Figure 9-22.
- In the Properties pane, name the New Employee button btnLaunch.
- In the Properties pane, name the E-mail Info button btnEmail.
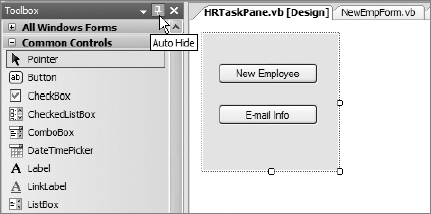
Figure 9-22. Completed HR task pane with Auto Hide command displayed
- Double-click the New Employee button to open its code stub.
- Add the following code to
btnLaunch_Click:
Dim oForm As New NewEmpForm

oForm.ShowDialog()
This code creates a new instance of our NewEmpForm and opens it in dialog mode (so it remains attached to the Excel window).
- Click back on the HRTaskPane.vb [Design] tab, and then double-click the E-mail Info button.
- Add the following code to
btnEmail_Click:
Dim rng As Excel.Range

rng = Globals.ThisAddIn.Application.Range("A6")

'code to handle e-mail here

MsgBox("Sending new hire information for" & rng.Text & " to Systems Group")
This is basically a dummy function to simply show that we can process the data from the task pane and place it anywhere else we'd like.
- Close the HRTaskPane design and code windows. If prompted to save changes, choose Yes.
Showing the Custom Task Pane Now that we've got our custom task pane set up, we need add code to show it when our add-in starts up. The ThisAddIn.vb code file that Visual Studio 2005 created for us came complete with two code stubs for handling add-in startup and shutdown.
Note The startup method contains one line of code generated by VSTO. This tells the add-in what application it's attaching itself to.
- Display the
ThisAddIn.vbcode window by clicking its tab in the Visual Studio display area (if it's not there, double-click it in the Solution Explorer). - Place the insertion point in the blank line below the end of the VSTO-generated code.
- Add the following code to display the HRTaskPane control:
Dim MyTaskPane As New HRTaskPane

Dim MyCustomTaskPane As Microsoft.Office.Tools.CustomTaskPane =

                 Me.CustomTaskPanes.Add(MyTaskPane, "HR Tasks")

MyCustomTaskPane.Visible = True
This code adds our HRTaskPane control to the add-in's CustomTaskPanes collection. In the call to the CustomTaskPanes.Add method, the second argument is the text that will display in the title bar of the task pane when it is displayed. Finally, we make the task pane visible.
Creating an Excel UserForm Using a Windows Form So far, we've created a task pane with two commands and added code to our add-in project to display the custom task pane. The last things for us to do are add controls to our Windows form to collect data and add commands to put the data on the active worksheet.
- Open NewEmpForm.vb in Design view by double-clicking it in the Solution Explorer.
- Add six labels, six text boxes, and two Button controls from the Common Controls Toolbox, and lay them out as shown in Figure 9-23.
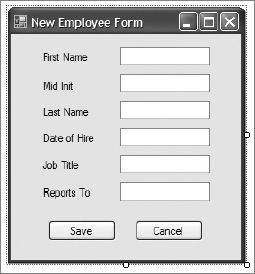
Figure 9-23. Completed employee data entry UserForm
- Name the text boxes and buttons per Table 9-1.
Table 9-1. New Employee Form Control Properties
| Item | Property | Value |
| Form | Text |
New Employee Form |
| TextBox1 | Name |
txtFName |
| TextBox2 | Name |
txtMidInit |
| TextBox3 | Name |
txtLName |
| TextBox4 | Name |
txtDOH |
| TextBox5 | Name |
txtTitle |
| TextBox6 | Name |
txtReportsTo |
| Label1 | Text |
First Name |
| Label2 | Text |
Mid Init |
| Label3 | Text |
Last Name |
| Label4 | Text |
Date of Hire |
| Label5 | Text |
Job Title |
| Label6 | Text |
Reports To |
| Button1 | Name |
btnSave |
| Button1 | Text |
Save |
| Button2 | Text |
btnCancel |
| Button2 | Text |
Cancel |
Now that we have our controls set, let's add code to create the display form in Excel 2007 and place the data from our Windows form onto the worksheet.
- Display the Save button code stub by double-clicking the Save button.
Our Save button will do three things:
- Set up the worksheet by adding headings and adjusting column widths
- Put the data from the data entry form on the worksheet
- Close the data entry form
- Add the following code to the
btnSave_Clickevent:
FormatForm()

PlaceData()

Close()
As you can see, each command maps to one of the three functions that the Save command will perform. The Close method is a built-in method of the Windows form object. Let's add the code for the FormatForm and PlaceData methods.
- On the NewEmpForm.vb code module, add a new subroutine and name it
FormatForm. - Add the following code to the
FormatFormsubroutine:
DoHeadings()

Dim rng As Excel.Range

With Globals.ThisAddIn.Application

    rng = .Range("A5")

    rng.Value = "First Name"

    rng.Font.Bold = True

    rng.ColumnWidth = 15

    rng = .Range("B5")

    rng.Value = "Mid Init"

    rng.Font.Bold = True

    rng.ColumnWidth = 15

    rng = .Range("C5")

    rng.Value = "Last Name"

    rng.Font.Bold = True

    rng.ColumnWidth = 15

    rng = .Range("A8")

    rng.Value = "Date of Hire"

    rng.Font.Bold = True

    rng = .Range("B8")

    rng.Value = "Job Title"

    rng.Font.Bold = True

    rng = .Range("C8")

    rng.Value = "Reports To"

    rng.Font.Bold = True

End With

rng = Nothing
The DoHeadings method will put the title and subtitle on the worksheet. The repeated reference to the rng variable sets the active cell, formats it, and places any text labels in the cell.
Note We have a reference to the Visual Basic Globals module in our With block. We saw the same reference earlier in our btnEmail_Click event on our custom task pane object. In order to access objects in an Excel workbook (or any Office application object), we must go through the Globals module. This module supports the runtime library members that contain information about the runtime currently being used.
- Add another subprocedure and name it
DoHeadings. - Add the following code:
Dim rng As Excel.Range

With Globals.ThisAddIn.Application

    rng = .Range("A1")

    rng.Value = "HR Data Entry System"

    rng.Font.Bold = True

    rng.Font.Size = 16

    rng = .Range("A2")

    rng.Value = "New Employee Information"

    rng.Font.Italic = True

    rng.Font.Size = 14

End With

rng = Nothing
There's nothing new here. This code works exactly like the FormatForm subroutine.
Next, let's add the code to put the data on the worksheet.
- Add a new subroutine, and name it
PlaceData. - Add the following code:
Dim rng As Excel.Range

With Globals.ThisAddIn.Application

    rng = .Range("A6")

    rng.Value = Me.txtFName.Text

    rng = .Range("B6")

    rng.Value = Me.txtMidInit.Text

    rng = .Range("C6")

    rng.Value = Me.txtLName.Text

    rng = .Range("A9")

    rng.Value = Me.txtDOH.Text

    rng = .Range("B9")

    rng.Value = Me.txtTitle.Text

    rng = .Range("C9")

    rng.Value = Me.txtReportsTo.Text

End With
Again, we're not doing anything new here—we're just breaking the functionality up into smaller pieces.
The last thing to do is to code the Cancel button.
- Select btnCancel from the Class Name drop-down list on the code designer.
- Select its click event from the Method Name list.
- In the
btnCancel_Clickevent code stub, add the following line of code:
Close()
That is all the code we need to write. Now let's run the application and see how it works.
Running the Add-In Now that the user control, the Excel Add-in, and the Windows form have all been coded, let's run the project and take a look at what we've done.
- Run the project by selecting Debug Start Debugging or pressing the F5 key.
Excel 2007 opens with a blank workbook displayed and our custom task pane anchored to the right of the workbook, as shown in Figure 9-24.
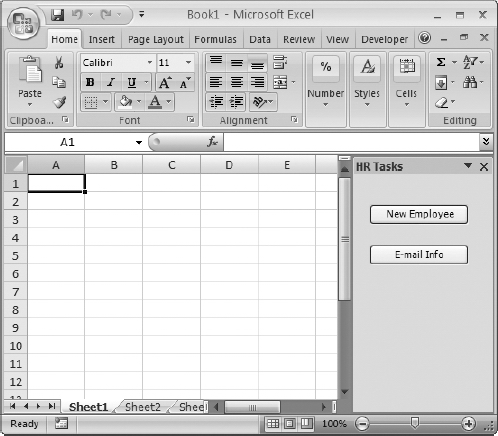
Figure 9-24. Excel 2007 workbook with custom task pane
- Click the New Employee button on the HR task pane to display the data entry form.
- Enter data on the New Employee form. Sample data is shown in Figure 9-25.
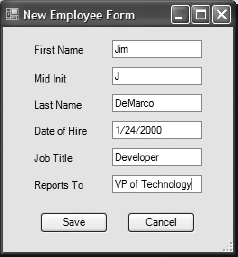
Figure 9-25. New Employee form with sample data
- Click the Save button to place the data on the worksheet and format the sheet, as shown in Figure 9-26.
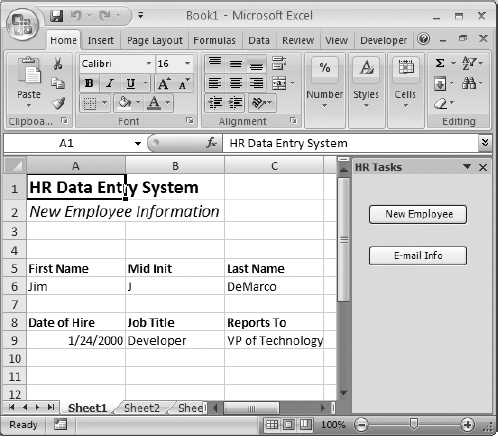
Figure 9-26. Data and formatting applied to active worksheet
- Close the workbook without saving.
- In Visual Studio 2005, save the project file.
Caution As with the previous example, the add-in will remain loaded for all Excel workbooks until you manually remove it.
Summary
We've created some very interesting code using both classic VB (6.0) and VSTO SE from within Visual Studio 2005. Although Microsoft is supporting VB 6 applications for the five-year product life cycle of Windows Vista, it is retiring support for the classic VB development environment. The good news is that .NET technologies, while not directly supported in Microsoft Office applications, are available to us via the VSTO SE package. Where previous versions of VSTO gave us direct access to Office products from within the Visual Studio development environment, the SE version does not. All access to Office applications is now done via add-in applications created in VSTO SE.
In this chapter, we looked at a method of bringing data into an Excel workbook using an ActiveX component created in VB 6.0. The code is almost identical to the code we wrote in Chapter 2 when we looked at data access in Excel 2007. With very few lines of code in the Excel VBE, we were able to accomplish what filled up multiple code modules in the original examples, by wrapping that code in a COM object.
We then built a couple of components using .NET technologies. These components made code nonexistent in our Excel workbooks. By running the code from an add-in, all we have to do is load the add-in, and the code runs. We built a simple data access tool that loads Northwind Employee data when a workbook is opened, and we designed a custom task pane that calls a data entry form to collect data and place it on the active worksheet.