
Chapter 7
Scanner scripting
Information in this chapter:
In this chapter, we will discuss how we can use and customize a few of the more popular scanning tools commonly found in penetration testing environments. Once again, we’ll be using the BackTrack 5 Linux security distribution, and everything we’ll be talking about will either already be found there or can easily be installed.
Although scanning tools are often useful in and of themselves, Nmap being an excellent example, we can often do considerably more with them if we are willing to devote the time and resources to learning how we can customize them. Many such tools provide us with the facility to customize or add to their default behaviors, either through easy avenues such as scripting or plug-in engines, or, failing that, by being driven directly through shell scripts. We will be taking a look at both types of development over the course of this chapter.
Even beyond the scope of what we talk about here, the authors encourage the reader to get out there and experiment with the tools that make up the penetration testing environment we have to work with. Many of the useful and interesting tools we have access to now are the result of someone thinking “there must be a better way to do this”, or “how handy it would be if we could just tie these tools together”. Penetration testing is all about thinking outside the box, and we have a really great set of tools to play with and expand upon. Let’s take a look at some of the tools we’ll be experimenting with.
Working with Scanning Tools
As we work through this chapter, we will cover what we can do with Netcat, Nmap, and Nessus/OpenVAS. Although some of us will be quick to point out that Netcat is not, strictly speaking, a scanning tool at all, it can be incredibly useful for such a simple tool, and we will cover some of the interesting things we can do with it, including using it as a scanning tool.
Netcat
Netcat is a deceptively simple command-line tool, available for both UNIX-like operating systems and Windows. In essence, Netcat allows us to connect to a Transmission Control Protocol (TCP) or User Datagram Protocol (UDP) network port and send or receive data. That’s it. Really. This may sound like a tool of limited utility to the uninitiated, but Netcat is often referred to as the “Swiss Army knife” of TCP/IP, due to its incredible range of utility.
We can use Netcat as a port scanner, as a banner grabber, to send files, to receive files, to listen on a port, as a proxy service, to forward ports, and a huge number of other potential tasks. All of this, and the fact that we can easily drive Netcat with a scripting language for shells, such as bash, which we covered in Chapter 1, earn Netcat a place in this chapter, as well as in the hearts of the authors.
Netcat is an open source tool, so we could tinker with the source code, if we so desired, but this is generally unnecessary. Netcat has sufficient flexibility all on its own that we can generally wrap it in a script and make it do what we need to do. Some of us might also point out that it sounds like a lot of effort to go through to get Netcat to jump through our particular hoops, and they may very well be correct. However, just as we discussed when we talked about Nmap, there are occasions when we may not be able to upload our favorite tools to a penetration testing target. On many UNIX-like systems, we will already find Netcat installed, ready and waiting to do our bidding.
Nmap
We’ve discussed Nmap in a few different places in this book, largely in regard to its role as a port scanner and service identifier. While these are certainly areas in which Nmap excels, they by no means represent the extent of its capabilities. We can also customize and develop entirely new functionality for Nmap by making use of the Nmap Scripting Engine (NSE). NSE is a fully developed scripting language for Nmap, with scripts being written in the Lua scripting language, which we will get into in a bit more depth later in the chapter.
By making use of NSE, we can ask Nmap to do all sorts of additional interesting things beyond simple port scanning, such as trying to carry out brute force attacks against the passwords for services we find open, to include the Simple Network Management Protocol (SNMP), Server Message Block (SMB), and Virtual Network Computing (VNC) services. Being able to call such functionality from Nmap not only gives us a much more useful tool, but also allows us to do more with less in environments in which we may not want to, or be able to, install additional tools. We also have a greater likelihood of finding Nmap installed on a target system already than we do of finding specific attack tools such as THC-Hydra.
Nessus/OpenVAS
Nessus and OpenVAS are a pair of tools that are, ostensibly, vulnerability scanners. The reason we mention them in the same breath there is that Nessus is the ancestor of OpenVAS, with OpenVAS having been forked from Nessus when Nessus changed from an open source tool to a closed source tool. There is much discussion on whether one product is superior to the other, based on any number of factors, to include cost (Nessus is subscription-based, while OpenVAS is free), availability of the source code, quality and quantity of the plug-ins for vulnerabilities, and a variety of other factors. BackTrack 5, as it was originally released, shipped with Nessus installed, but not OpenVAS. OpenVAS can be installed with relative ease by following the installation instructions for Ubuntu 10.04 (on which BackTrack 5 is based) on the openvas.org Web site, www.openvas.org/install-packages.html#openvas4_ubuntu_obs.
Whether we choose to use Nessus or OpenVAS, both support the Nessus Attack Scripting Language (NASL) for writing plug-ins. NASL, similarly to NSE, allows us to extend the functionality of Nessus/OpenVAS by writing additional plug-in scripts. Although the existing library of plug-ins for both tools is extensive and covers many of the common application vulnerabilities, there is no reasonable way for such a set of information to include every possible piece of software or service that might be running in our environments. Particularly in the case where we are using services on nonstandard ports, or custom applications entirely, we would need to make use of NASL to either develop a custom plug-in or modify an existing one to meet our needs.
Netcat
Netcat can be a very useful tool to have handy in a penetration testing environment. We can put it to a staggering number of uses, as we talked about earlier in this chapter, from moving files around to running servers; nearly any simple task we might want to do over the network can be carried out in some fashion with Netcat or one of its variants. It is well worth our time as penetration testers to spend a little time learning the ins and outs of Netcat, and to what purposes it can be put.
Implementations of Netcat
We discussed Netcat a bit earlier in the chapter, but let’s look at some of the more specific details now. As we said, Netcat is a very flexible tool that can be used to send or receive network traffic in support of a broad variety of efforts. We can commonly find Netcat installed on UNIX-like operating systems, particularly on Linux distributions, which can make it a very handy tool for us to access, since we may not even need to install it on our target system.
Although we are considerably less likely to find Netcat present on a Windows OS, there are versions that will run on Microsoft operating systems, and we can certainly install it there if we have the capability and permission to do so. We can find Netcat downloads for Windows scattered hither and yon across the Internet, as the source is available and many people have posted both binary and source versions of it. A little Googling will generally find us a copy in short order, but a fairly reliable place to pick up a compiled version for Windows is the Web site located at http://joncraton.org/blog/46.
WARNING
By default, many versions of Netcat for Windows are compiled with the –e option enabled, allowing us to use Netcat to run an executable file on the system and connect it to the network through Netcat’s network facilities. Many anti-virus tools on Windows will be upset by this and will flag Netcat as malware. If this is an issue, we can recompile Netcat without this option, or download a compiled version without the –e option present at www.rodneybeede.com/Compile_Netcat_on_Windows_using_MinGW.html.
Netcat variants
As we mentioned previously, Netcat is an open source tool. This leaves it open to the tinkering efforts of the masses of programmers and would-be programmers who might feel inclined to retool it in order to add features, make changes, and so on. A large number of Netcat derivatives are floating about on the Internet, so let’s take a look at a few of them quickly to see what the differences are. Some of the more interesting variations are Socat, CryptCat, and Ncat, but this is by no means an exhaustive list.
Socat1 is an implementation of Netcat that provides several very interesting features. One of the more useful bits is that Socat can make use of a number of channels to send and receive data, including TCP/IP, serial lines, files, pipes, and so on. This allows us to considerably extend the number of uses to which we can put Socat. Socat also has a large set of other features that extend the capabilities of Netcat, and more information can be found at www.dest-unreach.org/socat/doc/README. Socat is available for both UNIX-like and Microsoft platforms.
CryptCat2 is a relatively stock implementation of the Netcat source, with one interesting feature added: encryption. CryptCat supports Twofish encryption, enabling us to secure the network traffic we are sending through it. CryptCat is available for UNIX-like and Windows operating systems.
Ncat3 is a Netcat implementation that ships with the Nmap scanner distribution. Ncat, very similar in nature to Socat, is a Netcat derivative that adds a great number of features, including the ability to chain multiple Ncat instances together, enhanced support for using Ncat as a proxy, SSL support, and a number of other features. Ncat, like Nmap, is also functional on several platforms.
Now that we’ve talked about the possibilities of Netcat a bit, let’s look at a bit of code.
Simple Netcat usage
Before we jump into what we can do with scripts in Netcat, let’s take a quick look at what we can do with a simple command. We can very easily perform a primitive port scan with Netcat by running a command along the lines of nc –vvn –w 5 –z 10.0.0.1 50–80. Here we have specified we will run Netcat (nc) with extra verbosity (vv) and not resolve the domain name system or DNS (n), setting a timeout of five seconds (–w 5) and using zero I/O mode (z) against ports 50–80 of the IP address 10.0.0.1. We should get back a set of results something along the lines of the following, depending on what exactly we scanned and the ports on which that host is listening:
(UNKNOWN) [10.0.0.1] 80 (www) : Connection refused
(UNKNOWN) [10.0.0.1] 79 (finger) : Connection refused
(UNKNOWN) [10.0.0.1] 78 (?) : Connection refused
(UNKNOWN) [10.0.0.1] 77 (rje) : Connection refused
(UNKNOWN) [10.0.0.1] 76 (?) : Connection refused
(UNKNOWN) [10.0.0.1] 75 (?) : Connection refused
(UNKNOWN) [10.0.0.1] 74 (?) : Connection refused
(UNKNOWN) [10.0.0.1] 73 (?) : Connection refused
(UNKNOWN) [10.0.0.1] 72 (?) : Connection refused
(UNKNOWN) [10.0.0.1] 71 (?) : Connection refused
(UNKNOWN) [10.0.0.1] 70 (gopher) : Connection refused
(UNKNOWN) [10.0.0.1] 69 (?) : Connection refused
(UNKNOWN) [10.0.0.1] 68 (bootpc) : Connection refused
(UNKNOWN) [10.0.0.1] 67 (bootps) : Connection refused
(UNKNOWN) [10.0.0.1] 66 (?) : Connection refused
(UNKNOWN) [10.0.0.1] 65 (tacacs-ds) : Connection refused
(UNKNOWN) [10.0.0.1] 64 (?) : Connection refused
(UNKNOWN) [10.0.0.1] 63 (?) : Connection refused
(UNKNOWN) [10.0.0.1] 62 (?): Connection refused
(UNKNOWN) [10.0.0.1] 61 (?) : Connection refused
(UNKNOWN) [10.0.0.1] 60 (?) : Connection refused
(UNKNOWN) [10.0.0.1] 59 (?) : Connection refused
(UNKNOWN) [10.0.0.1] 58 (?) : Connection refused
(UNKNOWN) [10.0.0.1] 57 (mtp) : Connection refused
(UNKNOWN) [10.0.0.1] 56 (?) : Connection refused
(UNKNOWN) [10.0.0.1] 55 (?) : Connection refused
(UNKNOWN) [10.0.0.1] 54 (?) : Connection refused
(UNKNOWN) [10.0.0.1] 53 (domain) open
(UNKNOWN) [10.0.0.1] 52 (?) : Connection refused
(UNKNOWN) [10.0.0.1] 51 (?) : Connection refused
(UNKNOWN) [10.0.0.1] 50 (re-mail-ck) : Connection refused
sent 0, rcvd 0
This particular device is a firewall, and we can see we were able to make a connection to port 53, used for DNS, and that there are possibly a few other ports open which, although we could not connect to them with Netcat, we might want to look at further. We are also likely not seeing services making use of UDP. Netcat is indeed a powerful tool.
Building a Web server with Netcat
As we briefly discussed earlier in the chapter, we can also use Netcat to set up a very small and simple server. In this case, we will put together a Netcat Web server in a very small bash script. First we need a file to serve, so we will set up a simple HTML file:
<html>
<head>
<title>Netcat Rulez!</title>
<head>
<body>
.-=Netcat=-.<br>
<img src="http://icanhascheezburger.files.wordpress.com/2011/05/47a802ee-8bb2-4e1a-94a3-4a0c077eb307.jpg">
</body>
</html>
Now that we have something to serve, we need a small script to run Netcat and serve it out as a service on a port. We can execute this script by running it as sudo ./ncwebserver.
#!/bin/bash
while true; do nc -l -p 80 -q 1 < index.html; done
Let’s have a quick look at what we did here. We start out with the shebang, as we discussed in Chapter 1. We then set up a brief while loop, implemented all on a single line. We first set the condition of our loop with while true;. This will always evaluate to true, so what we have created here is an infinite loop. Next, we execute Netcat with the –l (the lowercase letter L, not the numeral 1) option, causing it to listen on the port we have specified with –p, namely port 80. We then make use of the less than operator to direct the contents of the file index.html to the Netcat process, and close out our loop with done. If all goes well, we should see results similar to Figure 7.1.
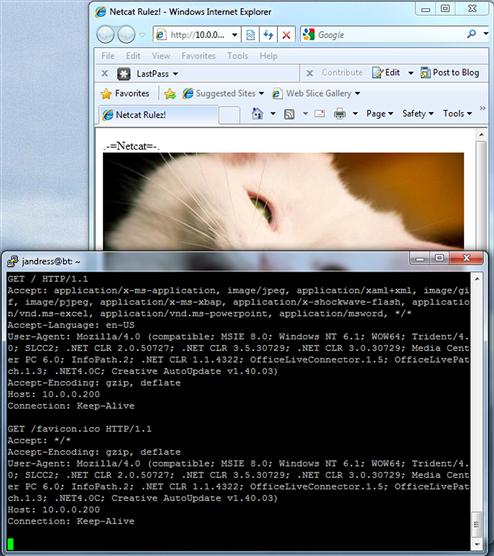
FIGURE 7.1 Netcat Web Server Output
Also notice we ran the script with sudo, allowing us to run it with the privileges of root. In this case, we need root privileges in order to run our tiny server on port 80. Any ports below 1024 require the additional permissions in order to open a listening port.
TIP
In some cases, we may find that our Netcat Web server is a bit difficult to stop, and may not respond to Ctrl + C properly. If this is the case, we can suspend the process with Ctrl + Z, then run ps (as root if we are not logged in directly) to get the process ID, and kill the process with kill -9 <process id>.
We can also watch the activity of our server on the console where the script is running. We can see the requests that come in from the browser, as well as the agent information for the browser, for each connection that is made to Netcat.
Transferring files with Netcat
Another handy thing we can do with Netcat is to send and receive files over the network. This works largely the same way as sending any other sort of network traffic we might care to, which is what it ultimately is. The simplest form of file transfer we can do is with a quick command-line usage of Netcat. On the receiving end, we would run nc –v –w 30 –l –p 5050 > myfile.txt. This will run Netcat in verbose mode with a timeout of 30 seconds, listening on port 5050, and sending whatever it receives to myfile.txt.
On the sending end, we would execute something along the lines of nc –v –w 5 10.0.1.1 5050 < myfile.txt. This will fire up Netcat in verbose mode, set a timeout of five seconds, and send myfile.txt to whatever is listening on port 5050. The beauty of Netcat is that we can perform a relatively complex activity with a few simple commands.
There are a few things we can do to make our file transfers a bit more aesthetically pleasing and to monitor their progress, so we might want to wrap Netcat in a bit of a script in order to add a few extra features.
For the sake of simplicity and clarity, we’ll be splitting the send and the receive code into two different scripts. First, let’s have a look at the receive code, which we would execute as ./receive:
#!/bin/bash
port=’5050’
port2=’5051’
filename=’default.txt’
filename2=’default.txt’
filename2=$(nc -w 30 -l -p $port2)
filename=$filename2
echo "Incoming filename is $filename"
nc -w 30 -l -p $port > $filename
echo "Finished"
This is a relatively simple block of code, but we’re doing a bit of extra work to make our file transfer somewhat cleaner. In the example we looked at where we did the file transfer on the command line, we had to manually specify the filename on the receiving end to end up in the right place, which is somewhat less than elegant. Here, we’ll be using two different Netcat transactions in order to avoid having to do this.
The top few lines of our bash script contain the shebang and the setup for our variables. We’ll be working with two different ports, 5050 to send the actual file over and 5051 to send the filename. We also have two variables set up to contain the filename, one of which we will be overwriting.
In our first Netcat transaction, we will be listening on the port specified in the variable port2, 5051 by default. We will take the traffic transmitted to our Netcat listener, hopefully our incoming filename, and place it into filename2. We will then take the value in $filename2 and write it to filename. We would take the input directly from our Netcat listener and put it into filename, but this doesn’t leave us much room for issues. Using two different filename variables this way gives us a margin for error, and gives us a better chance of ending up with something reasonable (likely default.txt) for a filename if we have a problem. Now that we have a filename, we can echo it out and look for the incoming file.
Here we start our second Netcat listener, this time on the port specified in our port variable (5050). We take the incoming file, naming it for the value in the filename variable which was passed to us earlier. We then echo a statement indicating we are done and exit the script.
Now let’s look at the send script, which we would execute as ./send testfile 10.0.0.200:
#!/bin/bash
filename=$1
host=$2
port=’5050’
port2=’5051’
echo "Sending file $filename to $host"
echo $filename | nc -w 2 $host $port2
nc -w 2 $host $port < $filename
echo "Finished"
This script has a similar initial setup as the receive script. First we have the shebang and out block of variables. We take in the name of the file we will be sending and the name of the host we will be sending it to as command-line arguments, $1 and $2, respectively. We also set our ports here in the port and port2 variables, matching the two port values we set in the receive script. Additionally, we echo out a message to the console to tell the user what file we will be sending and where we will be sending it.
Next, we run our two Netcat transactions. First, we send the filename by echoing the contents of the filename variable and piping that to Netcat. Netcat will send this to the host and port specified in our host and port2 variables, communicating the name of the file we intend to send so that the receive script can name it properly on the other end. Also note that here, and in the receive script as well, we have dispensed with the –v option for Netcat. Although it is nice to have Netcat be a bit chatty on the command line when we are using it, this is not as helpful in the middle of our script.
We then send the actual file itself over the port specified in port and to the same host as our previous connection. Lastly, we echo out a message to tell the user we have finished. The overall exchange from the receive side should look something like Figure 7.2.

FIGURE 7.2 Netcat File Transfer Receive Output
And from the send side it should look like Figure 7.3.
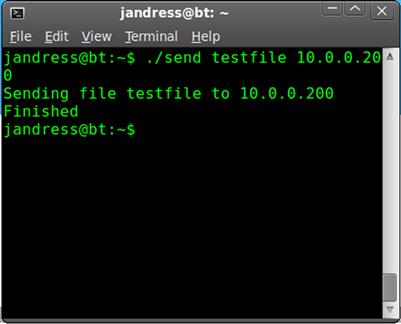
FIGURE 7.3 Netcat File Transfer Send Output
There are several things we can do to improve our set of scripts here:
• Use one of the Netcat derivatives that supports encryption in order to secure our transmissions.
• Combine the send and receive scripts into one script, and differentiate between sending and receiving functionality through the use of arguments.
• Include the option to use compression tools such as tar and/or gzip so that we don’t need to send as much data over the network.
• Consider rewriting the script in a more flexible language such as Perl or Ruby so that we can do more with the information that Netcat is sending or receiving.
• Take in the listening and/or sending ports as an argument so that we are more flexible.
• Add error handling. In the present state of our scripts, it doesn’t take much to get us off the rails, and we won’t handle issues gracefully.
• Add progress monitoring. We can use a tool such as pv4 to monitor the progress of our file transfer from either or both ends.
These are only the updates that immediately present themselves, and there are sure to be quite a few others we can come up with given a little thought. Although we could access this same functionality by using ready-made tools, such as Secure Shell (SSH), to provide this functionality, it is often a good thing when we can improvise what we need out of the materials we might have at hand.
Nmap
As we discussed earlier in the chapter, we can make use of NSE to extend the capabilities of Nmap. In this section, we will discuss the Lua programming language, in which NSE scripts are written, as well as some specific examples of what we can do with NSE.
Working with service probes in Nmap
One of the handy things we can do with Nmap is to probe for services on our target hosts. This allows us to add custom service definitions to Nmap, so we can detect running services outside the default list, specified in the nmap-service file, which is located in /usr/local/share/nmap on BackTrack 5. The nmap-service file is used to perform a simple match against the port number, and provides us with the name of the service that typically runs on that port. When we run a default Nmap scan like nmap 10.0.0.51 with no options, the nmap-service file is used to provide the service information, such as:
PORT STATE SERVICE
80/tcp open http
139/tcp open netbios-ssn
9100/tcp open jetdirect
9101/tcp open jetdirect
9102/tcp open jetdirect
9110/tcp open unknown
9220/tcp open unknown
As we said, this is simply a match from the nmap-service file, with no additional checks made. We can certainly edit this file to add or change entries, but this has limited utility as the file is already fairly exhaustive.
If we want to get a better idea of what exactly the running services are, we can run Nmap with the version checking option turned on, as in nmap –sV 10.0.0.51, which should produce results along the lines of the following:
PORT STATE SERVICE VERSION
80/tcp open http Virata-EmWeb 6.0.1 (HP PhotoSmart/Deskjet printer http config)
139/tcp open netbios-ssn?
9100/tcp open jetdirect?
9101/tcp open jetdirect?
9102/tcp open jetdirect?
9110/tcp open unknown
9220/tcp open hp-gsg HP Generic Scan Gateway 1.0
9290/tcp open hp-gsg IEEE 1284.4 scan peripheral gateway
1 service unrecognized despite returning data. If you know the service/version, please submit the following fingerprint at http://www.insecure.org/cgi-bin/servicefp-submit.cgi :
SF-Port9110-TCP:V=5.51%D=4/20%Time=4DD72E40%P=x86_64-unknown-linux-gnu
SF:%r(RPCCheck,2B,"��(rxfex1dx13�������x02�x01x86xa0�x
SF:01x97|��������������������");
Service Info: Device: printer
We can see here that we got back quite a bit more detailed information on several of the ports, although not everything was successful. This information is pulled from the entries in the nmap-services-probes file, also located in /usr/local/share/nmap on BackTrack 5. We can add entries to this file in order to perform detailed version detection for custom services. In the output from our example, we can also see information returned on an unrecognized service, which we could use as the basis for building a new entry in the nmap-services-probes file.
Let’s go ahead and add a new match entry in the nmap-services-probes file for the unknown service that came back from our scan.
In this case, the device is an HP LaserJet printer. If we look at the fingerprint data, we can break it out into its components, as listed in Table 7.1.
Table 7.1 Netcat Service Fingerprint Data
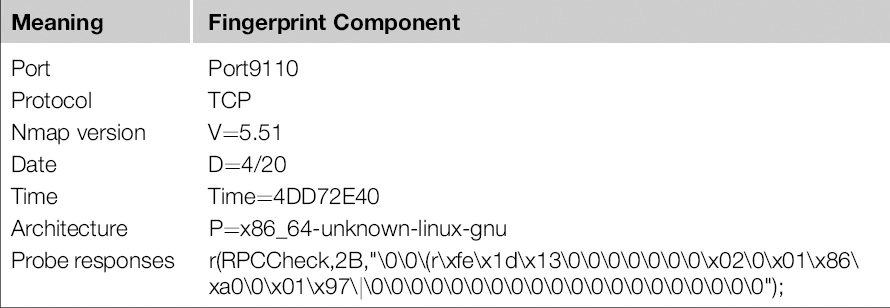
We can see from the probe response that port 9110 responded to a Remote Procedure Call (RPC) probe of some kind, so this gives us an indication of what kind of traffic may be flowing through the port. We can try to discover more specific information about this port with additional probing from Nmap, but with our example device, this will ultimately be rather fruitless. For now we will assume that this is (questionably) RPC and proceed on that basis.
If we check in nmap-services, we will find the entry for port 9110 listed as:
This is easy enough to correct, if we like, by editing the file. In order to get things working a bit better for the actual problems, we will need to place an entry in nmap-services-probes. We can tell that the response came from the RPCCheck probe, so this is where we need to start in the file. If we search for the string RPCCheck in the file, we will find it (at present) around line 7,694, which is where the probe section starts, as shown in Figure 7.4.
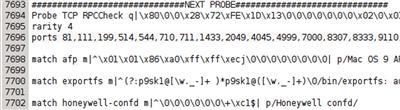
FIGURE 7.4 RPC Probe Section in nmap-service-probes
We will add a match line in this section in order to allow our service to be recognized a little better. In this case, we will take a section of the fingerprint and use it to put together the match line. The match line will simply be:
match hp-rpc m|^��(rxfex1dx13�������x02�x01x86| p/Unknown HP RPC Service/
The match statements in this file use the Perl regular expression (regex) syntax, as we discussed in Chapter 3. Here we start the line with match, then the service name, which we have set as hp-rpc here, then the match string, then the product name, which we have called Unknown HP RPC Service. That’s all there is to it.
Now we can save the file, and run our service scan again (nmap –sV 10.0.0.51) to see the results. This time we get back a different set of information for our port:
PORT STATE SERVICE VERSION
80/tcp open http Virata-EmWeb 6.0.1 (HP PhotoSmart/Deskjet printer http config)
139/tcp open netbios-ssn?
9100/tcp open jetdirect?
9101/tcp open jetdirect?
9102/tcp open jetdirect?
9110/tcp open hp-rpc Unknown HP RPC Service
9220/tcp open hp-gsg HP Generic Scan Gateway 1.0
9290/tcp open hp-gsg IEEE 1284.4 scan peripheral gateway
MAC Address: 00:15:60:4C:D6:7A (Hewlett Packard)
Depending on the service fingerprint in question and the probe being used, we may have to tinker about a bit in order to get the match line just right. We want to be specific enough so that we don’t accidentally include services that have a similar fingerprint and we include all the proper information when we have it. There are also a number of other fields we can use on the match line, all of which are included in the Nmap documentation [1].
The Nmap scripting engine
NSE basically amounts to a Lua interpreter, similar in nature to any of the other interpreters we have discussed in the course of this book. Additionally, NSE scripts require a few extra parameters in order for Nmap to interpret them properly. Let’s talk a bit about Lua first, and then we will come back to the specifics of how we need to format files in order for NSE to be happy with them.
Building Nmap NSE files
Lua is not a language we have discussed thus far in this book. It is used in a number of interesting places for various applications, such as the well-known World of Warcraft, and also in our favorite scanning tool, Nmap. We’re not going to go into great depth on it here, as it has a very specific application for this book, namely to write scripts for NSE. We will, however, go over some of the basics as we explore a simple NSE script.
NOTE
For those of us who might be interested in delving further into Lua, there are a great number of resources available to us. Many books have been written on the subject, but a good starting place is in the online documentation, more specifically the Lua 5.1 Reference Manual, available for free at www.lua.org/docs.html.
To take a cue from the official Nmap documentation, let’s take a look at a very simple NSE script, finger.nse. This script does exactly as it sounds like it should and retrieves information from the finger daemon running on the target host. The original source of this script can be found at http://nmap.org/svn/scripts/finger.nse.
description = [[
Attempts to retrieve a list of usernames using the finger service.
]]
author = "Eddie Bell"
license = "Same as Nmap--See http://nmap.org/book/man-legal.html"
categories = {"default", "discovery", "safe"}
---
-- @output
-- PORT STATE SERVICE
-- 79/tcp open finger
-- | finger:
-- | Welcome to Linux version 2.6.31.12-0.2-default at linux-pb94.site !
-- | 01:14am up 18:54, 4 users, load average: 0.14, 0.08, 0.01
-- |
-- | Login Name Tty Idle Login Time Where
-- | Gutek Ange Gutek ∗;:0 - Wed 06:19 console
-- | Gutek Ange Gutek pts/1 18:54 Wed 06:20
-- | Gutek Ange Gutek ∗pts/0 - Thu 00:41
-- |_Gutek Ange Gutek ∗pts/4 3 Thu 01:06
require "comm"
require "shortport"
portrule = shortport.port_or_service(79, "finger")
action = function(host, port)
local try = nmap.new_try()
return try(comm.exchange(host, port, " ",
{lines=100, proto=port.protocol, timeout=5000}))
end
The beginning of the script, up to the point of the two require lines, is all internal documentation and metadata. These lines provide a description of what the script does, provide several descriptive attributes, and display the usage for the script.
The two require lines add in libraries for the script to access, libraries for communications and for building short port rules, respectively. We can find the full list of NSE libraries available for our use in the Nmap documentation [2].
We then set up the line for detection of our target service. The portrule line will look for either the service operating on the port we specify, 79 in this case, or the service being named finger. Presuming our conditions for matching the service are met, we will execute the code in the action section.
Here, we will set up a bit of error handling using try so that we can gracefully handle any errors. We then use comm.exchange to open a connection to the host and send a carriage return and line feed (CRLF). If the connection is successful, we will wait for 100 lines of data, or a timeout of five seconds, or for the target to sever the connection.
This is an exceedingly simple script, and many in the standard set of NSE scripts are considerably more complex. Given the example of the finger script to work from, and the excellent documentation provided with Nmap, we should be able to construct other simple scripts. Such scripts, however, barely scratch the surface of what we can do with NSE. For additional information, the best available resource is Nmap Network Scanning (ISBN: 978-0979958717, Nmap Project), by Gordon “Fyodor” Lyon. This book goes into great detail on Nmap in general and on NSE in particular, and is generally a very good book on the topic.
Nessus/OpenVAS
Let’s talk a bit about what we can do with Nessus and OpenVAS. A huge library of plug-ins is available, more than 40,000 in the Nessus Professional Feed at the time this was written [3]. As we discussed earlier in the chapter, we may very well want to develop custom plug-ins in order to account for nonstandard services or custom applications in our environments.
NASL in Nessus and OpenVAS
Ideally, when we build custom scripts for penetration testing, we want them to be as versatile and as multipurpose as possible. NASL provides us with a good tool for doing this, as our plug-ins can generally be used in both Nessus and OpenVAS. This gives us the full support of the commercial version of Nessus where we are able to afford it and allowed to use it, as well as the ability to make use of OpenVAS in situations where we can’t or aren’t willing to use Nessus.
For the purposes of creating plug-ins, as we will discuss shortly, there really are no major differences between the two. Since the code bases between the two applications diverged, many of the changes and features added to Nessus were in the name of changes to the client end and in the name of performance. For our purposes, the two are largely interchangeable. In our examples, we will be using Nessus as this is what shipped with the original release of BackTrack 5.
In order to use Nessus on BackTrack 5, we will need to register it with at least the free home feed for plug-ins. More information on this is available at www.nessus.org/products/nessus/nessus-homefeed.
Nessus attack scripting language (NASL)
Okay, let’s jump directly in and do a little NASL scripting. NASL is generally similar to C and Perl, so if you can work in either of those a little, you should be fine here. If not, go back and revisit Chapter 3 to look over some of the Perl discussions and examples, and then come back here. Right; into the pool then:
socket = open_sock_tcp(21);
if (! socket) exit(0);
banner = recv_line(socket:socket, length:4096);
display(banner);
This is about as simple a NASL script as we can get. We can run it on BackTrack 5 by executing /opt/nessus/bin/nasl –t 10.0.0.50 ftp.nasl. Note that this will only work against a system that is running an FTP service and shows a banner. A favorite target for poking about of this sort is a network printer, as they usually have quite a few ports open and lousy security.
In the script, the first line opens a socket to port 21 (FTP) of the target we specified on the command line, in this case our handy network printer which runs an FTP server. The second line says we should exit if the socket could not be opened.
Now that we have a connection, we will use recv_line, in conjunction with our socket, to pull 4,096 bytes of data from the target at the other end of our connection and place it in the banner variable. Once we have this, we echo our information out to the console with display(banner). Simple enough. We should get a result something along the lines of Figure 7.5 when we execute our script.
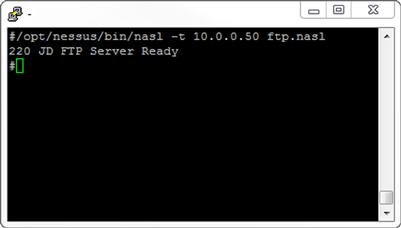
FIGURE 7.5 ftp.nasl Output
We can change this to interact with another service easily enough by altering the port specified in the first line. Our target device has a Telnet port open also, so let’s see where we get by simply changing the port to 23 (Telnet) and running it again.
Uh-oh, no output. We can use Netcat again here to go talk to the Telnet port on the device and see if we can figure out what happened, running it as netcat 10.0.0.50 23. Hmm, now we get back something along the lines of:
ÿûÿûHP JetDirect
Password is not set
Please type "menu" for the MENU system,
or "?" for help, or "/" for current settings.
>
So, maybe we need to try sending a character at it from our NASL script in order to get the output. We can modify the script like this:
socket = open_sock_tcp(23);
if (! socket) exit(0);
mesg = raw_string(0x0d);
send(socket:socket, data:mesg);
banner = recv_line(socket:socket, length:4096);
display(banner);
Here we have an extra couple of lines. The first new line, starting with mesg, will take a raw ASCII string, in this case 0x0d (a carriage return), and place it in the mesg variable. Directly below that, we use our socket to send the contents of mesg to the target on the other end of the socket, and then we carry on with the script. Let’s run the script again and see where this gets us using /opt/nessus/bin/nasl –t 10.0.0.50 telnet.nasl. The results here should look something like Figure 7.6. Much better.
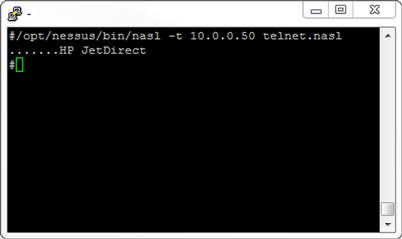
FIGURE 7.6 telnet.nasl Output
Now we’re getting somewhere. If we could retrieve one more line, our script would pick up a bit of interesting information, and we might be able to use the script for something. We can easily do this with one addition.
socket = open_sock_tcp(23);
if (! socket) exit(0);
mesg = raw_string(0x0d);
send(socket:socket, data:mesg);
banner = recv_line(socket:socket, length:4096);
banner += recv_line(socket:socket, length:4096);
display(banner);
Here we just added another recv_line below the first and tacked it onto the end of the banner variable. Now we should see:
#/opt/nessus/bin/nasl -t 10.0.0.50 telnet.nasl
…….HP JetDirect
Password is not set
#
Now we have a small NASL script that will talk to the Telnet interface on a printer and tell us if the administrative password is set or not. Network printers are often overlooked in penetration tests, but they can be a very juicy target indeed. This one is wide open.
We can do quite a few things to make this script better:
• The script presently does not contain the functionality that will allow it to be loaded as a plug-in directly by Nessus, or to show results in a report run from the GUI client.
• We don’t have logic in place to handle errors.
• Presently, we are only able to talk to printers running HP JetDirect cards.
• We could mine quite a bit more information from the Telnet interface. If we send menu at the Telnet prompt, the device will give us back more information.
Much of this work is simple programming logic, and anyone with a reasonable grasp on the syntax should be able to sort it out fairly easily. For the Nessus-specific pieces, the best resource available at present is Nessus Network Auditing, 2nd Edition (ISBN: 978-1-59749-208-9, Syngress), by Russ Rogers. Chapter 11 in this book is entirely dedicated to NASL, and goes into quite a bit of depth on the topic. Resources on NASL are also available from Tenable directly, but at the time that this was written, they had not been updated in some time.
Summary
There are a truly enormous number of scanning tools we might use in the conduct of a penetration test. Given the capability of customizing the way these tools function, or scripting their behavior, we can considerably expand the set of our potential activities in a penetration test, without necessarily needing to resort to additional tools. In particular, Netcat, Nmap, and Nessus/OpenVAS are a few of the tools that lend themselves well to this type of customization and/or automation.
We can alter or add to the behavior of Nmap through the use of Lua scripts with relative ease via the Nmap Scripting Engine (NSE). NSE scripts can allow us to add entirely new functionality to Nmap, for example, the variety of password brute forcing tools/scripts that ship with it, but are not a part of its core functionality. The output from Nmap can also be used to drive other tools as a source of input, where those tools do not have such functionality on their own.
Nessus and OpenVAS also lend themselves well to customization through the use of the Nessus Attack Scripting Language (NASL). NASL, very similarly to NSE, allows us to alter the functionality of Nessus and OpenVAS, or add new functionality to them entirely.
Netcat, although not directly alterable without making changes to the source code of the application itself, is sufficiently versatile as to be most useful from a scripting standpoint. We can easily control Netcat through shell scripting, such as we might do in a bash shell. Netcat can allow us to send files, run simple network services, forward ports, and a great number of other similar tasks. Netcat is truly the Swiss Army knife of all TCP/IP tools.
ENDNOTES
1. Lyon G. Nmap-service-probes file format. Nmap.org. [Online] 2011. [Cited: April 17, 2011.] http://nmap.org/book/vscan-fileformat.html.
2. Lyon G. NSE Libraries. Nmap.org. [Online] 2011. [Cited: April 19, 2011.] http://nmap.org/book/nse-library.html.
3. Tenable Network Security. Plugins. Tenable Network Security. [Online] 2011. [Cited: April 17, 2011.] www.nessus.org/plugins/.