Chapter 16. Using Event Kit on the iPhone and iPad
- Overview of the Event Kit frameworks
- Adding an event programmatically
- Using Event Kit view controllers
- Fetching events by using Grand Central Dispatch
With the Calendar app in iOS 4, iPhone or iPad owners can easily consolidate their Gmail account, Microsoft Exchange account, Mobile Me account, and other calendar accounts on the same device. The Calendar’s database can be accessed within your application through Event Kit frameworks. The Event Kit frameworks are made up of two frameworks: the Event Kit framework and the Event Kit UI framework. Together, they help your application access the Calendar’s database from a high level. Previously, in chapter 9, we covered the Address Book frameworks on iOS. The Event Kit frameworks are quite similar to the Address Book API in a way.
Imagine you can build a birthday event planner application and have every friend’s birthday party plan automatically added to the Calendar’s database by clicking one button. In this chapter, we’ll first provide some basic references on the Event Kit framework with the Birthday application, and then we’ll show another Event application to fetch and display the existing events from the Calendar’s database to the table view controller, with the help of the Event Kit UI framework. Finally, with the help of Grand Central Dispatch (GCD) from iOS 4, we’ll demonstrate an improved technique for fetching data from Calendar’s database.
16.1. An overview of the Event Kit frameworks
Calendar apps coming with iOS on iPhone and iPad are convenient for several reasons (see figure 16.1). They allow users to check out their schedule on the go and consolidate all the information into one Calendar database.
Figure 16.1. Calendar app on iPhone and iPad

In order to access the Calendar database, Apple provides a convenient API in iOS 4 called Event Kit. There are two frameworks for Event Kit, as we mentioned earlier. The Event Kit framework gives you access to insert and delete an event in the Calendar’s database. It’s high-level API access to the Calendar database, and the best part is that any changes made to the Calendar will be synced automatically, so you can have peace of mind when you’re writing the code for Calendar access. The Event Kit UI framework provides the handy interfaces to display and edit the Calendar’s database with the same view controller you’re already familiar with by using the Calendar app on the iPhone or iPad.
16.1.1. Adding Event Kit frameworks to your project
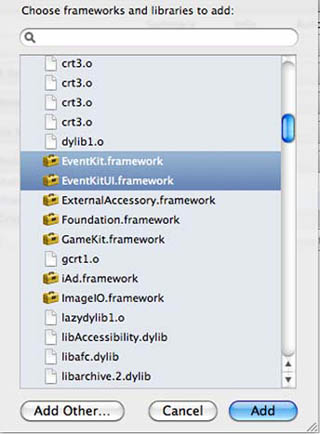
In order to use the Event Kit frameworks, you first need to add the existing frameworks EventKit.framework and EventKitUI.framework into the project. Head over to Xcode, highlight the top-level Project node in the project navigator tree, and on the right side view choose a target; then select the Build Phases tab. Under this tab is an entry called Link Binary with Libraries. Click the + button, and you’ll see a window with the entire list of available frameworks under the current SDK, as shown in figure 16.2. Navigate to EventKit.framework and click the Add button. You’ll see a new framework added to your project. Repeat the same process for EventKitUI.framework.
Figure 16.2. Add the Event Kit framework from the project panel.
After adding the required frameworks into the project, you also need to include two files to the header file you wish to use Event Kit, as follows:
#import <EventKit/EventKit.h>
#import <EventKitUI/EventKitUI.h>
With the Event Kit frameworks added into the project, you can start to use them for accessing Calendar’s database from the application. First, we’ll look at the Event Kit classes.
16.1.2. Event Kit classes
Inside the powerful Event Kit API are a handful of classes that are like useful friends; figure 16.3 gives you a general idea about the relationships among these important classes.
Figure 16.3. The Event Kit class structure
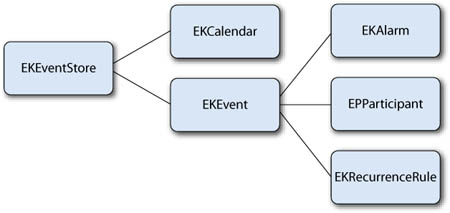
As you can see from figure 16.3, EKEventStore is the key object here, and it’s the connection to the Calendar database. You can use the following code snippet to initialize an EKEventStore object for Calendar data access:
EKEventStore *store = [[EKEventStore alloc] init];
Note that this initial method may consume a lot of time, so it’s a good practice to keep around that EKEventStore object in your program for all data access.
EKEvent is the object representing an event, which includes some import properties, as listed in table 16.1.
Table 16.1. EKEvent’s property table
|
Property |
Details |
|---|---|
| title | Title of the event; NSString type |
| location | Location of the event; NSString type |
| allday | BOOL type, indicating the event is an all-day event |
| startDate | Start date of the event |
| endDate | End date of the event |
| calendar | Calendar for a new event, EKCalendar type |
| attendees | Array of participants |
| alarms | Array of EKAlarm objects |
| eventIdentifier | Unique identifier for an event; NSString type |
After the EKEventStore object is initialized, the Calendar is ready for you to add or delete events. You can create an event object and add it to the Calendar’s database programmatically. Alternatively, you can use the Event Kit UI framework for event view controllers, which is a great choice for calendaring related user interaction. The Event Kit UI framework contains two types of view controllers for manipulating events:
- EKEventViewController—Use if you have an existing event you want to display or allow the user to edit
- EKEventEditViewController—Use if you allow the user to create, edit, or delete events
We’ll talk about how to do this in section 16.3. Next, let’s look at how to add a new event to Calendar programmatically with the Event Kit framework.
16.2. Adding new events to Calendar programmatically
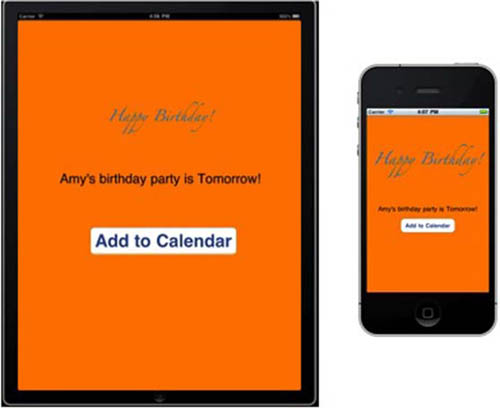
At the beginning of this chapter, we mentioned a birthday application example. In this section, you’ll build a small application that you can use to add a friend’s birthday party planner into Calendar’s database by clicking a button. The user interface looks like figure 16.4.
Figure 16.4. Birthday application launching on the iPhone and IPad
Let’s get started.
16.2.1. Adding Event Kit frameworks to the Birthday application
Fire up Xcode, and create a new project from the iOS application template: select View-Based Application, and select Device Family of iPhone. Name the application Birthday. Add the Event Kit and Event Kit UI frameworks to the project (as shown in figure 16.2); then include them in BirthdayViewController.h, as noted in section 16.1.1. Add a new method to the view controller:
-(IBAction)addEventToCalendar:(id)sender;
Click BirthdayViewController’s nib file to bring up the Interface Builder. You want to throw in a button for adding a new event to Calendar; don’t forget to hook up the button to the method you created for adding an event.
Go back to Xcode, and select Birthday under Targets. Navigate to Project > Upgrade Current Target for iPad, and create the universal application for the iPhone and iPad.
16.2.2. Adding an event to Calendar
Now it’s time to add code to BirthdayViewController.m. The process to create a new event and add it to the Calendar database is shown in the following listing.
Listing 16.1. Adding a new event to Calendar’s database
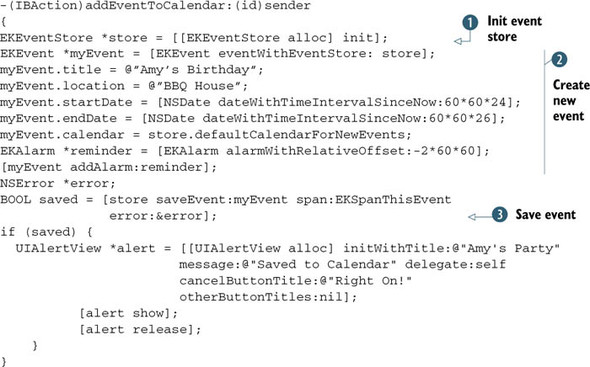
First, you initialize the event store with [[EKEventStore alloc] init] ![]() . Then, you create a new event from the event store with [EKEvent eventWithEventStore:store]
. Then, you create a new event from the event store with [EKEvent eventWithEventStore:store] ![]() , followed by setting properties for the birthday party’s title, location, start-Date, endDate, and default Calendar and configuring
a reminder alarm that will trigger two hours before the event’s start time. In the code, the start time is 24 hours from now
and the event will end after 2 hours. Finally, you save that event to the event store with method [store saveEvent:myEvent span:EKSpanThisEvent error:&error]
, followed by setting properties for the birthday party’s title, location, start-Date, endDate, and default Calendar and configuring
a reminder alarm that will trigger two hours before the event’s start time. In the code, the start time is 24 hours from now
and the event will end after 2 hours. Finally, you save that event to the event store with method [store saveEvent:myEvent span:EKSpanThisEvent error:&error] ![]() and give feedback to the user when the event is saved to Calendar successfully. That’s all you need to do to add a new event.
and give feedback to the user when the event is saved to Calendar successfully. That’s all you need to do to add a new event.
Note
At the time of writing, the iOS SDK doesn’t include the Calendar app on the Simulator. In order to test this application, you need to use a real device: your iPhone, iPod Touch, or iPad.
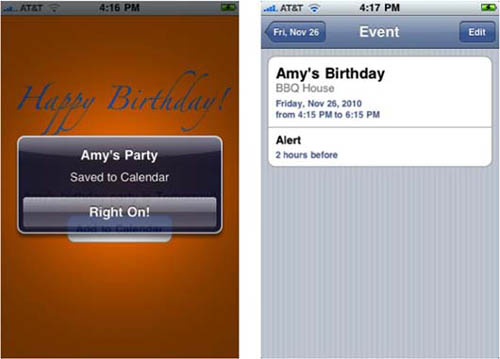
Build and run this application on your device. You should have a Birthday application similar to the one shown in figure 16.4. Click the Add to Calendar button to add a new event to Calendar. You should see the alert view informing you that the new birthday party event was added to Calendar successfully.
Go to the Calendar application on your device. You should see the new event appear on your schedule for tomorrow (figure 16.5).
Figure 16.5. The Birthday application successfully added the new event to the Calendar.
You’ve learned how to create a new event and add it to the Calendar database. Next, we’ll discuss how to add or edit an event by using the Event Kit UI framework.
16.3. Creating an event with the Event Edit view controller
Previously, we focused on how to add a new event to Calendar’s database programmatically. With the Event Kit UI framework, you can use the modal view controller to allow the user to add and edit events with a few lines of codes. As explained in section 16.1, EKEventEditViewController is for new events, whereas EKEventViewController is for existing events. First, let’s learn how to create a new event from EKEventEditView-Controller.
Follow the same steps as in section 16.2.1 and add the Event Kit frameworks to a simple view-based project. With the necessary frameworks included, the project is ready for the Event Edit view controller.
In order to allow the user to add a new event to the calendar you’ll use the EKEventEditViewController and EKEventEditViewController’s delegate. The Event Edit view controller must contain the eventStore property. The eventStore is an EKEventStore object representing the Calendar database. In the code example, you’ll use the default Calendar to save the new event.
The Event Edit view controller can be presented as a modal view controller; the delegate method eventEditViewController:didCompleteWithAction: lets you dismiss the Event Edit view controller once the user finishes editing or cancels the current work:
- (void)eventEditViewController:(EKEventEditViewController *)controller
didCompleteWithAction:(EKEventEditViewAction)action {
     [self dismissModalViewControllerAnimated:YES];
}
Now let’s continue the example. Add the Event Edit view controller to the Simple-EventViewController in the application.
In the header file, add EKEventEditViewDelegate and a new method for event editing, as shown in the following listing.
Listing 16.2. SimpleEventViewController header file
#import <UIKit/UIKit.h>
#import <EventKitUI/EventKitUI.h>
#import <EventKit/EventKit.h>
@interface SimpleEventViewController : UIViewController
<EKEventEditViewDelegate> {
    EKEventStore *eventStore;
    EKCalendar *defaultCalendar;
}
@property (nonatomic, retain) EKEventStore *eventStore;
@property (nonatomic, retain) EKCalendar *defaultCalendar;

-(IBAction) addEvent:(id)sender;
@end
The code in listing 16.2 is similar to the header file in the birthday party planner in section 16.2. Make sure you have a button linked to the addEvent method from Interface Builder. Next, add the code from the following listing to implement the Event Edit view controller
Listing 16.3. Using EventEditViewController and delegate to add a new event
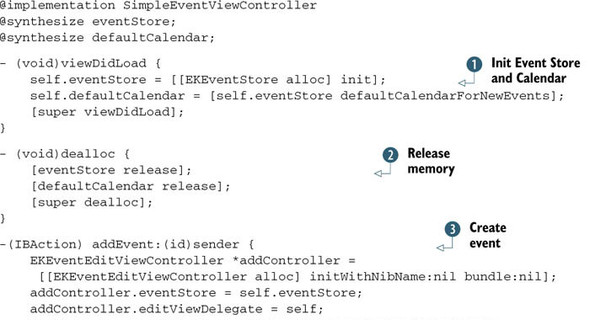
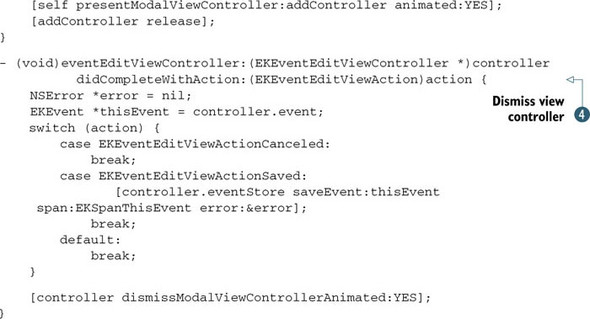
The access to Calendar’s database is done by a few lines of code. You initialize the event store [[EKEventStore alloc] init] and define Calendar for data access [self.eventStore defaultCalendarForNewEvents] ![]() . As mentioned earlier, it’s a good practice to keep one event store around for all the data access. dealloc
. As mentioned earlier, it’s a good practice to keep one event store around for all the data access. dealloc ![]() reminds you to release the memory when the view controller is released. The new thing you learned for using Event Edit view
controller is all in addEvent
reminds you to release the memory when the view controller is released. The new thing you learned for using Event Edit view
controller is all in addEvent ![]() and the delegate method -(void)eventEditViewController:(EKEventEditViewController *)controller didCompleteWithAction:(EKEventEditViewAction)action
and the delegate method -(void)eventEditViewController:(EKEventEditViewController *)controller didCompleteWithAction:(EKEventEditViewAction)action ![]() . You define the Event Edit view controller’s event store and delegate and then present the modal view controller [self presentModalViewController:addControlleranimated:YES]
. You define the Event Edit view controller’s event store and delegate and then present the modal view controller [self presentModalViewController:addControlleranimated:YES] ![]() . When the user finishes editing the new event, the method [controllerdismissModalViewControllerAnimated:YES]
. When the user finishes editing the new event, the method [controllerdismissModalViewControllerAnimated:YES] ![]() will dismiss the edit view and save the new event to the Calendar.
will dismiss the edit view and save the new event to the Calendar.
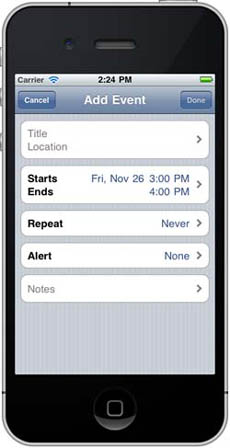
Now let’s build and run it. When the application launches, click the Add button to present the Event Edit view controller. As you can see in figure 16.6, the new event’s Title, Location, Starts, Ends, Repeat, and Alert options are editable.
Figure 16.6. EventEditViewController presented as a modal view controller
Congrats! You just created a new event and saved it successfully to the local Calendar with the Event Kit UI framework! Now let’s talk about how to fetch the existing events from the Calendar’s database.
16.4. Fetching events
Previously, you learned how to create an event with EKEventEditViewController. The next step is to get the existing events from Calendar’s database.
First, you need to learn how to access Calendar’s database to fetch the existing events. It’s time to introduce a new friend, the predicate.
16.4.1. Fetching events with the predicate
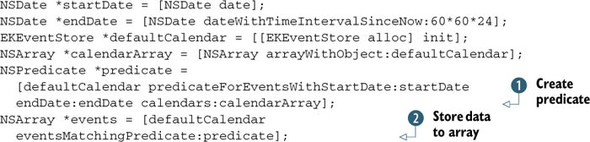
A common task is to find out all the events within a certain time period. For example, the user wants to figure out what’s on their Calendar for the next 24 hours. This task can be defined as a predicate in the following listing. Once you have the predicate, you can use a method called eventsMatchingPredicate in the event store to search for qualified events; the return of the search results will be an array of existing events.
Listing 16.4. Using NSPredicate to search for existing events in the device’s Calendar
Tip
Because the eventsMatchingPredicate method is running synchronously, you may not want to run it on your application’s main thread because that would block the UI until the operation is done. For example, if you’re fetching events from last month, you may want to have a spinner animation indicating the waiting time. The background thread will take care of the data fetching asynchronously. We’ll cover how to do this with GCD in the next section.
You create the predicate with the method [defaultCalendar predicateForEventsWithStartDate:startDate endDate:endDate calendars:calendarArray] ![]() . In the events array from [defaultCalendar eventsMatchingPredicate:predicate]
. In the events array from [defaultCalendar eventsMatchingPredicate:predicate] ![]() , each object is an object of EKEvent.
, each object is an object of EKEvent.
The application you’re about to build will show you how to fetch all the existing events in your Calendar from the app and display the events array as the table view’s data. Each of the rows in the table view will be an event’s title. When you select a row by tapping, the event’s detail view controller will get pushed onto the navigation controller’s stack. Sound good?
16.4.2. Displaying events with Event view controller
Let’s create a new project with the Navigation-based application template. Name it Event. First, let’s add the two Event Kit frameworks into the project. You learned how to do so in section 16.1.
Inside the RootViewController, define that the table view’s data equals the events array from Calendar’s database. Single-click the file RootViewController.h, and add the changes from the following listing.
Listing 16.5. RootViewController’s header file
#import <UIKit/UIKit.h>
#import <EventKit/EventKit.h>
#import <EventKitUI/EventKitUI.h>
@interface RootViewController : UITableViewController {
    EKEventStore *eventStore;
    EKCalendar *defaultCalendar;
    NSArray *events;
}
@property (nonatomic, retain) NSArray *events;
@property (nonatomic, retain) EKEventStore *eventStore;
@property (nonatomic, retain) EKCalendar *defaultCalendar;

-(NSArray *)fetchEventsForTommorrow;
@end
The method in listing 16.5 is for the table view’s data, which will be fetched by predicate from Calendar’s database.
Now you’ll implement the RootViewController.m file. First, fetch the events array before the table view is loaded inside the method viewWillAppear:; then store the data in the events array.
Single-click the file RootViewController.m, and then add the new method from the next listing.
Listing 16.6. Fetch tomorrow’s events from Calendar and display the details
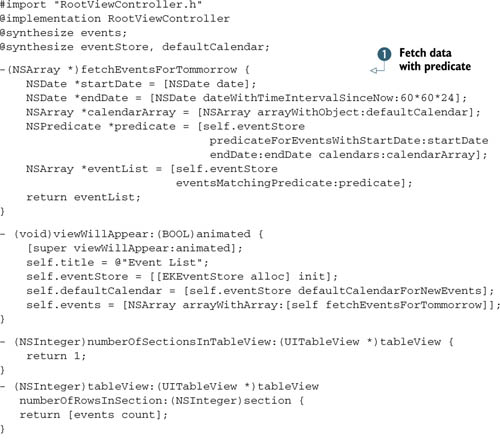
The method fetchEventsForTommorrow ![]() fetches the events from the Calendar database and returns them as an array. It’s called in the method viewWillAppear. Each time the Root view controller’s view appears, it will fetch the next day’s events from the device’s Calendar and store
the data into the array eventList. With the events data in an array, you define the total number of rows as the count of events. Then you get the event in
each row in
fetches the events from the Calendar database and returns them as an array. It’s called in the method viewWillAppear. Each time the Root view controller’s view appears, it will fetch the next day’s events from the device’s Calendar and store
the data into the array eventList. With the events data in an array, you define the total number of rows as the count of events. Then you get the event in
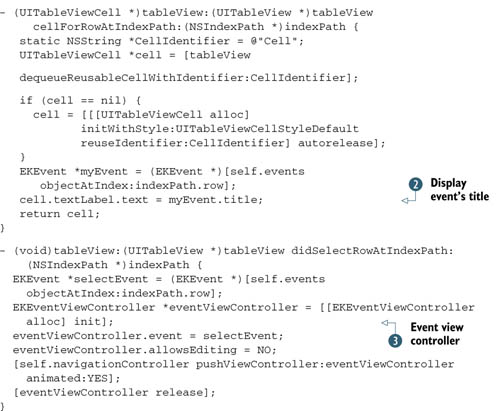
each row in ![]() and pass the event’s title to the cell’s text. The code in
and pass the event’s title to the cell’s text. The code in ![]() is almost self-explanatory. You get the selected event, define the event on the view controller, and present the Event view
controller by pushing it on the Navigation controller. (We covered the view controllers in chapter 6.) Save all the changes, and build the application.
is almost self-explanatory. You get the selected event, define the event on the view controller, and present the Event view
controller by pushing it on the Navigation controller. (We covered the view controllers in chapter 6.) Save all the changes, and build the application.
You may define the Event view controller’s property allowEditing = YES. Doing so will allow the user to edit the existing event.
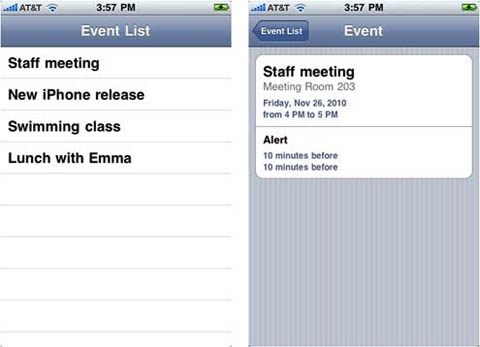
Save all the changes. Try to build and run the app on your device. You should be able to fetch all the existing events for the next day. The app launches in table view format, as shown in figure 16.7. As you can see inside my Calendar, I have a few events coming up. Tap each event; the details appear in the Event view controller.
Figure 16.7. Fetching and displaying events from the device’s Calendar database
Tip
Make sure you have some events scheduled in Calendar during the test. That’s how the application will get the events’ data.
In this section, you learned how to fetch existing events from the Calendar database and then how to display the events’ details in the application with the Event view controller. As noted, the fetching method isn’t performed asynchronously. In the next section, you’ll use an improved method and use Grand Central Dispatch to fetch the existing events asynchronously.
16.5. Fetching events with GCD
Grand Central Dispatch (GCD) was introduced in Mac OS X Snow Leopard as a comprehensive library for concurrent code execution on multicore hardware technology. Now it’s available on iOS 4 as a C API. Although multicore isn’t available on most current iOS devices (the iPad 2 has a multicore processor), GCD helps the application to run faster, more efficiently, and asynchronously. Concurrency is an advanced topic, and we don’t plan to dive into this concept in this chapter. You can find more information on the Concurrency Programming Guide from the iOS developer website. Let’s look at GCD and use it to fetch events.
16.5.1. Grand Central Dispatch overview
GCD is available to any application, and there’s no need to add in any other framework. Imagine that you have queues of operations, and each queue is running in its own thread separately on the system. You don’t have to worry about when to run the time-consuming operations. The system will take care of the order and make sure that the queue’s operations get done.
In order to keep the application running responsively, the key concept is don’t block the main thread. Throw the time-consuming tasks, such as fetching a list of events from the Calendar’s database or downloading an image file from the internet, to the background thread. Then update the UI after the work in the background is done and the data is ready to display.
How do you accomplish this task with GCD? As it turns out, it’s pretty easy. Call the method dispatch_async() to submit a queue of operations (a block of code) to the main queue and execute the task on a dispatch queue asynchronously; then tell the system to update the UI. You’ve already learned how to use blocks in the Core Animation API in chapter 13.
The definition for dispatch_async() is listed as
void dispatch_async( dispatch_queue_t queue,
dispatch_block_t block);
How do you create a queue or get the main queue? Here are some common methods related to GCD:
- Creating a queue—dispatch_queue_t dispatch_queue_create(const char*label, NULL);
- Releasing a queue—void dispatch_release(dispatch_queue_t);
- Getting the main queue—dispatch_queue_t dispatch_get_main_queue();
Don’t forget to release the queue when it’s created with the method dispatch_queue_create().
With GCD and blocks in hand, how can you improve the code in section 16.4? You want to create a queue for the fetching-events operations and let the system decide when to run this queue, followed by updating the UI in the main thread.
16.5.2. Fetching events with GCD
Let’s use GCD and blocks to fetch the whole month of events and update the table view display. You’ll re-create the Events application from section 16.4 but use the method in the following listing to fetch events with GCD.
Listing 16.7. Fetching events with GCD

In listing 16.7, you first create the custom queue ![]() . Then the GCD function starts
. Then the GCD function starts ![]() . The block of operations will first execute the custom task to fetch events from the Calendar database on the dispatch queue.
When the eventList array is ready, you want to update the table view’s UI with the new data on the main queue dispatch. The block
. The block of operations will first execute the custom task to fetch events from the Calendar database on the dispatch queue.
When the eventList array is ready, you want to update the table view’s UI with the new data on the main queue dispatch. The block ![]() first updates the events array and then reloads the table view’s data. Finally, don’t forget to release the queue
first updates the events array and then reloads the table view’s data. Finally, don’t forget to release the queue ![]() . Follow the design flow; GCD will automatically finish the task and provide a quick response asynchronously.
. Follow the design flow; GCD will automatically finish the task and provide a quick response asynchronously.
As you can see from the example, with a few lines of code, you manage to perform a task in the background and update the UI when the new data is ready. That’s the power of GCD and blocks.
16.6. Summary
The Event Kit framework provides an interface for accessing Calendar events on a user’s device. You can use this framework to get existing events and add new events to the user’s Calendar. In this chapter, you learned how to accomplish this task both with the Event Kit UI view controllers and programmatically. With GCD, the application’s performance is greatly improved, especially when fetching events from Calendar’s database asynchronously.
Calendar events can also include alarms to notify the user of the upcoming events. Similar to the alarms, the local notifications provide an alert view but with more interesting features. In the next chapter, we’ll tackle the local notifications and push notifications.