Chapter 15. Peer-to-peer connections using Game Kit
Networking has always been a complicated task in any programming language. It normally requires intimate knowledge of sockets, as well as a solid understanding of various network protocols such as TCP/IP and UDP. Apple has simplified this process with the release of the Game Kit framework.
In this chapter, we’ll take a tour of the Game Kit framework. Then, we’ll examine how to create peer-to-peer applications and a simple multiplayer game.
15.1. Overview of Game Kit
Game Kit is a framework that provides some simple yet powerful classes for accomplishing various networking tasks. These classes are built on top of the Bonjour protocol and do much of the heavy lifting needed for peer-to-peer interaction.
Although the Game Kit framework was primarily intended for game development, it isn’t limited to that. Many applications incorporate the Game Kit framework to accomplish network-related tasks. These tasks may be as simple as sharing photos or as complex as multiuser collaboration on a drawing board.
In Game Kit, peers communicate through objects called sessions. Each peer creates a session and uses it to discover other sessions. The sessions are also responsible for sending data to and receiving data from each peer.
Three different modes of a session determine how it interacts with peers. The first is server mode. When sessions are in this mode, they advertise their service to everyone on the network. The next is client mode. In this mode, sessions search for servers that are advertising. Finally, there is peer mode. In peer mode sessions play the role of both the client and the server at the same time.
We’ll show you how to implement the built-in peer picker in peer mode to establish a connection between two devices. After you’ve learned the basics, you’ll be able to move on and create a fully functional multiplayer application.
15.2. Creating peer-to-peer applications using the peer picker
The peer picker gives you a simple way to connect two devices over Bluetooth or wireless. It involves displaying Apple’s built-in Peer Picker view and implementing the delegate methods. This view is easy to use but is somewhat limited. First, it allows a connection only between two peers. You can never have more than two users playing the same game at once. Second, it can’t be customized. Although the view looks nice, it may not always fit into the look and feel of your application.
If you find yourself in a situation where you need to connect more than two peers at a time, you must create your own custom peer picker. Because we’ll be focusing on using Apple’s built-in peer picker, you should refer to the developer documentation titled “Game Kit Programming Guide” if you want more information about creating one.
This section will discuss how to communicate using the peer picker component of the Game Kit framework. We’ll use a simple chat application to demonstrate the concepts. You can obtain the full source for the chat application on the book’s website.
Note
You can’t test Game Kit applications using the Simulator. To run the examples in this chapter, you must have two devices in hand.
15.2.1. Using Apple’s built-in peer picker
Before you can do any programming using Game Kit, you must import the Game Kit framework into your project. After you’ve imported the framework, you must include the Game Kit/Gamekit.h header file in every project file that you wish to use the Game Kit functionality.
The GKPeerPickerController is simple to implement. You initialize it, set its delegate, and show it. Here’s an example of displaying the GKPeerPickerController:
-(void)viewDidLoad {
  [super viewDidLoad];
  chatPicker = [[GKPeerPickerController alloc] init];
  [chatPicker setDelegate:self];
  [chatPicker setConnectionTypesMask:GKPeerPickerConnectionTypeNearby];
  peers = [[NSMutableArray alloc] init];
}

-(IBAction) connect {
    [chatPicker show];
}
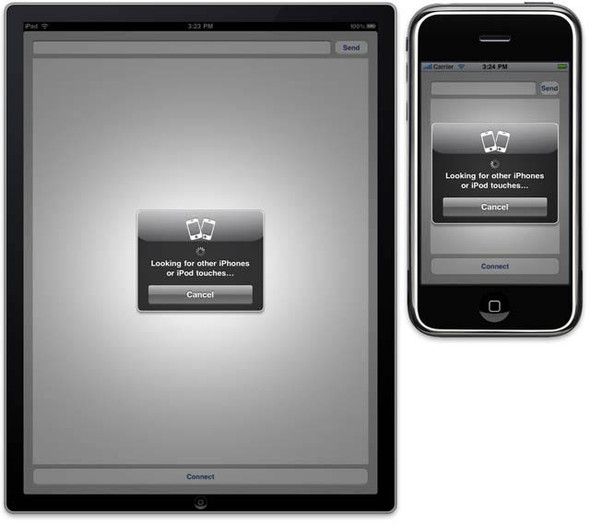
As you can see, it isn’t much different than displaying a UIAlertView or UIAction-Sheet. Here, you initialize the picker inside the viewDidLoad method and show it when the user presses a connect button. This allows you to reuse the same picker in case the user wants to find a different peer or needs to reconnect in the event the connection gets dropped. Figure 15.1 shows what the peer-picker interface looks like when it’s displayed.
Figure 15.1. The peer-picker interface on both the iPhone and iPad. Using Bluetooth, users can connect to other nearby devices and interact in real time.
One interesting variable you set is connectionTypeMask. It lets the picker know what type of peers it’s searching for. The values you can use here are GKPeerConnectionTypeNearby and GKPeerConnectionTypeOnline. The value GKPeerConnectionTypeNearby is required by any application that wants to use Game Kit; it tells the application to look for peers over Bluetooth as well as the local wireless network. If this value isn’t included, your application will throw an exception. The other value, GKPeerConnectionTypeOnline, tells the picker that you want to search for peers online. This requires some more complex networking knowledge that’s out of the scope of this book.
As usual, you set the delegate of the picker to self. This requires that the class implement the GKPeerPickerControllerDelegate interface. Table 15.1 describes the delegate methods in detail.
Table 15.1. GKPeerPickerControllerDelegate method descriptions
|
Delegate Method |
Description |
|---|---|
| peerPickerController:didSelectConnectionType: | This optional method is called when the user selects a connection type. As noted previously, the possible connection types are GKPeerConnectionTypeNearby and GKPeerConnectionTypeOnline. |
| peerPickerController:sessionForConnectionType: | This optional method is called when the controller requests a session. Implementing this method gives you greater control over the session, including the ability to customize the display name and session ID. |
| peerPickerController:didConnectPeer:toSession: | This is an optional method but is expected to be implemented. It’s called when a peer connects. At this point, you should dismiss the peer picker and take ownership of the session. |
| peerPickerControllerDidCancel: | This is another optional but expected method that’s called when the user cancels the request. At this point, you notify the user that the session was cancelled. |
Although all the delegate methods are optional, it’s a good idea to implement all of them in your application for greater control over the picker’s actions. The last thing you do in the viewDidLoad method is to create an NSMutableArray of peers. You add peers to this array as they join. Keeping a reference to all connected peers is necessary when sending data to them. We’ll discuss this in greater detail later in this section.
Now that you’ve created the picker, the next step is to implement these delegate methods. The following listing shows how you can implement each of these delegate methods.
Listing 15.1. GKPeerPickerControllerDelegate methods
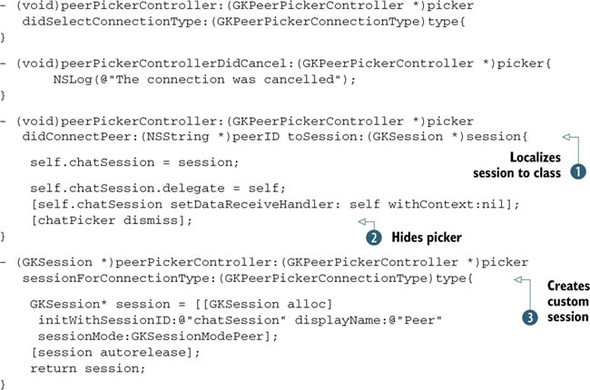
The peerPickerController:didSelectConnectionType: method has no use in this application because you have only one connection type. If you added multiple connection types, you’d do an if statement here and handle each connection type accordingly.
The peerPickerControllerDidCancel: method isn’t very interesting and is useful only to the developer. This method prints a message to the console notifying you that the connection was cancelled. Normally, you might want to do something like display an UIAlertView to do this.
peerPickerController:didConnectPeer: does three things ![]() . First, it sets the incoming session to the class’s session property. This lets you use it in other methods. Next, the session’s
delegate is set to the class. Table 15.2 lists the session delegate methods that can be implemented. Finally, the dataReceiveHandler of the session is set to the class. This allows the class to receive network data sent to the session. In order to use the
class as the session’s dataReceiveHandler, you must implement the receiveData method. We’ll discuss this method a little later in this section.
. First, it sets the incoming session to the class’s session property. This lets you use it in other methods. Next, the session’s
delegate is set to the class. Table 15.2 lists the session delegate methods that can be implemented. Finally, the dataReceiveHandler of the session is set to the class. This allows the class to receive network data sent to the session. In order to use the
class as the session’s dataReceiveHandler, you must implement the receiveData method. We’ll discuss this method a little later in this section.
Table 15.2. GKSessionDelegate methods
|
Delegate method |
Description |
|---|---|
| session:peer:didChangeState: | Called any time a peer changes state. The five possible states are GKPeerStateAvailable, GKPeerStateUnavailable, GKPeerStateConnected, GKPeerStateDisconnected, and GKPeerStateConnecting. |
| session:didReceiveConnectionRequestFromPeer: | Called when a peer wants to connect. Apple’s documentation suggests that this method can be ignored if you’re using the built-in peer picker. |
| session:connectionWithPeerFailed:withError: | Called when a connection error occurs. This method can also be ignored if you’re using Apple’s peer picker, because it automatically handles it and displays a UIAlertView. |
| session:didFailWithError: | Called when an unrecoverable error happens. In this method, you should disconnect all peers and notify the user. |
When the picker has done its job and is no longer needed, you dismiss it ![]() . The last method lets you create a custom session
. The last method lets you create a custom session ![]() If you didn’t implement this method, a default session would be created for you. As you can see, you can specify a custom
session ID as well as a display name. The session ID is used to differentiate the application’s session from others that might
be in the area. The display name is a custom name for a given peer. Think of it as a username.
If you didn’t implement this method, a default session would be created for you. As you can see, you can specify a custom
session ID as well as a display name. The session ID is used to differentiate the application’s session from others that might
be in the area. The display name is a custom name for a given peer. Think of it as a username.
The next step is to implement the session delegate methods to manage the session.
15.2.2. Implementing the GKSessionDelegate methods
To send and receive data with Game Kit, you must implement the delegate methods for GKSession. These methods provide a nice high-level interface for you to use to send data over the network. Your class must also implement the GKSessionDelegate interface. Your application should implement four delegate methods, outlined in table 15.2.
For most applications, you only need to implement the didChangeState method. The others are handled automatically. The didChangeState method is important for keeping track of all the peers connected. When a peer connects, you should maintain a reference to it by adding it to a global peers array. That way, when it comes time to send data to it, you’ll know where to send it. When a peer leaves, you should remove it from the peer array. The following listing details a simple way to implement this method.
Listing 15.2. Implementing the didChangeState delegate method
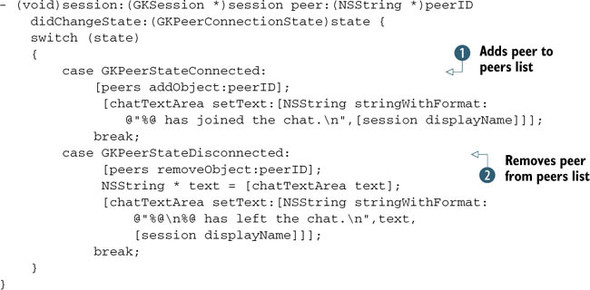
As you can see, this method is relatively simple to implement. You determine the state of the peer with a simple case statement. You add code to detect the two most important states, GKPeerStateConnected and GKPeerStateDisconnected. You should also handle the other states as noted in table 15.2.
In the event that a peer connects, you want to make sure to maintain a reference to that peer’s ID ![]() . You do this by adding the ID to an array of peer IDs. You’ll later use this ID to send data to that specific peer. Note
that you update the text of a UIText-View to notify the user that a given peer has connected. You can also do this with a UIAlertView or else start the game if you’re creating a multiplayer game.
. You do this by adding the ID to an array of peer IDs. You’ll later use this ID to send data to that specific peer. Note
that you update the text of a UIText-View to notify the user that a given peer has connected. You can also do this with a UIAlertView or else start the game if you’re creating a multiplayer game.
The session object contains quite a bit of information about the incoming session. The most important property for the sake of the chat application is the displayName field. This lets you display the unique name of a given peer. As you can imagine, almost any multiuser application can benefit from this field.
Finally, you handle the case where a peer disconnects ![]() . In the event of a disconnection, you want to remove the peer ID from the array. This ensures that you don’t waste any resources
sending data to it. Again, you notify the user that the peer has disconnected.
. In the event of a disconnection, you want to remove the peer ID from the array. This ensures that you don’t waste any resources
sending data to it. Again, you notify the user that the peer has disconnected.
Now that you’ve implemented the delegate methods, you need a way to send and receive data.
15.2.3. Sending and receiving data between peers
When you’re sending data from one peer to another, keep in mind that everything you send must be converted to NSData. Every one of Apple’s built-in objects supports this conversion. You can even convert custom objects to NSData using the NSKeyed-Archiver class.
The type of data you send over the network is highly dependent on what your application does. For example, if you’re creating a real-time game that sends a lot of data quickly, then you probably don’t want to send complete objects. In this case, you’re better off sending low-level data structures such as a struct. Although this method is much faster, it requires that you have a good understanding of some low-level C code. You’ll see more about sending structs over the network in the next section.
On the other hand, if your application doesn’t rely so much on speed, you can send high-level objects and greatly reduce the complexity of your application. For the simple chat application, you convert strings to NSData, send them over the network, and convert them back into strings. In the next listing you’ll see how to implement the receiveData method as well as the send method.
Listing 15.3. Implementing the receiveData and send methods
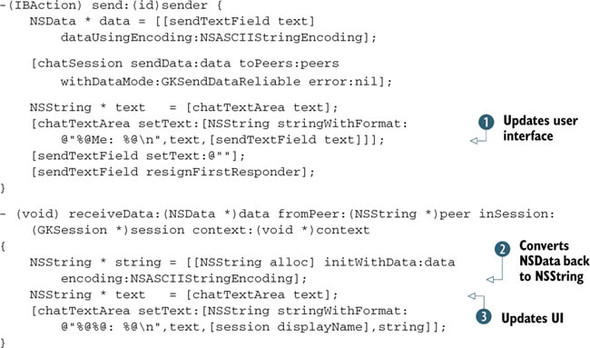
The first thing you do is convert the NSString to NSData. This is relatively straightforward because you use the dataUsingEncoding method of NSString. For almost all strings, the encoding type is NSASCIIStringEncoding.
Next, you send the string data to all the connected peers. Only two potential values can be used with the withDataMode property: GKSendDataReliable and GKSendDataUnreliable. The type of data mode you choose depends on the application you’re creating. It can even be dependent on the type of data you’re sending.
The GKSendDataReliable value tells the session to keep sending the data until it’s received. It does this by using TCP/IP. The session knows when the data has been received because the receiver sends an acknowledgement back to the sender to confirm. Another benefit of reliable transmission is that the data is always received in order. If you send data packet A and then data packet B, the receiver always gets data packet A before it gets data packet B. The downside of GKSendDataReliable is that it’s much slower than GKSendDataUnreliable. You use this method of sending when you want to ensure the data is received and you don’t care about speed. The protocol used when sending data unreliably is UDP. Examples include sending initial game information such as usernames, maps, and stats. This is also good for sending textual data, as in the chat application.
The GKSendDataUnreliable value tells the session that you don’t care if the data is received or in what order. Choosing this route gives you a big improvement in speed but is a little more complex to use. A good example of when you would use this is in a game where the position of an object changes quite a bit. Say you have a spaceship that moves three pixels, sending its position to the other peer every time it moves one pixel. If the data packet that notifies the peer that the ship has entered the second pixel gets dropped, but the packet at pixel 3 arrives, it’s not a problem. This is trivial, and you can move the ship’s position from pixel 1 to pixel 3 without the user ever knowing. If too many packets get dropped, your application may experience lag.
Another thing that you must track when sending unreliable data is the ordering of the packets. In the previous example, if the data packet containing position 1 arrives before the packet containing position 3, the ship will appear to go backward if you don’t keep track of the ordering. You can manage the data packet ordering by assigning a unique packet number to each of the data packets that get sent. We’ll discuss assignment of unique packet numbers in further detail in section 15.3.
Next, in listing 15.3, you update the interface ![]() . As with most chat applications, it appends the text of the user who just wrote the message to their chat window. This allows
the user to see the text they just wrote. This section does a couple other things to clean up, such as clearing the text field
where the user typed the text as well as hiding the keyboard.
. As with most chat applications, it appends the text of the user who just wrote the message to their chat window. This allows
the user to see the text they just wrote. This section does a couple other things to clean up, such as clearing the text field
where the user typed the text as well as hiding the keyboard.
To convert the NSData back into an NSString, you must call the initWithData method of NSString ![]() . Again, you should use NSASCIIStringEncoding for the encoding property. The last thing to do is update the user interface to display the received string. You append to the chat window
the received string along with the name of the sender
. Again, you should use NSASCIIStringEncoding for the encoding property. The last thing to do is update the user interface to display the received string. You append to the chat window
the received string along with the name of the sender ![]() .
.
Now that you’ve seen the basics of connecting two peers, we can show you how to dig deeper and create a fully functional multiplayer application. The next section will discuss how to create a simple multiplayer table tennis application using the Game Kit framework.
15.3. Example: creating a multiplayer table tennis game
Although Game Kit is practical in a wide variety of business applications, it was intended for gaming. When using Game Kit for this purpose, you must consider quite a few things. These include game state, multiple packet types, packet frequency, and size. You’ll learn about all these topics in the following example.
Programming games for the iPhone and iPad is different than for other applications. It’s often intimidating for new developers to jump right in and start creating them. Luckily, some basic design patterns are commonly used. After you’ve wrapped your head around these patterns, you’ll be able to create a game with any programming language.
Note that games generally follow a Model-View-Controller design. This means the interface code, game logic code, and game objects code are all separate. This approach, although a little challenging to get used to, removes complexity and promotes great code organization.
The driving force behind every game is called the game loop. This loop is usually invoked during initialization and periodically updates the game state. The rate at which the loop updates can vary, but it’s normally every hundredth of a second. The game loop is responsible for applying the game logic to the game objects and calling the draw methods in the interface to render them to the screen. The entire flow of the game depends on this loop.
Along with a game loop, any multiplayer game on the iPhone or iPad needs to implement all the networking methods mentioned in the previous section. The combinations of these provide a great starting point for any game.
One problem in multiplayer games involving the game loop is synchronization. How do you ensure that both players have the same game state? You achieve this by making one of the players a server and the other a client. The server maintains the global game state and sends it to the client. That way, if the client ever gets out of sync, the next message from the server will get it right back on track.
The game you’ll create is a simple table tennis clone, where two users hit a ball back and forth trying to get it past their opponent. The player who reaches five points first wins the game. You’ll use the Game Kit framework to establish the connection between the players and allow them to send data to one another.
15.3.1. Starting the GKTennis project
Begin the project by creating a View-Based Application. Name it GKTennis. Make sure you add the Game Kit framework to your application, because you’ll use it extensively. You’ll need to work with only three files: GKTennisViewController.h, GKTennisViewController.m, and GKTennisViewController.xib.
15.3.2. Creating the header file
You’ll start by declaring the properties needed for the application in the GKTennisViewController.h header file. The following listing contains this code.
Listing 15.4. GKTennisViewController.h
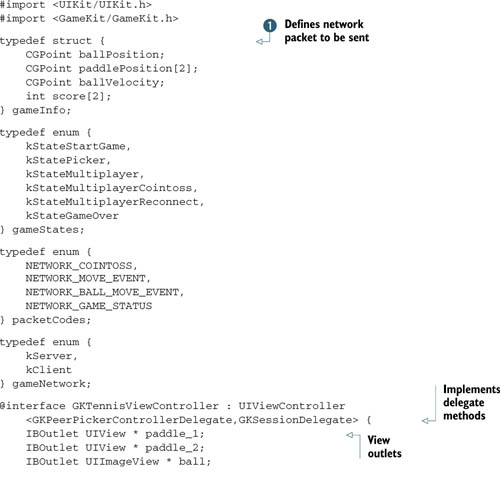
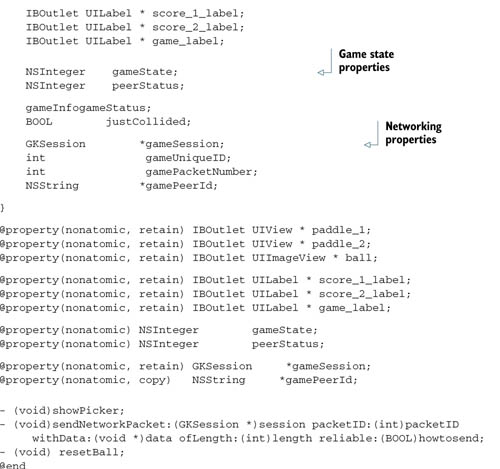
We won’t go into much detail about what’s in the header file right now because we’ll discuss each property and method as you
implement them in the code. One section of code you may find unfamiliar is the group of structs ![]() . Structs are C data structures for organizing variables and are lightweight in terms of size. The first struct maintains most of the information about the state of the game, including the ball position, ball velocity, paddle positions,
and scores. You also use it to send over the network in order to update each player on the state of the game. The next struct contains all the possible states of the game. You use these states in the game loop to control the flow of the game. Following
that is a struct containing the various packet types you send over the network. Even though you’re sending the same data every time, it’s
important to distinguish the event that just occurred. We’ll explain this in section 15.3.5. Finally, you declare a struct that contains two values. This is used to determine which peer is the client and which peer is the server.
. Structs are C data structures for organizing variables and are lightweight in terms of size. The first struct maintains most of the information about the state of the game, including the ball position, ball velocity, paddle positions,
and scores. You also use it to send over the network in order to update each player on the state of the game. The next struct contains all the possible states of the game. You use these states in the game loop to control the flow of the game. Following
that is a struct containing the various packet types you send over the network. Even though you’re sending the same data every time, it’s
important to distinguish the event that just occurred. We’ll explain this in section 15.3.5. Finally, you declare a struct that contains two values. This is used to determine which peer is the client and which peer is the server.
Now, you need to create the interface and hook it up to the IBOutlets.
15.3.3. Creating the table tennis interface
The interface for the table tennis game is simple. It consists of two paddles, a ball, and three labels. Open GKTennisViewController.xib to add these interface elements. Figure 15.2 shows how you should set up your view.
Figure 15.2. The GKTennis interface
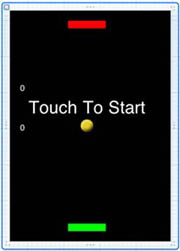
For the paddles, drag two UIViews onto the main view and resize them to your liking. Set the background color of each one to something different. Now, connect each paddle to its respective IBOutlet that was declared in the header file.
To create the ball, drag a UIImageView onto the main view. You may either create your own ball image or use the one provided with the source code for this section. Make sure the ball image has been added to the project, and set the image property of this view to your ball. Finally, connect the ball to its IBOutlet.
The last things you need to add to the view are three labels. Two of them are for the scores, and the other is for displaying game messages. Set the text of the game label to the string “Touch To Start.” After you connect these labels to their IBOutlets, save the nib file.
15.3.4. Game initialization
Initializing the game is straightforward. You set all the properties to their default values and invoke the main game loop. Also, you must synthesize all the properties you declared in the header file. You don’t need to do anything related to the Game Kit at this point. The following listing shows the initialization methods.
Listing 15.5. Game initialization

You set the initial game state to kStateStartGame. You’ll see this used later in the touchesMoved method to show the picker when the user touches the screen. Next, you get the UDID of the device ![]() and store it. The UDID of each device playing is used to determine who is the client and who is the server. Next, you call
the method
and store it. The UDID of each device playing is used to determine who is the client and who is the server. Next, you call
the method ![]() that resets the ball position to the center of the screen. Don’t worry about the last line, which sends the network packet—we’ll
discuss it a little further in this section. Finally, you create a timer that runs the game loop every hundredth of a second
that resets the ball position to the center of the screen. Don’t worry about the last line, which sends the network packet—we’ll
discuss it a little further in this section. Finally, you create a timer that runs the game loop every hundredth of a second
![]() .
.
15.3.5. Setting up the peer picker and getting connected
Now that you’ve initialized the game, it’s time to establish a connection to another peer. As you did in the previous section, you need to implement the GKPeerPicker-Controller delegate methods. The next listing shows the implementation of these methods.
Listing 15.6. Setting up the peer picker and responding to its events
- (void) showPicker {
    self.gameState = kStatePicker;
    GKPeerPickerController * picker =
       [[GKPeerPickerController alloc] init];
    picker.delegate = self;
    [picker show];
}

- (void)peerPickerControllerDidCancel:(GKPeerPickerController *)picker {

     picker.delegate = nil;
     [picker autorelease];
    self.gameState = kStateStartGame;
    self.game_label.hidden = NO;
}

(GKSession *)peerPickerController:(GKPeerPickerController *)picker
    sessionForConnectionType:(GKPeerPickerConnectionType)type {
    GKSession *session = [[GKSession alloc] initWithSessionID:@"GKTennis"
       displayName:nil sessionMode:GKSessionModePeer];
    return [session autorelease];
}

- (void)peerPickerController:(GKPeerPickerController *)picker
  didConnectPeer:(NSString *)peerID toSession:(GKSession *)session {
  self.gamePeerId = peerID;
  self.gameSession = session;
  self.gameSession.delegate = self;
  [self.gameSession setDataReceiveHandler:self withContext:NULL];

  [picker dismiss];
  picker.delegate = nil;
  [picker autorelease];

  self.gameState = kStateMultiplayerCointoss;
}
The showPicker method is called in the touchesMoved method when the state of the game is kStateStartGame. It then shows the peer picker. Notice that you’re not releasing the peer picker after showing it, as you would with an alert or action sheet. The reason is that it’s up to the delegate methods to release the picker when they finish using it.
The peerPickerControllerDidCancel: method is straightforward. It fires when the user presses the Cancel button on the peer picker. At this point, you set the game state back to kStateStartGame and show the Touch To Start label.
As in the previous section, you create a custom session called GKTennis for the game and return it.
The last method fires when a successful connection has been made to a peer. At this point, you retain the session and peer ID as well as set the delegate to the class. Finally, you hide the peer picker and set the game state to kStateMultiplayerCointoss. This state is used in the game loop method to allow the peers to determine who is the client and who is the server. The last methods related to networking that must be implemented are the send and receive methods.
15.3.6. Implementing the send and receive methods
The send and receive methods are a crucial part of the application because they do much of the heavy lifting. They’re also where most of the complexity associated with networking lies.
You can implement the send method in any number of ways. Apple has created a sample send method in the GKTanks application that can be used in most situations. Here, you take that method and use it directly. In general, send takes in some data, adds a header and packet ID, and sends the data over the network. The following listing shows how this method is implemented.
Listing 15.7. sendNetworkPacket method
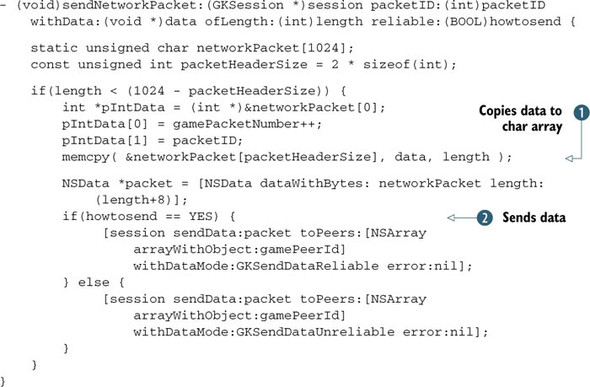
This code may look frightening if you’re unfamiliar with the C programming language. Although the code is a little complex, you have to write it only once, because most applications can use this method completely unchanged. We’ll give you a high-level explanation of what’s going on.
First, you declare a char array. You copy data into this array to be sent over the network. Next, you add two ints to the header. The first int is a unique packet number that gets incremented every time you send a packet. This is useful in the receive method in case the packets are received out of order. The second is the type of packet you’re sending; you saw the various packet types declared in the header file.
Now, the data you passed in to the send method is copied to the packet ![]() . Following that, the char array is converted to an NSData object in preparation to be sent. Finally, the data is sent
. Following that, the char array is converted to an NSData object in preparation to be sent. Finally, the data is sent ![]() .
.
The receive method must be implemented in the exact opposite manner. After unpacking the data, receive must determine what to do based on the packet ID that was sent. You’ll see this handled in the following listing as a switch statement.
Listing 15.8. The receiveData method
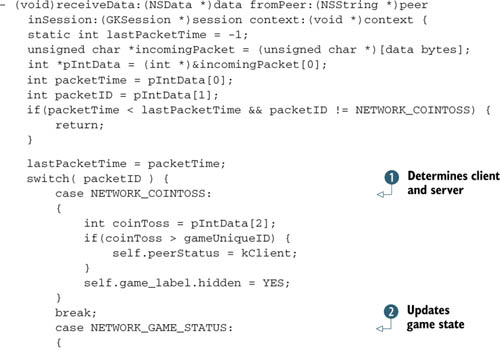
As noted before, the first part of this method reverses what you did in the send method: it converts the NSData back into an array of chars and retrieves the header data. Next, you determine whether the packet number is less than the number of the previous packet. If so, you ignore it because you’re interested in only the most recent data.
If the packet is current, you use a switch statement to determine what to do with the data. The switch statement is based on the packet ID specified in the header file.
At the beginning of the game, players send a coin-toss packet that contains their UDID. The code compares the UDIDs and determines
who is the client and who is the server ![]() .
.
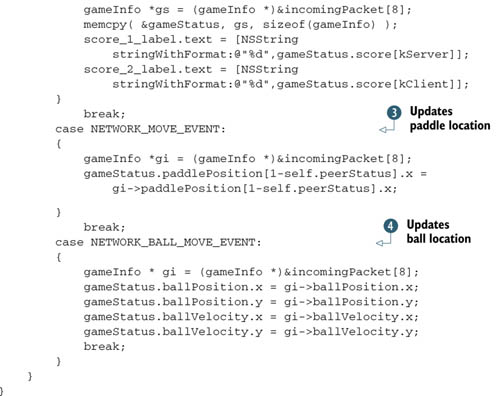
The next packet type is the game status packet. This type of packet is sent reliably and is used when you want to push the
entire state of the game from the server to the client ![]() . When this packet is sent, the client will memcpy its contents to its local copy of the game state.
. When this packet is sent, the client will memcpy its contents to its local copy of the game state.
The next packet is sent every time a player moves their paddle ![]() . You use 1-self.peerStatus to set the position of the opponent.
. You use 1-self.peerStatus to set the position of the opponent.
The final packet denotes the ball’s location ![]() . It’s sent every time the ball collides with the wall or a paddle.
. It’s sent every time the ball collides with the wall or a paddle.
Now that all the heavy lifting is out of the way, it’s time to implement the game loop method.
15.3.7. The game loop
The game loop is the driving force behind the application. This method is called frequently and is responsible for modifying game variables, updating the interface, and making sure the peers are in sync. Your game loop will generally be the largest method in your application. The next listing shows the code used for the game loop.
Listing 15.9. The game loop
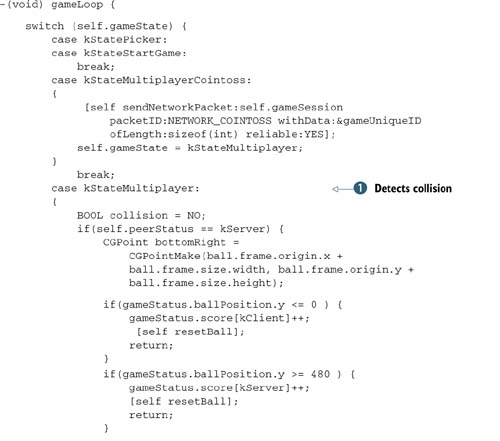
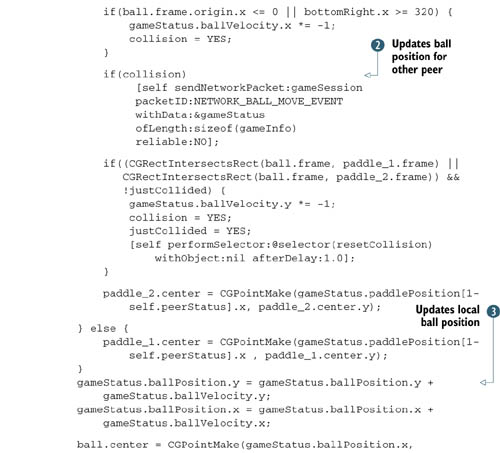

The first case occurs only once per game, when the game is in the coin-toss state. In this state, each player sends their UDID to the other. Immediately after this, the game state is set to multiplayer, and the game begins.
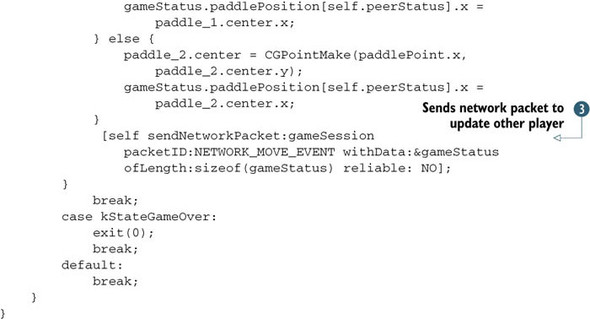
The next case gets into the game logic ![]() . You first determine whether you’re in the game loop of the client or the server. Following that is collision detection to
determine if the ball hits a paddle, a side wall, or a back wall to score a point. Note that you set the collision Boolean to NO. You use this to determine when to send the ball’s location to the other peer
. You first determine whether you’re in the game loop of the client or the server. Following that is collision detection to
determine if the ball hits a paddle, a side wall, or a back wall to score a point. Note that you set the collision Boolean to NO. You use this to determine when to send the ball’s location to the other peer ![]() . Because both peers are running different timers, there’s a good chance that the ball’s location could get out of sync. To
combat this, the server sends the ball’s current position to the client every time the ball collides with something.
. Because both peers are running different timers, there’s a good chance that the ball’s location could get out of sync. To
combat this, the server sends the ball’s current position to the client every time the ball collides with something.
One thing you may think of doing here is sending the ball’s position on every step of the timer. This would be a bad approach, because it would quickly flood the network, causing poor performance for the client. You must always be clever about when to send network packets. Try to send them as far apart as possible while still maintaining synchronization between the peers. For the example, you send a packet every time the ball changes direction, which is about once every half second.
Both the client and the server update the position of the ball on the screen ![]() . Following this, the winning conditions are checked to see if either player has scored five points
. Following this, the winning conditions are checked to see if either player has scored five points ![]() . If this is the case, you end the game.
. If this is the case, you end the game.
Although the code for this game loop could be improved quite a bit to make the game more interesting, it does a good job of showing when to send network packets. Because you send network data only when the ball collides with something, this loop may run a couple hundred times before the client is updated. The last part of the game involves user interaction by implementing the touchesMoved method.
15.3.8. User interaction
As with most applications, you’ll handle the user interaction by implementing the touchesBegan and touchesMoved methods. In these methods, you’ll capture the user’s touch location, move the paddle to that location, and send that location to the other peer. The following listing shows the code for these methods.
Listing 15.10. Methods for user interaction
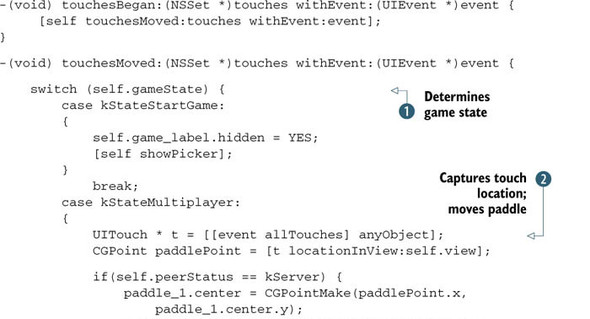
The first thing you see is common in many applications. Because the touchesBegan and touchesMoved methods do the exact same thing, you have one call the other.
As in most of the game methods, the game state is determined at the beginning of this method ![]() . That’s because you want to do different things based on the state of the game. If you’re at the beginning of the game, and
the user taps the screen, the method showPicker is called to display the peer picker to the user. At that point, the Game Kit code takes over until a connection is established.
. That’s because you want to do different things based on the state of the game. If you’re at the beginning of the game, and
the user taps the screen, the method showPicker is called to display the peer picker to the user. At that point, the Game Kit code takes over until a connection is established.
You next get the location on the screen where the user touched ![]() . The x coordinate of this touch is used to move the player’s paddle. As the user drags their finger on the screen, their
paddle moves along with it.
. The x coordinate of this touch is used to move the player’s paddle. As the user drags their finger on the screen, their
paddle moves along with it.
After each movement of the paddle, you must notify the other player of its new location ![]() . Notice that you send the data unreliably; this is because you’re sending so many packets to the other user that you don’t
care if they don’t receive a few of them.
. Notice that you send the data unreliably; this is because you’re sending so many packets to the other user that you don’t
care if they don’t receive a few of them.
The game you’ve just created is nowhere near complete, but it provides you with enough code to understand how Game Kit should be used in a multiplayer game. You could take this game further by adding better graphics as well as basic physics for the collisions.
15.4. Summary
The Game Kit framework provides a high-level interface to create fully networked applications. It handles every step of the process, including finding peers, establishing a connection, and transferring various types of data between them.
You must implement three things when creating any application that uses Game Kit for networking. The first is the set of delegate methods for the peer picker. These methods respond to various events, including finding peers and selecting which ones you want to connect to. The next thing is the set of delegate methods for the session. These methods allow you to create custom sessions as well as keep track of all the sessions currently connected. The last methods you must consider are send and receive. They’re responsible for all the data that’s transferred over the network.
As you saw in section 15.3, Game Kit is easy to integrate into a game application. You can use the basic Game Kit methods along with a game loop to create a simple template for any multiplayer game.
With the networking code behind you, you’re ready to learn how to communicate with the mother ship. The next chapter will discuss how to use the Event Kit.