Chapter 20. Making money with iAd
- Creating a banner ad in your application
- Responding to a user’s interaction, such as screen rotation
- Handling ad downloading errors
- Going live with iAd
You may remember the popular quotation from the movie Jerry Maguire: “Show me the money!” Let’s talk about making money. We covered the majority of the iOS 4 frameworks in the previous 19 chapters. You may have a plan to get your app-design business started. Sure, there are a lot of ways to make money with your applications. You can build a paid app, a free app with an app purchase, or a totally free app with some advertisements; when users see and interact with the ads inside your app, you’ll get paid. How much money can you make? The answer will be based on how many active users you have for your apps and, in turn, how many ads you’ve served and the reaction of your users. Apple will sell and distribute the ads through the iAd service; as a developer, you’ll keep 60% of the total revenue from iAd (at the time of writing).
If you decide to go for the advertisement option, there’s a good chance you’ll consider the iAd framework in iOS 4. In this chapter, we’ll cover how to integrate banner ads into your application, how to implement screen-rotation support for iAd, and how to handle ad-downloading errors. At the end of the chapter, we’ll cover how to enable iAd through iTunes Connect.
20.1. Adding a banner ad into your application
Before you start to code, let’s spend some time together on the banner advertisement structure. First, you need to provide some space for the banner image view in your application’s user interface, roughly 10% of the screen size. For example, the banner view under portrait mode on iPhone is 320 × 50 points (pt) in size, and portrait mode on the iPad is 768 × 66 pt. Ad sizes based on device and screen orientation are described in detail in table 20.1.
Table 20.1. iAd banner view size table
|
Device |
Screen orientation |
Banner size (width × height in points) |
|---|---|---|
| iPhone | Portrait | 320 × 50 |
| iPhone | Landscape | 480 × 32 |
| iPad | Portrait | 768 × 66 |
| iPad | Landscape | 1280 × 66 |
The iAd framework provides a convenient way to display that image banner view through ADBannerView. ADBannerView will make sure that the advertisements are automatically loaded from the iAd Network and presented in your application properly. When an end user or customer taps a banner image view, the current advertisement will begin its animation. A full-screen view controller will appear and interact with user gestures. The full-screen view controller could be a mini-application, which is a rich media advertisement based on HTML5; it may contain other features, such as the ability to use maps and purchase directly from iTunes. The customer can return to the app interface by tapping the Close button on the top-left corner of the screen.
Where is the advertisement from? It’s from the iAd service running on Apple’s ad servers. The good news is that you don’t need to worry about how the banner image was downloaded. That’s what the iAd framework is for. In this section, you’ll create a demo app with an ad banner view added to the view hierarchy.
20.1.1. Creating a simple app for the ad banner view
To start your money-making journey, you need to have a simple app to get your business going. Let’s use a simple application in the app template. Keep one important rule in mind: you need to have a view controller to display the banner view. In this section, you’ll use a view-based application for the iAd demonstration. It will give you a nice, simple view controller to display the AdBannnerView.
Fire up Xcode, and create a new project. When the project template opens, under iOS Application, choose View-Based Application. The product is iPhone. Name it MyApp. Now you have the basic view controller for the banner ad. Single-click the Classes folder on the Groups & Files panel. You’re going to use MyAppViewController as the parent view controller for the banner display.
Do you remember how to add a new framework into your app? (You can refer to chapter 16 for details.) You need to add the iAd framework into the app. Head back to Xcode. Highlight the top-level Project node in the Projects tree, and on the right side, choose a Target; then select the Build Phases tab. Under this tab is an entry called Link Binary with Libraries. Click the + button next to it, and you’ll see a window with the entire list of available frameworks under the current SDK. Navigate to iAd.framework, and click the Add button. Now the iAd framework is added to the app.
In order to have this simple app running on both the iPhone and iPad, go to Xcode 4 and select MyApp project node in the Navigation View. The editor view will display the project summary. Select MyApp target, and choose Universal for Devices option. Now you have the universal app for the iAd banner demonstration.
20.1.2. Adding the banner view to the view controller
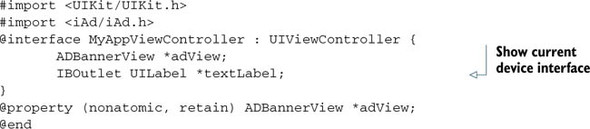
It’s time to add in the banner view. Single-click the MyAppViewController.h file, and add the header file for iAd framework:
#import <iAd/iAd.h>
Single-click the MyAppViewController.m file. Add the code in the following listing to make a simple banner ad.
Listing 20.1. Creating the banner view inside the view controller
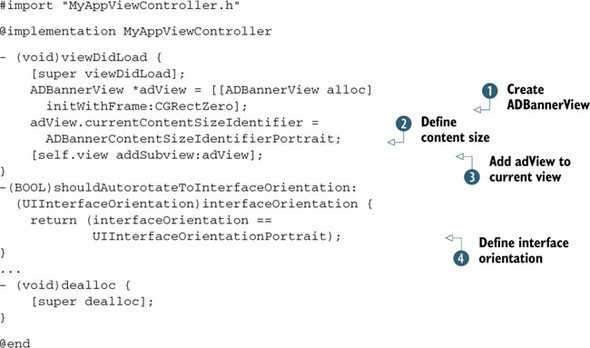
Let’s go through the changes. Inside the viewDidLoad method, you create a banner view ![]() , and then you define the content size to be portrait (320 × 50 on iPhone, 768 × 66 on iPad)
, and then you define the content size to be portrait (320 × 50 on iPhone, 768 × 66 on iPad) ![]() . Finally, you add the banner view to the view controller’s view hierarchy
. Finally, you add the banner view to the view controller’s view hierarchy ![]() . In order to define the interface orientation as portrait mode only, you define the interfaceOrientation
. In order to define the interface orientation as portrait mode only, you define the interfaceOrientation ![]() . Save all the changes.
. Save all the changes.
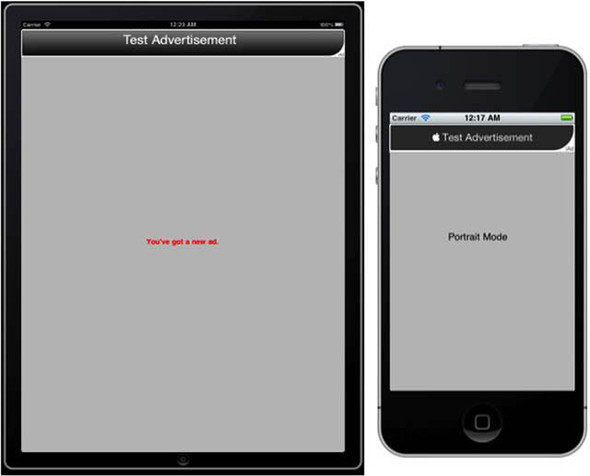
Click Build and Run on the Simulator. You should see the app running with a nice test banner on the top of the screen. Make sure your laptop is connected to the internet, because the test banner in figure 20.1 will work only when there’s an internet connection.
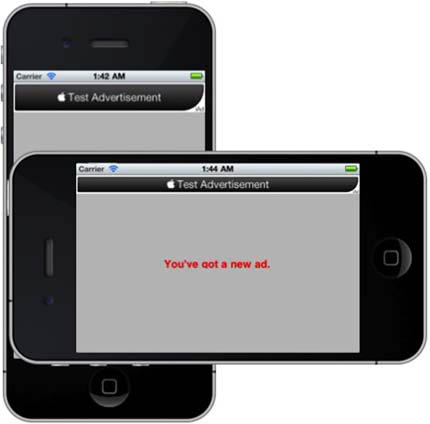
Figure 20.1. A successful demonstration of a test iAd banner view inside the view controller
As we mentioned in the beginning of the chapter, the banner view will respond to the user’s action. Click the banner view; are you getting the text shown in figure 20.2 on your Simulator now? Congrats! As you can tell from the message, you have the test advertisement running successfully.
Figure 20.2. Full-screen view controller presented when the user taps the banner ad
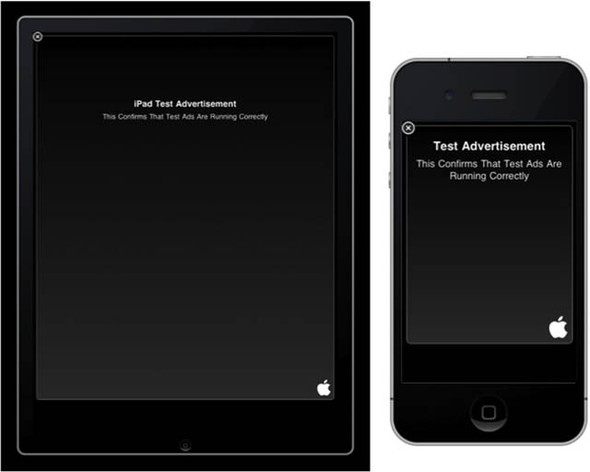
Click the top-left button to close the full-screen view controller. Now you have the banner view running smoothly in the app when it’s under portrait mode only. What if the user rotates the device from portrait mode to landscape mode? We’ll look into this scenario in the next section.
20.2. Supporting both portrait mode and landscape mode
Previously we talked about how to integrate the portrait-mode banner ad. It turns out that when the device is in landscape mode, you can change the banner view size from 320 × 50 to 480 × 32 on the iPhone and from 768 × 66 to 1024 × 66 on the iPad. In this section, we’ll cover how to change banner size dynamically when the user rotates the iPhone or iPad.
In order to make the app more responsive, let’s add a text label in the center of the screen. Go back to Xcode, single-click the MyAppViewController.h file, and add the following changes.
Listing 20.2. Adding the text label and banner view in MyAppViewController.h
This text label will be updated to show you the current device orientation. Save the changes, and follow up with the new code in the MyAppViewController.m file in the following listing. Single-click the MyAppViewController.m file, and implement the changes.
Listing 20.3. Presenting the banner view dynamically when the orientation changes
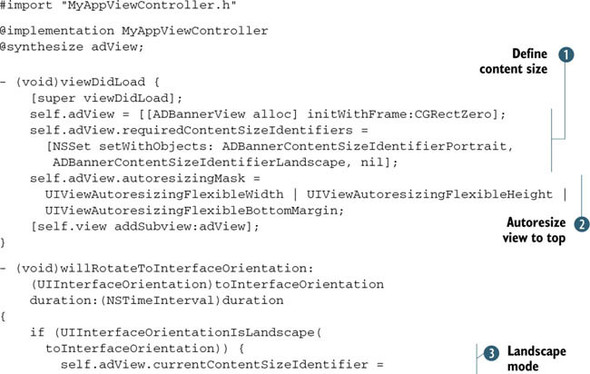
Save the changes. Let’s spend some time examining listing 20.3. You create a banner view ![]() and define the size to include both portrait mode and landscape mode. Then you add autoresizing and position the banner view
during the runtime
and define the size to include both portrait mode and landscape mode. Then you add autoresizing and position the banner view
during the runtime ![]() . Inside the method willRotateToInterfaceOrientation, you change the banner view’s size dynamically according to the new device interface. Next, you change the banner to landscape
mode
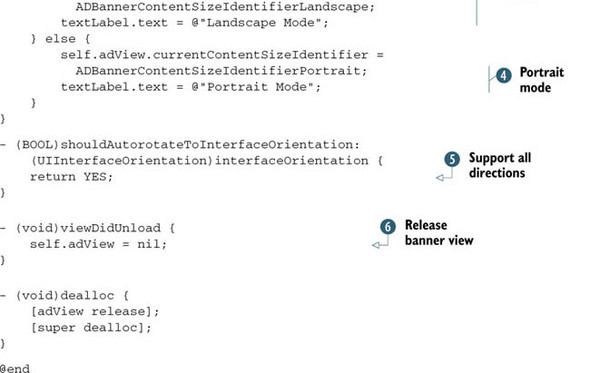
. Inside the method willRotateToInterfaceOrientation, you change the banner view’s size dynamically according to the new device interface. Next, you change the banner to landscape
mode ![]() and update the textLabel’s text to indicate that the current banner size will be in landscape mode. Then you define the banner to portrait mode and
update the textLabel’s text to indicate that the new banner size will be portrait mode
and update the textLabel’s text to indicate that the current banner size will be in landscape mode. Then you define the banner to portrait mode and
update the textLabel’s text to indicate that the new banner size will be portrait mode ![]() . Remember that you define interfaceorientation to be portrait mode only: you change it here to support all directions
. Remember that you define interfaceorientation to be portrait mode only: you change it here to support all directions ![]() . You release the banner view in the memory because you’re a good citizen
. You release the banner view in the memory because you’re a good citizen ![]() .
.
Don’t forget to create the textLabel inside the nib file. Double-click the MyAppViewController.xib file. Fire up the library, drag a UILabel onto the view, and place the label in the center. Double-click the label you just created, and change the text to Portrait Mode. Bring up the Connection Inspector (View menu > Utilities > Connections Inspector), click the File’s Owner icon in the MyAppViewController.xib file window to have the textLabel showing in the outlets, and then hook up the textLabel with the label you just created. When everything is finished, you should see a user interface similar to the one in figure 20.3.
Figure 20.3. MyAppViewController.xib file, connecting the textLabel outlet to the label inside the view
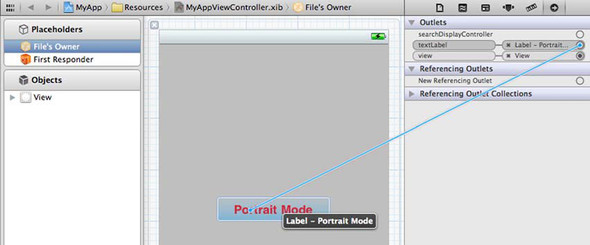
Under the text label’s Size tab, you can set the label’s positioning to be the center of the view. Save all the changes. Now you’re ready for the test run.
Click Build and Run on the Simulator. With everything running smoothly, you should be able to see the screen shown in figure 20.4 under portrait mode; and when you rotate the Simulator to landscape mode (press Command-left arrow on the keyboard, or choose Hardware menu > Rotate Left), the banner view is changed to the landscape size.
Figure 20.4. Dynamically update the banner view size to support both portrait mode and landscape mode.
Looking good! So far you’ve learned how to create a banner view inside the universal app with the iAd framework. We also looked into how to define the banner size dynamically when the device changes its interface orientation. Now let’s tackle another issue you may face in the real world: what if the iPhone or iPad has no wi-fi connection?
As we mentioned earlier, the banner ad is downloaded from the iAd Network. You won’t have a banner-ad view when no connection is available. It’s a bad user experience to have some sort of gray view on the top or bottom of the screen, with nothing showing up. Maybe you can try to hide the banner when there’s no ad or an error occurs. We’ll discuss this technical problem in the following section.
20.3. How to handle advertisement downloading errors
As we mentioned in the beginning of this chapter, the iAd banner is downloaded from the iAd Network somewhere in the cloud. When no connection or no ad is available, a download error will occur. Here we’ll revisit MyApp from section 20.2 to demonstrate how to hide the banner view when an error occurs during advertisement downloading and how to show the banner view with animation when a new advertisement arrives.
ADBannerViewDelegate provides you with some helpful methods for these common events:
- When a new advertisement is loaded:
-(void)bannerViewDidLoadAd:(ADBannerView *)banner - When an error occurs or advertisements are not available:
-(void)bannerView:(ADBannerView *)banner
didFailToReceiveAdWithError:(NSError *)error
In this section, we’ll cover how to handle the ad-downloading error with the ADBannerViewDelegate methods.
20.3.1. Adding a delegate to ADBannerView’s view controller
In Xcode, single-click the MyAppViewController.h file, and add the ADBannerView-Delegate to the header file as follows:
@interface MyAppViewController: UIViewController <ADBannerViewDelegate> {
Now you’ll add the new changes to the MyAppViewController.m file. Single-click the MyAppViewController.m file, define the adView’s delegate as self in the viewDidLoad method, and hide the banner view, as shown in the following listing.
Listing 20.4. Creating ADBannerView and assigning delegate to view controller
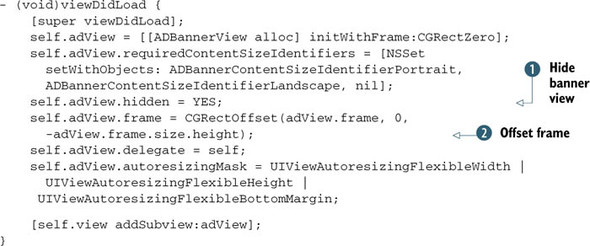
The view controller now has the delegate methods ready to implement. Notice that you hide the banner view when you create
the banner ![]() . Then you offset the banner’s frame height
. Then you offset the banner’s frame height ![]() to prepare for the banner view’s slide in animation. We’ll cover two methods in this section: when a new advertisement is
loaded, you’ll load the banner view with animation; when an error occurs during the loading time, you’ll hide the banner view
with the method bannerView:didFailToReceiveAdWithError.
to prepare for the banner view’s slide in animation. We’ll cover two methods in this section: when a new advertisement is
loaded, you’ll load the banner view with animation; when an error occurs during the loading time, you’ll hide the banner view
with the method bannerView:didFailToReceiveAdWithError.
Add the two ADBannerView delegate methods to the MyAppViewController.m file, as shown in the following listing.
Listing 20.5. Implementing the delegate methods for ADBannerView
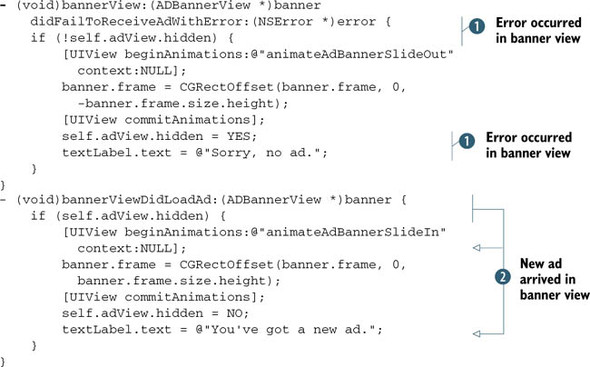
You use the ADBannerView’s delegate method ![]() to hide the banner view when an error occurs inside the banner view and add the animation to slide out the banner when a
new ad is loaded. Meanwhile, you update the textLabel’s text to give a hint as to what’s going on with the banner view. With the next method
to hide the banner view when an error occurs inside the banner view and add the animation to slide out the banner when a
new ad is loaded. Meanwhile, you update the textLabel’s text to give a hint as to what’s going on with the banner view. With the next method ![]() , you define the banner view to appear when a new advertisement is loaded and update the textLabel’s text to “You’ve got a new ad.” Pretty easy, right?
, you define the banner view to appear when a new advertisement is loaded and update the textLabel’s text to “You’ve got a new ad.” Pretty easy, right?
Next, let’s test the delegate methods with the application running under the Simulator.
20.3.2. Simulating event handling
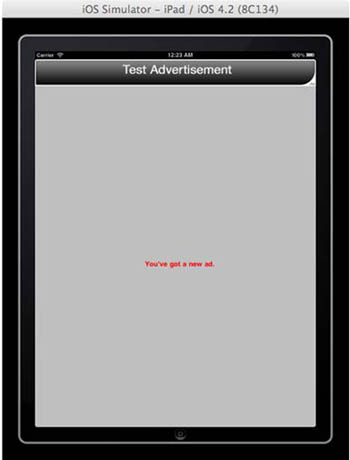
Save all the changes, click Build, and run the project on the Simulator. With an internet connection, you’ll see the screen shown in figure 20.5 on the Simulator when you get a new test advertisement. The animation effect is kind of cool, right?
Figure 20.5. The banner view delegate method notifies you when there’s a new advertisement on the iPad.
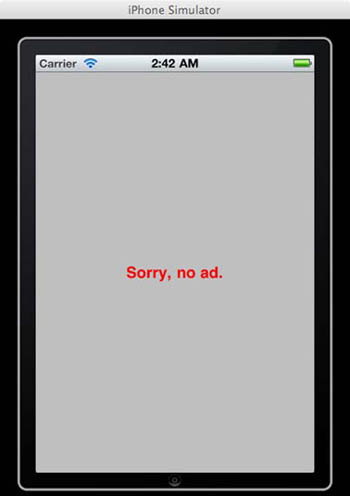
Turn off the internet connection (Apple’s iAd test environment will send you the error example from time to time even with the wi-fi connection). You’ll have a hidden banner view and a message saying “Sorry, no ad,” as shown in figure 20.6.
Figure 20.6. Hide the banner view when there’s an error in the banner view.
With the error handling, MyApp’s user interface makes the default error banner view unnoticeable. Instead of showing a gray empty banner as in figure 20.7, you have a much better user experience with a few lines of code from listing 20.5.
Figure 20.7. Default banner view when an error occurs during advertisement downloading

Some other delegate methods are worth mentioning here. When a user taps on the banner view, before the full-screen view controller presents, it calls the delegate’s bannerViewActionShouldBegin:willLeaveApplication: method. If your app is a game, you may want to save the current status or pause the game before the user leaves the application’s interface, so when the user comes back, the app can continue running without losing all the data. When the user dismisses the full-screen modal view controller, another method, bannerViewActionDidFinish:, gets called. Inside this method, you can restart the game or continue to run the app before the full-screen view controller appears.
Let’s review the new methods you’ve added in this part. You assigned the delegate to the view controller self when you first created the banner view; then you saw how to hide the banner view when an error occurs in the delegate method bannerViewdidFailToReceiveAd:WithError:. You can test the app on the device now: try it by either disabling wi-fi and 3G data on the device or by disabling networking entirely by setting the device to Airplane Mode in the Settings app. The banner view will be hidden as defined in the delegate method.
You’ve done enough testing. What if you want to go live and publish the application with the iAd Network? We’ll talk about this next.
20.4. Going live with the application
So far, you’ve tested the view-based application MyApp with test advertisements from the iAd Network service. You may wonder when you can see some real advertisements instead of the test ads. Well, it turns out the iAd Network will send test advertisements to MyApp under the entire testing process, which means under Simulator, under developer builds on the device, under ad hoc distribution builds to beta testers, and so on. The live ads will be available to MyApp only when the distribution build is submitted to the App Store. When end users download your app from the App Store, they’ll see the live ads automatically displayed.
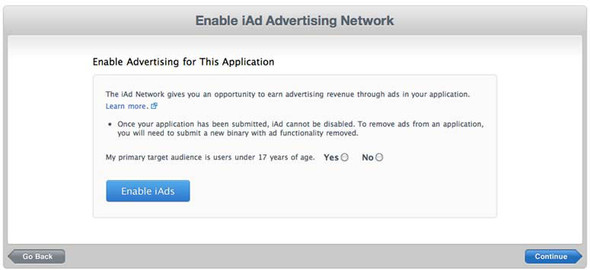
First, go to the iPhone Developer Program portal, and open the iTunes Connect Online Application. You need to accept the contract for iAd. Once your contract is ready, you can submit the final distribution build to the App Store. To receive advertisements from the iAd Network, you first need to enable the iAd service for the application you’re submitting, as shown in figure 20.8.
Figure 20.8. Enable the iAd Advertising Network for your application during the new application submission.
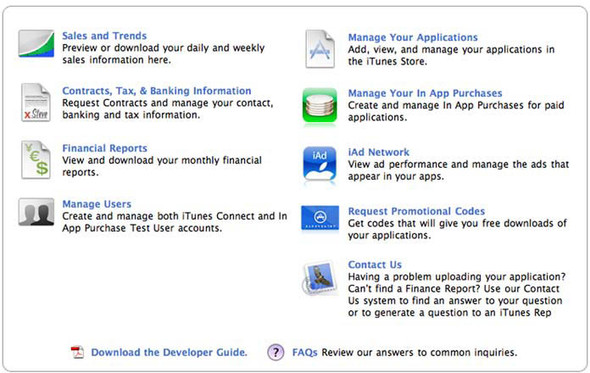
When you have at least one application with iAd enabled, there should be a new iAd Network item available on your iTunes Connect page, as shown in figure 20.9.
Figure 20.9. Your iTunes Connect page will include the iAd Network when the iAd’s contract is accepted.
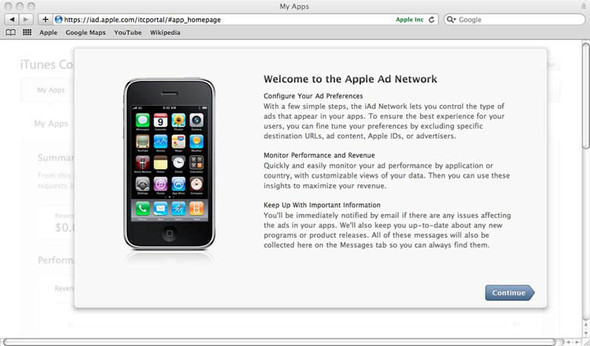
Click iAd Network. You can use this page to manage the ads that appear in your apps. You can also monitor the ads’ performance in your apps. For example, you can find out ad revenue, key metrics, and ad performance by app or country, as shown in figure 20.10.
Figure 20.10. iAd Network under iTunes Connect
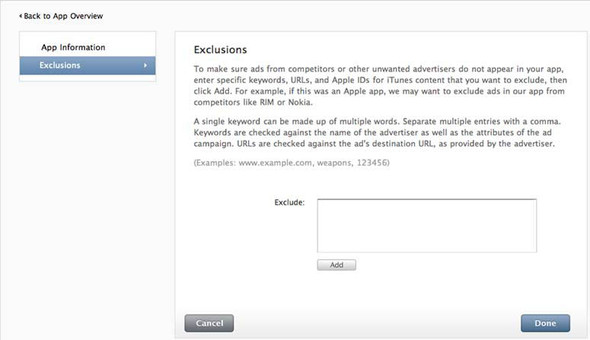
Another important feature on this page is that you can add exclusions for each app. You can add certain keywords, Apple IDs, or URLs to make sure ads from your competitors or certain unwanted advertisers won’t show up in your app. Click the app that you would like to add exclusions to, and the Exclusions feature will appear, as shown in figure 20.11.
In this section, we talked about how to get live ads with iTunes Connect on the iOS Developer Program website. With all the tools in hand, you should be able to monetize your app through iAd. When your application is approved and becomes live in the App Store, users will start to download your app; you can come back to the iTunes Connect page and check your revenue through iAd. Have fun!
Figure 20.11. Add exclusions to your app.
20.5. Summary
You’re ready to make money via iAd with your application! Let’s recap what you’ve learned in this chapter. First, you managed to create a portrait mode–only banner view, and then you learned how to handle some real problems, such as screen rotation or advertisement download errors. Now you can get live ads from iAd Network, monitor the ads’ performance, and get a revenue report.
Hope you’ve had a good time with iAd so far. Sit tight, because you’re heading to a fun and important part of iOS 4: multitasking.