
Appendix B. How jQuery UI tests jQuery UI
To verify that the various features of jQuery UI work as intended, the library has a series of unit tests that run in all the library’s supported browsers. The tests themselves are written using the QUnit testing library. Because several excellent QUnit tutorials are online (http://qunitjs.com/cookbook/ is a particularly good one), I won’t give one here. Instead, I’ll show how jQuery UI tests its own widgets, using examples directly from the jQuery UI source code. Hopefully, looking at how jQuery UI tests its own widgets will help you approach testing yours.
B.1. Testing options
jQuery UI attempts to test every potential value of every option for every widget. Although the test coverage isn’t perfect, the majority of options have tests to verify their behavior.
Note
The $( "#spin" ) call selects an <input id="spin"> element in the <div id="qunit-fixture">. If you’re not familiar with QUnit, the fixture <div> is a place to put markup to use during the tests. QUnit resets the markup in the fixture to its initial state before each test—ensuring changes made in one test don’t affect others.
Here’s the spinner widget’s tests for its max option:
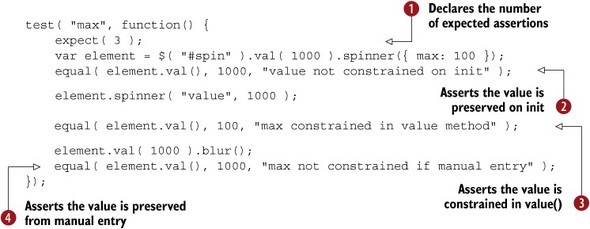
The test starts by calling QUnit’s expect() function, which tells QUnit how many assertions this test should perform ![]() . If this test completes, and exactly three assertions were not performed, QUnit will fail the test. Explicitly declaring the number of assertions acts as a safeguard; it ensures you don’t
include an assertion that QUnit can’t execute, which may happen during a refactor, or when dealing with asynchronous code.
The call to expect() is important enough that jQuery UI sets the QUnit requireExpects configuration variable to true (QUnit.config.requireExpects = true), which tells QUnit to require a call to expect() in each test. With require-Expects set, QUnit fails any test without an expect() call automatically.
. If this test completes, and exactly three assertions were not performed, QUnit will fail the test. Explicitly declaring the number of assertions acts as a safeguard; it ensures you don’t
include an assertion that QUnit can’t execute, which may happen during a refactor, or when dealing with asynchronous code.
The call to expect() is important enough that jQuery UI sets the QUnit requireExpects configuration variable to true (QUnit.config.requireExpects = true), which tells QUnit to require a call to expect() in each test. With require-Expects set, QUnit fails any test without an expect() call automatically.
Next, this test does a few assertions to verify the max option’s behavior. The code starts by setting the <input> element’s value to 1000, and then initializing a spinner widget on it. The spinner’s max option is set to 100. The first assertion ensures that the <input> element’s value wasn’t constrained by the max option, specifically, that the value remained 1000 despite the max of 100 ![]() . This behavior is for consistency with the native <input type="number"> control. If you create a <input type="number" value="1000" max="100"> element, its starting value is 1000.
. This behavior is for consistency with the native <input type="number"> control. If you create a <input type="number" value="1000" max="100"> element, its starting value is 1000.
The next assertion checks the opposite behavior—that the value is constrained when using the value() method. It does so by invoking the value() method with a value of 1000, and asserting that the value was limited to the max (100) ![]() .
.
The last assertion is another check to ensure consistent behavior with <input type="number"> controls. If a user manually types a number greater than the <input> element’s max, the browser doesn’t update the <input> element’s value on blur. The test makes sure the spinner adheres to this behavior by setting the <input> element’s value to 1000, explicitly triggering a blur event, and asserting that the value of 1000 wasn’t altered ![]() .
.
These tests ensure that the spinner’s max option does what its documentation says that it does. But this doesn’t cover everything the max option does. When using the spinner widget with Globalize, you can also pass formatted strings to use as the max option (appendix D looks at this in detail); therefore, the spinner widget includes a test for that as well:
test( "max, string", function() {
    expect( 3 );
    var element = $( "#spin" )
        .val( 1000 )
        .spinner({
            max: "$100.00",
            numberFormat: "C",
            culture: "en"

        });
    equal( element.val(), "$1,000.00", "value not constrained on init" );
    equal( element.spinner( "option", "max" ), 100, "option converted to number" );

    element.spinner( "value", 1000 );
    equal( element.val(), "$100.00", "max constrained in value method" );
});
This is more or less the same test as before; the only difference is the use of strings for the max option instead of numbers. jQuery UI attempts to write tests that cover every type documented in its API documentation. For instance, the autocomplete’s source option has tests that cover the three data types it accepts (array, object, and function).
For your own widgets, testing each type of each option verifies that the widget works correctly—especially as the widget is worked on over time. Looking for tests is also a good criterion for judging third-party widgets. A third-party widget with thorough test coverage is more likely to work as advertised than one without tests.
Let’s move from options to how jQuery UI tests its methods.
B.2. Testing methods
Like options, jQuery UI attempts to test every documented method for every widget. Importantly, though, jQuery UI doesn’t test internal, undocumented methods. Here’s the test for the spinner widget’s isValid() method:

The test makes a number of assertions to ensure the isValid() method correctly determines the validity of the spinner. It ensures that nonnumeric strings ![]() , values below the min
, values below the min ![]() , and values above the max
, and values above the max ![]() are all invalid—among other checks for the strings users can potentially input.
are all invalid—among other checks for the strings users can potentially input.
What you don’t see here is that internally isValid() uses an _adjustValue() method to do most of the dirty work of determining the validity of a user’s input. But because jQuery UI tests only the public API, you won’t find a single test that hits _adjustValue() directly. The _adjustValue() method gets indirectly tested when it’s called from the public API methods.
Like options, jQuery UI also tests all method variations. The spinner widget’s stepUp() method, for instance, can be called with no arguments—that is, spinner( "stepUp" )—or with a single argument indicating the number of steps to take—that is, spinner( "stepUp", 5 ). Here’s the test that jQuery UI uses to verify this method works as documented:

The test starts by creating a spinner widget with a value of 0, a step of 2, and a max of 16. The first assertion calls the stepUp() method and ensures it increments the <input> element’s value by a single step (from 0 to 2) ![]() . The next assertion invokes the stepUp() method with 5 and ensures it increments the <input> element’s value by 5 steps (from 2 to 12)
. The next assertion invokes the stepUp() method with 5 and ensures it increments the <input> element’s value by 5 steps (from 2 to 12) ![]() . The last two assertions ensure that the stepUp() method respects the spinner’s max and stops the value at 16—both when the spinner’s value starts below the max
. The last two assertions ensure that the stepUp() method respects the spinner’s max and stops the value at 16—both when the spinner’s value starts below the max ![]() and when it starts at it
and when it starts at it ![]() .
.
Let’s move from options to how jQuery UI tests events.
B.3. Testing events
Like options and methods, jQuery UI attempts to test each documented event for each widget. But testing events has a few unique twists. For one, events are often asynchronous, which requires extra logic in the tests. Listing B.1 shows a test for the autocomplete widget’s focus event.
Note
A little background: the autocomplete widget’s focus event is triggered every time an item in the autocomplete’s menu is focused. By default, the widget replaces the text <input> element’s value with the content of the focused menu item, but canceling the focus event prevents this behavior. The canceling behavior is what this test is concerned with.
Listing B.1. Testing canceling the autocomplete’s focus event

To start, you declare this test as an asyncTest() instead of a test() ![]() . (You’ll see why momentarily.) With a synchronous test, QUnit executes each line of code in the test() and then moves on to the next test(). With an asynchronous test, QUnit doesn’t continue when it reaches the end of an asyncTest(); instead, it waits for a call to start() before continuing.
. (You’ll see why momentarily.) With a synchronous test, QUnit executes each line of code in the test() and then moves on to the next test(). With an asynchronous test, QUnit doesn’t continue when it reaches the end of an asyncTest(); instead, it waits for a call to start() before continuing.
Within the test, the first thing you do is instantiate an autocomplete widget with a focus event callback. The callback sets the autocomplete’s <input> to a static string ![]() , and then returns false to cancel the event
, and then returns false to cancel the event ![]() . (Remember that you can return false or call preventDefault() on the event argument—which isn’t used here—to cancel an event.)
. (Remember that you can return false or call preventDefault() on the event argument—which isn’t used here—to cancel an event.)
Now, you need to trigger a focus event to get this callback to run. To make this happen, you do two things. First, you need to show the menu. You do this
by setting the <input> element’s value to the first two characters of a match ("ja") and triggering a keydown event ![]() . The next step is to simulate a down-arrow-key press (which moves focus to the first option), but you can’t do that quite
yet.
. The next step is to simulate a down-arrow-key press (which moves focus to the first option), but you can’t do that quite
yet.
We discussed all that jQuery UI does to write its tests, but we haven’t touched on how jQuery UI runs them. To start, because QUnit runs in a browser, you can run the library’s test suite yourself by downloading jQuery UI from https://github.com/jquery/jquery-ui/ and opening tests/unit/all.html in your browser of choice.
But that’s a manual process; to automate this, jQuery UI does a couple of things. First, every time code is committed to the master branch in the project’s git repository, a Travis CI (Continuous Integration) server runs checks on the project—including linting the project’s HTML, CSS, and JavaScript, as well as running all the unit tests. The committer of the code is notified if any problems are found. You can view the project’s Travis builds at https://travis-ci.org/jquery/jquery-ui.
Every commit also triggers a run on another CI server—TestSwarm. Unlike a more fully featured CI server, TestSwarm serves a single purpose: executing HTML-based tests across multiple browsers. Instead of opening an HTML page in dozens of browser + OS combinations, the jQuery UI team can test in their local browser and let TestSwarm handle the full suite of browsers that the library supports. You can learn more about TestSwarm, including how to set up your own TestSwarm infrastructure, at https://github.com/jquery/testswarm. You can view the results of the jQuery UI test runs at http://swarm.jquery.org/project/jqueryui.
Internally, jQuery UI displays the autocomplete menu asynchronously, with a delay that’s configurable by the delay option. Your code needs to wait for the menu to display before it can continue. To do that, you wrap the rest of the test’s
code in a setTimeout() call that delays its execution by 50 milliseconds ![]() . Remember that because this is an asyncTest(), QUnit won’t move on to the next test automatically. Instead, it idles until start() is called.
. Remember that because this is an asyncTest(), QUnit won’t move on to the next test automatically. Instead, it idles until start() is called.
After the delay, the menu has now been displayed, so you can continue. You simulate a down-arrow key being pressed ![]() , which moves focus to the first menu item and triggers your focus event callback. You ensure that the focus event was triggered, and that the <input> has the custom value (as opposed to “Java”)
, which moves focus to the first menu item and triggers your focus event callback. You ensure that the focus event was triggered, and that the <input> has the custom value (as opposed to “Java”) ![]() . Then you invoke start() to tell QUnit to continue with normal execution
. Then you invoke start() to tell QUnit to continue with normal execution ![]() .
.
There are other tests for the focus event when it’s not canceled, and tests to make sure focus event callbacks are triggered with the documented arguments (ui and event). As you can see, testing events is a little more work, but the same premise applies: jQuery UI attempts to test all its behavior that’s publicly documented.
And this premise extends beyond options, methods, and events. Each widget has tests to verify that the documented markup structures are parsed correctly, that the appropriate ARIA attributes are added, that the documented class names are added to the correct elements, and more. Writing and maintaining all these tests is no small task, but it helps make jQuery UI the stable library that it is.
In listing B.1 you may have noticed the call to simulate()—which isn’t a part of jQuery Core or jQuery UI. This works because jQuery UI includes the jQuery simulate plugin as part of its test suite. The simulate plugin is a small library specifically intended for simulating browser mouse and keyboard events.
The plugin works much like the jQuery Core trigger() method, except it has a convenient API to set properties on the event object passed to callbacks. Consider the call to simulate in listing B.1:
element.simulate( "keydown", { keyCode: $.ui.keyCode.DOWN });
If you were to call trigger( "keydown" ) instead, keydown event handlers wouldn’t know what key was pressed—and you can’t include properties in the Event object through the trigger() API. (Although you can explicitly create a jQuery.Event object and pass it to trigger(). For more, see http://api.jquery.com/category/events/event-object/.)
With simulate(), you have the convenience of quickly including properties on the Event object. The plugin intelligently merges properties passed to its second argument with properties on an Event object that it creates internally.
In addition to the Event object niceties, the simulate plugin also provides a convenient means of simulating the user dragging something across the screen. The following simulates the user moving an element 10 pixels left and 10 pixels down:
element.simulate( "drag", {
    dx: 10,
    dy: 10 });
The draggable and sortable widgets use this abstraction heavily in their test suites. For more on what the simulate plugin can do, and to download it for use in your own test suites, check out its GitHub repository at https://github.com/jquery/jquery-simulate.