
Chapter 10. Preparing your application for production
This chapter covers
- Managing dependencies with AMD
- Building your files for production
- Adding AMD support to jQuery UI extensions
So far, we’ve discussed all the components (widgets, effects, utilities, and more) that make up the jQuery UI library. Although these components offer a lot of functionality, there are a few problems associated with having this many components. The biggest problem is, because jQuery UI is a client-side library, the browser must download all the JavaScript code to implement this functionality over the network—which increases the amount of time it takes your application to load.
To make things worse, because JavaScript is an interpreted language, the browser also has to convert the text contents of these JavaScript files to executable byte code—which leads to a longer wait for your users. Load times are important. Studies have shown that over 25% of people abandon a website if it takes over 4 seconds to load. An amazon.com spokesman famously stated that a one-second delay on its load times represents a loss of over $1.5 billion a year!
The mobile explosion has exacerbated these issues. Users on mobile devices, especially ones on rural networks, have much higher latency and much lower download speeds than more traditional desktop computers.
The sheer size of jQuery UI coupled with mobile’s surge in importance has led to a perception that jQuery UI is too big to be used on mobile. Although jQuery UI is big, it’s also written modularly, meaning that it’s easy to include only the parts of the library you need. And because jQuery UI has so much in it (enough to write a whole book on!), few applications use even half of the library.
In this chapter, we’ll look at the tools jQuery UI provides to include only the parts of the library you need, and how to package them so your applications are optimized for production usage.
We’ll start by digging deeper into why the setup you’ve used to this point isn’t ideal for production.
10.1. The problem with third-party CDNs
In chapter 1, we introduced boilerplate to use in all your examples. It contained the following three lines to download jQuery Core and jQuery UI from jQuery’s CDN:
<link href="http://code.jquery.com/ui/1.11.0/themes/smoothness/
           jquery-ui.css" rel="stylesheet">
<script src="http://code.jquery.com/jquery-1.11.1.js"></script>
<script src="http://code.jquery.com/ui/1.11.0/jquery-ui.js"></script>
Third-party CDN downloads like this are great for testing; you can access the files you need without having to grab the files and store them on your own servers. But unless you’re developing the rare application that only ever runs on a blazing fast internal network, third-party CDNs aren’t appropriate for use in production. To explain why, we have to dig deeper into how the browser handles these three lines of code.
The browser has to figure out where the web server that hosts these files resides on the internet. Specifically, it has to perform a DNS lookup to find the IP address associated with the domain code.jquery.com. The browser and OS cache these lookups for a limited time to limit redundant trips, but if the user doesn’t have the domain cached, your application must perform the lookup before your application loads.
Once the browser knows where the web server is located, it must establish a TCP connection to the external server and transfer data across it. This again has a time cost to the end user.
The browser issues an HTTP GET request for jquery-1.11.1.js and ui/1.11.0/ jquery-ui.js from the web server located at code.jquery.com (or, as the browser sees it, 108.161.188.209). This workflow is shown in figure 10.1.
Figure 10.1. Round trips the browser must take when it parses a <script> tag from an external domain

No need to worry if this is too much information; the point is to show how network-intensive <link> and <script> tags can be.
The time it takes for each trip to the network is known as round-trip time (RTT). One round trip on a desktop browser with a fast internet connection takes a matter of a few milliseconds, but on mobile, a single round trip can easily take hundreds of milliseconds—and sometimes up to a full second in an extreme edge case (trying to access a server in Asia on a 3G network in rural Michigan, for example). Because of this, reducing RTTs is the top web-performance best practice listed on both Google and Yahoo’s performance best-practice lists. (See https://developers.google.com/speed/articles/ and http://developer.yahoo.com/performance/rules.html, respectively.) Reducing RTTs is the single most important thing you can do to improve the performance of your web applications—especially on mobile devices.
What does this have to do with third-party CDNs? Because the third-party CDN is on a different domain, the browser must perform at least one round trip to establish a TCP connection, and possibly a second to perform a DNS lookup. These are extra round trips that aren’t necessary if you host jQuery and jQuery UI on your own domain.
There’s one additional issue with third-party CDNs that we need to discuss: the sheer size of the download. Because you can’t tell the external CDN which parts of jQuery UI you need, you must download the entirety of the library. And because jQuery UI does a lot of stuff, that can be a whole lot of code. If you only need to use an autocomplete, you shouldn’t subject your users on slow connections to download sortable’s collision-detection algorithms, or datepicker’s globalization logic.
Although third-party CDNs are great for testing, they aren’t appropriate for use in production in the majority of applications. Throughout the rest of this chapter, you’ll rework your boilerplate project structure to perform better in a production setting. To overcome the issues with third-party CDNs, we have two goals: reduce the number of round trips and ensure users download only the parts of jQuery UI that they need.
Luckily, jQuery UI has tools to make both of these optimizations possible. We’ll start with Download Builder.
An oft-cited benefit of using third-party CDNs is the potential for the user to enter your site with the external resource already cached, eliminating the need for any network trips at all. Unfortunately cache hits in the wild are extremely rare.
Why?
Browsers cache files by their complete URL; for a user to have jQuery or jQuery UI cached, they would need to have visited another site that downloaded jQuery or jQuery UI using that exact same URL. Any change, however small, and the browser sees the file as a completely different resource. And there are three big differentiators in the URLs:
- The CDN provider —Google, the jQuery Foundation, Microsoft, and others provide CDNs with jQuery and jQuery UI. To the browser, http://code.jquery.com/jquery-1.11.1.js and http://ajax.googleapis.com/ajax/libs/jquery/1.11.1/jquery.min.js are different resources.
- The version number —There are dozens of versions of both jQuery and jQuery UI in the wild. In 2013, the most popular version was jQuery 1.4.2 (keeping in mind that the latest version released in 2013 was 1.10.2). To the browser, http://code.jquery.com/jquery-1.10.1.js and http://code.jquery.com/jquery-1.10.2.js are different resources.
- http versus https —To the browser, http://code.jquery.com/jquery-1.11.1.js and https://code.jquery.com/jquery-1.11.1.js are different resources.
Because of these variations, the odds of a user arriving at your site with jQuery or jQuery UI already cached are too low to justify using third-party CDNs. For a more detailed write-up on the subject, see http://www.stevesouders.com/blog/2013/03/18/http-archive-jquery/.
10.2. Downloading jQuery UI from Download Builder
The first tool we’ll look at is the jQuery UI Download Builder, available at http://jqueryui.com/download/. Download Builder lets you configure a download of jQuery UI with only the pieces you need.
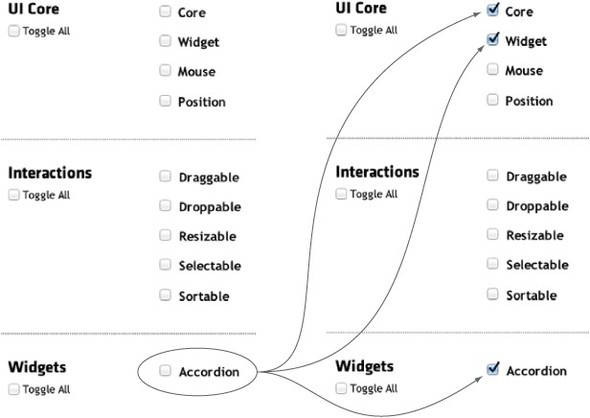
The page is set up as a series of check boxes for each of the widgets and utilities in jQuery UI. The check box for each feature is smart enough to know what the feature’s dependencies are. Because of this, the recommended approach to using Download Builder is to deselect all check boxes, and then select widgets and utilities that you need. In figure 10.2. when the accordion widget is selected, its two dependencies—jQuery UI Core and the widget factory—are selected as well.
Figure 10.2. When Accordion is checked, its dependencies are as well.
After you have the features you need selected, click the Download button to download a custom build of jQuery UI. The built JavaScript file is located at jquery-ui.min.js, and the built CSS file is located at jquery-ui.min.css in the downloaded build.
You can see the difference the custom build made by looking at the sizes of your new files. jQuery UI 1.11 in its entirety is 232 K, and your custom build with the accordion widget is 19 K. A savings of 213 K! Although not quite as much of an impact, your CSS file was reduced from 27 K to 16 K. The savings are shown in table 10.1.
Table 10.1. The savings of configuring a custom build of the accordion widget
|
File |
File size |
File size after gzip |
|---|---|---|
| jQuery UI JS (full) | 232 K | 61 K |
| jQuery UI JS (accordion only) | 19 K | 6 K |
| jQuery UI CSS (full) | 27 K | 5.5 K |
| jQuery UI CSS (accordion only) | 16 K | 3.3 K |
Although Download Builder can have huge benefits in reducing the size of jQuery UI, it can be a bit of a pain to use. If you decide to use a new widget, you have to go back to Download Builder, remember which dependencies you’re using, generate a new build, and put the updated files in your project—a lot of work for us lazy web developers.
More importantly, Download Builder doesn’t solve your biggest performance issue: reducing RTTs. The next technique solves both the download size and the RTT issues, but it’s going to require a bit more work to set up.
All modern browsers support sending compressed resources over the network, with the most common means of compression being gzip. gzip compression has a drastic impact on the file size of HTML, CSS, and JavaScript files. Running gzip on jQuery UI 1.11 reduces its JavaScript from 232 K to 61 K, and its CSS from 27 K to 5.5 K!
The compression algorithm running under the hoods of gzip works by replacing repeated strings with symbols; files with lots of repeated strings—such as CSS files—tend to get the highest level of compression.
Because of gzip’s dramatic impact, it’s important to make sure that your web server is using gzip on JavaScript and CSS files. You can verify this by looking for a Content-Encoding: gzip response header on these files. The following figure shows this header on the Network tab of Chrome’s developer tool.

Chrome’s developer tool showing that the Content-Encoding header is indeed sent on a JavaScript resource
For a more detailed explanation of gzip, see Chrome’s gzip best practice documentation at https://developers.google.com/speed/docs/best-practices/payload#Gzip-Compression.
10.3. Managing JavaScript dependencies with AMD
Managing dependencies in JavaScript has always been a tricky subject. Because JavaScript has no native means of declaring dependencies, web developers have historically been limited to <script> tags and global variables, which are easy to mess up. For instance, to use the accordion widget, you must know what its dependencies are (jQuery Core, jQuery UI Core, and the widget factory) and include each of them before the accordion widget itself. If you get the order wrong, you get an error. Although explicitly managing dependencies for a single script isn’t too bad, the practice can easily get out of control in big apps where you have hundreds of components with various codependencies.
The Asynchronous Module Definition (AMD) format attempts to solve dependency management on the web. Instead of relying on <script> tags that communicate through global variables, AMD modules declaratively specify their dependencies and return a function or object that other modules can use.
Note
ECMAScript 6, the upcoming version of JavaScript, includes an implementation of JavaScript modules, which will finally bring dependency management to JavaScript natively. But as of the time of this writing, the syntax hasn’t been finalized; it will be a few years before enough browsers implement modules and they can be realistically used in production applications.
Although AMD defines APIs for how modules should be specified, it doesn’t provide an implementation of the APIs. Think of AMD like the HTML specification which defines HTML elements and how they work, but it’s up to the browsers to implement them.
In the same sense, to use AMD you need a script loader that implements the AMD APIs. Although a few AMD loaders are out there, by far the most popular one is RequireJS. RequireJS is a free, open source, and well-documented library, making it perfect for managing dependencies in any application.
In the rest of this section, we’ll look at how to use RequireJS to load jQuery UI in your applications, how to switch your own application files to use AMD, and how to use RequireJS to optimize your files for production.
Although AMD provides many benefits to managing dependencies and building your resources, it can be difficult to convince your boss or organization to switch to using it—especially in existing code bases.
But don’t worry; you by no means have to use AMD. jQuery and jQuery UI both add all their modules to the global $ variable; therefore, you can reference these global variables as you always have.
Remember that your main performance goals were to reduce RTTs and the download size. If you can’t use AMD, you can use some other process to concatenate and minify your scripts, and a variety of alternative solutions for this are out there. Ruby on Rails has the Asset Pipeline and Rakefiles; Java has Ant tasks; Node.js has Grunt and Gulp tasks.
In general, it’s best to search for the best tool that matches your server-side environment.
Let’s start by looking at how to change your boilerplate to use RequireJS.
10.3.1. Setting up RequireJS for development
Before introducing RequireJS, let’s give an example showing how you’ve been doing things to this point. You’ll start with two files: an index.html and an app.js:

Your app’s index.html includes jQuery, jQuery UI, and your application’s functionality from jQuery’s CDN in <script> tags:
<script src="http://code.jquery.com/jquery-1.11.1.js"></script>
<script src="http://code.jquery.com/ui/1.11.0/jquery-ui.js"></script>
<script src="js/app.js"></script>
Your app.js performs whatever logic you need your application to perform. In this case, you’ll use it to create a new <input>, convert it to a spinner widget, and append it to the <body>:
$( "<input>" )
    .appendTo( "body" )
    .spinner({
        min: 0,
        max: 10
    });
Although this example is simple, it shows the disadvantages of using <script> tags and global variables. First, the three <script> tags must be in this exact order for this application to work. Second, this application downloads all of jQuery UI, and must perform numerous round trips to retrieve the three files it needs. So how are you going to improve this?
To get the improved example started, you’re going to need to download the latest versions of the following three things:
- require.js from http://requirejs.org/docs/download.html
- jQuery Core from http://jquery.com/download/
- jQuery UI from https://github.com/jquery/jquery-ui/releases
You’ll want to download the unminified, development versions of these libraries (jquery.js and require.js, not jquery.min.js and require.min.js). The development versions make your app easier to debug if things go wrong, and you’ll take care of minifying the files for production later. For jQuery UI, you can get the development files at https://github.com/jquery/jquery-ui/releases. Download the latest zip file and grab the JavaScript files, which as of version 1.11 are in the ui directory.
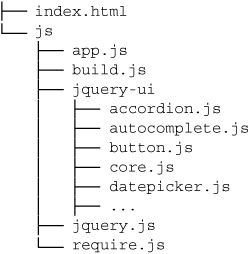
After downloading these files, you’ll want to create the following directory structure on your local development machine:

With this setup, you place all your JavaScript assets in a js directory, and all the jQuery UI files in a jquery-ui subdirectory. For convenience, you include all the jQuery UI files even though you’re not using every one. As you’ll see, RequireJS takes care of bundling up only what you need. RequireJS is also flexible enough to handle any directory structure you’d like to use. You’ll stick to this structure in your example for simplicity.
Now that you have your files set up, you have to use them.
10.3.2. Loading jQuery UI components with RequireJS
To start using RequireJS, change the three <script> tags in your index.html file to this:
<script src="js/require.js" data-main="js/app"></script>
This is a normal <script> tag that synchronously loads js/require.js. When require.js loads, it automatically performs an AJAX call to asynchronously load the file specified in its data-main attribute—js/app.js in this case—and executes it. Even though app.js loads and executes, you’re still not loading jQuery or jQuery UI; you get an error that $ isn’t defined.
To load your dependencies add an AMD-defined require() call in app.js:
require([ "jquery", "jquery-ui/spinner" ], function( $, spinner ) {
    $( "<input>" )
        .appendTo( "body" )
        .spinner({
            min: 0,
            max: 10
    });
});
The only thing different from before is the first line, and it can be tricky to understand at first. The require() function takes two parameters: an array of dependencies and a callback function. Our example’s two dependencies are jQuery Core and the jQuery UI spinner widget. RequireJS resolves these dependency strings—"jquery" and "jquery-ui/spinner"—as the names of files in the project’s directory structure. When require() runs, it asynchronously loads jquery.js and jquery-ui/spinner.js via AJAX requests. When these files both load, the callback function is invoked with the dependent modules as arguments.
RequireJS also does two important things on top of this. First, although it loads a module’s dependencies in parallel (that is, multiple HTTP requests are sent out simultaneously), it ensures that all dependencies are loaded before the callback function is invoked. In the callback function, you can be absolutely sure that all declared dependencies are available.
Second, RequireJS resolves deep dependencies of modules. The jQuery UI spinner widget depends on a few other jQuery UI files, such as the widget factory and the button widget. Having the deep file dependencies be transparent—that is, you don’t have to know the dependencies of dependencies—is incredibly useful. You can use modules without needing their dependencies. It’s the same functionality you got from the jQuery UI Download Builder, without going through the manual process of checking check boxes.
Under the hood RequireJS still loads these deep dependencies asynchronously. Figure 10.3 shows the network activity from running this example.
Figure 10.3. The Network tab of the Chrome developer tool showing the JavaScript files loaded by your AMD example
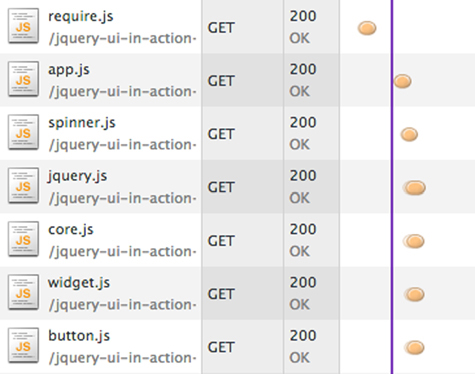
Figure 10.3 showcases another important feature of RequireJS: it’s smart enough to load dependencies only once. Every file in jQuery UI depends on jQuery Core, yet you can see that jquery.js was loaded only once. In fact, because the spinner widget depends on jQuery Core, you don’t have to list the jQuery dependency in your example. The following removes the "jquery" dependency from your require() call:
require([ "jquery-ui/spinner" ], function( spinner ) {
    $( "<input>" )
        .appendTo( "body" )
        .spinner({
            min: 0,
            max: 10
        });
});
When loaded with AMD, jQuery Core still makes the global $ variable available for backward compatibility. In the same manner, all the jQuery UI modules append their APIs to the global $ variable. The spinner widget’s constructor function is, for example, at $.ui.spinner.
All AMD modules have the ability to return a value, and the jQuery UI widgets all return their constructor functions. You can optionally use the widget’s constructor function instead of its plugin in the callback function:
require([ "jquery-ui/spinner" ], function( spinner ) {
    spinner({ min: 0, max: 10 }, "<input>" )
        .widget()
        .appendTo( "body" );
});
Note
All widgets have a widget() method that returns a jQuery object. For most widgets—such as accordion, menu, and tabs—the returned object contains the element the widget was initialized on. Other widgets return an element that they create internally; for instance, the autocomplete widget’s widget() method returns the <ul> element it displays suggestions in. The spinner widget’s widget() method returns a <div> it wraps around the <input> element it is initialized on. You can see what the widget() method returns for each widget on its API page.. The spinner widget’s widget() method is documented at http://api.jqueryui.com/spinner/#method-widget.
Regardless of how you choose to create widgets, the big advantage of AMD is that you’re loading only the parts of jQuery UI that you need. If your application needs only a spinner, you load only what you need to make a spinner. If your application suddenly needs an autocomplete, you can add "jquery-ui/autocomplete" to your require() call and not worry about what autocomplete depends on.
Although your example has solved your download size issues, there’s still a big problem: you perform more round trips than before—and we discussed how that’s the number-one thing you don’t want to do!
RequireJS has a trick up its sleeve to help with that. And it has a cool name too: the optimizer.
Yet again the pesky datepicker widget is the exception to the rule. Because datepicker isn’t written with the widget factory, it doesn’t return a constructor function when required with RequireJS. You can still load datepicker as an AMD dependency, but you can’t use the returned value as a constructor function; therefore, this doesn’t work:
require([ "jquery-ui/datepicker" ], function( datepicker ) {
    datepicker({}, "<input>" );
});
For better or worse, you need to stick to initiating datepicker instances with its plugin:
require([ "jquery", "jquery-ui/datepicker" ], function( $ ) {
    $( "<input>" )
        .datepicker()
        .appendTo( "body" );
});
10.4. Building your application’s assets with the optimizer
Although the AMD spec defines how to define and require resources, it doesn’t define how to optimize those files for use in web browsers. In addition to its implementation of AMD, RequireJS has a separate optimization tool that does this, known as the optimizer.
The optimizer is written in JavaScript and runs on top of Node.js. To run the examples in this section you need to have Node.js installed on your machine, although you do not need to learn anything about it. Also, installing Node.js on Windows and OS X is now as easy as downloading and running an installer. If you don’t have Node.js installed on your machine, grab the installer from http://nodejs.org/ and run it.
Tip
If you’re a Java developer, you might want to check out an alternative version of the optimizer written in Java. For more details, see https://github.com/jrburke/r.js.
You can verify the install worked by opening a new command-line session (Command Prompt on Windows, Terminal on OS X) and typing node. If you see something other than “command not found,” it worked.
In addition to Node.js itself, the installer installs npm, or Node Package Manager: a package management system for Node.js modules. Because the RequireJS optimizer is implemented as a Node.js module, you’ll use npm to install it.
To install the optimizer, run the following on your command-line session of choice:
> npm install –g requirejs
Note
In this book, command-line code is displayed in bold text to differentiate it from browser code.
The –g flag tells npm to install the module globally—in other words, not specific to an individual project. You can verify that the installation worked by running r.js (r.js.cmd on Windows). You should see the following output:
> r.js
See https://github.com/jrburke/r.js for usage.
That’s it for your installation; now you’re ready to optimize your files.
10.4.1. Optimizing JavaScript assets
Before doing so, we need to set a few configuration variables to tell the optimizer how to optimize your code. You can specify the configuration as command-line arguments or a JavaScript file to use as a build profile. I find the separate file to be more readable and maintainable, so you’ll use that for your example. If you’re interested in learning about the command-line option, the optimizer’s documentation (http://requirejs.org/docs/optimization.html) has a few examples.
You’ll name your configuration file build.js and place it in the same js directory you’ve placed the rest of your JavaScript assets in:
There is an overwhelming number of options that you can provide the optimizer (a full list is available at http://requirejs.org/docs/optimization.html#options), but the vast majority of applications need only a few, which we’ll walk through. For your example, you need only the following build.js:
({
    name: "app",
    out: "app.built.js"
})
You set two options: name and out. name is the filename of the JavaScript module to optimize, and out controls the filename of the output file generated by the optimizer.
Now that you have your installations done and your configuration in place, you can run the build. To do so, run this command in the root directory of your project (that is, the same directory containing your project’s index.html). Remember that on Windows, you’ll need to use r.js.cmd instead of r.js:
> $ r.js -o js/build.js
You should see the following output:
Tracing dependencies for: app
Uglifying file: js/app.built.js

js/app.built.js
----------------
js/jquery.js
js/jquery-ui/core.js
js/jquery-ui/widget.js
js/jquery-ui/button.js
js/jquery-ui/spinner.js
js/app.js
The optimizer starts at the file indicated by the name option (app.js), collects all its dependencies, concatenates them in a single file (named app.built.js because of the out option), and minifies that file. You now have a single js/app.built.js file that contains everything your application needs. Back in your app’s index.html, remember that you currently use this <script> tag:
<script src="js/require.js" data-main="js/app"></script>
To switch to the built file for production, all you need to do is add ".built" to the data-main attribute:
<script src="js/require.js" data-main="js/app.built"></script>
With this, you’ve solved both your RTT and download size issues. This code performs only two round trips—one for require.js and one for app.built.js. Because app.built.js contains only the modules you’re using, the user downloads only what is needed.
Tip
If performance is ultracritical and you want to get the RTT count down to one, the author of RequireJS provides an alternative AMD loader called almond. We’ll look at how to use almond in the next chapter.
This example shows the benefits of managing dependencies with AMD and RequireJS. Need to add a new dependency? Add it to your require() statement, rerun your build, and it’s there. Need to remove a dependency? Remove it from require(), rerun your build, and it’s gone. There’s no need to mess with configuration files or configure a new build on Download Builder.
We’ve now covered how to optimize your JavaScript assets for production, but we haven’t said a thing about CSS files. The reason is that although there are some third-party plugins, neither RequireJS nor the AMD specification handles CSS dependencies. Although RequireJS doesn’t manage CSS dependencies, its optimizer does let you concatenate and minify CSS files using the same build you used for JS files. We’ll look at how to use that next.
10.4.2. Optimizing CSS dependencies
The build you created in the previous section works great for smaller apps, but more complex apps have to build multiple JS files, CSS files, and more. No worries, though; RequireJS has configuration options to meet these nontrivial requirements.
Let’s return to your application’s directory structure to show the location of CSS files:

The same as your JavaScript files, you’re free to place your files in whatever directory structure you like (and RequireJS will support that structure), but for the sake of this example, you’re going to use a CSS directory with the jQuery UI .css files in a jquery-ui directory.
For your application’s code, you use a single app.css file in the same CSS directory. In it, you import your app’s CSS dependencies and add any styling you need for your application. For this example, you’ll load only your jQuery UI dependencies. To continue the same spinner example, place the following in your app.css:
@import "jquery-ui/core.css";
@import "jquery-ui/theme.css";
@import "jquery-ui/button.css";
@import "jquery-ui/spinner.css";
The only two required jQuery UI .css files are core.css and theme.css—which contain the jQuery UI CSS framework class names and the base theming rules, respectively. From there, all widgets in jQuery UI have a dedicated CSS file that’s needed only if you use that widget. Because—unlike AMD—you have no dependency management in CSS, you need to explicitly list your dependencies.
Normally, including @import statements in CSS files is a bad practice. The browser performs a separate HTTP request to load each of these files—the very round trips we’ve been attempting to avoid. But don’t worry; the same RequireJS optimizer you’ve been using to optimize your JS files can inline these @import statements as well.
Now that you have your CSS in place, let’s return to your build. Here’s the configuration you’ve been using:
({
    name: "app",
    out: "app.built.js"
})
This tells the optimizer to build the module in file app.js and place the output in app.built.js. To expand this to handle multiple files, including CSS files, you have to use additional build options. The following code is the updated build.js:

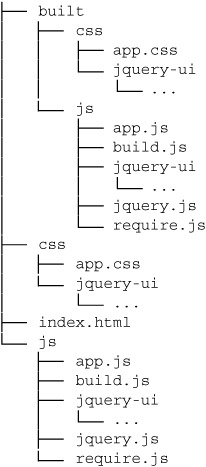
If you run this build from the command line again (r.js -o js/build.js), you’ll see that it takes a slightly different approach than your previous build. When you specify a dir option, the optimizer clones the app’s entire directory structure in a new directory. The name of the new directory is determined
by the dir option—in this case, built ![]() .
.
From there, the optimizer looks for any JavaScript or CSS files in the application—where the root of the application is determined
by the appDir option ![]() —minifies them, and inlines any @import statements in CSS files. The type of compression the optimizer does on CSS files is determined by the optimizeCss option. You use "standard" compression
—minifies them, and inlines any @import statements in CSS files. The type of compression the optimizer does on CSS files is determined by the optimizeCss option. You use "standard" compression ![]() , which removes all lines and unnecessary whitespace. If you want to preserve new lines or whitespace, you can set optimizeCSS to "keepLines" or "keepWhitespace", respectively.
, which removes all lines and unnecessary whitespace. If you want to preserve new lines or whitespace, you can set optimizeCSS to "keepLines" or "keepWhitespace", respectively.
The optimizer does the same task you saw in the previous section: optimizes AMD modules. By passing a modules option ![]() , you can specify multiple files to optimize if your application requires it. The directory for the JavaScript modules is
determined by the baseUrl
, you can specify multiple files to optimize if your application requires it. The directory for the JavaScript modules is
determined by the baseUrl ![]() option.
option.
The cool thing about this approach is that it doesn’t mix your source files with your built files. In the previous example, you had an app.built.js file that sat alongside app.js. Here, your source directories aren’t touched; instead, you have an app.js in your main application’s directory and another in the built directory, which gives the following structure:
If you look at your app.css in the built directory, you see that instead of being four @import statements, it’s now a single line of minified code with the four jQuery UI CSS files embedded.
Use the following two lines to import resources in development
<link href="css/app.css" rel="stylesheet">
<script src="js/require.js" data-main="js/app"></script>
and the following two for production:
<link href="built/css/app.css" rel="stylesheet">
<script src="built/js/require.js" data-main="built/js/app"></script>
The only difference is the updated references to the built directory, because that’s where your built assets are. In development, these two lines generate 10 HTTP requests for four CSS files and six JavaScript files. In production, these two lines generate 3 HTTP requests: one for app.css, one for require.js, and one for app.js. This is a major performance improvement, and this is for the simplest of examples. In large applications, a RequireJS build can easily reduce hundreds of requests down to a small handful.
The examples in this chapter were purposely simple to show how to use jQuery UI in an AMD setting. Because the topic of managing large applications and complex build configuration is so vast, a more comprehensive discussion is outside the scope of this book. If you’re looking for more detailed material on the subject, JavaScript Application Design: A Build First Approach by Nicolas Bevacqua, to be published by Manning in 2015, is an excellent resource.
Although we won’t dig deeper into AMD-based builds, we need to discuss one last thing, and that’s how you can add AMD support to your own jQuery UI extensions. How does jQuery UI offer AMD support, and still work for users not using AMD? Let’s explore that next.
10.5. Supporting AMD in custom widgets
If you’re designing a module to be externally used—whether it’s distributed online or distributed throughout your company—it’s important to support common development environments. In this case, that means supporting developers who want to use AMD, and developers who don’t.
Let’s return to your todo widget you built in chapter 8. Let’s suppose you want to use your todo widget in your AMD example from the previous section. You add its todo.js file to your js directory—right alongside jquery.js and the jquery-ui directory:

You change your app.js to use todo.js with the following:
require([ "todo" ], function( todo ) {
     todo( {}, "<ul><li>One</li><li>Two</li><li>Three</li>" )
          .element
          .appendTo( "body" );
});
You expect this code to create a new <ul> with three items, convert it to a todo widget, and append it to the <body>. Instead, this example fails with a JavaScript error that $ isn’t defined.
The problem is you never declared dependencies for your todo widget. RequireJS doesn’t know that the widget depends on jQuery Core and the widget factory, so it never loads them. You can change that easily enough. The following code shows the todo widget updated to support AMD:

Notice you’re using define() instead of require() on the first line of your module. require()lets you load dependencies; define() lets you load dependencies, and then return an API that can be used by other modules. You should use define()whenever you want to define a new module.
The parameters of define() are the same as require()—an array of dependencies as strings and a callback function ![]() . The todo widget depends on jQuery Core and the widget factory, so you pass them as the first argument. In the callback function—to
be consistent with the jQuery UI widgets—you return the result of $.widget(), which is the widget’s constructor function
. The todo widget depends on jQuery Core and the widget factory, so you pass them as the first argument. In the callback function—to
be consistent with the jQuery UI widgets—you return the result of $.widget(), which is the widget’s constructor function ![]() . That same constructor function was what your previous example was using:
. That same constructor function was what your previous example was using:
require([ "todo" ], function( todo ) {
     todo( {}, "<ul><li>One</li><li>Two</li><li>Three</li>" )
          .element
          .appendTo( "body" );
});
This code now works as expected. RequireJS loads jQuery, the widget factory, and the todo widget. Then, the code to create a new todo widget with the widget’s constructor function executes successfully.
There’s only one problem. Suppose the developers of another project don’t use AMD and want to use the todo widget. They use code like this:
<script src="js/jquery.js"></script>
<script src="js/jquery-ui/widget.js"></script>
<script src="js/todo.js"></script>
<script>
     $( "<ul><li>One</li><li>Two</li><li>Three</li></ul>" )
          .todo()
          .appendTo( "body" );
</script>
This code worked fine before you introduced AMD support, but now it doesn’t. Because this new example doesn’t use AMD or RequireJS—which implements the necessary AMD functions—this code throws an error because define isn’t defined. So when you added support for AMD, you also removed support for developers not using AMD. How do the jQuery UI modules support both?
What jQuery UI does, and what is the established solution to this problem, is a technique known as a UMD wrapper. UMD (Universal Module Definition) refers to a pattern for writing modules that work in multiple environments. jQuery UI uses a UMD wrapper in all its modules. If you look at the source code for the spinner widget you’ll see the following:

This code is a bit intimidating at first glance, so let’s break it down piece by piece. I find it easiest to explain this
in terms of the order in which these lines of code execute. Of course, the first line that executes is line one ![]() , which defines a function that immediately invokes itself. The function at
, which defines a function that immediately invokes itself. The function at ![]() passes itself a reference to the function at
passes itself a reference to the function at ![]() and sets it as a factory parameter. You may need to reread that sentence a few times or play with the code here before that sinks in. Don’t worry
if you continue to be confused. Just know that in the function at
and sets it as a factory parameter. You may need to reread that sentence a few times or play with the code here before that sinks in. Don’t worry
if you continue to be confused. Just know that in the function at ![]() , the following is now true:
, the following is now true:
factory = function( $ ) {
    return $.widget( "ui.spinner", {
        ...
    });
}
factory is a variable that references a function that creates the spinner widget; it hasn’t been invoked yet. Before invoking factory, you need to know whether the user is using AMD.
You check for AMD support by looking for a define() function available with an amd property ![]() . If this is the case, you call define()
. If this is the case, you call define() ![]() with the spinner widget’s dependencies—jQuery Core, jQuery UI Core, the widget factory, the button widget—and a reference
to the factory. define() resolves the dependencies and invokes factory with its dependencies. The factory invocation causes $.widget() to run
with the spinner widget’s dependencies—jQuery Core, jQuery UI Core, the widget factory, the button widget—and a reference
to the factory. define() resolves the dependencies and invokes factory with its dependencies. The factory invocation causes $.widget() to run ![]() , which defines the spinner widget as an AMD module.
, which defines the spinner widget as an AMD module.
Backing up to ![]() , if the user isn’t using AMD, you invoke the factory with the jQuery global variable
, if the user isn’t using AMD, you invoke the factory with the jQuery global variable ![]() . Note that this route doesn’t resolve any dependencies. It requires all of the spinner widget’s dependencies to be available
before this code runs.
. Note that this route doesn’t resolve any dependencies. It requires all of the spinner widget’s dependencies to be available
before this code runs.
Although admittedly a bit convoluted, the UMD wrapper lets you support AMD users and non-AMD users without having to create separate files.
Tip
Alternative versions of UMD also let you support use in Node.js environments. Because jQuery UI is exclusively browser-based code, it doesn’t add the extra code to do this. If you’re writing a module that would be useful in the browser as well as the server, check out the alternative UMD versions at https://github.com/umdjs/umd.
Let’s take what we’ve learned back to the todo widget. To support both AMD and non-AMD users, all you need to do is add the same UMD wrapper, passing the appropriate dependencies—jQuery Core and the widget factory:
(function( factory ) {
    if ( typeof define === "function" && define.amd ) {
        define([
            "jquery",
            "jquery-ui/widget"
        ], factory );
    } else {
        factory( jQuery );
    }
}(function( $ ) {
    return $.widget( "tj.todo", { ... });
}));
Users can now use the todo widget regardless of whether or not they use AMD. Although the UMD wrapper is a bit verbose and tricky to understand, the ability to support multiple usage scenarios is valuable in any code you intend to distribute—whether it’s on the web or in your company.
10.6. Summary
Performance is important to any web application. In the context of jQuery and jQuery UI, the two most important optimizations you can make to your application are reducing RTTs by concatenating scripts and reducing download size by configuring a build that includes only what you need.
Download Builder is a web-based tool that lets you configure a build of jQuery UI with only the pieces you need. Unfortunately, however, using Download Builder is a manual process. If you need another part of jQuery UI, you have to go back and create a new build.
AMD is a more complex, but more elegant solution to the performance problems. Using an AMD loader like RequireJS, you can specify your dependencies in your JavaScript files, and you can load only the code you need. When you’re ready for production, you can run the RequireJS optimizer to minify and concatenate your files.
Even if you can’t do every optimization laid out in this chapter, every little bit helps. If you can’t convince your boss, team, or organization to make the switch to AMD, look into ways you can minify and concatenate scripts in your own server-side environment. Focus on reducing RTTs and HTTP requests, as that has the biggest performance benefit, especially in the context of mobile devices.
If you’re building distributable code, support for both AMD and non-AMD usage makes it available to a wider audience of developers. Using a UMD wrapper is the preferred way of adding this support.
You’ve now made it through the core jQuery UI topics. You know how to wield widgets, customize themes, use effects, and now—how to get your code ready for production. It’s time to put all this knowledge to use on a larger scale.