
8
Getting started with Protractor
- Understanding how Protractor works
- Writing your first Protractor test
- Interacting with elements
- Interacting with a list of elements
- Organizing tests with page objects
In the first part of the book, you saw how to create unit tests that verify your application’s features work as expected in isolation. Having a good suite of unit tests isn’t enough to make sure your application will do what it’s supposed to. Because unit tests validate the Contacts app in isolation, they can’t confirm that external services or dependencies work together with the application.
You could test both the workflow and external dependencies with a set of tests that interact with the Contacts app like a real-world user. You could manually test the application, but it’s better to have automated tests. Tests that interact with the application like a real-world user are end-to-end tests. These tests launch a browser, navigate to the Contacts app and interact with. This kind of test would be expensive to run, so instead of exhaustively testing every possible real-world user scenario, we’ll pick a set of tests that cover the most important scenarios.
The testing pyramid we talked about toward the end of chapter 1 (figure 1.2) showed that 70% of tests should be unit tests, 20% integration tests, and 10% end-to-end tests. With such a high percentage, your unit tests shoulder a lot of the testing burden. You should look at which scenarios your unit tests have already covered before picking which tests you need to perform here.
Because integration tests involve validating external dependencies, we group them together with end-to-end tests. Integration tests use mock versions of external dependencies (an in-memory database, for example), and end-to-end tests use the real version, but they’re equivalent for our purposes.
You can write end-to-end tests two ways: with the Selenium WebDriver library or Angular’s Protractor test framework. If you’ve previously written a Selenium WebDriver test, you might have found that your tests became a nested chain of promises to synchronize browser commands. In contrast, Protractor wraps the Selenium WebDriver APIs to make asynchronous commands appear synchronous. Because of this wrapping, Protractor exposes the same set of APIs as Selenium WebDriver, making it interchangeable. When writing end-to-end tests for Angular, it’s better to use Protractor than Selenium WebDriver.
Before you can create a Protractor test suite, we’ll need to cover the basics. This chapter will demonstrate how Protractor works and how to write your first Protractor test. You’ll create a simple test that interacts with web elements on the screen. We’ll also show you how to organize test code with page objects. When refactoring your test suite, using page objects helps reduce code duplication and creates maintainable code.
If you’re already familiar with Protractor, feel free to skip to chapter 9, where we talk about timeouts, and chapter 10, where we’ll cover advanced Protractor topics.
8.1 How Protractor works
Let’s look at the big picture of how Protractor helps you write your browser tests. Protractor tests run on Node.js and send commands to a Selenium Server. The Selenium Server controls the browser via WebDriver commands and JavaScript functions (figure 8.1).
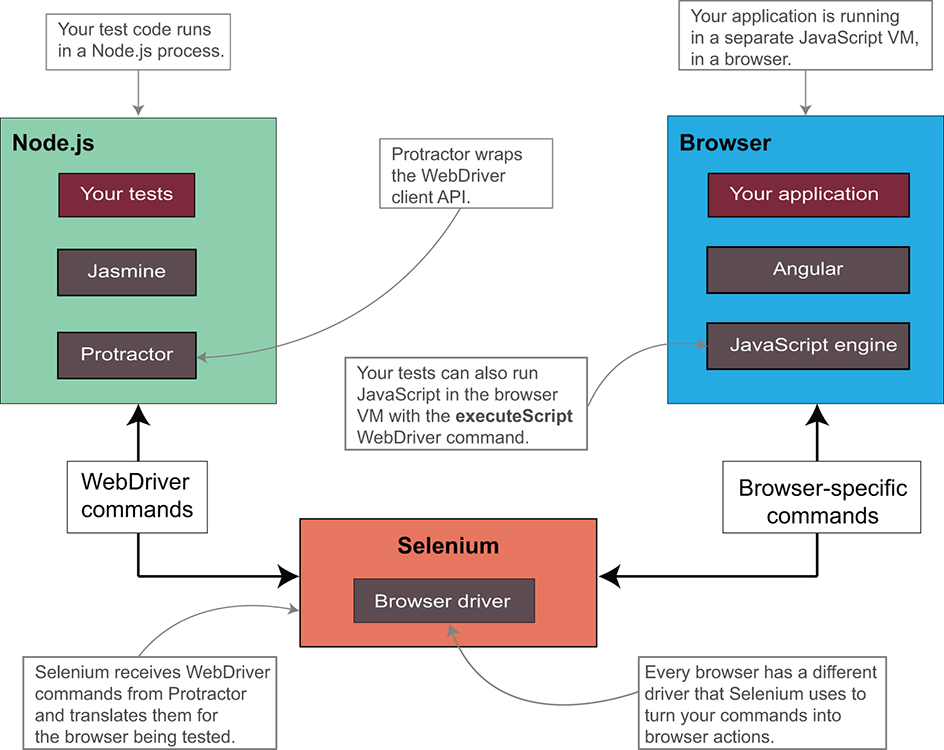
Figure 8.1 Protractor block diagram
Protractor is a Node.js program. After Protractor launches, it hands the execution of your tests over to Jasmine (or Mocha, or whichever test framework you prefer). Protractor wraps the Selenium WebDriver client and adds features for testing Angular applications. It then communicates to the browser via a Selenium Server. The Selenium Server controls the browser using vendor-specific browser drivers—for Firefox, Chrome, and so on. After the browser driver creates a session, Protractor loads the Angular application under test.
The important thing to take away from all of this is that browser tests run in a browser that’s independent of your test. Your tests are running in a Node.js process, and the Angular application is running in a browser. Because these are two separate processes, you need to provide some sort of synchronization between the Angular application running in the browser and the Protractor test. Protractor does this by inserting a JavaScript function that runs in the browser and waits for Angular to be stable. In this case, stable means that an event or background task isn’t pending that might cause a change to your application’s DOM.
8.2 Writing your first Protractor test
In this section, you’ll create the files you need to run a simple Protractor test in TypeScript. For your first Protractor test, we’ll guide you through some of the features in the Contacts app. When you run your test, a Chrome browser will launch, navigate to the application’s default page, and verify the URL address. You can find the code for this chapter at http://mng.bz/Fp9u.
8.2.1 File structure
Let’s take a look at the files and folder structure from the chapter 8 GitHub repository. These are the bare minimum files you need to run a Protractor test with TypeScript:
    .
    ├── e2e/
    │   ├── first-test.e2e-spec.ts
    │   └── tsconfig.json
    ├── package.json
    └── protractor-first-test.conf.js
package.json
The first file you need to create is package.json, shown in listing 8.1. devDependencies specifies that your project uses type definitions that the @types node modules specify. These are TypeScript typings for node modules written in JavaScript. In addition to type definitions, you also depend on typescript, protractor, and ts-node.
The scripts portion of package.json defines a pree2e and an e2e script, as shown in the following listing. The pree2e script launches the webdriver-manager node module to download binaries required to control a web browser. When running the e2e script to launch Protractor, the pree2e script automatically runs first.
Listing 8.1 Node package configuration—package.json
{
  "name": "protractor-tests",
  "scripts": {
    "pree2e": "webdriver-manager update --gecko false
    --standalone false",    ①
    "e2e": "protractor"    ②
  },
  "devDependencies": {
    "@types/jasmine": "^2.53.43",
    "@types/jasminewd2": "^2.0.1",
    "@types/selenium-webdriver": "^3.0.0",
    "typescript": "^2.2.1",
    "protractor": "^5.1.1",
    "ts-node": "^2.1.0"
  }
}
TypeScript configuration file
The next file you need is the TypeScript configuration file, tsconfig.json, in the e2e folder. The configuration file shown in listing 8.2 tells the TypeScript compiler (tsc command) which TypeScript files to transpile and which type definitions to use. Also, this file tells the transpiler to emit ES6 (ECMA2015) JavaScript, and that the JavaScript output files should be written to dist/out-tsc-e2e.
Listing 8.2 TypeScript compiler configuration—e2e/tsconfig.json
{
  "compileOnSave": false,
  "compilerOptions": {
    "declarations": false,
    "emitDecoratorMetadata": true,
    "experimentalDecorators"
    "lib": [ "es2016" ],
    "module": "commonjs",
    "moduleResolution": "node",
    "outDir": "../dist/out-tsc-e2e",    ①
    "sourceMap": true,
    "target": "es6",
    "typeRoots": [
      "../node_modules/@types"    ②
    ]
  }
}
Protractor configuration file
Now that you have the package dependencies and TypeScript support files, you need to create the Protractor configuration, protractor-first-test.conf.js, shown in listing 8.3. The Protractor configuration file tells Protractor how to launch your test. You can break it down into several parts: how to launch the browser, the path of the test files, the test framework, and plugins.
Listing 8.3 Protractor configuration file—protractor-first-test.conf.js
exports.config = {
  capabilities: {
    browserName: 'chrome'    ①
  },
  directConnect: true,    ①
  baseUrl: 'https://testing-angular-applications.github.io',
  framework: 'jasmine',
  specs: [
    './e2e/first-test.e2e-spec.ts'    ②
  ],
  onPrepare: () => {
    require('ts-node').register({
      project: 'e2e'
    });
  }
}
In this listing, directConnect and capabilities define how to launch and interact with the browser. In capabilities, you specify that you want a Chrome browser. If you don’t include any capabilities, Protractor launches Chrome by default. You’ll launch the Chrome browser with directConnect using the chromedriver binary that webdriver-manager downloads.
A few lines further down in protractor-first-test.conf.js are framework and specs. You specify that you’d like to use Jasmine as the test framework. If you didn’t specify the framework, Protractor would run the test with Jasmine by default. Because you’ve used the Jasmine test runner to write unit tests in previous chapters, we also recommend you use Jasmine for Protractor tests. The test runner will run e2e/first-test.e2e-spec.ts listed in the specs array.
The last section of protractor-first-test.conf.js is an onPrepare function. The onPrepare function uses the ts-node node module, which lets the Protractor test run the TypeScript files without compilation. You register the e2e directory, which has your tests, with ts-node.
Protractor test file
The last file you need is the test specification, e2e/first-test.e2e-spec.ts, shown in listing 8.4. Because you use the Jasmine framework, the spec file looks similar to the unit tests you’ve seen in previous chapters. The first line imports the browser from Protractor and uses it to navigate to the Contacts app and validate that the current URL is the browser.baseUrl, which is https://testing-angular-applications.github.io.
Listing 8.4 Test specification—e2e/first-test.e2e-spec.ts
import { browser } from 'protractor';

describe('your first protractor test', () => {
  it('should load a page and verify the url', () => {
    browser.get('/#/');
    expect(browser.getCurrentUrl())
        .toEqual(browser.baseUrl + '/#/');
  });
});
Now that you have the bare minimum files, you can install the node module dependencies and run your first Protractor test.
8.3 Installing and running
You start by installing the node modules defined in package.json with npm install. After the node modules are downloaded, you can launch Protractor using the scripts defined in package.json. You can launch the Protractor test with the command npm run e2e protractor-first-test.conf.js. At the beginning of the test, the pree2e script downloads the chromedriver binary using webdriver-manager. After the files are downloaded, Protractor launches the test using the Protractor configuration file protractor-first-test.conf.js.
Protractor starts the new WebDriver instance according to the configuration file. The new WebDriver instance launches a Chrome browser window using the chromedriver binary. The console output should look similar to the following listing.
Listing 8.5 Running Protractor with the e2e script
npm run e2e protractor-first-test.conf.js

> [email protected] pree2e /path/to/protractor-first-test    ①
> webdriver-manager update --gecko false --standalone false    ②

[11:48:53] I/file_manager - creating folder /path/to/selenium    ②
[11:48:54] I/downloader - curl -o /path/to/selenium/chromedriver_2.28.zip https://chromedriver.storage.googleapis.com/2.28/chromedriver_mac64.zip
[11:48:54] I/update - chromedriver: unzipping chromedriver_2.28.zip /path/to/selenium/chromedriver_2.28.zip
[11:29:38] I/update - chromedriver: unzipping chromedriver_2.28.zip
[11:29:38] I/update - chromedriver: setting permissions to 0755 for /path/to/selenium/chromedriver_2.28
[11:29:38] I/update - chromedriver: chromedriver_2.28 up to date

> [email protected] e2e /path/to/protractor-first-test    ③
> protractor "protractor-first-test.conf.js"

[11:29:39] I/launcher - Running 1 instances of WebDriver
[11:29:39] I/direct - Using ChromeDriver directly...    ④
Started
.    ⑤

1 spec, 0 failures
Finished in 2.484 seconds
During the test, you’ll see the Chrome browser launch and close quickly. In this short time, Protractor runs the Jasmine test, launches the Chrome browser, navigates to the Contacts app, validates the URL, and closes the browser window.
Now that you’ve run your first Protractor test, you’ll write some new tests to expand your test suite. To add these tests, you’ll first need to learn some additional Protractor APIs to handle HTML web element interaction.
8.4 Interacting with elements
In the last section, you learned about the bare minimum files you needed to write your first Protractor test. In this section, we’ll introduce two new Protractor APIs: element and by. These APIs help you interact with the Contacts app. By the end of this section, you’ll create several test scenarios around creating a new contact.
The related files from the GitHub repository for the next section are e2e/add-contact.e2e-spec.ts, e2e/add-second-contact.e2e-spec.ts, and protractor-add-contact.conf.js. In protractor-add-contact.conf.js, you need to copy over most of the test configurations from protractor-first-test.conf.js. You also need to change the Protractor configuration specs array from including a single file to using file globbing, as shown in listing 8.6. Globbing match selects a set of files based on a file path pattern and wildcard characters. This will allow you to test both e2e/add-contact.e2e-spec.ts and e2e/add-second-contact.e2e-spec.ts without having to specify the exact files you’re using.
Listing 8.6 Protractor configuration file with file globbing
exports.config = {
  capabilities: {
    browserName: 'chrome'
  },
  directConnect: true,
  baseUrl: 'https://testing-angular-applications.github.io',
  framework: 'jasmine',
  specs: [    ①
    './e2e/add-*contact.e2e-spec.ts'
  ],
  onPrepare: () => {
    require('ts-node').register({
      project: 'e2e'
    });
  }
}
Because you’re using the file globbing option, your Protractor test will run all files that are in the e2e directory starting with "add-" and match the file suffix of "contact.e2e-spec.ts".
8.4.1 Test scenario: creating a new contact
Usually it’s easy to figure out the happy path when coming up with end-to-end tests. To expand on the definition we provided in chapter 6, you also can look at the happy path as being the workflow a user follows to successfully complete a set of tasks. In this case, figure 8.2 shows the happy path—the user interacts with the Contacts app to create a new contact. The user clicks the + button, fills out the required fields, and clicks the Create button.
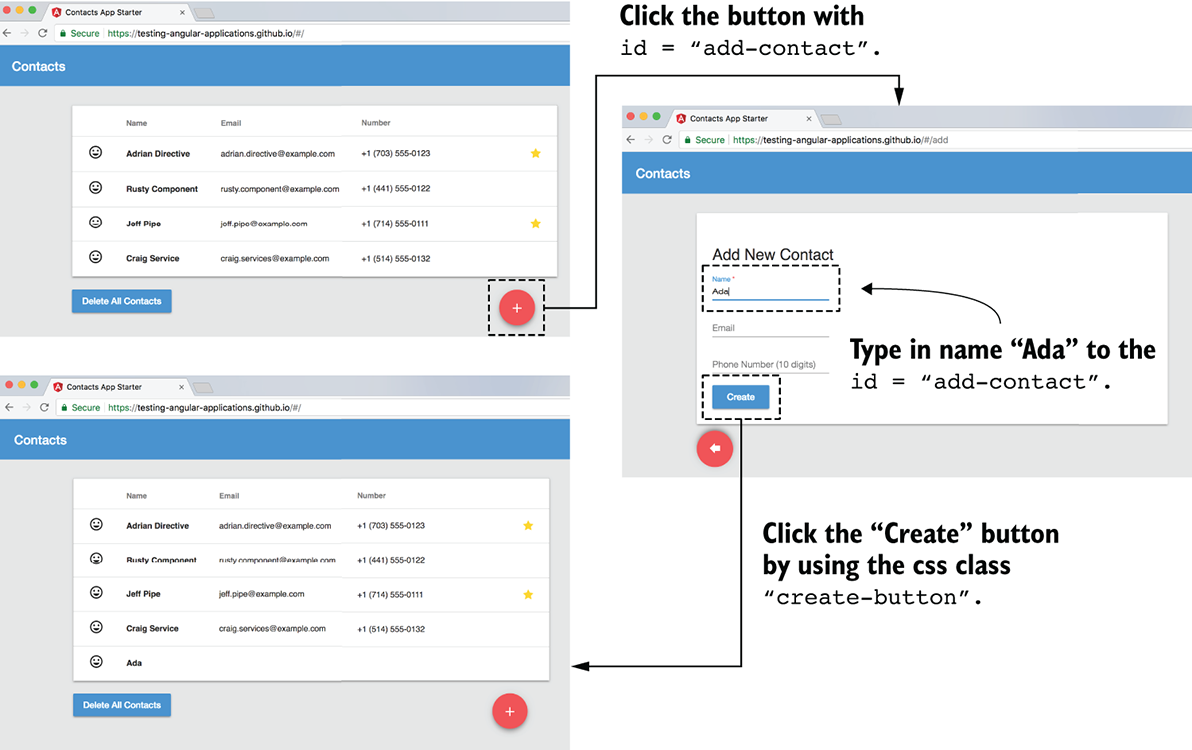
Figure 8.2 Create new contact workflow
To test this workflow, it’s helpful to look at the HTML to identify the elements you need to interact with. The test case will first click the + symbol. In the HTML snippet below, you see the + symbol is generated by the mat-icon class "add-fab-icon". You could try to click the icon, or you could find the web element by either the button or the <a> tag. For this example, you’ll use the <a> tag. Because the web page could have several <a> tags, you also need to use the id="add-contact" to find the link, as shown in the following snippet:
<a *ngIf="!isLoading && !deletingContact" id="add-contact" routerLink="/add" mat-fab class="add-fab">
  <button mat-fab class="add-fab">
    <mat-icon class="add-fab-icon"
              mdTooltip="Add new contact">
      add
    </mat-icon>
  </button>
</a>
You can find and click on the <a> tag web element using two Protractor APIs: by and element. The by API has methods to find web elements using an identifier. The element API consumes the object generated by the by API and returns a Protractor ElementFinder object that represents the web element. After you call the click method on the web element, the Contacts app will navigate to a new page that contains the new contact.
In listing 8.7, your test will fill out the form using the id attribute of the input tag. Similar to the previous step, you can find the HTML input tag using the id attribute equal to contact-name. After finding the element, the test fills out the form with the name Ada using the sendKeys method. Because this is the first time you’re finding a web element, you should verify that its text matches the expected value. You’ll need to get the value attribute from the input field and compare it to the text that the test just entered. After you assert that the text is Ada, you’ll find the Create button by using the css class create-button so you can add a new contact. After your test has clicked the Create button, it will check that the route navigated back to the browser.baseUrl.
Listing 8.7 Test specification to create a new contact—e2e/add-contact.e2e-spec.ts
import { browser, by, element } from 'protractor';

describe(adding a new contact with only a name', () => {
  beforeAll(() => {
    browser.get('/#/');
  });

  it('should find the add contact button', () => {
    element(by.id('add-contact')).click();    ①
    expect(browser.getCurrentUrl())
        .toEqual(browser.baseUrl + '/#/add');
  });

  it('should write a name', () => {
    let contactName = element(by.id('contact-name'));    ①
    contactName.sendKeys('Ada');
    expect(contactName.getAttribute('value'))
        .toEqual('Ada');
  });

  it('should click the create button', () => {
    element(by.css('.create-button')).click();    ②
    expect(browser.getCurrentUrl())
        .toEqual(browser.baseUrl + '/#/');
  });
});
When you filled out the name input field on the contact form, you might have noticed that the form also populated an email and phone number fields. Another useful test scenario would be to fill out the form completely. In the e2e/add-second-contact.e2e-spec.ts file shown in the following listing, you move some of these interactions into the beforeAll step because the previous test has already tested loading up the main page and filling out the name field.
Listing 8.8 Test to create another contact—e2e/add-second-contact.e2e-spec.ts
import { browser, by, element } from 'protractor';

describe('adding a new contact with name, email,' +
    'and phone number', () => {
  beforeAll(() => {
    browser.get('/#/');
    element(by.id('add-contact')).click();
    element(by.id('contact-name')).sendKeys('Grace');
  });

  it('should type in an email address', () => {
    let email = element(by.id('contact-email'));    ①
    email.sendKeys('[email protected]');    ②
    expect(email.getAttribute('value'))
        .toEqual('[email protected]');
  });

  it('should type in a phone number', () => {
    let tel = element(by.css('input[type="tel"]'));    ③
    tel.sendKeys('1234567890');
    expect(tel.getAttribute('value'))
        .toEqual('1234567890');
  });

  it('should click the create button', () => {
    element(by.css('.create-button')).click();
    expect(browser.getCurrentUrl())
        .toEqual(browser.baseUrl + '/#/');
  });
});
Finally, you can run the Protractor test using the command npm run e2e protractor-add-contact.conf.js. When running the npm command, you can see Protractor launching browsers and creating the contacts you specified in this section.
8.4.2 Test scenario: workflows that don’t create a new contact
In the not-so-happy path, a user could enter incorrect data. For example, they might forget to enter a required field, enter a malformed telephone number, or enter an invalid email address.
We’ll guide you through test scenarios using the Contacts app that fail because of invalid data. For example, if you try to create a new contact with an invalid email, the result is a modal alert window (figure 8.3).

Figure 8.3 Workflow that doesn’t create a new user
How do you translate this scenario into a test case? In the GitHub repository, e2e/invalid-contact.e2e-spec.ts and protractor-invalid-contact.conf.js cover this test scenario to create a new contact with invalid information.
In listing 8.9, the test enters a valid name and an invalid email address, baduser.com. After the test clicks the Create button, it should check if the modal alert window is visible and dismiss the message. After dismissing the modal alert message, it’s a good idea to verify that the modal alert did disappear. To test this, you can use another Protractor API called ExpectedConditions. The ExpectedConditions API combined with the browser.wait method allows the test to wait for some condition to occur on the web application within a set period of time. In this example, you’re waiting for the web element to not be present within five seconds. Finally, because the test should fail to create a new contact, the test also should check to see if the Contacts app route URL is still on the /#/add route.
Listing 8.9 Test that doesn’t create a new contact—e2e/invalid-contact.e2e-spec.ts
import { browser, by, element, ExpectedConditions as EC } from 'protractor';

describe('adding a new contact with an invalid email', () => {
  beforeEach(() => {
    browser.get('/#/add');
    element(by.id('contact-name')).sendKeys('Bad Email');
  });

  it('shouldn’t create a new contact with baduser.com', () => {
    let email = element(by.id('contact-email'));
    email.sendKeys('baduser.com');
    element(by.buttonText('Create')).click();

    let invalidEmailModal = element(by.tagName(
        'app-invalid-email-modal'));
    expect(invalidEmailModal.isPresent()).toBe(true);    ①

    let modalButton = invalidEmailModal.element(
        by.tagName('button'));    ②
    modalButton.click();

    browser.wait(EC.not(
        EC.presenceOf(invalidEmailModal)), 5000);    ③
    expect(invalidEmailModal.isPresent()).toBe(false);    ④
    expect(browser.getCurrentUrl()).toEqual(
        browser.baseUrl + '/#/add');
    });
});
If you try other email inputs, you might also find that you can still create an account if the email field is @bademail.com. This is obviously incorrect, so you might want to add a new feature to your web app to not accept an email with this specific malformed email address.
Now that you have one not-so-happy test scenario, you could try other test scenarios. You could implement more combinations of text inputs, but this defeats the purpose of having a strong suite of unit tests. You should have covered this email validation feature with a set of text input unit tests.
So far, you’ve written several Protractor tests that have found web elements by buttonText, id, and css. Unfortunately, you can’t find all web elements using these three locators. In the next section, we’ll cover other ways to identify web elements.
8.5 by and element methods
In the previous section, we showed a subset of the different ways to use locators to identify web elements. Other locators are available. Table 8.1 lists the common locator methods and where to use them.
by API| Locator | Usage |
by.css | Finding a web element by css HTML: <input class="contact-email"
id="contact-email" type="email">Protractor: let e1 = element(by.css('.contact-email'));let e2 = element(by.css('#contact-email'));let e3 = element(by.css('input[type="email"]')); |
by.id | Finding a web element by id HTML: <input class="contact-email"
id="contact-email" type="email">Protractor: let email = element(by.id('contact-email')); |
by.buttonTextby.partialButtonText | Finding a button with the matching text HTML: <button>Submit Contact</button>Protractor: let fullMatch = element(by.buttonText(
'Submit Contact'));let partialMatch = element(by. partialButtonText('Submit')); |
by.linkTextby.partialLinkText | Finding a link by matching text HTML: <a href="/add">Add contact</a>Protractor: let fullMatch = element(by.linkText(
'Add contact'));let partialMatch = element(by. partialLinkText('contact')); |
by.tagName | Finding a web element by tag name HTML: <app-contact-detail>…</app-contact-detail>Protractor: let tag = element(by.tagName(
'app-contact-detail')); |
by.xpath | Finding a web element by xpath. Using xpath as a locator strategy can create brittle tests requiring high maintenance. We recommend not using xpath as a locator strategy. HTML: <ul><li><a>Foobar</a></li></ul>Protractor: let xpath = element(by.xpath('//ul/li/a')); |
by.binding | Finding a web element by binding for objects in AngularJS. Currently, this isn’t implemented for Angular. HTML: <span ng-bind="contact.name"></span>Protractor: let binding = element(by.binding(
'contact.name')); |
by.model | Finding a web element by model in AngularJS. Currently, this isn’t implemented for Angular. HTML: <input ng-model="contact.name">Protractor: let model = element(by.model(
'contact.name')); |
So far, we’ve covered sendKeys, click, and getAttribute, but you can interact with web elements in other ways. Table 8.2 covers the commonly used element methods. All of these methods return a WebDriver promise. Protractor’s test framework takes those WebDriver promises and makes the browser interactions appear synchronous. Synchronizing these asynchronous WebDriver calls cuts some of the complexity that such WebDriver promises introduce.
element API | Element method | Usage |
getWebElement | Occasionally, you’ll need to access Selenium WebDriver WebElement’s APIs, which aren’t available from Protractor’s element object. One example of this would be verifying a web element’s x and y location via the getLocation method, which exists only on the WebElement object. After calling the getWebElement method, you’ll need to wait for the WebDriver promise for the WebElement to resolve:let button = element(by.css(
'.contact-email')).getWebElement();
button.getLocation().then(point => {
console.log('x = ' + point.x + ', y = ' +
point.y);
}); |
isPresentisElementPresent | When testing Angular structural directives like *ngIf, you need to call isPresent to validate if a web element exists on the screen. In the Contacts app, after the test enters the name of the new contact, the email field appears, and you could test it like so:
browser.get('/#/add');
expect(element(by.id('contact-email')) .isPresent()).toBe(false);element(by.id('contact-name')).sendKeys('foo');expect(element(by.id('contact-email')) .isPresent()).toBe(true); |
getTagName | When writing tests, you can use identifiers like css to find the web element. Use the getTagNamemethod to validate the current tag that Protractor is returning:browser.get('/#/add');let body = element(by.tagName('body'));let mdToolbar = body.element(
by.css('[color="primary"]'));expect(mdToolbar.getTagName()).toBe('mat-toolbar'); |
getCssValue | Use getCssValueto get the value of a given css property:browser.get('/#/add');let toolbar = element(by.tagName('mat-toolbar'));
expect(toolbar.getCssValue('background-color'))
toBe('rgba(33, 150, 243, 1)'); |
getAttribute | When typing values into input fields, you can validate you entered them properly using the getAttribute method. To get the contents of an input field, you’ll need to get the 'value' attribute. A common mistake is to try to use the getText method to get the text from an input field:browser.get('/#/add');
let email = element(by.id('contact-email'));
email.sendKeys('foobar');
expect(email.getAttribute('value')).toBe('foobar'); |
getText | When you use the getText method, Protractor will return a promise for the text that appears on the web element. Note that to get the text for an input field, you’ll need to use getAttribute('value'): browser.get('/#/');
element(by.tagName('tbody')).getText()
.then(text => {
console.log(text);
expect(text.match(/[email protected]/)
.index > 0).toBe(true);
expect(text.match(/something that doesn’t match/))
.toBe(null);
}); |
sendKeys | Use sendKeys to simulate typing in text—for example, to fill out an input field:browser.get('/#/add');
element(by.id('contact-name')).sendKeys('foobar');
expect(element(by.id('contact-name'))
.getAttribute('value')).toBe('foobar'); |
clear | Use clear to remove the text from an input field:browser.get('/#/add');let name = element(by.id('contact-name'));name.sendKeys('foo bar');name.clear();expect(name.getAttribute('value')).toBe(''); |
isDisplayed | You can check if an element is present but hidden from view with isDisplayed. If a web element is hidden but still part of the DOM, Protractor will return that it’s present but not displayed:browser.get('/#/add');
let contactName = element(by.id('contact-name'));expect(contactName.isDisplayed()).toBe(true);// Change the input to not be visible by style.
browser.executeScript("arguments[0].setAttribute('style', 'display:none;')", contactName.getWebElement());expect(contactName.isPresent()).toBe(true);expect(contactName.isDisplayed()).toBe(false); |
In this section, we reviewed commonly used methods of interacting with web elements. In the next section, we’ll examine how to work with a collection of web elements.
8.6 Interacting with a list of elements
Interacting with a list of elements is similar to interacting with a single element. Finding web elements is asynchronous, whether it’s a single element or a collection, so the result is a promise. A common gotcha is to try to iterate over the collection of web elements with a for loop. You can’t loop through a promise, so instead you’ll use the Protractor API methods for element.all. For the Contacts app, you can call element(by.tagName('tbody')).all(by.tagName('tr')) to get the array of table row web elements. In the following sections, we’ll cover several methods that will help you.
8.6.1 Filtering web elements
Let’s consider creating a new contact in the Contacts app. How do you validate that the new contact exists in the list of contacts? You could find the tbody web element, get all the text from the table body, and create a phone number regular expression to match the new contact. But what if two contacts have the same phone number? How can you get the information for a single contact? You use the filter function, which will find a subset of contacts from the contact list. Figure 8.4 shows how to find a contact that matches the name that’s equal to Craig Service.

Figure 8.4 Filtering strategy for names equal to ‘Craig Service’
When you call the filter function shown in figure 8.5, the returned object is an array of web elements that satisfy the callback function. In this example, the filter callback function, filterFn, returns true when the name matches Craig Service. See the lower part of the diagram for the function signature.

Figure 8.5 filter function
For this example, look at the contact component template shown in listing 8.10. Notice that you can’t call element.all(by.tagName('tr')) because that would also include the table headers. You might wonder if you could use *ngFor to identify only the rows of the contacts. That doesn’t work, because *ngFor tells Angular how to modify the DOM’s structure, and that attribute isn’t included in the rendered output.
Listing 8.10 HTML template of the contact list
<table class="mdl-data-table mdl-js-data-table mdl-shadow--2dp">
  <thead>
    <tr>
      <th class="mdl-data-table__cell--non-numeric"></th>
      <th class="mdl-data-table__cell--non-numeric">Name</th>
      <th class="mdl-data-table__cell--non-numeric">Email</th>
      <th class="mdl-data-table__cell--non-numeric">Number</th>
      <th class="mdl-data-table__cell--non-numeric"></th>
      <th class="mdl-data-table__cell--non-numeric"></th>
      <th class="mdl-data-table__cell--non-numeric"></th>
    </tr>
  </thead>
  <tbody>
    <tr *ngFor="let contact of contacts"
             (click)="onSelect(contact)">    ①
      <td class="mdl-data-table__cell--non-numeric"
          (click)="onClick(contact)">
        <mat-icon>mood</mat-icon>
      </td>
      <td class="mdl-data-table__cell--non-numeric"
          (click)="onClick(contact)">    ②
        <strong>{{ contact.name }}</strong>
      </td>
      <td class="mdl-data-table__cell--non-numeric"
          (click)="onClick(contact)">{{ contact.email }}</td>
      <td class="mdl-data-table__cell--non-numeric"
          (click)="onClick(contact)">
{{ contact.number | phoneNumber : "default" : contact.country : true }}
      </td>
    </tr>
  </tbody>
</table>
Listing 8.11 shows a Protractor test against the rendered HTML from listing 8.10 that uses the filter method. First, you find the tbody web element using the by.tagName locator. Within that tbody, you then get all the table rows and assign them to trs. Next, you filter the table rows in trs to find the one you want. You pass filter() a callback function that evaluates to true if the text in the row matches 'Craig Service'. The resulting list only includes web elements that the callback function returned true for.
Listing 8.11 Filter for a contact—e2e/contact-list.e2e-spec.ts
import { browser, by, element } from 'protractor';

describe('the contact list', () => {
  it('with filter: should find existing ' +
     'contact "Craig Service"', () => {
    let tbody = element(by.tagName('tbody'));
    let trs = tbody.all(by.tagName('tr'));    ①
    let craigService = trs.filter(elem => {
      return elem.all(by.tagName('td')).get(1).getText()    ②
          .then(text => {
        return text === 'Craig Service';    ③
      });
    });
    expect(craigService.count()).toBeGreaterThan(0);    ④
    expect(craigService.all(by.tagName('td'))
        .get(2).getText())    ⑤
        .toBe('[email protected]');
  });
});
To verify that you found the correct row for 'Craig Service', you could also check that you found only one element and that the email matches '[email protected]'.
8.6.2 Mapping the contact list to an array
Let’s consider a different scenario where you need to test all the contacts on the contact list. Instead of writing a filter function for each contact, you could use the map function. The map function converts the web elements returned from the element.all to an array shown in figure 8.6.

Figure 8.6 Convert the web elements to an array using the map function
Before you use the map function (in figure 8.6), you should review the map function for element.all shown in the figure 8.7 diagram.
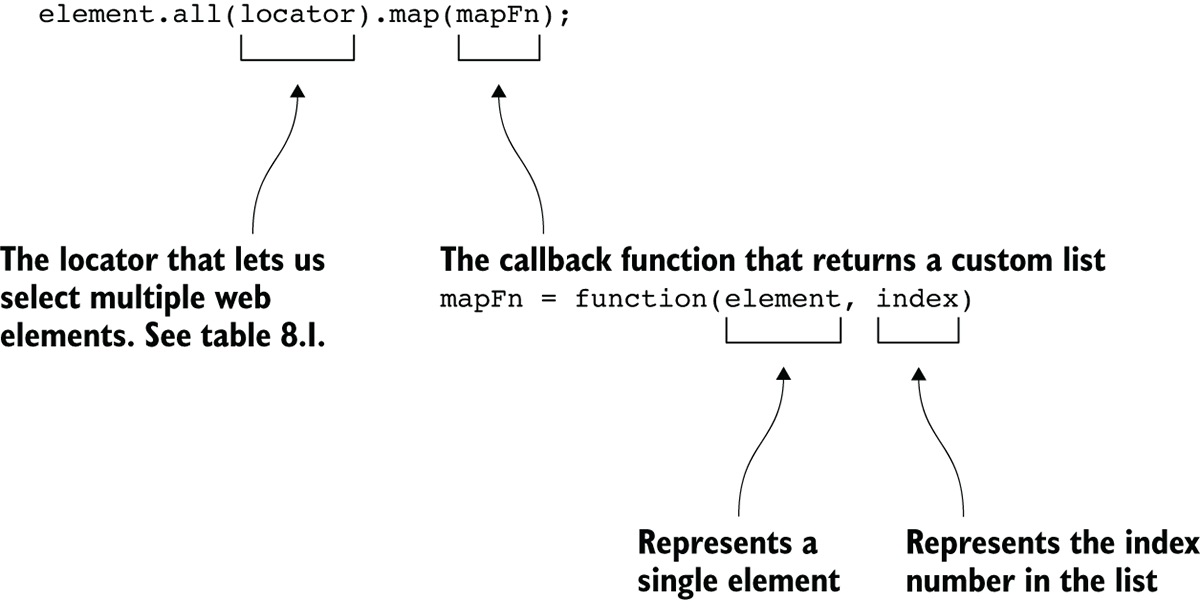
Figure 8.7 map function
In listing 8.12, you use map to transform the contact list into an array of objects that implement the Contact interface. To validate that the contact list appears as expected, you create an expected list of contacts using the same Contact interface and compare them at the end of the test.
Listing 8.12 Checking that all the contacts appear as expected with map
import { browser, by, element } from 'protractor';
import { promise as wdpromise } from 'selenium-webdriver';

export interface Contact {
  name?: string;
  email?: string;
  tel?: string;
}

describe('the contact list', () => {
  let expectedContactList: Contact[] = [{
      name: 'Adrian Directive',
      email: '[email protected]',
      tel: '+1 (703) 555-0123'
    }, {
      name: 'Rusty Component',
      email: '[email protected]',
      tel: '+1 (441) 555-0122'
    }, {
      name: 'Jeff Pipe',
      email: '[email protected]',
      tel: '+1 (714) 555-0111'
    }, {
      name: 'Craig Service',
      email: '[email protected]',
      tel: '+1 (514) 555-0132'
  }];

  beforeAll(() => {
    browser.get('/#/');
  });

  it('with map: should create a map object', () => {
    let tbody = element(by.tagName('tbody'));
    let trs = tbody.all(by.tagName('tr'));
    let contactList = trs.map(elem => {    ①
      let contact: Contact = {};
      let promises: any[] = [];
      let tds = element.all(by.tagName('td'));    ②
      promises.push(tds.get(0).getText().then(text => {    ③
        contact.name = text;
      }));
      promises.push(tds.get(1).getText().then(text => {    ③
        contact.email = text;
      }));
      promises.push(tds.get(2).getText().then(text => {    ③
        contact.tel = text;
      }));

      return Promise.all(promises).then(() => {    ④
        return contact;
      });
    });
    expect(contactList).toBeDefined();    ⑤
    contactList.then((contacts: Contact[]) => {    ⑥
      expect(contacts.length).toEqual(4);
      expect(contacts).toEqual(expectedContactList);    ⑦
    });
  });
});
In listing 8.12, you use a promise array to keep track of promises to set the name, email, and telephone number to the contact when calling getText. After you’ve created the promises and added them to the promise array, you call Promise.all. Calling then on the Promise.all, resolves all the promises in the array. In this case, the contact properties are set. Finally, you return the contact for that row.
The map function iterates through all the web elements and returns a promise that resolves to the contact list. Next, the test calls then to get the contact list array. Having the contact list array, the test can verify if the expected contact list matches the one from the web application.
8.6.3 Reduce
Another possible test scenario might be testing that only the names match. As before, you could use map to create an array of names. An alternative solution would be to use the reduce function, which can turn a collection of contact web elements into a single string of names (figure 8.8).

Figure 8.8 Reduces the contact list to a single string of names
The reduce function applies a callback to each element of the array and accumulates the result in a single value. The method signature is shown in figure 8.9.

Figure 8.9 reduce function
In your Contacts app, you gather the contact names into a single string to check the default values. The reduce function returns a comma-delimited list of names, as shown in the following listing.
Listing 8.13 Reduce the list of elements to a single string
describe('the contact list', () => {
  beforeAll(() => {
    browser.get('/#/');
  });

  it('with reduce: get a list of contact names', () => {
    let tbody = element(by.tagName('tbody'));
    let trs = tbody.all(by.tagName('tr'));    ①
    let contacts = trs.reduce((acc, curr) => {    ②
      let name = curr.all(by.tagName('td')).get(0);    ③
      return name.getText().then(text => {
        return acc + ', ' + text;    ④
      });
    });
    expect(contactList).toEqual(
        'Adrian Directive, Rusty Component, Jeff Pipe, ' +
        'Craig Service');
  });
});
The curr parameter in the callback represents the table row web element. The callback gets the text from the first column. Then you take the text and concatenate it into the accumulator. Finally, the test checks whether the accumulated string matches the expected list of names.
8.7 Page objects
Let’s say the developer (whether you or someone else) changes the attribute ID from add-contact to create-contact. After the changes are published, if you don't update your tests, they’ll fail because the ID is no longer add-contact. Having hardcoded strings like IDs or class names makes tests harder to maintain—you may have to manually update all your tests after one simple code change.
One way to make tests more maintainable is to use a common design pattern called page objects. Page objects organize your test code around logical interactions with your web app, instead of with raw elements. Instead of finding the Create button and then calling the click method, a page object would wrap this functionality with a method called createClickButton. If you needed to change the locator for the Create button, you could fix it in one location.
Previously you wrote a create contact test that typed in the new contact name and clicked the Create button. The examples so far have had IDs and class names that have provided helpful hints as to their function. In real-world applications, these identifiers aren’t always so helpful and can be arbitrary.
Listings 8.14 and 8.15 bring together all the interactions for creating a new contact in a NewContactPageObject and a ContactListPageObject, respectively. The page objects group the WebDriver commands into typical interactions. Each constructor sets the element finders for the page view, but Protractor doesn’t find the element until a call interacts with it, like a click() or sendKeys().
Listing 8.14 Contact list page object—e2e/po/contact-list.po.ts
import { browser, by, element, ElementFinder } from 'protractor';

export class ContactListPageObject {
  plusButton: ElementFinder;

  constructor() {
    this.plusButton = element(by.id('add-contact'));    ①
  }

  clickPlusButton() {
    this.plusButton.click();
    return new NewContactPageObject();    ②
  }

  navigateTo() {
    browser.get('/#/');
  }
}
Listing 8.15 New contact page object—e2e/po/new-contact.po.ts
import { browser, by, element, ElementFinder } from 'protractor';

export class NewContactPageObject {
  inputName: ElementFinder;
  inputEmail: ElementFinder;
  inputPhone: ElementFinder;

  constructor() {
    this.inputName = element(by.id('contact-name'));
    this.inputEmail = element(by.id('contact-email'));
    this.inputPhone = element(by.css('input[type="tel"]'));
  }

  setContactInfo(name: string, email: string,
      phoneNumber: string) {
    this.inputName.sendKeys(name);    ①
    if (email) {    ②
      this.inputEmail.sendKeys(email);
    }
    if (phoneNumber) {    ②
      this.inputPhone.sendKeys(phoneNumber);
    }
  }

  clickCreateButton() {
    this.element(by.buttonText('Create')).click();
    return new ContactListPageObject();
  }

  getName() {    ③
    return this.inputName.getAttribute('value');
  }
}
  getPhone() {
    return this.inputPhone.getAttribute('value');
}
  getEmail() {
    return this.inputEmail.getAttribute('value');
}
Now that you’ve seen how to make page objects, you can refactor your create contact test as shown in listing 8.16. First, the test creates the contactList object and navigates to the contact list page. The next it() block clicks the plus button and verifies that the current URL is the create contact page. On the create contact page, the test fills out the name input field and email input field. After the fields are filled, the test verifies that the input values match. Finally, the test clicks the Create button and returns to the contact list page.
Listing 8.16 Refactor creating a new contact—e2e/page-object.e2e-spec.ts
import { ContactListPageObject } from './po/contact-list.po.ts';
import { NewContactPageObject } from './po/new-contact.po.ts', , Contact }

describe('contact list', () => {
  let contactList: ContactListPageObject;
  let newContact: NewContactPageObject;

  beforeAll(() => {
    contactList = new ContactListPageObject();
  });

  describe('add a new contact', () => {
    beforeAll(() => {
      contactList.navigateTo();
    });

    it('should click the + button', () => {
      newContact = contactList.clickPlusButton();
      expect(browser.getCurrentUrl())
          .toBe(browser.baseUrl + '/#/add');
    });

    it('should fill out form for a new contact', () => {
      newContact.setContactInfo(
          'Mr. Newton', '[email protected]', null);
      expect(newContact.getName()).toBe('Mr. Newton');
      expect(newContact.getEmail())
          .toBe('[email protected]');
      expect(newContact.getPhone()).toBe('');
    });

    it('should click the create button', () => {
      contactList = newContact.clickCreateButton();
      expect(browser.getCurrentUrl())
          .toBe(browser.baseUrl + '/#/');
    });
  });
});
Instead of importing in Protractor’s browser, by, and element, the test imports the page objects and uses only methods from the page objects for navigation and validation.
Summary
- The Angular CLI provides a scaffold of Protractor files that you can use as a good starting point. The setup allows you to use the built-in TypeScript support when writing your Protractor tests.
- Protractor has many ways to locate objects on the screen. If you’re looking for more than one web element, Protractor can find an array of elements.
- When you’re looking for many objects on the screen, you can use Protractor’s built-in
filter,map, andreducefunctions to manipulate a list of web elements. - Using page objects when writing Protractor tests allows you to initialize locators in one location and encapsulate actions into methods.