
11
Continuous integration
- Setting up Jenkins
- Running both unit and E2E tests on Jenkins
- Configuring CircleCI to run your unit and E2E tests
Writing tests for your Angular application is only half the battle. You need to remember to run those tests to make sure you catch regressions as you continue to add features. Running tests manually can be tedious. It’s better to set up a continuous integration (CI) system that will integrate with your source repository and automatically run all the tests for each change.
In practice, you develop your Protractor tests on a desktop, where you can watch the browser and see if your tests are passing. One big stumbling block people run into when setting up their tests in a CI system is that the server doesn’t normally have a GUI. (It’s a headless environment.) In this chapter, we’ll show how to set up your tests to run automatically in a headless environment. First, we’ll cover setting up your own CI system using the open source Jenkins server; then we’ll show you how easy it can be to set up testing with CircleCI, which is a hosted CI service that has a free tier.
11.1 Jenkins
Jenkins is an open source CI server with a powerful web interface. It was originally created for testing Java applications, but, thanks to a rich ecosystem of plugins, Jenkins can now test almost any project in any language. You’re going to set up a Jenkins server that will run your tests on Node.js.
11.1.1 Setting up Jenkins
Jenkins is a large, complicated project, and the full details of installing it are beyond the scope of this book. The example in this chapter assumes you’re running Jenkins on an Ubuntu server, but you also can install it on macOS and Windows. Follow the official instructions for installing Jenkins on your server at https://jenkins.io/doc/book/installing, and then come back here when you’ve set up the first admin user.
You need a browser to run both unit and end-to-end (E2E) tests; you’ll use Chrome for this example. Chrome needs a GUI to run, and your server is headless, so you’ll install Xvfb. You also need Node.js to run the tests.
The following listing shows how to install the prerequisites for this setup on Ubuntu. You can use apt to install Xvfb, but you should manually install Google Chrome and Node Version Manager (nvm) to get their latest versions.
Listing 11.1 Install prerequisites: Chrome, Xvfb, and Node
sudo apt-get update
sudo apt-get install Xvfb -y    ①

sudo sh -c 'echo "deb [arch=amd64]
  http://dl-ssl.google.com/linux/chrome/deb/ stable main" >>
  /etc/apt/sources.list.d/google-chrome.list'    ②

wget -q -O - https://dl-ssl.google.com/linux/linux_signing_key.pub
  | sudo apt-key add -

sudo apt-get update
sudo apt-get install google-chrome-stable –y

curl -o-
  https://raw.githubusercontent.com/creationix/nvm/v0.33.2/install.sh     ③
  | bash
nvm install 8    ④
Now that you have your prerequisites, you’re ready to install the plugins you need using Jenkins’ browser-based admin interface. In the browser window, you can install plugins by navigating to Manage Jenkins and then clicking the Manage Plugins link. The plugins you need for your Jenkins job are the JUnit plugin, the Xvfb plugin, and the nvm wrapper plugin, all shown in figure 11.1. The JUnit plugin will interpret and show a trending history of your test. The nvm wrapper plugin will allow your test to launch Protractor with Node.js, and the Xvfb plugin will allow you to run your test in a browser.

Figure 11.1 JUnit, nvm wrapper, and Xvfb plugins
You’ll also need to set some configuration options for Jenkins. In the same browser window, you can configure Jenkins by clicking Manage Jenkins, then navigating to Global Tool Configuration. From there, you need to set a valid path for both JAVA_HOME and Xvfb, shown in figure 11.2. Jenkins requires Java to be set in the path to launch the Selenium standalone server and Xvfb to run the virtual desktop environment.
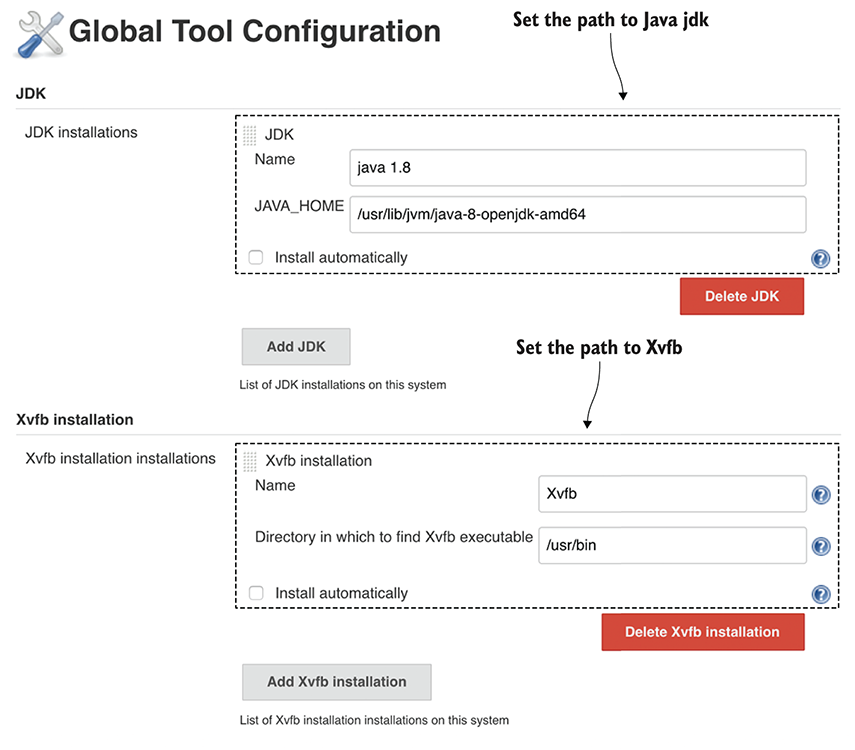
Figure 11.2 Jenkins Global Tool Configuration
Now that you have all the components required to run a Protractor test, let's review the test in the GitHub repository (http://mng.bz/z22f). In Jenkins, create a new freestyle project, go to the Source Code Management section, and add the git repository as https://github.com/testing-angular-applications/testing-angular-applications.git.
11.1.2 Unit tests
You use Karma to run your unit tests. Karma takes care of starting a browser, connecting to it, and running your tests there. Because Karma runs your unit tests in a real browser, your tests have access to a real DOM and your client code runs exactly as it will in production. In fact, you can use Karma to run your unit tests on other browsers, like Firefox and Safari, to make sure your application is compatible with them. To keep things simple, for this example you’ll run the unit tests for your project on Chrome.
Jenkins expects test results to be in an XML file with the same format the JUnit would use to report Java test results. This format has become a de-facto standard, and test frameworks in a variety of languages can now report test results in this JUnit-XML style. Karma has a plugin called karma-junit-reporter, which outputs the results of running Karma in this format so that Jenkins can understand them. To run your unit tests on Jenkins, you’ll create a separate configuration for Karma that uses this plugin.
As noted earlier, Chrome’s headless mode starts Chrome without a display. Your unit tests don’t need a GUI, so even though you’ve already set up Xvfb, go ahead and use headless Chrome to run your unit tests. Don’t worry; you’ll be using Xvfb soon.
The karma-chrome-launcher plugin will start headless Chrome if you specify the browser as ChromeHeadless. The following listing shows the Karma config for your CI server, using headless Chrome and JUnit XML reporting.
Listing 11.2 Karma configuration for CI server—chapter11/karma-ci.conf.js
module.exports = function (config) {
  config.set({
    basePath: '',
    frameworks: ['jasmine', '@angular/cli'],
    plugins: [
      require('karma-jasmine'),
      require('karma-chrome-launcher'),
      require('karma-jasmine-html-reporter'),
      require('karma-junit-reporter'),
      require('@angular/cli/plugins/karma')
    ],
    reporters: ['junit'],    ①
    junitReporter: {
        outputDir: 'karma-results',    ②
        outputFile: 'karma-results.xml'    ②
    },
    angularCli: {
      environment: 'dev',
    },
    port: 9876,
    logLevel: config.LOG_INFO,
    browsers: ['ChromeHeadless'],    ③
    autoWatch: false,    ④
    singleRun: true    ④
  });
};
This is a Karma configuration separate from the one you use during development. For the rest of this book, we’ve kept the test cases and website in separate directories, so you can follow along as you write tests in each chapter.
Create a new project in Jenkins by clicking New Item on the main page. Create a new Freestyle project. In the configuration for the new project, select Git under Source Code Management. The build config for your unit tests is shown in figure 11.3.
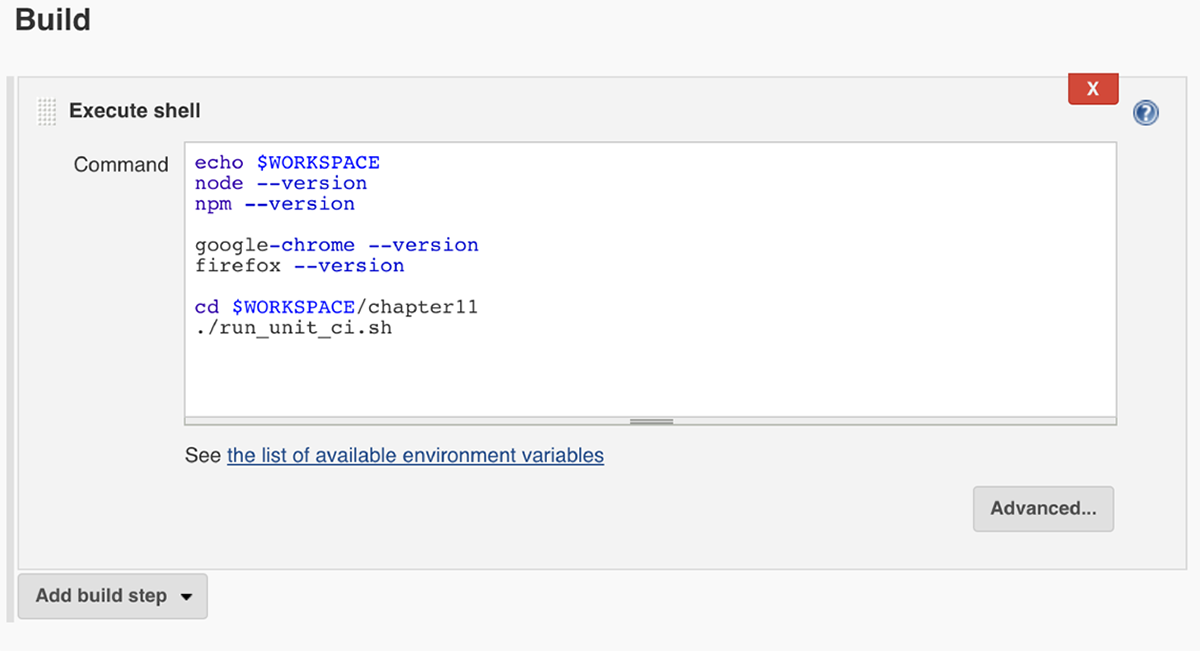
Figure 11.3 Build configuration for the unit test Jenkins job
All this config needs to do is call the run_unit_ci.sh script. In general, it’s better to keep as much of your CI process as possible in a script in your source repo, where it’s easy to debug and track changes. This also keeps your Jenkins config simple, because all it needs to do is call that script. Your Jenkins job config also prints out the versions of npm, Node, and Chrome. Jenkins saves the console output for each run, and it can be helpful to see exactly which versions of these tools were used in an old run.
You also need to tell Jenkins where to find the JUnit XML output for your test run. You do that configuration in the Post-Build Actions section, as shown in figure 11.4.

Figure 11.4 Post-build actions for the unit test Jenkins job
Note that you both archive the XML and publish a JUnit test report based on it. Publishing the JUnit test report will create a chart of test pass/failure over time, and it gives you detailed information about which test cases failed. Archiving the XML means that Jenkins will keep the file around, which can be helpful later for debugging purposes.
11.1.3 E2E tests
Setting up Jenkins to run E2E tests is quite similar to setting it up to run unit tests. You could use headless Chrome again, but for instructional purposes, you’ll try something different and use regular Chrome and Xvfb. Also, instead of using directConnect as you’ve done in previous chapters, you’ll use a local driver provider, which will tell Protractor to launch the Selenium server on a random available port. You’ll use this option because you might not have a Selenium standalone server running in the background. As before, you’ll turn on JUnit-style reports so you get detailed information about test runs in Jenkins.
Before you set up Jenkins, let’s look at the Protractor configuration file (listing 11.3). You want to set up your tests to behave differently when running on Jenkins. In the configuration file, you’ll set an IS_JENKINS environment flag. When your tests aren’t running on Jenkins and that flag isn’t set, the default behavior will be to use directConnect. In your Jenkins environment, you’ll set the IS_JENKINS environment variable to true. When the flag is set, the test won’t launch with directConnect, and Protractor will handle starting and stopping your Selenium standalone server for you. The IS_JENKINS flag also guards the onPrepare function to generate only JUnit reports on Jenkins.
Listing 11.3 Protractor configuration file—chapter11/protractor.conf.js
exports.config = {
  directConnect: !process.env.IS_JENKINS,    ①
  capabilities: {
    browserName: 'chrome'
  },
  baseUrl: 'https://testing-angular-applications.github.io',
  specs: ['e2e/**/*.spec.ts'],
  onPrepare: () => {
    if (process.env.IS_JENKINS) {    ②
      let jasmineReporters = require('jasmine-reporters');
      let junitReporter = new jasmineReporters.JUnitXmlReporter({
        savePath: 'output/',
        consolidateAll: false
      });
      jasmine.getEnv().addReporter(junitReporter);
    }
    require('ts-node').register({
      project: 'e2e'
    });
  },
};
When you configure the Jenkins job for your E2E tests, you’ll need to first set up the build environment. In the Build Environment section shown in figure 11.5, select these two options: Start Xvfb Before the Build and Run the Build in an NVM Managed Environment (with Node Version 8).
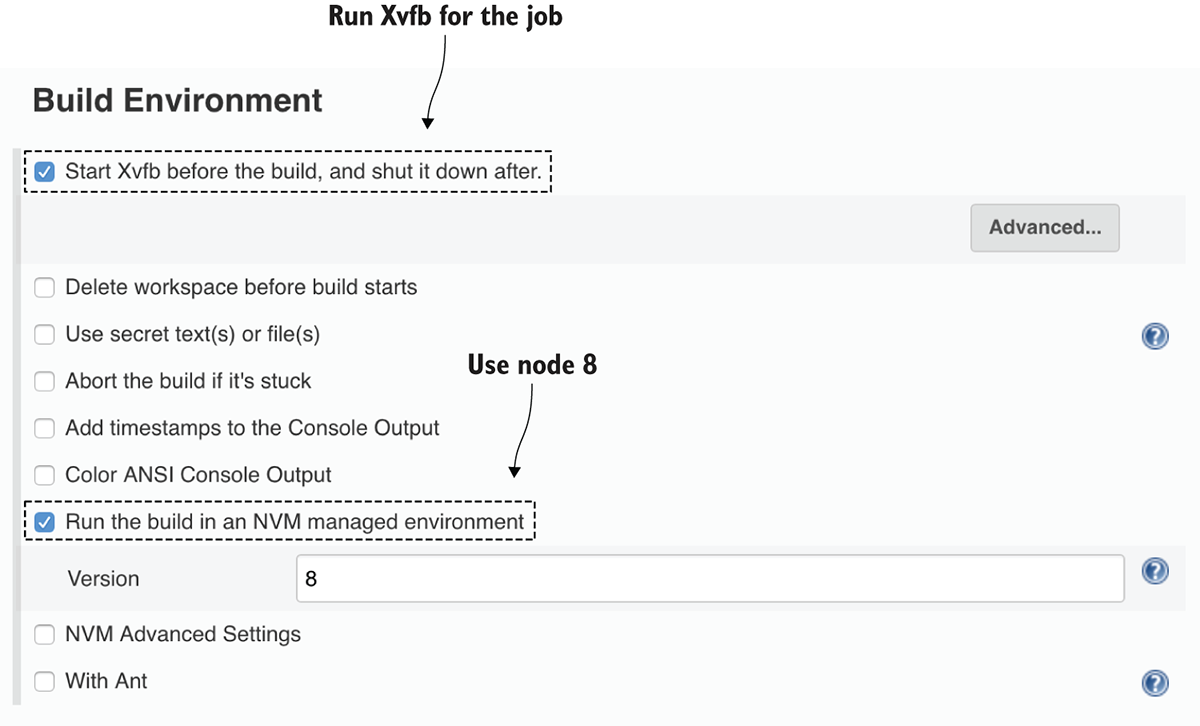
Figure 11.5 Build environment for the E2E Jenkins job
Next, set up an execute shell build step with the snippet shown in listing 11.4. In the shell commands, you specify the environment variable that your Protractor configuration file is using. You won’t be using directConnect and you’ll be generating JUnit style reports because you’ve set IS_JENKINS to true.
Listing 11.4 Jenkins execute shell
export IS_JENKINS=true    ①

node --version    ②
npm --version    ②
google-chrome --version    ②

cd $WORKSPACE/chapter11    ③
npm install    ④
npm run webdriver-update    ⑤
Finally, in the Post-Build Actions section, you’ll specify Archive the Artifacts for the JUnit reports. You’ll also use Publish JUnit Test Result Report with the same file set you’re planning to archive (figure 11.6).

Figure 11.6 Post-build actions for the E2E Jenkins job
Publishing a JUnit test result report will create a history in Jenkins of your test runs. After more than one build occurs, the Jenkins job will display a plot of failed and passing tests along with a set of the last successful artifact outputs. Figure 11.7 shows the summary plot and artifacts for your test job.
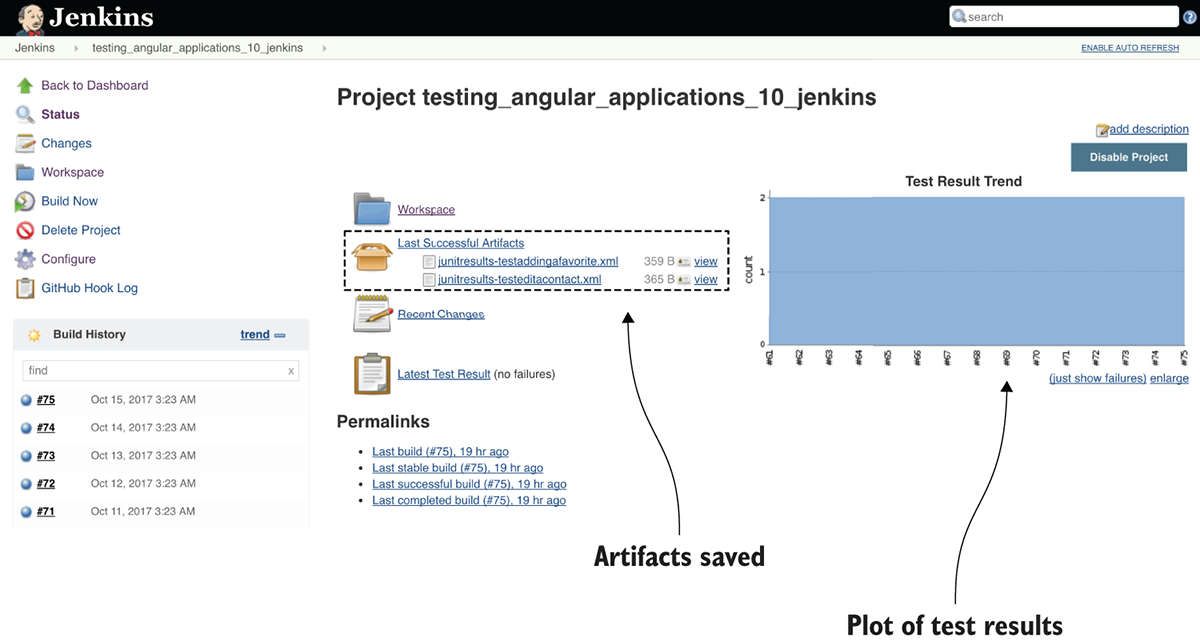
Figure 11.7 Jenkins test results display
As previously mentioned, you could have used headless Chrome instead of Xvfb, and you also could have used directConnect instead of launching the test with the local driver provider option. In the next section, you take the same test and run it on CircleCI, but with headless Chrome and directConnect instead.
11.2 CircleCI
CircleCI is another continuous integration service that integrates with GitHub and is free for open-source projects; it also has a paid enterprise tier. The neat thing about CircleCI version 2.0 is that it’s optimized for Docker images. Docker is a container-based system for Linux virtualization, so when you use a Docker image, it’s a virtual Linux distribution running preinstalled software. You can use a container to install Node.js and Chrome in your CI environment.
CircleCI makes it easy to run your tests more often. This gives you the option of testing things automatically that you might have tested manually before. For example, you can use your new Protractor CI setup to automatically test the appearance of your app using tests that take screenshots.
Before you set up your CircleCI configuration, add to the previous Protractor configuration file with a new environment variable, IS_CIRCLE, in listing 11.5. This additional environment variable will run your CircleCI tests with headless Chrome using directConnect. On Jenkins, it will run with a local launch of the Selenium standalone server with JUnit-style reports. Finally, in your development environment, you’ll use directConnect without headless mode so that you can see what’s happening in your E2E tests.
Listing 11.5 Protractor configuration for CircleCI
exports.config = {
  directConnect: (!process.env.IS_JENKINS && true),
  capabilities: {
    browserName: 'chrome',
    chromeOptions: {
      args: (process.env.IS_CIRCLE ? ['--headless'] : [])    ①
    }
  },
  baseUrl: 'https://testing-angular-applications.github.io',
  specs: ['e2e/**/*.spec.ts'],
  onPrepare: () => {
    if (process.env.IS_JENKINS) {
      let jasmineReporters = require('jasmine-reporters');
      let junitReporter = new jasmineReporters.JUnitXmlReporter({
        savePath: 'output/',
        consolidateAll: false
      });
      jasmine.getEnv().addReporter(junitReporter);
    }
    require('ts-node').register({
      project: 'e2e'
    });

  },
};
Next, you need to set up CircleCI by creating a configuration file, ./circle/config.yml. You can use a CircleCI-maintained docker image that includes Node and browsers. Then you need to specify the shell commands to run your tests. The only difference between the shell commands in the following listing and the Jenkins shell commands is that in CircleCI, you need to change to the website directory and run the npm command.
Listing 11.6 CircleCI configuration file .circle/config.yml
version: 2    ①
jobs:
  build:
    working_directory: ~/workspace    ②
    docker:
      - image: circleci/node:8-browsers    ③
    steps:
      - checkout

      - run: export IS_CIRCLE=true    ④
      - run: node --version
      - run: npm --version
      - run: google-chrome --version

      - run: cd website && npm install
      - run: cd website && npm run karma start karma-ci.conf.js    ⑤
      - run: cd website && npm run e2e protractor.conf.js    ⑥
Note that running unit and E2E tests in CircleCI is easy: you specify a shell command to run. As with Jenkins, CircleCI can take test results in JUnit XML format to give detailed test information. Unlike Jenkins, CircleCI will automatically search your project and try to interpret any test output XML files that it finds. If you don’t care about detailed results, you don’t have to produce a JUnit XML file. CircleCI will consider the test failed if any of the steps return a nonzero exit code, which Karma and Protractor both do if a test fails.
Summary
- If you need to set up your own CI, use Jenkins server. It requires some additional setup steps for you to be able to run your unit and E2E tests.
- If your tests can produce a JUnit-style XML test result, Jenkins can use that information to create detailed reports of your test runs.
- CircleCI is an easy to use hosted solution for CI with a free tier, and it’s good if you need a quick solution for setting up a CI system.