
Chapter 7. Building cross-platform models
This chapter covers
- Creating simple model layers
- Creating and running unit-test projects to test your models
- Structuring more complex model layers with services, repositories, and data models
- Using an ORM to access SQLite
- What REST services and JSON are
- Accessing web services from .NET Standard libraries
In the last chapter we started planning our mobile apps—we looked at the user flows, thought about the UIs, worked out what code would be in each layer, and thought about the threads our code should run on. Then we created a solution and took a look at some of the options and settings available in mobile apps. We talked about two apps: SquareRt (a simple square-root calculator) and Countr (an app for counting things).
Now we’re going to get our hands dirty and write some code. In this chapter we’re going to look at the model layer—looking at ways to build simple and more complex cross-platform model layers, thinking about testing our code, and discussing databases and web services. Everything in this chapter is cross-platform—after all, the big reason for using Xamarin is to share code and write all the business and UI logic once. The examples will be relevant to both SquareRt and Countr, so by following these examples you’ll be able to build up the model layer of both of these apps.
If you’re planing on coding along with this chapter, please make sure you’ve created the relevant solutions as described in the previous chapter, or use the precreated ones in the Git repository that accompanies this book.
7.1. Building simple model layers
The model layer is a cross-platform layer that represents your data, your business logic, and your access to external resources such as databases or web services (figure 7.1). For some apps, the model layer is pretty thin, with only very basic logic. For others, it’s much more in depth. One thing to remember, though, is that this layer should be built in a way that makes sense to your domain—it should use classes, names, and data types that make sense from a business perspective, not ones that necessarily make sense from a UI perspective.
Figure 7.1. The model layer in an MVVM-based mobile app is written using cross-platform code.

As you’ve already seen, view models map one-to-one with views (so for FooView you’d have FooViewModel), but they don’t have to map one-to-one to a model class (so there’s no need to have FooModel). Instead, you can create classes in the model that provide data and business logic across multiple views and view models.
In the last chapter we looked at the user flow for the SquareRt app—the app is so simple it only has one. Figure 7.2 shows what we came up with. This app is simple—it only needs one thing in the model layer, the SquareRtCalculator. The sole job of this class is to take a number and calculate its square root.
Figure 7.2. The user flow for SquareRt that we mapped to classes in chapter 6

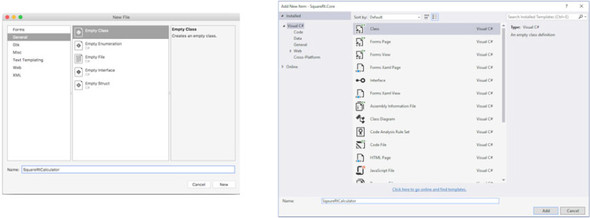
Let’s create this class now. Create a new class inside the SquareRt.Core project and call it SquareRtCalculator. To do this, right-click the SquareRt.Core project (remember, models are cross-platform, so they’ll be in the cross-platform core projects), select Add > New File (for Mac) or Add > New Item (on Windows), select a file type of Class, and enter the class name (figure 7.3). As this is a simple project, I won’t put this in a folder. I’ll just put it in the root of the project.
Figure 7.3. Adding the SquareRtCalculator class in Visual Studio for Mac (left) and Windows (right)
The following listing shows the simple implementation of this class.
Listing 7.1. Implementing the SquareRtCalculator class
using System;

namespace SquareRt.Core                                                1
{
   public class SquareRtCalculator
   {
      public double Calculate(double number) => Math.Sqrt(number);     2
   }
}
- 1 This new class is in the SquareRt.Core namespace.
- 2 The Calculate method uses the System.Math.Sqrt method for the calculation.
So far, so simple—we have a class that uses a .NET Framework library to do the calculation for us. But we’re not finished here. We have one more thing to do. Back in chapter 4 we discussed testability, including the concept of using interfaces instead of concrete implementations. We looked at IoC containers and saw how we could register classes by interface and then inject those implementations as dependencies in other classes—for example, we could register our SquareRtCalculator using an ISquareRtCalculator interface and pass that in when constructing a view model, as shown in figure 7.4.
Figure 7.4. Using an IoC container to pass instances of ISquareRtCalculator wherever they’re needed

This is an important concept and one we shouldn’t neglect here, despite the simplicity of our model layer. We need to expose our calculator through an interface and register it with the IoC container. We can start by extracting an interface from our SquareRtCalculator class, and then we can register it in the container.
Create a new file called ISquareRtCalculator in the same place as the SquareRtCalculator class. The following listing shows the code for this.
Listing 7.2. The ISquareRtCalculator interface
namespace SquareRt.Core                           1
{
   public interface ISquareRtCalculator
   {
      double Calculate(double number);            2
   }
}
- 1 This new interface is in the SquareRt.Core namespace, the same as the SquareRtCalculator class.
- 2 This new interface has the Calculate method on it.
Once the interface is declared, the SquareRtCalculator class needs to implement it, as shown in the next listing.
Listing 7.3. SquareRtCalculator now implements our new interface
public class SquareRtCalculator : ISquareRtCalculator           1
...
- 1 SquareRtCalculator now implements ISquareRtCalculator.
The final step is to register this in the IoC container. To do this you need to modify the App class in App.cs in the SquareRt.Core project, as shown in the next listing.
Listing 7.4. Adding registration of the ISquareRtCalculator
using MvvmCross.Platform;                                                  1
using MvvmCross.Platform.IoC;

namespace SquareRt.Core
{
   public class App : MvvmCross.Core.ViewModels.MvxApplication
   {
      public override void Initialize()
      {
         CreatableTypes()
             .EndingWith("Service")
             .AsInterfaces()
             .RegisterAsLazySingleton();
         Mvx.ConstructAndRegisterSingleton<ISquareRtCalculator,            2
                                           SquareRtCalculator>();          2
         RegisterNavigationServiceAppStart<ViewModels.FirstViewModel>();
      }
   }
}
- 1 A new using directive gives access to the static Mvx IoC container.
- 2 A call is made to the Mvx container to construct a new instance of SquareRtCalculator and register it using its ISquareRtCalculator interface.
We now have an interface, a class that implements it, and we’ve registered it in our container. Although this example is simple, you’ll use this basic pattern again and again when constructing your apps, so it’s a good habit to get into right off the bat.
When writing code, it’s always nice to be able to run it and see what happens. The problem here is that we’ve written code in the model layer only—it’s not wired up to a view model and view, so there’s no way to manually test that our code works through a mobile app. We could wait until our app is complete to do our testing, but it would be better to test this code as soon as it’s written. What we need is unit testing.
7.2. Unit testing
When making coffee using an industrial coffee machine in a coffee shop, you always need to ensure that your coffee maker is working in tip-top condition. If it’s not up to scratch, you could end up with nasty-tasting coffee, or worse, hot steam shooting out at people. This is why you need to test the machine to make sure it’s working before you can make the first cup of coffee each day. That’s not easy to do manually—testing things like water pressure is hard without special tools. It’s a long process to do properly, and being long and boring it’s prone to human error.
Luckily, coffee machines have automated tests built in, so when they’re first turned on they’ll check things like the water pressure, whether they have beans, and anything else they need to ensure they’re working correctly. This automated testing is much more reliable than human tests, it happens daily, with some tests, such as checking for beans running continuously, and it allows the baristas to get on with making fantastic hot drinks without worrying. This is something we can also do with our code—instead of waiting until our app is complete to test its functionality manually in a way that’s prone to human error, we can use unit testing to write automated tests that can be run on a regular basis, ensuring not only that our code works but that it stays working.
Unit testing is a technique whereby you write some test code to check that your code is working correctly. Unit refers to a small runnable unit of code, which is usually taken to mean one public member on a class, such as a method or a property. You want your units to be as small as possible, testing one thing and one thing only. Your tests shouldn’t cover more than one unit of code, and they should only validate one or two things—this way, if a test fails, it’s immediately obvious which unit of code is failing under what scenario. If you write one huge test that tests a multitude of inputs and outputs, it’s hard to spot what the actual problem is.
The purpose of unit testing is to test units of code in isolation with multiple inputs to ensure that they’re working as expected, and that they keep working as expected. Not only can you write unit tests to check your code now, but you can run these on a regular basis (manually or, ideally, using a CI server) to ensure that your code continues to work even after other changes are made to the code base. After all, fixing a bug while you’re writing your code has a minimal impact on when your code is released or on your customers’ opinions of your app. If a bug makes it to your released app, however, it can take much longer to get a fix out to your users, leading to a poor customer experience and bad reviews on app stores.
Unit testing is a huge topic, and one well worth mastering. A full discussion of this topic would take a book in itself, and indeed many good books have been written on this topic, such as The Art of Unit Testing, Second Edition, by Roy Osherove (Manning, 2013).
To test the Calculate method of our SquareRtCalculator, we could wait till we’ve built the entire app and test it manually, but that’s not the best way to do it. By the time the app is built, we could have forgotten how we wrote the code, making it slower to fix any bugs. We could even have handed the app over to another member of the team, who wouldn’t know our code. We’d also have to manually test a number of possible calculations to ensure that they were all working, which is time consuming and potentially boring to do manually. And, of course, every time we tweak the app and rerelease it, we’d have to test it all over again. This sounds extreme for a simple calculator, which will probably work the first time, but for more complex apps (the kind you’d be likely to build in the real world), testing all of your code automatically as you’re writing it is a huge time saver.
7.2.1. Creating a unit-test project
Before you can write unit tests, you need a new project inside your solution that can contain all your tests. It’s common practice to put your tests in a separate project, rather than inside the project you’re testing, so that the tests aren’t shipped with your final app. A unit-test project is a simple class library—just like the SquareRt.Core project. The only difference is that it uses a unit-testing framework to define code as tests that can be run, either using command-line tools, CI servers, or directly inside Visual Studio.
Unit-testing frameworks are NuGet packages that provide attributes that you can use to indicate that a particular method is a unit test, as well as classes and methods that allow you to validate that your code is correct. They may also include extensions that provide features to your IDE, allowing you to run tests and track passes and failures.
There are a number of popular frameworks (such as xUnit—https://github.com/xunit/xunit), all open source and available for free with their own upsides and downsides. For this book I’ll use one called NUnit (https://nunit.org), as it comes built into Visual Studio for Mac and it’s easy to use from Visual Studio.
Creating a unit-test project in Visual Studio for Mac
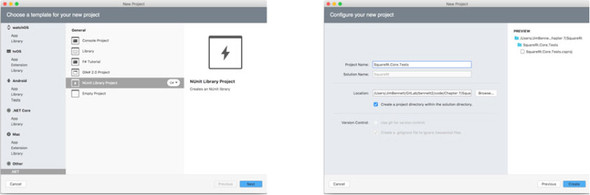
Visual Studio for Mac works with NUnit support out of the box, and it even ships with a project template you can use to create a unit-test project with NUnit support. To create a unit-test project, right-click the solution and select Add > Add New Project. From the New Project dialog box, select Other > .NET on the left side, select NUnit Library Project from the middle section, and click Next. On the next screen, enter the project name as SquareRt.Core.Tests and click Create (figure 7.5). This will create a new project and then automatically download and install the NUnit NuGet package. The project will have a dummy test file in it called Test.cs, which you can delete.
Figure 7.5. Adding a new NUnit library project
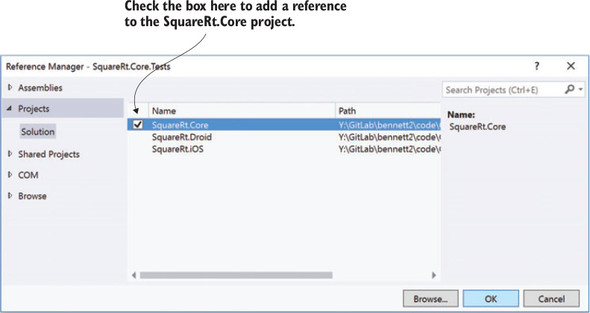
This project will need to reference the SquareRt.Core project to be able to test it, so right-click the References folder in the SquareRt.Core.Tests project, select Edit References, and in the Projects tab, check the box next to SquareRt.Core (figure 7.6).
Figure 7.6. Adding a reference to another project

Creating a unit-test project in Visual Studio for Windows
Getting Visual Studio for Windows to work with NUnit is a little bit more work than for the Mac. By default, it wants to use the Microsoft unit-testing framework, but I prefer to use NUnit, as this is available on both Windows and Mac. To enable NUnit, you’ll need to install another extension—go to Tools > Extensions and Updates, select Online in the list on the left, and search for NUnit. From the list in the middle, select the NUnit 3 Test Adapter (note the version number 3 in the name) and click the Download button (figure 7.7). Follow the onscreen instructions, and then restart Visual Studio.
Figure 7.7. Adding the NUnit 3 extension to Visual Studio. You can also add the NUnit 2 extension to support NUnit projects created by Visual Studio for Mac.

A number of popular Visual Studio extensions also provide ways to run tests
If you use extensions such as ReSharper from JetBrains (www.jetbrains.com/resharper/) or CodeRush from DevExpress (www.devexpress.com/products/coderush/), you already have the ability to run NUnit tests without installing another extension. You’ll see all your tests and be able to run them from the relevant ReSharper or CodeRush Test Runner window. See the docs for these extensions for more details.
NUnit currently has two versions in regular use
NUnit has been growing and evolving for a number of years now, and at the time of writing, 3.5 is the latest version. Version 3 has a number of incompatibilities with version 2 in the way the tools that run the tests work. When you create a new unit-test project in Visual Studio for Mac, it will default to using NUnit 2.6.4, which can’t be run in Visual Studio using the NUnit 3 test adapter. The “fix” is to either upgrade the NUnit NuGet packages in the test project to the latest version, or to use the NUnit Test Adapter extension (note the lack of NUnit version number in the name), which supports NUnit 2 in Visual Studio.
Once you’ve added the extension, create a new project by right-clicking the solution and selecting Add > New Project. Select Visual C# from the tree on the left, select Class Library (.NET Framework) from the list in the middle, enter the project name as SquareRt.Core.Tests, and click OK (figure 7.8). Although there’s a new project type under Visual C# > Tests called NUnit Test Project, it’s not advisable to use this, as the resulting project won’t work in Visual Studio for Mac. It’s always good to create projects that work in both, as you never know what environment other developers in your team might want to use in the future.
Figure 7.8. Creating a new class library project to put our NUnit tests into

We’re creating a .NET Framework library, not a .NET Standard library
This is a .NET Framework library, rather than a .NET Standard library. At the time of writing, .NET Standard is still new and the tooling isn’t quite perfect. If you create a .NET Standard library, your tests won’t show up in the test explorer, and they won’t be able to be run using Visual Studio for Mac. This tooling is constantly being improved, however, so by the time you read this, the .NET Standard unit test libraries may well work fully.
The project will contain a default Class1.cs class file, which you can delete. You’ll then need to add the NUnit NuGet packages to this project manually by right-clicking the newly created SquareRt.Core.Tests project and selecting Manage NuGet Packages. Search for NUnit in the browse tab and install the latest version (figure 7.9).
Figure 7.9. Install the NUnit package into your test project.

This project will need to reference the SquareRt.Core project to be able to test it, so right-click the References folder in the SquareRt.Core.Tests project, select Add Reference, and from the Projects tab check the box next to SquareRt.Core (figure 7.10).
Figure 7.10. Adding a reference to the SquareRt.Core project from the SquareRt.Core.Tests project
7.2.2. Creating your first test
There is a huge range of techniques developers can use to build unit tests, and we’re not going to go into too much depth here. Instead we’ll focus on a simple way to create tests.
Once you have created the SquareRt.Core.Tests project, it’s time to create a first unit-test class to test the calculator. We’ll start with a simple test to see if it can correctly calculate the square root of 4. Create a new class in the root of the unit-test project called SquareRtCalculatorTests. Add the code in the following listing to this class.
Listing 7.5. A first unit-test class for the square-root calculator
using NUnit.Framework;                                      1

namespace SquareRt.Core.Tests
{
    [TestFixture]                                           2
    public class SquareRtCalculatorTests
    {
        ISquareRtCalculator calc;                           3

        [SetUp]                                             4
        public void SetUp()                                 4
        {
            // Arrange
            calc = new SquareRtCalculator();                5
        }

        [Test]                                              6
        public void Calculate_4_Returns2()                  6
        {
            // Act
            var squareRoot = calc.Calculate(4);             7
            // Assert
            Assert.AreEqual(2, squareRoot);                 8
        }
    }
}
- 1 A new using directive to access the NUnit code
- 2 The TestFixture attribute tells NUnit that this class is a test fixture.
- 3 An instance of the ISquareRtCalculator
- 4 The SetUp attribute tells NUnit to run this method before each and every test.
- 5 In the SetUp method, the instance of ISquareRtCalculator is set to a new SquareRtCalculator.
- 6 The Test attribute marks a method as a unit test that can be run.
- 7 The square root is calculated.
- 8 Assert.AreEqual is an NUnit static method that will check two values and throw an exception if they’re different.
First you create one-unit test class for each model class that you want to test, usually named something like ClassNameTests—in this case we’re testing the SquareRtCalculator class, so we have a test class called SquareRtCalculatorTests. This class is decorated with the TestFixture attribute from NUnit, which marks this class as one that contains unit tests (classes that contain unit tests are referred to as test fixtures). Visual Studio has test runners that will look for classes in your solution that are marked with this attribute, and will allow you to run the tests defined in these classes.
Second, you need to define any setup or tear-down code. This is code that’s run before and after each test and is encapsulated in methods that return void, that take no parameters, and that are marked with either the SetUp or TearDown attributes. In this case you don’t need any clean-up code, but you’re doing some setup—to save on creating a new instance of the SquareRtCalculator in every test method, you’re creating it in the setup. This reduces the amount of identical code you’d have to write, and if you ever change the constructor on the SquareRtCalculator class, you’d only have to fix up the setup method instead of fixing a multitude of tests. This instance is stored in a field of type ISquareRtCalculator—storing this as the interface is intentional. Good unit tests should test the exposed interface of a class because it’s this interface that would be passed to other classes (such as a view model), so if you test the interface, you can be sure you’re testing all the members exposed to the classes that’ll use this.
Finally you need to create the tests themselves. These are methods with a void return type (or async Task if your test will be testing asynchronous code that you want to await), and they don’t take any parameters. They’re also marked with the Test attribute, and it’s this that tells the test runner that the method is a unit test. In these methods you write any code that you want to test, and the way to flag a test as failing is by throwing an exception.
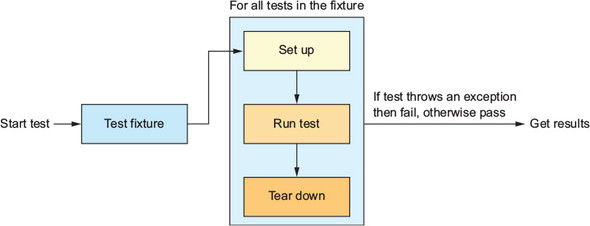
This standard structure of a test fixture with multiple tests that are set up, run, and then torn down is shown in figure 7.11.
Figure 7.11. Test fixtures can contain multiple tests, with setup run before each test, and tear down run after.
The standard way to write a test is arrange, act, assert: set up your code, perform an action, and then verify that the result of the action is correct:
- Arrange— This is where you set up your test. This setup includes creating any classes you need and setting a relevant state. In this example, there’s minimal setup—just creating a class—but in a lot of tests there might be other setup. For example, if you were testing that a Name property correctly concatenates a FirstName and LastName, your arrange step would be setting the values on the FirstName and LastName properties.
- Act— This is where you perform the action under test, and it should ideally be a single code statement, or, if necessary, the smallest number of statements possible. This is what you’re testing, so if this fails you want it to be immediately obvious what has failed, making it easier to debug and fix.
- Assert— Once the unit of code has been run, you need to evaluate the results, outputs, or side effects of your code to ensure that the code ran successfully. You assert that what you expect has happened, such as a calculation returning the correct result or correctly modifying an object’s state. The way you assert something is to check the relevant condition, and if the condition isn’t met, throw an exception. NUnit has a static Assert class that can do this for you, with methods to perform various assertions that throw exceptions if the assertions fail. A good test will ideally have only one assertion because the test should only check one thing, but sometimes it’s more practical to have more than one. For example, if you’re testing a SetName(string firstName, string lastName) method that sets both the first and last names of an object, you might want to write two assertions: one to assert that the first name is set correctly, and one to assert that the last name is set. These should be kept to a minimum, though, as you want to always be able to link a test failure back to a specific scenario to make debugging easier.
In the case of our test, we’re setting up the SquareRtCalculator in the setup method (arrange), we’re calculating the square root of 4 (act), and we’re verifying that the result is 2 (assert). The verification is done using the Assert static class that comes from NUnit, using its AreEqual method that takes two values and throws an exception if they’re different. We can create more tests that follow this pattern to test other values, as shown in table 7.1.
Table 7.1. Our tests follow the pattern of arrange, act, assert
|
Arrange |
Act |
Assert |
|---|---|---|
| Create SquareRtCalculator | Calculate(0) | Assert result is 0 |
| Create SquareRtCalculator | Calculate(4) | Assert result is 2 |
Naming your tests
It’s often said that the two hardest things in programming are cache invalidation, naming things, and off-by-one errors. This is true with unit tests, where naming your tests can be hard. Ideally the test name should describe the test and contribute in part to documenting the behavior of the class under test. TestCalculate would be a bad name for our test, but Calculate_4_Returns2 describes the test as using the Calculate method and passing in 4 with the expectation that the method will return 2. This is a good patten to follow: UnitOfWork_StateUnderTest_ExpectedBehavior. Don’t worry about the length of the name—it’s better to have a longer, more descriptive test name than a shorter confusing one. You can read more about test naming in Roy Osherove’s “Naming standards for unit tests” blog entry at http://mng.bz/qzym.
Running your tests in Visual Studio for Mac
To run your tests, you can do one of two things—run them directly from the file, or run them via the Unit Tests pad.
If you want to run unit tests directly from your code, you need to enable editor–unit-test integration from the application Preferences by going to Visual Studio > Preferences, selecting the Text Editor > Source Analysis tab on the left, and ticking Enable Text Editor Unit Test Integration (figure 7.12).
Figure 7.12. To run unit tests from inside the code editor, an option in the preferences needs to be set.

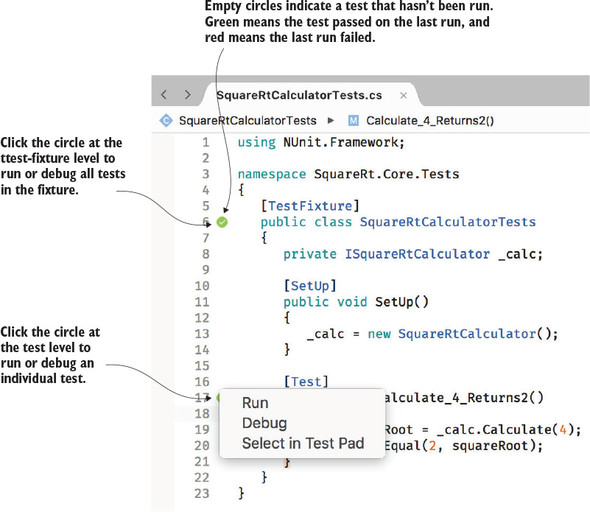
After enabling this, if you look at your test fixture code, you’ll notice empty circles in the left margin next to the class declaration for your test fixture, as well as in line with each test method. You can click the circle next to the class declaration to run all the tests in the fixture, or the circle by an individual test to run just that test (figure 7.13). Selecting Run will run the tests and highlight success or failure with either a green circle with a tick in it if the test passes or a red circle with a lightning bolt in it for failure. Selecting Debug will run your test through the debugger, so that you can set breakpoints to debug any issues in your code. Select in Test Pad will open another pad that shows all the tests in your solution hierarchically by namespace, so that you can run all tests or any selection you want.
Figure 7.13. Unit tests can be run using the circles next to the test classes or methods.
The other option is to run your tests from the Unit Tests pad directly, which you can view by selecting View > Pads > Unit Tests, or by selecting View > Test to have Visual Studio change to a unit-testing layout, with the Unit Tests and Test Results pads showing. You can then run your tests by double-clicking on them in the test pad.
Running your tests in Visual Studio for Windows
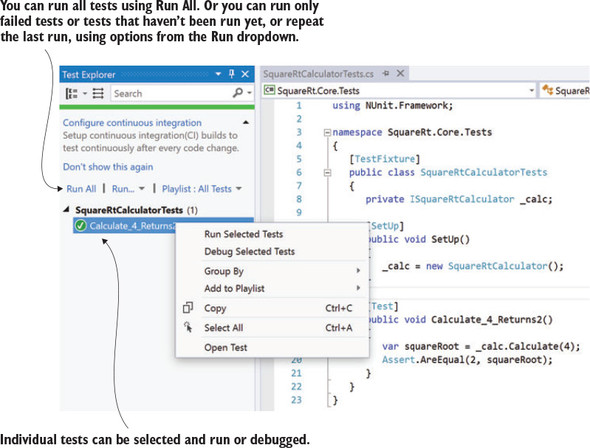
To run your tests in Visual Studio, click the Test menu and select Run > All Tests. This will build your solution and then run all the tests it can find in a new Test Explorer window that will appear on the left side. From there you can see all the tests and can run or debug each one by right-clicking it (figure 7.14). If you can’t see the Test Explorer, you can show it by selecting Test > Windows > Test Explorer.
Figure 7.14. Visual Studio can run tests in Text Explorer.
7.2.3. What do these tests tell you?
If you run the SquareRtCalculatorTests fixture tests, you should see them all pass—also referred to as going green. Unit-test results are often shown using green for pass and red for fail, and you’ll often hear the colors used to define pass and fail states. If a developer you’re working with tells you your tests are red, it means you have some failures. (If you want to see what a failure looks like, try changing the expected result from 2 to something else, and run the test again.) This test tells you that your calculator can successfully calculate a square root using one input.
It would be easy to add more tests to cover more inputs, to both ensure that your code works, and to explore different inputs. A good example would be to write a unit test for –1. The square root of –1 is i, an imaginary number, and this is represented as double.NaN in C# (NaN means “not a number”—something that can’t be represented by a simple decimal number). By writing a test for this, you could see what the output is and make a decision about how you’re going to represent this in your UI—maybe by always showing 0 as the result for negative numbers. Calculating the square root of –1 is the kind of thing a user would do to play with your app, but it’s something that, as a developer, it’s easy to forget to consider if you were just doing manual testing. By automating testing using unit tests, you’re more likely to consider the inputs to your code and cover edge cases.
Use test cases to cover multiple inputs
You can test multiple inputs and outputs using a single test method by defining multiple test cases. These are test methods that take parameters defining the inputs and expected outputs and then test against these. They have a different attribute on the method—they use multiple TestCase attributes, which are created with a list of values that get passed to the method for each test. You can read more on the TestCase attribute in the NUnit docs at http://mng.bz/Vj2M.
Unit tests don’t just make it easier for you to focus on one method when testing so that you cover the possible inputs and outputs, they give you another very important thing—cross-platform testing of your model layer. You use MVVM to share large amounts of cross-platform code, and by decoupling the UI from the logic, you can write unit tests to test large portions of your code, reducing the amount of slow, laborious manual testing that you’d need to do. This is what you’re seeing here—you’ve written some cross-platform code once, and unit-tested it. You don’t have to manually test that the calculations work, just that the UI is wired up correctly. If you hadn’t used MVVM and instead had wired up a button directly to the calculation code, you wouldn’t have been able to test this except manually. If you’d written your app using Swift on iOS and Java on Android, you’d have had to write this unit test twice.
In real apps the logic is more complex than a simple call to Math.Sqrt
This is a simple example of a method that makes a direct call to a system function, but it illustrates the principles. In a real-world app, your logic in the model layer could be more complex, so you’d want to test a variety of inputs and outputs. Thanks to MVVM and Xamarin, you can test complex model-layer logic using unit tests, and test it once.
7.3. Building more complex model layers
The SquareRt app has a simple model layer, but our Countr app needs something a bit more complex—including the ability to store counters somewhere. As a refresher, let’s look at the Countr user flows that we discussed in chapter 6. Figure 7.15 shows these.
Figure 7.15. The user flows for the Countr app: showing, adding, deleting, and incrementing counters

Let’s look at a popular way to structure more complex model layers using services, data models, and repositories.
7.3.1. Services, data models, and repositories
In our hypothetical coffee shop, we have baristas that can turn beans, water, and optionally milk into a delicious beverage. Beans are stored in cupboards behind the counter, milk is in the fridge, and there are taps to provide a good supply of water. If a customer comes in and orders an espresso, a number of things happen:
- The barista gets some beans out of a bag in a cupboard.
- The barista puts the beans in a grinder, and takes out ground coffee.
- The barista puts the ground coffee into the espresso maker, which is plumbed into the main water supply, puts a cup under the spout, and taps a button.
- The espresso maker pushes hot water through the grounds and streams coffee into the cup.
- The barista hands over your coffee.
We can break this down into three categories—entities (coffee beans, cups), places where entities are stored (cupboards), manipulators of entities (barista, espresso machine). These lists are shown in table 7.1.
Table 7.2. Grouping our coffee shop into entities, storage, and manipulators
|
Entities |
Storage |
Manipulators |
|---|---|---|
| Beans | Cupboard | Grinder |
| Milk | Fridge | Steamer |
| Water | Pipes | Barista |
| Cups | Coffee machine |
Let’s think about our Countr app in similar terms. We have an entity in the form of a class that represents a counter. We need a place to store the counters, and something to manipulate the counters, such as getting them all, adding new ones, removing them, or incrementing them. A common pattern for doing this is to use a set of data model classes, services, and data repositories:
- Data models— Data models are classes for simple data objects—objects that have properties to represent state, but few if any methods. These should map to the real-world entities that your app is concerned with.
- Services— Service classes provide the business logic that acts upon those data models, such as creating them from different data, performing calculations, uploading or downloading them from web services, or persisting them to repositories.
- Repositories— Repositories are used to persist the data models, usually to a local database such as SQLite.
Table 7.3. Grouping our Countr app into entities, storage, and manipulators
|
Entities (data models) |
Storage (repositories) |
Manipulators (services) |
|---|---|---|
| Counter | CountersRepository | CountersService |
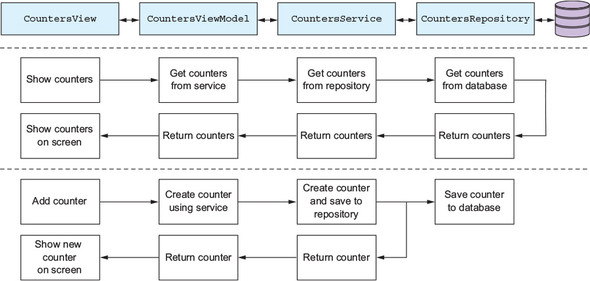
Our MVVM model layer needs to expose state and behavior to the views via the view models. Our services are the entry point into the model layer from the view models. If we have a CountersViewModel that shows a list of Counter objects on the CountersView, it would use CountersService to retrieve a list of counters, which would ultimately come from the CountersRepository. When a new Counter is created, it would be created via the service, which in turn would store the new counter in the repository. Figure 7.16 shows these two flows in action through the layers.
Figure 7.16. The counters view talks to the view model, which in turn talks to the service, which talks to the repository, which stores and retrieves data from a database.
By having separate services and repositories, we get a really good separation in our code, with each layer being relatively thin so it’s much, much easier to unit-test. This is one of the key goals of using the MVVM design pattern. It also means that in a larger app you can share services between view models, and share repositories between services.
For example, when creating a new email in an email app, you’d have a view and view model for the new email screen, and this view model would access a service to provide a list of contacts to help the user fill in the To and CC fields. You could also have a service that provides access to the user’s photos or other documents for adding attachments. The contacts service could also be used on a screen that shows your inbox, putting pictures beside the sender of each email.
This model also applies to our Countr app—we can use a counters service to not only get the list of counters to display on the main screen, but when the user adds a new counter, the view and view model for an add-counter screen would also use the same service to construct and store the new counter.
Let’s now build our service and repository, starting at the bottom with a database and data models, and working our way up through the repository to the service.
7.3.2. Accessing databases
A repository is a class that provides the ability to store and retrieve data from some kind of storage, and the most popular storage mechanism on mobile is a database called SQLite (www.sqlite.org). SQLite is a small, fast, file-based, open source database that has been around for over 15 years, and it comes embedded in iOS and Android. Other databases are available (such as Realm—https://realm.io), but SQLite is the most popular because it’s built into the OS. SQLite is very low level with a C API, but there are C# wrappers for this API as well as some really nice open source ORM (object-relational mapping) layers that you can use. ORM is a layer that abstracts database tables, columns, and rows away from you—instead of worrying about how to structure your data in the database, you can create tables based on a class, and perform basic CRUD (create, read, update, and delete) operations just by passing instances of your class around, or by requesting data by class type.
The best ORM for SQLite, by far, is SQLite-Net (not to be confused with SQLite.NET—it has a hyphen in the name instead of a period) from Frank Krueger. It’s available in a NuGet package called SQLite-Net-Pcl, which you should add to all the projects in the Countr solution (on Windows you can do this at the solution level, but on Mac you have to add it to the individual projects one by one).
There are many different SQLite packages available, so make sure you install the correct one! Also, be aware that despite the package having PCL in its name, in the latest versions it’s a .NET Standard library, not a PCL. This book was written using version 1.4.118, so install that version, although the latest version may also work. In Visual Studio for Mac you can select the version from the drop-down list at the bottom right; on Windows you can select it from the package settings at the right (figure 7.17).
Figure 7.17. The best ORM is SQLite-Net-PCL, but there are a number of NuGet packages available with SQLite in the name, so be sure to install the correct one with the correct version.

We first need to define classes that can store the data we need to persist. Then we’ll create a repository that can persist and retrieve those classes. This repository will, in turn, use SQLite-Net to automatically create the relevant tables for us.
Storing models in the database
For the Countr app, you need to be able to store counters and update them when the counter is incremented. To do this, you need a class to represent the counter with a name and a current value. Usually a class like this would be considered a data model as it models data (not to be confused with the model layer), so you can create a folder in the Countr.Core project called Models (right-click and select Add > New Folder). Then, add a new class in this folder called Counter. The following listing shows the contents of this class.
Listing 7.6. A simple data class to represent a counter
using SQLite;                                 1

namespace Countr.Core.Models
{
   public class Counter
   {
      [PrimaryKey, AutoIncrement]             2
      public int? Id { get; set; }            2

      public string Name { get; set; }
      public int Count { get; set; }
   }
}
- 1 The using directive gives access to the SQLite-Net classes.
- 2 The Id property is an auto-incrementing primary key.
This class contains a Name property to store the name of the counter, and a Count property to store the current value. It also has an Id property that’s marked with some attributes that come from SQLite-Net and that provide instructions on how the table for this class should be set up. When this class is stored in a SQLite table, it will go into a table called Counter (tables are named by SQLite-Net to match the class name that’s stored in them) that has three columns that map one-to-one with the public properties: an int column called Id, a string column called Name, and another int column called Count. Table 7.4 shows the structure of this table with some example counters already added to it.
Table 7.4. The Counter table, showing some example counters that a user might create when they use the app
|
Id—int (primary key) |
Name—string |
Count—int |
|---|---|---|
| 1 | “Cups of coffee” | 14 |
| 2 | “Gym sessions” | 8 |
| 3 | “Cakes” | 2 |
You need a primary key column (a column that contains a unique key that you can use to reference each counter), and ideally you don’t want to manage this yourself. This is what the attributes on the Id property provide. The PrimaryKey attribute tells SQLite to make this column the primary key, so it’s the unique ID used to reference individual counters, and the AutoIncrement attribute tells SQLite to automatically set the value of this ID to the next available value when a new row is added. For example, if you have three counters in the database with IDs 0, 1, and 2, and you add a new counter, it would have its Id value automatically set to 3 when it’s added to the table. This value is an int?—a nullable int. That’s because 0, the default value of an int, is a valid ID. If the ID was an int and you created and saved a new counter, SQLite wouldn’t know if it was a new counter or an update to a counter with an ID of 0. Because you’re using an int?, the default value is null, so SQLite will know to insert the counter.
All these properties have public getters and setters, and this is by design. There’s also no constructor, so the compiler automatically creates a default (parameterless) one for you. The way SQLite-Net works when loading data from a table is to construct an object using its default constructor, and then set the properties via reflection using the values from the columns. If you didn’t have a default constructor, SQLite-Net couldn’t create the object, and if the properties didn’t have public setters, the values couldn’t be set. When an object is saved, SQLite-Net uses reflection as well—the getters need to be public so that the ORM can get the values to write to the columns in the table. It’s fine to add a custom constructor, just as long as you add a parameterless one as well (the compiler won’t create a default constructor automatically if another constructor is defined).
Creating a repository
Now that you have a data model, you need to set up a repository to store and retrieve models from a database. By using SQLite-Net, you can deal with your data models directly without having to manually store these objects across different columns in different tables. This makes the repository fairly simple.
Create a Repositories folder in the Countr.Core project, and add a new interface there called ICountersRepository. The following listing shows the code for the interface.
Listing 7.7. The interface to the counters repository—simple and easy to understand
using System.Collections.Generic;
using System.Threading.Tasks;
using Countr.Core.Models;

namespace Countr.Core.Repositories
{
   public interface ICountersRepository
   {
      Task Save(Counter counter);
      Task<List<Counter>> GetAll();
      Task Delete(Counter counter);
   }
}
This is a very simple interface that encapsulates the basic operations you’ll want to do to maintain a store of counters—save a counter (either saving a new one or updating an existing one), get them all, or delete one.
But when calling save, how do you know if you’re creating a new counter or updating an existing one? The same with delete—how do you know which one to delete? The answer relies on the Id field on the Counter—the field marked with the PrimaryKey attribute. SQLite uses this primary key as the unique identifier of a row in a table, so if you save a counter with an Id of 2, it will check for an existing row in the table with the Id column set to 2. If it finds one, it will update that row to match the values on the counter being saved; if not, it will create a new row. The same happens with delete: if you delete a counter with an Id of 7, it will look for a row in the table with that Id to delete; if there isn’t one, nothing will happen.
Let’s create the CountersRepository class now and set up SQLite. Then we’ll implement the interface.
SQLite is very easy to set up—you create a connection to a database file by passing it a filename, and the SQLite engine will create a database file if one with that name doesn’t exist, or open it if it does. There’s a small catch, though—where to store the database file. .NET Standard libraries contain APIs to reference the filesystem, but the filesystem is different on iOS and Android, with different paths for storing local files. Luckily, there’s a Xamarin plugin that gives you a single method to call to get the path for storing local data and that returns the correct value on each platform. To install this plugin, install the PCLStorage NuGet package into all the projects in the solution (figure 7.18). The code in this book was written against version 1.0.2, so use this version if you have any problems.
Figure 7.18. The PCLStorage NuGet package gives access to the filesystem from .NET Standard libraries.

Now that you have this plugin installed, you can use it to provide a path for your SQLite-Net database connection. Create a new class called CountersRepository and add the following code.
Listing 7.8. Setting up the connection to a SQLite database
using System.IO;
using Countr.Core.Models;
using PCLStorage;                                                  1
using SQLite;

namespace Countr.Core.Repositories
{
   public class CountersRepository
   {
      readonly SQLiteAsyncConnection connection;                   2

      public CountersRepository()
      {
         var local = FileSystem.Current.LocalStorage.Path;         3
         var datafile = Path.Combine(local, "counters.db3");       4
         connection = new SQLiteAsyncConnection(datafile);         5
         connection.GetConnection().CreateTable<Counter>();        6
      }
   }
}
- 1 A using directive to bring in the file storage plugin
- 2 This is the connection to the database—async so you can use async/await.
- 3 This path comes from the file plugin and provides the path to the OS-specific local storage.
- 4 All SQLite database files use the .db3 extension.
- 5 SQLite connections are created pointing to the database file.
- 6 CreateTable will look for a table that matches the given type, and create it if it doesn’t exist.
The SQLiteAsyncConnection class gives you an asynchronous connection to the database, allowing you to use async methods that you can await—these methods will handle spawning tasks to run the database interactions from the calling thread. The only downside is that it doesn’t provide any synchronous methods—something you need to create the tables in the constructor of this repository. You can get a non-async version of the connection from the async connection using the GetConnection() method, and you can use this to create the table synchronously. This constructor will be called during app startup while the app is on the splash screen, and it will be very fast, so there should be no noticeable app slowdown for the user. Obviously, if you wanted to do more complex database creation work, or migration between different database structures, you should do this on a background thread while displaying something to the user so they don’t think their app has locked up—maybe by adding an Init method to the class, which gets called on a background thread during app startup.
Now that you have have your connection, let’s implement the repository interface. The following listing shows the implementation. All the async methods call a single async method on the SQLite connection, so instead of marking your methods as async and awaiting the calls, you can just return the tasks directly.
Listing 7.9. The implementation of the ICountersRepository interface
using System.Collections.Generic;
using System.Threading.Tasks;
...

public class CountersRepository : ICountersRepository           1
{
   ...
   public Task Save(Counter counter)
   {
      return connection.InsertOrReplaceAsync(counter);          2
   }

   public Task<List<Counter>> GetAll()
   {
      return connection.Table<Counter>().ToListAsync();         3
   }

   public Task Delete(Counter counter)
   {
      return connection.DeleteAsync(counter);                   4
   }
}
- 1 This class now implements the ICountersRepository interface.
- 2 Saves a counter by inserting or updating it based on its Id
- 3 Retrieves all the rows from the table and converts them to a list
- 4 Deletes the counter with an Id that matches the one passed in
As you can see from this simple implementation, SQLite-Net makes your life really easy when it comes to interacting with databases. This leads to an obvious question—if it’s so easy to interact with databases, and each method in the repository is a single SQLite-Net call, then why would you even bother creating a repository in the first place? The answer is, once again, unit testing. You can’t easily unit-test code that interacts with a database directly—you’d need a SQLite database. Although you can get implementations of SQLite on Mac and Windows (the platforms that your unit tests run on), they’re different from the implementation that runs on a device, and you’d need a lot of setup code to create and configure these databases for each unit test. It’s easier to create a very thin repository layer that you can mock out in unit tests. You can’t test the repository, but you can mock it to test the services that use it.
You can unit-test SQLite by using on-device unit tests
Xamarin provides a way to run unit tests on a physical iOS and Android device or emulator. This means you can write unit tests (or, more correctly, integration tests, as they test the integration between your app code and the database) against a SQLite database if you want to. You can find more details in the Xamarin iOS unit testing guide at http://mng.bz/0tv6 and the Android troubleshooting guide at http://mng.bz/mMWa.
Now that you have your repository, you need to register it in the IoC container. You’ve seen already that you can easily register individual classes inside the container, but MvvmCross has a simple way to automatically register multiple classes that are similarly named. If you open App.cs from the Countr.Core project, you’ll see the following line.
Listing 7.10. MvvmCross projects register all services into the IoC container by default
CreatableTypes()
    .EndingWith("Service")
    .AsInterfaces()
    .RegisterAsLazySingleton();
This tells MvvmCross to look inside the current assembly and find all classes with names that end with Service and register them as singletons based on their interface (registering them as lazy singletons to be precise, meaning they’re only constructed the first time they’re accessed). Because it’s a common pattern to have service class names end in Service, MvvmCross projects are set up to automatically register them, by default. You can extend this to include repositories by adding a copy of the same code but with a different name, as follows.
Listing 7.11. Automatically registering all repositories into the IoC container
...
CreatableTypes()
    .EndingWith("Repository")
    .AsInterfaces()
    .RegisterAsLazySingleton();
...
Once you’ve added this line, there’s no need to explicitly register your CountersRepository—MvvmCross will search the assembly, find the repository based on its name ending in Repository, get its interface, and register the class against its interface.
7.3.3. Adding a service layer
You have your data model (the Counter class) and your repository layer (the CountersRepository class). Now you need to add a service layer on top. The view models will interact with the services in this layer, which in turn will use the repositories to store and retrieve data. As a reminder, figure 7.19 shows these layers.
Figure 7.19. The layers in the Countr app
![]()
Creating the service
You need to create a new counter service that your view models can interact with, so let’s start with the interface, as always. Create a Services folder, and in that folder create a new interface called ICountersService, as in the following listing.
Listing 7.12. The interface for the counters service
using System.Collections.Generic;
using System.Threading.Tasks;
using Countr.Core.Models;

namespace Countr.Core.Services
{
   public interface ICountersService
   {
      Task<Counter> AddNewCounter(string name);          1
      Task<List<Counter>> GetAllCounters();              1
      Task DeleteCounter(Counter counter);               1
      Task IncrementCounter(Counter counter);            2
   }
}
- 1 Methods to create, delete, and get all the counters
- 2 A method to increment the counter
The first three methods on this service are fairly self-explanatory—they allow the callers to get, save, and delete counters. The fourth method is a bit different—it increments a counter. It may seem odd to be incrementing a counter from a service when the Count value on the counter could be manipulated directly, but there’s a good reason for this. If the Count property is 0 and is updated directly to 1, then the Counter instance is updated, and this new count of 1 is held in memory. If the app dies and is reloaded, what would the counter show? It would show 0 again. You need to persist all changes to the repository to ensure that when the app restarts and all counters are loaded, the correct values are available. By having the service control the incrementing of counters, it can ensure that the new values are always persisted to the database.
Now you have your interface. Let’s create the service, and then implement the interface. Create a new class called CountersService. The following listing shows the initial code for it.
Listing 7.13. The initial implementation of the counters service
using Countr.Core.Repositories;

namespace Countr.Core.Services
{
   public class CountersService
   {
      readonly ICountersRepository repository;

      public CountersService(ICountersRepository repository)      1
      {
         this.repository = repository;
      }
   }
}
- 1 The repository comes from a constructor parameter and is stored in a field.
Having the ICountersRepository interface as a constructor parameter for CountersService tells the MvvmCross IoC container to pass in whatever implementation of the ICountersRepository it has to this constructor when the class is created.
Let’s wire up the rest of the class now. Add the following code.
Listing 7.14. Implementing the ICountersService interface
using System.Collections.Generic;
using System.Threading.Tasks;
using Countr.Core.Models;
...

public class CountersService : ICountersService
{
  ...
  public async Task<Counter> AddNewCounter(string name)
  {
     var counter = new Counter { Name = name };                 1
     await repository.Save(counter).ConfigureAwait(false);      1
     return counter;                                            1
  }

  public Task<List<Counter>> GetAllCounters()
  {
     return repository.GetAll();                                2
  }

  public Task DeleteCounter(Counter counter)
  {
     return repository.Delete(counter);                         3
  }

  public Task IncrementCounter(Counter counter)
  {
     counter.Count += 1;                                        4
     return repository.Save(counter);                           4
  }
}
- 1 A new counter is created from a name, stored in the repository, then returned.
- 2 Getting all counters returns all counters from the repository.
- 3 Deleting a counter deletes it from the repository.
- 4 Incrementing a counter will increment the Count property and then update the counter in the repository.
Most of this code should be fairly self-explanatory. AddNewCounter constructs a new counter based on the name given, saves it to the repository, and returns it. IncrementCounter increments the Count value on the given counter and saves the incremented version to the repository. GetAllCounters gets all counters from the repository, and DeleteCounter deletes a counter from the repository. IncrementCounter, GetAllCounters, and DeleteCounter just return the tasks from the async methods they call on the repository. AddNewCounter is marked as async and uses ConfigureAwait(false) to tell the compiler that after the call to Save, the rest of the code in the method can stay on the same thread that Save used to do its work.
We’re done with the model layer now—you have a repository that manages counters using a SQLite database and a service layer that encapsulates all your interactions with counters. But like the model layer for SquareRt, how can you test this? You could wait until the app is built, but it’s better to write some unit tests, so that not only can you test the code now, you can test your code again and again and again to ensure you don’t break anything in the future. You can’t easily unit-test the repository, but you can test your service.
Unit-testing your service layer
Before you can think about unit testing, you need to create a unit-test project. Create a new project called Countr.Core.Tests in the same way as you did the SquareRt.Core.Tests project—either using a new NUnit Library Project in Visual Studio for Mac or by creating a new .NET Framework Class Library in Visual Studio and adding the NUnit NuGet package. Once the project is created, add a reference to the Countr.Core project.
As we’ve discussed, you can’t easily unit-test code that talks to a database, so you can’t test your repository. Although the service doesn’t interact directly with a database, it does use the repository, which in turn uses a database, so how can you unit-test this?
What you need to do is not use your implementation of the repository. Instead, you need to use a dummy implementation—one that not only doesn’t talk to a SQLite database, but ideally one that you can control. For example, to test that the IncrementCounter method on the service is working correctly, you need to ensure that it not only increments the Count property, but that it saves the incremented value to the repository—this checks that you haven’t got the save and increment lines the wrong way around. If you have a repository that you can control, you could perform some kind of assertion on the call to Save to ensure that the incremented counter is saved.
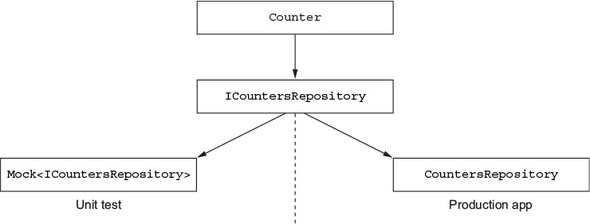
There’s a great pattern for creating dummy implementations, called mocking. In this technique, you create an implementation of an interface and have complete control on a test-by-test basis, allowing you to configure what the methods on the interface do and return, and also verify that the methods are called (figure 7.20).
Figure 7.20. Mocking is a simple technique allowing you to unit-test without worrying about dependencies.
There are a number of great open source tools to help with this, my favorite being Moq (https://github.com/Moq). To install Moq, add the Moq NuGet package to the Countr.Core.Tests project (figure 7.21).
Figure 7.21. Installing the Moq NuGet package gives you a simple way to mock interfaces in your unit tests.

Add a new folder called Services to the test project, and then add a CountersServiceTests class. The following listing shows the initial implementation of this class.
Listing 7.15. The initial implementation of the unit tests for the counters service
using NUnit.Framework;
using Moq;
using Countr.Core.Repositories;
using Countr.Core.Services;

namespace Countr.Core.Tests.Services
{
   [TestFixture]
   public class CountersServiceTests
   {
      ICountersService service;
      Mock<ICountersRepository>  repo;

      [SetUp]
      public void SetUp()
      {
         repo = new Mock<ICountersRepository>();            1
         service = new CountersService(repo.Object);        2
      }
   }
}
- 1 In the test fixture setup, a new mock repository is created so that it’s ready for each test.
- 2 A new instance of the CountersService created using the mock object.
The Mock<ICountersRepository> field is a mock of the ICountersRepository interface. It has a property called Object that’s an ICountersRepository interface, which you can pass to the constructor of the CountersService.
What’s powerful about this mock is what happens when you call the methods on the interface. By default, these methods will do nothing and will return the default value for the return type (for example, if you call the GetAllCounters method, it will return null), but you can override this behavior. You can set up methods to return whatever you want, perform actions when they’re called, or throw exceptions—this can be for all calls to a method, or only when it’s called with specific parameters. You can also get a count of how many times a method is called—either the total of all calls, or a count of different calls with different parameters.
Let’s start with a simple set of tests for the IncrementCounter method. You want to test two things—that the counter is incremented, and that the incremented value is stored. Here’s the code for these two tests.
Listing 7.16. Testing the IncrementCounter method
using System.Threading.Tasks;
using Countr.Core.Models;
...
[Test]
public async Task IncrementCounter_IncrementsTheCounter()          1
{
   // Arrange
   var counter = new Counter { Count = 0 };
   // Act
   await service.IncrementCounter(counter);
   // Assert
   Assert.AreEqual(1, counter.Count);                              2
}

[Test]
public async Task IncrementCounter_SavesTheIncrementedCounter()    1
{
   // Arrange
   var counter = new Counter { Count = 0 };
   // Act
   await service.IncrementCounter(counter);
   // Assert
   repo.Verify(r => r.Save(It.Is<Counter>(c => c.Count == 1)),     3
                      Times.Once());                               3
}
- 1 Instead of returning void, these tests are async Task methods, so they can await async methods on the service.
- 2 This asserts that the counter now has a Count of 1.
- 3 This verifies that the Save method was called with a counter with a Count of 1.
These two tests cover the basics of the IncrementCounter method. The IncrementCounter_IncrementsTheCounter test ensures that the counter has an incremented Count after the method has finished—a nice, simple sanity check. The interesting test is the IncrementCounter_SavesTheIncrementedCounter test. This uses a method on the mock repository called Verify that verifies that a method has been called. Let’s look at the two arguments passed to Verify.
The first argument, r → r.Save(It.Is<Counter>(c → c.Count == 1)) is used to define which method is being verified. It’s a lambda expression where the parameter is the interface for the mock (in this case, the ICountersRepository interface), and you call the method that you want to verify. You then specify what the parameters you’re verifying are. They can be fixed values, or you can use the static It class from Moq, which allows you to specify certain conditions about the parameter. You can use It.IsAny<T> to specify any value of type T, or use It.Is<T>(Func<T, bool>) to check for specific properties of the instance of T. In this case we’re using It.Is<Counter>(c → c.Count == 1) to say that we want to verify that this method was called using an instance of Counter that has a Count property set to 1. This is a very important part of this test—you need to ensure that the incremented value is saved, and that’s what the check for a count of 1 is doing. If the service code saved the counter before incrementing it, this test would fail because the counter passed to Save would have a value of 0.
The second argument, Times.Once(), is the number of times this method was called with the given criteria. You don’t have to specify this argument, and if you don’t, it verifies that the method was called at least once (with no upper limit on how many times it was called). Here we’re saying it should be called only once. After all, there’s no point in calling this method more than once. There are a number of alternatives, such as Times.Never, to ensure that the method is never called, or variants that allow you to set the minimum, maximum, or exact number of times the method must be called.
Table 7.5 shows a breakdown of these two tests. They both have the same arrange and act—creating a counter with a count of 0 and incrementing it—but the assertions are different. One test asserts that the count of the counter has incremented, and the other test asserts that the new value has been saved.
Table 7.5. The arrange, act, and assert for the CountersService tests
|
Arrange |
Act |
Assert |
|---|---|---|
| Create a counter with a count of 0 | _service.IncrementCounter(counter) | Assert the counter’s count is now 1 |
| Create a counter with a count of 0 | _service.IncrementCounter(counter) | Assert a counter with a count of 1 is saved to the repository |
This is powerful testing functionality—you can’t unit-test the repository, but you can ensure that your services make the correct calls to it.
The other thing you can do is control the return value from the different methods on the interface using the Setup method. The following listing shows a test to verify the GetAllCounters method on the service.
Listing 7.17. Testing the GetAllCounters method
using System.Collections.Generic;
...
[Test]
public async Task GetAllCounters_ReturnsAllCountersFromTheRepository()
{
   // Arrange
   var counters = new List<Counter>
   {
      new Counter {Name = "Counter1" },
      new Counter {Name = "Counter2" }
   };
   repo.Setup(r => r.GetAll()).ReturnsAsync(counters);      1
   // Act
   var results = await service.GetAllCounters();
   // Assert
   CollectionAssert.AreEqual(results, counters);            2
}
- 1 Sets up the GetAll method to return a defined list of counters
- 2 Asserts that the collections contain the same items
The Setup method allows you to set up the behavior of a method on the interface. You specify the criteria for the method in the same way as the Verify method, and then you can specify callbacks or the value that the method returns. Returns specifies the return value of a normal method, and ReturnsAsync, which we’re using here, specifies the return value of an async method. CollectionAssert is an NUnit helper class that can assert on collections, and we’re using it here to assert that the results of the call to GetAllCounters returns a collection that matches the collection returned from the repository. Table 7.6 shows a breakdown of this test.
Table 7.6. The arrange, act, and assert the Return all counters tests
|
Arrange |
Act |
Assert |
|---|---|---|
| Set up a list of counters to be returned from GetAll on the repository | _service.GetAllCounters() | Assert that the counters returned from the service are the same as the counters set up as the return value for the GetAll method on the repository |
Moq can also be used to set up properties
Setup is used to set up methods. For properties there’s a pair of similar methods: SetupGet and SetupSet to set up the getter and setter for a property.
There’s plenty more on the service that needs to be tested, and as an exercise you can think up some more tests that would cover all the methods of the service. Run these tests now, though, and enjoy watching them pass.
Once again, we’ve written one set of unit tests that allow us to test code that will run on both iOS and Android. This is something we couldn’t do if we’d just wired up events on the UI to code, or if we wrote our apps using Java and Objective-C/Swift.
7.3.4. Accessing web services
So far we’ve looked at a simple model layer for our SquareRt app, and a more complex model layer for Countr that uses a SQLite database to save data. Calculations and data persistence are popular things to have in the model layer, but there’s one other thing a lot of model layers do that we should look at—making web service calls. Many apps have some kind of service running over the internet to provide data—email apps download and send emails via an email server, and social media apps like Facebook and Twitter download and send posts or tweets over the internet.
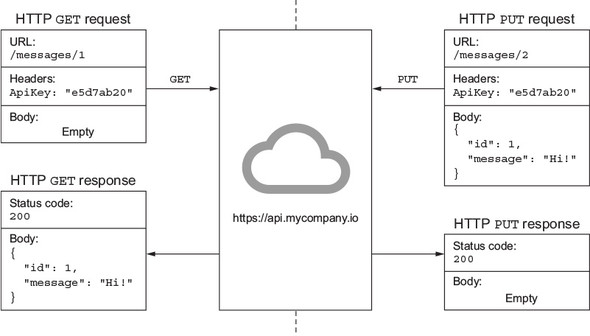
By far the most popular way to do this is using REST services over HTTP. These are stateless services whereby different URLs represent resources that you can interact with using CRUD operations. You send HTTP verbs that describe the action you want to do: send a GET request to a URL to request data, POST to create data, PUT to update data, or DELETE to delete data. The URL you use describes details about the resource you want to interact with; you can include a body with your request, such as the data to PUT; you can use HTTP headers to specify details about the request, such as authorization details; and you can add query parameters to the URL. Query parameters are a way of passing information to a GET request using just a URL instead of sending a body of data. You can send information to the HTTP request using JSON (a lightweight way to represent data) or XML, and get results back as JSON or XML. JSON is becoming the most popular as it’s simple and lightweight. This is shown in figure 7.22.
Figure 7.22. REST APIs allow you to send requests to URLs using HTTP verbs, and to get data back.
REST APIs are a huge topic in themselves, and they’re outside the scope of this book, but we’ll look at how to call a simple REST API and interpret the data from the model layer. For a more detailed look at REST APIs, I recommend Irresistible APIs by Kirsten L. Hunter (Manning, 2016).
Using Microsoft Bing’s search API to calculate a square root
When you’re building a commercial app, you may well have a set of REST services provided by your company or client that your app will need to interact with. There are also many third-party APIs that your app can use to incorporate a wide variety of functionality: performing calculations, manipulating images, getting data such as government records, and using artificial intelligence services. One such service is Microsoft Bing—the search engine from Microsoft. Not only can it search the web much like other popular search engines, such as Google, but it can also be used for calculations. You can try this out by going to Bing.com and searching for “square root 4”.
Microsoft has made a REST service for Bing available to developers to use inside their apps, allowing a large number of searches per month for only a few dollars (and a lot more searches per month if you’re willing to pay more). We can use this API in our SquareRt app to calculate square roots instead of using System.Math.Sqrt.
Microsoft has a large number of APIs available to developers as part of its Azure cloud, from simple searches to a whole host of artificial intelligence tools. You can see all of these services from Microsoft’s Cognitive Services website at http://mng.bz/B97v. You’ll need an Azure account to use these services, so if you don’t have one, click Free Account, then Start Free, and follow the instructions to sign up. You’ll need a credit card to sign up, but this is only used for verification, and at the time of writing you get $200 worth of credit just for signing up. You can also sign up using Visual Studio Developer Essentials at www.visualstudio.com/dev-essentials/?WT.mc_id=xamarininaction-book-jabenn to get $25 a month in credit for a year.
Once you’re signed in, head to the Azure portal at portal.azure.com. Click New on the left side (if the menu on the left is minimized, the New option is a green plus sign), select AI + Cognitive Services in the Azure Marketplace list that appears, and then click Bing Search APIs.
Each thing on Azure that you sign up for (such as access to a cognitive service API, a virtual machine, or a database) is referred to as a resource. All resources are part of resource groups—logical groupings of resources that you can manage together. For example, when you’re finished using a set of resources, you can delete the resource group to remove all resources in one go. You’ll need to configure the Bing Search APIs resource and make it part of a resource group.
Start by entering a name for this resource, such as SquareRt, select your Azure subscription, set the pricing tier to S1 (this works out to $3 a month at the time of writing). You’ll then need to create a new resource group to put this resource into, so ensure Create New is selected under Resource Group, and enter a name such as SquareRt (figure 7.23).
Figure 7.23. Configuring the new Bing search API resource

Each resource group is run from a data center somewhere in the world, and you can configure which data center to use from the Resource Group Location drop-down. Choose the one closest to your physical location, read the terms and conditions at the bottom, and tick the box to confirm you’ve read them. Finally, click the Create button to create the resource.
Once the resource is created, you’ll see an overview page with details about the new SquareRt resource. From here, select Resource Management > Keys on the left to see some API keys that you can use to access these services from your own apps (figure 7.24).
Figure 7.24. The Microsoft cognitive service APIs use API keys to control access.

Now that you have your API keys, you can use them to calculate square roots using the Bing web service. When you make a call using this service, you get results back as a JSON object. Because Bing search is a general-purpose API, you don’t just get back a single number; instead you get back an object that contains the details of the response, serialized as JSON. I’ve used the term JSON a lot, so who is this Jason fellow?
JSON
JSON stands for JavaScript Object Notation, and it’s a simple, lightweight way of serializing data to a string. You can read more about it at www.json.org, but essentially it’s a way of storing data in a string as a set of key-value pairs, and the value can be either a single value such as a string or number, or it can be another set of key-value pairs to represent another object. You can even represent lists of objects. Each string containing an object or an array of similarly typed objects is referred to as a JSON document (you may have heard of document databases such as MongoDB—these store JSON documents as indexable and searchable objects).
The following listing shows a JSON representation of an object that would come back from a call to the Bing search API, with figure 7.25 showing a summary of the objects that it represents.
Listing 7.18. A JSON document representing the results of a Bing calculation search
{
  "_type": "SearchResponse",
  "computation": {
    "id": "https://api.cognitive.microsoft.com/api/v5/#Computation",
    "expression": "sqrt(40)",
    "value": "6.32455532"
  },
  "rankingResponse": {
    "mainline": {
      "items": [
        {
          "answerType": "Computation",
          "value": {
            "id": "https://api.cognitive.microsoft.com/api/v5/#Computation"
          }
        }
      ]
    }
  }
}
Figure 7.25. Overview of the JSON document returned from the Bing search service

The curly braces ({ and }) represent an object, with the properties of the object defined as a set of key-value pairs. The property name is the key, and it’s defined as a string. The value is defined after the colon (:) as either a string representation of a value, such as a string or a number, as an object wrapped in braces, or as an array stored inside square brackets ([ and ]). The document in listing 7.18 consists of an outer object (in JSON, objects don’t have named types) with three properties:
- _type—A string
- computation—An object with three properties (id, expression, and value)
- rankingResponse—An object that has a property called mainline, which is an object with a property called items, which is an array of objects, each having an answerType and value property, value being another object
JSON seems pretty complex, and parsing a string representation like this is a lot of work. Luckily, once again someone else has done the hard work for us, and you can install a NuGet package to take the complexities away. Newtonsoft.Json, also known as Json.NET, is not only the most installed NuGet package ever (at the time of writing, it has been installed over 42 million times), but it provides a simple way to convert from JSON to C# classes and vice versa. Json.NET can also do value conversions, so if your C# class has a field of type double, it will look at the string value in the JSON and convert it to a decimal number—such as converting "6.32455532" in the preceding JSON document to a double value of 6.32455532. If you want to have any interaction with JSON data, I strongly advise you to use Json.NET to make your life much easier.
We’ll use it here, so install the Newtonsoft.Json NuGet package. The code in this book was written against version 10.0.3, but later versions should work (figure 7.26).
Figure 7.26. Adding the Newtonsoft.Json NuGet package

You saw an example JSON response from the Bing search API in listing 7.18, so let’s think about a class that could encapsulate this data. All we really need is the computation’s value, so what do we need to do to get this?
We need to define a class hierarchy that matches the JSON document, just focusing on what we need—in this case, a class that has a property called computation of a type that has a property called value. One good thing Json.NET does is only deserialize the values you have in your classes, ignoring all the others. This is good for us because we only need the value property from the computation object. It would be a pain to have to implement all the classes and properties in this JSON document just for one field. This also prevents our app from breaking if new fields are added to the JSON, such as if you add extra data that’s only used by a later version of your app.
We can define this in code by adding two new classes to the SquareRt project called Computation and SquareRootResponse. The following listing shows these classes.
Listing 7.19. Classes that represent the JSON response from the Bing search API
public class Computation                                   1
{
   public double Value { get; set; }                       2
}

public class SquareRootResponse                            3
{
   public Computation Computation { get; set; }            4
}
- 1 The Computation class wraps the object represented by the “computation” key in the JSON document.
- 2 The Value field will map to the “value” property.
- 3 The SquareRootResponse class encapsulates the outer object in the JSON response.
- 4 The “computation” property of the JSON object is mapped to a property called “Computation”
Using Json.NET, you can deserialize a string containing a JSON document to a class that you can specify. It will take the properties in the JSON document and map them to properties in the class based on the properties’ names. It’s also smart enough to ignore case (JSON uses lowercase for the first letter of each property, whereas C# by convention uses uppercase). If you were to deserialize the JSON document in listing 7.18 to a SquareRootResponse, it would map the computation property in the JSON document to the Computation property on the class, and map the properties of the object assigned to the computation object to the properties on the Computation class. Figure 7.27 shows this mapping.
Figure 7.27. The JSON properties are mapped to the properties of C# classes based on their names.

It’s fairly simple to map other JSON documents to classes—all you need to do is build a hierarchy of classes with properties that map to the JSON document. These properties don’t need to be strings—they can be classes in their own right, as demonstrated by SquareRootResponse, or they can be data types such as numbers, like the Value property of Computation. In the JSON, this is a string, but we’re mapping it to a double and Json.NET takes care of the conversion.
Now we have a class that encapsulates what we need from the response. Let’s wire this up to an HTTP call.
Making web service calls
When making a call to a web service, you need to use the device-specific network stack—both iOS and Android have classes that can interact with web services that are specific to the individual OS. The good news for us C# developers is that this is such a normal thing to do that Xamarin and Microsoft have made sure the part of the .NET Framework that allows easy interaction with HTTP endpoints is available in .NET Standard libraries. This means you can hit web services from your core projects.
To make a call to a web service from a .NET Standard library, you can use HttpClient—a class that under the hood uses the native network stack to make calls to web services. This class has methods to make all the possible HTTP calls—GET, POST, PUT, and DELETE.
To calculate a square root, you need to make a GET call to the Bing service. Bing, by default, is a search engine, so you can create a URL that searches for the square root of a particular number, and you can then specify that instead of a simple web search, you’re interested in a performing a calculation. There are a whole host of options for this API, and you can read more on it in Microsoft’s Web Search API Reference at http://mng.bz/4KQ3.
HttpClient, like a lot of modern .NET Framework classes, uses async and await, so the first thing to do is change our ISquareRtCalculator interface to support this. The following listing shows the changes to the interface.
Listing 7.20. Updating the square-root calculator interface to use async and await
using System.Threading.Tasks;

public interface ISquareRtCalculator
{
   Task<double> Calculate(double number);
}
You also need to update the implementation of this calculator to not only use async/await, but to make a call to the Bing search API to calculate the square root.
Listing 7.21. Making a web service call from the square-root calculator
using System.Net.Http;
using System.Threading.Tasks;
using Newtonsoft.Json;
...
public class SquareRtCalculator : ISquareRtCalculator
{
   readonly HttpClient httpClient = new HttpClient();                             1

   public SquareRtCalculator()
   {
      httpClient.DefaultRequestHeaders                                            2
         .Add("Ocp-Apim-Subscription-Key",
              "your API key");
   }

   public async Task<double> Calculate(double number)
   {
      var url = "https://api.cognitive.microsoft.com/bing/v5.0/search?" +         3
                $"q=sqrt({number})&responseFilter=Computation";
      var response = await httpClient.GetAsync(url).ConfigureAwait(false);        4
      var json = await response.Content.ReadAsStringAsync().ConfigureAwait(false);5
      var squareRt =
            JsonConvert.DeserializeObject<SquareRootResponse>(json);              6
      return squareRt.Computation.Value;                                          7
   }
}
- 1 Creates a new instance of HttpClient to interact with web services
- 2 Sets the API key on the headers—this would be one of the keys assigned to your Bing search API subscription
- 3 Specifies the URL of the endpoint to use for the search
- 4 Makes an HTTP GET call to get the response
- 5 Gets the content of the response as a string containing a JSON document
- 6 Converts the JSON document to your new classes
- 7 Returns the value of the calculation from the JSON
This is a complicated set of calls, so let’s break it down line by line.
- readonly HttpClient httpClient = new HttpClient(); This creates a new instance of the HTTP client class that you use to interact with web services. You don’t need to create a new one for every request—you can reuse the same one.
- _httpClient.DefaultRequestHeaders.Add("Ocp-Apim-Subscription-Key", "<your API key>");` This adds a header that includes the API key to all the HTTP requests. You should replace <your API key> with one of the API keys assigned to your account when you set up your Bing search subscription.
- var url = "https://api.cognitive.microsoft.com/bing/v5.0/search ?q=sqrt({number})&responseFilter=Computation";
This is the URL used to perform searches against the Bing API. It sends a request to https://api.cognitive.microsoft.com/bing/v5.0/search
using a couple of query parameters. The standard way to send query parameters is using the ? operator followed by queries in the form of key=value, separated using the & character. In this example, you’re sending a query with the first parameter set to "q=sqrt(<number>)" (where <number> is the number passed in to the Calculate method), which is the same as entering a search query of 'sqrt(<number>)', into Bing. The second parameter is "responseFilter= Computation", which tells Bing to run a computation instead of a search. This is broken down in figure 7.28.
Figure 7.28. HTTP requests can be suffixed with a ? followed by query parameters as multiple key=value pairs separated by an &.
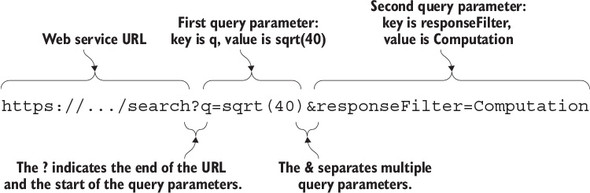
- var response = await httpClient.GetAsync(url).ConfigureAwait(false); This will make the call to the web service and get a response object. This response has a couple of interesting properties: StatusCode and Content. The status code is the HTTP status code, so 200 for success, 404 if a URL isn’t valid, or 418 if the endpoint is a teapot and you’ve sent a request to brew coffee (yes, really). Anything in the 200 range is success, and anything in the 400 range is an error. You can read more about the possible status codes on Wikipedia (http://mng.bz/dfmF). This call will throw an exception if it times out, or if the status code is in the 400 range. Here we’re not handling exceptions for the sake of brevity, but in production code you should handle all possible exceptions from this call. This is an async method, and the implementation of HttpClient will use background threads to do its work. When you call await httpClient.GetAsync(url), a new task is created and run to make the call to the web service on a background thread. ConfigureAwait(false) tells the compiler to keep using this background thread to run the rest of the method until the next await.
-
var json =
  await response.Content.ReadAsStringAsync().ConfigureAwait(false);
The response contains the JSON for the search result, so this call will read the content as a string that you can then deserialize to an object. Again, like GetAsync, this will create a task to download the response on a background thread, and the call to ConfigureAwait(false) will keep the rest of this method on that background thread. -
var squareRt =
  JsonConvert.DeserializeObject<SquareRootResponse>(json);
Once you have the string response, you can use the static JsonConvert class from Json.NET to deserialize the string into an instance of the SquareRootResponse class, and you can get the calculated value from there.
The end result of this code is that you’ve sent a request to the Bing search API to calculate a square root, and you’ve received a response that you can convert from JSON to a set of C# classes that you can use to get the result as a double. Let’s test this out.
Testing this call
Our unit tests are designed to test the methods on our classes, so as long as the interface doesn’t change, the unit tests should still pass. This is one of the great things about unit testing—you can refactor your implementations, and assuming you haven’t made any errors when refactoring, your unit tests should work. We can prove this here—you’ve changed the implementation of the Calculate method, so your tests should still work.
HttpClient is implemented in all platforms, including Mac and Windows, so there are no technical problems calling it from a unit test. In the real world you wouldn’t necessarily do this in a unit test—instead you’d wrap the web service calls in another class and mock it out (as we did for the database), but we’ll do it here as a simple way to call the method and prove that the code works.
You can’t just run your test and have it work, though, because you did change the interface slightly. You made the method async, so you need to tweak the test to be async as well. Make the test return async Task, and await the Calculate call, as shown in the following listing.
Listing 7.22. Making the Calculate_4_Returns2 test async
using System.Threading.Tasks;
...
[Test]
public async Task Calculate_4_Returns2()             1
{
   // Act
   var squareRoot = await calc.Calculate(4);         2
   // Assert
   Assert.AreEqual(2, squareRoot);
}
- 1 The test now returns async Task so that you can use await.
- 2 The Calculate call is async, so you need to await it.
You’ll also need to install the Newtonsoft.Json NuGet package into the unit-test project. Once this package is installed, you should be able to run this test and have it work, validating that the Bing API can correctly calculate square roots!
There’s a lot of boilerplate code that you can avoid
When dealing with web services, there’s a lot of boilerplate code you end up writing again and again and again. To avoid this, there’s a NuGet package that allows you to write a simple interface to your web service, decorating methods with attributes to say which REST calls these methods map to, and the package will build a class to implement the actual HTTP calls. This package is called Refit, and it can be found at https://github.com/paulcbetts/refit. I highly recommend trying this out, as it simplifies your code when dealing with REST APIs.
Now that you’ve tested your code, it’s worth deleting the Bing Search API resource from your Azure account to avoid paying any more than you have to. You can do this in one of two ways: by deleting the resource itself, or by deleting the whole resource group. To delete the resource, select it in the Azure portal and click the Delete button at the top, and then click Yes when asked to confirm. Deleting the entire resource group follows the same process—select it and click the Delete resource group button, but this time you’ll need to type in the resource group name to confirm the deleting, making it harder to accidentally delete a resource group.
7.4. A quick recap
We’ve implemented a couple of different model types in this chapter: a simple one and a more complex one. We’ve also looked at how you can interact with databases and web services, and we’ve used a few NuGet packages along the way. Table 7.7 sums up the NuGet packages we’ve used.
Table 7.7. The NuGet packages used in this chapter
|
NuGet package |
Description |
|---|---|
| NUnit | Unit-testing framework |
| SQLite-Net-Pcl | ORM for SQLite databases |
| PCLStorage | .NET Standard-based filesystem access |
| Moq | Mocking tools for unit testing |
| Newtonsoft.Json | Tools for serializing and deserializing C# classes to JSON |
We’ve also created a few interfaces and classes for our SquareRt and Countr apps. Table 7.8 lists them for the SquareRt app, and table 7.9 covers the ones for the Countr app.
Table 7.8. Classes and interfaces we’ve created for the SquareRt app
|
Name |
Description |
|---|---|
| ISquareRtCalculator | The interface for the calculation logic |
| SquareRtCalculator | The implementation for the square-root calculation logic (either using a direct calculation or the Bing search services) |
| SquareRtCalculatorTests | Unit tests for the square-root calculator |
| SquareRootResponse | Class to represent the JSON response document from the Bing search request |
| Computation | Class to represent the computation section of the JSON response document from the Bing search request |
Table 7.9. Classes and interfaces we’ve created for the Countr app
|
Name |
Description |
|---|---|
| Counter | A data-model class for a counter |
| ICountersRepository | The interface to a repository for storing and retrieving counters |
| CountersRepository | The interface of a repository for storing and retrieving counters from a SQLite database |
| ICountersService | The interface to a service that handles counters, including reading from and writing to the repository and incrementing values |
| CountersService | The implementation of the service that handles counters |
| CountersServiceTests | Unit tests for the counters service |
This is our model layer done. In the next chapter we’ll move up a layer to the view models.
Summary
In this chapter you learned
- Model layers can be simple or more complex, and they can include any business logic you need, such as calculations.
- Unit tests are a great way to test code without having to build an entire app.
- SQLite provides a simple, file-based database that you can access from a .NET Standard library.
- .NET Standard libraries don’t have file access, so you need a plugin to allow you cross-platform access to the filesystem.
- Complex model layers are better split into data models, repositories, and services.
- HttpClient provides a nice, cross-platform way to interact with web services.
- If your web service returns a status code of 418, it’s actually a teapot.
You also learned how to
- Create a unit-test project and run tests in that project
- Set up a SQLite database, create tables, and set up a class to store inside a table
- Mock interfaces to make it easier to unit-test dependencies between classes
- Use the Bing search API to calculate square roots