
Chapter 4. Introduction to Azure Storage
There are two things in the IT world that we can be certain of: when things go wrong, storage and networking are inevitably to blame. I say this as someone who’s worn the hat of a SAN admin in one of my past lives! I was best friends with the networking team. I’m mostly joking (about being best friends), but it doesn’t matter how well an application is designed and written: the foundational infrastructure pieces must be in place to support it. Bear with me in the next couple of chapters as we explore Azure Storage and Azure Networking. These services may be things that you’re tempted to brush over and get to the cool stuff in the later chapters, but there’s a lot of value in spending some time exploring and learning these core services. It won’t make your food taste any better, but it may help your customers as they order their yummy pizza for delivery!
In this chapter, we look at the different types of storage in Azure and when to use them. We also discuss redundancy and replication options for the Azure Storage service, and how to get the best performance for your applications.
4.1. What’s so special about storage?
Storage may not seem the obvious topic to examine to build and run applications, but it’s a broad service that covers a lot more than you may expect. In Azure, there’s much more available than just somewhere to store files or virtual disks for your VMs.
Let’s look at what your fictional pizza company needs to build an app that processes orders from customers for takeout or delivery. The app needs a data store that holds the available pizzas, list of toppings, and prices. As orders are received and processed, the app needs a way to send messages between the different application components. The frontend website then needs mouth-watering images to show customers what the pizzas look like. Azure Storage can cover all three of these needs:
Figure 4.1. An Azure Storage account allows you to create and use a wide variety of storage features, way beyond just somewhere to store files.
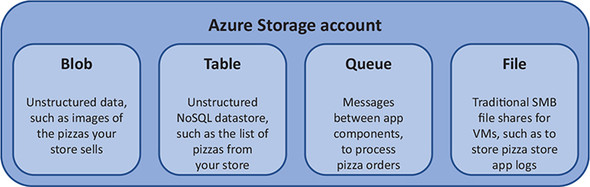
- Blob storage—For unstructured data such as media files and documents. Applications can store data in blob storage, such as images, and then render them. You could store images of your pizzas in blob storage.
- Table storage—For unstructured data in a NoSQL data store. As with any debate on SQL versus NoSQL data stores, plan your application and estimate the performance requirements when it comes to processing large amounts of data. You could store the list of pizzas on your menu in table storage. We explore NoSQL more in the next section.
- Queue storage—For cloud applications to communicate between various tiers and components in a reliable and consistent manner. You can create, read, and delete messages that pass between application components. You could use queue storage to pass messages between the web frontend when a customer makes an order and the backend to process and bake the pizzas.
- File storage—For a good old-fashioned Server Message Block (SMB) file share, accessible by both Windows and Linux/macOS platforms. Often used to centralize log collection from VMs.
Azure Storage for VMs is straightforward. You create and use Azure managed disks, a type of virtual hard disk (VHD) that abstracts away a lot of design considerations around performance and distributing the virtual disks across the platform. You create a VM, attach any managed data disks, and let the Azure platform figure out redundancy and availability.
The Azure Managed Disks service launched in early 2017 with the goal of making VM storage easier. Before managed disks, you had to create a uniquely named storage account, limit the number of virtual disks you create in each, and manually move around custom disk images to create VMs in different regions. The Managed Disks service removes the need for a storage account, limits you to “only” 10,000 disks per subscription, and lets you create VMs from a custom image across regions. You also gain the ability to create and use snapshots of disks, automatically encrypt data at rest, and use disks up to 4 TB in size.
Why is this important? If you run across old documentation or blog posts, they may have you create a storage account for your VMs. Stop right there! Yes, you can convert VMs from unmanaged disks to managed disks, but if you have a clean slate, look to begin each project with managed disks from the start. The use case for unmanaged disks is more to maintain backward compatibility with existing deployments, although I’d argue you should look to convert those workloads to managed disks!
4.1.1. Table storage
Let’s discuss a couple of different types of storage. First is table storage. Most people are probably familiar with a traditional SQL database such as Microsoft SQL Server, MySQL, or PostgreSQL. These are relational databases, made up of one or more tables that contain one or more rows of data. Relational databases are common for application development and can be designed, visualized, and queried in a structured manner—the S in SQL (for Structured Query Language).
NoSQL databases are a little different. They don’t follow the same structured approach, and data isn’t stored in tables where each row contains the same fields. There are different implementations of NoSQL databases: examples include MongoDB, Cassandra, SAP HANA, CouchDB, and Redis. The touted advantages of NoSQL databases are that they scale horizontally (meaning you can add more servers rather than adding more memory or CPU), can handle larger amounts of data, and are more efficient at processing those large data sets.
How the data is stored in a NoSQL database can be defined in a few categories:
- Key-value, such as Redis
- Column, such as Cassandra
- Document, such as MongoDB
Each approach has pros and cons from a performance, flexibility, or complexity viewpoint. An Azure storage table uses a key-value store and is a good introduction to NoSQL databases when you’re used to an SQL database such as Microsoft SQL or MySQL. Figure 4.2 shows an example of what data stored in a table looks like.
Figure 4.2. Unstructured data stored in a table: a key-value pair made up of the PartitionKey and RowKey. The data is shown in the cost and description fields.

You can download and install the Microsoft Azure Storage Explorer from www.storageexplorer.com if you like to visualize the data. You don’t need to do this right now. The Storage Explorer is a great tool to learn what tables and queues look like in action. In this chapter, I don’t want to take you too far down the rabbit hole of NoSQL databases—in chapter 10, we explore some cool NoSQL databases in depth with Azure Cosmos DB. In fact, in the following exercise, you use the Cosmos DB API to connect to Azure Storage and create a table. The use of Azure tables is more an introduction to NoSQL databases than a solid example of production use.
For now, let’s run a quick sample app to see how you can add and query data, just as you’d do with an actual application. These samples are basic but show how you can store the types of pizzas you sell and how much each pizza costs. Rather than use something large like Microsoft SQL Server or MySQL, let’s use a NoSQL database with Azure table storage.
To see Azure tables in action, complete the following steps.
1. Open the Azure portal in a web browser, and then open the Cloud Shell.
2. In chapter 3, you obtained a copy of the Azure samples from GitHub. If you didn’t, grab a copy as follows:
git clone https://github.com/fouldsy/azure-mol-samples.git
3. Change into the directory that contains the Azure Storage samples:
4. Install a couple of Python dependencies, if they aren’t already installed. Here you install the azurerm package, which handles communication that allows you to create and manage Azure resources, and two azure packages, which are the underlying Python SDKs for Azure CosmosDB and Storage:
pip2 install --user azurerm azure-cosmosdb-table azure-storage-queue
What does --user mean when you install the packages? If you use the Azure Cloud Shell, you can’t install packages in the core system. You don’t have permissions. Instead, the packages are installed in your user’s environment. These package installs persist across sessions and let you use all the neat Azure SDKs in these samples.
5. Run the sample Python application for tables. Follow the prompts to enjoy some pizza:
python2.7 storage_table_demo.py
Python is a widely used programming language that’s often used in “Intro to Computer Science” classes. If you mainly work in the IT operations or administration side of things, think of Python as a powerful scripting language that works across OSs. Python isn’t just for scripting—it can also be used to build complex applications. As an example, the Azure CLI that you’ve been using is written in Python.
I use Python for some of the samples in this book because they should work outside of the Azure Cloud Shell without modification. macOS and Linux distros include Python natively. Windows users can download and quickly install Python and run these scripts locally. Python is great for those with little-to-no programming experience, as well as more seasoned developers in other languages. The Azure documentation for Azure Storage and many other services provides support for a range of languages including .NET, Java, and Node.js. You’re not limited to using Python as you build your own applications that use tables.
Note that these samples use Python 2.7. There’s a more modern Python 3.x, but there can be inconsistencies across OSs with the various Azure SDKs. To minimize problems, I kept the samples basic and compatible with the older Python version; but again, you’re not limited to this when you build your own applications.
4.1.2. Queue storage
Azure tables are cool when you start to dip your toes into the world of cloud application development. As you begin to build and manage applications natively in the cloud, you typically break an application into smaller components that can each scale and process data on their own. To allow these different components to communicate and pass data back and forth, some form of message queue is typically used. Enter Azure Queues.
Queues allow you to create, read, and then delete messages that carry small chunks of data. These messages are created and retrieved by different application components as they pass data back and forth. Azure Queues won’t delete a message until an application component confirms it has finished acting on it when read.
To see Azure Queues in action, run the following Python script from the same azure-samples/4 directory. Follow the prompts to see messages written, read, and deleted from the queue:
python2.7 storage_queue_demo.py
Let’s continue the example application that handles pizza orders. You may have a frontend application component that customers interact with to order their pizza, and then a message queue that transmits messages to a backend application component for you to process those orders. As orders are received, messages on the queue can be visualized as shown in figure 4.3.
Figure 4.3. Messages are received from the frontend application component that details what pizza each customer ordered in the Message Text property.

As the backend application component processes each yummy pizza order, the messages are removed from the queue. Figure 4.4 shows what the queue looks like once you have a veggie pizza in the oven and that first message is removed.
Figure 4.4. As each message is processed, it’s removed from the queue. The first message shown in figure 4.3 was removed once it was processed by the backend application component.

4.1.3. Storage availability and redundancy
Azure datacenters are designed to be fault-tolerant with redundant internet connections, power generators, multiple network paths, storage arrays, and so on. You still need to do your part when you design and run applications. With Azure Storage, you choose what level of storage redundancy you need. This level varies for each application and how critical the data is. Let’s examine the available storage-redundancy options:
- Locally redundant storage (LRS)—Your data is replicated three times inside the single datacenter in which your storage account was created. This option provides for redundancy in the event of a single hardware failure, but if the entire datacenter goes down (rare, but possible), your data goes down with it.
- Zone-redundant storage (ZRS)—The next level up from LRS is to replicate your data three times across two or three datacenters in a region (where multiple datacenters exist in a region), or across regions. ZRS is also available across availability zones, which we explore more in chapter 7.
- Geo-redundant storage (GRS)—With GRS, your data is replicated three times in the primary region in which your storage is created and then replicated three times in a paired region. The paired region is usually hundreds or more miles away. For example, West US is paired with East US, North Europe is paired with West Europe, and Southeast Asia is paired with East Asia. GRS provides a great redundancy option for production applications.
- Read-access geo-redundant storage (RA-GRS)—This is the premium data-redundancy option. Your data is replicated across paired regions like GRS, but you can also then have read-access to the data in that secondary zone.
4.2. VM storage
Years ago, server storage was expensive, slow, and overly complicated. It wasn’t uncommon for a storage vendor to sell you hardware that cost hundreds of thousands of dollars and took days, or even weeks, for an army of their consultants and engineers to configure. As virtualization began to take root in the datacenter and VMware and Hyper-V became more accepted, storage often became the bottleneck. And that’s to say nothing of firmware mismatches between storage adapters in the server and on the storage array, redundant network paths failing back and forth, and SSDs being considered the only way to gain performance.
Has Azure magically fixed all these storage problems? Of course not! But it abstracts away 95% of these worries and leaves you to focus on how to build and create awesome experiences for your customers. Let’s spend some time on the final 5% that you need to be aware of.
4.2.1. Standard vs. premium storage
Remember that line earlier about how if you wanted the best performance, you had to buy SSDs? There’s no magic fix to get around that in Azure—sorry. The truth is that SSDs greatly outperform regular spinning disks. There are physical limits to how fast those spinning disks can, well, spin. The engineers at Microsoft haven’t been able to bend the laws of physics just yet! There are still use cases for regular spinning disks, and just as in regular storage arrays, the latest technologies can provide good performance from a pool of spinning disks.
The first, and main, choice you need to make for an Azure VM is what type of storage to use:
- Premium SSD disks—Use high-performance SSD disks for optimal performance, greater IOPS, and low-latency. Recommended storage type for most production workloads.
- Standard SSD disks—Use standard SSDs. Delivers consistent performance compared to HDDs. Great for development and testing workloads, or budget-conscious and low-demand production use.
- Standard HDD disks—Use regular spinning disks for more infrequent data access such as archives or backups.
The VM size you choose helps determine what type of storage you can select. Back in chapter 2, when you created a VM, you picked a size to quickly give you a VM. You happened to pick a D2S_v3 series VM, which gave you access to premium SSD disks. How can you tell which VMs can access premium SSD disks? Look for an s in the VM size, for SSD. For example:
- D2S_v3, Fs, GS, and Ls series VMs can access premium SSD disks.
- D, A, F, and M series VMs can only access standard SSD or HDD disks.
If you select a VM size that can use premium SSD disks, there’s no obligation to do so. You could create and use standard SSD or HDD disks. By choosing premium SSD disks, you future-proof the application and give yourself the option to use high-performance SSDs as you need them without the need to resize your VMs and incur a little downtime in the process. All VM sizes can use standard SSD disks.
How can you tell what VM sizes are available to you? In the Azure portal, open the Cloud Shell. Enter the following command (feel free to use your own region):
az vm list-sizes --location eastus --output table
Remember, any size with an s gives you access to premium SSD disks.
4.2.2. Temporary disks and data disks
Now that you’ve figured out what level of performance you need for your applications, let’s discuss another couple of puzzle pieces. Disks are connected two different ways:
- Temporary disks—Every VM automatically has local SSD storage attached from the underlying host that offers a small amount of high-performance storage. Take great care in how you use this temporary disk! As the name implies, this disk may not persist with the VM. If the VM moves to a new host in a maintenance event, a new temporary disk will be attached. Any data you stored there will be lost. The temporary disk is designed as a scratch space or application cache.
- Data disks—Any disks you specifically create and attach to the VM act as you’d expect in terms of partitions, filesystems, and persistent mount points. Data disks are reattached as the VM moves around the Azure datacenter, and they’re where the bulk of your applications and data should be stored. You can still use storage spaces or software RAID to pool data disks at the VM level for even greater performance.
4.2.3. Disk-caching options
It’s also important to consider the OS disk that comes with the VM. When you create a VM, you always get at least one disk. That’s the disk where the OS itself is installed, and it’s tempting to use that disk to install your applications or write log files to it. Unless you run a small proof-of-concept deployment, don’t run your applications on the OS disk! There’s a good chance you won’t get the performance you desire.
Disks in Azure can have a caching policy set on them. By default, the OS disk has read/write caching applied. This type of caching typically isn’t ideal for application workloads that write log files or databases, for example. Data disks, by contrast, have a default cache policy of none. This is a good policy for workloads that perform a lot of writes. You can also apply a read-only cache policy, which is better suited for application workloads that primarily read data off the disks.
In general, always attach and use data disks to install and run your applications. Even the default cache policy of none likely offers better performance than the read/write cache policy of the OS disk.
4.3. Adding disks to a VM
Let see how you can add disks to a VM as you create it. In chapter 2, you created a VM with the Azure portal. This time, let’s use the Azure CLI to create a VM. The Azure CLI provides a quick way to create a VM and attach a data disk at the same time.
To create a VM and see data disks in action, complete the following steps.
1. In the Azure Cloud Shell, create a resource group with az group create. Provide a name for the resource group, along with a location:
az group create --name azuremolchapter4 --location eastus
In the following examples and later chapters, the backslash () means the command continues on the next line. It’s a way to wrap long lines, and this approach is used in a lot of online samples where you can copy and paste the commands. You don’t have to type out the backslashes in this book’s examples if you don’t want to! Just continue typing the additional parameters as part of one big line.
If you’re using the Windows command prompt rather than a Bash shell, don’t include the backslashes. If you do, you really won’t get the outcome you desire!
2. Create a VM with the az vm create command. The final parameter, --data-disk-sizes-gb, lets you create a data disk along with the VM. In the end-of-chapter lab, you can connect to this VM and initialize the disks.
You create a Linux or Windows VM for this exercise. If you’re comfortable with Linux or want to learn how to initialize and prepare a disk for Linux, use the following command to create an Ubuntu LTS VM:
az vm create
--resource-group azuremolchapter4
--name storagevm
--image UbuntuLTS
--size Standard_B1ms
--admin-username azuremol
--generate-ssh-keys
--data-disk-sizes-gb 64If you’re more comfortable with Windows, use the following command to create a Windows Server 2016 VM. You can then RDP to the VM to configure the disks later:
az vm create
--resource-group azuremolchapter4
--name storagevm
--image Win2016Datacenter
--size Standard_B1ms
--admin-username azuremol
--admin-password P@ssw0rd!
--data-disk-sizes-gb 64It takes a few minutes to create the VM. The VM already has one data disk attached and ready for use.
What if you want to add another data disk after a few weeks or months? Let’s use the Azure CLI again to see how to quickly add a disk. The process is the same for a Linux or Windows VM. All you do is tell Azure to create a new disk and attach it to your VM.
Add an additional data disk to your VM as shown next.
Create a new disk with the az vm disk attach command. Provide a name and size for the disk. Remember the earlier discussion on standard and premium disks? In the following example, you create a premium SSD disk:
az vm disk attach
    --resource-group azuremolchapter4
    --vm-name storagevm
    --disk datadisk
    --size-gb 64
    --sku Premium_LRS
    --new
Do you recognize the last part of that storage type? LRS means locally redundant storage.
In two commands, you created a VM with the Azure CLI that included a data disk and then simulated how to attach an additional data disk later. Just because you attached these disks, doesn’t mean you can immediately write data to them. As with any disk, be it a physical disk attached to an on-premises server, or a virtual disk attached to a VM, you need to initialize the disk and create a partition and filesystem. That’s your exercise in the end-of-chapter lab.
4.4. Lab: Exploring Azure Storage
Here’s a chance to test your skills. Pick one of the following tasks to complete for your lab exercise.
4.4.1. Developer-focused
If you’re more of a developer and don’t want to figure out initializing data disks on a VM, go back to the Cloud Shell and explore the two Python demos that use tables and queues. Even if you’re new to Python, you should be able to follow along with what’s going on:
- Think of some scenarios where you could implement tables or queues in your own applications. What would it take to build cloud-native applications with individual application components that could use queues, for example?
- Modify one of the samples that interests you, to create an additional pizza menu item (if a table) or creates a new pizza order message (if a queue).
4.4.2. VM-focused
If you want to log in to a VM and see that the process to initialize a disk and create a filesystem is the same as any other VM you’ve worked with, try one of these exercises:
1. Log in to the VM you created in section 4.2. Depending on your choice, you’ll connect with SSH or RDP.
2. Initialize the disk, and create a partition:
- On Linux, the flow is fdisk, mkfs, and then mount.
- On Windows, use whatever sequence you’re comfortable with—probably Disk Management > Initialize > Create Volume > Format.