
Chapter 7. High availability and redundancy
I can’t count the number of times that something in IT has failed me. I’ve had a laptop hard drive crash the day before a conference, a smoking power supply in an email server, and failed network interfaces on a core router. And don’t even get me started on OS, driver, and firmware updates! I’m sure that anyone who works in IT would love to share horror stories of situations they’ve had to deal with—usually problems the happened late at night or at a critical time for the business. Is there ever such a thing as a good failure, and at a nice time?
If you anticipate failures in IT, you learn to plan and design your applications to accommodate problems. In this chapter, you’ll learn how to use Azure high availability and redundancy features to minimize disruptions caused by maintenance updates and outages. This chapter builds a foundation for the next two or three chapters as you start to move from an application that runs on a single VM or web app, to one that can scale and be globally distributed.
7.1. The need for redundancy
If you want customers to trust you for their important pizza business, they expect that the applications you provide will be accessible whenever they need them. Most customers won’t look for “hours of operation” on a website, especially if you work in a global environment and customers could be from all over the world. When they’re hungry, they want to eat! Figure 7.1 shows a basic example of an application that runs on a single VM. Unfortunately, this application creates a single point of failure. If that one VM is unavailable, the application is unavailable, which leads to customer unhappiness and hunger.
Figure 7.1. If your application runs on a single VM, any outage on that VM causes the application to be inaccessible. This could mean customers take their business elsewhere or, at the least, aren’t satisfied with the service you provide.

If you drive a car, there’s a good chance there’s a spare tire in case you have a puncture. If you a use a laptop or tablet, there’s a good chance you plug the device into a charger in case the battery runs out in the middle of work. At home or your apartment, do you have spare lightbulbs in case one of the lights goes out? What about a flashlight or candles in case there’s a power outage?
Most people like to have some form of redundancy or backup plan, both in day–to-day life and, especially, in IT. If you’re ready to switch over to a spare car tire or lightbulb, you can handle outages and failures with minimal interruption. If you design and build your applications for redundancy, you provide a high level of availability to your customers that minimizes or even hides any interruptions the application encounters.
All Azure datacenters are built for high availability. Backup power supplies, multiple network connections, and storage arrays with spare disks are just some of the core redundancy concepts that Azure provides and manages for you. All the redundancy Azure provides may not help if you run your application on a single VM. To give you flexibility and control over how to make your application highly available, two main features for IaaS workloads are available:
- Availability Set—Lets you logically group VMs to distribute them across a single Azure datacenter and minimize disruption from outages or maintenance updates.
- Availability Zone—Lets you distribute VMs across physically isolated segments of an Azure region to further maximize your application redundancy. Zones can also provide high availability to network resources such as public IP addresses and load balancers.
For most new application deployments in Azure, I suggest you plan to use availability zones. This approach offers flexibility in how to distribute your application and provides redundancy to the network resources that are often central to how customers ultimately access the underlying VMs. To see how each of these approaches works, let’s discuss them in more depth.
Azure often provides access to features and services as a preview. The technology that runs in these preview programs is designed to let customers try out new and upcoming features for performance and usability purposes.
Support is usually provided for preview features, although that doesn’t mean you should throw in all your production workloads. Feel free to use preview features for development and test workloads, or lower-priority production workloads, but know that you may occasionally run into unexpected results.
Preview programs are a great way to get a head start on what’s new in Azure. If you participate in a preview feature, try to take some time to provide feedback that can help improve the product’s readiness for general release.
Depending on when you’re reading this, the limitations of availability zones and the list of supported resources may have changed. You can view the latest information on supported services and regions at http://mng.bz/6k72. Even though a region may be in preview, availability zones offer many benefits that provide redundancy to your entire application, not just VMs. Availability sets won’t go away any time soon, but as you deploy workloads in Azure, I’d suggest you go with availability zones to future-proof yourself and protect a larger amount of your application environment.
7.2. VM redundancy with availability sets
If you only want to provide redundancy for VMs, availability sets have you covered. They’re proven, reliable, and available across all regions. Availability sets contain a logical group of VMs that indicate to the Azure platform the underlying hardware those VMs run on needs to be carefully selected. If you create two VMs that run on the same physical server, and that one server fails, both of those VMs go down. With potentially tens of thousands or more physical servers in an Azure datacenter, it’s highly unlikely you’d have both of those VMs on the same server, but it’s possible! It may be not a failure, but a maintenance update that causes the physical server to be briefly unavailable.
What if your VMs run in the same rack, attached to the same storage or networking equipment? You’re back to the single point of failure discussed at the start of the chapter.
Availability sets allow the Azure platform to create your VMs across logical groups called fault domains and update domains. These logical domains let the Azure platform understand the physical boundaries of hardware groups to make sure your VMs are evenly distributed across them. If one piece of hardware has a problem, only a few VMs in your availability set are affected. Or if there are maintenance updates to be applied to the physical hardware, the maintenance affects only a few of your VMs. The relationship of physical hardware to logical fault domains and update domains inside an availability set is shown in figure 7.2.
Figure 7.2. Hardware in an Azure datacenter is logically divided into update domains and fault domains. These logical domains allow the Azure platform to understand how to distribute your VMs across the underlying hardware to meet your redundancy requirements. This is a basic example—an update domain likely contains more than one physical server.

7.2.1. Fault domains
A fault domain is a logical group of hardware in an Azure datacenter. It contains hardware that shares common power or network equipment. You don’t control what these fault domains are, and there’s nothing for you to configure at the VM level. The Azure platform tracks what fault domains your VMs are placed in and distributes new VMs across these fault domains so that you always have VMs available if power or a network switch fails.
VMs that use managed disks (remember, all of your VMs should use managed disks!) also respect logical fault-domain boundaries and distribution. The Azure platform logically assigns storage clusters to fault domains to ensure that as your VMs are distributed across hardware groups, the managed disks are also distributed across storage hardware. There would be no point in VM redundancy across server hardware if there was a potential for all the managed disks to end up in the one storage cluster!
7.2.2. Update domains
Whereas fault domains create a logical group of hardware to protect against hardware failures, update domains protect against routine maintenance. To do this, a fault domain is further logically divided into update domains. Again, there’s nothing for you to configure here. Update domains are a way for the Azure platform to understand how it must distribute VMs across your availability set.
Azure engineers perform (mostly automated) maintenance and apply updates across all the physical hardware in one update domain, and then perform the same maintenance across all hardware in the next update domain. This maintenance work is staggered across update domains to make sure VMs in an availability set aren’t all running on hardware that undergoes maintenance at the same time.
There’s no relationship between domains across multiple availability sets. The physical resources that make up the fault and update domains in one availability set may not be the same for a second availability set. This awareness means if you create multiple availability sets and distribute your VMs across them, fault domain 1, for example, doesn’t always contain the same physical hardware.
7.2.3. Distributing VMs across an availability set
Let’s go step by step and see how VMs are distributed across the logical fault and update domains that make up an availability set. This way, you have multiple VMs that can run your pizza store, and customers won’t go hungry!
To see availability sets in action, complete the following steps to deploy a Resource Manager template as shown in figure 7.3.
1. Open a web browser to a Resource Manager template from the GitHub samples repo at http://mng.bz/o92f, and then select the Deploy to Azure button. You use a template in this exercise so that you can quickly deploy VMs and let you explore how those VMs are distributed across the availability set.
2. The Azure portal opens and prompts for a few parameters. Choose Create New Resource Group, and then provide a name such as azuremolchapter7. Select a region, and then provide your SSH Key Data (you can obtain in this Cloud Shell with cat ~/.ssh/id_rsa.pub).
The template creates an availability set that contains three VMs. These VMs are distributed across the logical fault and update domains. From the previous chapter on Resource Manager, the template uses the copyIndex() function to create multiple VMs and NICs.
3. To acknowledge that you wish to create the resources detailed in the template, check the box for “I agree to the terms and conditions stated above” and then select Purchase.
Figure 7.3. The template in GitHub for this exercise loads in the Azure portal and prompts for a few parameters. Provide a resource group name, location, and SSH key, and then deploy the template to create your resources.

It takes a few minutes to create all three VMs in the availability set. Let the deployment continue in the portal while you read the rest of this section.
When the template starts to deploy, an availability set is created, and the number of update and fault domains you requested are assigned. The following properties were defined in the sample template:
"properties": {
    "platformFaultDomainCount": "2",
    "platformUpdateDomainCount": "5",
    "managed": "true"
}
These properties create an availability set with two fault domains and five update domains, as shown in figure 7.4, and indicate that the VMs are to use managed disks, so honor the disk distribution accordingly. The region you select for the availability set determines the maximum number of fault and update domains. Regions support either 2 or 3 fault domains, and up to 20 update domains.
Figure 7.4. The availability set that your sample template deploys contains two fault domains and five update domains. The numbering system is zero-based. The update domains are created sequentially across the fault domains.

As you create more VMs in an availability set, you need to consider how many update domains to use. For example, five update domains mean that up to 20% of your VMs may be unavailable due to maintenance:
- Let’s say that you have 10 VMs in your availability set. This means two of those VMs may undergo maintenance at the same time. If you wanted to allow only one VM at a time to undergo maintenance, you’d need to create 10 update domains.
- The more update domains you create, the longer the period when your application is potentially in a maintenance state.
When the first VM is created, the Azure platform looks to see where the first available deployment position would be. This is fault domain 0 and update domain 0, as shown in figure 7.5.
Figure 7.5. The first VM is created in fault domain 0 and update domain 0.

When the second VM is created, the Azure platform looks to see where the next available deployment position would be. This is now fault domain 1 and update domain 1, as shown in figure 7.6.
Figure 7.6. With a second VM created, the VMs are now evenly distributed across fault and update domains. This is often considered the minimal amount of redundancy to protect your applications.

Your template creates three VMs, so what do you think happens next? The Azure platform looks again to see where the next available deployment position would be. You created only two fault domains, so the VM is created back in fault domain 0. But the VM is created in a different update domain than the first VM. The third VM is created in update domain 2, as shown in figure 7.7.
Figure 7.7. The third VM is created back in fault domain 0, but in update domain 2. Although VMs 0 and 2 potentially share the same hardware failure risk, they’re in different update domains and so will not undergo regular maintenance at the same time.

VMs 0 and 2 are in the same fault domain, so potentially a hardware failure could impact both VMs. But routine maintenance impacts only one of those VMs at a time, because they’re distributed across update domains. If you keep going and create more VMs, the Azure platform will continue to distribute them across different fault and update domains. When all five update domains are used, the sixth VM is created back in update domain 0, and the cycle continues.
7.2.4. View distribution of VMs across an availability set
Now that you understand the theory of how VMs are distributed across fault and update domains in an availability set, let’s check what happened to your Resource Manager template deployment.
To see how your VMs are distributed in an availability set, complete the following steps.
1. Browse to and select Resource Group from the navigation bar at left in the Azure portal. Choose the resource group you created for your template deployment, such as azuremolchapter7.
2. Select your availability set from the list of resources, such as azuremolavailabilityset.
3. In the Overview window is a list of VMs and their associated fault and update domains, as shown in figure 7.8.
Figure 7.8. The availability set lists the VMs it contains and shows the fault domain and update domain for each VM. This table lets you visualize how the VMs are distributed across the logical domains.

If you’re particularly observant, you may notice that the VMs don’t line up perfectly with the expected order of fault and update domains. Is there a bug?! Probably not. If you examine the example in figure 7.8 and compare it with what the previous concepts told you, you’d expect the VMs to be distributed as shown in table 7.1.
Table 7.1. How you’d expect the VMs to be logically distributed in an availability set. The VMs are sequentially created and distributed across domains in a neat pattern.
|
Name |
Fault domain |
Update domain |
|---|---|---|
| vm0 | 0 | 0 |
| vm1 | 1 | 1 |
| vm2 | 0 | 2 |
So, what went wrong? Nothing. Think back to how Resource Manager creates resources from a template. The Azure platform doesn’t wait for the first VM to be created before the second can be created. All three VMs are created at the same time. As such, there may be fractions of a second difference in which VM is associated with an availability set first. It doesn’t matter what this order is, because you don’t control what the underlying fault and update domains represent. That’s all up to the Azure platform. You just need to make sure that your VMs are distributed, not where.
If the serial creation behavior of VMs bugs you and you must distribute the VMs in a neat order, you can instruct Resource Manager to create VMs in serial, rather than parallel. In this mode, the VMs are created one after another, so the deployment time is increased. To enable this serial behavior, use "mode": "serial" in your templates as part of the copyIndex() function. That should distribute the VMs in a nice, sequential way for you!
7.3. Infrastructure redundancy with availability zones
Availability sets only work with VMs. That limitation makes it hard to design and build applications that continue to be available if part of a datacenter has a problem. It’s possible a major outage may cause issues across an entire Azure datacenter, so what happens to network resources like public IP addresses and load balancers? How can customers order their pizza if you don’t have redundancy with your network resources?
Availability zones are physically separate datacenters that operate on independent core utilities such as power and network connectivity. Each Azure region that supports availability zones provides three zones. You create your resources in and across these zones. Figure 7.9 shows how Azure resources can be distributed across availability zones.
Figure 7.9. An Azure region can contain multiple availability zones: physically isolated datacenters that use independent power, network, and cooling. Azure virtual network resources such as public IP addresses and load balancers can span all zones in a region to provide redundancy for more than just the VMs.

With availability zones, your applications can tolerate an entire Azure datacenter going offline. Sure, it would take a major event for this situation to occur, but it’s still possible!
In large application deployments, you may create more than one VM in each availability zone. Multiple VMs in an availability zone don’t quite follow the same methodical distribution across update and fault domains as they do in availability sets. Because availability zones provide redundancy across zones, the need for update and fault domains is diminished—you don’t need to worry about the individual datacenter distribution anymore. Even if a maintenance update or equipment failure inside a zone were to impact all your VMs that run in the zone, remember that zones are physically isolated from each other—the VMs in another zone would continue to run.
Now, if you feel particularly unlucky, could your VMs in different zones all experience maintenance updates at the same time? Yes, but that’s unlikely. Zones within a region have staggered update cycles, just like update domains within availability sets. Updates are performed across one zone; once they’re complete, updates are performed across the next zone. So again, although your VMs within a zone aren’t technically distributed across the same concept of update domains, they don’t need to be. Availability zones provide a higher level of abstraction and redundancy, and you should look at your application across the entire deployment, not just where VMs in one zone reside.
The inclusion of the virtual network resources in availability zones is a lot more important than it may seem at first. Figure 7.10 shows what would happen if the datacenter became unavailable for network resources such as a public IP address and load balancer that run across availability zones.
Figure 7.10. When network resources are attached to a single Azure datacenter, or zone, an outage in that facility causes the entire application to be unreachable by the customer. It doesn’t matter that the other VMs continue to run in other zones. Without the network connectivity to distribute traffic from your customers, the whole application is unavailable.

I talk more about load balancers in the next chapter, but for now, all you need to understand is that the load balancer distributes traffic across all available VMs that are attached to it. The VMs report their health status at set intervals, and the load balancer no longer distributes traffic to a VM that reports as being unavailable. With a load balancer that works across availability zones, an outage in one Azure datacenter causes those VMs to become unavailable and be taken out of the load-balancer rotation.
A public IP address that spans availability zones provides a single entry point for customers to reach your load balancer and then be distributed to an available VM. In an application deployment where that public IP address resides in a single Azure datacenter, if that datacenter encounters a problem, no customer can access the public IP address. The customer can’t use your application, even if there are VMs available to serve customer requests.
Some availability zone regions may be in preview as you read this, so only a select number of regions, resources, and even sizes of VMs may be available for use. These limitations are likely to change over time: check out http://mng.bz/6k72 for the latest information as to what regions and resources are supported.
This chapter focuses on VMs, public IP addresses, and load balancers, but you should expect the list of supported Azure resources to grow. For example, virtual machine scale sets (covered in chapter 9) can also be created in availability zones.
For most examples throughout this book, you can select any region you wish for your resources. For these exercises on availability zones, you need to create resources in one of the supported regions. Either use the default region specified in the exercise, or refer to the list of supported regions and make sure you use one of those.
7.3.1. Creating network resources across an availability zone
Public IP addresses and load balancers can be created in one of two available tiers: basic and standard. The primary difference is that the standard tier allows the network resource to use availability zones. By default, a standard public IP address or load balancer is automatically zone redundant. There’s no additional configuration for you to complete. The Azure platform centrally stores the metadata for the resource within the region you specify and makes sure the resource continues to run if one zone becomes unavailable.
Don’t worry too much about what happens with the load balancer and network resources right now. Remember what I said at the start—these next two or three chapters all build on each other. In the next chapter, we dive into load balancers, and all this should start to make more sense.
To create network resources that are redundant across availability zones, complete the following steps.
1. Select the Cloud Shell icon at the top of the Azure portal dashboard. Create a Resource group, such as azuremolchapter7az:
az group create --name azuremolchapter7az --location westeurope
2. Create a standard public IP address in your resource group. By default, a basic public IP address would be created and assigned to only a single zone. The --sku standard parameter instructs Azure to create a redundant, cross-zone resource:
az network public-ip create
--resource-group azuremolchapter7az
--name azpublicip
--sku standard
3. Create a load balancer that spans availability zones. Again, a basic load balancer would be created by default and assigned to a single zone, which isn’t the high-availability design you want for your applications. Specify a standard load SKU to create a zone-redundant load balancer, as follows:
az network lb create
--resource-group azuremolchapter7az
--name azloadbalancer
--public-ip-address azpublicip
--frontend-ip-name frontendpool
--backend-pool-name backendpool
--sku standard
7.3.2. Creating VMs in an availability zone
To create a VM in an availability zone, you specify which zone to run the VM in. To deploy many VMs, you ideally create and use a template. The template defines and distributes the zones for each of the VMs. As customer demand for your online pizza store grows, you can also update the template with the number of VMs you now want, and then redeploy the template. The new VMs are distributed across zones for you automatically, and there’s no need to manually track which zones the VMs run in. In the end-of-chapter lab, you use a template to automatically create and distribute multiple VMs. To see the logical process to specify a zone for a VM, let’s create a VM and manually specify the zone.
The create a VM in an availability zone, complete the following steps.
1. In the Azure portal, select the Cloud Shell icon at the top of the dashboard.
2. Create a VM with the az vm create command you’ve used in previous chapters. Use the --zone parameter to specify zone 1, 2, or 3 for the VM to run in. The following example creates a VM named zonedvm in zone 3:
az vm create
--resource-group azuremolchapter7az
--name zonedvm
--image ubuntults
--size Standard_B1ms
--admin-username azuremol
--generate-ssh-keys
--zone 3
It takes a few minutes to create the VM. Once finished, the output from the command indicates the zone that the VM runs in. You can also view this information with the az vm show command:
az vm show
  --resource-group azuremolchapter7az
  --name zonedvm
  --query zones
Note
The examples in these “Try it now” exercises are simple, but are designed to show you that zones require little configuration to use. You didn’t integrate the zone-redundant load balancer and VM, but in the next chapter, you build out a more usable application environment that’s distributed across availability zones. The goal here is to show you that the Azure platform handles the redundancy and distribution of your resources, so you can focus on the application itself.
7.4. Lab: Deploying highly available VMs from a template
This lab combines and reinforce what you learned in the previous chapter on Azure Resource Manager and templates, with availability zones. Take some time to look over the example quickstart template in this exercise to see how you can use logic and functions to distribute multiple VMs across zones. Don’t just deploy the template and move on—look at how the template builds on the features introduced in the previous chapter!
In Azure, default quotas on your subscription prevent you from accidentally deploying a bunch of resources and forgetting about them, which would cost you a lot of money. These quotas typically vary by resource type and subscription type and are enforced at the region level. You can see a full list of quotas at http://mng.bz/ddcx.
When you start to create multiple VMs in these next few chapters, you may run into quota issues. You can also encounter quota issues if you haven’t deleted resources from previous chapters and exercises. The quotas are a good system that keeps you aware of your resource usage. The error messages may not be clear, but if you see error text along the lines of
Operation results in exceeding quota limits of Core.
Maximum allowed: 4, Current in use: 4, Additional requested: 2.
then it’s a good indication that you need to request an increase in your quotas. There’s nothing complicated, and it’s not something unique to Azure. You can view your current quota for a given region as follows:
az vm list-usage --location eastus
If you have trouble with this lab, delete the first two resource groups created in this chapter, such as azuremolchapter7 and azuremolchapter7az. If you have a low default quota set, the four VMs across those resource groups may prevent you from successfully completing this exercise.
To request an increase in your quotas for a region, follow the steps outlined at http://mng.bz/Xq2f.
3. Let’s review and deploy a sample template that includes multiple VMs across availability zones. In a web browser, open the JSON file at http://mng.bz/8Oys and search for the following text:
Microsoft.Compute/virtualMachines
The VMs section looks similar to what you used in the previous chapter, but notice the property value for zones. This section combines a few different functions available in templates to pick either zone 1, 2, or 3 as the VM is created. This way, you don’t need to manually track what VM runs in which zone, and how you then deploy additional VMs.
4. In your web browser, search for each of the following to see the sections on the public IP address and load balancer:
Microsoft.Network/publicIPAddresses
Microsoft.Network/loadBalancersBoth resources use standard SKU, which provides zone redundancy by default. There’s zero additional configuration to make this work!
5. Let’s see this in action! In your web browser, open the quickstart template at http://mng.bz/O69a, and select the Deploy to Azure button.
6. Create or select a resource group, and then provide a username and password for the VMs. Enter a unique DNS name, such as azuremol.
7. Choose to create Linux or Windows VMs. Windows VMs take a little longer to create. Then, specify how many VMs to create, such as 3.
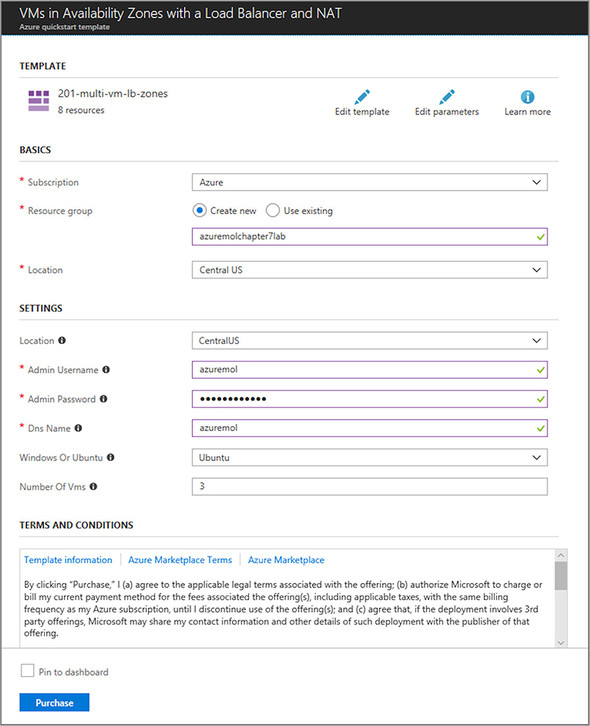
8. Check the box to agree to the terms and conditions for the template deployment, and then select Purchase, as shown in figure 7.11.
Figure 7.11. To deploy the availability zone template in the Azure portal, specify a resource group, username, and password, and then the OS type and the number of VMs you wish to create. The template uses loops, copyIndex(), dependsOn, variables, and parameters, as covered in the previous chapter on Resource Manager.
Once the VMs have been created, use the Azure portal or the az vm show command to see how the VMs were distributed across zones. If you’re curious about what the rest of the template does with the network resources, the next chapter dives deep into load balancers for you!
Remember when, at the start of the book, I said to make sure you clean up after yourself to minimize the cost against your free Azure credits? I strongly advise you to delete the resource groups you created in this chapter. The next couple of chapters continue to create multiple VMs and web app instances, so make sure you keep costs and quotas under control.
Each time you log in to the Azure portal, you should get a pop-up notification that lets you know the status of your Azure credits. If you see your available credit reduced by a large dollar amount from day to day, examine what resource groups you may have forgotten to delete!