
Chapter 9. Applications that scale
In the previous two chapters, we examined how to build highly available applications and use load balancers to distribute traffic to multiple VMs that run your app. But how do you efficiently run and manage multiple VMs, and run the right number of VM instances when your customers need them the most? When customer demand increases, you want to automatically increase the scale of your application to cope with that demand. And when demand decreases, such as in the middle of the night when most people without young children are asleep, you want the application to decrease in scale and save you some money.
In Azure, you can automatically scale in and out IaaS resources with virtual machine scale sets. These scale sets run identical VMs, typically distributed behind a load balancer or application gateway. You define autoscale rules that increase or decrease the number of VM instances as customer demand changes. The load balancer or app gateway automatically distributes traffic to the new VM instances, which lets you focus on how to build and run your apps better. Scale sets give you control of IaaS resources with some of the elastic benefits of PaaS. Web apps, which we haven’t covered a lot in the last couple of chapters, now make a solid reappearance with their own ability to scale with application demand.
In this chapter, we examine how to design and create applications that can scale automatically. We look at why this ability to scale with demand helps you run efficient applications, and explore different ways to scale based on different metrics.
9.1. Why build scalable, reliable applications?
What does it mean to build applications that scale? It lets you grow and keep up with customer demand as the workload increases, even when you’re at the movies on a weekend. It means you don’t get stuck with a bill for a bunch of extra resources you don’t use or, maybe worse, have your application go down due to a lack of available resources. The sweet spot for applications and the resources they need is rarely static. Usually, application demands ebb and flow throughout the day and night, or between weekdays and weekends.
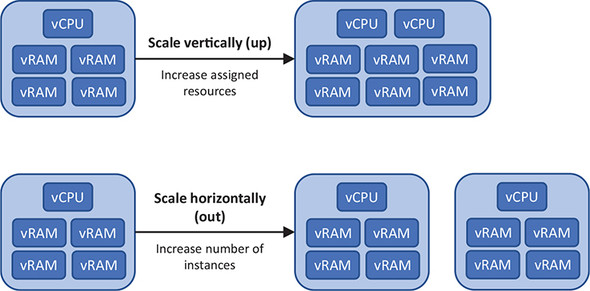
There are two main ways you can scale resources, as shown in figure 9.1: vertically and horizontally. Both virtual machine scale sets and web apps can scale vertically or horizontally.
Figure 9.1. You can scale your applications up and down, or in and out. The method you use depends on how your application is built to handle scale. Vertical scale adjusts the resources assigned to a VM or web app, such as the number of CPU cores or amount of memory. This method to scale an application works well if the application runs only one instance. Horizontal scale changes the number of instances that run your application and helps increase availability and resiliency.
Scalable applications have a strong relationship with highly available applications. In chapters 7 and 8 we spent a lot of time with availability sets and availability zones, and how to configure load balancers. Both chapters centered around the need to run multiple VMs. When your applications can scale automatically, the availability of that application is also increased as those VMs are distributed across availability sets or availability zones. All of this is a Good Thing. The power of Azure is that you don’t need to worry about how to add more application instances, spread those across datacenter hardware or even datacenters, and then update network resources to distribute traffic to the new application instances.
9.1.1. Scaling VMs vertically
The first way to scale resources is often the time-honored way that you may have done so in the past. If your application starts to perform slowly as more customers use it, what would you normally do? Increase the amount of CPU or memory, right? You scale up the resource in response to demand.
One of the most common uses of vertical scale is for database servers. Databases are notoriously hungry when it comes to compute resources—even hungrier than your pizza store customers! Database servers often consume all the resources provided to a VM, even if they don’t immediately use them. This can make it hard to monitor the actual demands on the system and know when you need to scale vertically and provide more resources. Figure 9.2 shows the typical vertical scale response to a database server that needs more resources.
Figure 9.2. As a database grows, it needs more resources to store and process the data in memory. To scale vertically in this scenario, you add more CPU and memory.

You may need to scale beyond the demand for CPU or memory. What if you run a website that serves a lot of images or video? There may not be a lot of processing requirements, but the bandwidth demands may be high. To increase the available bandwidth, you can increase the number of NICs on your VM. And if you need to store more images and video, you add more storage. You can add or remove resources such as virtual NICs and storage as the VM continues to run.
Resizing virtual machines
In Azure, you can increase the VM size (scale up) if you need more compute resources for your application. Back in chapter 2 you created a basic VM. Its size was Standard_D2s_v3. That name doesn’t tell you a lot about the compute resources assigned to a VM to determine whether you may need to increase the CPU or memory. If you want to scale vertically, you need to know what your options are.
1. Open the Azure portal in a web browser, and then open the Cloud Shell.
2. Enter the following Azure CLI command to list available VM sizes and the compute resources they provide:
az vm list-sizes --location eastus --output table
The output from az vm list-sizes varies from region to region and changes over time as Azure adjusts its VM families. Here’s a condensed example of the output, showing the MemoryInMb and NumberOfCores each VM size provides:
MaxDataDiskCount    MemoryInMb    Name                    NumberOfCores
------------------  ------------  ----------------------  ---------------
                 4          8192  Standard_D2s_v3                       2
                 8         16384  Standard_D4s_v3                       4
                16         32768  Standard_D8s_v3                       8
                32         65536  Standard_D16s_v3                     16
                 8          4096  Standard_F2s                          2
                16          8192  Standard_F4s                          4
                32         16384  Standard_F8s                          8
                 2          2048  Standard_B1ms                         1
                 2          1024  Standard_B1s                          1
                 4          8192  Standard_B2ms                         2
                 4          4096  Standard_B2s                          2
So, your Standard_D2s_v3 VM provides you with two CPU cores and 8 GB of memory. That’s more than enough for a basic VM that runs a web server. Let’s assume your online pizza store starts to get some orders, and you want to scale vertically: you can use az vm resize to pick another size. You specify the VM size that has the number of CPU cores and memory your application needs.
The additional CPU and memory don’t magically appear on your VM. This behavior may be a little different than what you experience with Hyper-V or VMware in an on-premises world. Within reason, you can add or remove core compute resources in an on-premises environment as the VM continues to run. In Azure, a VM reboot is currently required when you resize it to register the new compute resources and trigger the appropriate billing rules. When you want to scale vertically, plan for some downtime as the VM reboots.
Scaling down
What if you have a VM with more resources than it needs? This scenario is often more common than a VM that has fewer resources than needed. Application owners may choose a larger VM size than is required, to be sure their application runs smoothly. All those wasted resources cost money, and it’s easy for the costs to go unnoticed until the bill arrives at the end of the month.
The ability to scale resources works in both directions. We’ve focused on how to scale up resources, but all the same concepts work to scale down resources. It’s important to identify the VM sizes in use and how much of a demand the applications make on those resources. You can then use az vm resize to pick a VM size with fewer CPU cores and memory. Again, a VM restart is also currently needed for any resize operation.
9.1.2. Scaling web apps vertically
Web apps can scale up or down based on resource needs, in the same way as VMs. When you created a web app in chapter 3, the default S1 Standard size provided one CPU core and 1.75 GB RAM. Each web app tier and size provides a set amount of resources such as CPU cores, memory, and staging slots. Even if the default size or resource allocation changes, or you chose a different web app size, the concept remains the same.
If you create your web app and find the application requires more resources than the service plan provides, you can change to a different tier, as shown in figure 9.3. The same process works if you have more resources that you need. Your web app can scale up or down manually in this way as needed.
Figure 9.3. To manually scale a web app vertically, you change the pricing tier (size) of the underlying app service plan. The app service plan defines the amount of resources assigned to your web app. If your application requires a different amount of storage, number of CPUs, or deployment slots, you can change to a different tier to right-size the assigned resources to the application demand.

9.1.3. Scaling resources horizontally
A different approach to keep up with demand is to scale out, horizontally. To scale vertically, you increase the amount of CPU and memory assigned to a single resource, such as a VM. To scale horizontally, you increase the number of VMs, instead, as shown in figure 9.4.
Figure 9.4. To deal with an increase in demand to your application, you can increase the number of VMs that run the application. This distributes the load across multiple VMs, rather than ever-larger single-instance VMs.

To scale horizontally, your application does need to be aware of this ability and be able to process data without conflicts. A web application is a great candidate to scale horizontally, because the application can typically process data by itself.
As you build more complex applications, you may break an application into smaller individual components. If you think back to Azure storage queues from chapter 4, you may have one application component that receives the frontend web orders, and another application component that processes those orders and transmits them to the pizza store. The use of message queues is one approach to how you design and write applications that can operate in an environment that scales horizontally. This approach also lets you scale each application component separately and use different VM sizes or web app plans to maximize efficiency and reduce your monthly bill.
Historically, you’d scale vertically because it was easier to throw more compute resources at an application and hope it was happy. To set up a cluster of resources and scale an application horizontally was often complex in the physical world. With cloud computing and virtualization, the challenges of scaling horizontally are minimized to the point that you can often scale horizontally more quickly than vertically, and without downtime.
Remember the az vm resize command from the previous section? What happens as the VM resize operation completes? The VM is restarted. If that’s the only instance of your application, no one can access it until it comes back online. When you scale horizontally, there’s no downtime when you add VM instances—when the new VMs are ready, they start to process some of the application requests. The load-balancer health probes from chapter 8 automatically detect when a new VM in the backend pool is ready to process customer requests, and traffic starts to be distributed to it.
Azure is designed to give you flexibility and choice when it comes to how you scale. If you’re designing a new application environment, I suggest you implement a horizontal scale approach. VMs have a cool cousin in Azure that can help you out here: virtual machine scale sets.
9.2. Virtual machine scale sets
VMs are one of the most common workloads in Azure, for good reason. The learning curve to build and run a VM is shallow, because most of what you already know transfers straight into Azure. Web servers are one of the most common workloads for a VM, which again is convenient in that you don’t have to learn new skills to transfer your knowledge of how to run Apache, IIS, or NGINX in an Azure VM.
What about a cluster of VMs that runs a web server? How would you handle that in your regular on-premises environment? There are many possible cluster solutions, to start with. What about updates to your physical servers or VMs? How would you handle those? What if you wanted to automatically increase or decrease the number of instances in the cluster? Do you need to use another tool to handle that? An outline of a virtual machine scale set is shown in figure 9.5.
Figure 9.5. A virtual machine scale set logically groups together a set of VMs. Each VM is identical and can be centrally managed, updated, and scaled. You can define metrics that automatically increase or decrease the number of VMs in the scale set based on your application load.

A scale set simplifies how you run and manage multiple VMs to provide a highly available, load-balanced application. You tell Azure what size VM to use, a base image for the VM, and how many instances you want. You can then define CPU or memory metrics to automatically increase or decrease the number of instances in response to the application load, or on a schedule at peak customer hours. Scale sets combine the IaaS model of VMs with the power of PaaS features like scale, redundancy, automation, and centralized management of resources.
If you build applications on VMs, plan to start out with a scale set, even if you only need one VM. Why? A scale set can expand at any time, and it automatically creates the connections to a load balancer or application gateway. If demand for the application suddenly increases in two months, you can tell the scale set to create an additional VM instance or two.
With a regular, standalone VM, to expand, you need to add that VM to a load balancer; and if you didn’t begin with the VM in an availability set or availability zone, you have to plan for how to now make those VMs highly available. By creating a scale set to begin with, even for one VM, you future-proof your application with minimal additional work required.
9.2.1. Creating a virtual machine scale set
Although a scale set makes it simpler to build and run highly available applications, you need to create and configure a few new components. That said, you can reduce the process down to two commands to deploy a scale set with the Azure CLI.
To create a scale set with the Azure CLI, complete the following steps.
1. Open the Azure portal, and select the Cloud Shell icon at the top of the dashboard.
2. Create a resource group with az group create. Specify a resource group name, such as azuremolchapter9, and a location:.
az group create --name azuremolchapter9 --location westeurope
Scale sets can use availability zones, so make sure you select a region where support is available.
3. To create a scale set, specify the number of VM instances you want and how the VM instances should handle updates to their configuration. When you make a change to the VMs, such as to install an application or apply guest OS updates, the VMs can update automatically as soon as they detect the change. Or you can set the upgrade policy to manual and apply the updates at a suitable time of your choice. The rest of the parameters should be familiar from when you create a single VM:
az vmss create
--resource-group azuremolchapter9
--name scalesetmol
--image UbuntuLTS
--admin-username azuremol
--generate-ssh-keys
--instance-count 2
--vm-sku Standard_B1ms
--upgrade-policy-mode automatic
--lb-sku standard
--zones 1 2 3
That’s it! You created multiple VMs across an availability zone that can scale. Get ready for what’s really cool about the scale set you just created with the Azure CLI. Remember that entire previous chapter about load balancers, and all those CLI commands you had to use, and how you looked at templates to simplify how you create a load balancer? That az vmss create command created and configured a load balancer for you!
I mentioned this a couple of chapters ago, but it’s worth repeating in case you run into problems. In Azure, default quotas on your subscription prevent you from accidentally deploying resources and forgetting about them, which will cost you money! You can see the list of quotas at http://mng.bz/ddcx.
When you create multiple VMs, you may run into quota issues. You may also have issues if you don’t delete resources from previous chapters and exercises. If you see error text along the lines of
Operation results in exceeding quota limits of Core.
Maximum allowed: 4, Current in use: 4, Additional requested: 2.
it’s a good indication that you need to request an increase in your quotas. You can view your current quota for a given region as follows:
az vm list-usage --location westeurope
To request an increase in your quotas for a region, follow the steps outlined at http://mng.bz/Xq2f.
The Azure CLI helps you create a scale set with minimal prompts. A load balancer has been created and configured, a public IP address assigned, and the scale set VM instances added to the backend IP pool.
Check out the resources created with your scale set, as described next.
To see what resources were created with your scale set, run the following command:
az resource list
  --resource-group azuremolchapter9
  --output table
The output is similar to the following example. Look at the Type column for proof that a virtual network, public IP address, and load balancer were created:
Name     ResourceGroup     Type
------   ----------------  ----------------------------------
mol      azuremolchapter9  Microsoft.Compute/virtualMachineScaleSets
molLB    azuremolchapter9  Microsoft.Network/loadBalancers
molLBIP  azuremolchapter9  Microsoft.Network/publicIPAddresses
molVNET  azuremolchapter9  Microsoft.Network/virtualNetworks
What does all this magic mean? When you create a scale set with the Azure CLI, a zone-redundant load balancer and public IP address are created for you. The VMs are created and added to a backend IP pool on the load balancer. NAT rules are created that allow you to connect to the VM instances. The only thing missing are load-balancer rules, because they vary based on the applications you want to run. As you add or remove VMs to the scale set, the load-balancer configuration automatically updates to allow traffic to be distributed to the new instances. This magic isn’t limited to the Azure CLI—if you use Azure PowerShell or the Azure portal, these supporting network resources are created and wired up to work together.
Your scale was created with two instances. You can manually scale the number of VM instances in your scale set. When you do, the load balancer automatically updates the backend IP pool configuration. Set the --new-capacity of the scale set to four instances as follows:
az vmss scale
    --resource-group azuremolchapter9
    --name scalesetmol
    --new-capacity 4
9.2.2. Creating autoscale rules
When you created your scale set, a fixed number of instances were deployed. One of the biggest features of scale sets is the ability to automatically scale in or out the number of VM instances that the scale set runs.
As shown in figure 9.6, the number of instances in a scale set can automatically increase as the application load increases. Think about a typical business application in your environment. Early in the workday, users start to access the application, which causes the resource load on those VM instances to increase. To ensure optimum application performance, the scale set automatically adds more VM instances. The load balancer automatically starts to distribute traffic to the new instances. Later in the workday, as users go home, application demand goes down. The VM instances use less resources, so the scale set automatically removes some VM instances to reduce unnecessary resources and lower cost.
Figure 9.6. Scale sets can automatically scale in and out. You define rules to monitor certain metrics that trigger the rules to increase or decrease the number of VM instances that run. As your application demand changes, so does the number of VM instances. This maximizes the performance and availability of your application, while also minimizing unnecessary cost when the application load decreases.

You can base your scale-set rules on various metrics. You can look at host metrics for basic resource consumption, configure in-guest VM metrics collection for analysis of specific application performance counters, or use Azure Application Insights to monitor deep within the application code.
Schedules can also be used to define a certain number of VM instances in a scale set for a time window. Back to the example of a common business application where demand is higher in the work hours than evening, you may want to define a higher fixed number of instances to run during business hours. In the evening, you then define a lower fixed number of instances to run.
Autoscale rules based on metrics monitor performance over a defined time interval, such as 5 minutes, and may then take another few minutes to spin up the new VM instances and configure them for application use. If you use fixed schedules to autoscale the number of VM instances in your scale set, those additional resources are already in use, and the load balancer distributes traffic to them throughout the day.
The use of schedules requires a baseline for the typical application demand and doesn’t account for higher or lower demand at certain parts of the business account or sales cycle. You may end up with more resources than you need at times, so you pay more than needed. And you may have situations where the application load is higher than the number of VM instances in the scale set can provide.
To create autoscale rules for a scale set, complete the following steps.
1. Browse to and select Resource Group from the navigation bar at left in the Azure portal. Choose the resource group you created for your template deployment, such as azuremolchapter9.
2. Select your scale set from the list of resources, such as scalesetmol.
3. Under Settings at left in the Scale Set window, choose Scaling. Select the Enable Autoscale button.
4. Enter a name, such as autoscale, and then define a minimum, maximum, and default instance count. For this exercise, set the minimum to 2, maximum to 10, and default to 2.
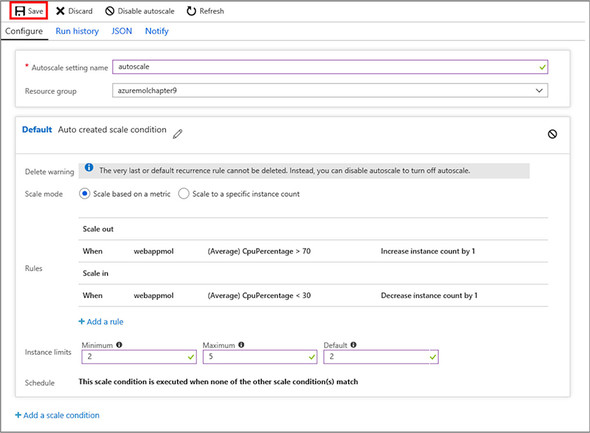
5. Choose Add a Rule, and then review the available rule settings, as shown in figure 9.7.
Figure 9.7. When you add an autoscale rule, you define the exact behavior required for the rule to trigger.
The default parameters look at the average CPU consumption. The rule triggers when the load is greater than 70% over a 10-minute interval. The scale set is increased by 1 VM instance, and the rules then wait for 5 minutes before they begin to monitor and can trigger the next rule.
This cool-down period gives the new VM instances time to deploy and begin to receive traffic from the load balancer, which should decrease the overall application load in the scale set. Without this cool-down period, the rules may trigger another VM instance to be added before the load has started to be distributed across the previous VM instance created. To create the rule, select Add.

6. Choose Add a Rule again. This time, configure the rule to Decrease Count By 1 when the average CPU load is less than 30% over a 5-minute duration. To create the rule, select Add.
7. Review your rules, as shown in figure 9.8, and then select Save.
Figure 9.8. You should now have one rule that increases the instance count by one when the average CPU load is greater than 70%, and another rule that decreases the instance count by one when the average CPU load is less than 30%.

You can also configure autoscale rules with the Azure CLI, Azure PowerShell, or in templates. The portal provides a nice visual way to review the rules and see available options for each parameter. As you build more complex rules, templates provide a way to create scale sets with the same set of rules in a reproducible fashion.
9.3. Scaling a web app
If you were super interested in web apps in chapter 3, or Azure tables and queues in chapter 4, these last three chapters that have been heavy on IaaS VMs may have left you scratching your head. Wasn’t the cloud meant to be easier than this? For PaaS components like web apps, absolutely!
I don’t want you to feel like the next few pages rush through how to provide the same high availability and autoscale capabilities to web apps. The truth is, it’s a lot easier to do! Like all things, the choice between IaaS and PaaS is a balance between flexibility and ease of management. Much of the underlying redundancy is abstracted in PaaS services like web apps, so you don’t need a whole chapter on high availability and another chapter on load balancers.
The IaaS path to build and run your own VMs or scale sets with load balancers and availability zones may come from a business need or restriction. Developers, operations engineers, or tools and workflows may not be ready to go all-in to web apps. That said, I strongly urge you to look at web apps for new application deployments. The use of PaaS components like web apps gives you more time to focus on the apps and your customers rather than infrastructure and administration.
To create a web app with the Azure CLI, complete the following steps.
1. In chapter 3, you created a web app in the Azure portal. As with most resources, it’s often quicker and easier to use the Azure CLI. Open the Cloud Shell in the Azure portal.
2. Create an app service plan that’s a Standard S1 size. This size allows you to autoscale up to 10 instances of your web app:
az appservice plan create
--name appservicemol
--resource-group azuremolchapter9
--sku s1
3. Create a web app that uses a local Git repo for deployment, as you did in chapter 3:
az webapp create
--name webappmol
--resource-group azuremolchapter9
--plan appservicemol
--deployment-local-gitAll the concepts and scenarios discussed in the previous section around autoscale rules and schedules for scale sets apply to web apps. As a quick recap, these are a couple of common scenarios for autoscaling web apps:
- Automatically increase or decrease the number of web app instances based on performance metrics, to support application demand throughout the workday.
- Schedule a web app to automatically increase the number of instances at the start of the workday and then decrease the number of instances at the end of the workday.
In the case of the pizza store, the web app may receive more traffic later in the day and through the evening, so there isn’t one set of autoscale rules that applies to every situation. Again, you need to baseline your application performance to understand how it runs under normal use and the performance metric at which the app needs to scale out or in. Even when you use autoscale schedules, you should continue to monitor and track when your peak application demands are, to create rules that support that usage pattern.
To create autoscale rules for a web app, complete the following steps.
1. Browse to and select Resource Group from the navigation bar at left in the Azure portal. Choose the resource group you created for your web app, such as azuremolchapter9.
2. Select your web app from the list of resources, such as webappmol.
3. Under Settings at left in the web app window, choose Scale Out (App Service Plan). Select the Enable Autoscale button.
4. Enter a name, such as autoscalewebapp, and then define a minimum, maximum, and default instance count. For this exercise, set the minimum to 2, maximum to 5, and default to 2.
5. Choose Add a Rule, and then review the available rule settings. This window looks the same as the autoscale rules for scale sets. The default parameters look at the average CPU consumption, and trigger when the load is greater than 70% over a 10-minute interval. The web app is increased by one instance, and the rules then wait for 5 minutes before they begin to monitor and can trigger the next rule. To create the rule, select Add.
6. Choose Add a Rule again. This time, configure the rule to Decrease Count by 1 when the average CPU load is less than 30% over a 5-minute duration. To create the rule, select Add.
7. Review your rules, as shown in figure 9.9, and then select Save.
Figure 9.9. You should now have one rule that increases the instance count by one when the average CPU load is greater than 70%, and another rule that decreases the instance count by one when the average CPU load is less than 30%.
When your autoscale rules trigger the web app to scale out or scale in, the Azure platform updates the traffic distribution to the available web app instances. There’s no load balancer, like you have with scale set. The concept is similar, just abstracted away from you because you’re meant to enjoy the PaaS approach and not worry so much!
Both scale sets and web apps provide a way to build rules that automatically scale the number of instances that run your applications. With multiple instances to run your application, you also increase the availability of your app. Scale sets are a good middle ground between developers and business decision makers who want or need to build applications on VMs, while using the PaaS-like features to autoscale and reconfigure the flow of customer traffic.
9.4. Lab: Installing applications on your scale set or web app
We covered a lot in this chapter, so now you can choose a quick final lab for either scale sets or web apps. Or, if you want to extend your lunch break, do both!
9.4.1. Virtual machine scale sets
You have multiple VM instances in your scale sets, but they don’t do a lot right now. For an overview of the different ways to install applications to VM instances in a scale set, see http://mng.bz/9Ocx. In practice, you’d use one of those automated deployment methods; but for now, manually install a web server on the VM instances as you did in chapter 8:
1. Remember load-balancer NAT rules? By default, each VM instance in a scale set has a NAT rule that allows you to SSH directly to it. The ports aren’t on the standard TCP port 22. You can view the list of VM instances in a scale set and their port numbers as follows:
az vmss list-instance-connection-info
--resource-group azuremolchapter9
--name scalesetmol
2. To connect to a specific port via SSH, use the -p parameter as follows (provide your own public IP address and port numbers):
ssh [email protected] -p 50003
3. Install a basic NGINX web server on each VM instance with apt install. Think back to how you did that in chapter 8.
4. To see the scale set in action, open the public IP address of the scale set load balancer in a web browser.
9.4.2. Web apps
To deploy your application to a web app that runs multiple instances, the process is the same as the single web app from chapter 3. You push the application to the local Git repository for the web app, and, thanks to the power of PaaS, the Azure platform deploys that single codebase to multiple web app instances:
1. Initialize a Git repo in azure-mol-samples/9, and then add and commit the sample files as you did in chapter 3:
cd azure-mol-samples/9
git init && git add . && git commit -m "Pizza"
2. Your web app has a local Git repository. Add a remote for your web app in the same way you did in chapter 3:
git remote add webappmolscale <your-git-clone-url>
3. Push this sample to your web app. This makes a single code commit, but your app is then distributed across the multiple web app instances:
git push webappmolscale master