
Chapter 11. Managing network traffic and routing
Domain Name Service (DNS) resolution is at the heart of almost every digital connection you make. It’s how you browse the web, receive email, watch Netflix, and make Skype calls. DNS is the mechanism that translates a name, such as manning.com, into an IP address. When I want to learn a new topic, I don’t need to remember 35.166.24.88—I just enter manning.com in a web browser and browse some books! Network devices route traffic based on IP addresses, so you need an approach that helps those of us with bad memories to do things like buy books or pizza online.
Over the last few chapters, we’ve spent a lot of time learning about how to build applications that can scale, are highly available, and are globally distributed. One of the last missing pieces is how to direct customers from around the world to the most appropriate application instance, typically the instance closest to them. Azure Traffic Manager makes it easy to automatically route customers to your application instances based on performance or geographic location. In this chapter, we discuss how you can create and manage DNS zones in Azure, and then how to use Traffic Manager to route customers with DNS queries, as shown in figure 11.1.
Figure 11.1. In this chapter, we examine how you can create DNS zones in Azure DNS. To minimize latency and improve response times, Traffic Manager can then be used to query DNS and direct customers to their closet application instance.

11.1. What is Azure DNS?
You don’t need a deep understanding of how DNS works to complete this chapter and use Azure DNS. Figure 11.2 shows a high-level overview of how a user queries a DNS service to obtain the IP address for a web application. A lot of substeps could happen around steps 1 and 2, so if you have a little time left in your lunch break at the end of this chapter, feel free to read up on how DNS queries and recursion work.
Figure 11.2. This simplified flow of DNS traffic shows how a user sends a DNS request for www.azuremol.com to a DNS server, receives a response that contains the associated IP address, and then can connect to the web application.

Azure DNS functions the same as any existing DNS solution you may use or be familiar with. Your zone and records are stored in Azure, and the name servers that respond to DNS queries are globally distributed across the Azure datacenters.
Azure DNS supports all the record types you’d expect in a regular DNS service offering. Both IPv4 and IPv6 records can be created. The record types are as follows:
- A—IPv4 host records, to point customers to your applications and services
- AAAA—IPv6 host records, for the cool kids who use IPv6 to point customers to your applications and services
- CNAME—Canonical name, or alias, records, such as to provide a short name that’s easier to use than the full hostname of a server
- MX—Mail exchange records to route email traffic to your mail servers or provider
- NS—Name server records, which include automatically generated records for the Azure name servers
- PTR—Pointer records, for reverse DNS queries to map IP addresses to hostnames
- SOA—Start-of-authority records, which include automatically generated records for the Azure name servers
- SRV—Service records, to provide network services discovery, such as for identity
- TXT—Text records, such as for Sender Protection Framework (SPF) or DomainKeys Identified Mail (DKIM)
In a typical DNS configuration, you configure multiple DNS servers. Even with geographic distribution of those servers for redundancy, customers may query a name server on the other side of the world. Those milliseconds to query, resolve, and then request a response for the web application can add up when you have lots of customers wanting to order pizza.
An Azure DNS zone is replicated globally across the Azure datacenters. Anycast networking ensures that when a customer makes a DNS query to your domain, the closest available name server responds to their request. How does anycast routing do this? Typically, a single IP address is advertised across multiple regions. Rather than a simple DNS query that resolves back to a single IP address that only exists in one location, anycast routing allows the network infrastructure to intelligently determine where a request is coming from, and route the customer to the closest advertised region. This routing allows your customers to connect to your web application more quickly and provides a better overall customer experience.
You don’t need to be an expert at networking to fully understand how this works—Azure handles it for you! When you combine Azure DNS with Azure Traffic Manager, which we look at in the next section, you not only return DNS queries from the closest name servers, but also connect customers to the closest application instance to them. Make those milliseconds count!
11.1.1. Delegating a real domain to Azure DNS
When you register a real domain, your provider gives you a management interface and tools to manage that domain. To allow customers to access your services and use the Azure DNS zone and records, you delegate authority of your domain to the Azure name servers. This delegation causes all DNS queries to immediately be directed to those Azure name servers, as shown in figure 11.3. Azure doesn’t currently allow you to purchase and register domains within the platform, so you need to purchase the domain name through an external registrar and then point the NS records to the Azure name servers.
Figure 11.3. To delegate your domain to Azure, configure your current domain provider with the Azure name server addresses. When a customer makes a DNS query for your domain, the requests are sent directly to the Azure name servers for your zone.

Why delegate your DNS to Azure? To simplify management and operations. If you create additional services, adjust the load-balancer configuration, or want to improve response times with globally replicated DNS, Azure provides that single management interface to complete those tasks. When your DNS zones are hosted in Azure, you can also implement some of the Resource Manager security features discussed in chapter 6: features such as role-based access control (RBAC) to limit and audit access to the DNS zones, and resource locks to prevent accidental, or even malicious, zone deletion.
Most domain registrars provide rather basic interfaces and controls to manage DNS zones and records. To reduce management overhead and improve security, Azure DNS allows you to use the Azure CLI, Azure PowerShell, or the REST APIs to add or edit records. Operations teams can use the same tools and workflows to onboard new services; and if problems occur, it’s often easier to troubleshoot when you can verify that DNS operates as you expect without introducing the variable of a third-party DNS provider.
So, if you’re convinced there’s logic to delegating your domain to Azure DNS, what Azure name servers do you point your domain to? If you create an Azure DNS zone, the name servers are listed in the portal, as shown in figure 11.4. You can also access these name server address with the Azure CLI or Azure PowerShell.
Figure 11.4. You can view the Azure name servers for your DNS zone in the Azure portal, Azure CLI, or Azure PowerShell.

There are no “Try it now” exercises for these last few pages, because unless you purchase and configure a real domain, you can’t test how to route real traffic. You can create an Azure DNS zone without a real domain, but no traffic can route to it. In real life, you update the NS records with your current provider to point any queries for your domain to the Azure name servers. It can take 24 to 48 hours (although usually much less time) for the delegation of your domain to propagate throughout the global DNS hierarchy, so plan accordingly—this may cause brief interruptions for customers who access your application.
11.2. Global routing and resolution with Traffic Manager
In previous chapters, you learned about highly available applications that are globally distributed. The end goal is multiple web app or VM instances, in different regions or continents, that connect to a Cosmos DB instance close to them. But how do you get your customers to connect to the closest VM or web app that runs your application?
Azure Traffic Manager is a network service that acts as a central destination for your customers. Let’s use the example of a web application at the address www.azuremol.com. Figure 11.5 provides an overview of how Traffic Manager routes users to the closest available application.
Figure 11.5. A customer sends a DNS query to a DNS service for www.azuremol.com. The DNS service forwards the query to Traffic Manager, which returns an endpoint based on the routing method in use. The endpoint is resolved to an IP address, which the customer uses to connect to the web application.

Traffic Manager doesn’t perform the role of a load balancer that you learned about in chapter 8. As figure 11.5 shows, Traffic Manager routes traffic to a public IP. Let’s examine the flow of traffic a little more closely:
1. The user makes a DNS query for www.azuremol.com. Their DNS server contacts the name servers for azuremol.com (which could be Azure name servers if you use Azure DNS!) and requests the record for www.
2. The www host resolves to a CNAME record that points to azuremol.trafficmanager.net.
3. DNS service forwards the DNS request the Azure name servers for trafficmanager.net.
4. Traffic Manager then examines the request and determines an endpoint to direct the user toward. Endpoint health and status are examined, as with Azure load balancers. The Traffic Manager routing method is also reviewed. The routing methods that Traffic Manager can use are as follows:
- Priority—Controls the order in which endpoints are accessed
- Weighted—Distributes traffic across endpoints based on an assigned weight metric
- Performance—Latency-based routing of users to an endpoint so that the user receives the quickest possible response time
- Geographic—Associates endpoints with a geographic region, and directs users to them based on their location
5. The endpoint eastus.cloudapp.net is returned to the DNS service by Traffic Manager.
6. The DNS service looks up the DNS record for eastus.cloudapp.net and returns the result of the query to the customer.
7. With the IP address of their requested endpoint, the customer contacts the web application directly. At this point, the traffic could hit the public IP address of an Azure load balancer rather than a VM directly.
As you can see, the role of Traffic Manager is to determine a given application endpoint to direct customers to. There are some health checks that monitor the status of endpoints, similar to the load-balancer health probes you learned about in chapter 8. And you can define a priority or weighted traffic-routing mechanism to distribute users across a set of available endpoints—again, similar to a load balancer. Traffic Manager typically directs traffic to an Azure load balancer or application gateway, or to a web app deployment.
11.2.1. Creating Traffic Manager profiles
Traffic Manager uses profiles to determine what routing method to use and what the associated endpoints are for a given request. To continue the theme of the previous chapters about a globally distributed application, you want your users to use the web application closest to them. If you look at the routing methods again, there are two ways to do this:
- Performance routing—The customer is routed to the endpoint with the lowest latency, relative to the source of the request. This routing method provides some intelligence and always allows Traffic Manager to forward the customer to an available endpoint.
- Geographic routing—The customer is always routed to a given endpoint, based on the source of their request. If the customer is in the United States, they’re always directed to East US, for example. This routing method requires you to define geographic regions to be associated with each endpoint.
When you use geographic routing, you get a little more control over the endpoints that customers use. There may be regulatory reasons that state customers in a given region must always use endpoints in the same region. The exercises use geographic endpoints to show a more real-world example, because there’s a trick to geographic routing—you should specify a child profile, not an endpoint directly.
The sky won’t fall if you use the geographic routing method with endpoints, but the recommended practice is to use another Traffic Manager profile to pass traffic to the final endpoint. Why? Regions can only be associated with one Traffic Manager profile. In the previous chapters on high availability, you always wanted to make sure you have redundancy. If you associate a region with a given endpoint and use geographic routing, you have no failover option should that endpoint encounter a problem, or if you perform maintenance.
Instead, nested child profiles allow you to set a priority that always directs traffic to a healthy endpoint. If the endpoint is unhealthy, traffic goes to an alternate endpoint. Figure 11.6 shows traffic failing over to a different region, although you could also create multiple web app instances in West US and use a weighted routing method on the child profile. As you start to scale out your application environment, take time to think about how best to provide high availability to endpoints behind Traffic Manager. For these examples, you create failover between regions to clearly see the differences in behavior.
Figure 11.6. A parent Traffic Manager profile with the geographic routing method should use child profiles that contain multiple endpoints. Those child endpoints can then use priority routing to always direct traffic to the preferred endpoint. For example, the East US child profile always sends traffic to the endpoint in East US, provided the endpoint is healthy. If the endpoint is unhealthy, traffic is then directed to West Europe. Without this child profile, customers in East US couldn’t fail over to an alternate endpoint and would be unable to access your web application.

To create the Traffic Manager profiles for your distributed application, complete the following steps.
The rest of the exercises use East US and West Europe. If you don’t live in one of those regions, pick a different region that’s more appropriate. Just remember to be consistent throughout the exercises! The end-of-chapter lab shows how this all comes together and works, but you won’t be correctly directed to your web apps if you live outside of North America or Europe and don’t change the regions accordingly.
1. Open the Azure portal, and select the Cloud Shell icon across the top of the dashboard.
2. Create a resource group, specifying a resource group name, such as azuremolchapter11, and a location, such as eastus:
az group create --name azuremolchapter11 --location eastus
3. Create the parent Traffic Manager profile. You want to use the geographic routing method and then specify a name, such as azuremol. The parameter for the DNS name tells you it must be unique, so provide a unique name. The following domain creates the hostname azuremol.trafficmanager.net, which you use to configure the web apps in the lab at the end of the chapter:
az network traffic-manager profile create
--resource-group azuremolchapter11
--name azuremol
--routing-method geographic
--unique-dns-name azuremol
4. Create one of the child Traffic Manager profiles. This time, use the priority routing method and the name eastus, and specify another unique DNS name, such as azuremoleastus:
az network traffic-manager profile create
--resource-group azuremolchapter11
--name eastus
--routing-method priority
--unique-dns-name azuremoleastus
5. Create one more child Traffic Manager profile with the name westeurope, and another unique DNS name, such as azuremolwesteurope:
az network traffic-manager profile create
--resource-group azuremolchapter11
--name westeurope
--routing-method priority
--unique-dns-name azuremolwesteurope
6. You’ve created a web app a couple of times now, so let’s use the CLI to quickly create two app service plans and then a web app in each plan. One of these web apps is in East US, the other in West Europe. In the end-of-chapter lab, you upload sample web pages to these web apps, so for now just create the empty website and get them ready to use a local Git repository.
Create the web app in East US as follows:
az appservice plan create
--resource-group azuremolchapter11
--name appserviceeastus
--location eastus
--sku S1
az webapp create
--resource-group azuremolchapter11
--name azuremoleastus
--plan appserviceeastus
--deployment-local-gitCreate a second web app in West Europe:
az appservice plan create
--resource-group azuremolchapter11
--name appservicewesteurope
--location westeurope
--sku S1
az webapp create
--resource-group azuremolchapter11
--name azuremolwesteurope
--plan appservicewesteurope
--deployment-local-git
11.2.2. Globally distributing traffic to the closest instance
You’ve created the Traffic Manager profiles and endpoints, but no traffic that can flow. If customers were directed to the profiles, there would be no association with your endpoints. The diagram in figure 11.7 shows how you need to associate endpoints with profiles.
Figure 11.7. In this section, you associate your endpoints with the Traffic Manager profiles, and define the priority for the traffic to be distributed.

The first associations you make are for your web app endpoints. Remember that for high availability, you want both web apps to be available to each Traffic Manager profile. You use a priority routing method to direct all traffic to the primary web app for each profile. If that web app is unavailable, the traffic can then fail over to the secondary web app endpoint.
When you created the Traffic Manager profiles in the previous section, a few defaults were used for the health-check options and endpoint monitoring. Let’s explore what those options are:
- DNS Time to Live (TTL): 30 seconds—Defines how long the DNS responses from Traffic Manager can be cached. A short TTL ensures that customer traffic is routed appropriately when updates are made to the Traffic Manager configuration.
- Endpoint Monitor Protocol: HTTP—You can also choose HTTPS or a basic TCP check. As with load balancers, HTTP or HTTPS ensures that an HTTP 200 OK response is returned from each endpoint.
- Port: 80—The port to check on each endpoint.
- Path: /—By default, checks the root of the endpoint, although you could also configure a custom page, like the health-check page used by load balancers.
- Endpoint Probing Interval: 30 seconds—How frequently to check endpoint health. The value can be 10 seconds or 30 seconds. To perform fast probing every 10 seconds, there’s an additional charge per endpoint.
- Tolerate Number of Failures: 3—How many times an endpoint can fail a health check before the endpoint is marked as unavailable.
- Probe Timeout: 10 seconds—The length of time before a probe is marked as failed and the endpoint is probed again.
You don’t need to change any of these default options. For critical workloads when you build your own application environments in the real world, you could lower the number of failures to tolerate or the probing interval. These changes would ensure that any health issues were detected quickly, and traffic would be routed to a different endpoint sooner.
To associate endpoints with profiles and finish the geographic routing, complete the following steps.
1. In the Azure portal, browse to and select your resource group. Select the Traffic Manager profile you created for East US.
2. Choose Endpoints from the navigation bar at left in the profile, and then select Add, as shown in figure 11.8.
Figure 11.8. Select your resource group, and then choose the Traffic Manager profile for East US. Under Settings, select Endpoints, and then choose Add.

3. Create an endpoint, as shown in figure 11.9. For Type, select Azure Endpoint. Enter a name, such as eastus, and then choose App Service as the Target Resource Type.
Figure 11.9. Create an endpoint named eastus. The target resource type is App Service. Select the web app you created in East US. With a priority of 1, all traffic is directed to this endpoint, provided the endpoint remains healthy and can serve traffic.

4. Select Target Resource, and then select your web app in East US, such as azuremoleastus.
5. Leave Priority as 1, and then select OK.
6. Repeat the process to add another endpoint. This time, name the endpoint westeurope, select your web app in West Europe as the Target Resource, and set a priority of 100.
Your Traffic Manager profile now lists two endpoints: one for the web app in East US, and one for the web app in West Europe, as shown in figure 11.10. This priority-based routing of the endpoints always directs traffic to the web app in East US when that resource is healthy. If that resource is unavailable, there’s redundancy to fail over to the web app in West Europe.
Figure 11.10. Two endpoints are listed for the Traffic Manager profile. The endpoint for East US has the lower priority, so it always receives traffic when the endpoint is healthy. Redundancy is provided with the West Europe endpoint, which is used only when the East US endpoint is unavailable

7. Go back to your resource group, and select the Traffic Manager profile for West Europe. Choose to add endpoints.
8. Repeat the steps to add two endpoints. Configure them as follows:
- Name: westeurope Target Resource: Web app in West Europe Priority: 1
- Name: eastus Target Resource: Web app in East US Priority: 100
Your Traffic Manager profile now lists two endpoints: one for the web app in West Europe, and one for the web app in East US, as shown in figure 11.11. You’ve provided the same redundancy as the previous Traffic Manager profile, this time with all traffic going to West Europe when healthy and East US if not.
Figure 11.11. The same configuration of endpoints as the previous Traffic Manager profile, this time with the location of the web apps reversed. These child profiles can be used to always route customers to the web app in either East US or West Europe, but you now have redundancy to fail over to another endpoint if the primary endpoint in the region is unavailable.

Just one more part to this process, I promise! Remember, this is a best practice for high availability if you use Traffic Manager for global distribution of applications. In the real world, your environment may not be this complex. Let’s look at the diagram again to see the child profiles and association with the regional web apps you need to create, as shown in figure 11.12.
Figure 11.12. The child Traffic Manager profiles for East US and West Europe have been created, with the regional web apps and priorities configured as needed. Now you need to associate the child profiles with the parent profile.

To direct traffic based on geography, you define a region, such as North America, and a nested profile, such as eastus. All customers in the North America region are directed to this child profile. You configured the priorities on that child so that the web app in East US always serves the traffic. But you’ve provided a redundant option to fail over to the web app in West Europe as needed.
The inverse happens for customers in West Europe. Another endpoint for the parent Traffic Manager profile can be added, this time with Europe as the region to be associated with the endpoint, and then the westeurope nested profile. All European traffic is routed to this profile, and the web app in West Europe always serves the web application. In the event of a problem, the traffic can fail over to East US.
If you have policy or data sovereignty mandates such that traffic can’t fail over to a different region like this, you may need to adjust how the Traffic Manager endpoints and profiles are set up. You could, for example, create multiple web apps in West Europe, as you saw in a previous chapter. This way, you have multiple web app instances that can serve customers. Or, if your application runs on VMs, use a scale set behind a load balancer to profile similar redundancy.
To associate the child profiles with the parent profile, complete the following steps.
This is where your own regional location matters! If you live outside one of the regional groupings shown in the Traffic Manager profiles, make sure you select your own region, or you won’t be able to access the web app in the end-of-chapter lab.
1. In the Azure portal, browse to and select your resource group. Select the parent Traffic Manager profile. In the earlier examples, that was called azuremol.
2. Choose Endpoints from the navigation bar at left in the profile, and then select Add.
3. Create an endpoint that uses the first child profile, as shown in figure 11.13. For Type, choose Nested Endpoint. Provide a name, such as eastus, and then select Target Resource. Select the Traffic Manager profile you created for East US.
Figure 11.13. This endpoint uses the nested profile for East US. The regional grouping directs all customers from North America/Central American/Caribbean to the endpoints configured in the child profile.

4. Under Regional Grouping, choose North America/Central America/Caribbean from the drop-down menu, and then select OK.
5. Repeat the steps to add another endpoint. This time, name the endpoint westeurope, set Target Resource to the child Traffic Manager profile for West Europe, and choose Europe from the drop-down menu for Regional Grouping.
Your endpoints for the parent profile now list the two child profiles, with each an endpoint associated with the appropriate geographic region, as shown in figure 11.14.
Figure 11.14. Nested child profiles with associated geographic regions. This parent Traffic Manager profile now directs all traffic from Europe to the web app in West Europe, with redundancy to use East US if there’s a problem. The opposite is true for customers in North America/Central America/Caribbean.

6. The web apps are currently set to only accept traffic on their default domain. This default domain is in the form of webappname.azurewebsites.net. When Traffic Manager directs customers to those web app instances, the traffic appears to come from the domain of the parent profile, such as azuremol.trafficmanager.net. The web apps don’t recognize this domain, so the web application won’t load.
Add the domain of the parent Traffic Manager profile to both web app instances you created in the previous steps. If needed, you can find the domain name on the Overview page of the parent Traffic Manager profile:
az webapp config hostname add
--resource-group azuremolchapter11
--webapp-name azuremoleastus
--hostname azuremol.trafficmanager.net
az webapp config hostname add
--resource-group azuremolchapter11
--webapp-name azuremolwesteurope
--hostname azuremol.trafficmanager.net
Now, when you open the address of your parent Traffic Manager profile in a web browser, such as https://azuremol.trafficmanager.net, you can’t tell which web app you access as they run the default web page. In the end-of-chapter lab, you upload a basic web page to each web app to differentiate between them!
Let’s stop and examine what you’ve created through these exercises. It’s important, because all the high-availability and redundancy features from previous chapters can now be used by customers, with automatic traffic routing that directs them to the closest instance of your web application. In this chapter, you’ve created the following:
- A web app in East US and another in West Europe.
- Traffic Manager profiles that use geographic routing to direct all customers in North and Central America to the East US web app, and all customers in Europe to the West Europe web app.
- Child Traffic Manager policies with priority routing to provide failover use of the alternate region if the primary web app for the region is unavailable.
In terms of high availability:
- If you combine this setup with web apps that autoscale, you have a ton of redundancy right now.
- If you combine these web apps with Cosmos DB, you now have your entire application automatically scaling and globally distributed, with customers always accessing resources close to them for the lowest latency on response times and best performance.
- Even if you stuck with VMs, you can use scale sets with load balancers to provide the same highly available, globally distributed environment.
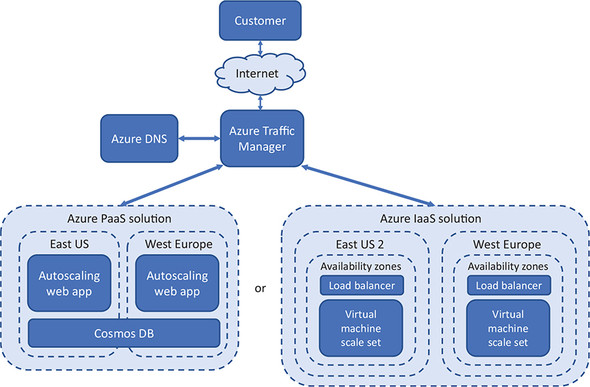
I know these last few chapters have contained a lot of new stuff, and each chapter has taken up pretty much all of your lunch break each day! But look at where you’ve come in the past week. You can now create a web application with either IaaS VMs or PaaS web apps, make them highly available and load balanced, and let them automatically scale, as shown in figure 11.15. You can use a globally distributed Cosmos DB backend for your database needs, and you can automatically route customers to the closest regional instance of your application, all with DNS that’s hosted in Azure.
Figure 11.15. After the last few chapters, you should understand how to create highly available IaaS or PaaS applications in Azure. The IaaS solutions can use availability zones, load balancers, and scale sets. The PaaS solutions can use autoscaling web apps and Cosmos DB. Traffic Manager and Azure DNS can route customers to the most appropriate application instance automatically, based on their geographic location.
The end-of-chapter lab uploads a couple of basic websites to your web apps, just to prove that Traffic Manager works and the appropriate endpoint serves your traffic. If you have time, feel free to complete the exercise; otherwise pat yourself on the back and go take a nap. I won’t tell your boss! We have one more chapter in this second section of the book, and it talks about how to make sure your applications remain healthy: how to monitor and troubleshoot your applications and infrastructure.
11.3. Lab: Deploying web apps to see Traffic Manager in action
This has been another chapter where we covered a lot, so this exercise should be one that keeps building mental muscle of your Azure skills with web apps. In the Azure samples GitHub repo are two basic web pages for the online pizza store application. Each web page’s title shows the location of the web app. Upload these web pages to the relevant web app instance to see your Traffic Manager flows in practice:
1. If needed, clone the GitHub samples repo in your Cloud Shell as follows:
git clone https://github.com/fouldsy/azure-mol-samples.git
2. Start with the eastus web page, and then repeat the following steps in the westeurope directory:
cd ~/azure-mol-samples/11/eastus
3. Initialize the Git repo, and add the basic web page:
git init && git add . && git commit -m "Pizza"
4. In the Azure portal, the Overview window for your web app lists the Git clone URL. Copy this URL, and then set it as a destination for your HTML sample site in the Cloud Shell with the following command:
git remote add eastus <your-git-clone-url>
5. Push the HTML sample site to your web app:
6. Repeat these steps for the azure-mol-samples/11/westeurope directory. When finished, open your web browser to the domain name of your parent Traffic Manager profile, such as https://azuremol.trafficmanager.net, to see the traffic flow.