
Chapter 16. Azure Security Center and updates
Wouldn’t it be great if Azure was smart enough to monitor all of your core application resources and alert you about any security concerns? Or what if your business has security policies already defined (if you don’t have any security policies, please stop right now and make a note to create some!)—how do you ensure that your Azure deployments remain compliant? If you’ve ever gone through an IT security audit, you know how fun it can be to look over a list of misconfigurations applied to your environment, especially the basic security lapses that you know to avoid!
Azure Security Center provides a central location for security alerts and recommendations to be grouped for your review. You can define your own security policies and then let Azure monitor the state of your resources for compliance. In this chapter, we discuss how Security Center can alert you to problems and provide steps to correct them, how you can use just-in-time VM access to control and audit remote connections, and how Update Management keeps your VMs automatically up to date with the latest security patches.
16.1. Azure Security Center
Throughout this book, we’ve discussed security-related topics like how to create and configure network security groups (NSGs) to restrict access to VMs, and how to only permit encrypted traffic to Azure Storage accounts. For your own deployments beyond the exercises in this book, how do you know where to start, and how can you check that you applied all the security best practices? That’s where Azure Security Center can help, by checking your environment for areas you may have missed.
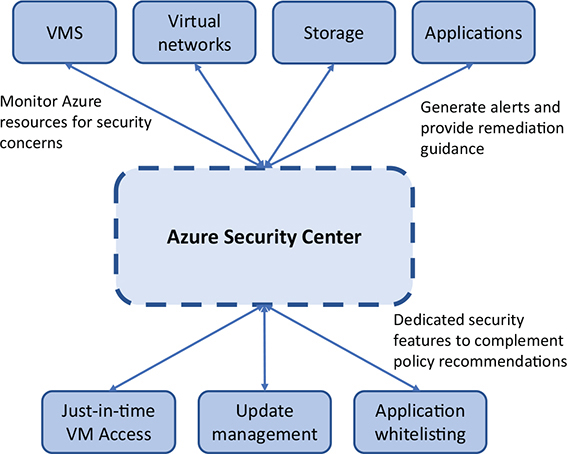
Azure Security Center scans your resources, recommends fixes, and helps remediate security concerns, as shown in figure 16.1. When you only have a couple of test VMs and a single virtual network in your Azure subscription, it may not seem that hard to keep track of what security restrictions you need to put in place. But as you scale up to tens, hundreds, or even thousands of VMs, manually keeping track of what security configurations need to be applied to each VM becomes unmanageable.
Figure 16.1. Azure Security Center monitors your Azure resources and uses defined security policies to alert you to potential threats and vulnerabilities. Recommendations and steps to remediate issues are provided. You can also use just-in-time VM Access, monitor and apply security updates, and control whitelisted applications that can run on VMs.
Security Center can also alert you to general best practices, such as if a VM doesn’t have diagnostics enabled. Remember in chapter 12 when we looked at how to monitor and troubleshoot VMs? You need to install and configure the diagnostics agent before you have a problem. If you suspect a security breach, you may not be able to access the VM and review logs. But if you had configured the diagnostics extension to stream logs to Azure Storage, you could review what had occurred and hopefully track down the source and extent of the problem.
To get started with Azure Security Center, complete the following steps.
1. Open the Azure portal, and select the Cloud Shell icon from the top menu.
2. Create a resource group. Provide a name, such as azuremolchapter16, and a location, such as eastus:
az group create --name azuremolchapter16 --location eastus
3. Create a basic Linux VM so that Security Center has something to monitor and provide recommendations for:
az vm create
--resource-group azuremolchapter16
--name azuremol
--image ubuntults
--admin-username azuremol
--generate-ssh-keys
4. Once the VM is deployed, close the Cloud Shell. In the Azure portal, select Security Center from the list of services at left. The first time the dashboard opens, it takes a few seconds to prepare all the available components; see figure 16.2.
Figure 16.2. The Azure Security Center Overview window provides a list of recommendations, alerts, and events. You can select a core resource type such as Compute or Networking to view a list of security items specific to those resources.

Security Center looks at how resources such as VMs, NSG rules, and storage are deployed. Built-in security baselines are used to identify problems and provide recommendations. For example, the VM you just deployed generates a couple of warnings, as shown in figure 16.3. You can, and should, implement your own security policies that tell Azure how you want to restrict access or what needs to be done to comply with business mandates. As you then create or update resources, Azure continually monitors for deviations from these policies, and alerts you about what steps need to be taken to remediate the security issues. You use the default Azure security policies in this chapter, but think of any particular security configurations that you may want to apply to your VMs and how they could be defined in your own custom policies.
Figure 16.3. The VM you created already triggers security warnings. In this example, the first is that no firewall appliance is detected other than NSGs. The second warning is that the NSG allows traffic from any internet device, rather than restricting access to a specific IP address range.
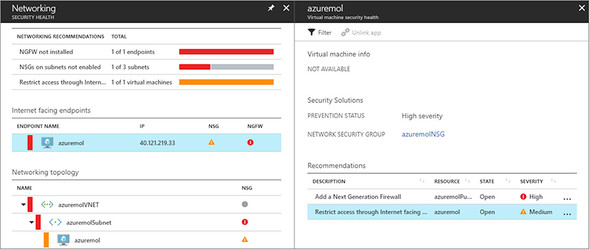
5. Click the Networking icon in the Security Center dashboard to view the security alerts. Even though you just created this VM and used default values from the Azure CLI, some security warnings are shown in this example:
- No next-generation firewall detected—NSG rules are a great way to control traffic flow to and from VMs, but they don’t have the same level of features as true firewall appliances such as those from Cisco, Barracuda, or Fortinet. There’s no requirement to use an additional virtual firewall appliance, but it’s probably best to chat with your best friends on the networking team to see what they’re planning to use to secure virtual network traffic. I told you that you’d become best friends with that team, right?
- Inbound access allowed from any internet location—When you created the VM, a default NSG rule was created that allows inbound remote connections from any internet location. The recommended practice is to limit access to coming from a specific IP range or subnet. The Azure CLI (or PowerShell, portal, or templates) can’t secure this rule by default unless you specify an allowed inbound range. You can edit the existing rules to limit the inbound traffic, as suggested by Security Center.
16.2. Just-in-time access
In the previous section, you learned how Security Center suggests that you limit the scope of inbound remote connectivity. You could provide an IP range to limit traffic, but ideally, you only open inbound connectivity when it’s needed. That way, the VM is completely closed for remote connections and is accessible only for a short time when needed. And yes, you should still limit that brief window of connectivity to a specific IP range! That’s where just-in-time (JIT) VM access comes in useful, as shown in 16.4.
Figure 16.4. With JIT VM access, NSG rules are configured to deny remote connections to a VM. RBAC permissions are used to verify permissions when a user requests access to a VM. These requests are audited, and if the request is granted, the NSG rules are updated to allow traffic from a given IP range, for a defined period of time. The user can access the VM only during this time. Once the time has expired, the NSG rules automatically revert to a deny state.

With JIT access, Security Center dynamically adjusts access restrictions on a VM. When enabled, NSG rules are created that deny all remote connection traffic. A user can then request access to a VM only when needed. In combination with RBACs (discussed in chapter 6), Security Center determines whether a user has rights to access a VM when they request a connection. If the user does have permissions, Security Center updates the relevant NSG rules to allow incoming traffic. These rules are applied only for a specific time window. Once that time is up, the rules are reverted, and the VM becomes closed to remote connections again.
When would you use JIT in your fictional pizza store? Think about any VMs that would run your web application, order system, or business logic applications. Would you want those to be connected to the internet and available for people to access all the time? Hopefully not! There are valid reasons for remote access with SSH or RDP, but always try to minimize how long that access is available. Even if you have NSG rules that restrict access to certain IP ranges, JIT adds another layer of protection in terms of what Azure users can access, and then creates an easier audit trail about which Security Center can provide reports.
To enable just-in-time VM access, complete the following steps.
1. Open the Azure portal, and select Security Center from the menu at left. Under Advanced Cloud Defense, select Just in Time VM Access.
2. If prompted, choose the option to Try Just in Time VM Access or to Upgrade to Standard Tier of Security Center. This free trial lasts 60 days and doesn’t automatically extend. This overlaps with your free Azure account and won’t cost you any money to use. Select the option to Apply Standard Plan, and then wait a few moments for it to be enabled. Once it’s enabled, you may need to close and reopen the Azure portal before you can complete the following steps.
3. Select Just in Time VM Access from the Security Center window again. Once your standard tier account is enabled, you can view a list of VMs to use. Select Recommended, and then choose your VM and select Enable JIT on 1 VMs, as shown in figure 16.5.
Figure 16.5. Select a VM from the Recommended options, and then choose to Enable JIT on 1 VMs. State currently shows that this VM is Open for all remote access, which flags the severity of the security concern as High.

4. By default, JIT defines rules that can open ports for SSH (port 22), RDP (port 3389), and PowerShell remoting (ports 5985 and 5986) for a period of 3 hours. If desired, select a rule and change Allowed Source IPs or Max Request Time, and then choose OK. Otherwise, leave all the defaults and choose Save, as shown in figure 16.6.
Figure 16.6. When you enable JIT, you can change the default rules to be allowed, the allowed source IPs, and a maximum request time in hours. These JIT rules allow granular control over what’s permitted to allow only the bare minimum of connectivity.

5. With JIT enabled, browse to your resource group, and then select your VM. Choose Networking to view the assigned virtual network configuration for the VM. The list of assigned NSG rules is shown, as in figure 16.7.
Figure 16.7. The JIT rules are created with the lowest priority. These priorities make sure the JIT rules take precedence over any later rules applied at the subnet level.
The JIT rules are shown at the top of the list, because they have the lowest priority. Traffic is denied to the IP address of the VM. What may seem odd here is that a default-allow-ssh rule still exists and permits all traffic. Think back to chapter 5, when we discussed NSGs—can you tell what’s happening here?
JIT applies only to the VM. In the JIT rule, Destination shows the IP address of the VM. In the example shown in figure 16.7, that’s 10.0.0.4. Traffic is denied. But the actual NSG rule is applied to the entire subnet. The default-allow-ssh rule applies at the subnet level. NSG rules are processed in order of priority, from low to high. A Deny action always takes effect, regardless of any additional rules.
So, even though you allow SSH at the subnet level, a rule with a lower priority explicitly denies traffic to the individual VM. This makes sense, because again, JIT works at the VM level, not the subnet level. RBAC permissions may differ between VMs connected to the same subnet, so this level of granularity lets you be specific about who can access what VMs when JIT is enabled.

6. Go back to Security Center, and select Just in Time VM Access. Choose your VM from the list, and then select Request Access.
7. The Azure platform checks your RBAC permissions to make sure you can enable access. If you’re permitted, the window shown in figure 16.8 is displayed; it allows you to toggle On or Off each port. By default, JIT also only allows access from My IP. To do this, the Azure platform looks up the IP of your current connection and limits JIT access to connections from that IP.
Figure 16.8. When you request access, only the specific ports and source IPs are permitted. The defaults are populated from the settings you provided when you enabled the VM for JIT, but the values can now be changed as needed for each access request.

8. Toggle On the rule for port 22, and then select Open Ports.
Go back to your VM, and look at the NSG rules again. The JIT rule is now enabled for the ports you specified, as shown in figure 16.9.
Figure 16.9. The JIT rule now allows traffic on port 22 to your VM, but only from your public IP address. After the time period specified (by default, 3 hours), this NSG rule reverts back to the traffic being denied.

The NSG rule automatically changes back to a Deny action after the time period specified has elapsed. By default, JIT rules are applied for 3 hours. After that time, the VM returns to a more secure state, and you’d need to request access to the VM again.
This JIT process is to control who can request, and be granted, access to the VM. But just because a person can successfully request access to a VM doesn’t mean they have permissions to log on to that VM. All that happens in Azure is that the defined NSG rules are updated. Security Center and JIT can’t add, remove, or update access credentials on the VM.
All JIT requests are also logged. In Security Center, select the Just in Time VM Access option, and then choose your rule. On the right, select the ... menu option, and then choose Activity Log. This activity log helps you audit who requested access to a VM in the event of a problem.
JIT VM access is one way Security Center and Azure help keep your VMs secure. Controlling access to the VMs is a big part of security, but what about the applications, libraries, and services running on the VM? That’s where you need to ensure that all the latest security updates are applied to your VMs in a timely manner.
16.3. Azure Update Management
One area that Azure Security Center can report on is the status of any required OS updates required by the VM. In your pizza store, you should try to install the latest security and application patches. You don’t want to run any systems that have a known vulnerability or attack area, so a way to automate the updates of those systems and track compliance improves your security. When you work with applications that involve customer data and payment information, don’t run systems without the latest patches installed. And remember to plan for a test environment that lets you safely apply security patches and validate that they don’t cause problems before you apply them to production systems!
An Update Management feature is built into Azure VMs and can scan, report, and remediate OS updates. What’s great about this solution is that it works across both Windows and Linux, and even within Linux, across different distributions such as Ubuntu, Red Hat, and SUSE. Figure 16.10 shows how Update Management monitors and can install required updates.
Figure 16.10. Update Management installs a VM agent that collects information on the installed updates on each VM. This data is analyzed by Log Analytics and reported back to the Azure platform. The list of required updates can then be scheduled for automatic install through Azure Automation runbooks.

It takes a few minutes for the VM to prepare itself and report back on its update status, so let’s set up your VM and then see what goes on behind the scenes.
1. Open the Azure portal, and select Resource Groups from the menu at left. Select your resource group, such as azuremolchapter16, and then select your VM, such as azuremol.
2. Under Operations, select Update Management.
3. Leave the default options for Location and to create a Log Analytics workspace and Automation Account. We examine these components more in the remainder of this section. To turn on update management for the VM, select Enable.
4. You return to the Update Management Overview window, but it takes a few minutes to configure the VM and report back on its status. Continue reading, and let the process continue.
Let’s look a little more at what happens to make this Update Management solution work. A new component was automatically installed when the VM was configured for Update Management: Operations Management Suite, which includes Azure Automation.
16.3.1. Operations Management Suite
If you’ve worked with any on-premises Microsoft technologies, you may have come across the System Center suite. System Center consists of multiple components such as Configuration Manager, Operations Manager, Orchestrator, and Data Protection Manager. There are a couple of other parts, but those core components provide a way to do the following:
- Define configurations and desired state
- Install applications and updates
- Report on health and security
- Automate deployments of large services and applications
- Back up and replicate data
As businesses have moved to cloud computing providers over the last few years, those more traditional on-premises System Center components have received some updates to try to make them work in a hybrid environment. Operations Management Suite (OMS) provides a solution that was natively designed to work in the cloud but retains some of the capabilities to work with on-premises systems. We’ve already looked at two components of OMS in earlier chapters, even if you didn’t realize it:
- Azure Backup provides a way to back up VMs or individual files, define retention policies, and restore data.
- Azure Site Recovery allows you to replicate VMs to different geographic regions in the event of a natural disaster or prolonged outage.
Both Azure Backup and Site Recovery helped you protect your data in chapter 13. Now you’ll use two additional components of OMS with Update Managements:
- Log Analytics collects information from various sources or agents, and allows you to define policies and queries to alert you to conditions that may occur. These queries and alerts can help you track the update status of a VM, or notify you of configuration or security issues.
- Azure Automation allows you to build runbooks that execute commands or entire scripts. Runbooks can be large, complex deployments, and can call multiple other runbooks. We look at Azure Automation in depth in chapter 18.
- The integration of these components under the OMS umbrella is shown in figure 16.11.
Figure 16.11. Operations Management Suite (OMS) covers multiple Azure services that work together to provide management and configuration features across your entire application environment. The services that use OMS aren’t limited to Azure VMs or resources and can work across other cloud-providers or on-premises systems when appropriately configured.

Both Log Analytics and Azure Automation are powerful components and could easily fill entire chapters of a book by themselves. With only a handful of VMs to manage, it’s easy to overlook the need for a centralized log repository for querying and alerting, or a way to automate configurations and deployments across VMs. If you haven’t already been making a list of Azure components to follow up on when you’re finished with this book, start one, and add both of these components to that list!
One thing to understand is that in Azure, there are often multiple services and components that can interact and complement each other. In the same way that Azure VMs and Azure virtual networks are individual services, both services also complement, or even rely, on each other. Azure Backup and the Azure diagnostics extension are great individual components, but they really shine if Log Analytics is used to monitor their status and collate any generated events or warnings. Hopefully, you’ve begun to identify some of these related components and see how Azure services often build on each other. Now that we’re into these final few chapters and looking at security and monitoring options, the goal is to ensure that the applications you run in Azure are healthy and stable.
Thinking about services that complement each other, one large (and I mean large!) part of Azure that we’ve only lightly touched on is Azure Active Directory (AAD). Identity is central to everything in Azure, and AAD provides some of the security features we examined in chapter 6 with the Azure Resource Manager deployment model. The ability to use RBACs to limit what actions can be performed a resource by certain users or groups is tied into a central identity solution. Even being able to log in to the Azure portal or Azure CLI is driven by AAD.
This book doesn’t cover AAD, because the scope of what it provides is broad and quite different from Azure IaaS and PaaS services like VMs, scale sets, and web apps. There may be some overlap in the topics’ audience, but most developers would have a different goal for what they wanted to learn about regarding AAD compared to an application manager or an IT pro who deploys the infrastructure.
Depending on your Azure account, you may also be limited in what you can do with AAD. When you sign up for a free Azure trial account, a default AAD instance is created for you. You’re the primary account in that directory, and you have full administrator rights. If you log in to Azure with an account from your business or educational institution, there’s a good chance that you have little to no administrative rights. So even if we could agree on a couple of topics to focus on, you might not be able to carry out any of the exercises directly. And I really don’t recommend that you go digging around in an actual AAD environment to learn how things work!
But AAD is another of those central services in Azure that binds together many other services and components. Cloud computing doesn’t magically make things easier or break down operational silos—you still need the skills to work with different teams and stakeholders. Throughout these chapters, hopefully you’ve picked up the core skills for these different Azure services, which will help you understand how to build large, redundant applications and converse at a better level and with more awareness of what other teams may face.
For the purposes of Update Management on your VM, you don’t need to interact directly with the OMS or Log Analytics. For your own awareness, there’s currently a separate OMS dashboard that you can access from the Azure portal for more insights. The OMS dashboard doesn’t contain a lot of information, because you have only one VM onboard and reporting information, as shown in figure 16.12; it becomes a lot more useful, the more VMs you register for monitoring. For now, you can use the regular Azure portal to update the VMs.
Figure 16.12. The OMS dashboard for Update Management reports the status of configured VMs. As more VMs are added to the service, you can quickly determine how many VMs require patches and how critical the missing patches are in terms of security and compliance. The pie charts show the number of Windows and Linux computers in need of updates, and then how many updates are required for each VM.

Now that you understand a little about OMS and what happens behind the scenes to make Update Management work, let’s go back and discuss what your VM reports and how to perform some updates.
16.3.2. Reviewing and applying updates
It can take some time for the VM agent to perform the first scan and report back on the status of applied updates. The list of installed components must also be cross-referenced with the list of available updates for a given OS and version. If your VM hasn’t finished and reported back on its status, keep reading, and check back in a few minutes. When it’s ready, the overview looks like figure 16.13.
Figure 16.13. Once the VM agent has scanned for compliance, a list of available updates is provided. Depending on the OS and version, Update Management may be able to work with Log Analytics to classify the updates based on severity, or provide links to the relevant update hotfix pages.

A list of required updates is great, but what about a way to install them? That’s where Azure Automation steps in! When you enabled Update Management, a number of Azure Automation runbooks were created that automatically handle the process to apply the required updates.
To apply the required updates for your VM, complete the following steps.
If you’re lucky (or unlucky), your VM may report that no updates are required. VM images are frequently updated in Azure, and if you deploy a VM soon after the latest image was built, all the required updates are already installed. If so, read through these steps so you understand what’s required when your VMs do need updating!
1. From the Update Management section of your VM, select Schedule Update Deployment.
2. Enter a name for the update deployment, such as azuremolupdates, and then review the Update Classifications. You can control which sets of updates are applied. For now, leave all the default options set.
3. Updates to Exclude lets you specify specific updates that you don’t want to install. If you know your application requires a specific version of a package or library, you can make sure an updated package isn’t installed that breaks things.
4. Select Schedule Settings, and then choose a time for the updates to be applied from the calendar and time options. The start time must be at least 5 minutes ahead of the current time, to give the Azure platform a few moments to process and schedule your runbook in Azure Automation. When you’re ready, select OK.
5. Maintenance Window (Minutes) defines how long the update process can run before the VM needs to be back in operation. This maintenance window prevents long-running update processes that may cause a VM to be unavailable for hours at a time. You may want to make the maintenance window shorter or longer, depending on any service-level agreements (SLAs) for the applications that run on those VMs, or the number and size of the updates required. Leave the default value for Maintenance Window, and then select Create.
6. Back in the Update Management window, select Scheduled Update Deployments. The updates are listed as scheduled to install at the date and time you select, as shown in figure 16.14.
Figure 16.14. The list of scheduled deployment tasks is shown. If desired, you can delete a given task; otherwise, the updates are automatically applied at the defined time.

7. At the top of the Update Management window, select Manage Multiple Computers. The window switches to the Azure Automation account that was automatically created when Update Management was enabled for the VM. Don’t worry too much for now about what the runbooks do. There’s nothing for you to customize, and we examine Azure Automation in chapter 18.
Note that you can choose Add Azure VM or Add Non-Azure Machine, as shown in figure 16.15. This ability highlights how OMS is designed to provide a single approach to managing updates across your entire application environment, not just for Azure VMs.
Figure 16.15. In the Azure Automation account, you can manage multiple computers and view the status or apply updates. Both Azure VMs and non-Azure computers can be monitored and controlled by the same Azure Automation account. Behind the scenes, OMS can integrate with other providers to install agents on computers in a hybrid environment. This integration allows a single dashboard and management platform to handle your update needs.

8. Under Process Automation, select Jobs. When your update deployment starts, its status is shown, as in figure 16.16. You can monitor the status of the jobs and review the output as they’re executed.
Figure 16.16. You can monitor the status of running Azure Automation jobs in the portal. To help review or troubleshoot tasks, you can click a job to view any output and generated logs.

9. Once the update deployment has finished, browse back to your resource group, select your VM, and then choose Update Management. It may take a few minutes for the agent to update itself and report back through Log Analytics that the updates have been applied; it should then show on the dashboard that the VM is up to date and no additional updates are required.
This has been a whirlwind tour of Security Center and associated components such as JIT VM access and Update Management. The goal is for you to start to think beyond just how to deploy and run a VM or web app, and instead plan for the wider application management that goes with it. Cloud computing doesn’t change the need for security policies—there’s arguably a greater need for resources to be secured. Let Azure features such as Security Center guide you through what needs to be done, and use the built-in tools like Update Management and Azure Automation to keep things secure at all times.
16.4. Lab: Enabling JIT for a Windows VM
This chapter covered a few different components that may have taken some time to enable themselves and report back on their expected status. This lab is optional and is more to show that there’s nothing OS-specific about any of these features. If you don’t have time, or you feel that you understand how you can also apply these features to a Windows VM, feel free to skip this lab. Otherwise, try the following tasks to gain some additional practice with Security Center and Update Management. Practice makes perfect, right?
1. Create a Windows Server VM of your choice in the same resource group you used for the previous exercises, such as azuremolchapter16.
2. Enable Just in Time VM Access on the VM. View the NSG rules, and then use your local Remote Desktop Connection client to verify that RDP connections are blocked.
3. Request JIT access, review the NSG rules again, and confirm that you can now RDP to your VM.
4. Enable Update Management on your Windows VM. This time, you should be able to use the existing OMS workspace and Azure Automation accounts. Let the OMS agent report back on required updates, and then schedule the updates to be applied through Azure Automation.