 CHAPTER 2
GRAPHITE PENCIL
Lab Mix
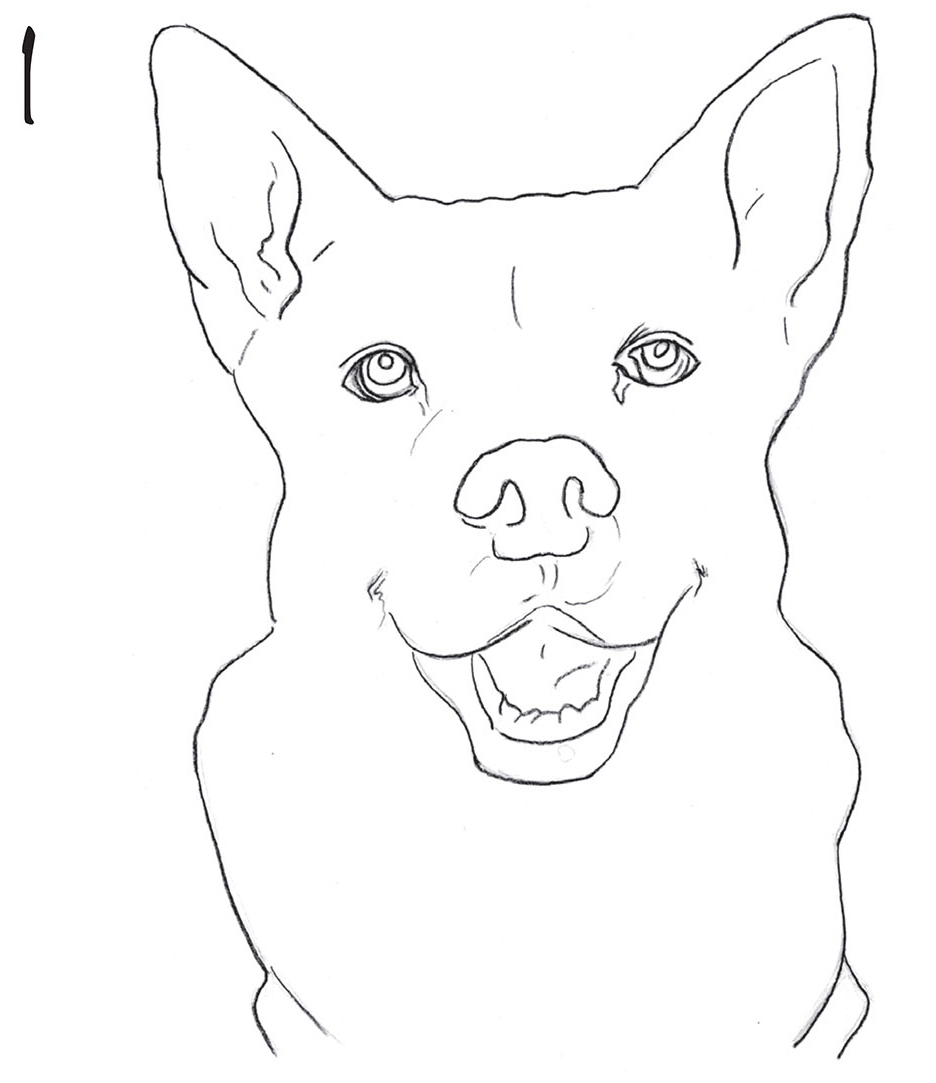
1 Start with a line drawing of the head and facial features using an F pencil, which has a medium lead consistency that is neither too soft nor too hard.
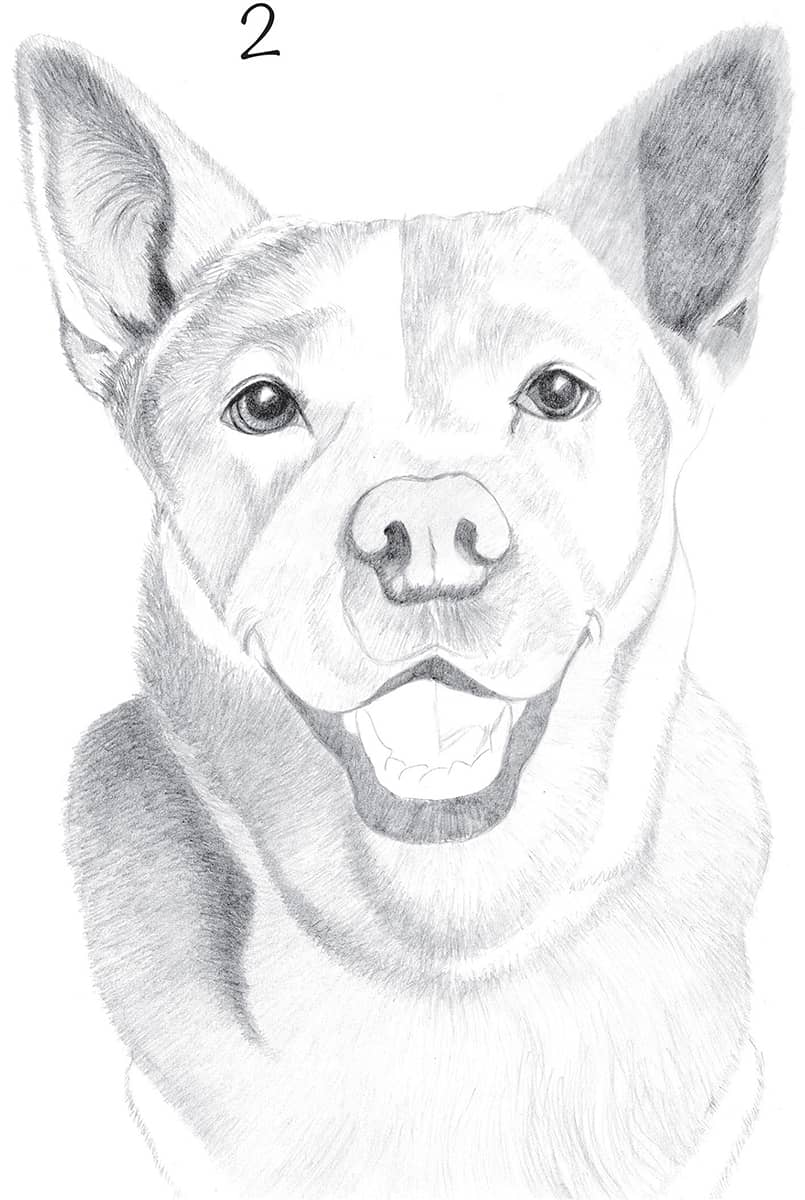
2 Use a 2B pencil to stroke in an initial layer for the coat, beginning with the ears and moving downward. Apply several layers of graphite to the darkest areas, and block in the shapes of the eyes.
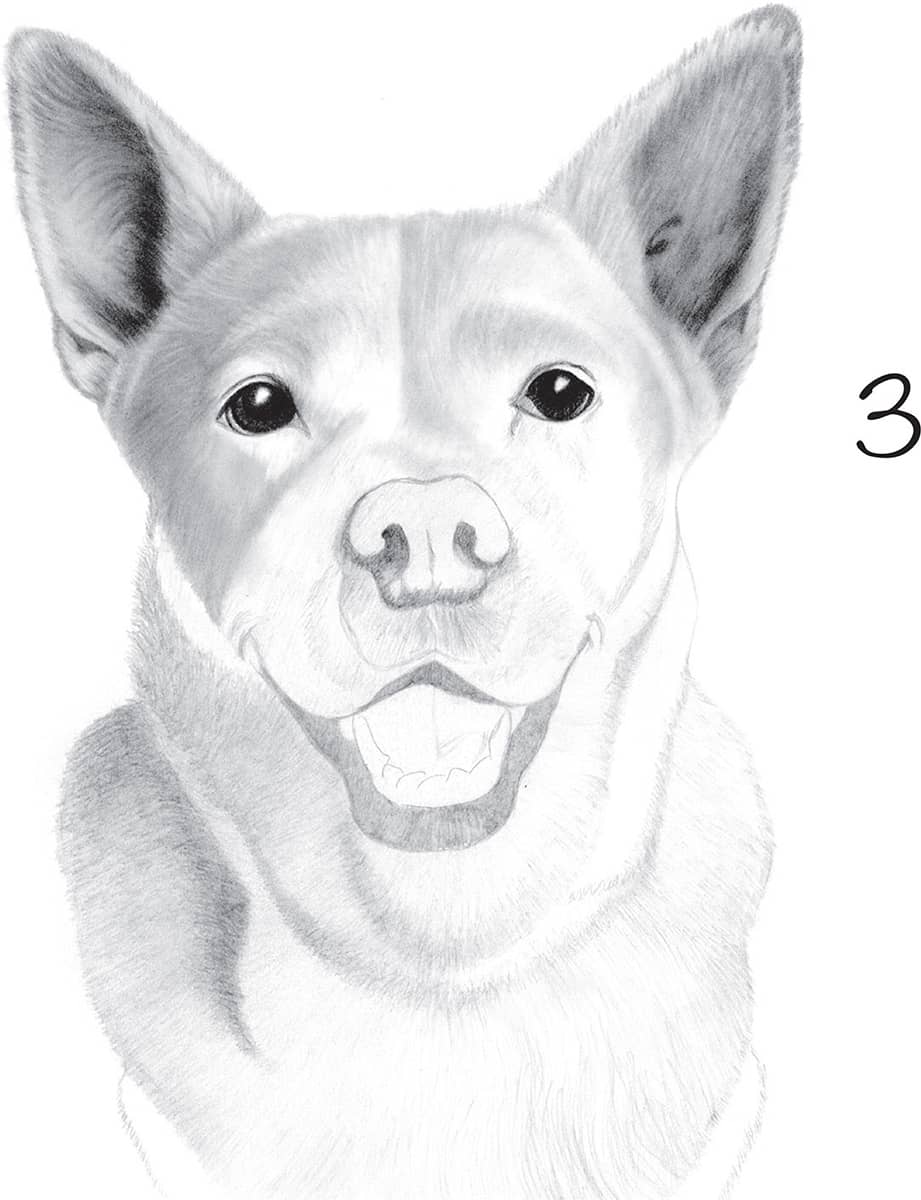
3 Complete the ears with a 2B pencil by adding more layers of graphite to the darkest areas, blending them with a tortillon and then lightening them with a kneaded eraser. Draw individual strands of hair, blend, and lighten. Continue pulling out highlights with the eraser and gently blend large areas with a chamois for a smooth appearance. Refine the eyes by darkening the pupil and iris in each, preserving the white highlights by drawing around them.
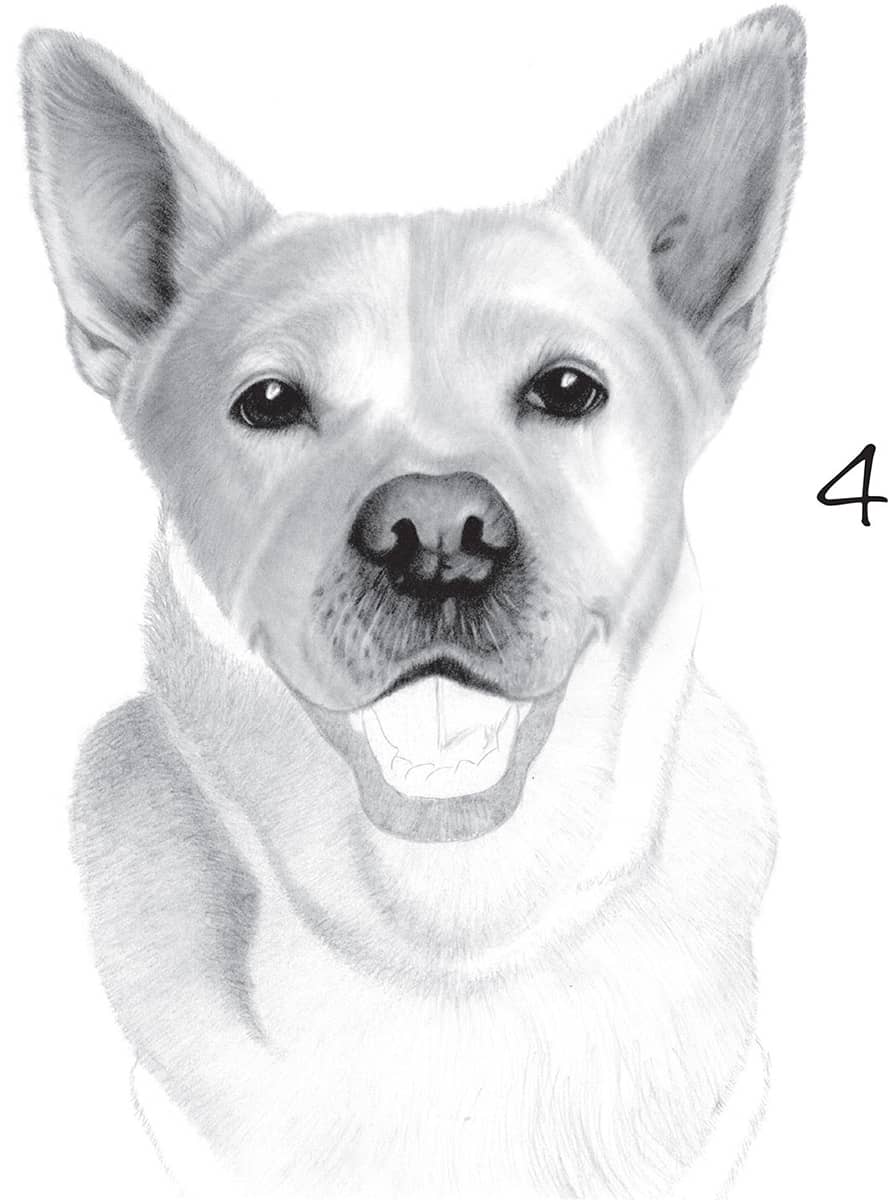
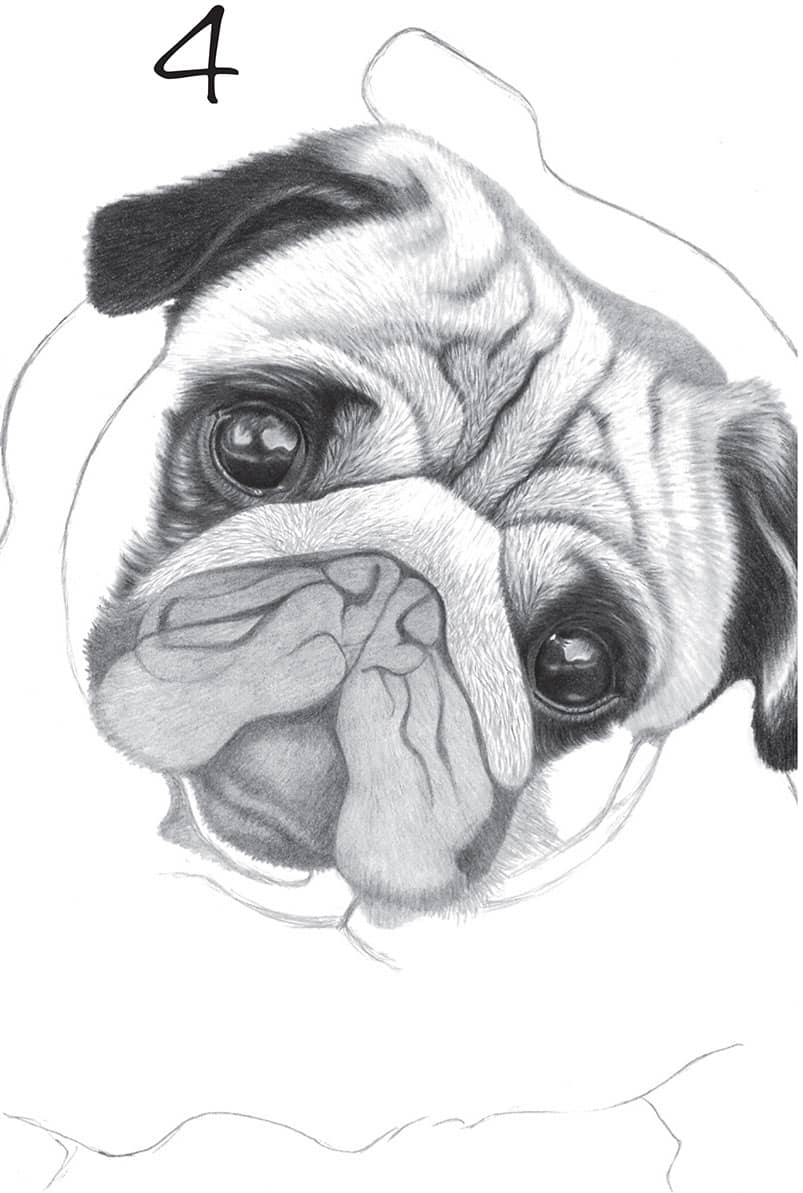
4 Using a 2B pencil, darken the pupils, draw radial lines within each iris, and darken the rims. Blend the eyebrows and markings around the eyes with a tortillon. Next, re-outline the basic shape of the nose and fill in the darkest areas. Use a tortillon to blend and an eraser to lighten. Continue this process on the muzzle, adding the darks, blending them, and pulling out whiskers with a molded eraser point.
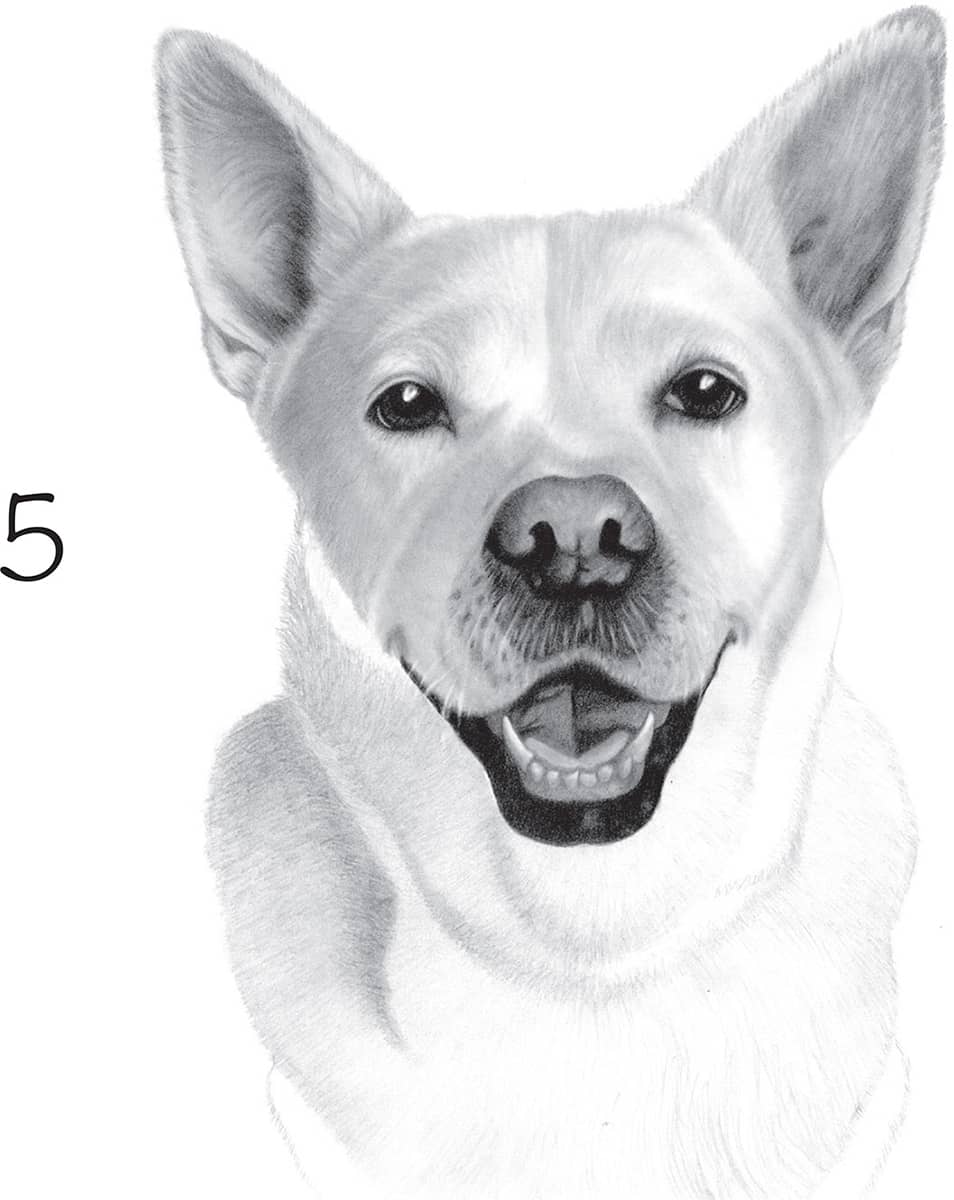
5 Finish the mouth by blocking in extreme darks with 2B graphite. Lightly fill in the tongue, blend, and build up the midtones with the graphite on the tortillon. Keep the tongue soft by blending, and outline the teeth and gums. Pull out a few whiskers with a kneaded eraser molded into a thin edge. Refine the muzzle and add a bit more dark to the area. Then add curved smile lines at the upper corners using a tortillon.
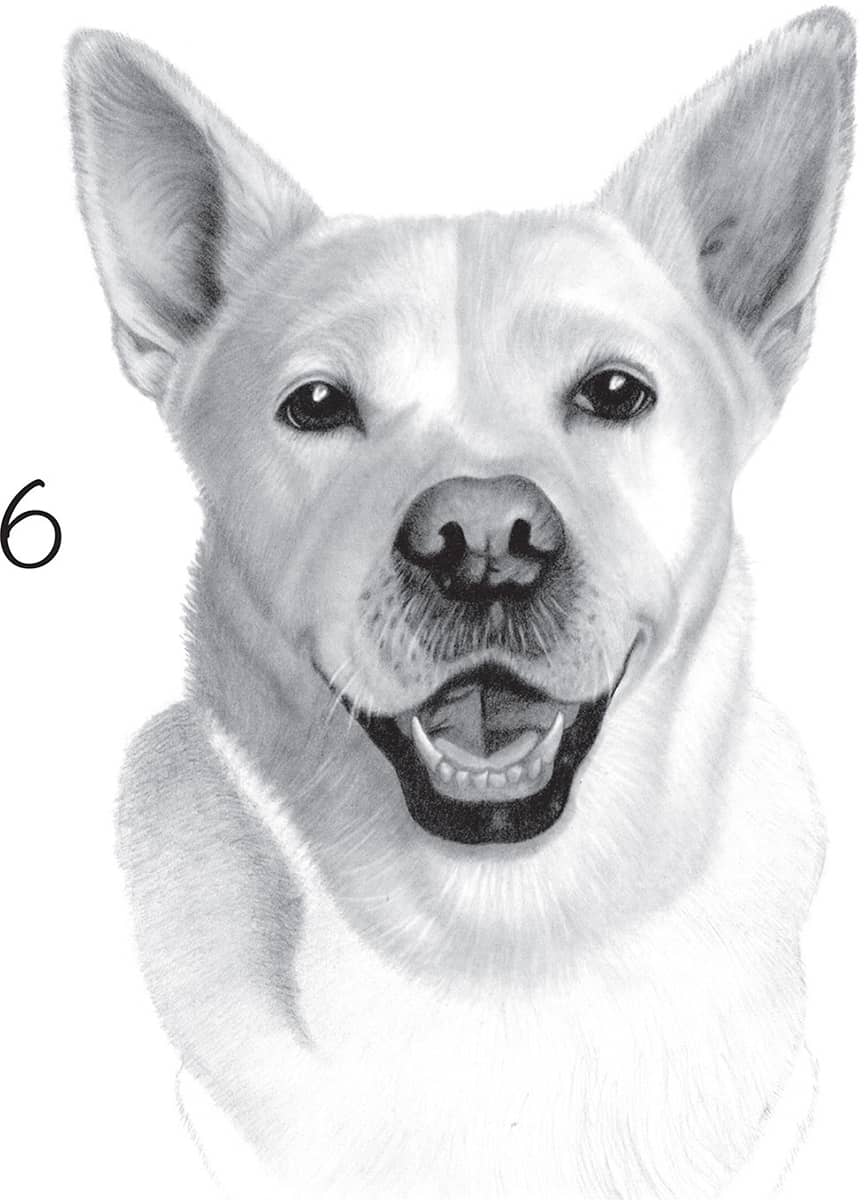
6 Apply a layer of graphite over the features, moving from left to right. On the left side, use a “dirty” tortillon to apply the graphite and then use the kneaded eraser to pull out light streaks. Continue blending. On the right side, use the “dirty” tortillon to blend the coat and pull out light hairs.
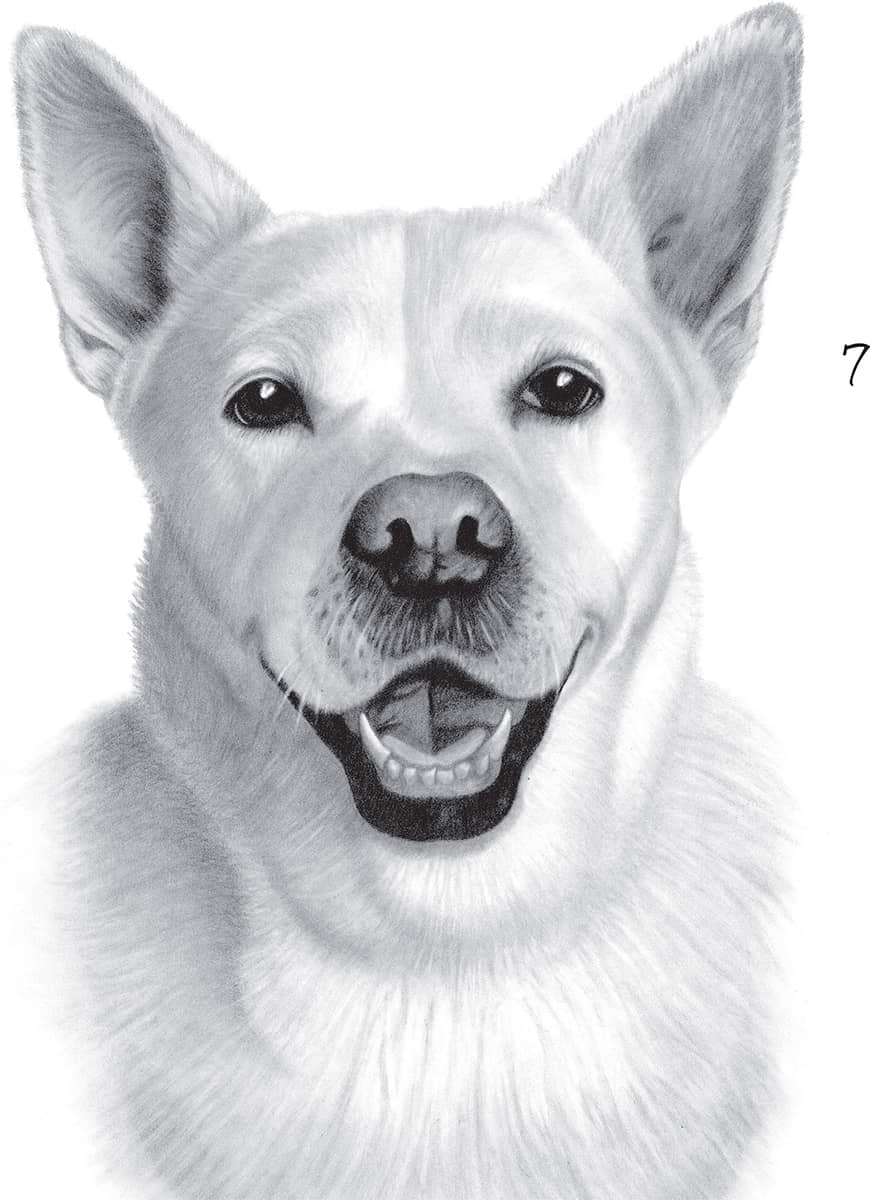
7 In the last step, lay down a light layer of graphite on the neck with a 2B pencil; blend the shadows until they are smooth. Blend the center and right areas using the tortillon, stroking individual strands in the direction of hair growth, and then blending outward with a chamois cloth. Repeat this process several times. To finish, blend and blur the edges of the coat outward into the white paper. Spray the drawing with workable fixative.
Yorkie Puppy
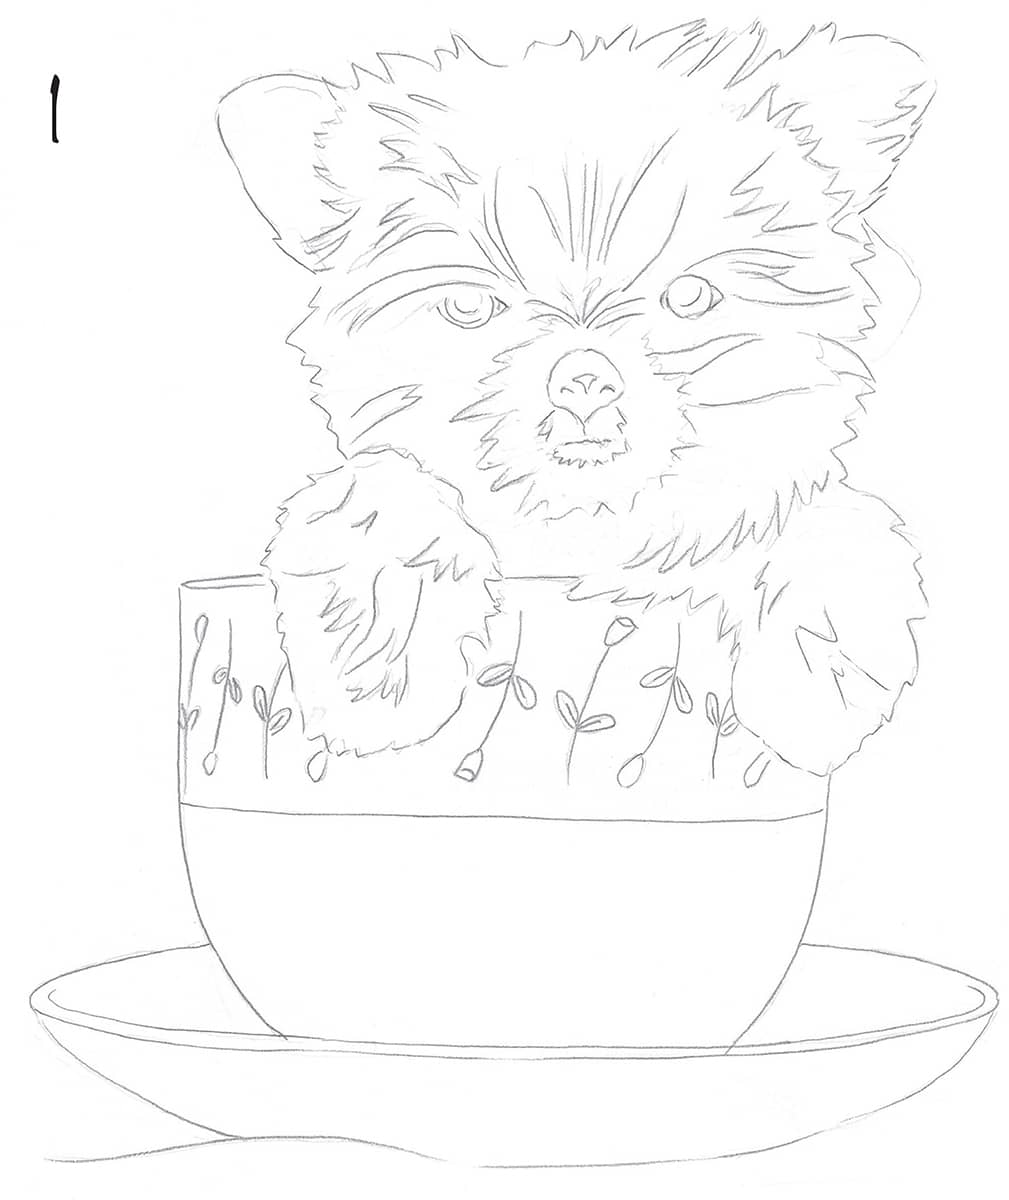
1 Sketch the outlines of the Yorkie and teacup.
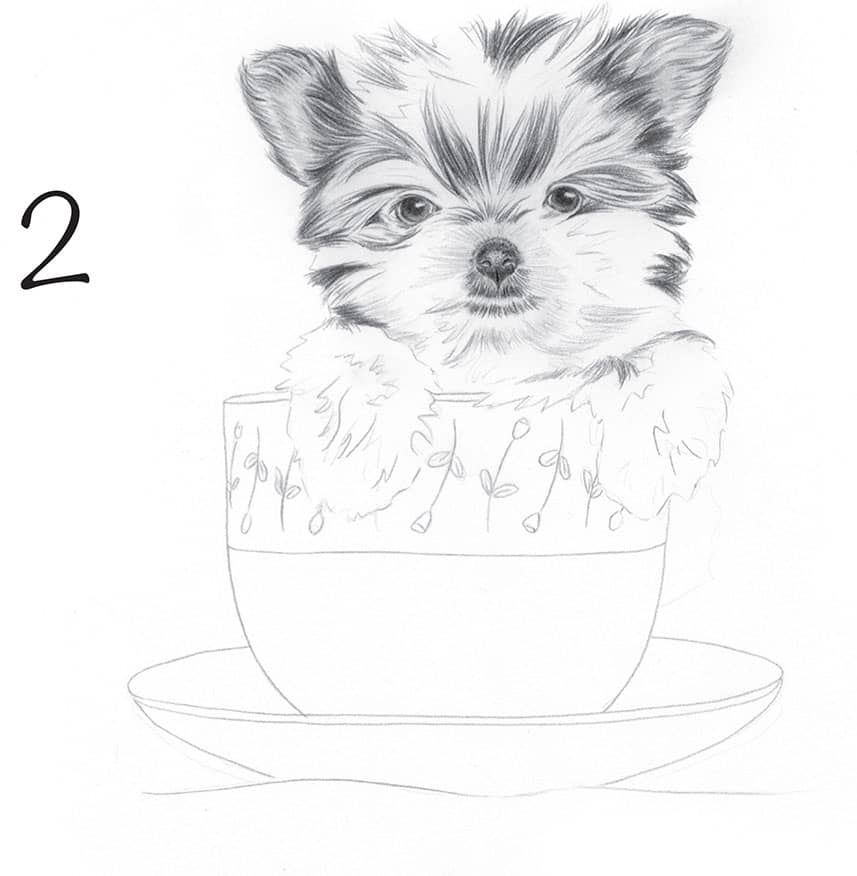
2 Begin shading the eyes and lightly filling in the irises with a 4B pencil, blending the tone in the irises with a tortillon. Fill in the pupils, using heavier pressure and leaving a highlight in each. Shade the nose with circular strokes and a 4B pencil, and create the dark area under the nose with a 2B. Establish the darker areas of the head with a 4B by blending the tone with bristle brush. Then use a 2B and long, tapering strokes for the midtones of the ears; blend the tone inside the ears.
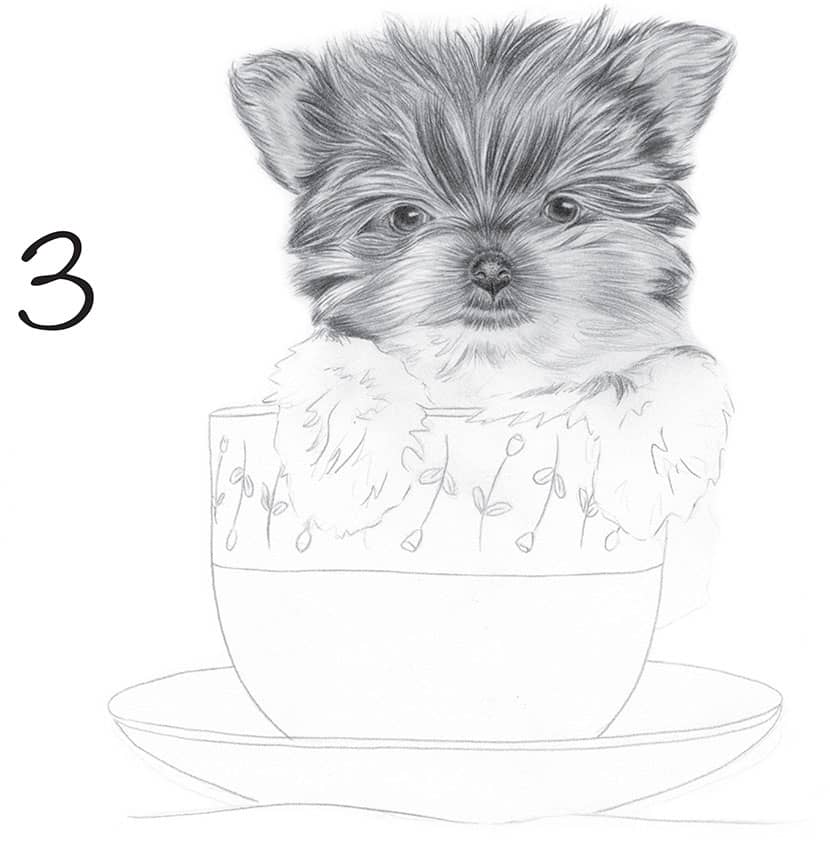
3 Continue working on the head, alternating between an H and a 2B for the lighter and midtone areas. Use long, tapering strokes, being careful to follow the direction of the hair. Lift out tone with a kneaded eraser pinched to a sharp edge, and use a 4B to add a few darker hairs throughout for depth. Draw darker individual hairs over the lighter hairs in various directions for a more natural appearance. Start the whiskers at the sides of the nose with an H pencil.
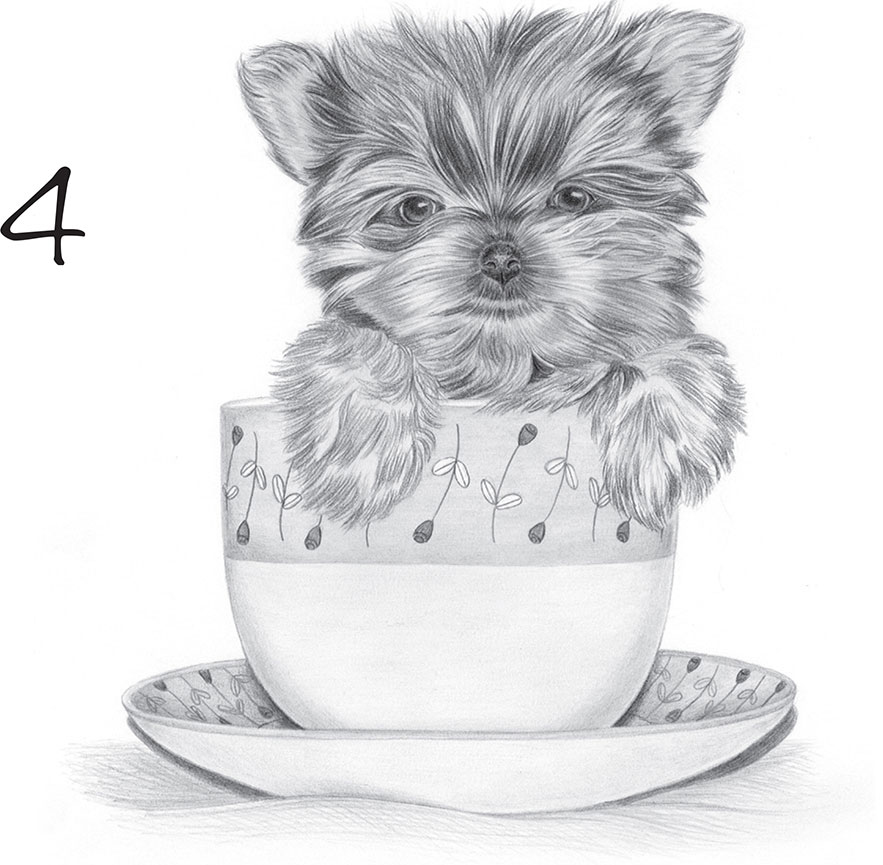
4 Use a 4B to darken the darks, bringing out the highlighted hair, and continue lifting out lighter hairs with an eraser. Periodically blend and spread the tone with the bristle brush. Start laying in the darker areas of the paws with a 2B, leaving white areas for the lighter hairs. Use an H pencil to cover the entire teacup with long, even strokes that are close together. Add another layer of H pencil for the darker areas of the cup and saucer. Continue defining the darks of the teacup and saucer with a sharp 2B pencil. Use a 4B for the outline and stems of the flowers and a 2B for the darkest flowers. Then use a 2B to add dark shading to the outer edges of the cup and saucer, achieving a rounded look. Create the darks of the paws with a 4B pencil.
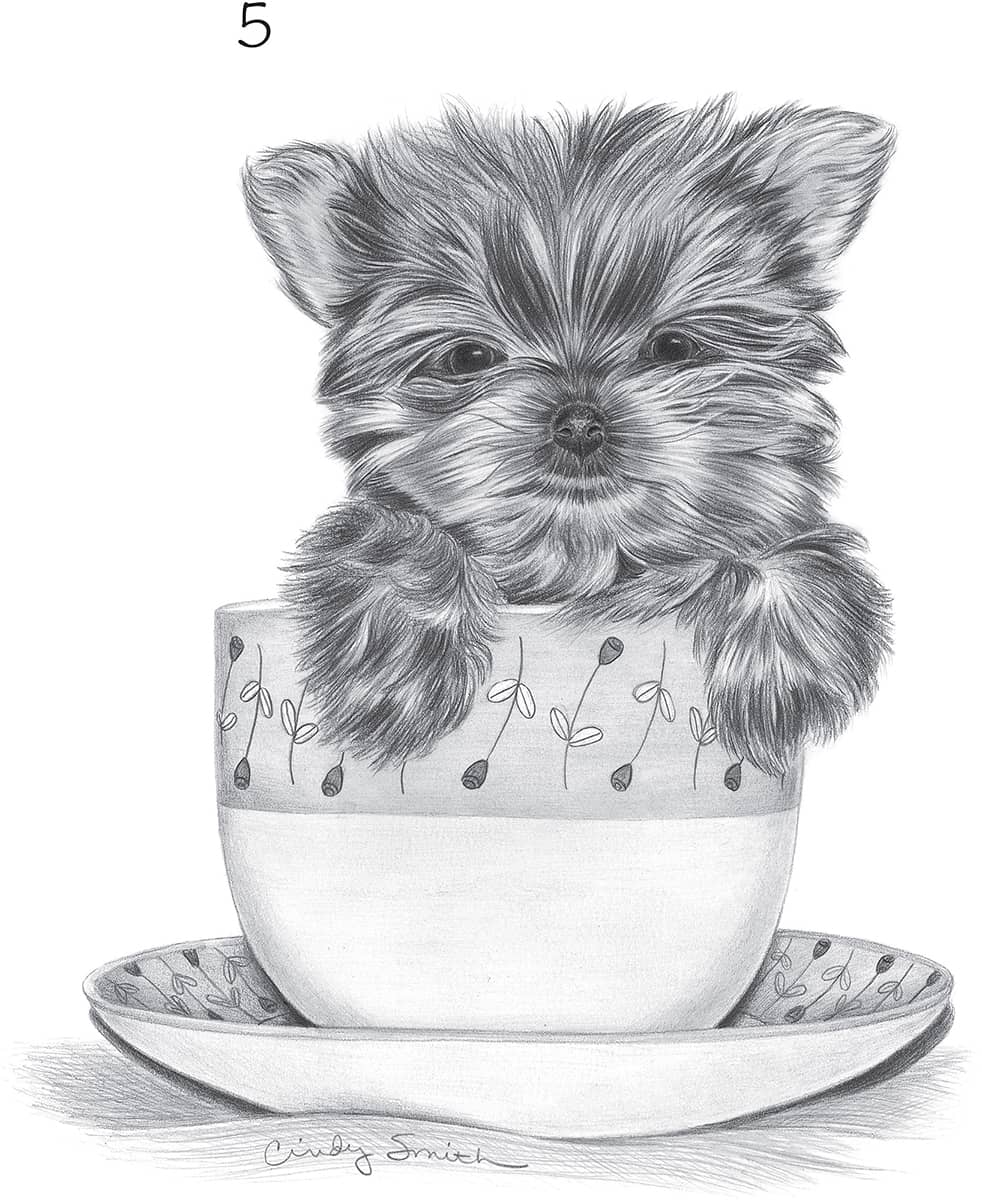
5 Finish the paws by adding midtones with a 2B pencil. Then go over the whole drawing, darkening the darks with a 4B and lifting out highlights with a kneaded eraser.
Bulldog
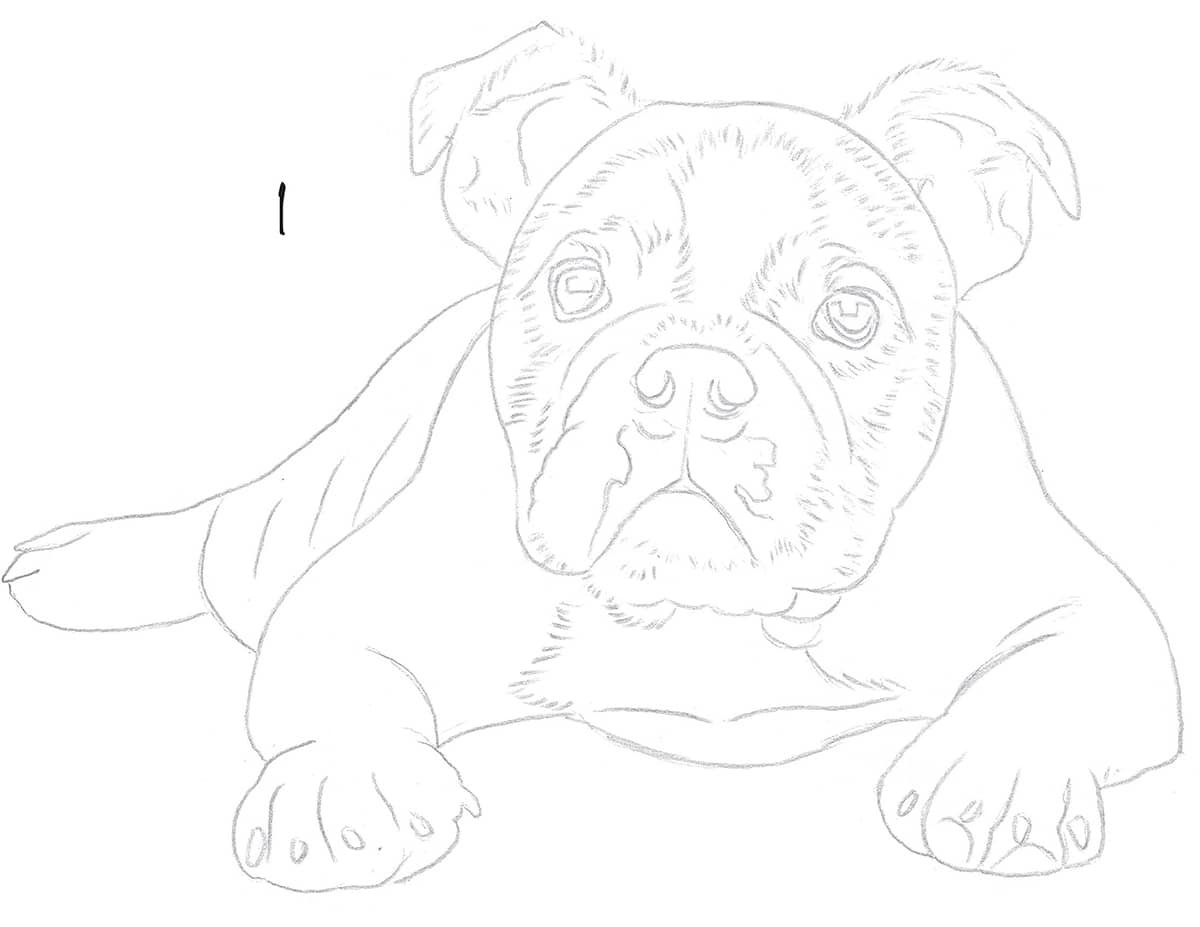
1 Sketch the outline of the head using an HB pencil. Add the arch indicating the muzzle, the shape of the jowls, and the eyes, adjusting for accurate proportions. Very little of the body is showing, so it is quite simple to sketch the shoulders, front paws, and what little of the rear body is visible.
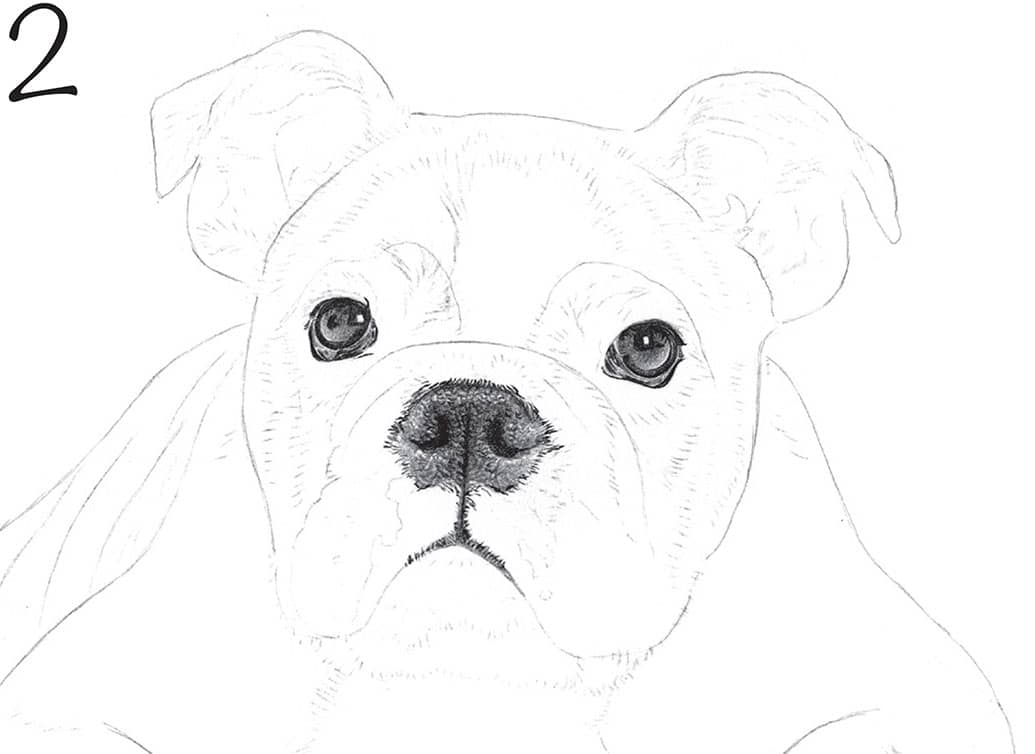
2 Lighten the initial sketch with a putty eraser and then use a 2B pencil to block in the darkest areas, which include the eyes, nostrils, and mouth. Apply a layer of HB graphite to each eye, lightening the tone toward the bottom edges to give them a spherical look. Darken the skin around the eyes and then complete the right eye in the same manner. Create texture on the nose by drawing random cracks over a layer of tone using a 2B pencil. Notice how the cracks in the middle of the nose all point away from the nostrils and middle crease, giving the illusion of curvature in this area.

3 Use short pencil strokes to render the body texture. Begin with the darkest areas of the head, which are the skin folds and shadows within the ears. Using a 2B pencil, apply short strokes in the direction of growth. The hair always grows away from the eyes in a slight spiral shape, moving up over the head, out toward the ears, and down the side of the muzzle, and then out toward the side of the face. Remembering this pattern makes the early stages easier.
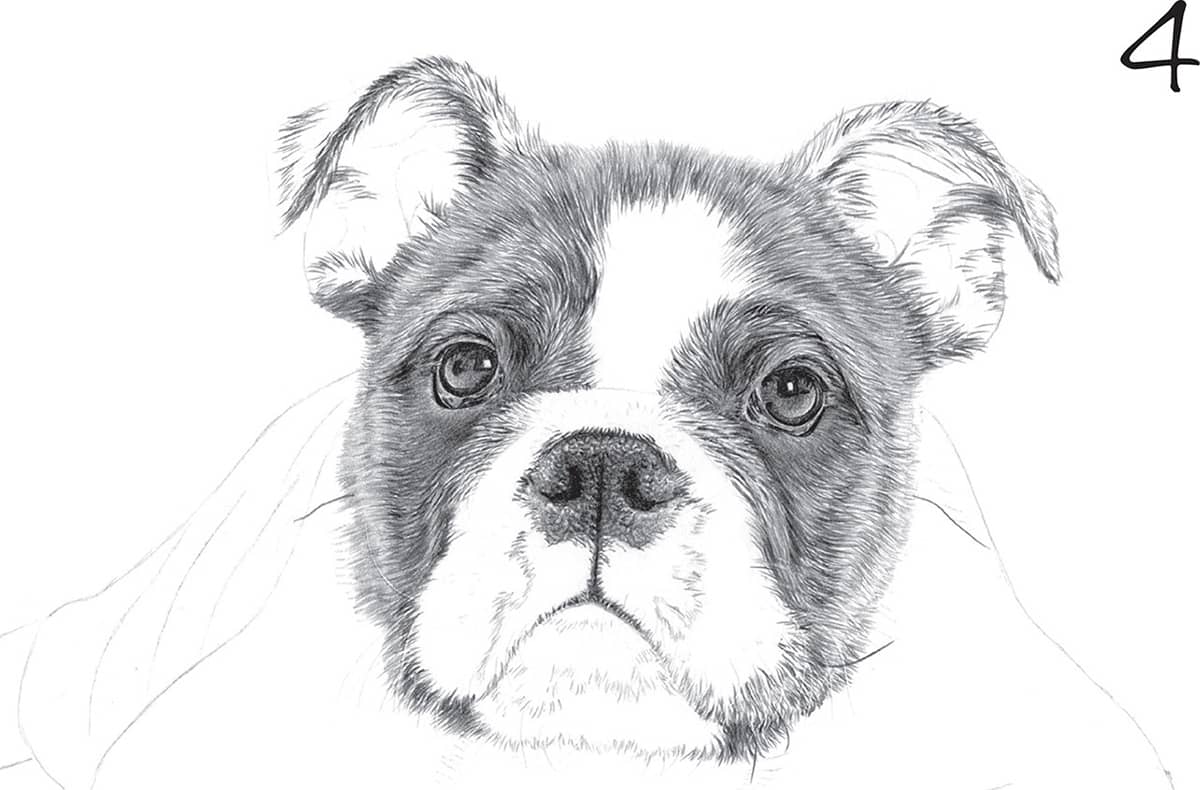
4 Switch to an HB pencil and use the same short strokes to add hair growing away from the eye. Leave areas of paper showing through the lines; then go over with a 2H pencil to create the lightest hairs. Continue this process over the rest of the head. The darker 2B lines applied earlier are now showing through the lighter HB lines, giving the impression of folds and ridges of fur. For the white patch on the forehead, stroke a few short lines with an H pencil to indicate light hair.
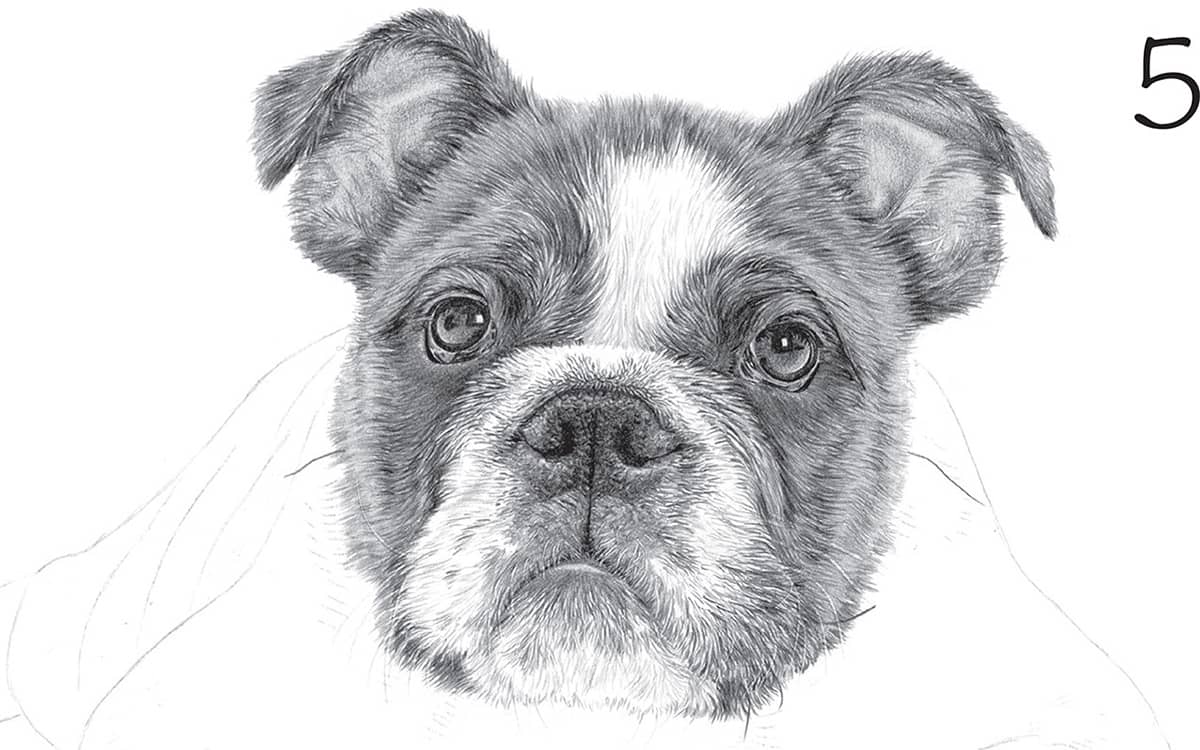
5 The muzzle features short white hairs and black skin beneath. Create this look using very short pencil strokes, leaving white between the hairs. The area directly below the nose and the lower lip is almost free of hair, so indent a few stray hairs and then shade using a 2B pencil. Apply a few HB strokes for more white hair on the muzzle and along the tops of the ears.
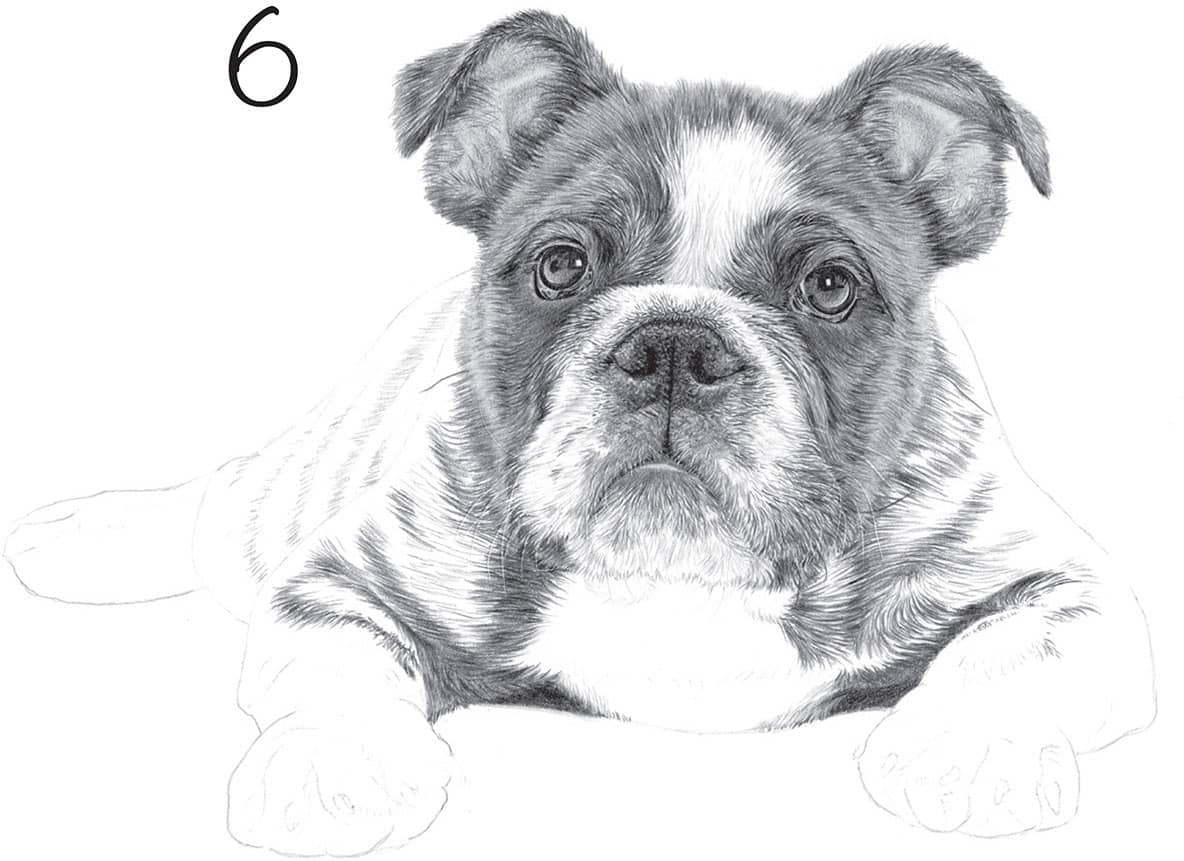
6 Finish the ears with a layer of HB. Apply more pressure to either side of the ridges inside the ears and then add a highlight to the top of the ridges using a putty eraser. The darkest area of the body is the shadowed underside, so apply block shading here first, avoiding the white of the chest. Work exactly the same way as on the face, applying darker lines first to produce the folds of fur and progressing to lighter lines.
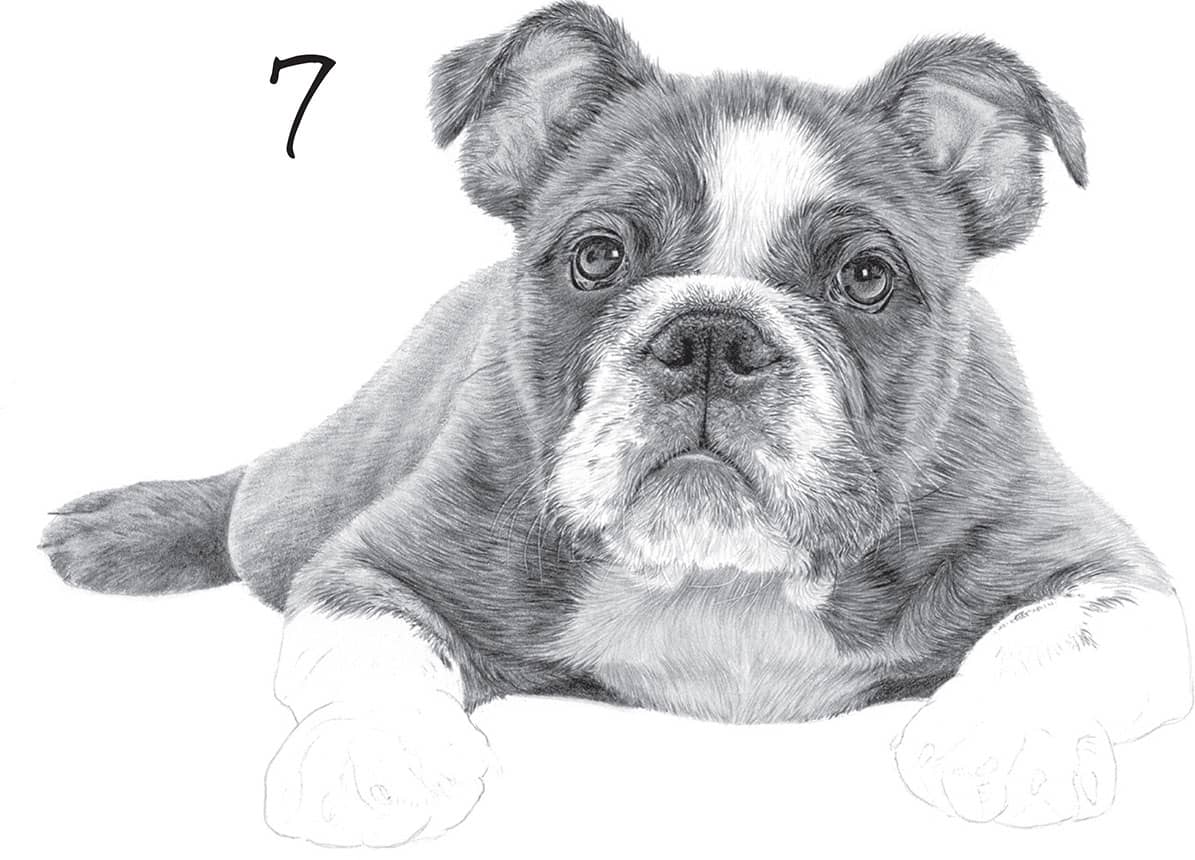
7 With the folds in place, build up tone over the area using a series of lines with an HB pencil. Lighten the pressure toward the outer edge. Next stroke in the fur of the white chest using a series of pencil strokes with an HB; then block shade the area with an H pencil to show that it is in shadow. On the rear of the body and leg use block shading with an HB pencil and roughly go over the area with strokes of a 2B to suggest the direction of the hair.
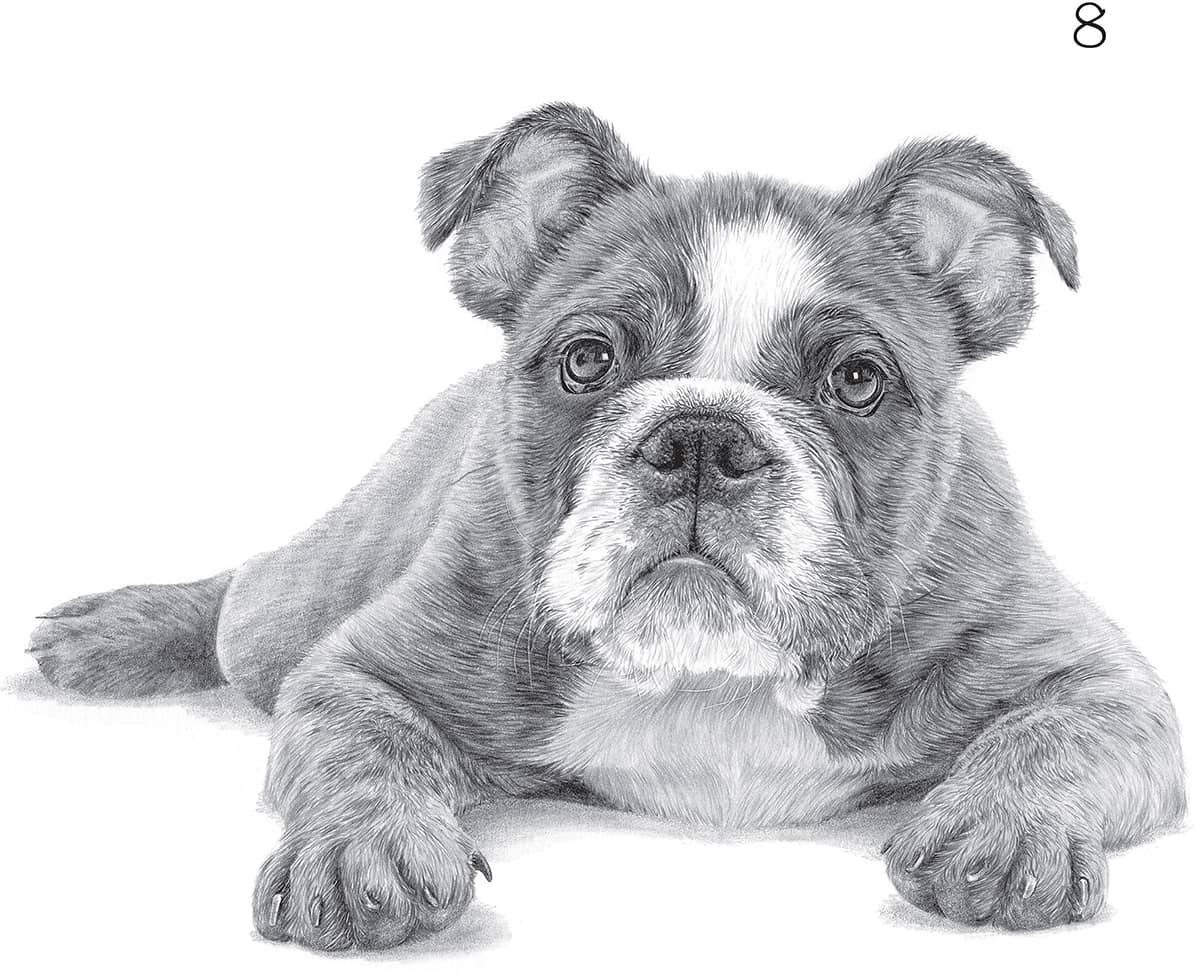
8 Finally, moving to the paws, shade the nails, first applying a dark edge to each using a 2B pencil. Then add a thick line using a blunt HB pencil along the dark edge, leaving the rest white to indicate reflected light. Shade the undersides of the pads using an HB pencil; then apply the graphite using very small circles to imply a rough texture. Build up the layers of fur on the paws with a 2B pencil, applying the lines closer together in the shadows. Finish the paws by applying a single layer of HB pencil over the entire area to indicate the value of the brown hair. Finally, ground the dog with a subtle shadow. Apply a little graphite with a 2B pencil under the body and each of the paws, and then blend with a tortillon.
HUSKY
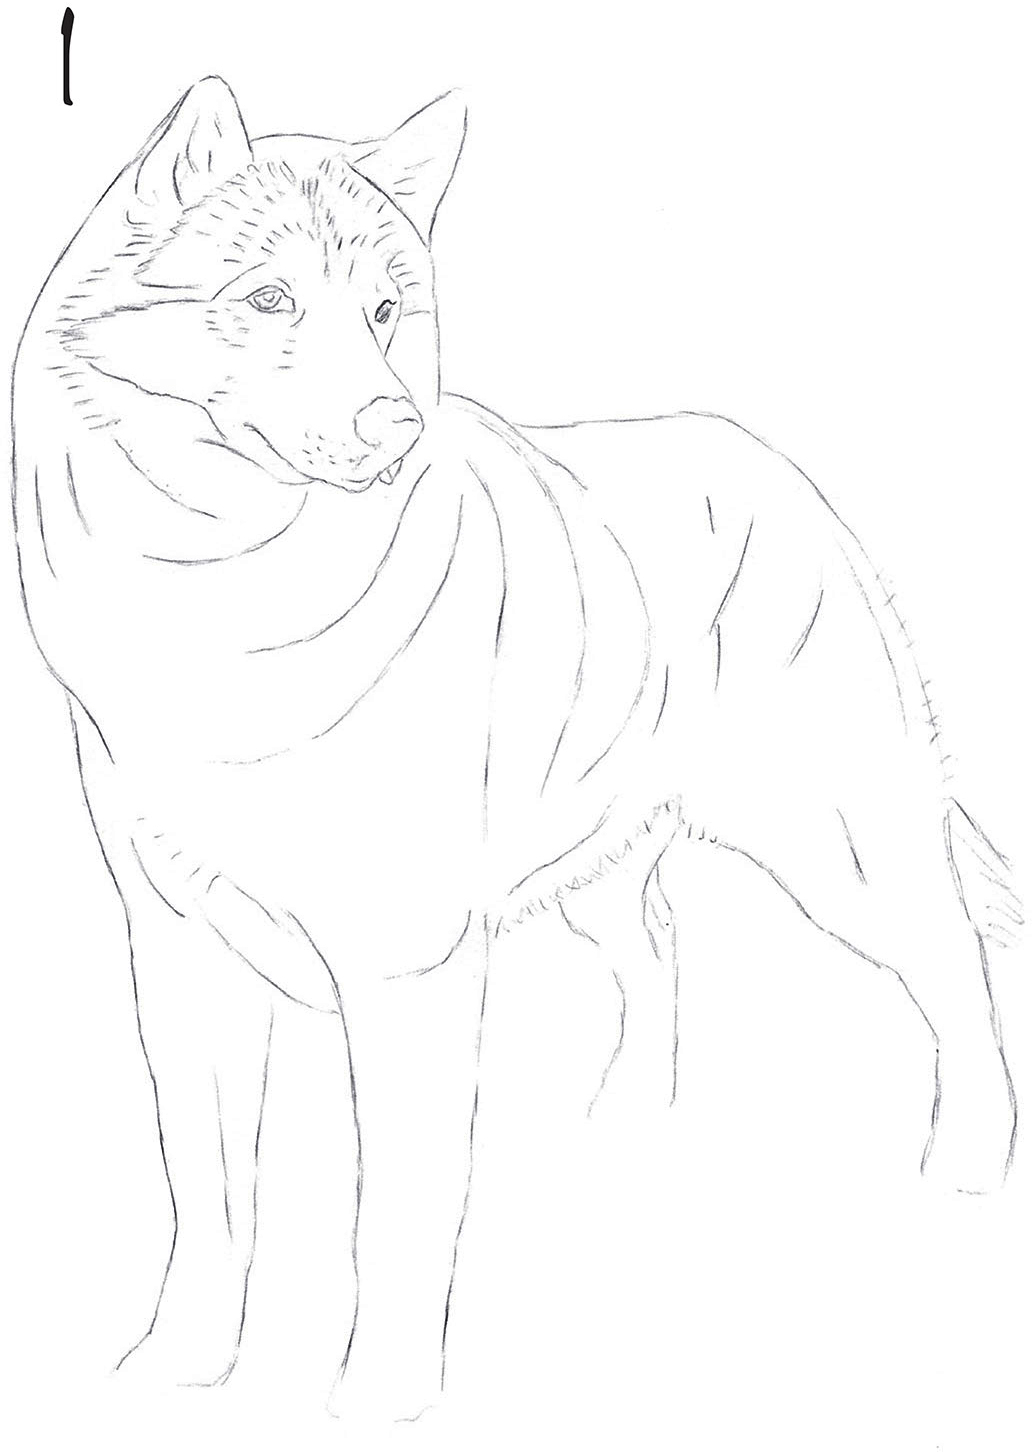
1 Sketch a rough outline of the Husky, positioning the features accurately. Mark the folds of skin that help indicate the twist in the upper body.
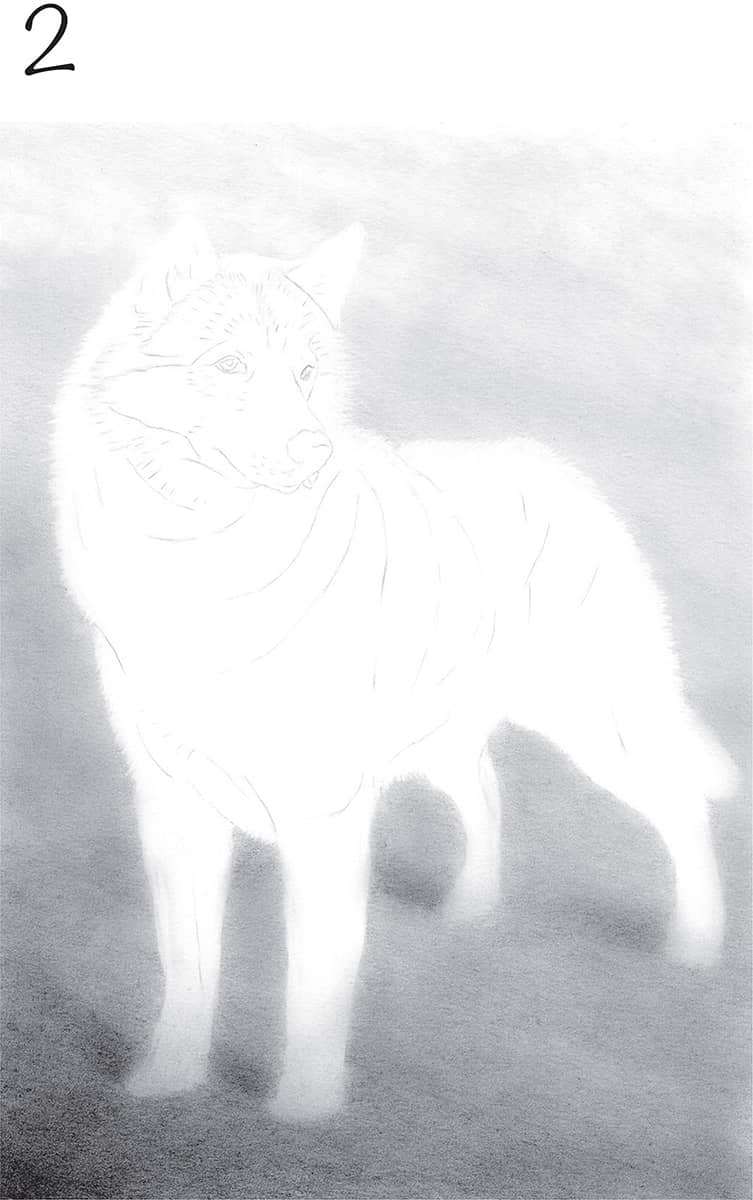
2 Block in the background using a blunt 5B pencil, working around the shape of the outline. Apply more pressure toward the bottom. To add interest, use a putty eraser to stroke rough lines at the top of the drawing, giving the impression of a sky, and also adding subtle shadows near the dog’s legs. Use a pencil eraser to flick out around the edge of the dog, suggesting fluffy fur.
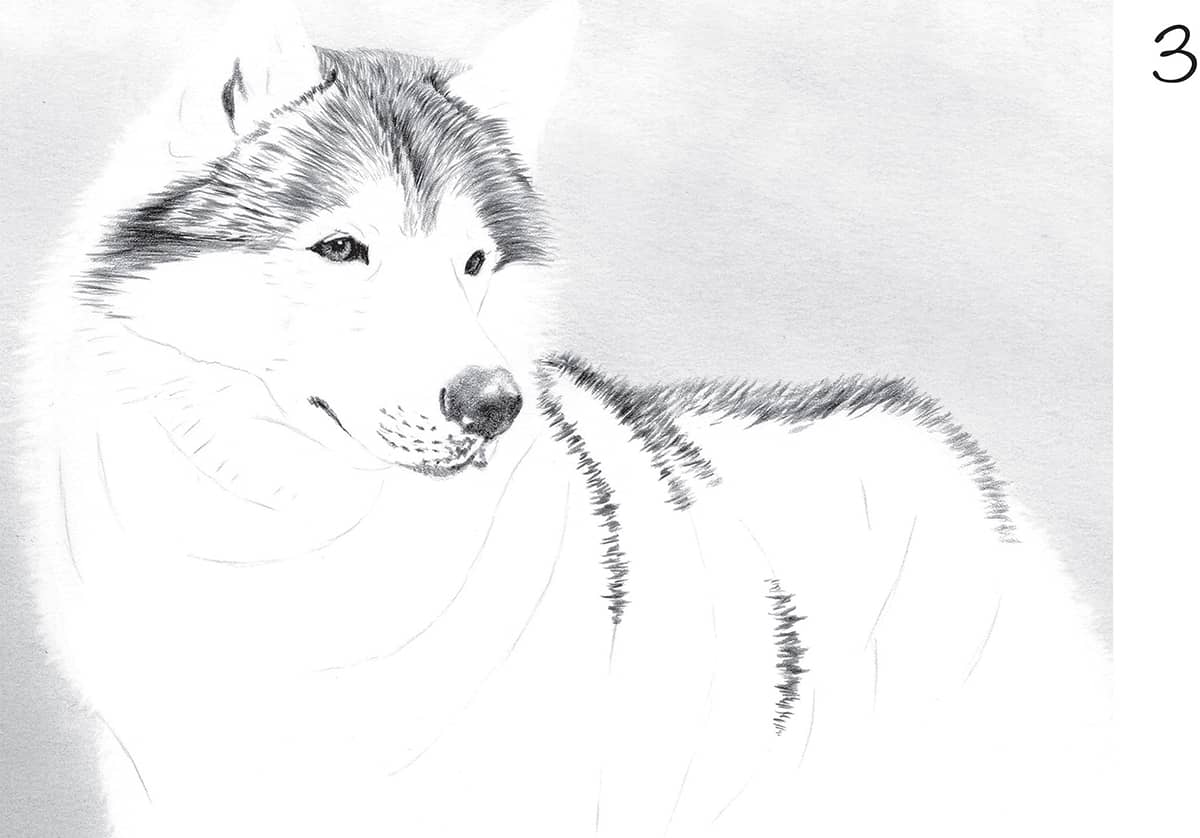
3 Pick out the darkest areas and shade them with a sharp 2B pencil; these include the eyes and nose which, at this distance, don’t require much detail. Move to the dark fur of the head and back using random, zigzagging lines. Returning to the head, use a sharp 2B pencil and short lines to develop the hair up and over the forehead and out toward the ears, leaving light areas around the eyes.

4 With an HB pencil, go over the dark fur of the head with more short lines, following the same direction as used in step 3. Block shade over the areas of dark hair using a blunt 2H pencil to add tone and fill in the white of the paper. This method of applying 2B, then HB, and finally 2H pencils gives the fur a sense of depth. Repeat this technique over the back of the dog, applying lines closer together to indicate creases in the coat.
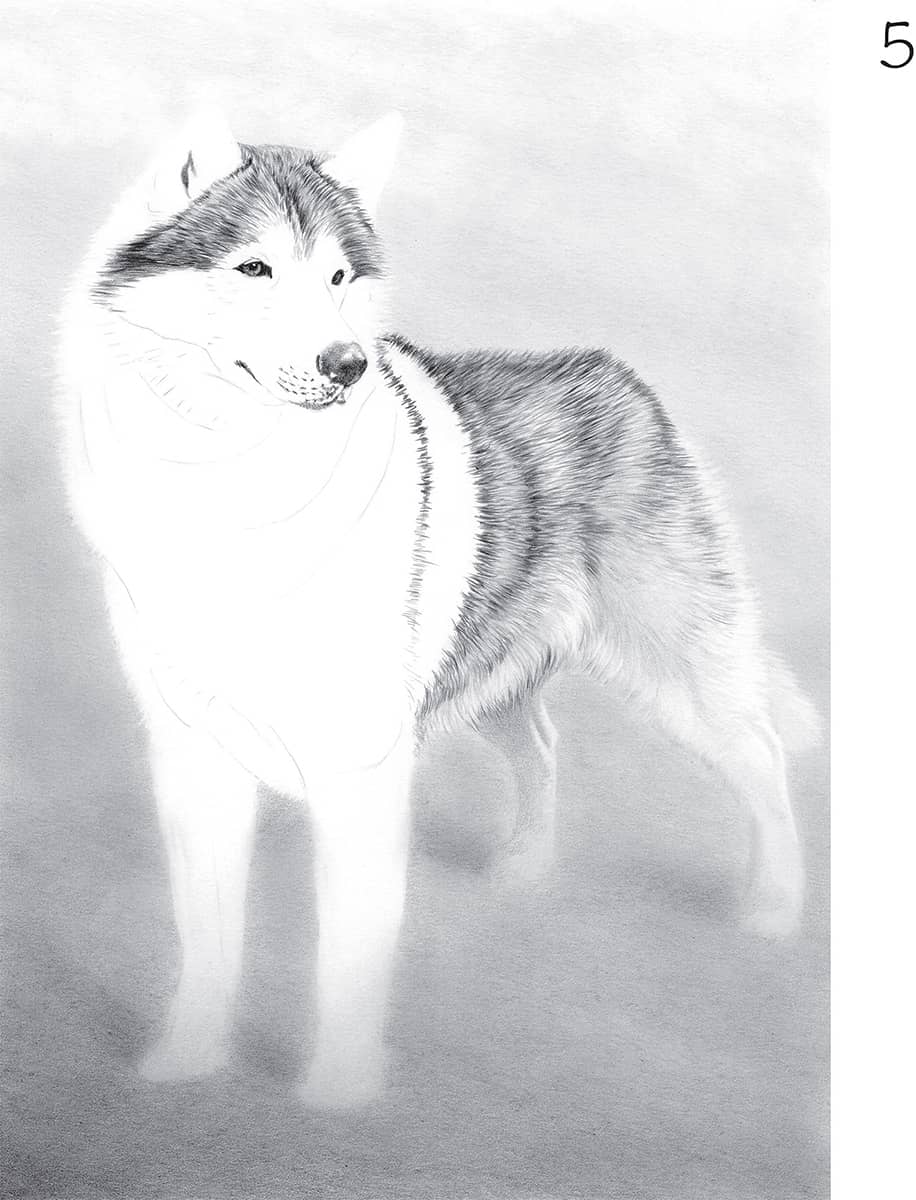
5 Moving to the dog’s back, repeat this technique of adding HB and 2H lines over the 2B strokes. Extend the layer of 2H pencil down over the thigh, creating a lighter tone of fur. Erase some lines of hair on the underside of the dog and where the stomach meets the hind leg. Block in the fur of the hind legs using an HB pencil, making sure that the tones differ from those of the surrounding background. Erase the back edge of each leg to suggest reflected light.

6 For the front of the dog, use the same technique as in previous steps. However, instead of starting with the lines of a 2B pencil, start with the lines of an H pencil; then move to the 2H and layer over the top with the blunt side of a 2H pencil. Leave a bit of white of the paper showing though where the light is hitting the back of the legs and the front right shoulder.
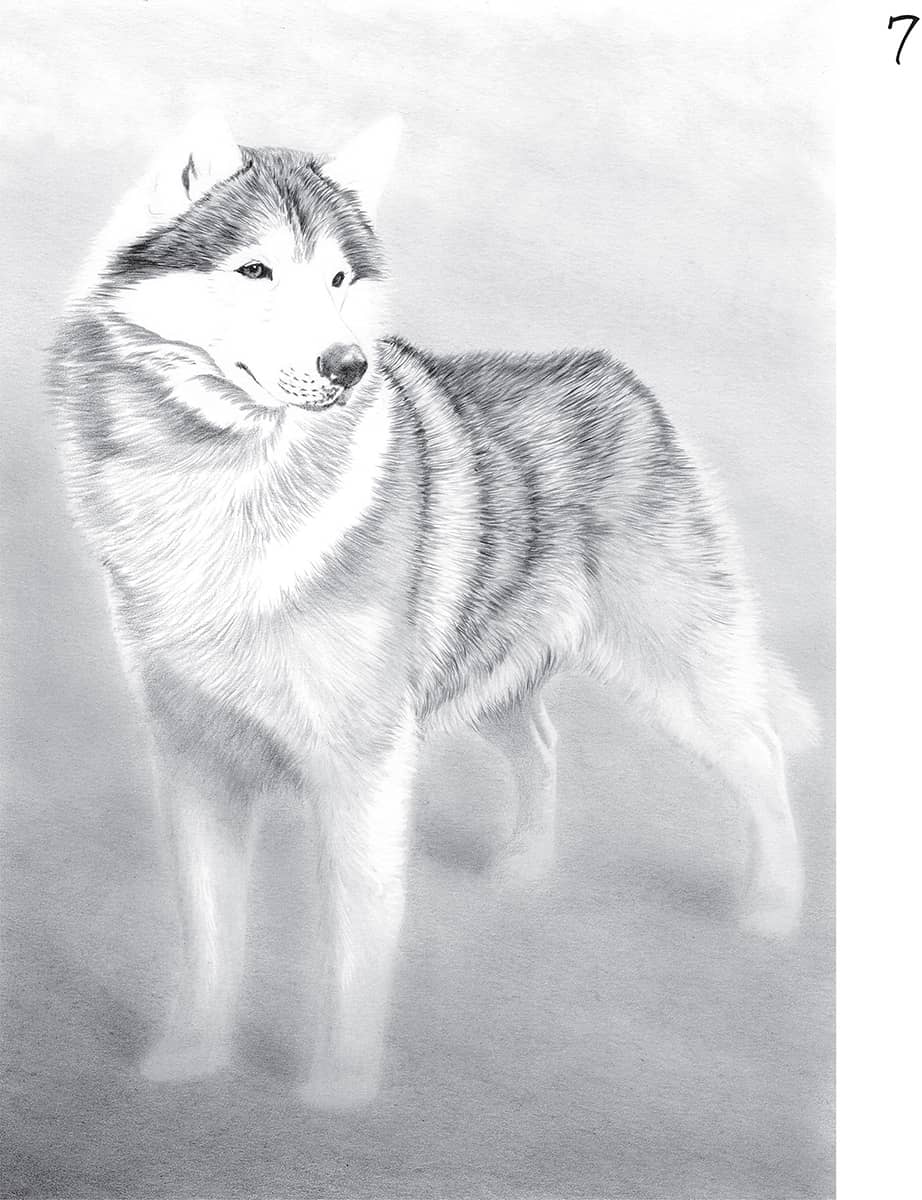
7 Continuing across the neck, minimize detail in this area so the Husky’s face stands out. Use an HB pencil and begin filling in the area with strokes in the direction of hair growth, applying lines closer together to create creases in the coat. Switch to a 2B pencil for the neck area at left, where the coat is in shadow, drawing slightly longer lines here, as the fur lengthens around the neck.
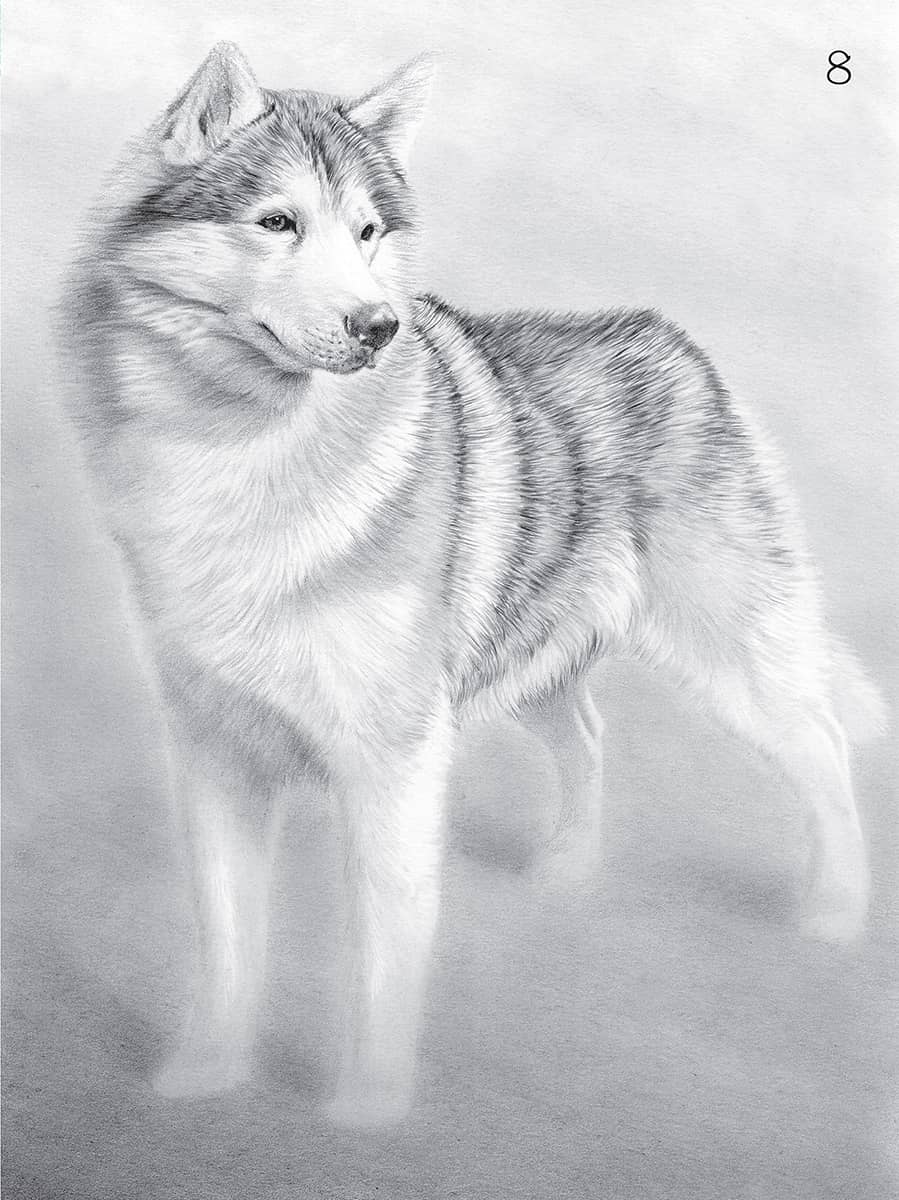
8 Go over the neck with a blunt 2H pencil to blend the area; then pick out the highlights using a pencil eraser. The main highlights are just to the left of the muzzle, where clumps of fur are catching the light. Blend along the left edge of the neck; then use an HB pencil to shade the remaining parts of the face and ears. Darken the back sides of the ears using a 2B pencil. To finish, lift out the top of the muzzle to create more contrast within the face.
Springer Spaniel Puppy
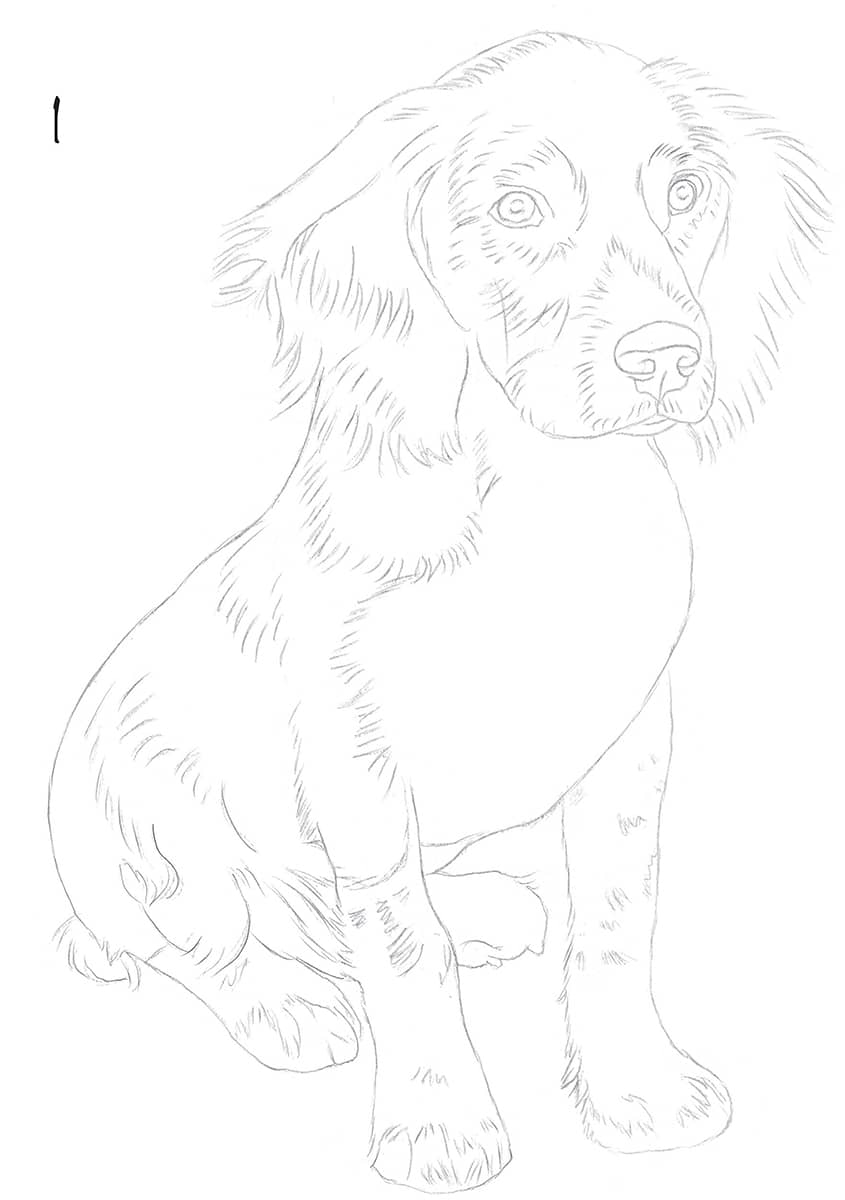
1 Draw a basic outline, ensuring that proportions are accurate. Suggest the hair using short, tapering strokes in the direction of hair growth.
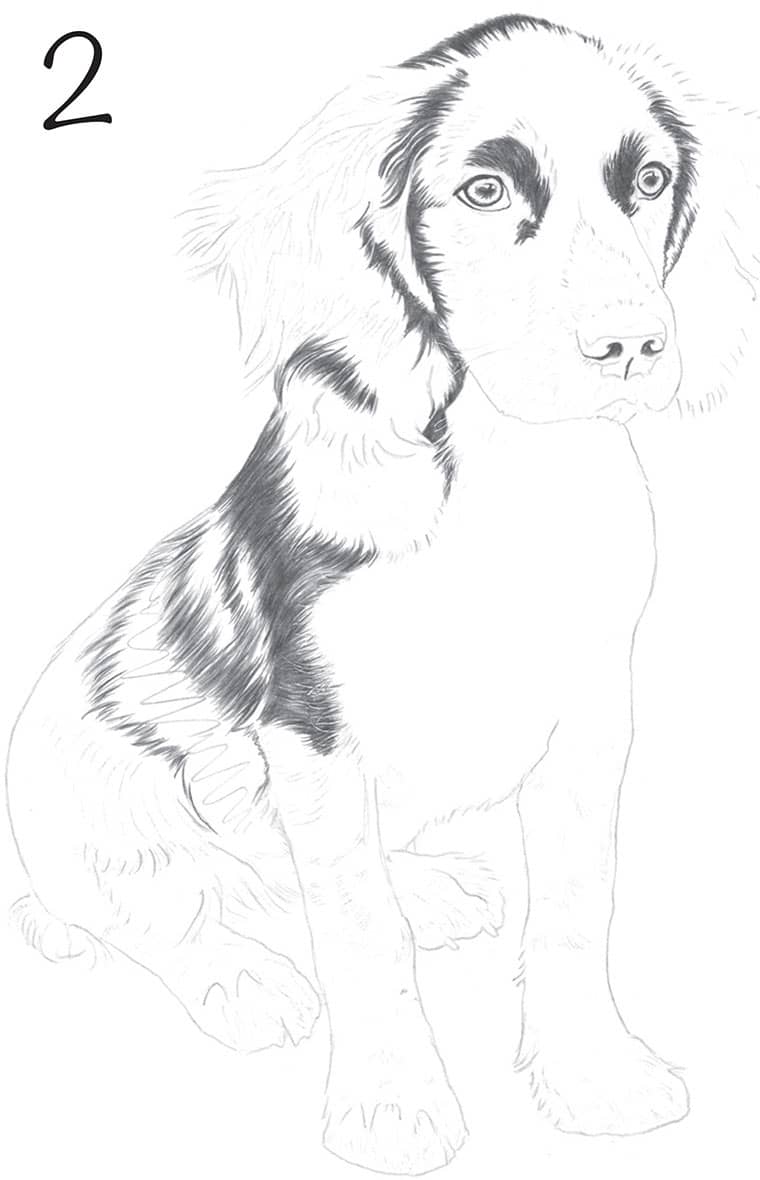
2 Use a 2B pencil to block in the pupils, working around the highlight. Add thin lines of dark skin around the eyes; then begin developing the darkest areas of hair around the eye socket and face, within the ears, and down the back, drawing in the direction of hair growth. Vary the length of each stroke to keep the hair from looking too uniform and taper the strokes for seamless transitions between values.
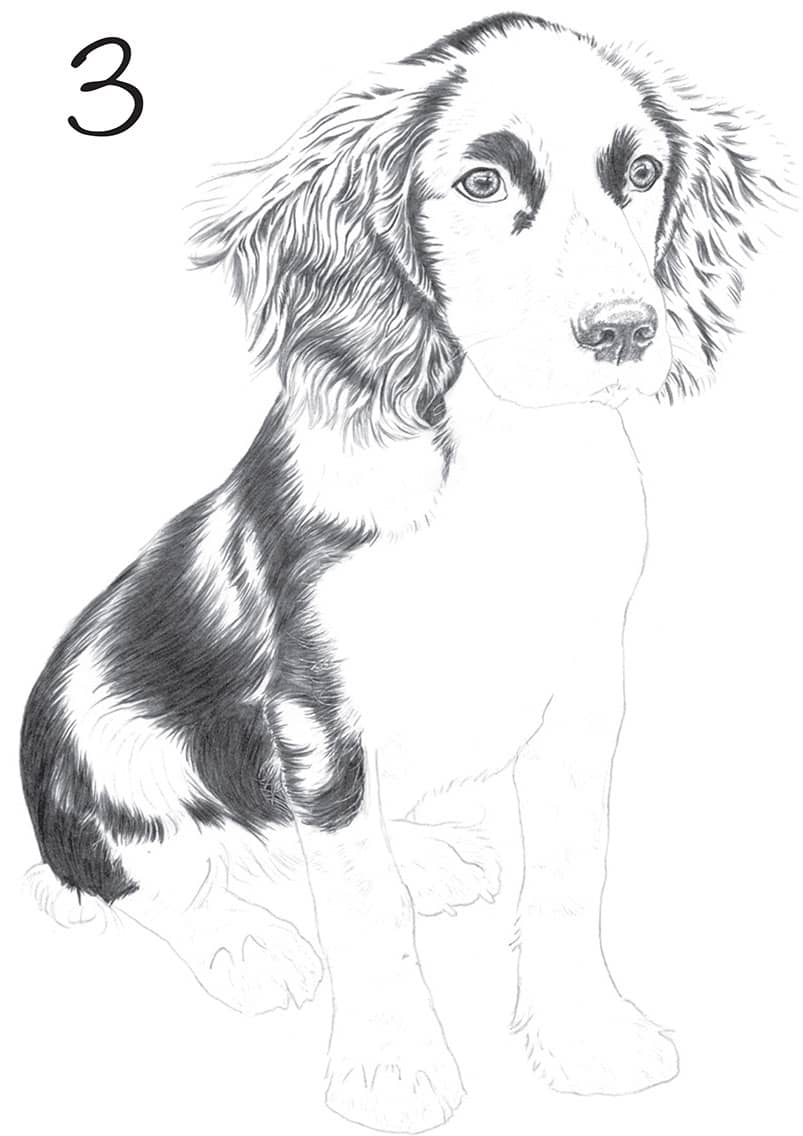
3 After toning the darkest areas, increase the value by stroking over them with a 4B pencil, paying close attention to the curving and swirling patterns within the hair. Returning to the 2B pencil, stroke within the ears to define strands of hair, focusing on the shadows. Apply a layer of tone to the nose using light circular strokes.
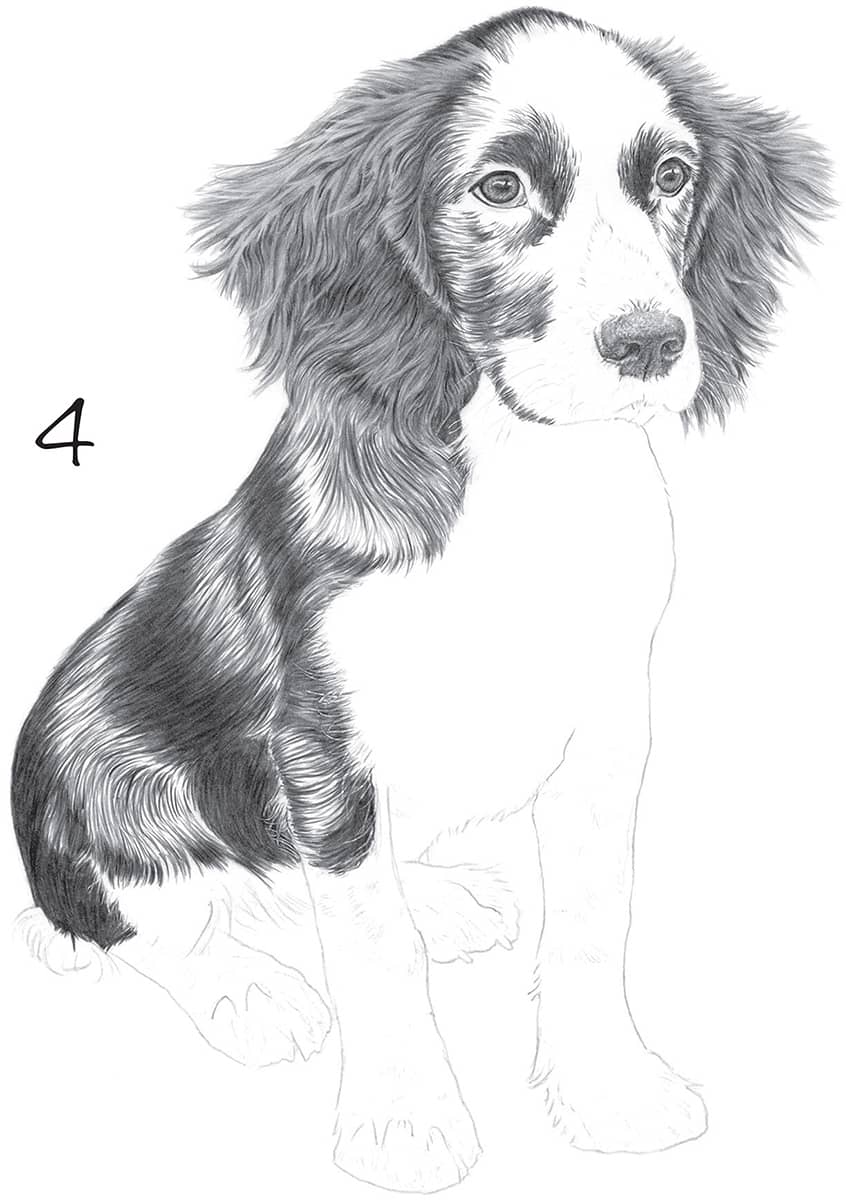
4 Use an HB pencil to apply the lightest tones to the dog’s ears. Stroke alongside the previous layers of graphite, creating a soft, silky look. Develop the eyes and nose, adding midtones and pulling out highlights where needed. Use the 2B to pull tone over the light areas of the body, connecting the sections of hair. Begin developing the hair over the face, scooping under and over the eyes to follow the direction of hair growth.
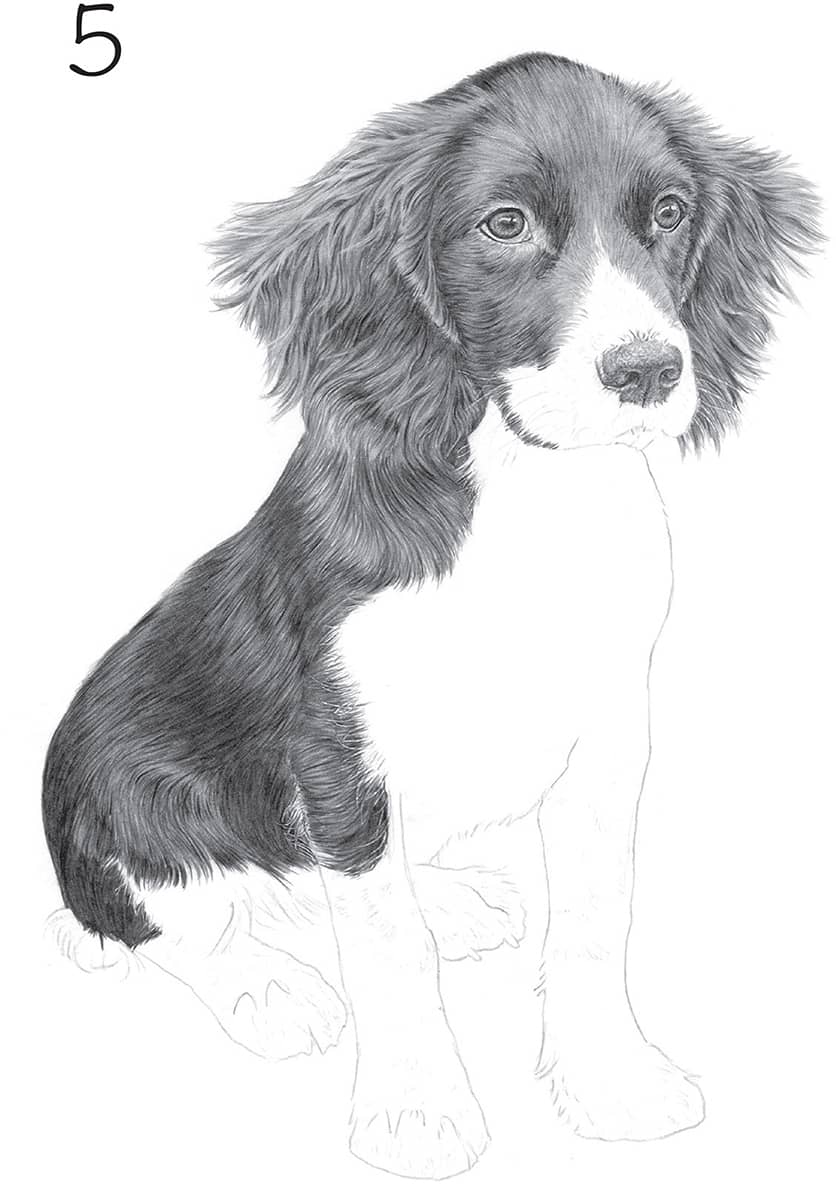
5 Continue to build up tone over the Spaniel’s back using a blunt 2B pencil.
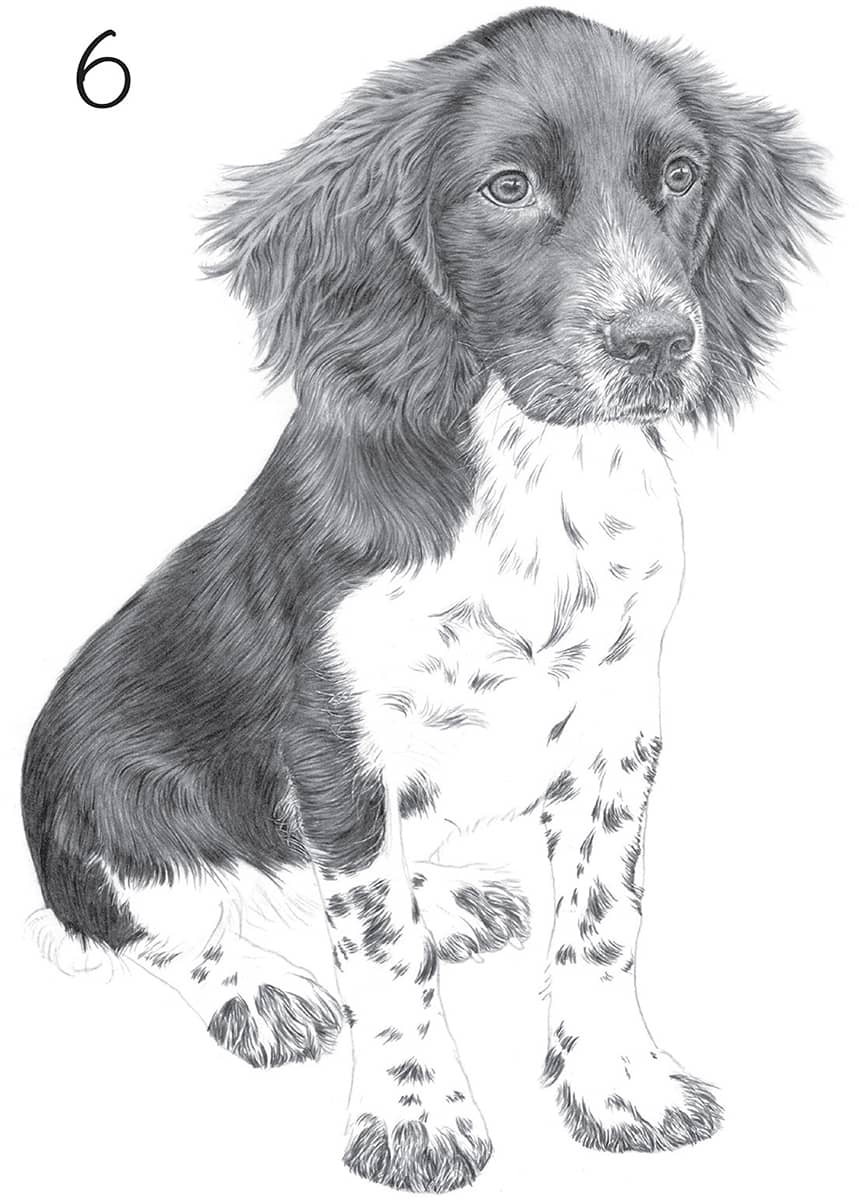
6 With an HB pencil, indicate the hair on the pup’s muzzle, keeping some areas white. Use a 2B pencil to suggest the direction of hair growth with minimal strokes, adding curves, sprouts, swirls, and spots to create the markings on the fur.
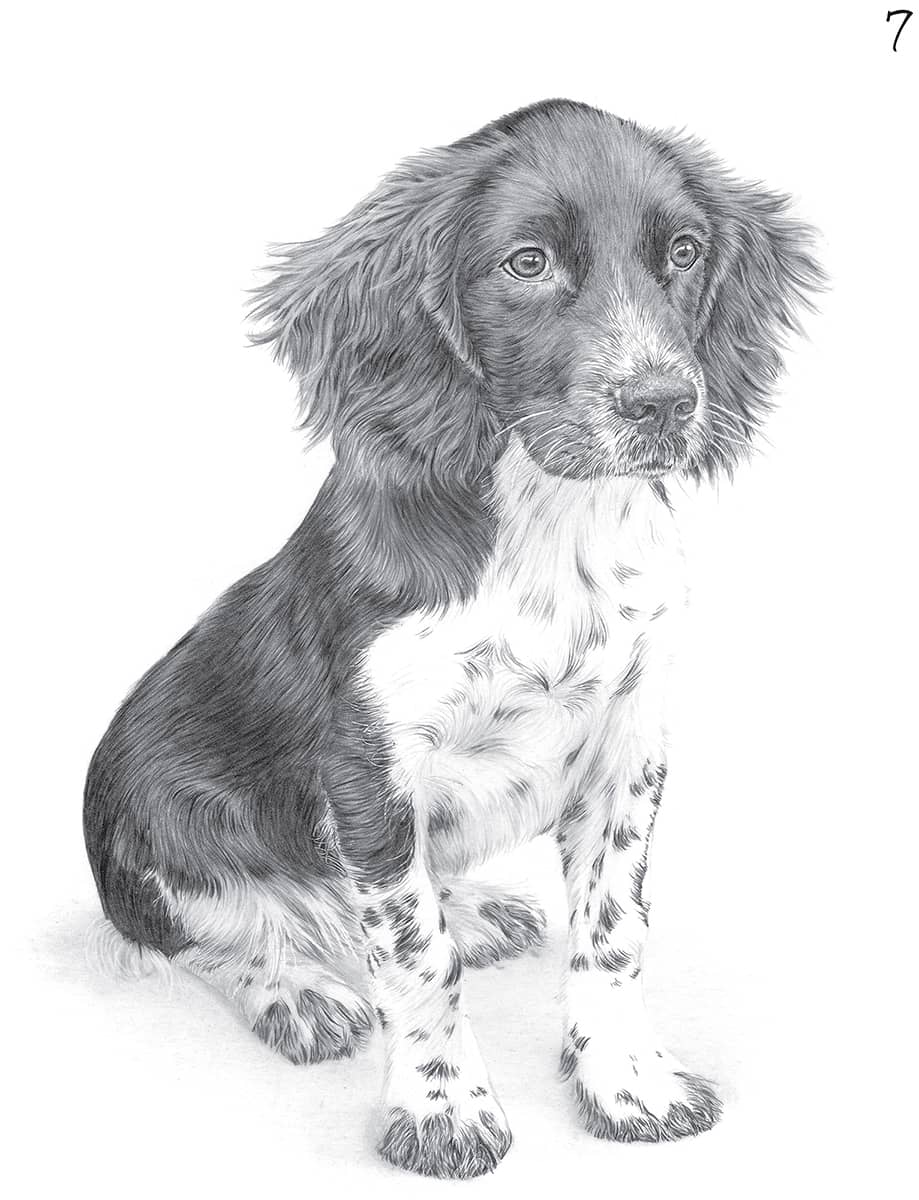
7 With an H pencil, add fine strokes to develop the area of white hair. Use a tissue to gently rub over areas in shadow, focusing on the pup’s underside. Then add a light layer of graphite add a soft cast shadow under the pup, blending the strokes with a tissue.
Beagle
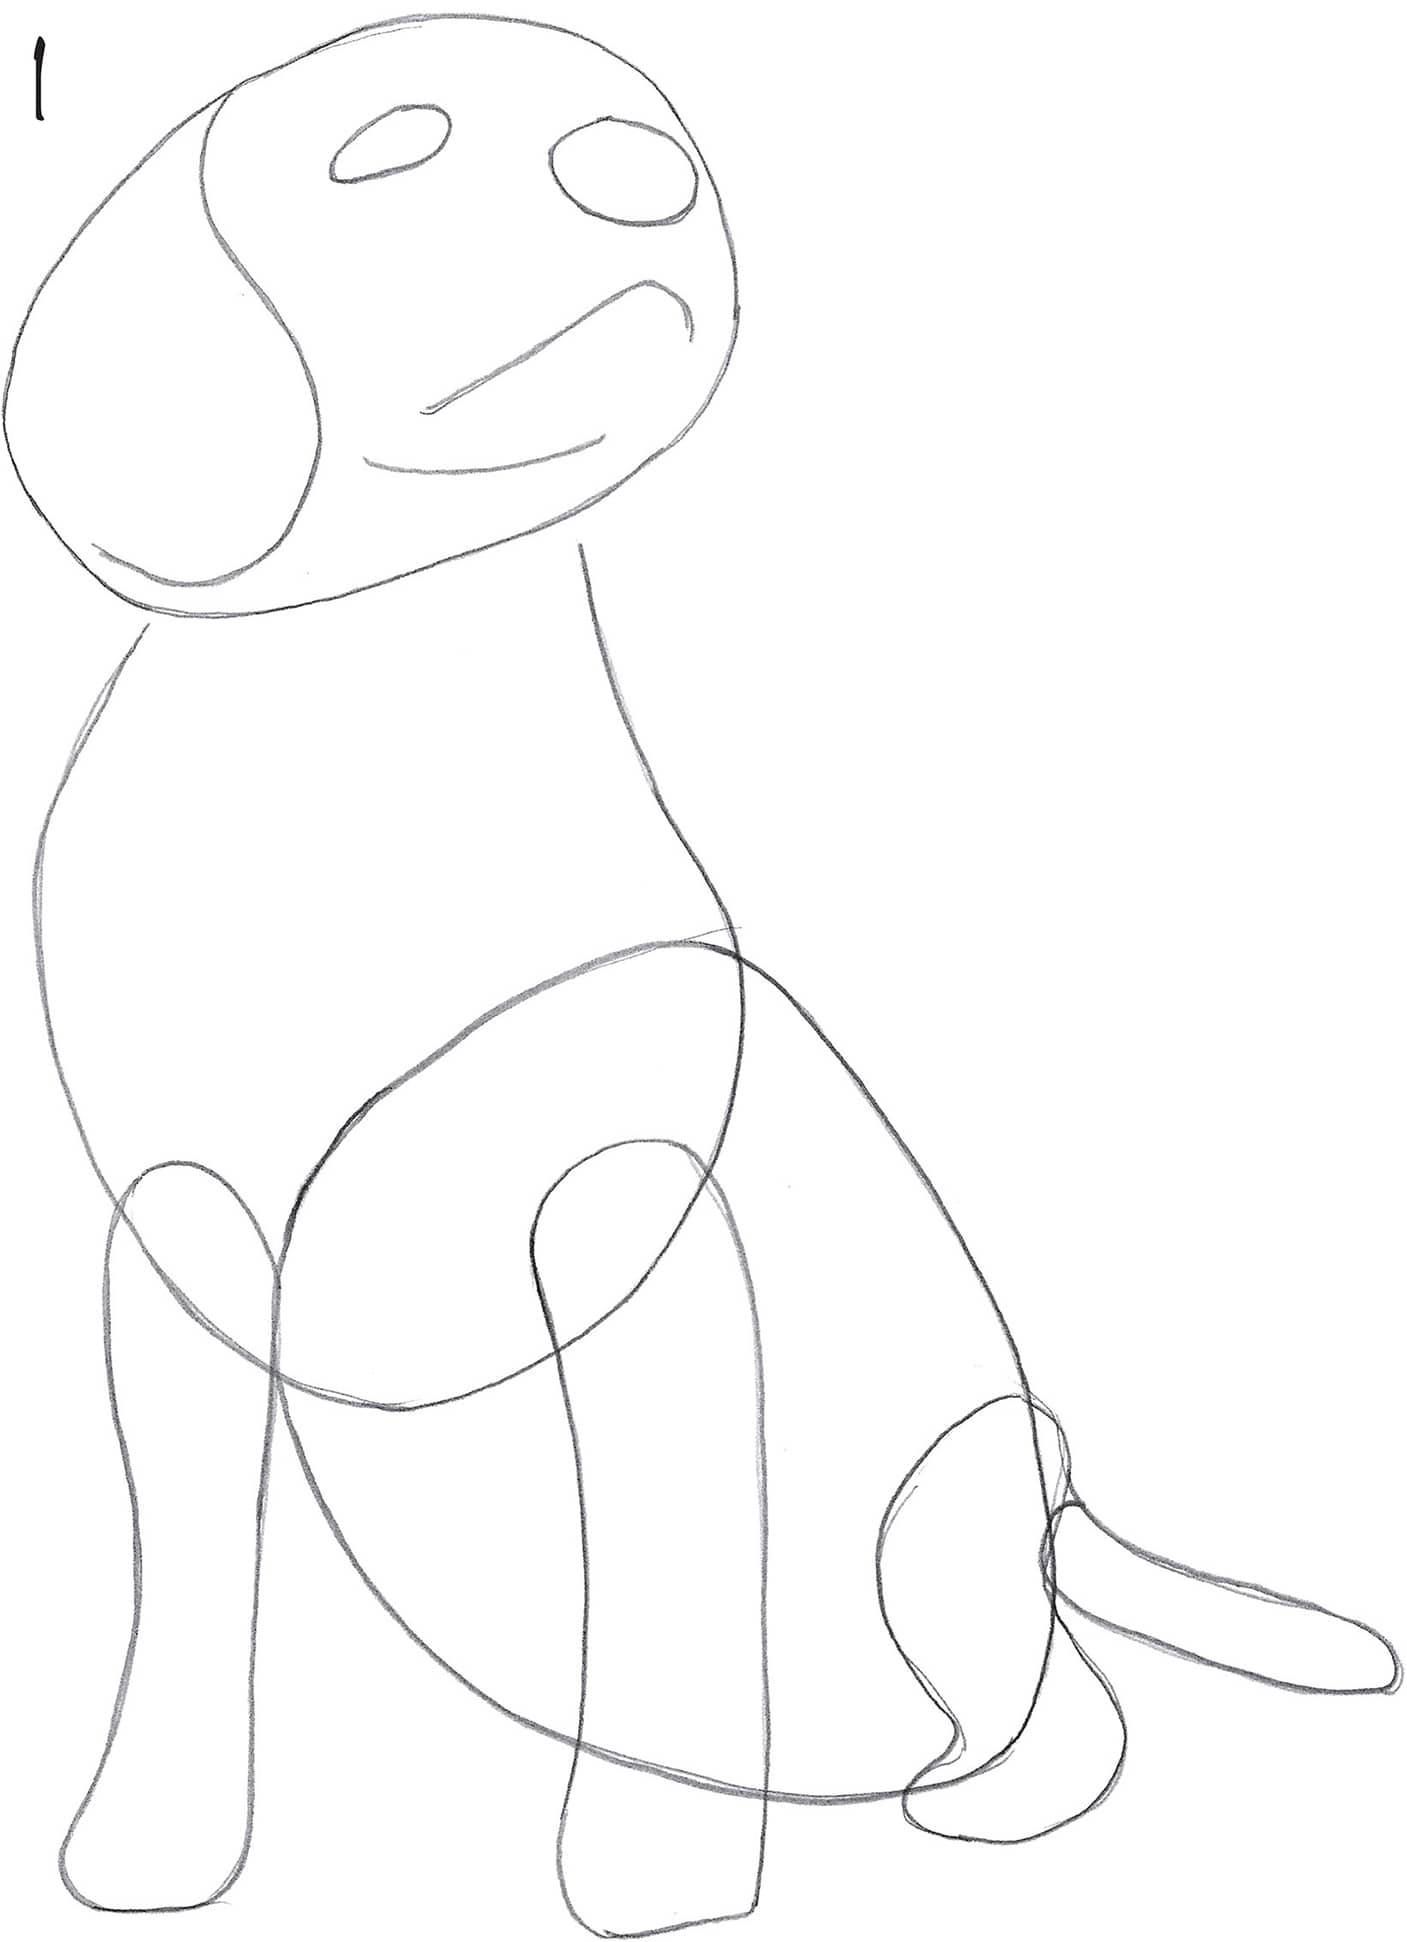
1 Draw the beagle’s basic shapes to define overall form.
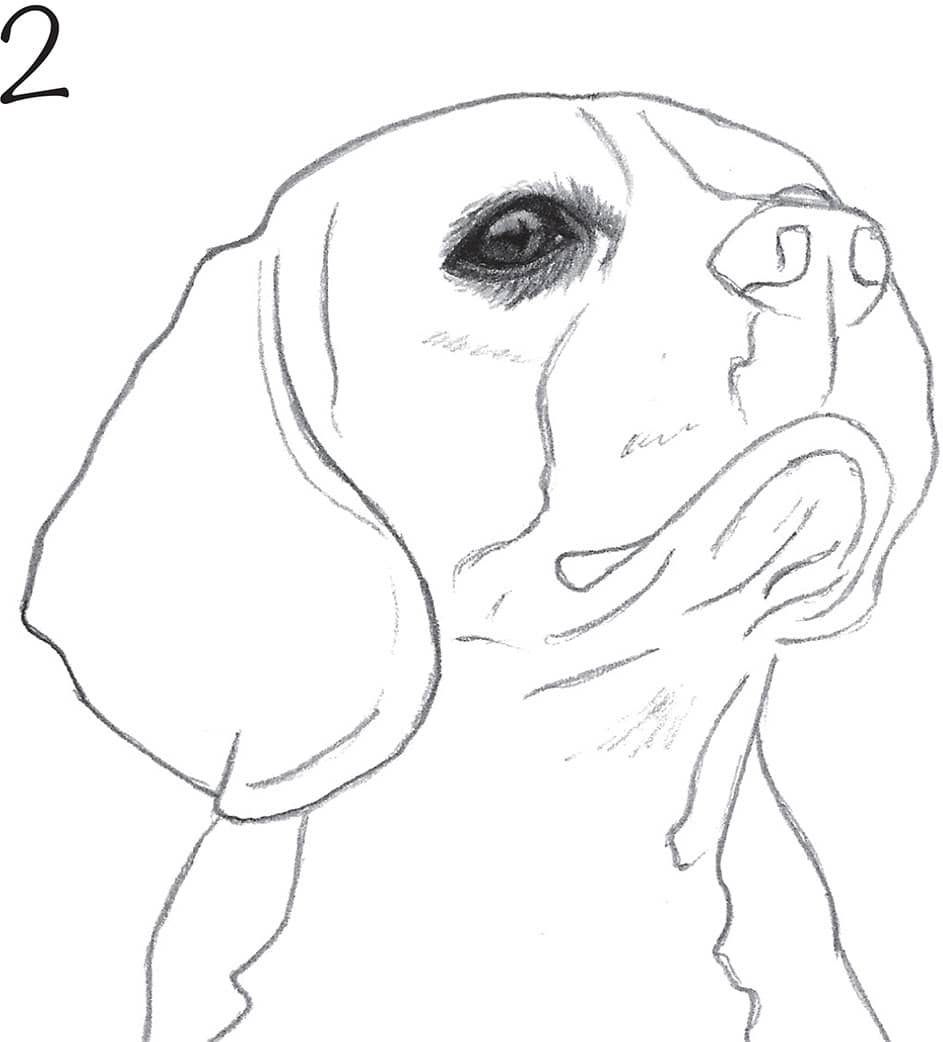
2 Draw a more detailed sketch. Refine the outline of the eye, and darken the eyelids and darkest sections within; then draw in a bit of fur around the eye.
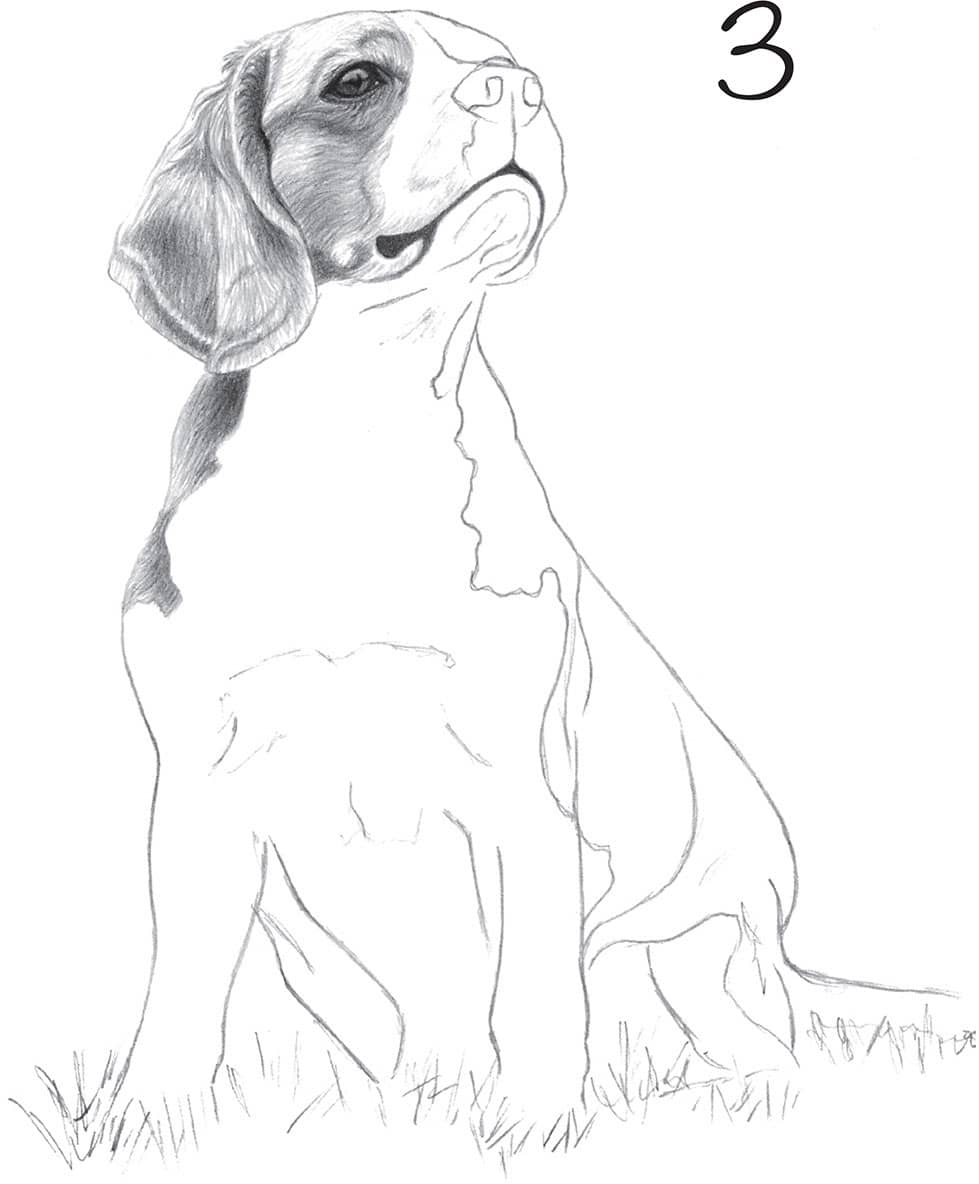
3 Use a 2B pencil to lightly lay in an initial foundation of fur, increasing pressure in the darker areas. Draw in the mouth with firm pressure to establish its dark value.
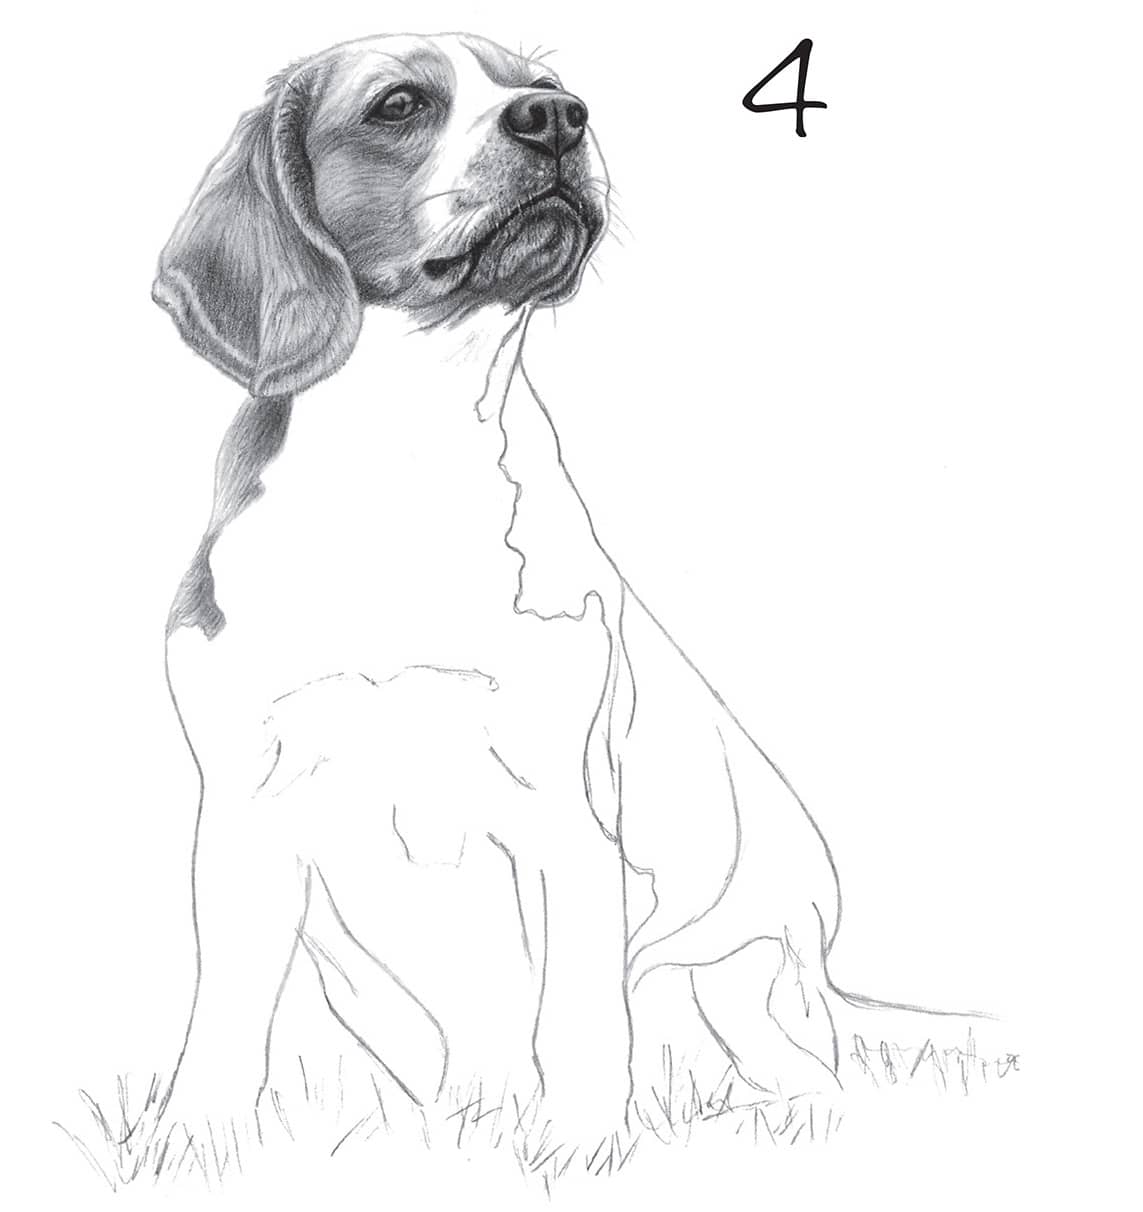
4 Blend and darken the fur as needed, and lift out highlights with a kneaded eraser. Block in the darkest darks of the nose and mouth with layers of 6B graphite, blending between applications. Use a 2B pencil to fill in the lighter areas; then map in the fur below the nose and mouth. Add whiskers and eyebrow lines to complete the face.
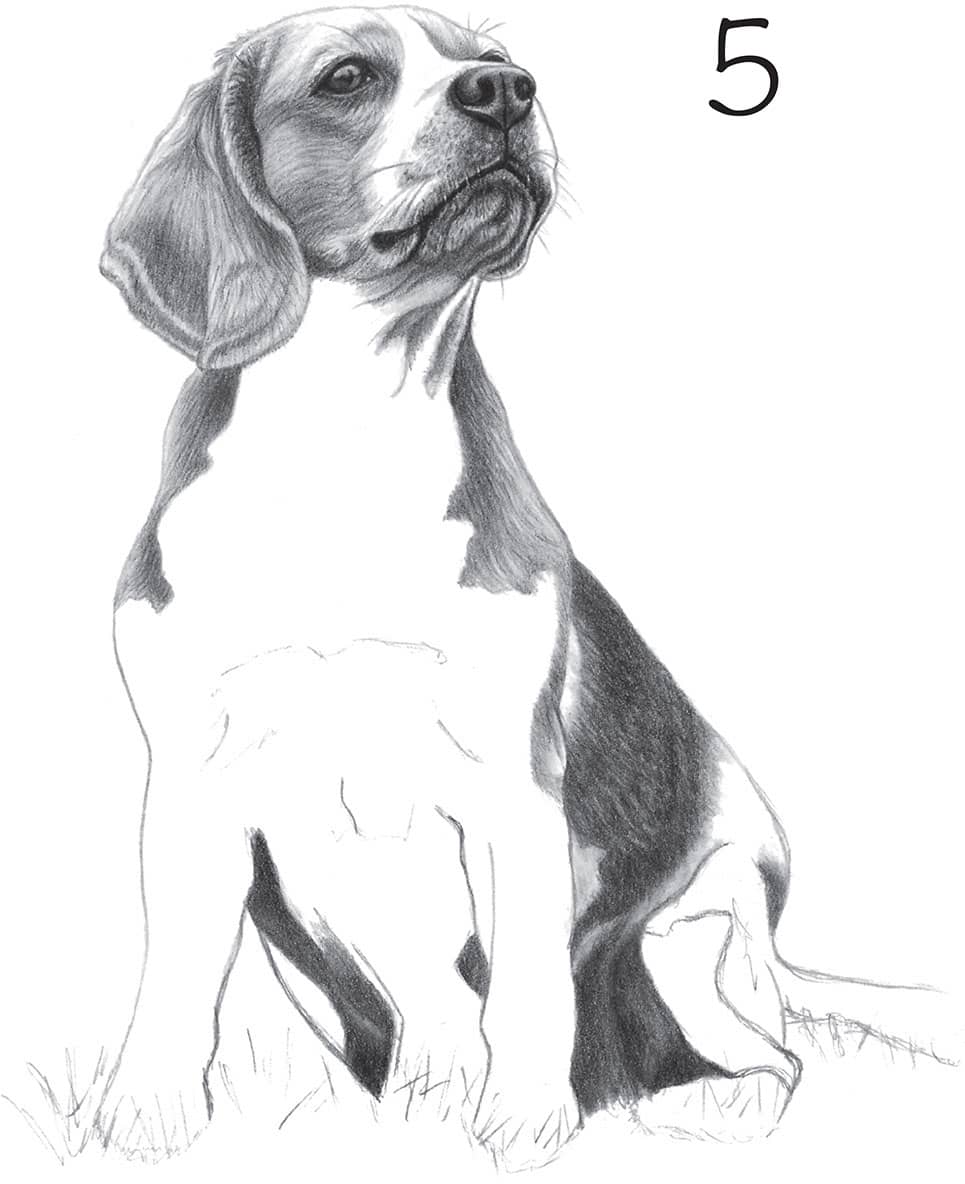
5. Block in the dark body fur with a 2B pencil, followed by a 6B pencil. Use a tortillon to blend each layer until the values appear correct.
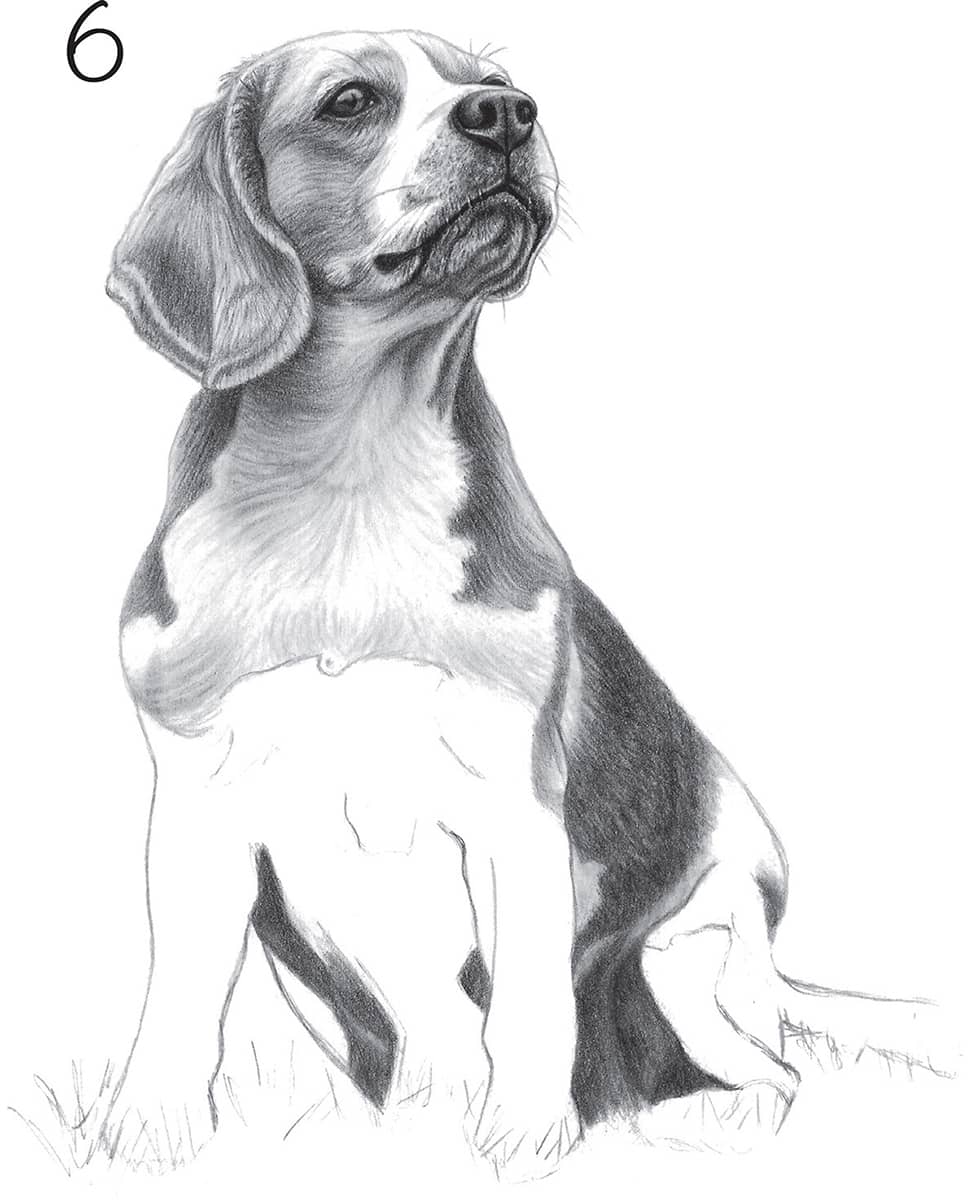
6 With light strokes of 2B graphite, block in the neck fur and blend. Add shading on the dog’s right side with 6B graphite and then blend. Increase the strokes on the chest, blending downward to build density. Use a kneaded eraser to lift graphite and reclaim lighter fur. Then add several more layers of 6B graphite to the darkest fur areas.
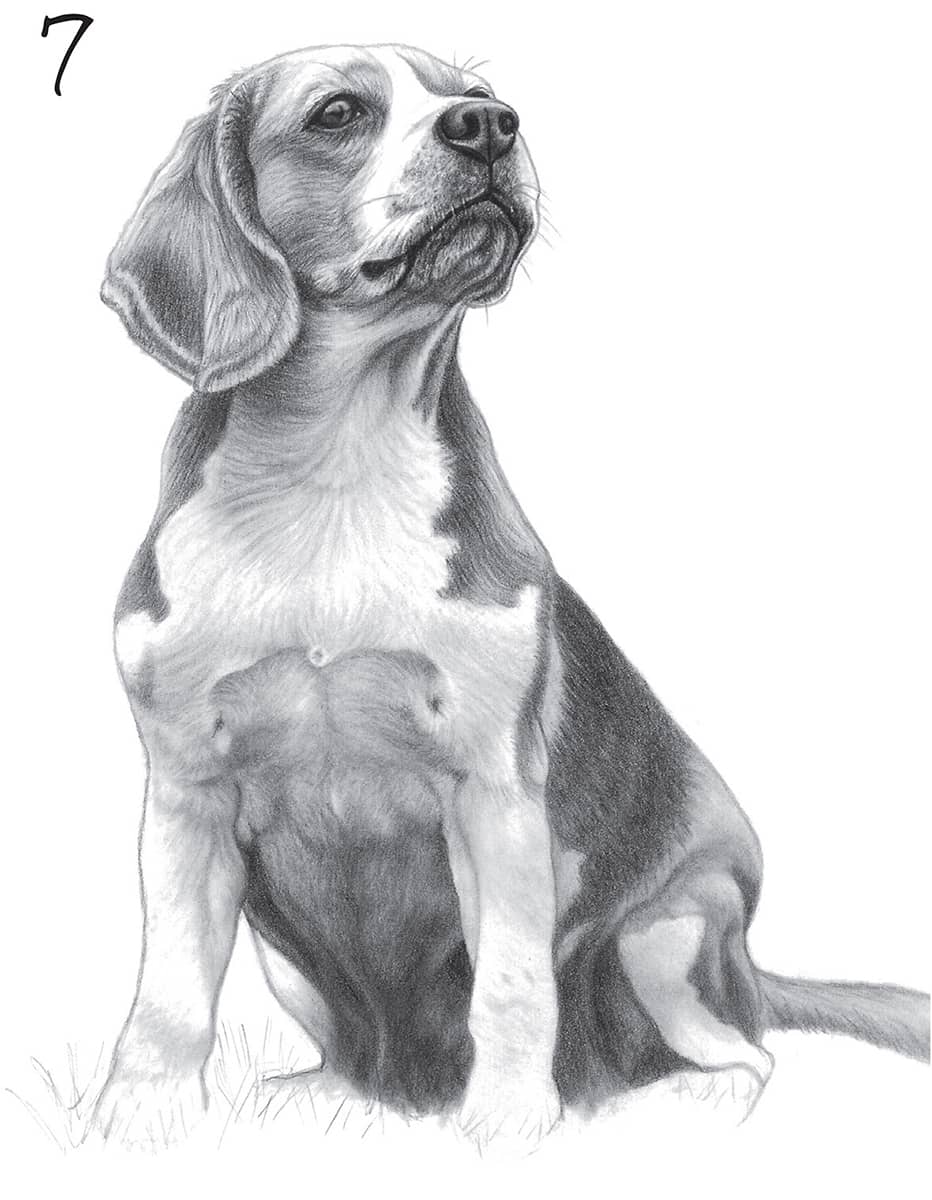
7 Use the same techniques to render the dog’s right side. Use a tortillon to blend and lift graphite in each area and a chamois cloth to lighten and blend larger sections that are overly dark.
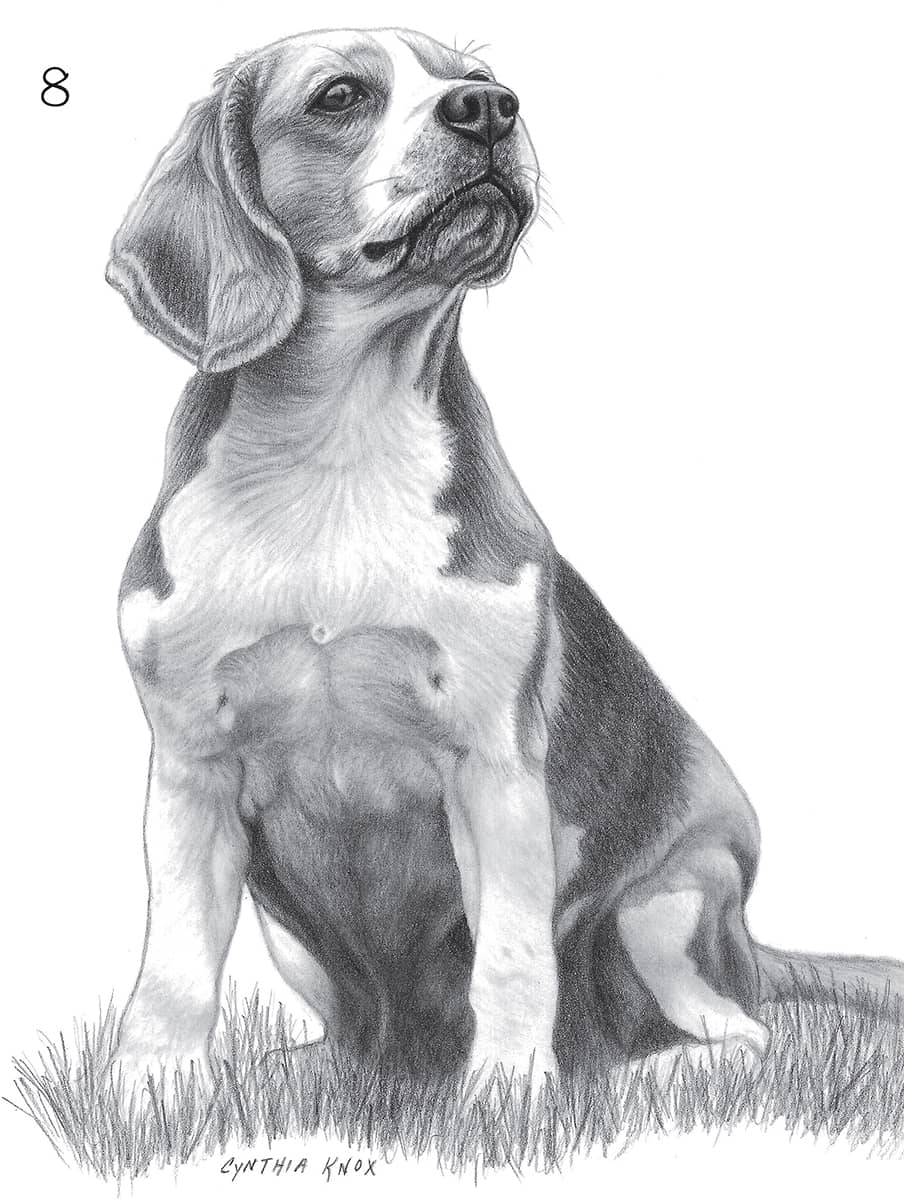
8 To complete the portrait, use 2B and 6B pencils to add scribbled grass. Erase any pencil smudges, and spray the piece with workable fixative to keep the graphite intact.
Pug
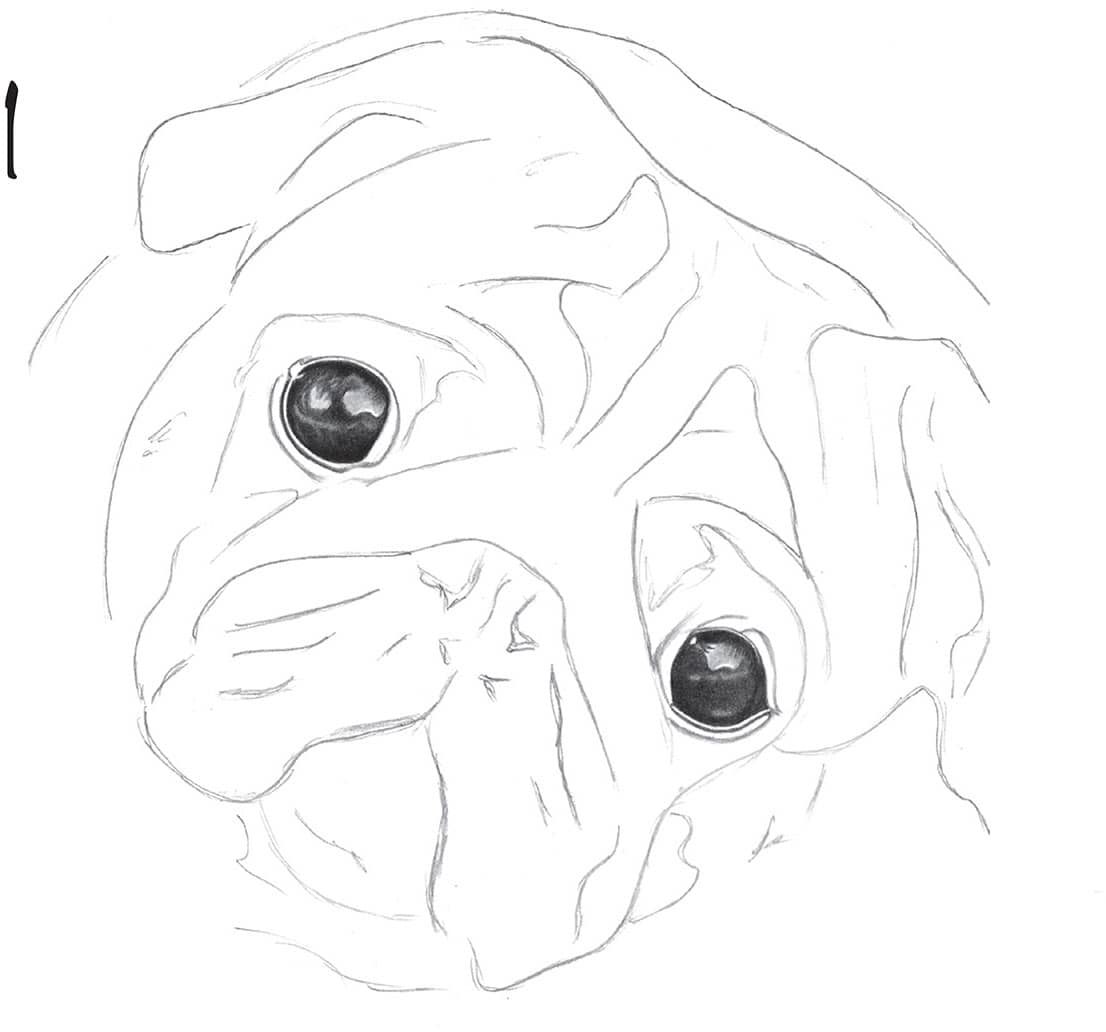
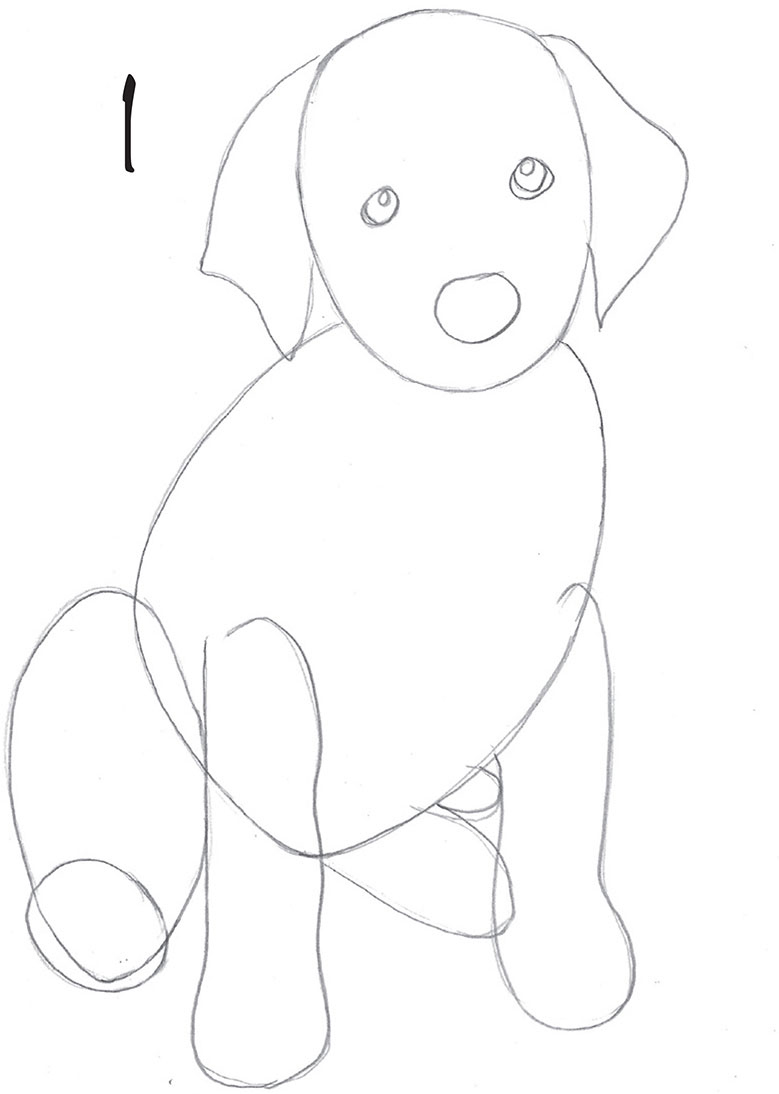
1 Draw a simple sketch, working on the eyes with a 2B pencil. Draw around the lighter shapes, applying more pressure to the darkest sections. Lightly fill in the reflections and blend. Then add a layer of 2B graphite everywhere, including a light layer over the highlights, and blend again.
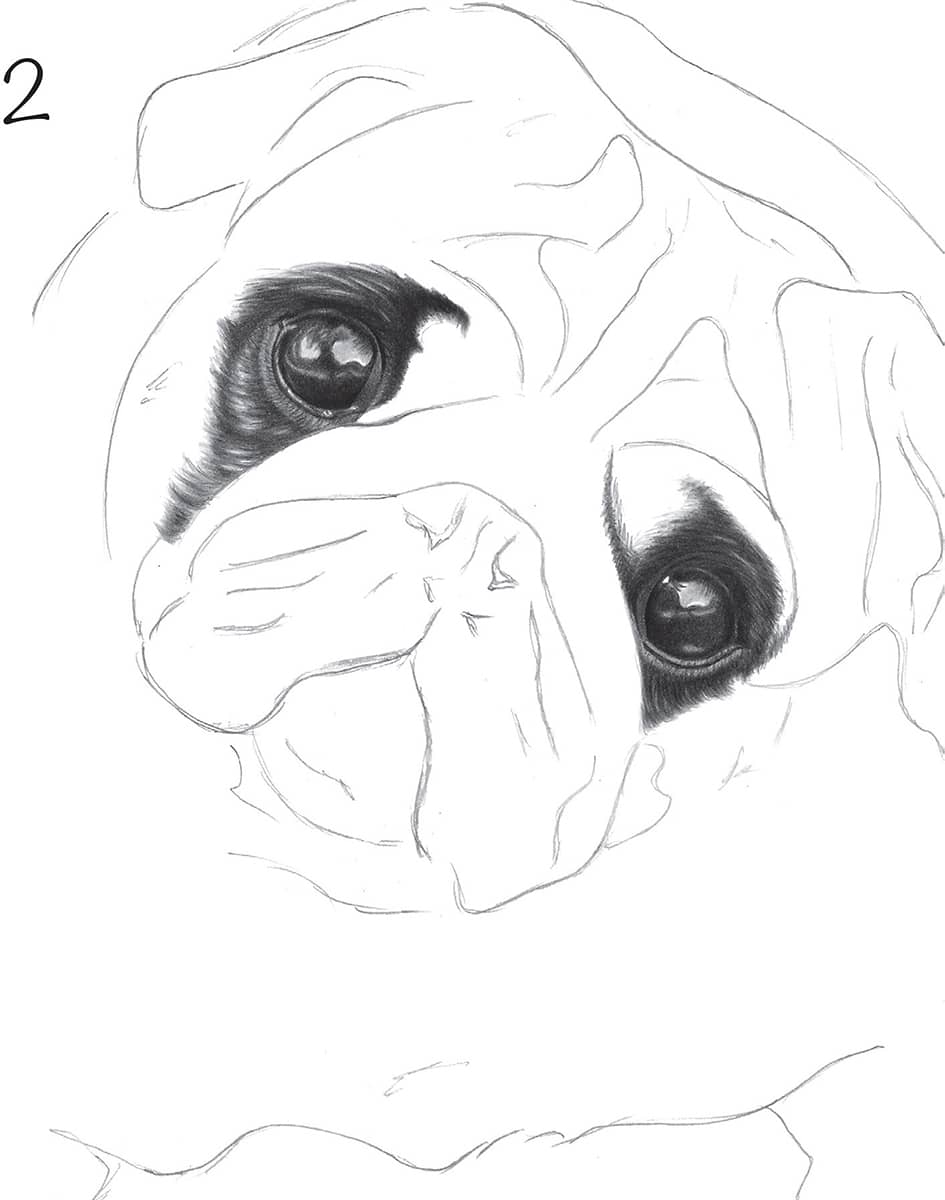
2 Block in the eyelids and around the eyes with several layers of graphite to build density. Keep the highlights white, pulling them out with the edge of a kneaded eraser.
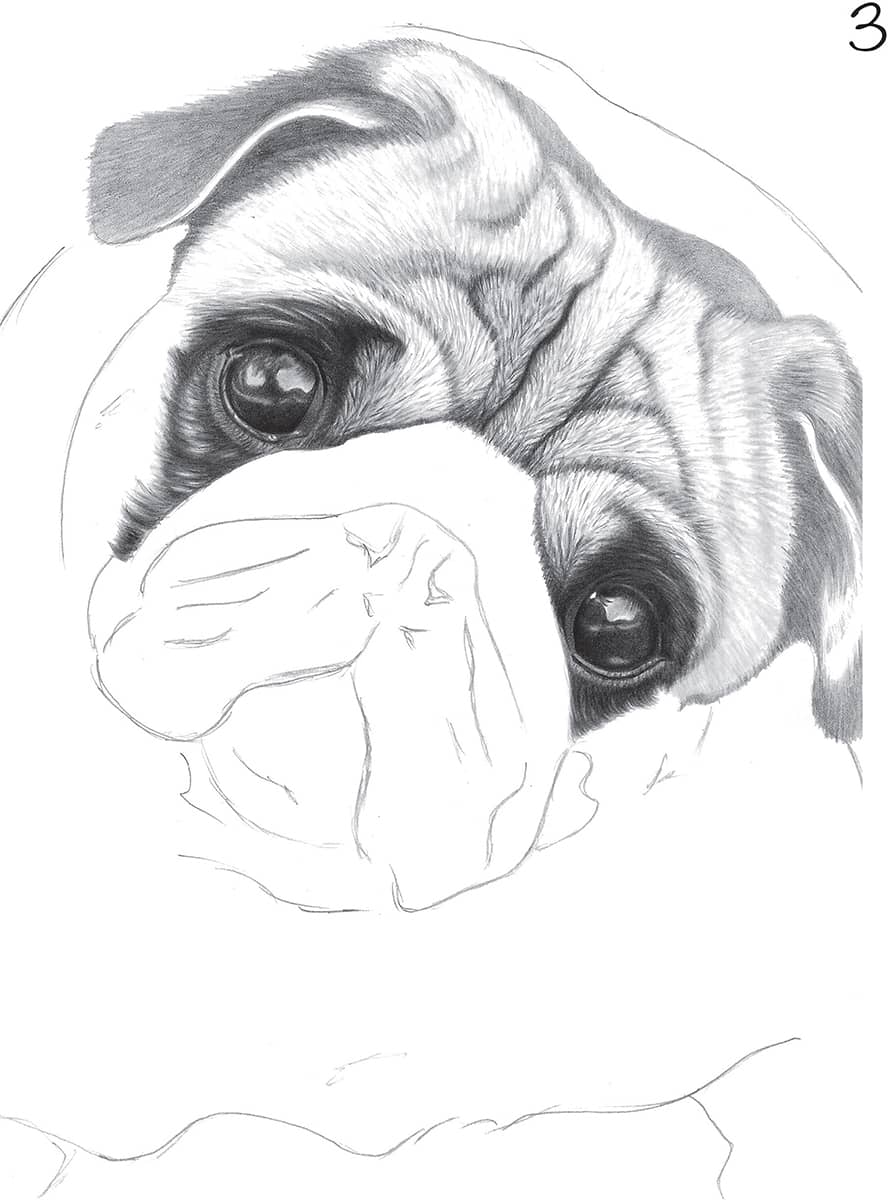
3 Render the light fur with short strokes, blending with a tortillon to soften the texture. To finish, pull out white streaks with the edge of a kneaded eraser. Render the dark folds with several layers of 2B graphite in a jagged pattern. Then pull an eraser edge through random areas of the folds to suggest overlapping fur. Lightly layer a section behind the head with graphite, and block in a couple layers on each ear.
4 Finish the ears with layers of 6B graphite. Pull out white streaks in the lightest areas. Use a 2B pencil to render the small tufts of fur above the ears and blend. Next redraw portions of the nose and mouth, blocking in the dark areas. Apply a light layer of graphite over the entire area, and stroke in the fur above the nose.
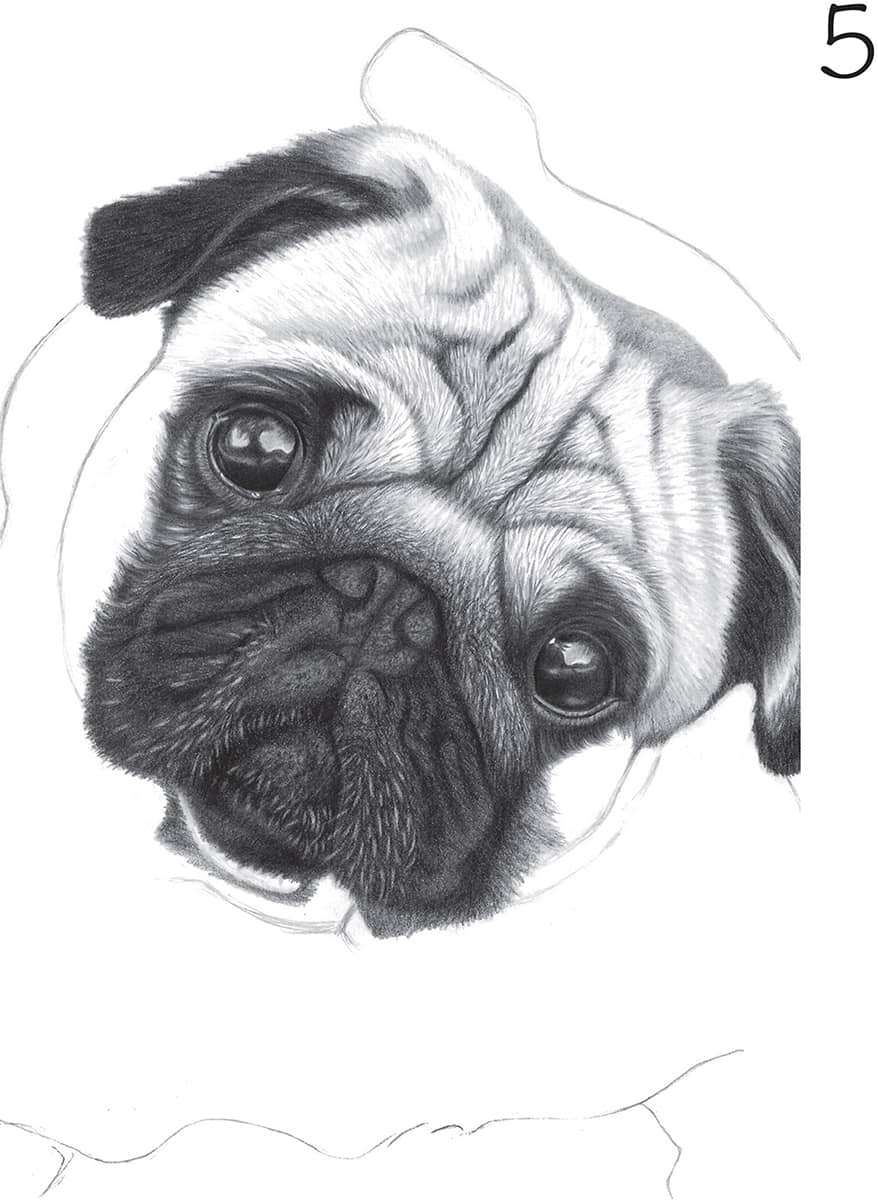
5 Use a 5B pencil to darken the nose and muzzle, using small circular strokes for the flesh and directional strokes for the fur. Use a kneaded eraser to lighten the nostrils and randomly apply dots and short lines to create realistic texture. After blending, pull out short streaks of light fur strands. Above the nose, apply short strokes of 6B graphite close together and pull out streaks of white fur.
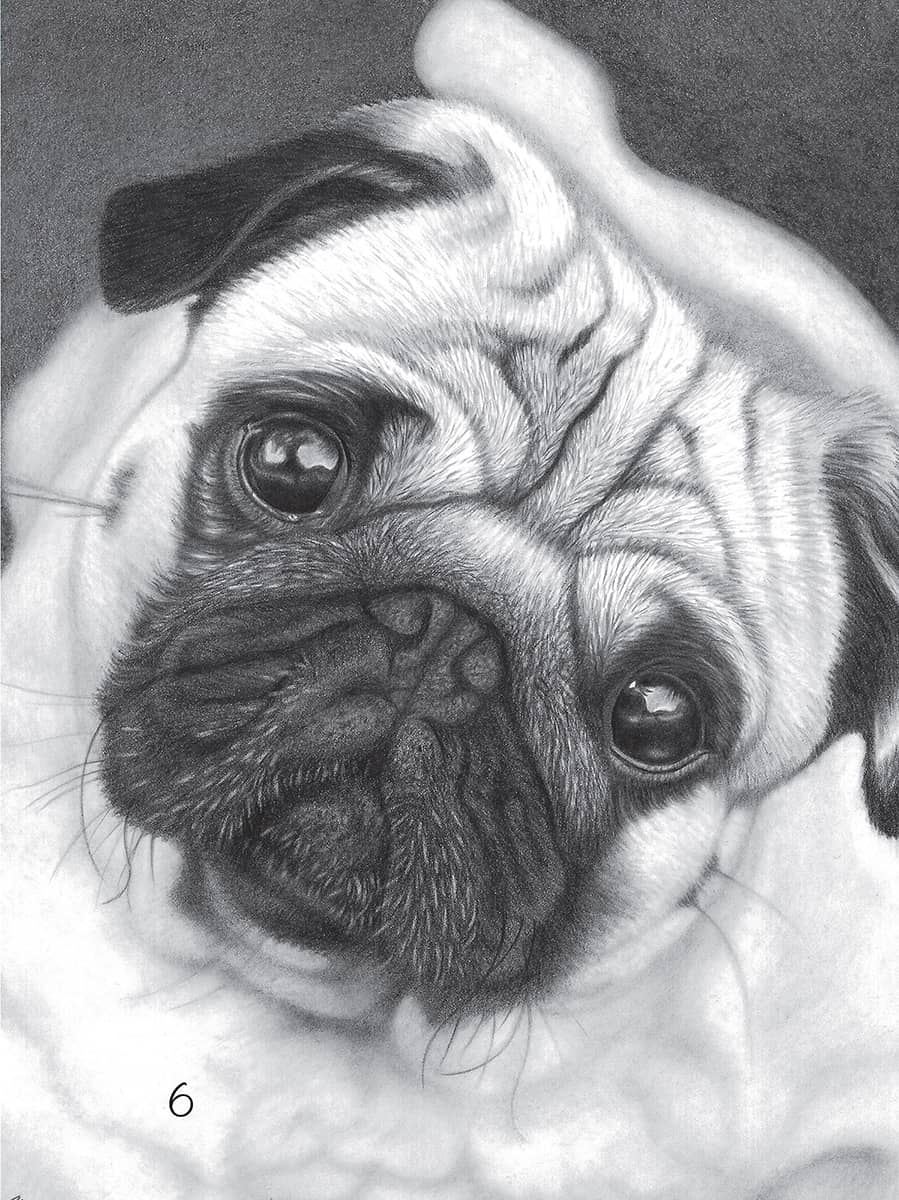
6 Use a 5B pencil to cover the background with tiny, smooth circles, using less pressure in the upper left corner to avoid competing with the ear. Blend and blur the outline of the tail. Then apply a base layer of body fur and create dark markings and shadows with a tortillon in a tight circular motion. Blend the darks and blur the fur with a chamois. Add whiskers with a sharp 2B pencil, lightening with a tortillon as needed. To finish, add in graphite where it has faded—especially in the eye area.
Lab Puppy
1 Map out the basic shapes to get started.
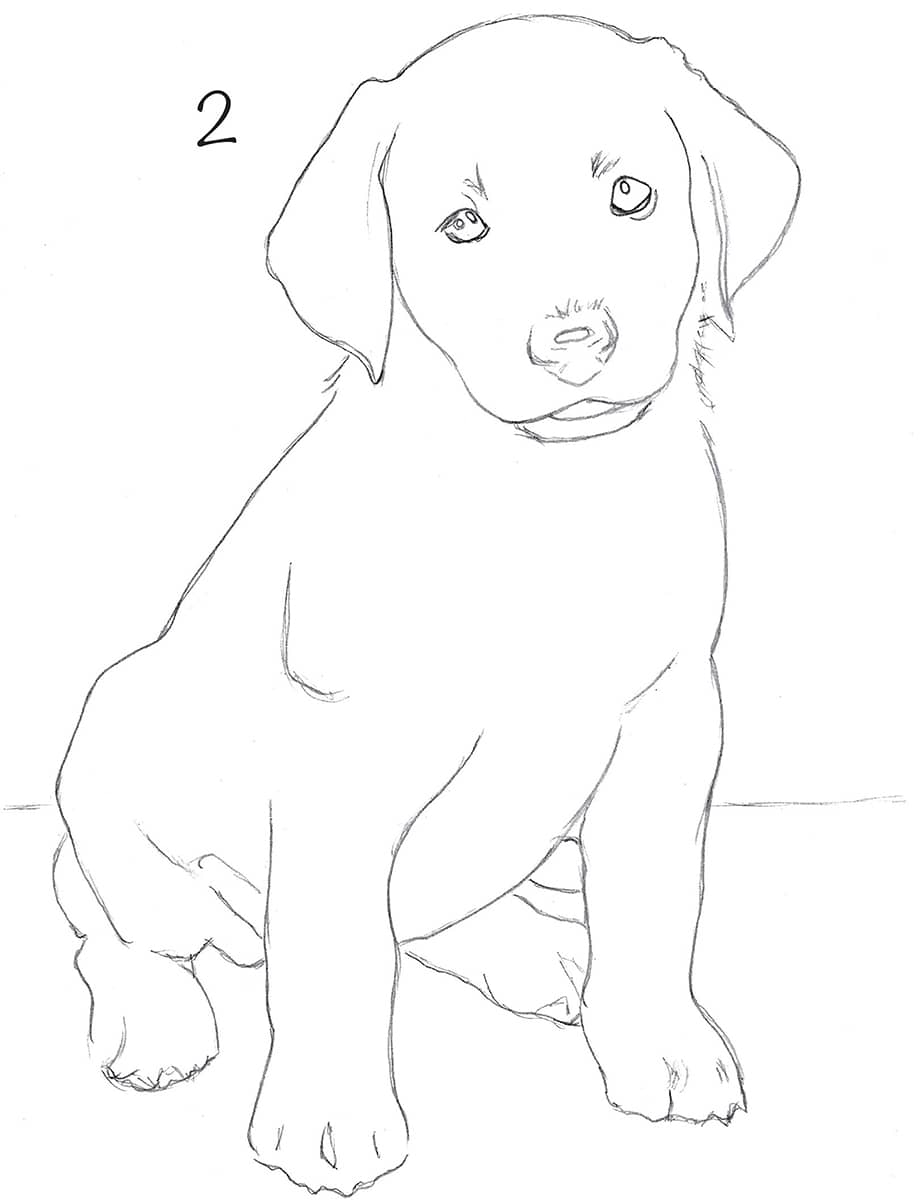
2 Refine the outline with an HB pencil. HB lead can be erased easily as you change the outlines into soft sections of fur.

3 Block in the facial features. To render authentic eyes, the catchlights (white reflections) are important. Take your time with their placement, and keep your strokes soft. Softly shade the ears and face.

4 Next work on the facial fur, using light strokes. Block in the rest of the darker fur and then lightly erase extra graphite with the tip of a kneaded eraser. You can also use a kneaded eraser to lift out graphite from areas that are too dark.
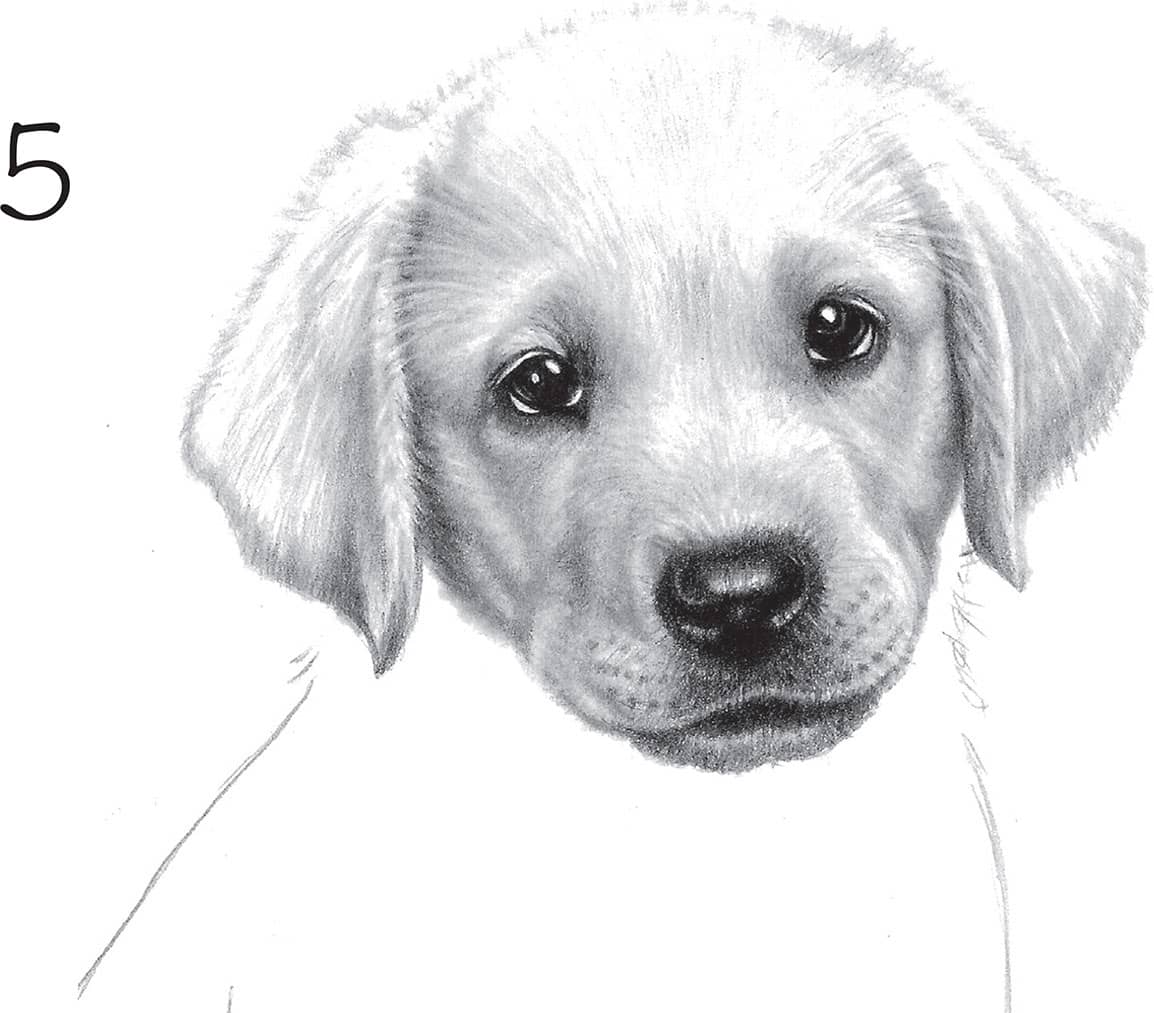
5 Blend the lighter fur into the darker fur with the corner of a soft chamois cloth. Then add more graphite to the darker areas and blend with a small tortillon. Use a kneaded eraser to reclaim light areas and pull out individual fur strands.
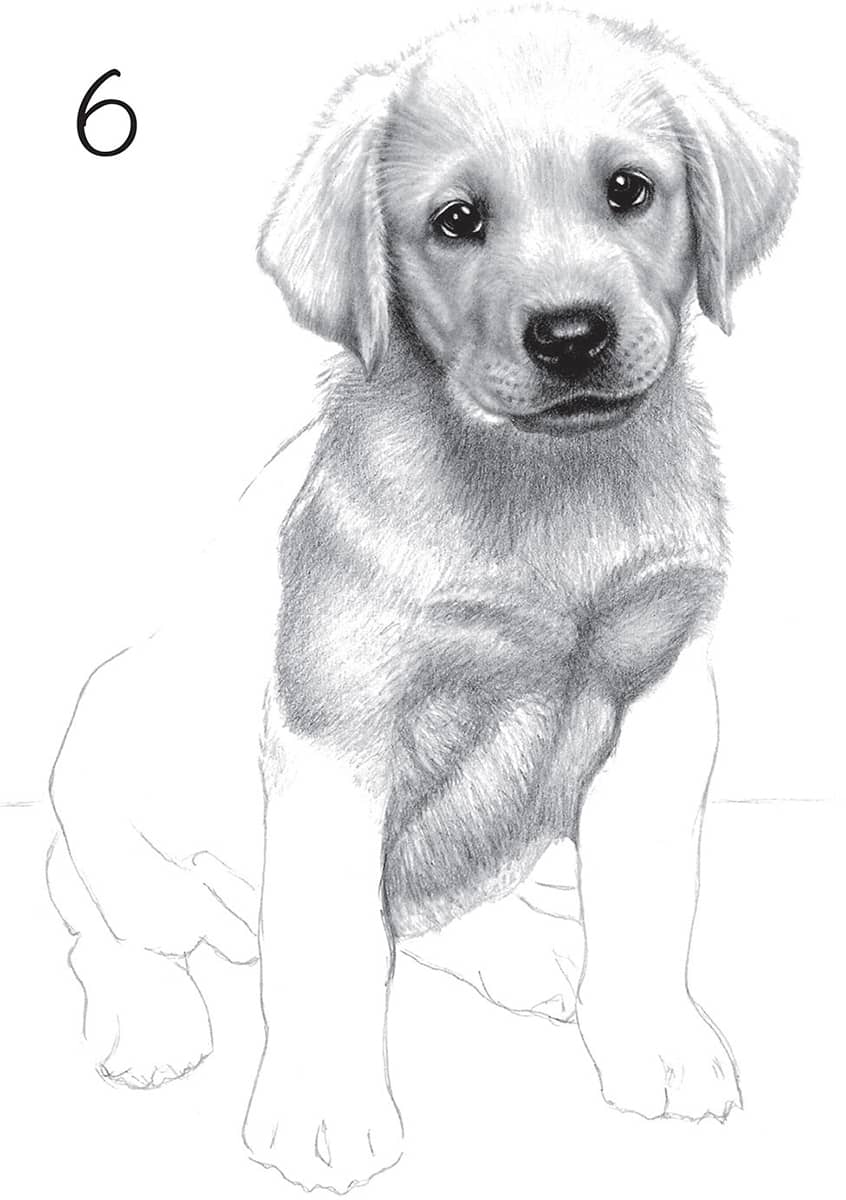
6 Start laying graphite on the body, using smooth strokes. Then block in the darkest areas. Don’t worry about exact placement. Blending will smooth everything out.
7 Blend the chest fur with a tortillon, add dark 6B pencil where needed; blend again. Then lift graphite from overly dark areas and pull out individual strands of fur with an eraser.
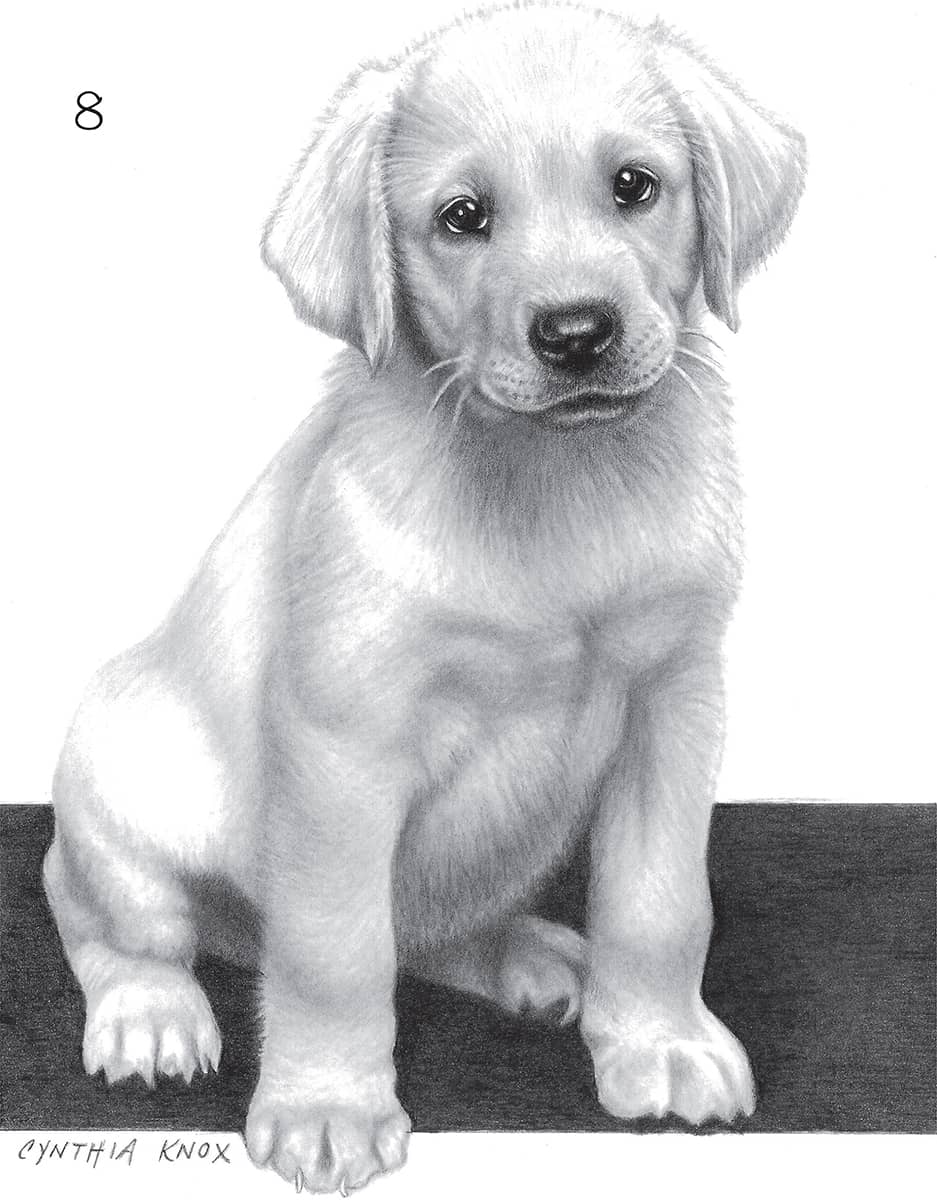
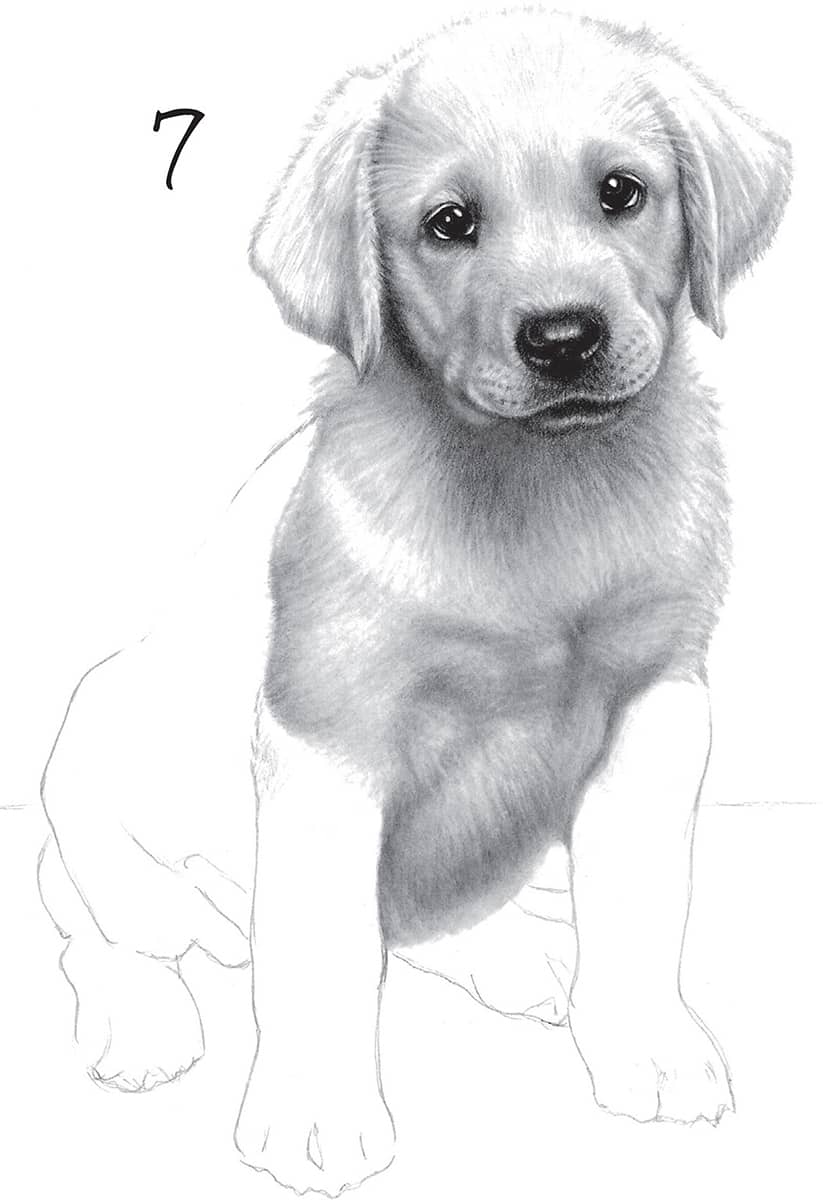
8 Lightly erase the outlines on the back of the puppy. Then use a dirty blending tortillon to lightly “draw” the puppy’s back and back leg. Lightly fill the areas with a 2B pencil and blend. Repeat this on the front legs. Lift and lighten graphite with a kneaded eraser, and add light fur streaks and whiskers. To finish, add a dark surface below the pup to ground him in the scene.