
Exposure and Color Menus | 7 |
You learned the most basic elements of exposure in Chapter 3. In this chapter, I’m going to lead you through the seven menu groups (shown in Figure 7.1) you’ll need to master to calculate ambient and flash exposure, and fine-tune both white balance and color tone.
1. Exposure
The Exposure group includes these entries:
- ■Auto Slow Shutter (Movies)
- ■ISO
- ■ISO Range Limit
- ■ISO Auto Minimum Shutter Speed
- ■Auto/Manual Switch Settings (Movies)
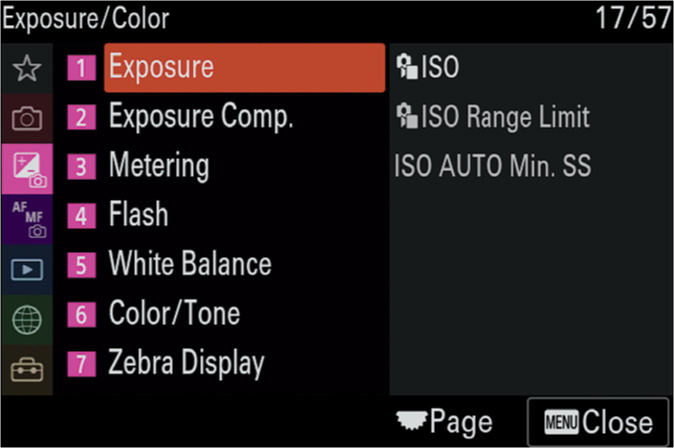
Figure 7.1 Exposure/Color menu.
Auto Slow Shutter 
Options: On, *Off
My preference: Off
When shooting movies in very dark locations, the best way to ensure that the video clips are bright and with less noise is to use a slow shutter speed. When this menu item is On, the camera can automatically switch to a slower shutter speed than its default. There’s no need to use S mode and set a slow shutter speed yourself in dark locations. I like to leave it off, because when I am capturing video with a slow shutter speed, I want to make sure I have the camera mounted on a tripod, and the need to activate this feature manually is a reminder to me that I need to do so.
To use it, the camera must be using Aperture Priority or Manual Exposure, with ISO set to ISO Auto. If you happen to be using Flexible Exposure mode (described in Chapter 6), the shutter speed (Tv) must be set to autoexposure, rather than manual.
ISO 
Options: Fixed settings: ISO 50 to 204800; ISO Auto
My preference: N/A
When you select Exposure/Color > Exposure > ISO, you can adjust the ISO sensitivity of the camera. I’ll address each of the sub screens separately. This menu item can also be accessed by pressing the right (ISO) button on the control wheel and from the Function menu. It allows you to specify the ISO setting (sensor sensitivity) in one of two ways:

Figure 7.2 ISO Auto allows specifying minimum and maximum ISO sensitivity.
- ■ISO Auto. The Auto ISO setting is at the top of the scrolling list. When it’s highlighted, press the right button and choose a minimum ISO to be used as well as the maximum ISO applied (which prevents the camera from taking a clutch of pictures at, say, ISO 25600, unbeknownst to you). For general shooting, I use ISO 100 and ISO 3200 for my limits, as I mentioned. I sometimes lower the upper limit to ISO 1600 when I especially want to minimize noise, and raise the upper end to ISO 6400 or higher for indoor subjects (especially sports, which can benefit from faster shutter speeds and/or smaller f/stops). (See Figure 7.2.)
- The ISO Auto label will appear at lower right of the viewfinder or LCD monitor screen, warning you that sensitivity is being set automatically. When you depress the shutter button halfway, the ISO that has been set will appear.
- ■Fixed ISO settings. You can Select ISO settings from 50 to 204800, and the camera will take all its shots at that sensitivity. Strictly speaking, ISO 100 is the lowest real sensitivity the camera can produce; that’s the “native” sensitivity of the sensor. The 50/64/80 settings are “interpolated” and produce slightly higher contrast and lower quality. The a7 IV places horizontal bars above and below the number for those values as a “warning.” Similarly, the same bars sandwich ISO settings above 64000 to let you know that quality is reduced at the loftier settings.
- I recommend using the interpolated lower values only when you really need a lower sensitivity, say, to use a wider f/stop in very bright conditions, or when you want to use a slower shutter speed to intentionally produce blur of, perhaps, a waterfall. A neutral-density filter attached to your lens can also reduce the amount of light reaching the sensor. The upper extended settings are best reserved for situations where you really need high ISO sensitivity and are willing to accept the visual noise that results.
When making fixed ISO adjustments, you can scroll up and down the list in 1/3-stop increments with the up/down directional controls (the up/down buttons and multi-selector), and by rotating the control wheel or front dial. Rotate either rear dial to make adjustments in full EV steps.
Your choices are restricted when you’re using movies or S&Q video (only ISO 100 to 102400, plus ISO Auto are available) or Intelligent Auto (ISO Auto is set automatically). The available range may also change when using Picture Profiles, which mandate the use of higher ISO settings in order to capture an extended tonal range.
Surprise! You can use ISO Auto in Manual exposure mode, giving you an “automatic” exposure mode. You still select the shutter speed and aperture and the a7 IV will increase or decrease ISO sensitivity to produce an appropriate metered exposure within the Minimum ISO and Maximum ISO settings you specify. You’ll know your manual exposure is being “corrected” when you see the ISO Auto label at lower right of the viewfinder or LCD monitor screen. When you depress the shutter button halfway, the actual ISO that has been set will appear.
ISO Range Limit
Options: ISO 50 to 204800
My preference: Minimum: ISO 50, Maximum: ISO 12800
This setting works exactly like the ISO Auto range settings shown in Figure 7.2, except that it limits the ISO settings you can choose manually. Use this option if you want to intentionally restrict the ISO settings that are available (say, to avoid accidentally using settings you find are not usable from a quality standpoint). You can specify the minimum and maximum available ISO settings from 50 to 204800. The a7 IV does let you set the minimum and maximum to the same figure, that is a minimum of ISO 100 and a maximum of ISO 100 (thus locking you into a single ISO sensitivity), but it is intelligent enough to keep you from setting a maximum that is lower than your minimum.
ISO Auto Minimum Shutter Speed 
Options: Fixed: 1/8000th to 30 seconds; Slow, Slower, Standard, Fast, Faster
My preference: 1/30th second
Use this entry with the a7 IV to specify the shutter speed that activates the ISO Auto feature described above. You’ll want to use ISO Auto most frequently to avoid having the camera select a blur-inducing slow shutter speed when using P (Program Auto) or A (Aperture Priority) modes. (You always select the shutter speed yourself in S and M modes.) Depending on how well you can hand-hold the camera, or your level of trust for the lens and/or in-body image stabilization, you can choose which shutter speed you deem “too slow,” and your a7 IV will boost the ISO sensitivity as required when ISO Auto is active. You can choose from values that the camera calculates, or supply a specific shutter speed, below which Auto ISO will start to do its stuff.
The camera-calculated minimum speeds are very cool because they are based on the focal length of your lens, giving you faster minimum speeds with telephoto lenses, and longer minimum speeds with wide angles. The Fast and Faster settings increase the minimum shutter speed by 1 and 2 stops (respectively) from the standard setting for a particular focal length. The Slow and Slower settings lower the minimum shutter speed for that focal length by 1 and 2 stops (respectively).
- ■Faster/Fast. When you highlight this entry, you can press the left/right directional buttons to choose among Faster/Fast, STD (Standard), or Slow/Slower. The a7 IV will activate ISO Auto at shutter speeds that are faster than the “standard” setting (which is calculated individually based on the focal length or zoom setting of your lens). This is a more conservative setting.
- ■STD (Standard). At this value, the camera detects the current focal length/zoom setting and selects a minimum shutter speed that takes into account the effect the focal length has in magnifying the degree of blur. That is, a 200mm lens calls for higher shutter speeds than, say, a 50mm lens.
- ■Slow/Slower. This is a more liberal setting that allows slightly slower shutter speeds than specified by STD before ISO Auto kicks in. Use if you have an extraordinarily steady hand.
- ■1/8000th–30 seconds. You can bypass the camera’s internal algorithm mumbo-jumbo and directly select a shutter speed that you want to use to activate ISO Auto. If you choose 1/8000th second, ISO Auto will effectively be active all the time (except when 1/8000th second is used as the shutter speed). Select 30 seconds, and ISO Auto will not activate at all.
Auto/Manual Switch Setting
Options: Av Auto/Manual Switch: *Auto, Manual; Tv Auto/Manual Switch: Auto, *Manual; ISO Auto/ Manual setting: Auto, *Manual
My preference: N/A
This setting works when you’ve set Shooting > Shooting Mode > Exposure Control Type to Flexible Exposure Mode, which I explained in Chapter 6. This entry belongs in the Exposure Control Type entry, but Sony put it here for some reason. As you learned in the previous chapter, Flexible Exposure allows you to press the C2, C4, and C1 custom keys to switch between Av, Tv, and ISO automatic and manual settings. This entry lets you specify the default behavior for each.
2. Exposure Compensation
There are three entries in the Exposure Compensation group. (See Figure 7.3.)
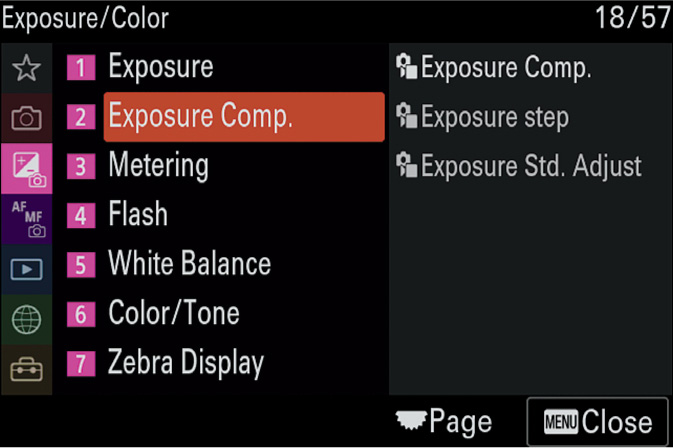
Figure 7.3 Exposure Compensation group.
- ■Exposure Compensation
- ■Exposure Step
- ■Exposure Standard Adjustment
Exposure Compensation
Options: From +5 to –5
Default: 0.0
My preference: N/A
There are three ways to specify exposure compensation:
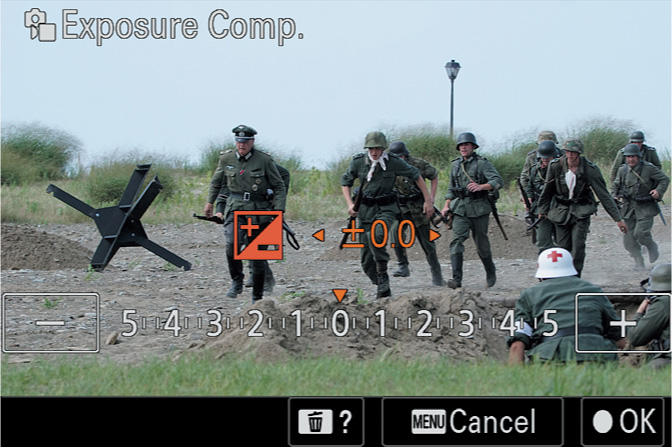
Figure 7.4 Using Exposure Compensation.
- ■This menu entry. Here you can adjust EV values from +5 to –5 using the directional buttons, the multi-selector joystick, or by rotating the control wheel, rear dial, or front dial. (See Figure 7.4.)
- ■Function menu. Press the Fn button and navigate to the Exposure Compensation icon (located by default in the top row, fifth from the left). You can use the same controls described above to make adjustments.
- ■Exposure Compensation (right rear) dial. If you elect to use the physical right rear dial you can choose values from +5 to –5. The dial is the fastest option. Any setting you make with the dial overrides an adjustment made with the menus. Remember to press the dial’s lock button until it pops up to free the dial, then press down to lock it again if you don’t want your setting to change accidentally.
Scroll until you reach the value for the amount of compensation you want to set to make your shots lighter (with positive values) or darker (with negative values). Note that only values between –3 and +3 will be reflected by a decrease or increase in brightness in the screen display; higher or lower exposure compensation settings will apply only to the recorded image. When shooting movies, only +2 to –2 values are valid.
Remember that any compensation you set will stay in place until you change it, even if the camera has been powered off in the meantime. It’s worth developing a habit of checking your display to see if any positive or negative exposure compensation is still in effect; return to 0.0 before you start shooting.
Exposure compensation cannot be used when the camera is set to Intelligent Auto. In Manual exposure mode, the EV settings only apply if ISO has been set to ISO Auto. The EV changes you make with the menus will be in either 1/3- or 1/2-EV increments, depending on the step size you specify in the Exposure Compensation Step entry, which I’ll explain next.
Exposure Compensation Step
Options: *0.3EV, 0.5EV
My preference: 0.3EV
This setting specifies the size of the exposure change for both exposure compensation and flash exposure compensation. The 0.3 (1/3 stop) default allows fine-tuning exposure more precisely, while selecting 0.5 (1/2 stop) lets you make larger adjustments more quickly, which is useful when you are trying to capture more dramatic exposure changes. The actual difference between 1/3-stop and 1/2-stop changes is relatively small, so this setting is primarily a convenience feature that’s most useful when you plan to, say, use exposure compensation and want to move from 0.0 to plus or minus several whole stops in bigger jumps. I’m never in that much of a hurry, so I opt for the greater precision of the 1/3 EV steps.
Exposure Standard Adjustment
Options: Adjust Multi, Center, Spot, Entire Screen Averaging, or Highlight Metering
My preference: Zero values for each
This setting is a powerful adjustment that allows you to dial in a specific amount of exposure compensation that will be applied to every photo you take using each of the five metering modes. No more can you complain, “My a7 IV always underexposes by 1/3 stop!” If that is the case, and the phenomenon is consistent, you can use this menu adjustment to compensate.
Exposure compensation is usually a better idea (does your camera really underexpose that consistently?), but this setting does allow you to “recalibrate” your camera yourself. You can fine-tune exposure separately for each of the metering modes. However, you have no indication that finetuning has been made, so you’ll need to remember what you’ve done. After all, you someday might discover that your camera is consistently overexposing images by 1/3 stop, not realizing that your Exposure Standard Adjustment setting is the culprit.
In practice, it’s rare that the a7 IV will consistently provide the wrong exposure in any of the five metering modes, especially Multi metering, which can alter exposure dramatically based on the camera’s internal database of typical scenes. This feature may be most useful for Spot metering, if you always take a reading off the same type of subject, such as a human face or 18 percent gray card. Should you find that the gray card readings, for example, always differ from what you would prefer, go ahead and fine-tune optimal exposure for Spot metering, and use that to read your gray cards. To use this feature:
- 1.Select Exposure Standard Adjustment. Select this menu entry from the Exposure/Color > Exposure Compensation group.
- 2.Consider yourself warned. In the screen that appears, choose OK after carefully reading the warning that Sony insists on showing you every time this option is activated.
- 3.Select metering mode to correct. Choose Multi metering, Center, Spot, Entire Screen Averaging, or Highlight-weighted metering in the screen that follows by highlighting your choice and pressing the center button. You can set the standard adjustment separately for each exposure mode. (See Figure 7.5.)
- 4.Specify amount of correction. Press the up/down buttons to dial in the exposure compensation you want to apply. You can specify compensation up to + 1 or –1 stops in increments of 1/6 stop, half as large a change as conventional exposure compensation. This is truly fine-tuning.
- 5.Confirm your change. Press the center button when finished to return to the previous menu. You can repeat the action to fine-tune the other exposure modes if necessary. When finished, press MENU to exit. Note that the values you set will survive using the Reset option of the Setting Reset entry in the Setup menu but will be canceled if you choose Initialize instead.
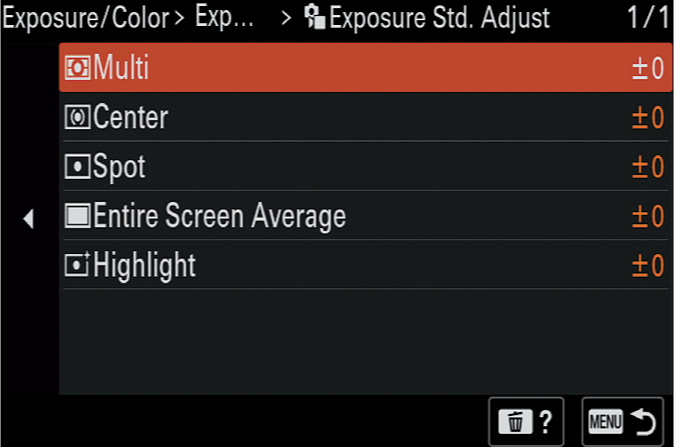
Figure 7.5 Changing the standard exposure adjustment.
3. Metering
There are four entries in the Metering group, shown in Figure 7.6.
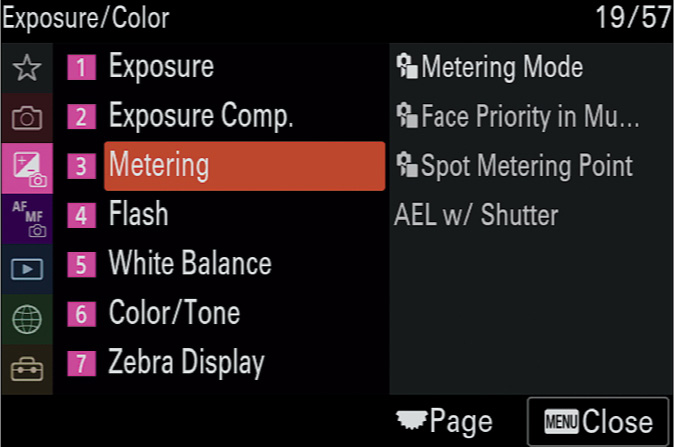
Figure 7.6 The Metering group.
- ■Metering Mode
- ■Face Priority in Multi Metering
- ■Spot Metering Point
- ■AEL with Shutter
Metering Mode
Options: *Multi, Center, Spot (Standard, Large), Entire Screen Averaging, Highlight
My preference: Multi
The metering mode determines how the camera will calculate the exposure for any scene. The camera is set by default to Multi, which is a multi-zone or multi-segment metering approach. No other options are available in Intelligent Auto mode or when you’re using digital zoom.
- ■Multi. Evaluates 1,200 individual segments of the scene using advanced algorithms; often, it will be able to ignore a very bright area or a very dark area that would affect the overall exposure. It’s also likely to produce a decent (if not ideal) exposure with a light-toned scene such as a snowy landscape, especially on a sunny day. While it’s not foolproof, Multi is the most suitable when you must shoot quickly and don’t have time for serious exposure considerations. Note that when Face Priority in Multi Metering (discussed next) is On, this metering mode will base exposure on faces detected, if any.
- ■Center. Center-weighted metering primarily considers the brightness in a large central area of the scene, while still taking into account the average value of the rest of the frame. This approach ensures that a bright sky that’s high in the frame, for example, will not severely affect the exposure. However, if the central area is very light or very dark in tone, your photo is likely to be too dark or too bright (unless you use exposure compensation).
- ■Spot. When using Spot metering, the camera measures only the brightness in a very small central area of the scene; again, if that area is very light or very dark in tone, your exposure will not be satisfactory. It’s important to spot meter an area of a medium tone. Use this mode to zero in on a specific area of your image, such as a performer on a darkened stage.
- •Size of spot. When Spot is highlighted, press the left/right controls to change from a standardsize spot to a larger spot.
- •Position of spot. By default, the metering spot is placed in the center of the frame. You can optionally link the spot to the current focus point using the Spot Metering Point entry, discussed shortly.
- ■Entire Screen Averaging. The a7 IV calculates exposure based on the average brightness of the entire frame. This setting is useful if the overall scene has similar brightness values throughout; you can recompose slightly, or your subject can move within the frame and the exposure will not change.
- ■Highlight. In this mode, the camera adjusts the exposure to avoid blowing out the highlights, if at all possible. Use this setting if the highlights of a scene are the most important and you don’t care if some shadow detail is lost. You can give Highlight metering some extra muscle by activating D-Range Optimizer or Auto HDR. The a7 IV will segment the image into small areas and analyze the difference between the light and dark areas, preserving the highlights but also keeping as much shadow detail as possible.
Face Priority in Multi Metering
Options: *On, Off
My preference: Off
When you choose On, this setting tells the a7 IV to adjust its Multi metering to prioritize exposure for any faces in the scene. Select Off, and the standard 1,200-zone evaluative metering system is used. For most shooting I disable this feature, as Multi metering does a good job of exposing so that faces and other parts of the image are well exposed. I turn it on when I am photographing individuals or groups and their surroundings are extra bright or dark and I want to make sure the faces receive optimal exposure.
Spot Metering Point
Options: *Center, Focus Point Link
My preference: Focus Point Link
If Focus Area is set to Spot or Expand Spot, and Spot metering is selected as the metering mode, then the Spot metering area can be linked to the focus point, rather than locked in the center. Just choose Focus Point Link here. If Center is selected instead, the focus point is locked in the center of the frame. Note that Focus Point Link also works when Focus Area is set to Tracking: Spot or Tracking: Expand Spot, but the spot metering area is moved to the starting area and does not move once tracking begins.
Autoexposure Lock with Shutter
Options: *Auto, On, Off
My preference: On
This item allows the a7 IV to lock the exposure (as well as the focus in AF-S mode) when you apply light pressure to the shutter release button. Point the camera at your primary subject and maintain contact with the button while re-framing for a better composition. This technique will ensure that both focus and exposure are optimized for the primary subject. There are three modes to choose from:
- ■Auto. Adjusts focus and then locks in exposure in AF-S mode when you press the shutter release down halfway. In AF-A mode, the camera will do the same thing if the subject is stationary. If the subject is moving (that is, the camera switches to AF-C mode) or you are shooting continuously in burst mode, exposure is not locked. However, even if Auto is activated, pressing the AEL lock button overrides this behavior.
- ■On. Exposure is locked when you press the shutter release halfway.
- ■Off. Pressing the shutter release halfway locks only focus. Exposure is not locked when you press the shutter release halfway, and exposure will be adjusted automatically during continuous shooting. Exposure isn’t locked until you press the shutter release down all the way to take the photo, or you press the AEL lock button. Use this setting when you prefer to lock exposure manually using the AEL button or when taking the actual picture.
- You might want to choose the Off option to lock focus on one subject in the scene while locking the exposure for an entirely different part of the scene. To use this technique, focus on the most important subject and keep the focus locked by keeping your finger on the shutter release button while you recompose. You can then point the lens at an entirely different area of the scene to read the exposure, and lock in the exposure with pressure on the AEL button. Finally, reframe for the most pleasing composition and take the photo.
- In your image, the primary subject will be in sharpest focus while the exposure will be optimized for the area that you metered. This technique makes the most sense when your primary subject is very light in tone like a snowman or very dark in tone like a black Lab dog. Subjects of that type can lead to exposure errors, so you might want to expose for an area that’s a middle tone, such as grass.
4. Flash
The Flash group has six entries, shown in Figure 7.7.
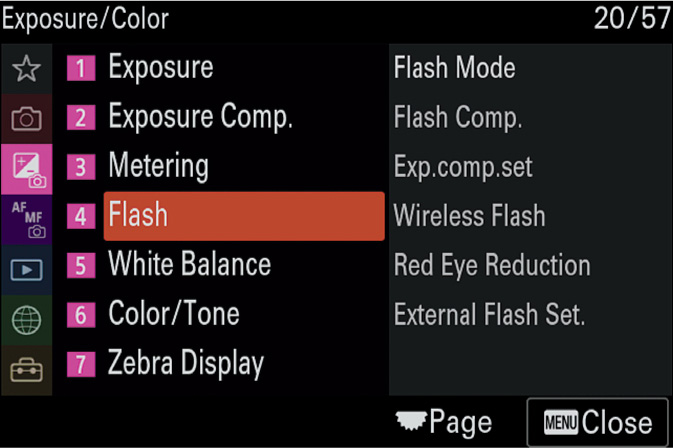
Figure 7.7 The Flash group.
- ■Flash Mode
- ■Flash Compensation
- ■Exposure Compensation Settings
- ■Wireless Flash
- ■Red Eye Reduction
- ■External Flash Settings
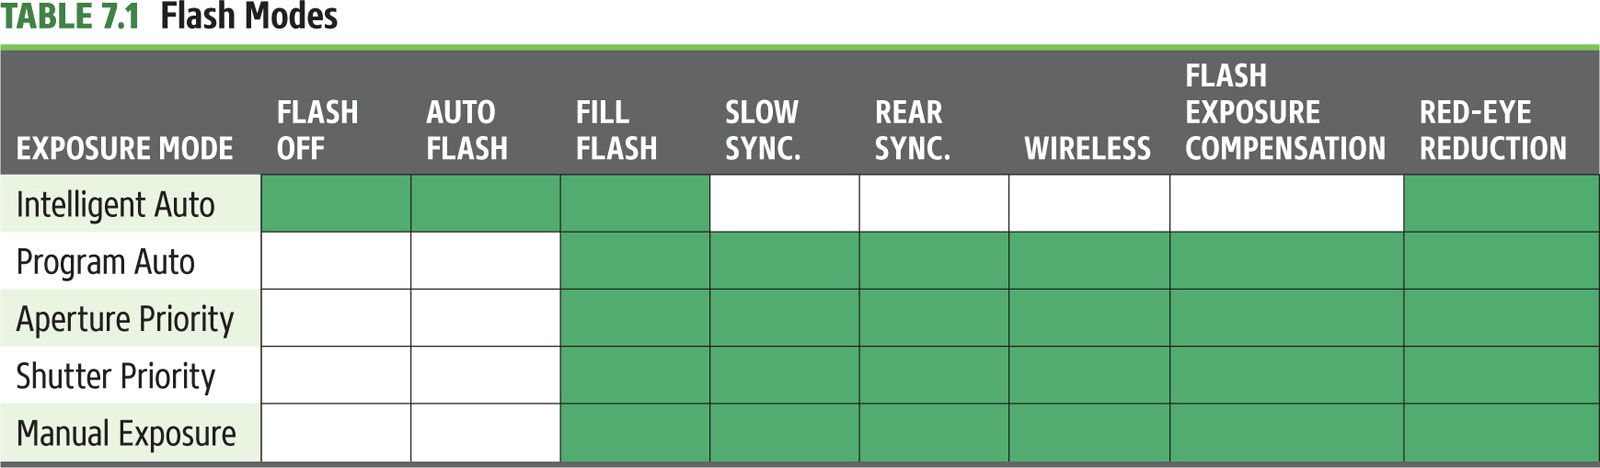
Flash Mode
Options: Flash Off, Auto Flash, Fill Flash, Slow Sync.,
*Rear Sync.
My preference: N/A
This item offers options for the several flash modes that are available. Not all the modes can be selected at all times, as shown in Table 7.1. I’ll describe what these modes do, and the use of flash in detail in Chapter 13.
Flash Compensation
Options: –3 to +3 in 1/3 or 1/2 EV steps
My preference: N/A
This feature controls the flash output. It allows you to dial in plus compensation for a brighter flash effect or minus compensation for a subtler flash effect. If you take a flash photo and it’s too dark or too light, access this menu item. Scroll up/down to set a value that will increase flash intensity (plus setting) or reduce the flash output (minus setting) by up to three EV (exposure value) steps. You can select between 1/3 and 1/2 EV increments in the Exposure Compensation Step entry described earlier in this chapter. Flash compensation is “sticky,” so be sure to set it back to zero after you finish shooting. This feature is not available when you’re using Intelligent Auto mode. I’ll discuss this and many other flash-related topics in detail in Chapter 13.
Exposure Compensation Settings
Options: Ambient & Flash, *Ambient Only
My preference: Ambient & Flash
I prefer using the Ambient & Flash option, so that any exposure compensation value set will apply to both the ambient light exposure and to the flash exposure when using flash. You’d want to stick to this option in flash photography when you find that both the available-light exposure and the flash exposure produce an image that’s too dark or too light. Setting plus or minus exposure compensation will affect both. However, in another situation when using flash, you might want to control only the brightness of the ambient light exposure and not the flash exposure.
The Ambient Only option allows you to control only the brightness of the background, such as a city skyline behind a friend when you’re taking flash photos at night in a scene of this type. Setting exposure compensation will now allow you to get a brighter or a darker background (at a + and – setting, respectively) without affecting the brightness of your primary subject who will be exposed by the light from the flash. (Any exposure compensation you set will have no effect on the flash intensity.)
Wireless Flash
Options: *Off, On
My preference: N/A
Sony is still playing catch-up in the electronic flash arena, having supported only optically triggered wireless flash until recently, but now offers radio-controlled wireless flash using the Sony AF-WRC1M/FA-WRR1 wireless radio commander/receiver combination or radio-compatible external flash units like the Sony HVL-F60RM/RM2, HVL-F46M, HVL-F45RM, and HVL-F28RM. This entry allows you to enable/disable both optical and radio wireless modes. I’ll explain these and other flash options in Chapter 13.
Red Eye Reduction
Options: On, *Off
My preference: Off
When flash is used in a dark location, red-eye is common in pictures of people, and especially of animals. Unfortunately, your camera is unable, on its own, to totally eliminate the red-eye effects that occur when an electronic flash bounces off the retinas of your subject’s eyes and into the camera lens. The effect is worst under low-light conditions (exactly when you might be using a flash) as the pupils expand to allow more light to reach the retinas. The best you can hope for with this option is to reduce or minimize the red-eye effect. After all, the feature is called red-eye reduction, not redeye elimination.
It’s fairly easy to remove red-eye effects in an image editor (some image importing programs will do it for you automatically as the pictures are transferred from your camera or memory card to your computer). But, it’s better not to have glowing red eyes in your photos in the first place.
To use this feature, you first have to attach an external flash to the multi-interface shoe. When Red Eye Reduction is turned on through this menu item, the flash issues a few brief bursts prior to taking the photo, theoretically causing your subjects’ pupils to contract, reducing the red-eye syndrome. It works best if your subject is looking toward the flash. Like any such system, its success ratio is not great. This feature is not available when using wireless flash, as described in Chapter 13.
External Flash Settings
Options: External Flash Firing Settings, External Flash Custom Settings
My preference: N/A
This setting allows you to make adjustments to compatible flash units attached to the camera’s multiinterface shoe (currently Sony’s radio-controlled units), as described in Chapter 13. Unlike other Sony flash units, these can be adjusted right from the a7 IV’s menus, instead of the controls on the back panel of the flash itself. The options include:
- ■Flash Control Mode. Choose TTL Flash Firing for automatic flash metering, Manual Flash Firing, Multi Flash Firing (for “stroboscopic” effects), and Group Flash Firing (when using more than one flash in Wireless mode).
- ■Memory Recall. Recalls M1 and M2 Custom Settings registered to your particular flash and stored in your camera.
- ■Zoom. Changes the coverage area of flash units that have Zoom features.
- ■CMD. Used to set a flash to either Commander (to trigger other flash units, if the unit has that capability) or Receiver mode (to respond to a commander). You can also turn the wireless features off here.
- ■High Speed Sync. Allows using flash at a shutter speed higher than the a7 IV’s sync rate of 1/250th second (full frame) or 1/320th second (APS-C mode).
- ■CMD Flash Firing. Available only with units that have both optical and radio wireless capabilities. It disables the optical protocol, which prevents your flash from being triggered by any Sony flash units used in optical wireless mode by others in your surroundings.
- ■Flash Compensation. Flash exposure can be adjusted in the range –3 to +3, duplicating the Exposure > Color > Flash > Flash Compensation setting.
- ■Ratio Control. Allows you to set output levels for as many as three flash groups. I’ll tell you about groups, channels, and other wireless concepts in Chapter 13.
- ■External Flash Custom Settings. This entry has three tabs used to create custom settings that can be stored in your flash’s memory, select a communication channel, and make other adjustments, including power saving.
5. White Balance
The White Balance group has three entries shown in Figure 7.8.

Figure 7.8 White Balance group.
- ■White Balance
- ■Priority Settings in Auto White Balance
- ■Shutter Auto White Balance Lock
White Balance
Options: *Auto WB, Daylight, Shade, Cloudy, Incandescent, Fluorescent (4 options), Flash, Underwater Auto, C.Temp/ Filter, Custom 1-3, Custom Setup
My preference: AWB
The various light sources that can illuminate a scene have light that’s of different colors. A household lamp using an old-type (not daylight balanced) bulb, for example, produces light that’s quite amber in color. Sunlight around noon is close to white but it’s quite red at sunrise and sunset; on cloudy days, the light has a bluish bias. The light from fluorescents can vary widely, depending on the type of tube or bulb you’re using. Some lamps, including sodium vapor and mercury vapor, produce light of unusual colors.
The Auto White Balance feature works well, particularly outdoors and under artificial lighting that’s daylight balanced. Even under lamps that produce light with a slight color cast such as green or blue, you should often get a pleasing overall color balance. One advantage of using AWB is that you don’t have to worry about changing it for your next shooting session; there’s no risk of having the camera set for, say, incandescent light, when you’re shooting outdoors on a sunny day.
The a7 IV also lets you choose a specific white balance option—often called a preset—that’s appropriate for various typical lighting conditions, because the AWB feature does not always succeed in providing an accurate or the most pleasing overall color balance. Your choices include:
- ■Daylight. Sets white balance for average daylight.
- ■Shade. Compensates for the slightly bluer tones encountered in open shade conditions.
- ■Cloudy. Adjusts for the colder tones of a cloudy day.
- ■Incandescent. Indoor illumination is typically much warmer than daylight, so this setting compensates for the excessive red bias.
- ■Fluorescent (four types). You can choose from Warm White, Cool White, Day White, and Daylight fluorescent lighting.
- ■Flash. Suitable for shooting with the a7 IV’s external electronic flash unit.
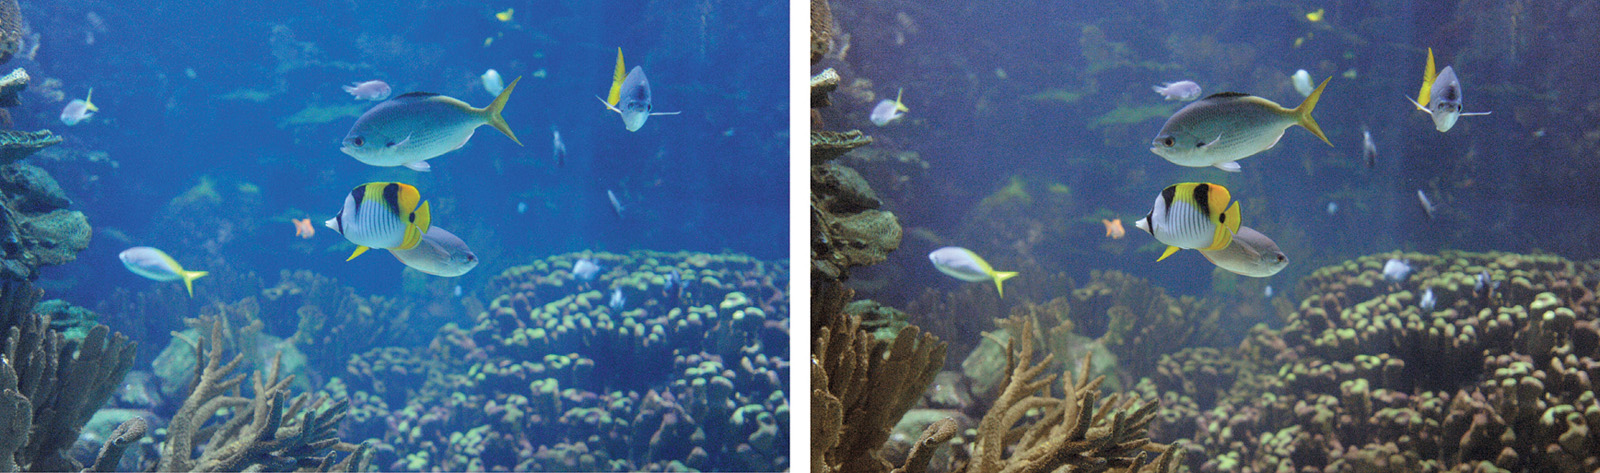
Figure 7.9 The Underwater Auto setting can reduce the blue cast of typical subsurface photos.
- ■Underwater Auto. Although you may find a vendor offering an underwater housing for your a7 IV, it’s more likely that your “underwater” shooting will involve photographing fish and other sea life through the glass of an aquarium of the commercial variety. This setting partially tames the blue-green tones you can encounter in such environments (see Figure 7.9, left), producing a warmer tone that some (but not all) may prefer (see Figure 7.9, right).
- ■C.Temp/Filter/Custom/Custom Setup. These advanced features provide even better results once you’ve learned how to fine-tune color balance settings, which I’ll explain in Chapter 5.
When any of the presets are selected, you can press the right button to produce a screen that allows you to adjust the color along the amber (yellow)/blue axis, the green/ magenta axis, or both, to fine-tune color rendition even more precisely. The screen shown in Figure 7.10 will appear, and you can use the up/down and left/right controls to move the origin point in the chart shown at lower right to any bias you want. The amount of your amber/blue and/or green/magenta bias are shown numerically to the left of the chart. You’ll find more information about setting White Balance in Chapter 5.
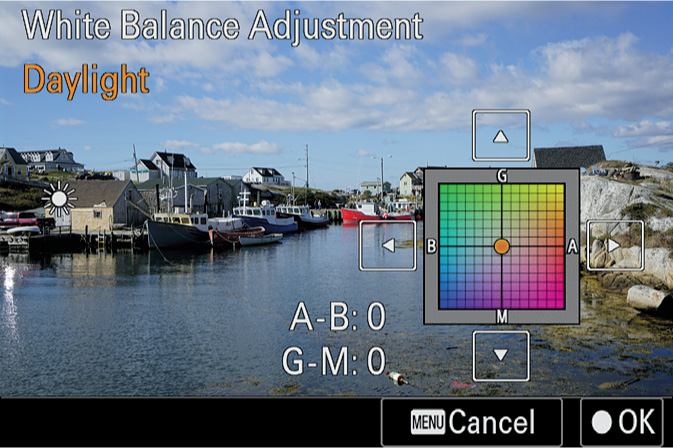
Figure 7.10 Fine-tune the color bias of your images using this screen.
My recommendation: If you shoot in RAW capture, though, you don’t have to be quite as concerned about white balance, because you can easily adjust it in your software after the fact. Here again, as with ISO and exposure compensation, the white balance item is not available in Intelligent Auto mode; the camera defaults to Auto White Balance.
Priority Setting in AWB
Options: *Standard, Ambience, White
My preference: Standard
You can finally exercise some control over Auto White Balance. This setting allows you to fine-tune how AWB works, producing “automatic” color balance that may more closely suit your personal taste than the default balance the a7 IV is initially set for. You have three choices:
- ■Standard. The camera makes its own adjustments for white balance, based on its interpretation of the colors it sees in your scenes. The a7 IV does a pretty good job of telling daylight from incandescent illumination and responding accordingly, and a fair job with other forms of illumination. This will work for you most of the time, although you’ll want to use one of the presets or other white balance customizing features described above when appropriate.
- ■Ambience. Detects the light source and, if a naturally warm source is identified, will bias the color to keep warmer tones. Your interior photos, fireside chats, and similar scenes can keep their rosy colors. An indicator on your shooting settings screens will indicate that Ambience (or White) bias is being used.
- ■White. The reverse of Ambience, this setting tries to preserve whites in scenes with warm color temperatures.
Shutter AWB Lock
Options: Shutter Half Press, Continuous Shooting, *Off
My preference: Off
As described earlier, your a7 IV actually has two Auto White Balance controls—the standard AWB setting and Underwater Auto. Each selects the appropriate white balance for their respective conditions. However, neither auto white balance option is perfect; you may find that white balance adjustments may occur as you hold the shutter release down halfway, or during continuous shooting. If color consistency between individual shots is important, you can tell the camera to lock color balance temporarily. These are the settings:
- ■Shutter Half Press. If you choose this setting, the camera will always lock the white balance at its current setting whenever AWB or Underwater Auto are active and the shutter release is halfpressed. If the Drive mode is Continuous, when you press the shutter release down all the way and hold it down, the white balance is locked for the entire sequence.
- ■Continuous Shooting. White balance is locked only during continuous shooting. Either Auto WB setting may continue to make adjustments when the shutter release is half-pressed.
- ■Off. White balance may change during a half-press or continuous shooting when either of the two Auto white balance presets are enabled. (The non-auto fixed presets, of course, do not change until you adjust them.)
Shockless White Balance
Options: Off, *1 (Fast), 2, 3 (Slow)
My preference: 1
When capturing video, abrupt changes in white balance can be disconcerting. This setting allows you to specify how quickly the a7 IV adjusts the white balance when you make a manual change to a different setting. It has no effect when Auto White Balance is set for video. You can choose 1 (fastest) to 3 (slowest), or disable the feature entirely.
6. Color/Tone
The Color/Tone group has four entries as shown in Figure 7.11.
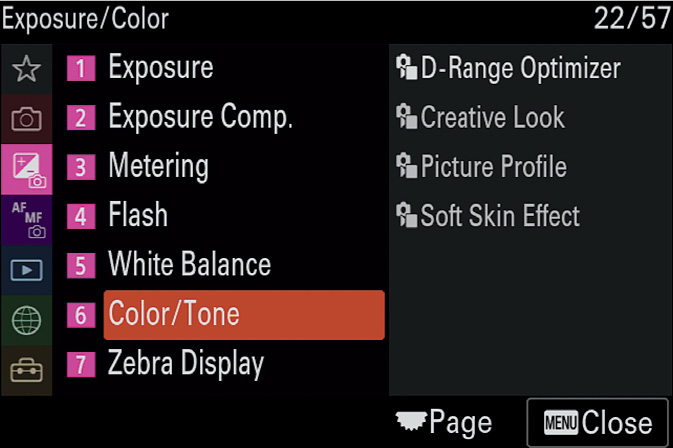
Figure 7.11 Color/Tone group.
- ■D-Range Optimizer
- ■Creative Look
- ■Picture Profile
- ■Soft Skin Effect
D-Range Optimizer
Options: DRO Off; DRO *Auto, Levels 1-5
My preference: Auto
The brightness/darkness range of many images is so broad that the sensor has difficulty capturing detail in both bright highlight areas and dark shadow areas. That’s because a sensor has a limited dynamic range. However, the a7 IV is able to expand its dynamic range using extra processing when dynamic range optimization (DRO) is active. It’s on by default at the Auto level where the camera evaluates the scene contrast and decides how much extra processing to apply; this is the only available setting in Intelligent Auto mode. In other modes, you can turn DRO off, or set it manually to one of five intensity levels.
When the DRO Auto option is highlighted, you can press the left/right controls to set the DRO to a specific level of processing, from 1 (weakest) to 5 (strongest). You’ll find that DRO can lighten shadow areas; it may darken bright highlight areas too, but not to the same extent. By level 3, the photos you take will exhibit much lighter shadow areas for an obviously wide dynamic range; DRO Auto will never provide such an intense increase in shadow detail. There is no effect on RAW files, whether captured alone or as part of a RAW + JPEG duo.
Creative Look
Options: *ST, PT, NT, VV1, VV2, FL, IN, SH, BW, SE
My preference: N/A
This JPEG/HEIF-only option is an evolution and improvement over Sony’s previous Creative Styles presets, now offering the ability to make many more adjustments. The older Creative Styles let you tweak Sharpness, Saturation, and Contrast only. With these new “looks,” you can also adjust Highlights, Shadows, Fade, Sharpness Range, and Clarity. The available Creative Looks include:
- ■ST (Standard). This is, as you might expect, your default setting, with a good compromise of sharpness, color saturation, contrast, and the other parameters. Choose this, and your photos will have excellent colors, a broad range of tonal values, and standard sharpness that avoids the “over-sharpened” look that some digital pictures acquire.
- ■PT (Portrait). You’ll get reduced saturation, contrast, and sharpness for a more “gentle” rendition that often works well for people pictures, especially skin tones. This style is a good choice if you’re planning on fine-tuning those aspects of your JPEG photos in your computer and don’t want the camera to overdo any of them.
- ■NT (Neutral). Reduces saturation and sharpness to produce images with more subdued tones. Use this if you plan on tweaking your photos in an image editor and you want a basic image without any of the enhancements of the other styles.
- ■VV1 (Vivid 1). If you want more punch in your images, with richer colors, heightened contrast that makes those colors stand out, and standard sharpness, this setting is for you. It’s good for flowers, seaside photos, any picture with expanses of blue sky, and on overcast days where a punchier image can relieve the dullness.
- ■VV2 (Vivid 2). Provides even brighter and more saturated colors. You may find this preset to be too much for your taste, so use it with caution.
- ■FL. Sony claims this setting will give you a “moody” look with sharp contrast and impressive colors in the sky and greens. Reds and blues seem to be suppressed while greens are enhanced. The shifted colors remind me of some fluorescent lighting effects.
- ■IN. This one should give you a flatter look, compared to NT (Neutral) thanks to reduced contrast and color saturation.
- ■SH. Sony describes this one as “bright, transparent, soft, and vivid.” Ordinarily, “soft” and “vivid” are contradictory terms, especially since this setting reduces color saturation. However, the reduced saturation isn’t applied evenly. Reds are muted to orange, while greens and blues are affected less. Overall color changes do give you a dreamy look.
- ■BW (Black-and-white). This is useful if you want to shoot monochrome photos in the camera, so you won’t need to modify color photos in software. This style will allow you to change the contrast and sharpness, but not the saturation (because there are no colors to saturate).
- ■SE (Sepia). A monochrome image with an overall sepia tone.
- ■Numbered Versions. You’ll find a second version of the ST, FL, IN, SH, SE, and BW options (in that order), prefixed by a number. That gives you a total of 16 available “looks” to work with.
Each of the Creative Looks has its own “base” level of each of the nine adjustable parameters. That is sharpness, saturation, contrast, and the other settings for the Standard preset are different from those for, say, the Neutral “look.” When a particular look is highlighted (as in Figure 7.12, left), press the left/right directional controls to scroll among the available adjustments, and then use the up/down controls to change a highlighted parameter (Figure 7.12, right). Press the center button to confirm. You can press the Trash button to return a particular Creative Look’s values to their defaults. Although the looks are applied only to the JPEG/HEIF files, the settings are embedded in the RAW files so your image editor can apply them during the conversion process if you like. Here is a summary of how changing the parameters in a Creative Style will affect your images:
- ■Contrast (+/-9). Compresses the range of tones in an image (increase contrast from 0 to +9) or expands the range of tones (from 0 to –9) to decrease contrast. Higher-contrast images tend to lose detail in both shadows and highlights, whereas lower-contrast images retain the detail but appear more flat and dull, without any snap.
- ■Highlights (+/-9). Increases or decreases the brightness of the lightest areas of your image without affecting the shadows.
- ■Shadows (+/-9). Increases or decreases the brightness of the darkest areas of your image without affecting the highlights.
- ■Fade (0-9). Determines the effect of the Creative Look, from imperceptible (0) to strongest (9).
- ■Saturation (+/-9). You can adjust the richness of the color from low saturation (0) to high saturation (9). Lower saturation produces a muted look that can be more realistic for certain kinds of subjects, such as humans. Higher saturation produces a more vibrant appearance but can be garish and unrealistic if carried too far. Boost your saturation if you want a vivid image, or to brighten up pictures taken on overcast days. Saturation cannot be changed for the Black & White Creative Look.
- ■Sharpness (0-9). Increases or decreases the contrast of the edge outlines in your image, making the photo appear more or less sharp, depending on whether you’ve selected 0 (no sharpening), to 9 (extra sharpening). Remember that boosting sharpness also increases the overall contrast of an image, so you’ll want to use this parameter in conjunction with the contrast parameter with caution.
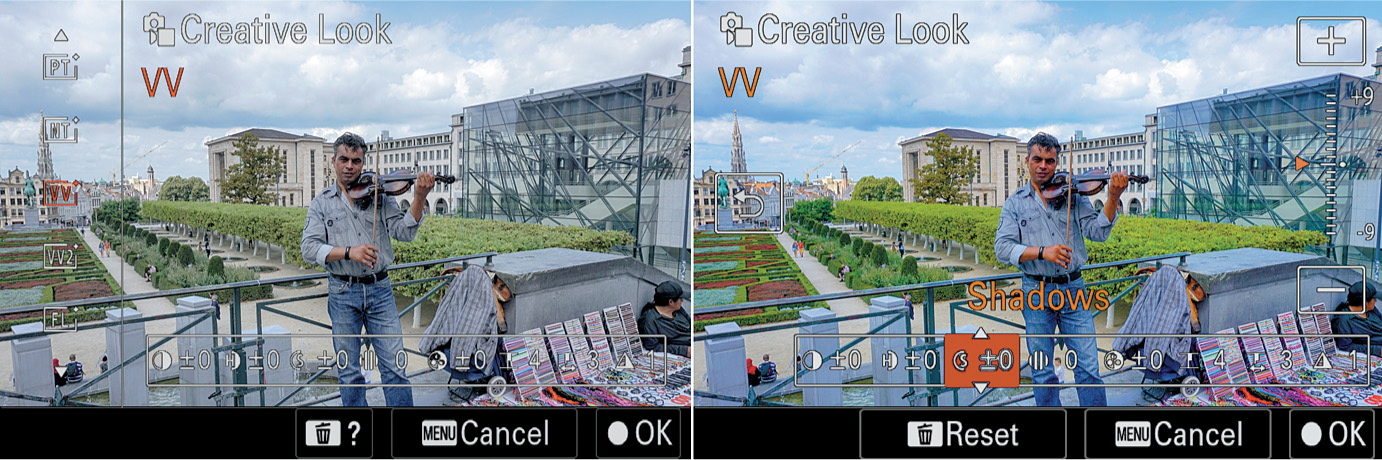
Figure 7.12 Choosing a Creative Look (left). Adjusting parameters (right).
- ■Sharpness Range (1-5). Determines the range of the outlines affected by the Sharpness parameter. A setting of 5 applies sharpness to finer outlines, which can cause unwanted halo effects.
- ■Clarity (0-9). Increases the sharpness of the middle tones of an image, avoiding adjusting the dark and light tones, adding “punch” to your image while avoiding an unnatural look that can result from oversharpening.
Note that Creative Looks and Picture Profiles (discussed next) cannot be used at the same time.
Picture Profile
Options: Picture Profiles PP1-PP11, *Off
My preference: Off
Picture Profiles are a great tool for advanced movie shooters. You can customize the picture quality, including color and gradation of your movies by defining the parameters included in each of 11 different Picture Profiles. To make these adjustments, connect the camera to a TV or monitor using the HDMI port, and use the picture on the screen as a guide while making your changes. After connecting the camera to your HDTV/monitor, navigate to this menu entry and select which Picture Profile you want to modify. Press the right button to access the index screen, then press the up/down buttons to select the parameter to be changed. Then make your adjustments and press the center button to confirm.
Even a short course in how each of the parameters affects video images, and a discussion of how to select the best settings would require a chapter or two of technical discussion and is thus beyond the scope of this book. I’m going to provide a quick listing of each type of setting for a reminder; your Sony manual provides more information about each of these. The Picture Profile presets already have default values:
- ■PP1: Example setting using [Movie] gamma
- ■PP2: Example setting using [Still] gamma
- ■PP3: Example setting of natural color tone using the [ITU709] gamma
- ■PP4: Example setting of a color tone faithful to the [ITU709] standard
- ■PP5: Example setting using [Cine1] gamma
- ■PP6: Example setting using [Cine2] gamma
- ■PP7: Example setting using [S-Log2] gamma
- ■PP8: Example setting using [S-Log3] gamma with the Picture Profile’s Color Mode set to [S-Gamut3.Cine]
- ■PP9: Example setting using [S-Log3] gamma with the Picture Profile’s Color Mode set to [S-Gamut3]
- ■PP10: Example setting for HDR Movies using [HLG2] gamma
- ■PP11: Example setting using [S-Cinetone] gamma
The list that follows is not for the faint-of-heart. As I noted, you can find entire books and motionpicture school classes on color grading and adjusting these parameters:
- ■Black Level. Sets the black level (-15 to +15). Black level is the level of brightness at which no light is emitted from a screen, resulting in a pure black screen. Adjustment of this parameter ensures that blacks are seen as black, and not a dark shade of gray.
- ■Gamma. Selects a gamma curve, a formula which corrects for the nonlinear relationship between the brightness (luminance) captured by a sensor and the brightness of the image as it’s displayed on a monitor. In other words, correction is needed to make what you see on a screen more closely resemble what the camera captured in real life. You can choose from 14 different gamma curves.
- ■Black Gamma. Corrects gamma in low-intensity areas, using Range and Level controls.
- ■Knee. Sets “knee point” and slope for video signal compression to prevent overexposure by limiting signals in high-intensity areas of the subject to the dynamic range of your camera. In short, a higher knee level produces more detail in the highlights; a lower knee level produces fewer details in the highlights. Your adjustments include:
- •Mode. In Auto mode, the knee point and slope are set automatically; in Manual mode, they are set manually.
- •Auto Set. Even when the mode is set to Auto, you can still choose maximum point for the knee point, from 90 to 100 percent, and Sensitivity, from High, Medium, or Low.
- •Manual Set. When mode is set to Manual, you specify a knee point (75 to 105 percent), and Slope from gentle (-5) to steep (+5).
- ■Color Mode. Sets type and level of colors, from among Movie, Still, Cinema, Pro, ITU-709 Matrix, Black & White, and S-Gamut, S-Gamut3.Cine, S-Gamut3, PT-2020, and 709.
- ■Saturation. Sets the color saturation, from –32 to +32 values.
- ■Color Phase. Sets the color phase (-7 to +7).
- ■Color Depth. Sets the color depth for each color phase.
- ■Detail. Sets parameters including Level, and Detail adjustments including Mode, Vertical/Horizontal Balance, B/W Balance, Limit, Crispning (sic), and Hi-Light Detail.
- ■Copy. Copies the settings of the Picture Profile to another Picture Profile number.
- ■Reset. Resets the Picture Profile to the default setting. You cannot reset all Picture Profile settings at once.
Soft Skin Effect
Options: *Off, On: Low, Mid, High
My preference: Off
If you want to shoot portraits that you can use straight out of the camera (SOOC), this setting tells the a7 IV to smooth skin tones when using the Face Detection feature. It tends to smooth out skin while retaining detail in the eyes and other high-contrast parts of the face. If you plan on editing your photos, you should leave it turned off. When you highlight On, you can use the left/right directional controls to choose Low, Medium, or High levels. This setting is not available when shooting only RAW, or RAW & JPEG/HEIF. It is also unavailable when using digital zoom.
7. Zebra Display
There are just two entries in the Zebra Display group, seen in Figure 7.13.
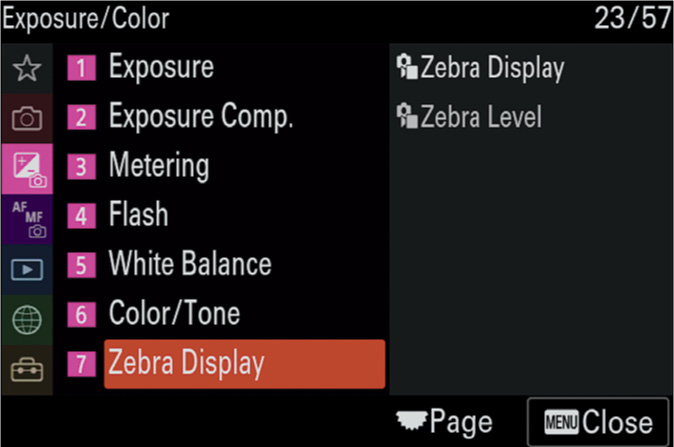
Figure 7.13 The Zebra group.
- ■Zebra Display
- ■Zebra Level
Zebra Display
Options: On, *Off
My preference: Off
The Zebra warns you when highlight levels in your image are brighter than a setting you specify in the Zebra Level entry, discussed next. This entry allows you to turn the effect on and off. Sony has made it a separate entry so you can assign the on/off function to a custom key and not have to return to this menu entry to enable/disable it.
Zebra Level
Options: IRE *70, 75, 80, 85, 90, 95, 100, 100+
My preference: 80
The Zebra display is a useful warning, especially when shooting movies, as it clearly shows when highlight levels in your image are brighter than a setting you specify here. It’s somewhat comparable to the flashing “blinkies” that digital cameras have long used during image review to tell us, after the fact, which highlight areas of the image we just took are blown out.
Zebra patterns are a much more useful tool because you are given an alert before you take the picture and can specify exactly how bright too bright is. The Zebra feature has been a staple of professional video shooting for a long time, as you might guess from the moniker assigned to the unit used to specify brightness: IRE, a measure ofvideo signal level, which stands for Institute of Radio Engineers.
When you want to use Zebra pattern warnings, access this menu entry and specify an IRE value from 70 to 100, and 100+. Once you’ve been notified, you can adjust your exposure settings to reduce the brightness of the highlights, as I’ll describe in Chapter 7.
So, exactly how bright is too bright? A value of 100 IRE indicates pure white, so any Zebra pattern visible when using this setting (or 100+) indicates that your image is extremely overexposed. Any details in the highlights are gone and cannot be retrieved. Settings from 70 to 90 can be used to make sure facial tones are not overexposed. Generally, Caucasian skin generally falls in the 80 IRE range, with darker skin tones registering as low as 70, and very fair skin or lighter areas of your subject edging closer to 90 IRE. Once you’ve decided the approximate range of tones that you want to make sure do not blow out, you can set the camera’s Zebra pattern sensitivity appropriately and receive the flashing striped warning on the LCD of your camera. (See Figure 7.14.) The pattern does not appear in output to a device through the HDMI port, nor in your final image, of course—it’s just an aid to keep you from blowing it, so to speak.
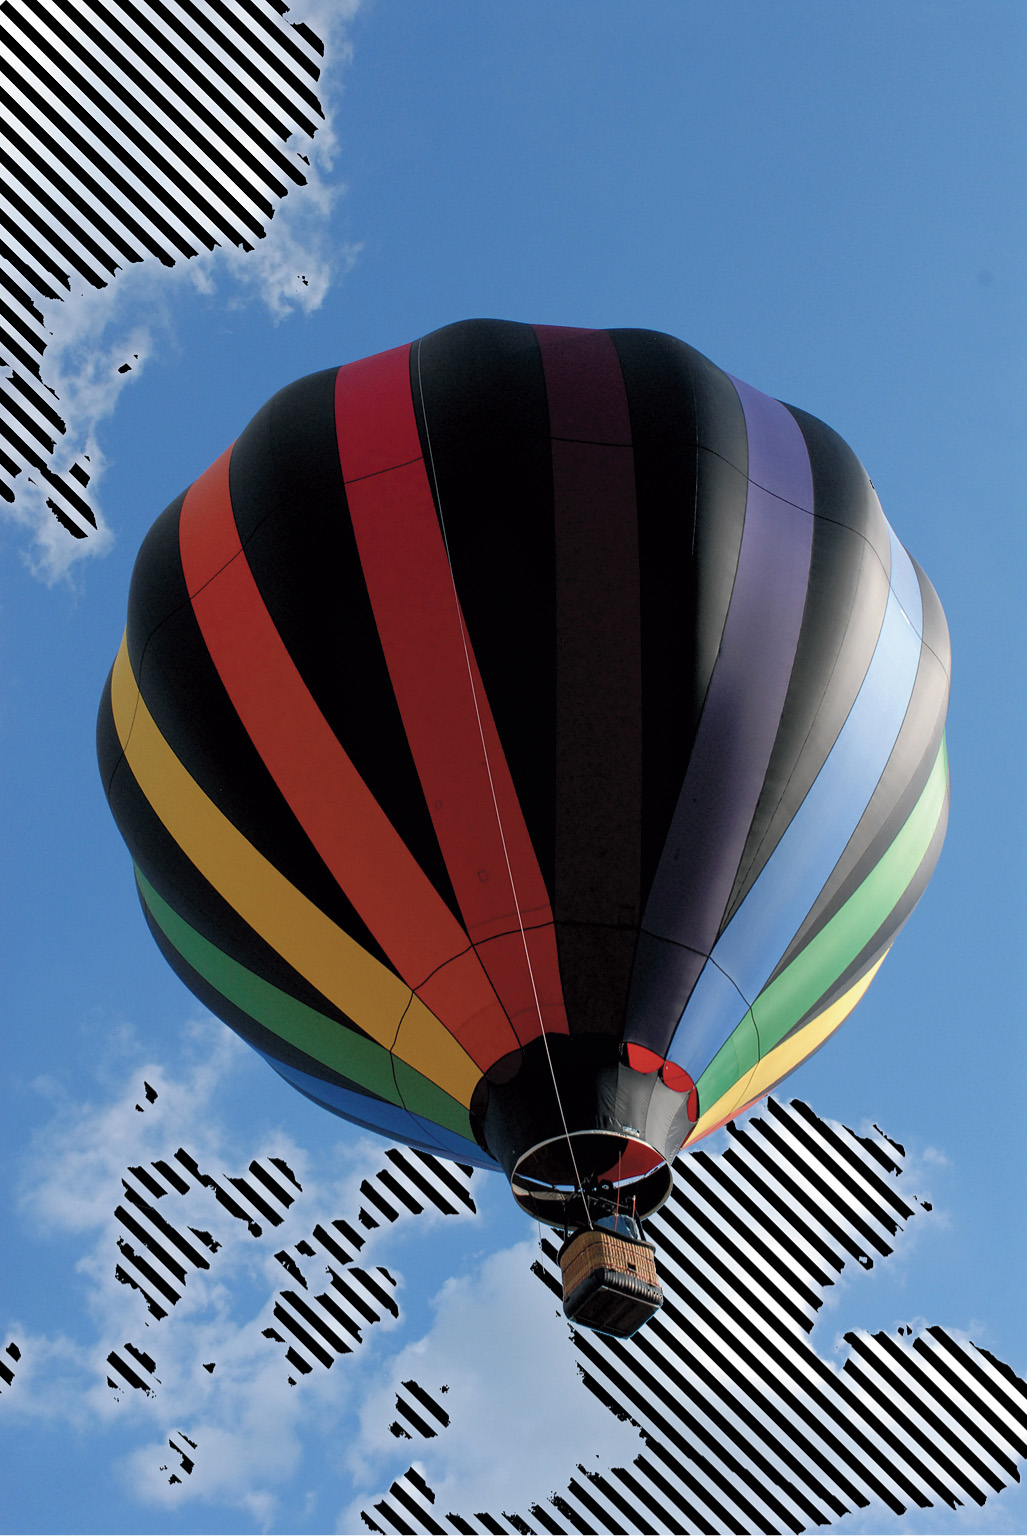
Figure 7.14 The flashing stripes show an area is overexposed.