CHAPTER 8 REFLECTIONS
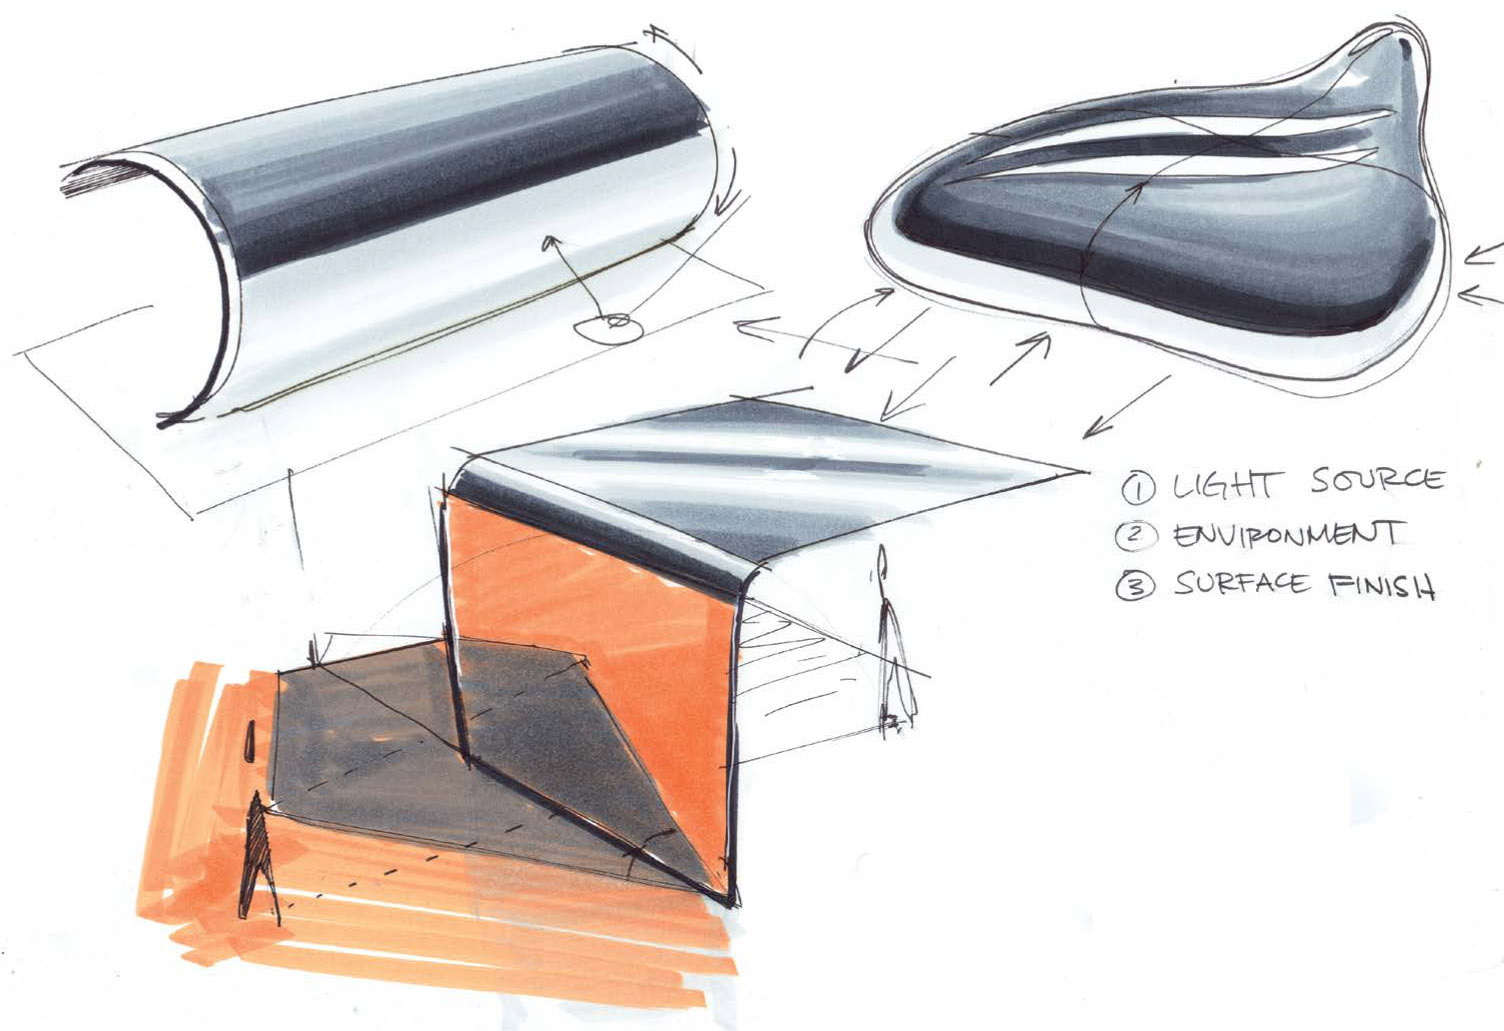
In the last chapter, we discussed light, how it creates shadows, and how shadows add depth and realism to your sketches and drawings. Light also creates reflected images on some surfaces when we observe the object. Reflected light is fundamental to how we see everything in the real world—every object’s color, tone, shade, and texture. Reflections are caused by light being incident to a surface and the viewer observing the reflected light. To produce clear reflections, a surface must have a few characteristics that allow light to bounce to our eyes.
Smooth vs. Rough Surfaces
As you know from real-world observations, reflections from smooth, flat surfaces look different than those from uneven surfaces. The reason why relates to how the trajectory of light interacts with the surface and how that affects what you, the observer, see of the object and the reflected image.
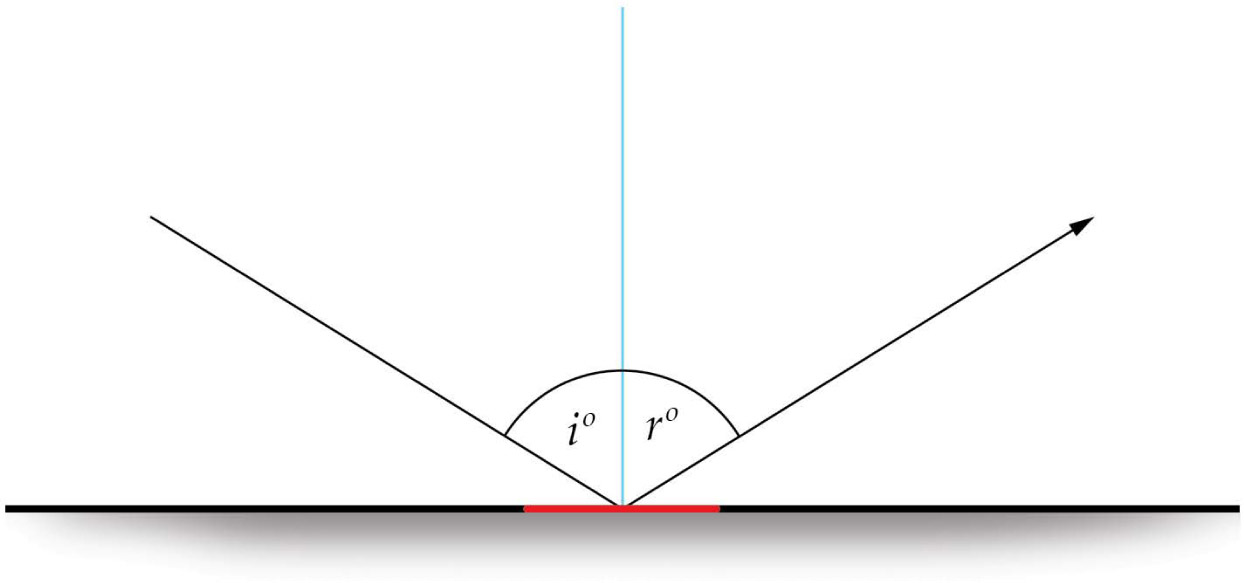
Imagine a mirror (or other highly polished, flat, smooth surface) with a light source and objects nearby. Rays emanate from the light source and hit the mirror’s surface at a point of contact; the angle at which the light hits the surface is called the angle of incidence. In math terms, the angle of incidence is the angle between the surface normal (vertical line that is perpendicular to a line tangent to the point of contact) at the point of tangency located at the point of incidence (the contact point) and the trajectory of the ray of light from the light source that hits that point. The path of light that is reflected from the surface is at the same angle at which the light was incident to the surface. This second angle is called the angle of reflection. This is true for flat surfaces as well as curved surfaces.
The less polished a surface is, the less refined the reflection will be, and the more polished the reflective surface is, the clearer the reflected object will appear. Additionally, the color of the reflective surface may affect whether the reflection is clear like a mirror or more fuzzy. Adding color to a reflection can also enhance the visual realism of the drawing.
With a curved surface, each ray of light that is incident will have a different surface normal and angle of reflection. This is in part why shadow cores work the way they do on curved surfaces and value is varied on a curved surface.
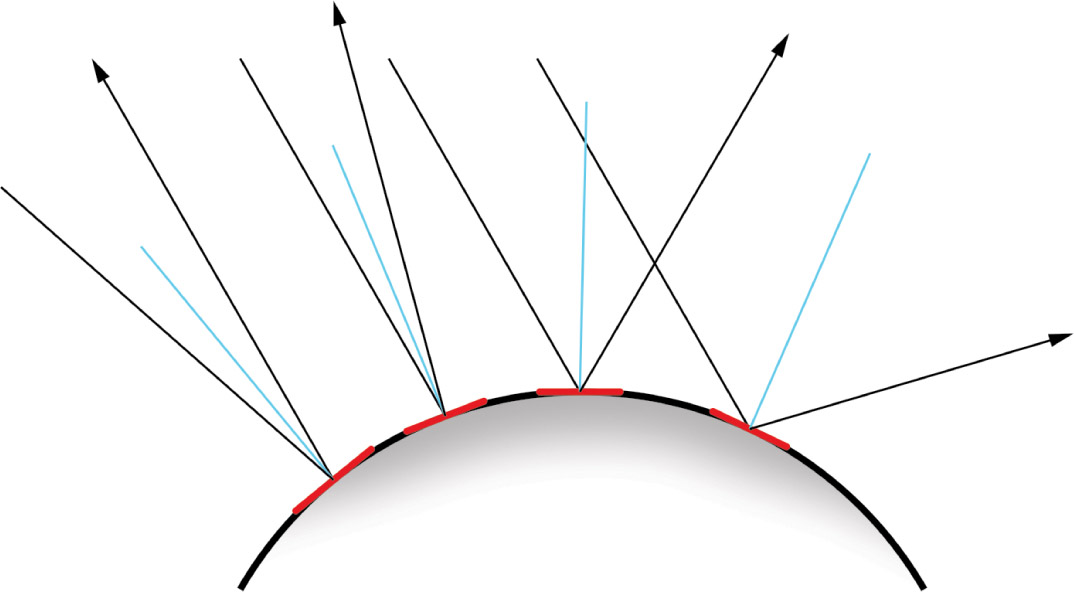
The rays of light that are incident to the curved surface may be reflected in a divergent or convergent pattern, thus intensifying the reflected light or spreading it out. This spreading or converging of reflected light rays causes a value change in surface appearance as well as distortions in reflections. Study a shiny, curved object nearby, and compare its reflections to that of a smooth, flat surface. (We’ll revisit this concept a bit later in this chapter.)
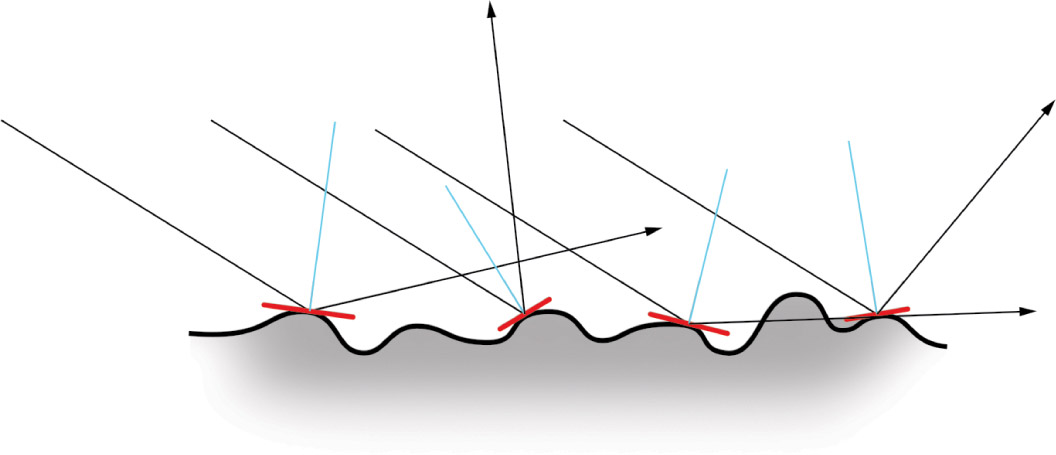
So, what is a matte surface, and why does it not reflect, even though it is flat? A smooth surface that is perfectly flat and polished will have few to no undulations. Conversely, a rough surface will have several undulations at a very small scale, albeit in a generally even pattern at small scale. If you zoomed in and magnified a flat matte surface, it would look something like the illustration of a flat surface up close with undulations on page 93. Each undulation on the surface is a small deviation in the flat surface, so small you cannot see it without magnification. Because of these changes in the surface topography, the light that it reflects is diffused as it bounces from the surface. Why? With each undulation, the angle of incidence and, therefore, angle of reflection change with each successive ray of light that is incident to the surface. These differences in angles of incidence mean that each light ray is reflecting toward the viewer at a distinctly different angle. This varied reflection of light causes the diffused matte appearance in surface finish.
Simple Reflections
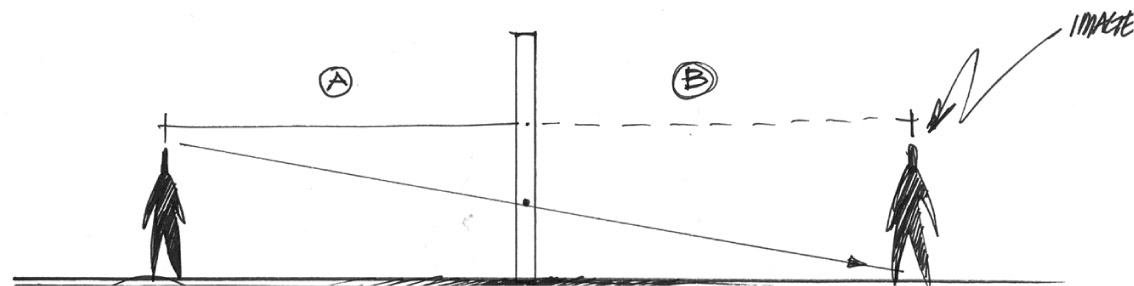
With reflections, the light the viewer sees is secondary light, reflecting off an object before being seen by the viewer.
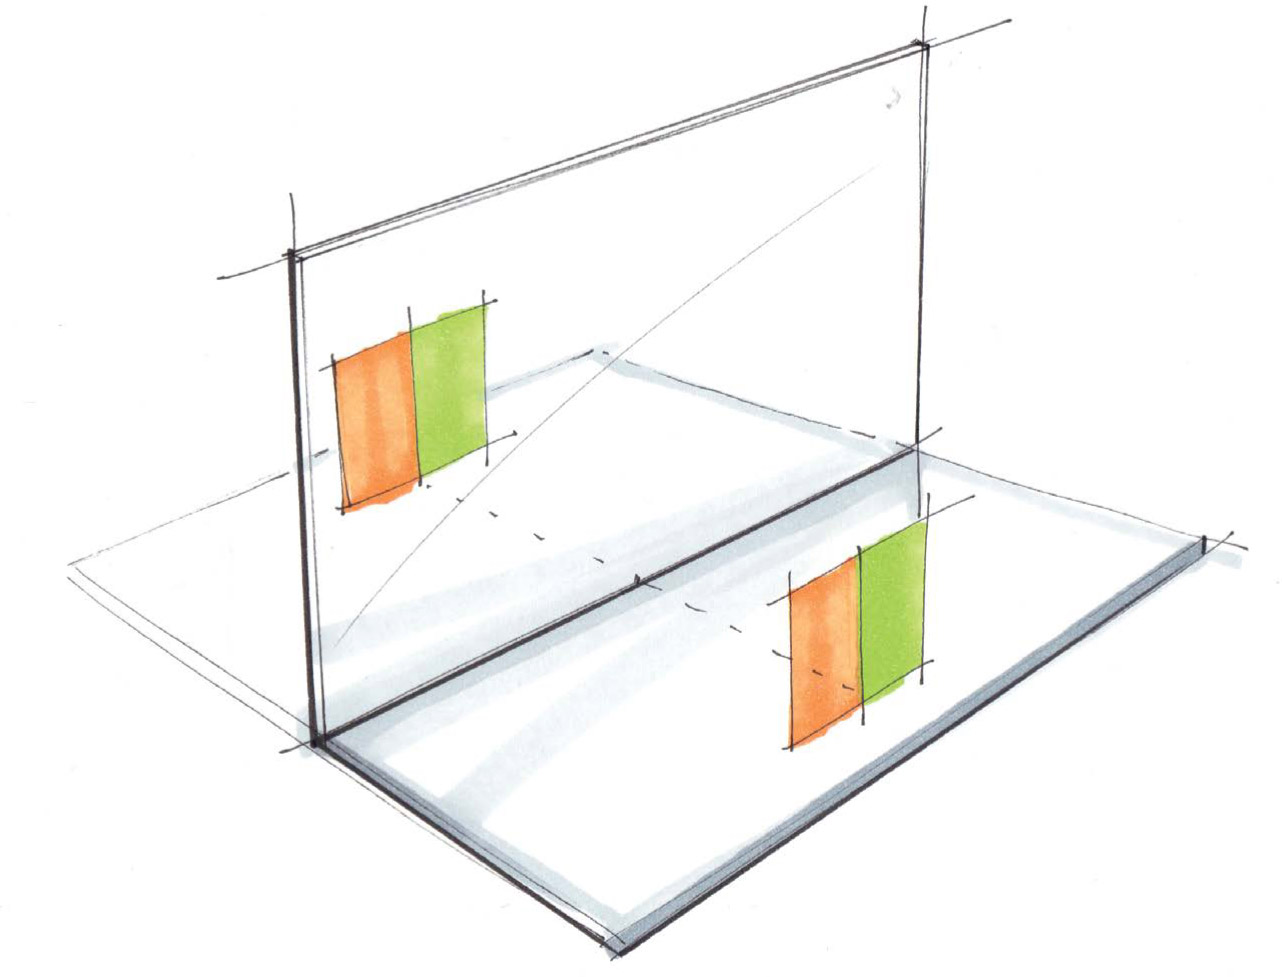
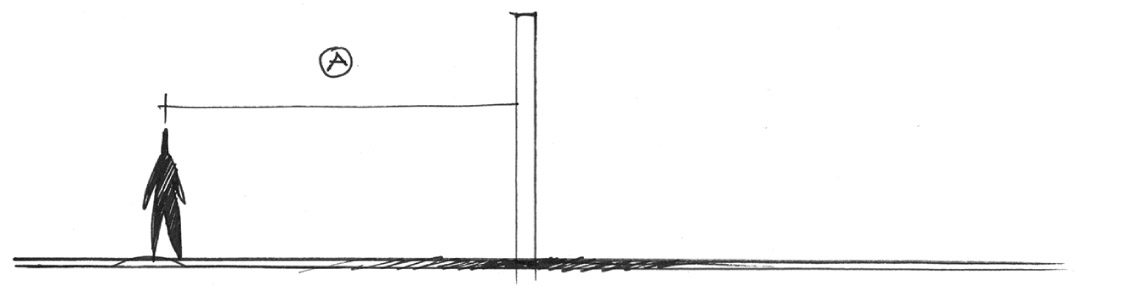
Look at the diagram for a simple reflection example. The viewer can see into the mirror from their perspective and notices that the subject is inverted. Why? The light the viewer is observing is the light reflected from the surface of the mirror. (In the diagram, the dotted line represents the image of the trajectory of the reflected light traced “into” the mirror.)
Remember, the angle of incidence is equal to the angle of reflection, which explains why the image the viewer sees is inverted. In this case, the inversion is top to bottom because the subject is resting on the mirror. If the subject was in front of the mirror and the subject was also the viewer, the image in the mirror would be flipped as the light being observed would be the light that is reflected from the subject to the viewer.
Reflections help reinforce depth, but may be abbreviated (right) as well
This may seem confusing at first but try replicating the example shown with a few simple objects to get the hang of it.
Try drawing a similar setup and tracing lines to calculate where an image would be produced relative to the object in this two-dimensional scene.
In perspective or three-dimensional drawing, reflections work much the same as shown in the previous two-dimensional example. Remember, the reflection in view is the result of light reflecting from the object to the viewer at the same angle.
In the two-dimensional example, when distance is placed between the object and the mirror, the distance is also reflected in the mirror. Simply put, the distance of an object to the mirror is equal to the distance of the image of the object in the reflection. Remembering this relationship simplifies drawing reflections in planar faces when drawing in perspective.
There are multiple ways to estimate the distance of an object from a mirror in perspective drawing, similar to working with square faces and boxes in perspective when calculating double or triple distances. One simple and useful method is to draw a rectangle, find the center, and extend the rectangular shape into the mirror.
Estimating Reflection Distance in Two Dimensions Demonstration
1. Draw a rectangle and extend the base of the rectangular line. You’ll use this extended line to find the length of the new rectangle. This method will work with any rectangular shape or a square.
2. Draw lines from corner to corner of the rectangular shape and find the center of the rectangle. It is important to use this method as it translates well in perspective drawing.
3. With the center located, draw a line horizontal from the center of the rectangle to intersect with one of the vertical sides.
4. Draw a line from the opposite topmost side of the rectangle through the new point on the vertical side of the rectangle.
5. Extend this line to intersect with the base line that was extended. The length between this new point and the rectangular shape should be equal.
Estimating Reflection Distance in Perspective Demonstration
Applying the same technique in perspective, you can figure out the optical distance of the reflection from the surface of the mirror. Because distances are shortened in perspective drawings, it’s important to be mindful of placing the image that is the reflection in a way that represents this shortened distance.
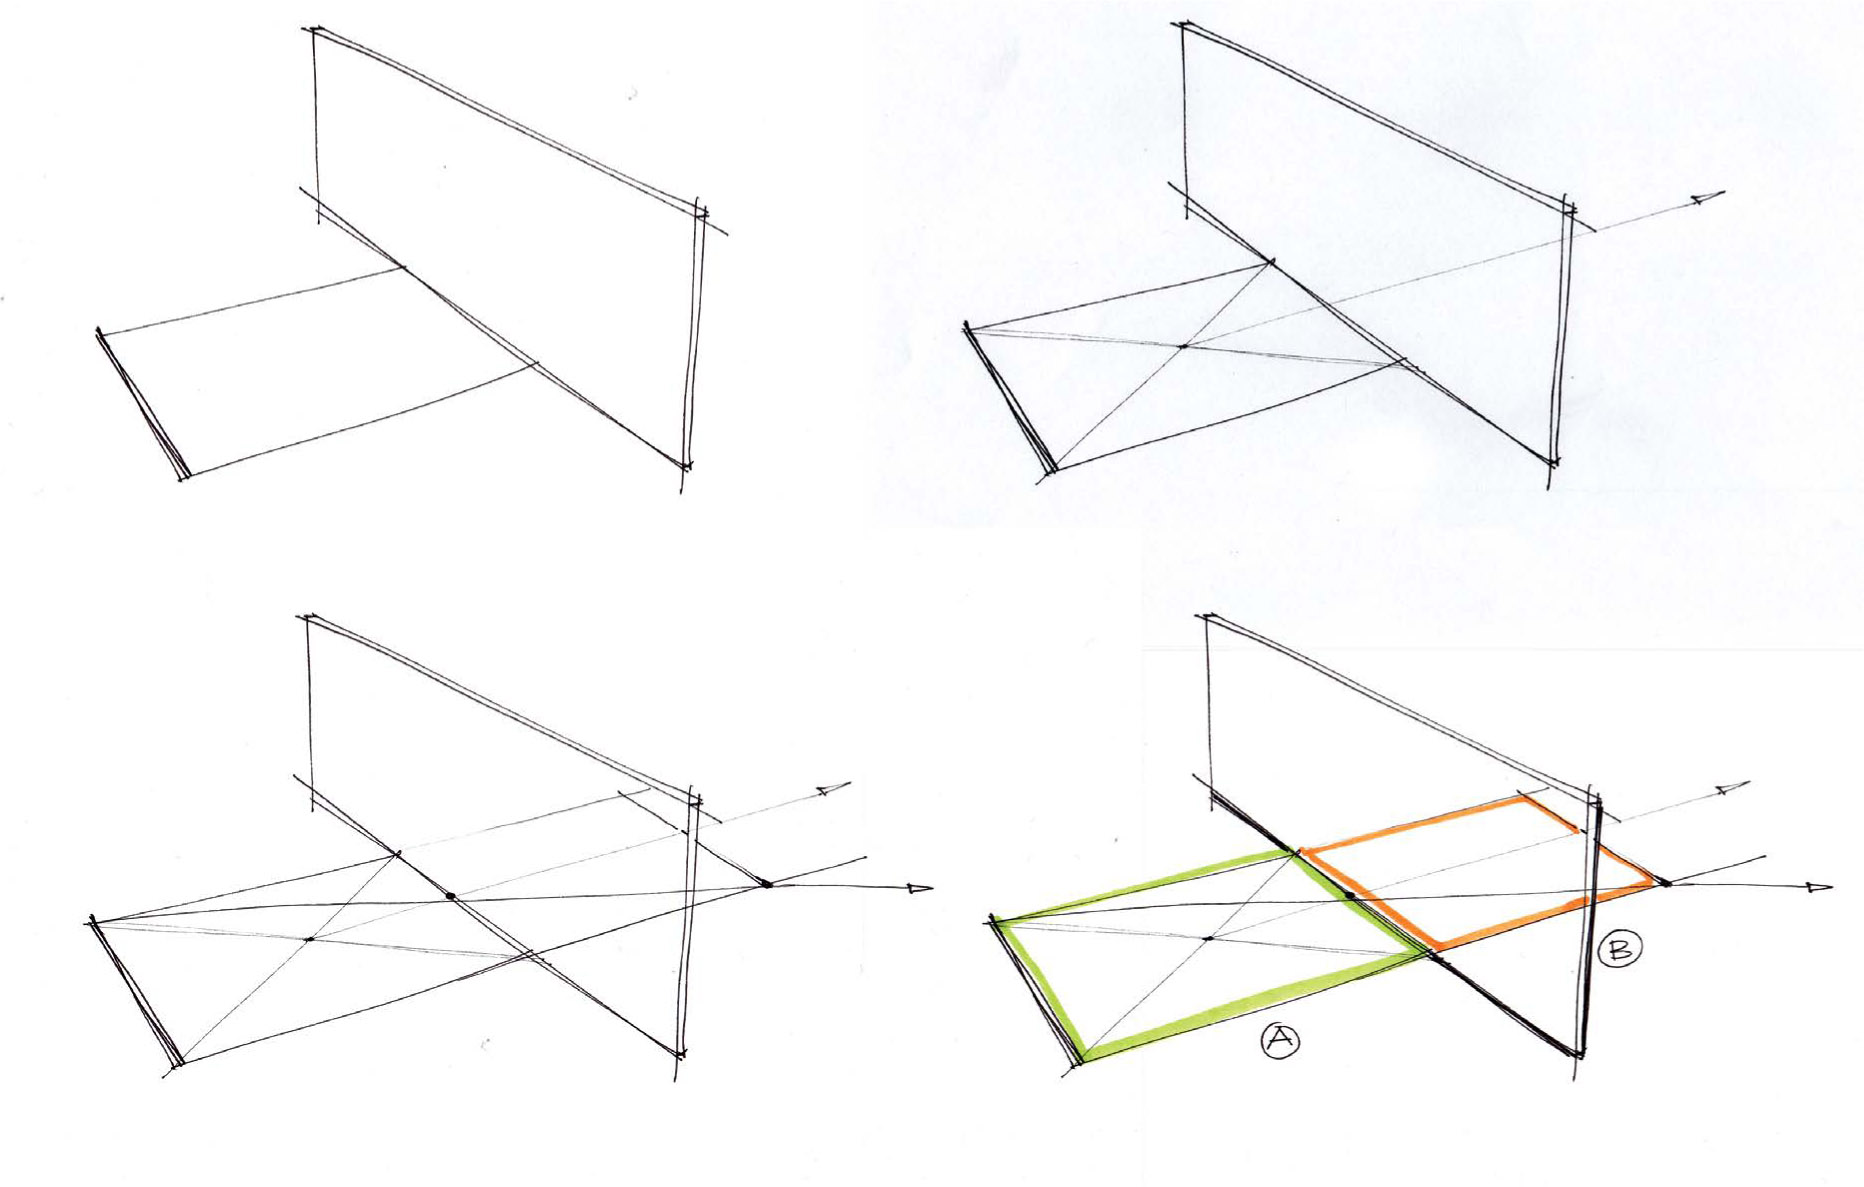
1. Draw a rectangle using perspective lines that converge at the vanishing points to create a rectangle that touches the mirror surface. Centering the rectangle on the object isn’t critical.
2. Extend one side of the rectangle in perspective through the reflective surface of the mirror. Much like in the two-dimensional example, this line will be used to find the equivalent distance in perspective.
3. Find the center of the rectangle by drawing two lines from corner to corner and extend a line from the center of the rectangle to intersect the mirror surface. This is the midpoint of the rectangle’s short side.
4. Draw from the opposite far corner, much like the two-dimensional example, and extend a line to intersect with the extended side of the rectangle.
5. Complete the rectangle. You should now have the estimated distance from the object to the mirror and from the mirror to the reflection of the object in the mirror.
You can use this technique to find distances in a precise way when drawing in perspective. In most cases, however, a simple visual estimate of the distance (keeping perspective in mind) should be enough to visually place the reflection on a reflective surface. Practice estimating perspective, and measuring will feel much more natural.
Curved Surfaces and Reflections
Curved mirrors and surfaces can be complex to understand. Curved surfaces and mirrors can be convex or concave and also have such additional properties as a focal point for a concentration of light rays that reflect and interact with the surface. Curved surfaces and mirrors will distort the image of a subject produced when reflected as seen by the observer of the image in the mirror. This image distortion may be compressed, elongated, or expanded based on the relative position of the subject to the mirror. These reflections are sometimes referred to as artifacts, as the image is not as clear as you would see in a planar mirror.
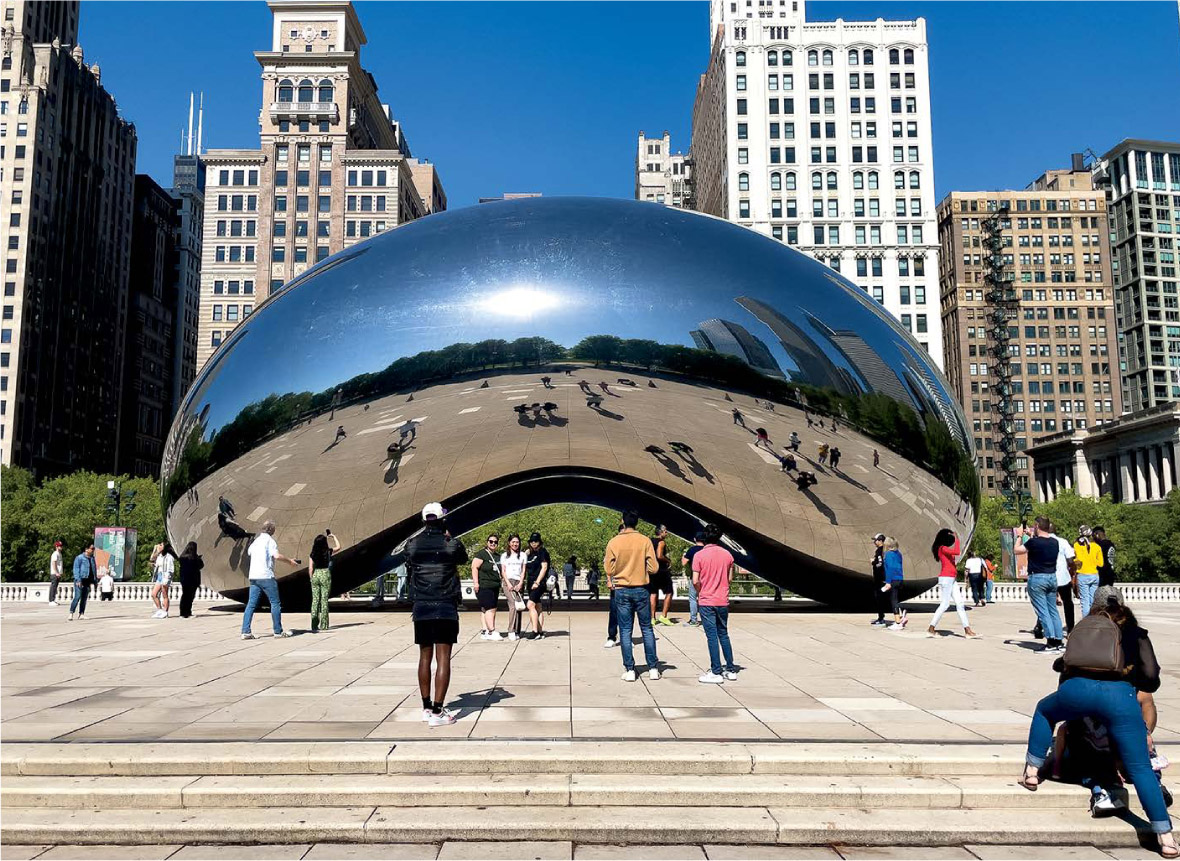
Without delving deep into the mechanics of a curved mirror, you can learn much by observing real objects. The Cloud Gate sculpture in Chicago is a great example of curved mirrors and the type of reflections they produce. As always, observation is often the best teacher; pay close attention to the reflections in this photo.
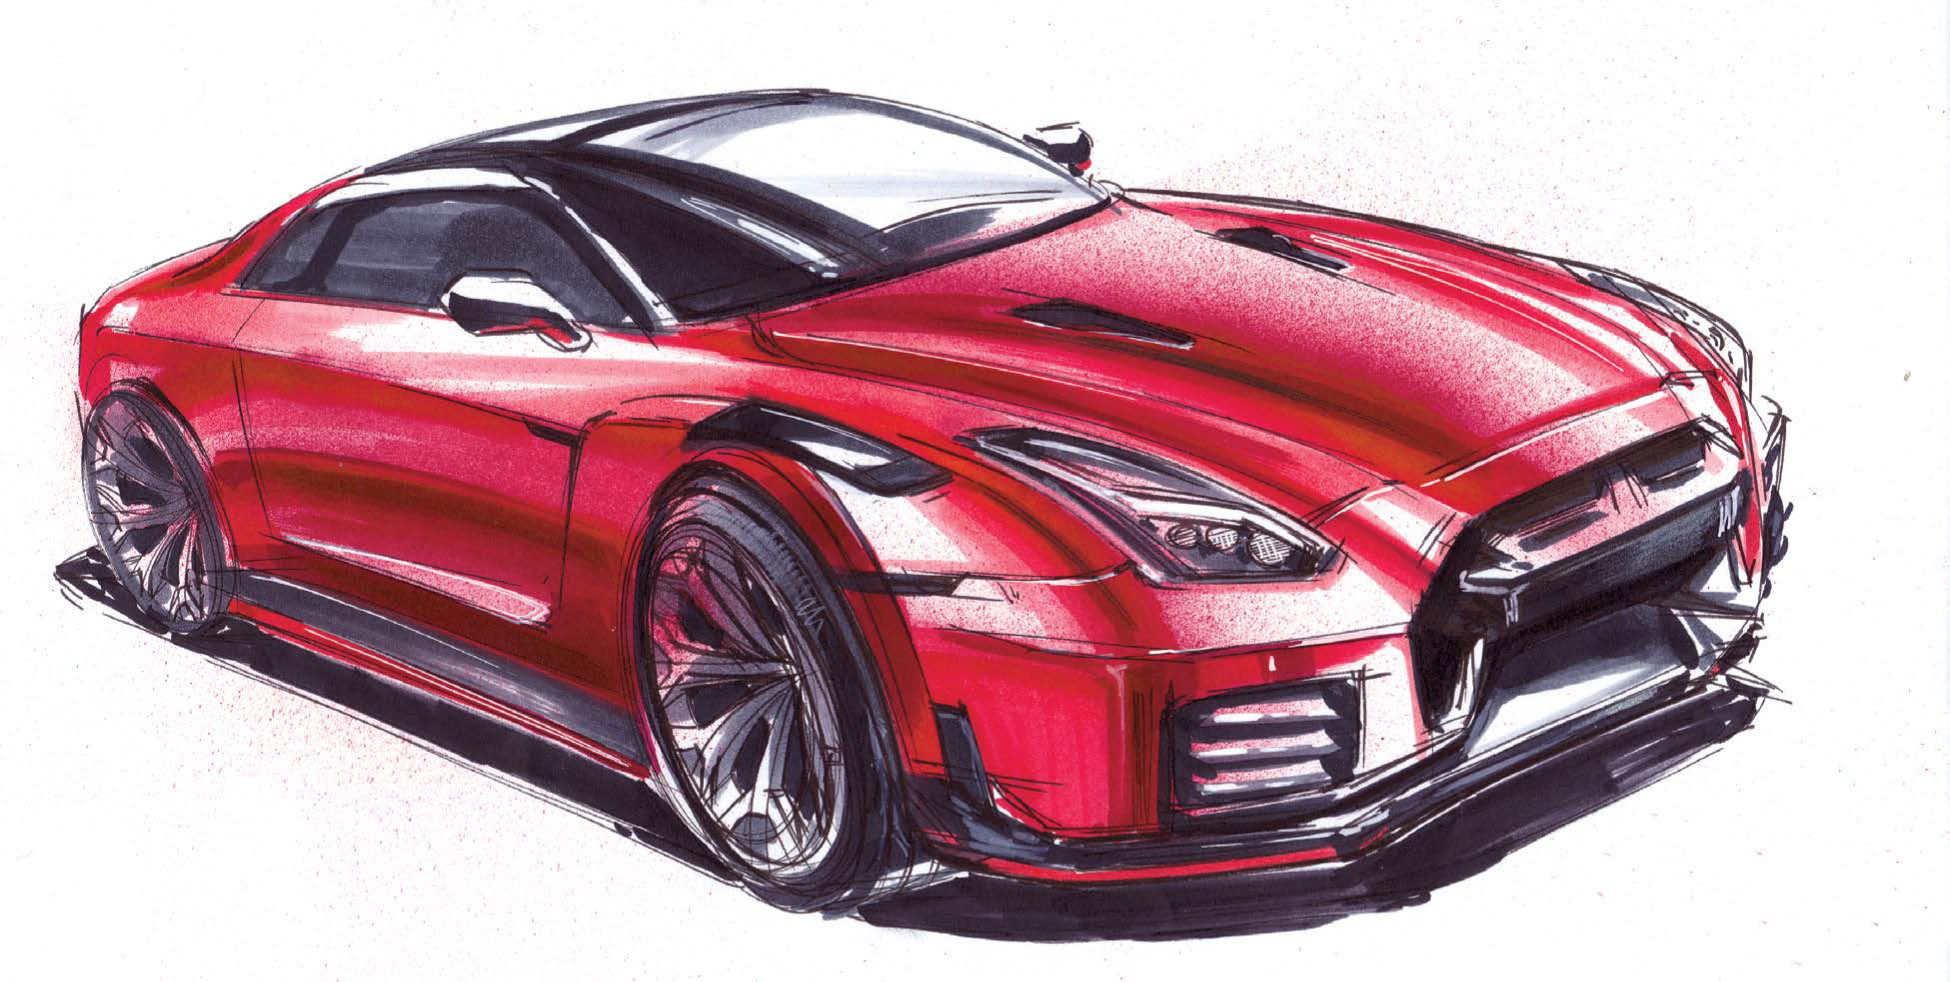
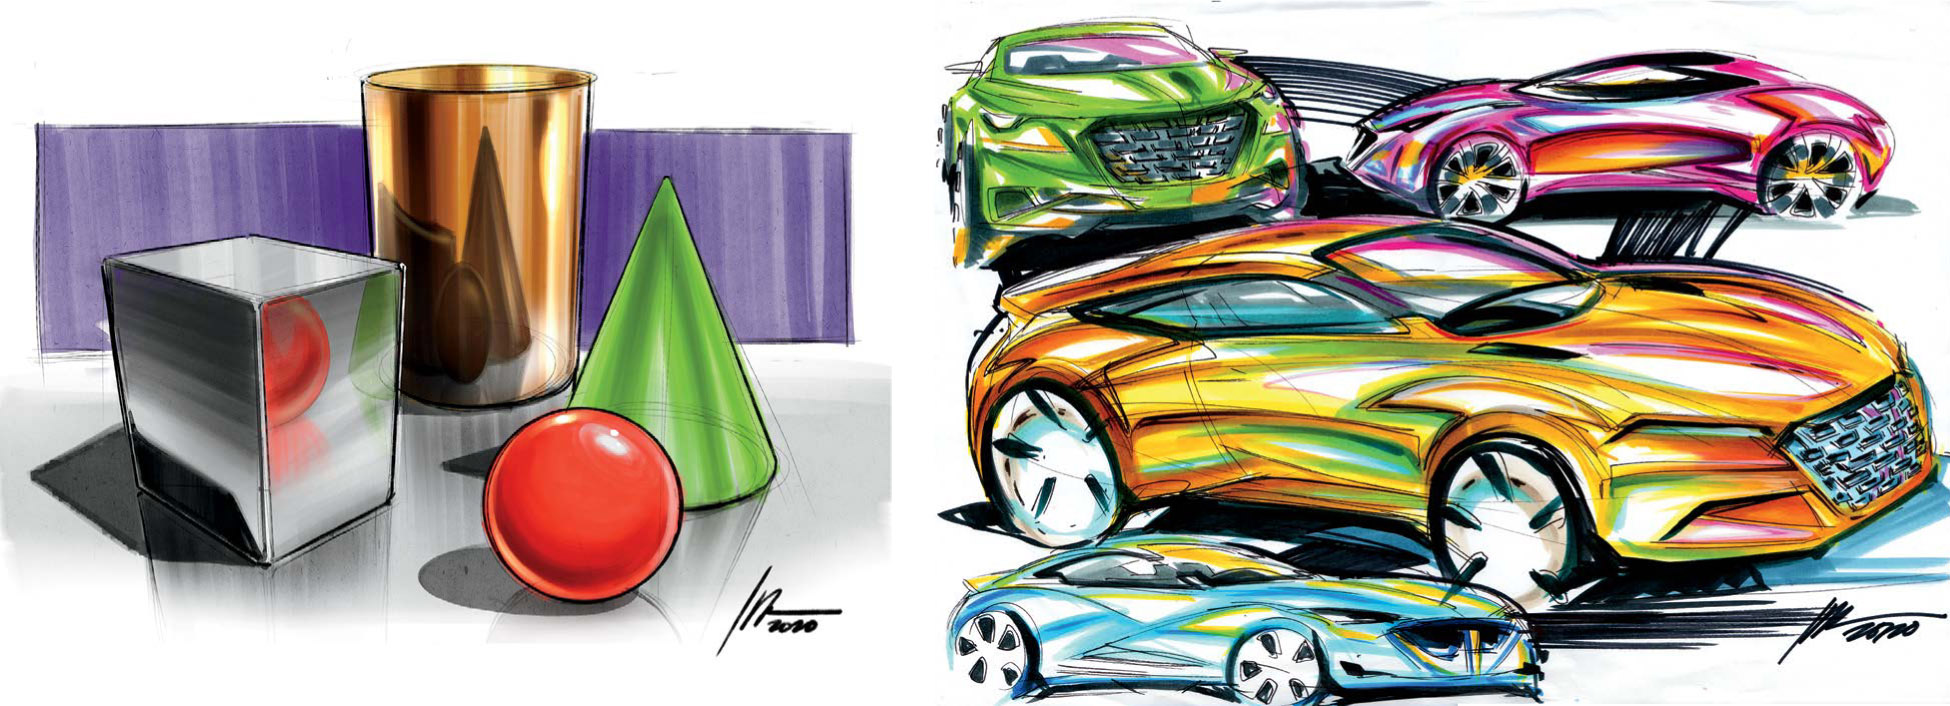
Another good way to observe curved reflections is by studying reflections in chrome pipes and mufflers, as well as the surface paint on automobiles. Notice the way colors shift, as well, based on the color of the reflective surface.
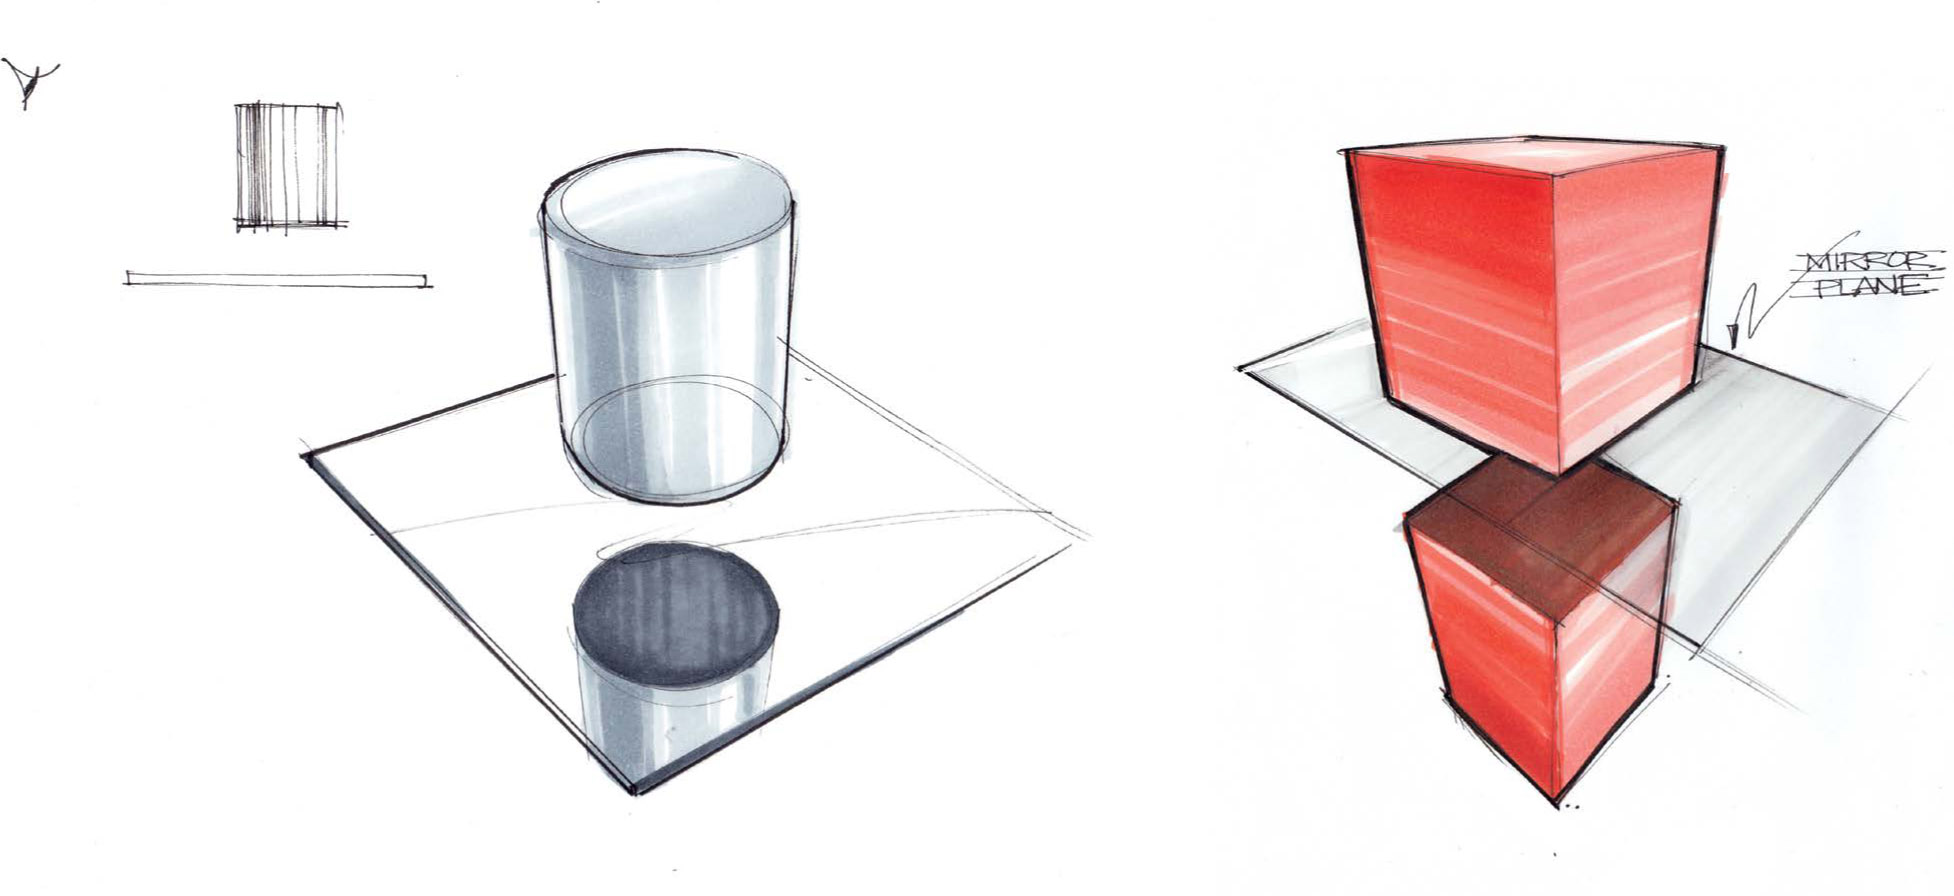
Ground Plane Reflection
Ground plane reflections, along with shadows, are a great way to add depth to your drawing. With your subject on the ground plane, adding a reflection is fairly simple as the ground plane is flat. Imagine the plane being a polished mirror much like the examples shown earlier. Finding the reflection is a matter of measuring downward and sketching the inverted image into the ground plane at equal proportions as the object viewed resting on the ground plane.
Because the subject is the main component in the composed scene, be mindful to not let the reflection overshadow the main subject. To ensure it doesn’t, I sketch the reflection with lighter tones and lines to show that the ground plane itself is not a perfectly smooth surface.
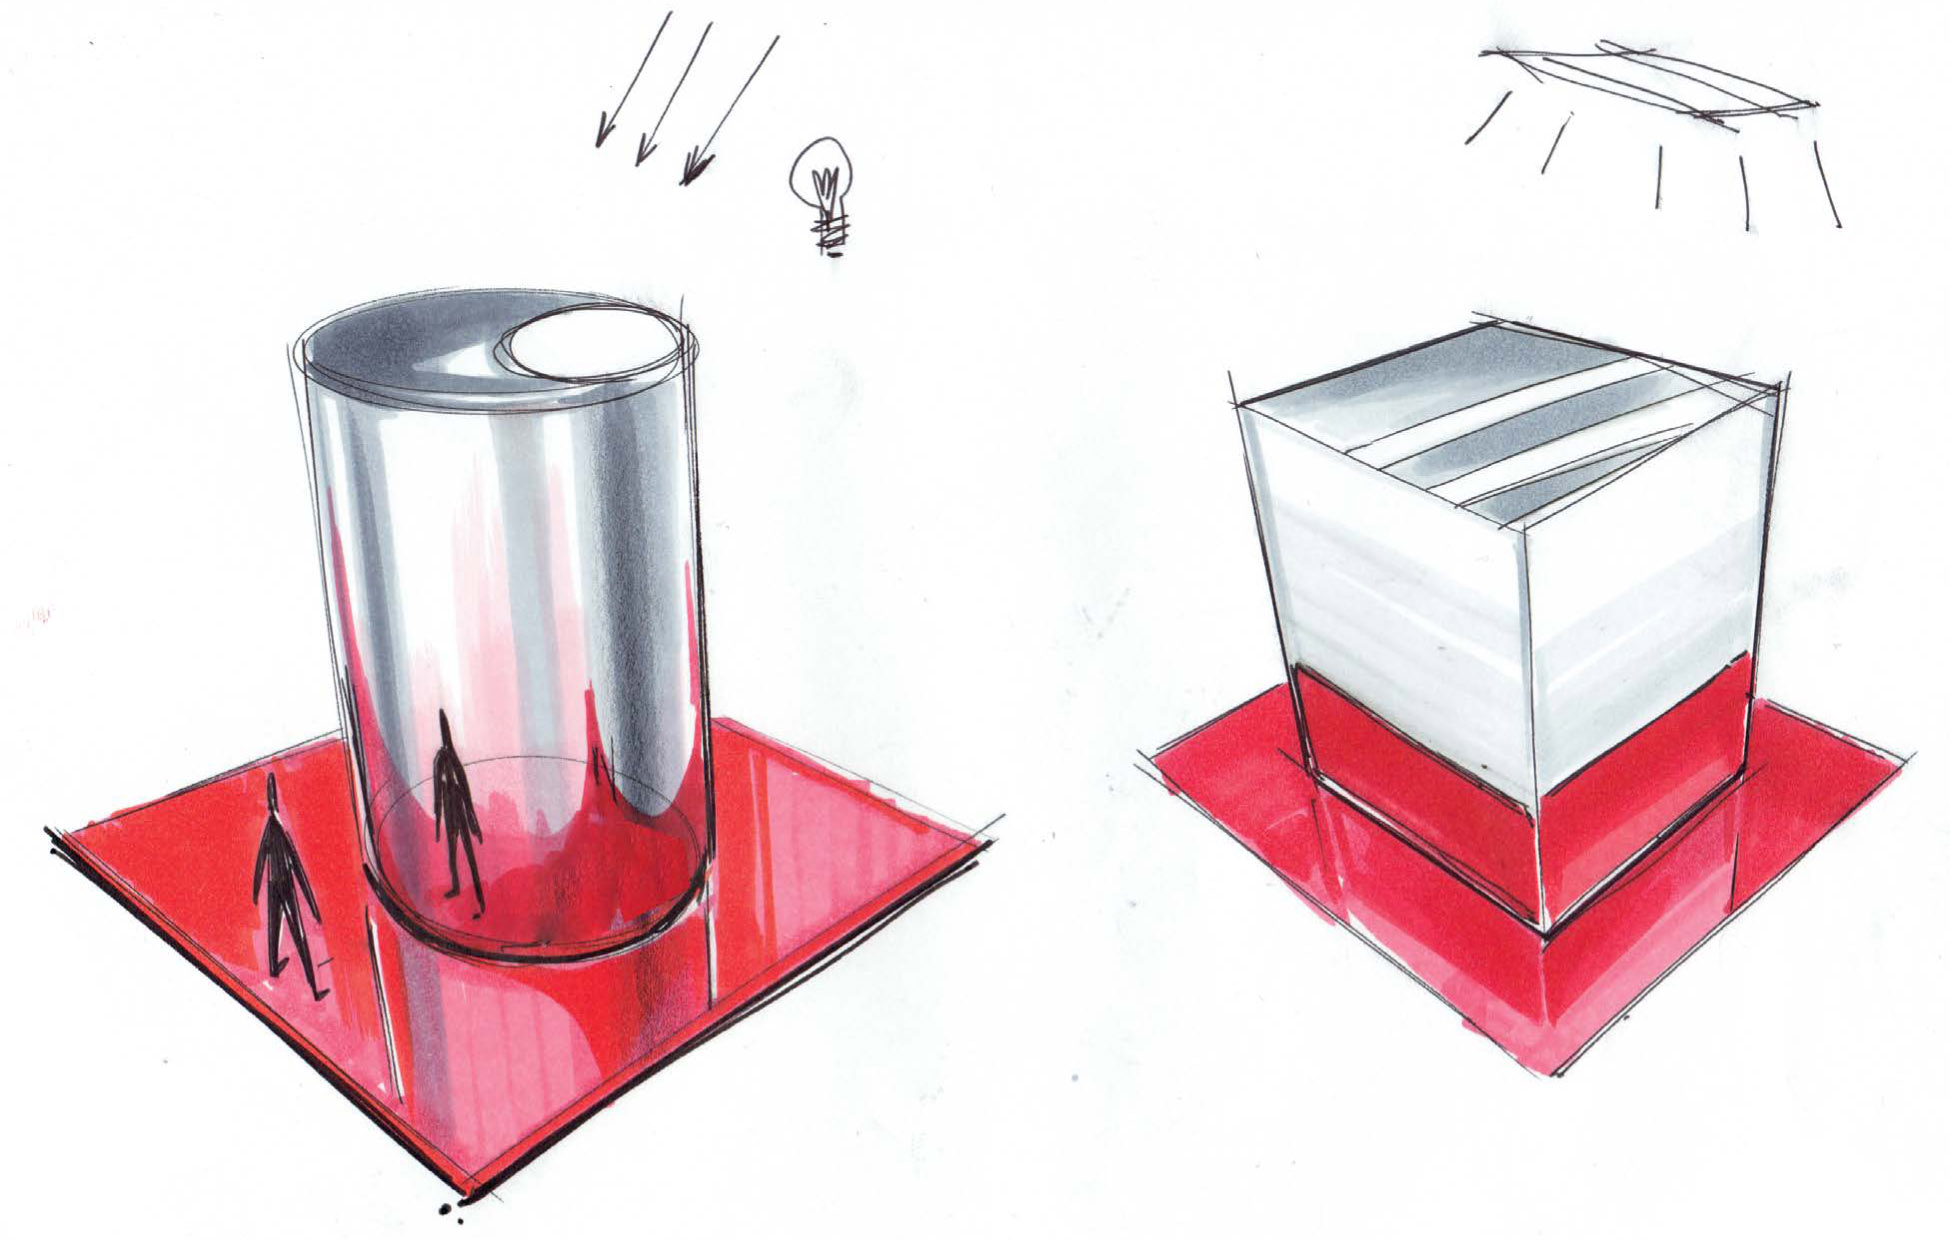
Cube Reflection in Ground Plane Demonstration
Let’s practice sketching a vertical reflection with a simple cube resting on a reflective mirror-like surface.
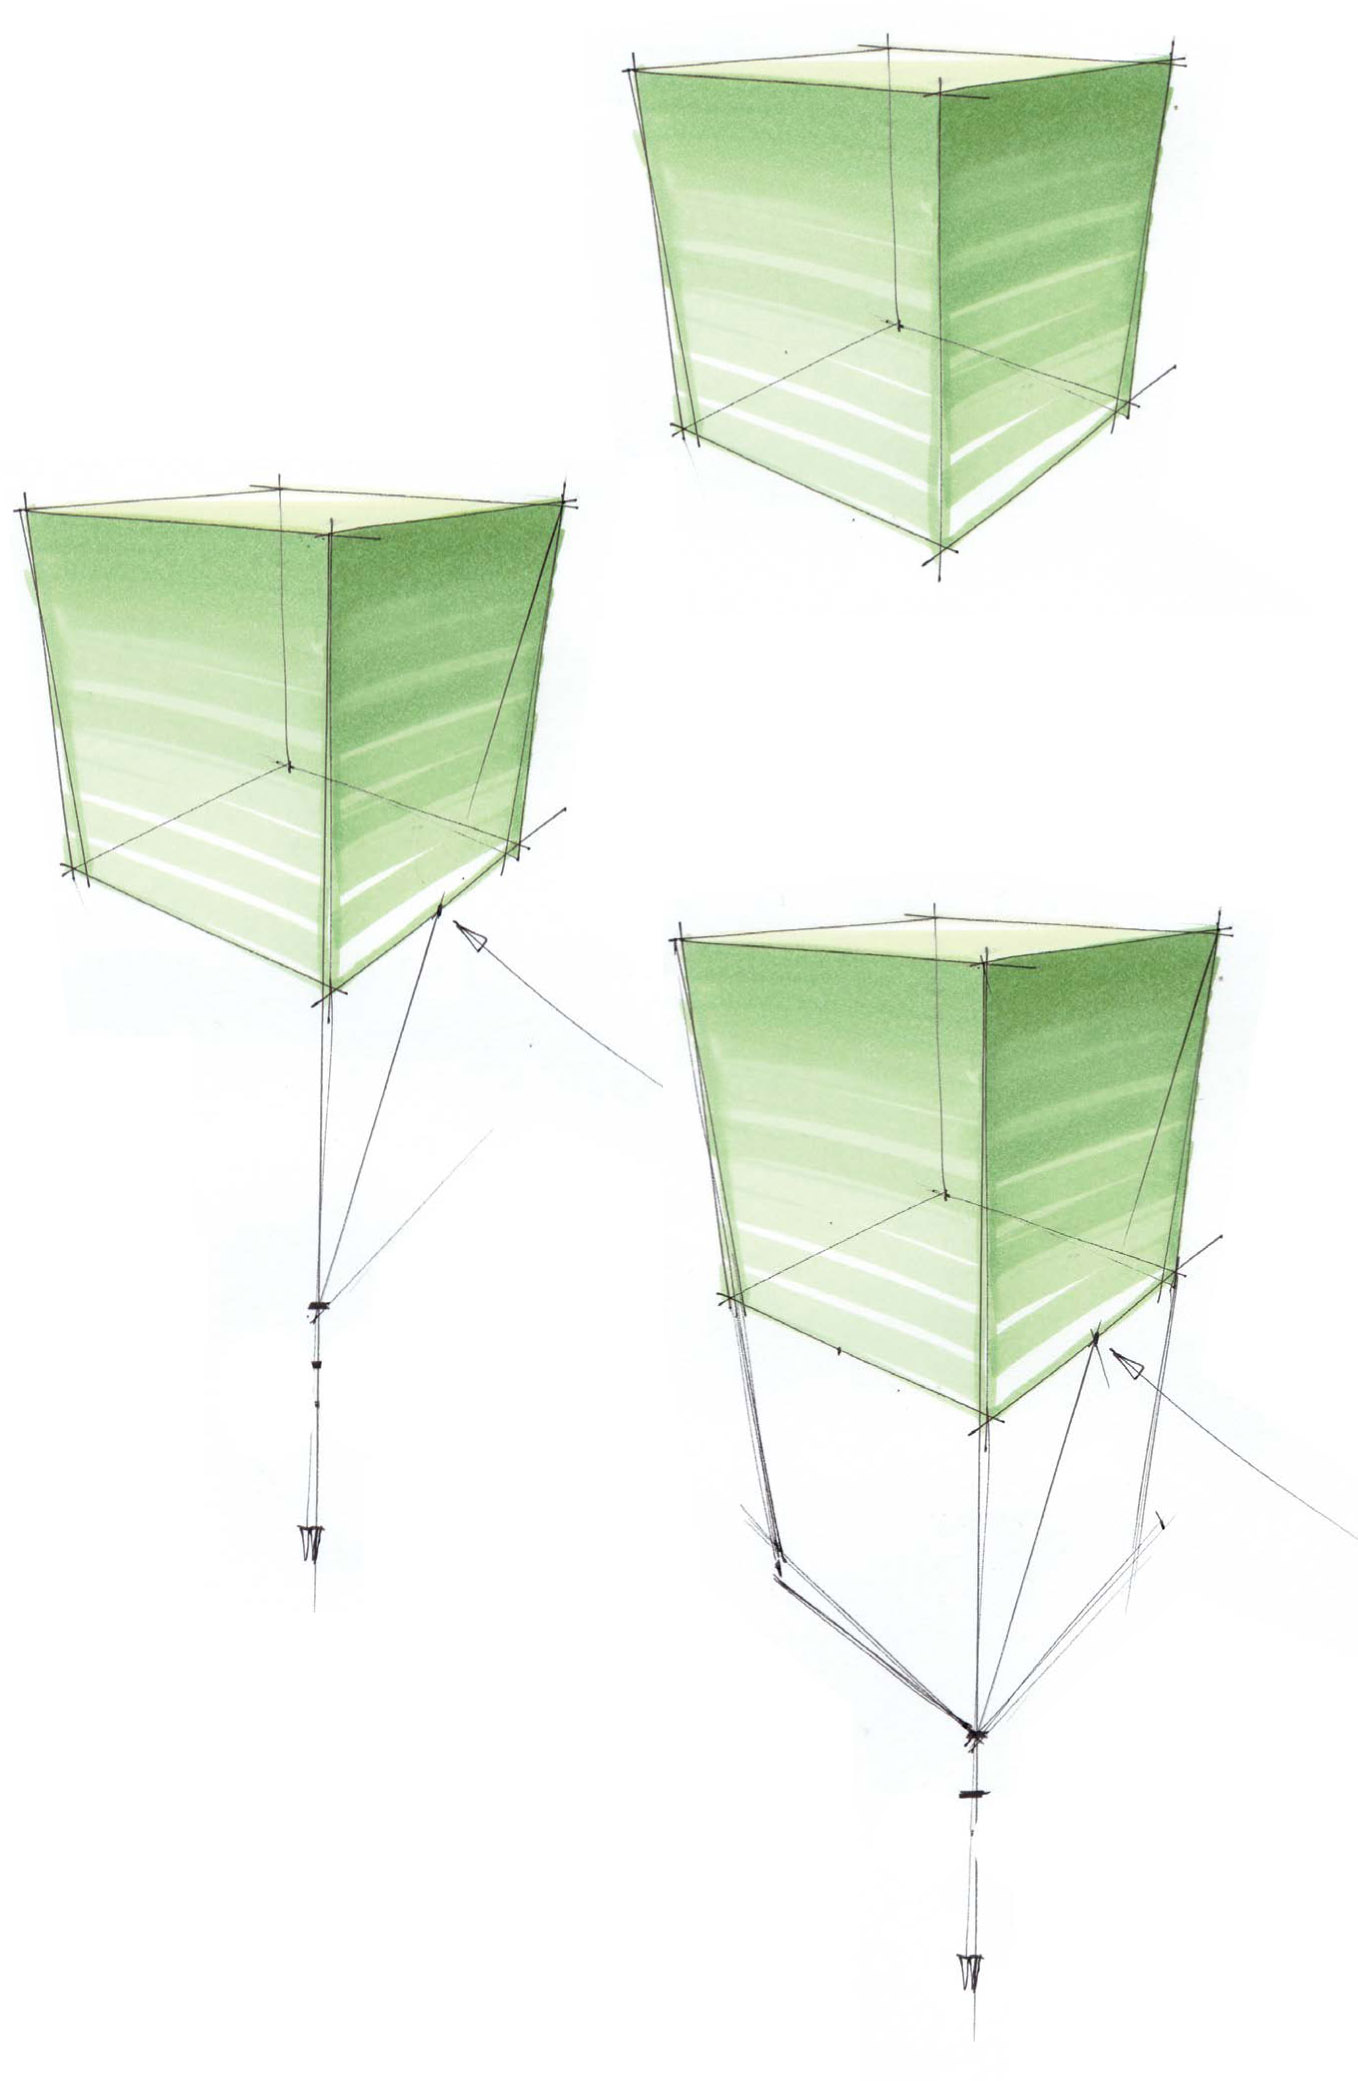
1. Sketch a cube in the perspective of your choice.
2. Shade the cube as you would like. I have used markers in this example.
3. Estimate or measure in perspective the vertical distance of the cube’s height and draw this distance downward as the image in the mirror.
4. One way to do this is by finding the midpoint of a horizontal base edge of the cube. Draw diagonally through the midpoint from a top corner of the cube to intersect with the extension of a vertical edge.
5. This new point will be the height of the cube as reflected. This technique is especially important if using three-point perspective.
6. With the height of the cube reflected into the ground plane, project lines to the vanishing points or in the same direction as receding lines converging to the left and right and find intersecting points.
7. Complete the outline of the cube and shade, if desired.
Reflecting other objects is simply a matter of applying these steps to the broken-down components of a more complex form.
Abbreviated Reflections
For ground reflections, rather than creating a full reconstruction of the object that is inverted into the ground surface as an image, you can add an abbreviated reflection to convey the same visual symbol of having a reflection. An abbreviated reflection may include a small portion of the reflected image closest to the object as it rests on the ground plane.
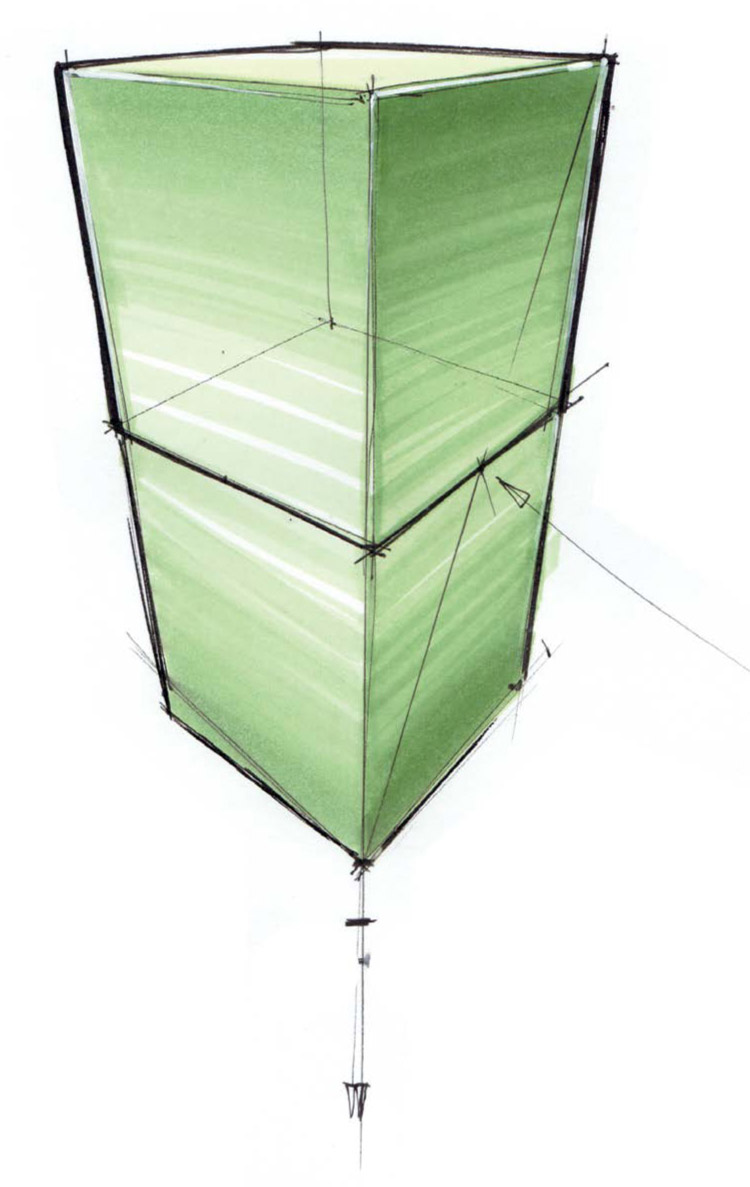
It is up to you to decide how much of the image to show. If the object is fairly complex, adding an abbreviated reflection saves time and effort rather than constructing a perfect image for the reflection.
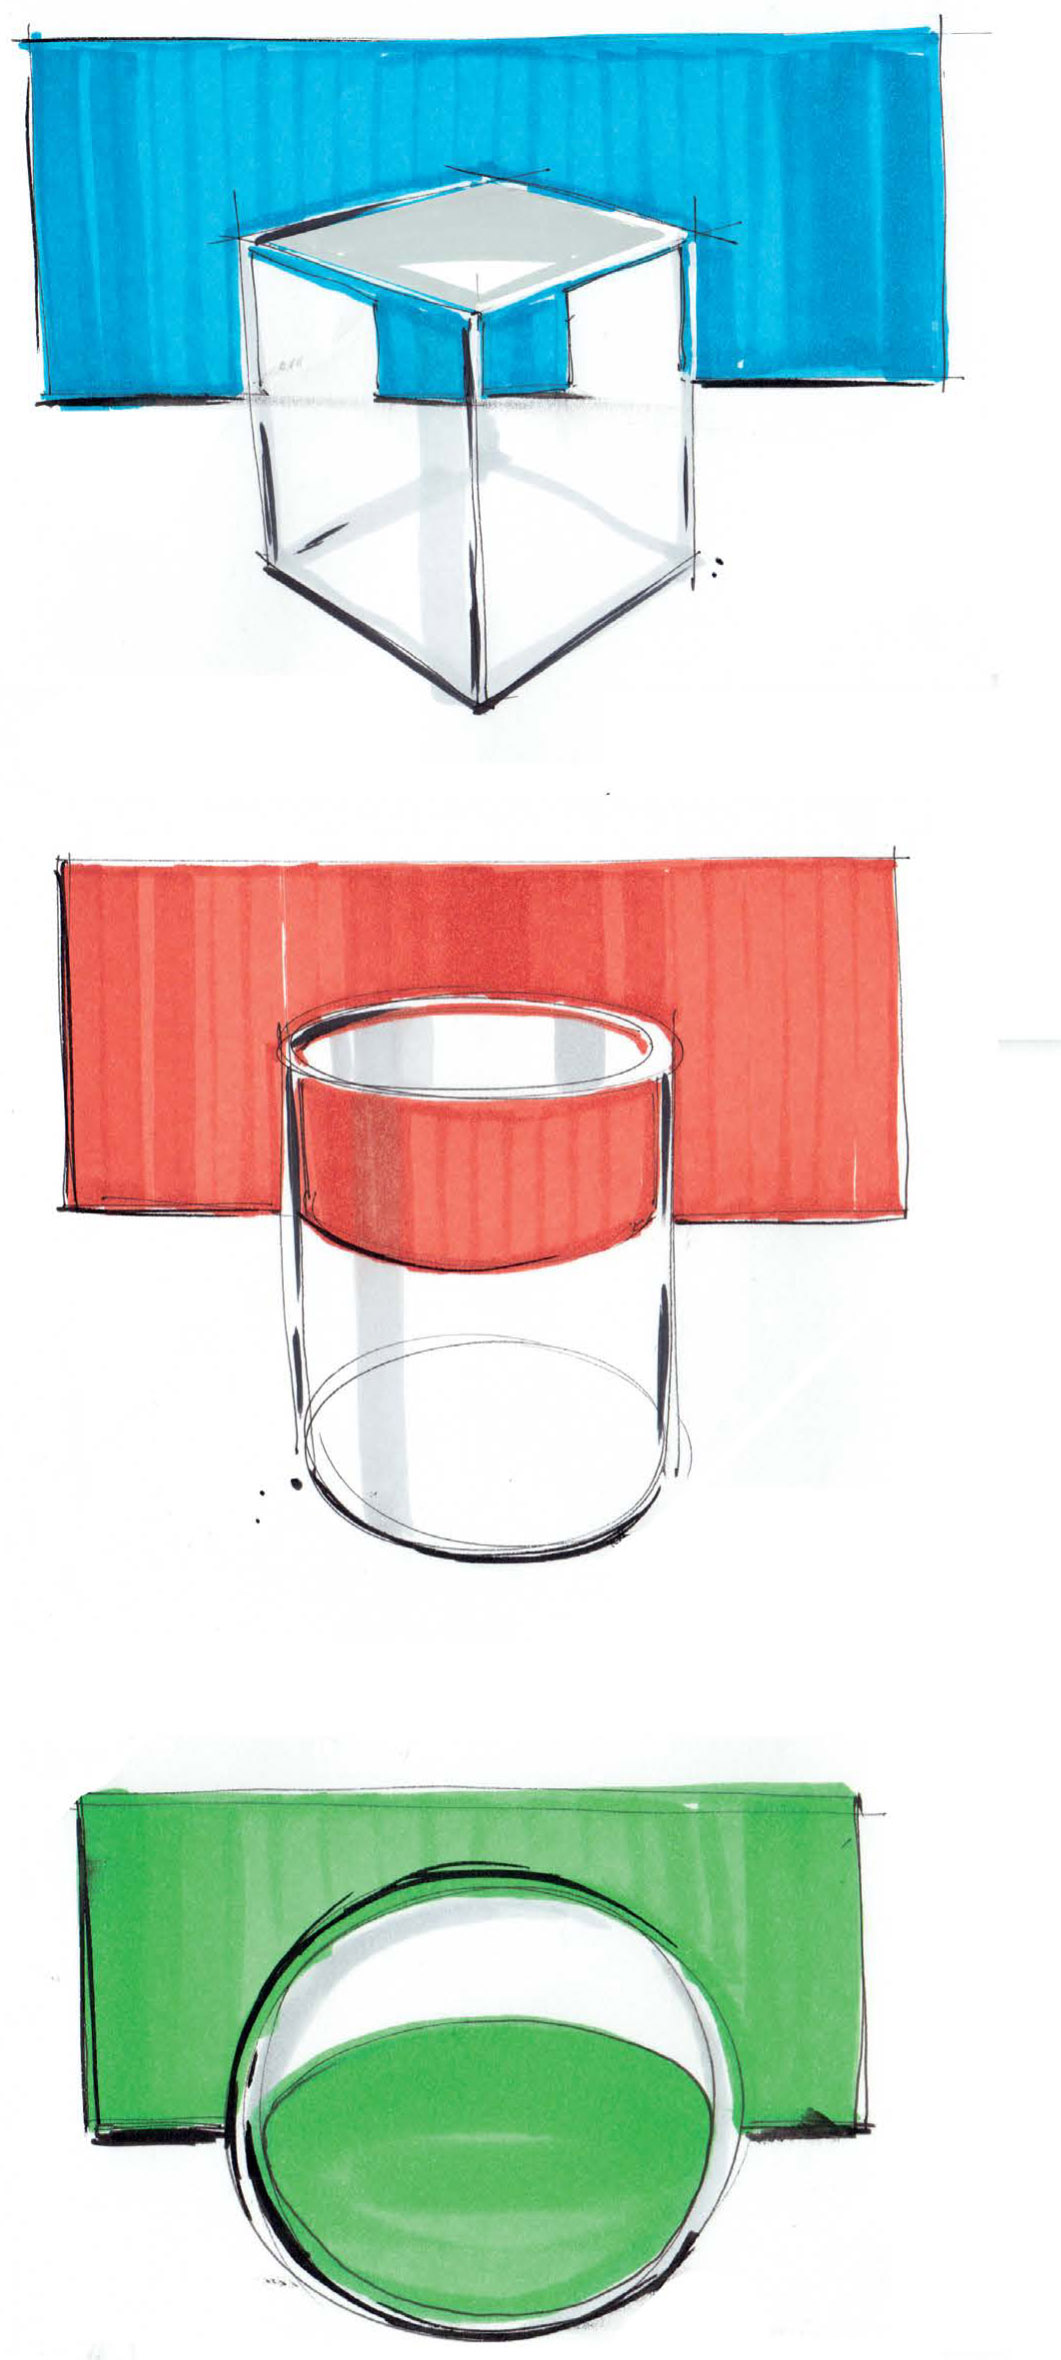
Glass and Transparent Objects
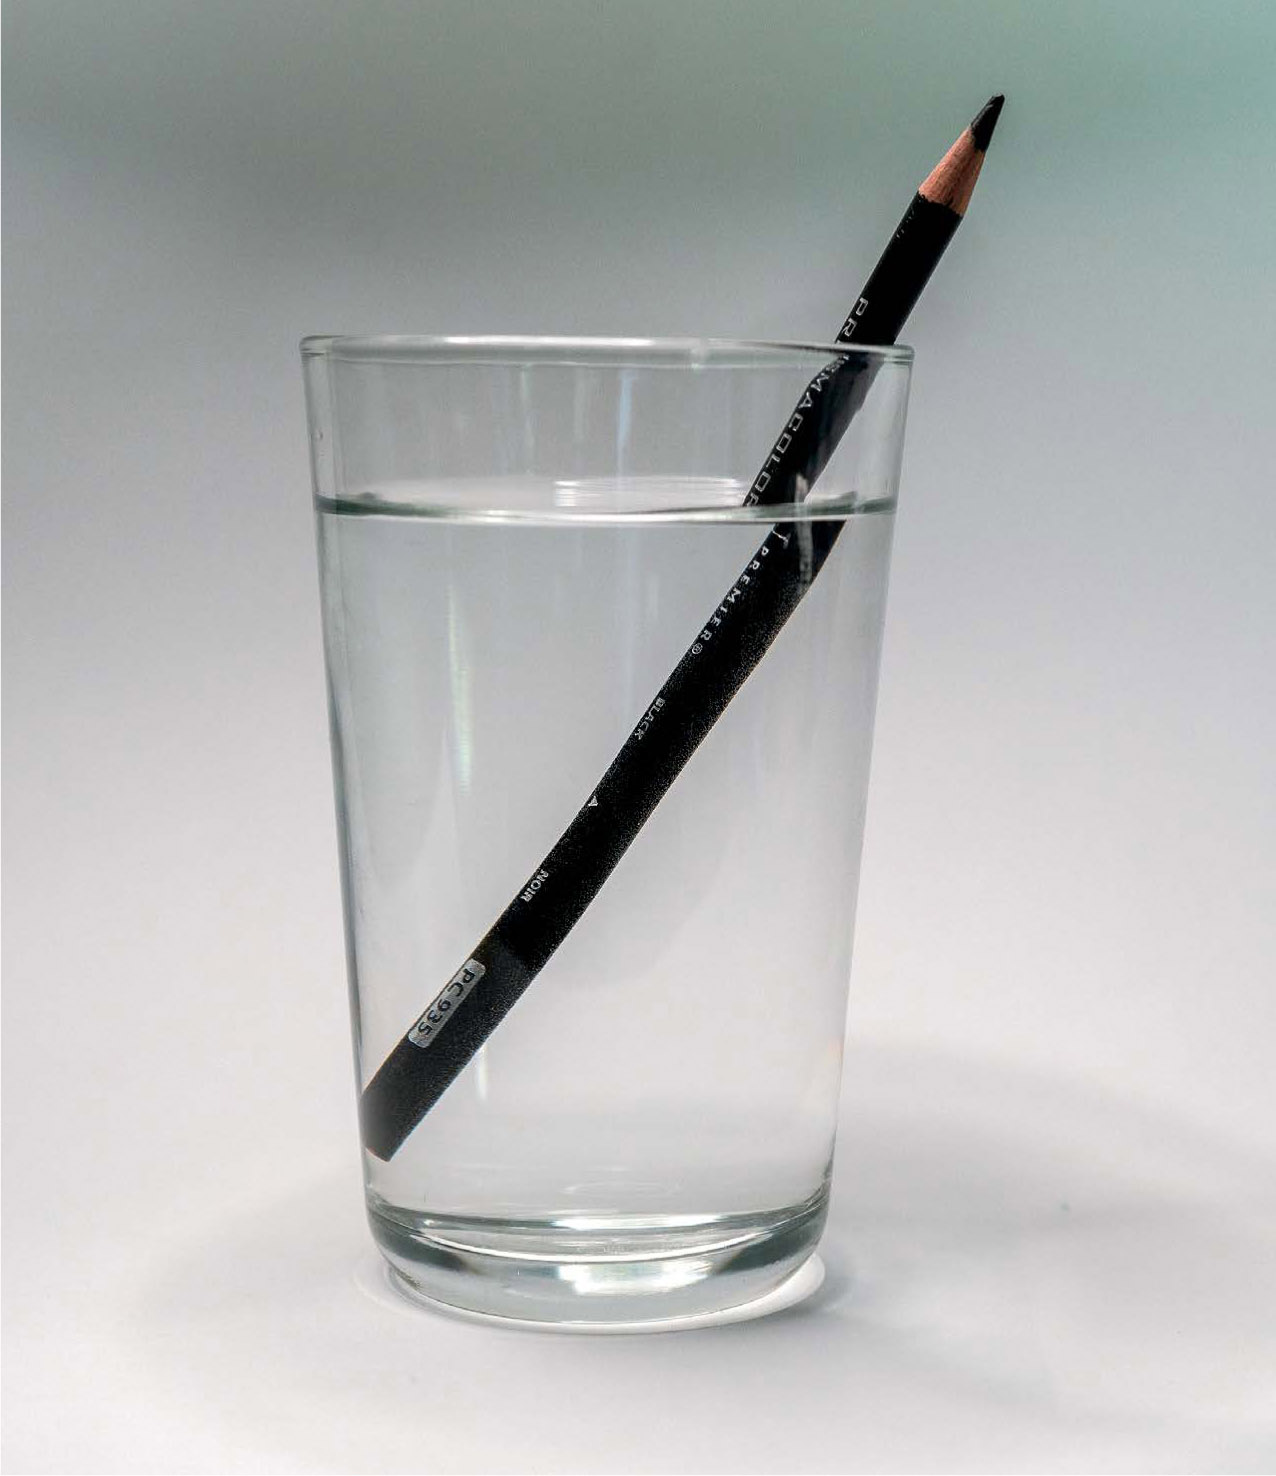
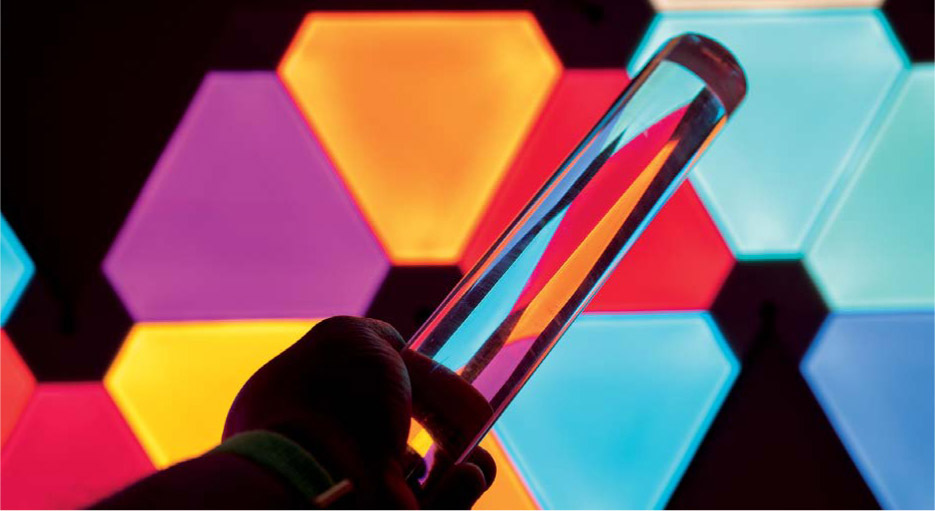
Sometimes you’ll need to draw a transparent object, and understanding how light interacts with such an object is important when drawing in perspective. Internal reflection and refraction are also characteristic of some transparent objects. The space light travels through is called a medium. Air is a medium for light to travel through, as is water or glass. As light travels through an object that is one medium and enters another, the light bends and is refracted on its path. This bending of light creates distortions when viewing the medium; a pencil that is partially submerged in water is a good example of this effect.
When light enters another medium and is refracted, it may also be reflected internally on the surfaces of the medium, based on the angle of incidence to the internal surface and subsequent angles and trajectories of the reflected light rays.
Refraction of light coupled with internal reflections creates artifacts in different mediums as light travels from one medium to another. You can observe these artifacts in the edges of a glass where it thickens or at the base of a glass. Add water to a glass and add an object so that it is partially submerged to observe this effect in action.
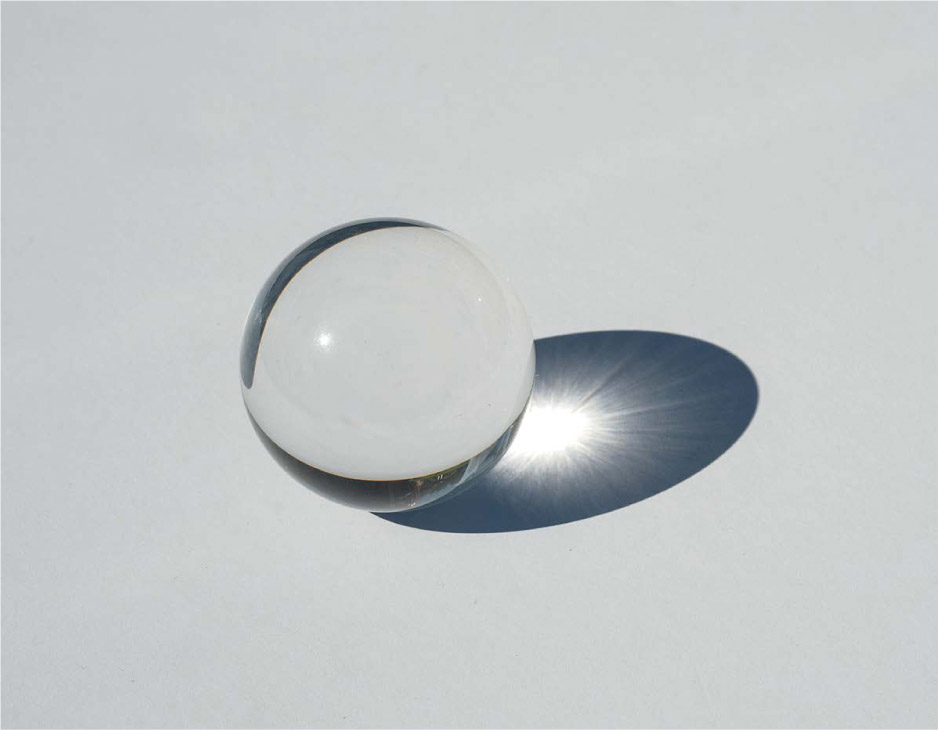
With observation, you can learn much about refraction, reflection, and artifacts in transparent and translucent media. Practice simplifying artifacts to build your visual vocabulary. Many times, a symbolic representation of the real phenomena is enough to convey a sense of depth and realism.
Overlapping Transparency
When a transparent object is placed in front of another object, be mindful of how light affects the object. Even in a simple two-dimensional drawing, the shift in optics of an object interacting with a translucent or transparent object can be a powerful way of showing depth and overlap with two objects.
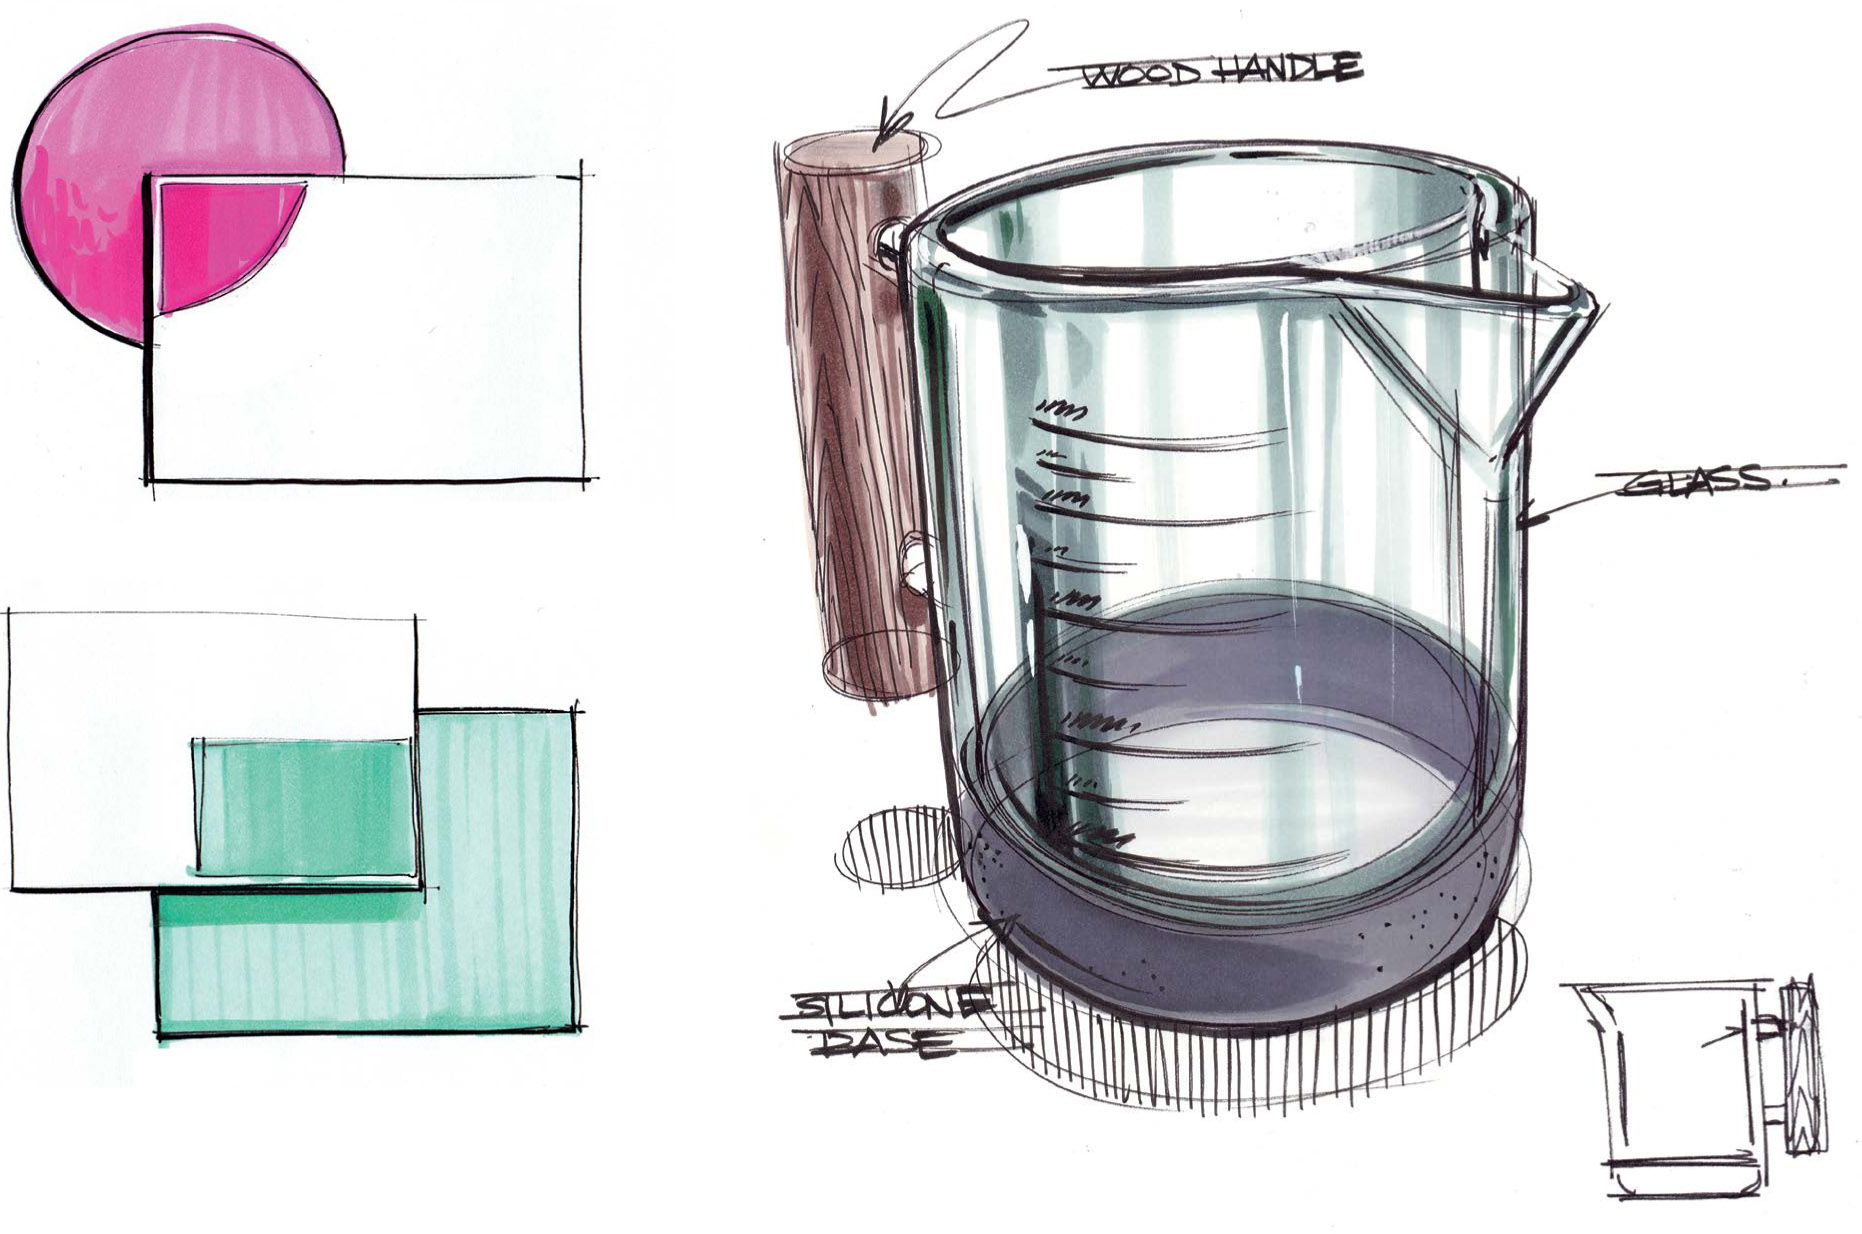
With three-dimensional objects the optical shift also can be a way to simulate the refractive and reflective quality of translucent or transparent objects that happen to overlap another object such as a simple background or another element in a scene.