
CHAPTER 7 LIGHT AND SHADOW
Lighting plays a key role in bringing your drawings to life. When combined with good quality, expressive, and confident line work, lighting adds a level of depth and presence to your perspective drawings of objects. All of what you observe in real life is the result of light interacting with the surfaces of objects. To handle lighting correctly in your drawings, you need to understand to some degree what happens when rays of light interact with objects.
For purposes of this book, consider light as traveling in very high-speed waves that are high energy and high frequency. In simple terms, you can think of light as imaginary or invisible lines that are emitted from a light source. These light rays, or lines, are emitted from a single source and interact with a surface of an object or the environment and reflect toward us. Our eyes then detect light rays and interpret what we observe with the help of our brains.
If a light source has higher energy, the resultant rays that reflect toward us are more intense and appear bright and concentrated. Conversely, if a light source is dim or low energy, the rays that reflect toward us also appear dim. If an object has a rough texture or finish, light rays still reflect toward us, but these rays may be slightly dispersed at different and inconsistent angles, thus conveying a more dull or matte appearance. (You’ll learn more about texture in Chapter 10, “Texture: Ink & Color”)

Artificial light shadows cast by primitive objects.
The source of light can vary depending on the type of context or environment in which an object is located.
Direct Lighting
Direct lighting is the light emitted from a point light or natural light source (although even the Sun itself may be considered to be a point light source). Direct lighting may be primary, secondary, or tertiary in source and intensity to create a more interesting scene. More often than not, I choose a simpler lighting setup with a direct light source and ambient or reflected lighting as a secondary light source.
Ambient and Reflected Lighting
Ambient light is the general, or global, light resulting from reflected light in an environment. Reflected light cast on the observed or imagined object you’re drawing may come from light bouncing off surfaces and other objects in the proximate environment. Reflected ground light comes from the surface an object rests on and is particularly noticeable on objects that are spherical and smooth and resting on a flat surface.

Light will reflect and color other objects in a scene.
Because light reflects and influences other objects, lighting is most often uneven when interacting with a surface of an object. Take a minute to look around you at objects in your environment. Notice the interplay of color and light that may be cast by other objects in proximity to the main object you are observing. Consider your walls, too. Although painted a certain color, they also take on the reflected color of other objects in the environment, as well as cast reflected light onto other surfaces in the room.
Contrast Is Key
Much of what we see is the result of contrast in how objects are lighted. When a surface with the same color changes direction relative to a light source or is juxtaposed with a surface in contact that is incongruent, the contrast value changes on the surface. This contrast happens whether the surface is planar, curved, or organic in nature. With planar surfaces, there is a generally even, though somewhat varied, value in how the surface appears. When the surface is curved, shadow cores and reflected light help define the nature of the surface through contrast.

Contrast in value on the walls creates a sense of depth. Bonus, one point perspective!
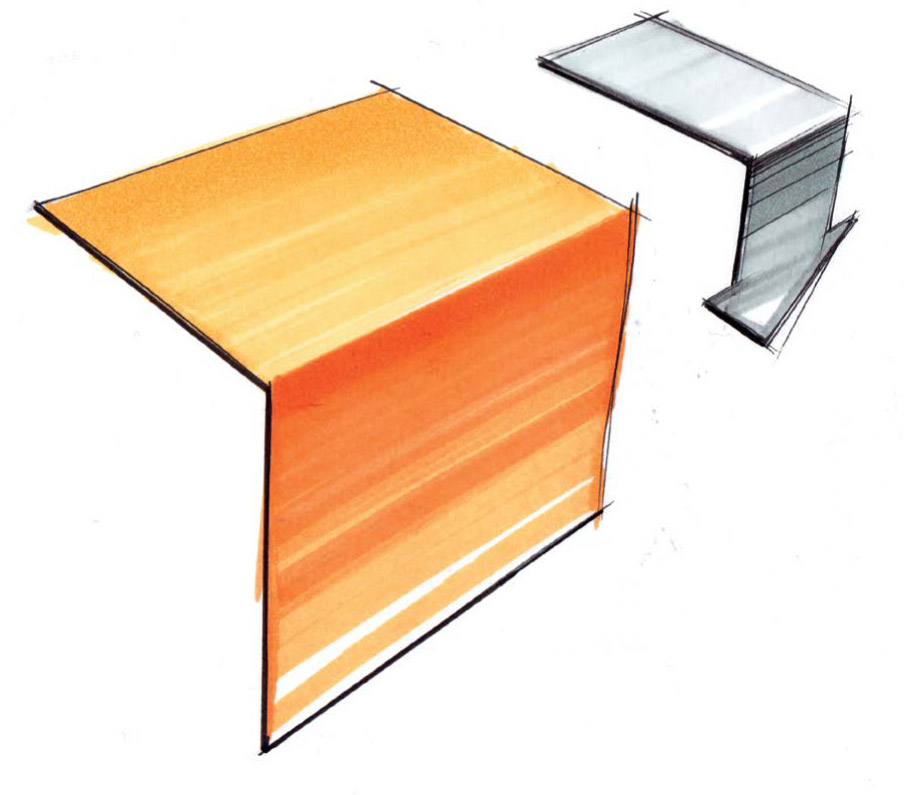
Consider, for example, these two planar faces orthogonal to each other.
The surface that diverges away from the light source appears darker to the viewer compared to the surface that is facing towards the light source. These simple observations make it much easier to draw from imagination and work more quickly while sketching objects to capture ideas, as well as to add depth and a level of realism to your work.
Shadows on Surfaces
As mentioned, the surface on an object that diverts away from the light source will appear darker to the viewer compared to the surface that is facing towards the light source. In effect, the surface receives less light and is shadowed. Shadows on flat surfaces are fairly simple to understand and apply. To add shadow to a surface, simply darken the tone and value of the color, shading, or texture on the planar surface. For curved surfaces, shadows (and reflections) become a bit more complicated.
To understand shadows, you need to know a bit about how light bounces off a surface. Whenever light interacts with a surface, there is an angle of incidence, an angle of reflection, and a surface normal at each point light hits the surface. Consider, for example simple planar surface. The light ray has a trajectory and hits the surface at a point. At that point is a surface normal, a vertical line that is perpendicular to a tangent line at the point of contact. The same would be true for a curved surface (more on this in a bit).
At the point of incidence, the light ray then reflects away from the surface, and if you are looking at the surface, your eyes detect those light rays and others that are reflecting toward you that also may have been incident to the surface. This angle of reflection is always equal to the angle of incidence. This idea makes it a bit easier to understand shadows on curved surfaces as well as reflections.

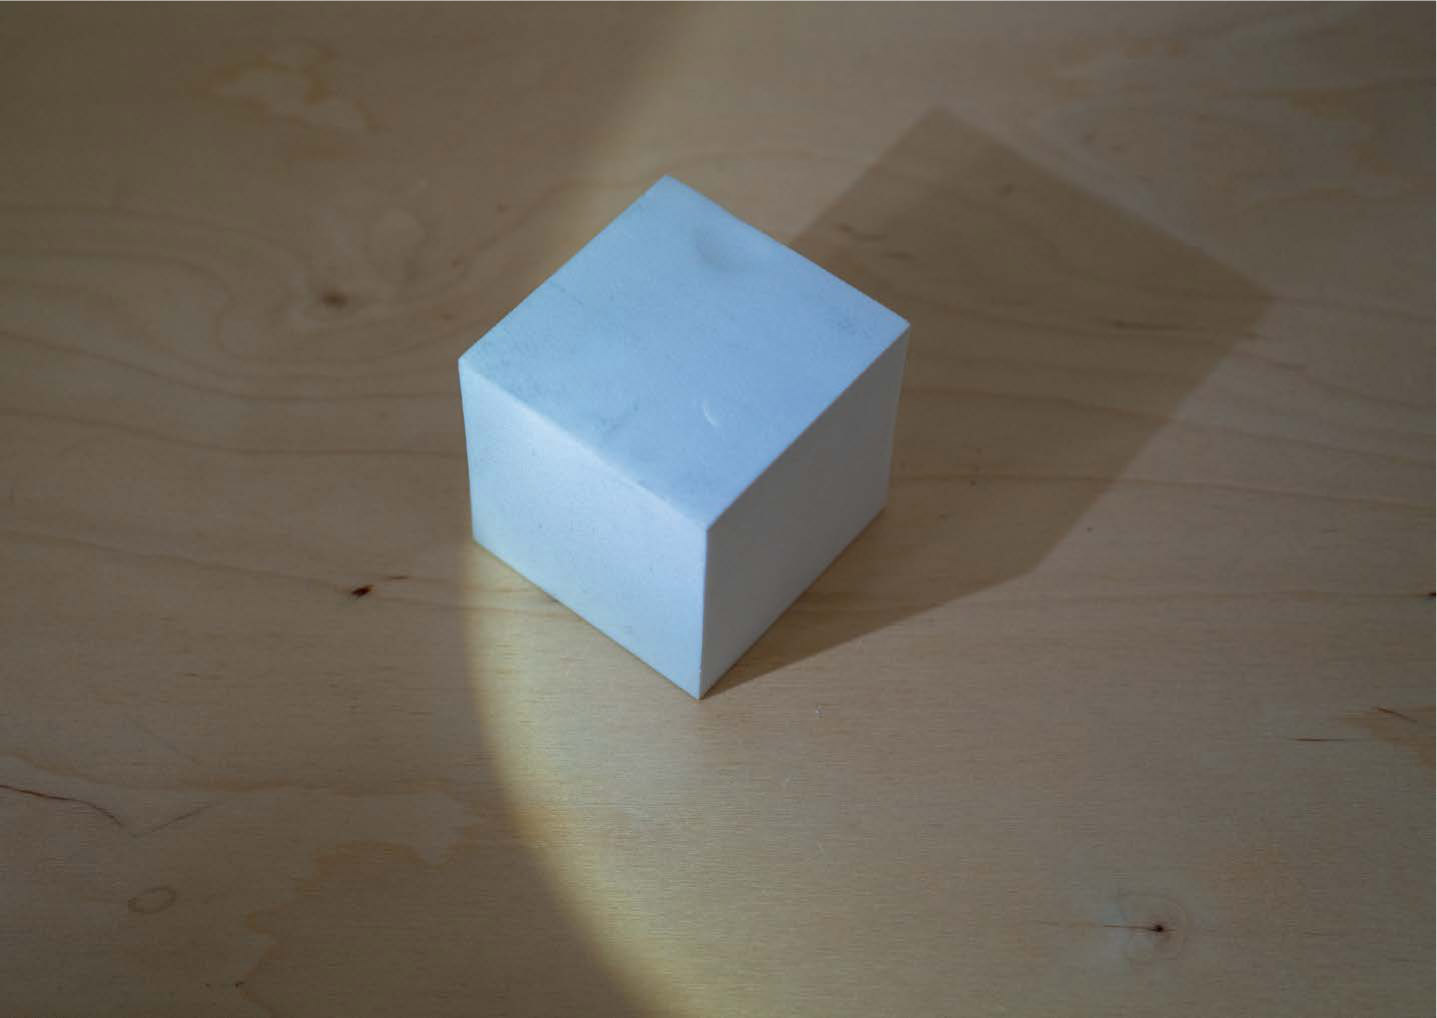
Shading and Shadow Demonstration: Cube with Markers
Let’s practice drawing and shading a cube.
1. Start by drawing a cube of any size. For details on how to do this, refer back to Chapter 6, “Drawing with Depth in 3D.” When working with markers, I go light until I get it right. For this demo, I used a 30%, 50%, and 70% gray marker selection. If using color, choose colors that work together and have a 20% to 30% value spread. (For more advice on markers, see Chapter 9, “Color.”) Rotate the paper to draw at the best angle for you.
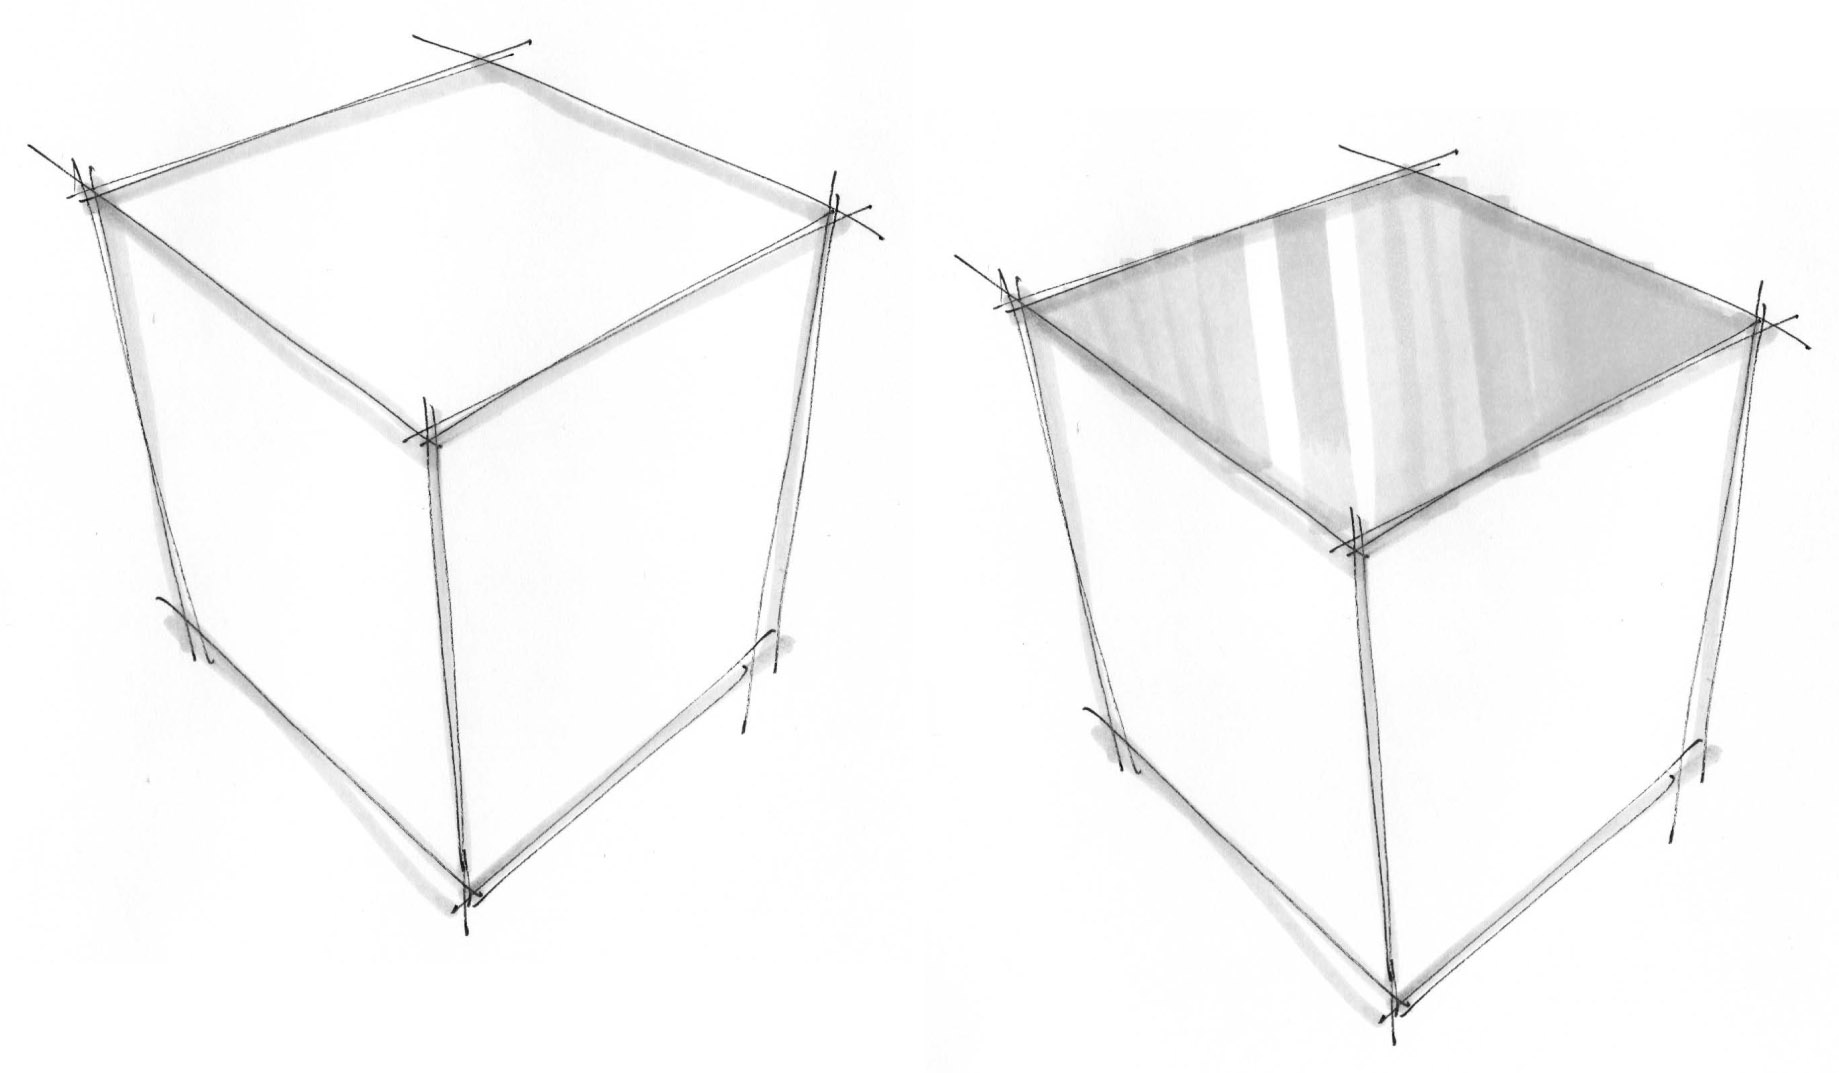
2. Outline the cube with your lightest marker. Next, work on the shading for the lightest surface. This will be the top of the cube, assuming the light is located above and to either the left or right of the cube. As you shade, create a gradient with the marker from the back of the top to the front.
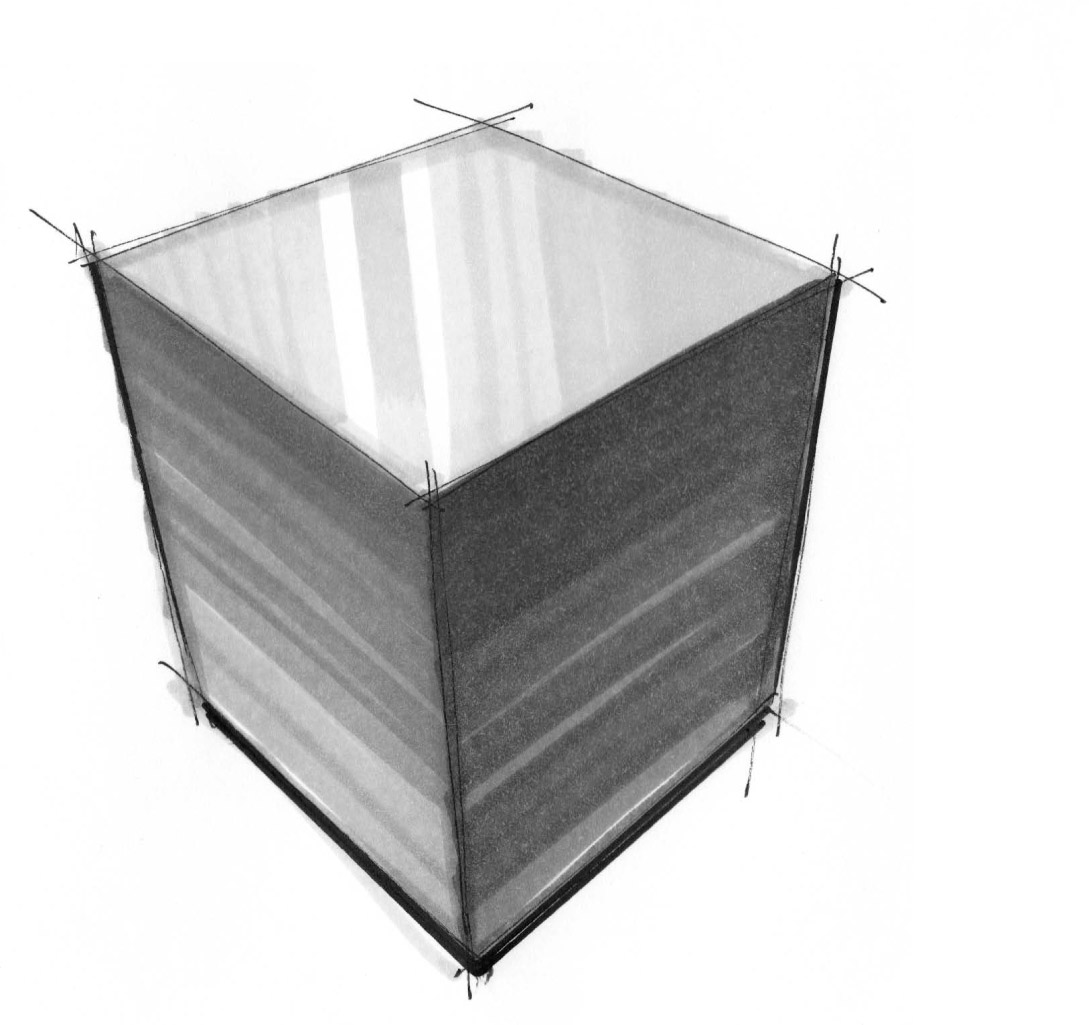
3. Shade in either the darkest side or midtone side of the cube, being mindful to evenly apply the marker. Once the marker is dried, apply another few strokes close to the edge to add additional contrast at the edges of the cube.

4. Finish shading in the surfaces with gradated marker strokes. The gradient is important as it adds a bit of realism to your drawing as light will hit the surface the object is on and create an uneven shade on the planar surface of the cube. This technique should work for most planar forms.
Shadow Core
Because a curved surface is always changing direction relative to the light source, lighting on that surface will be uneven and varied.
A shadow core is a concentration of shadow along a surface that represents the areas at which light passes the surface as the surface changes direction away from the light source. In this illustration, the surface normals and angles of incidence and angles of reflection change as the surface changes and diverts light away from you, the viewer. Additionally, as light passes the perceptual edge of the object, the rear of the object is in shadow.
Without any kind of ambient lighting, the rear half of the object would appear flat and dark. When ambient or reflected light is present in the environment of the object or form, a core shadow forms along with rim light and highlights. (We’ll discuss reflections, highlights, and how they affect shading in Chapter 8, “Reflections.”)

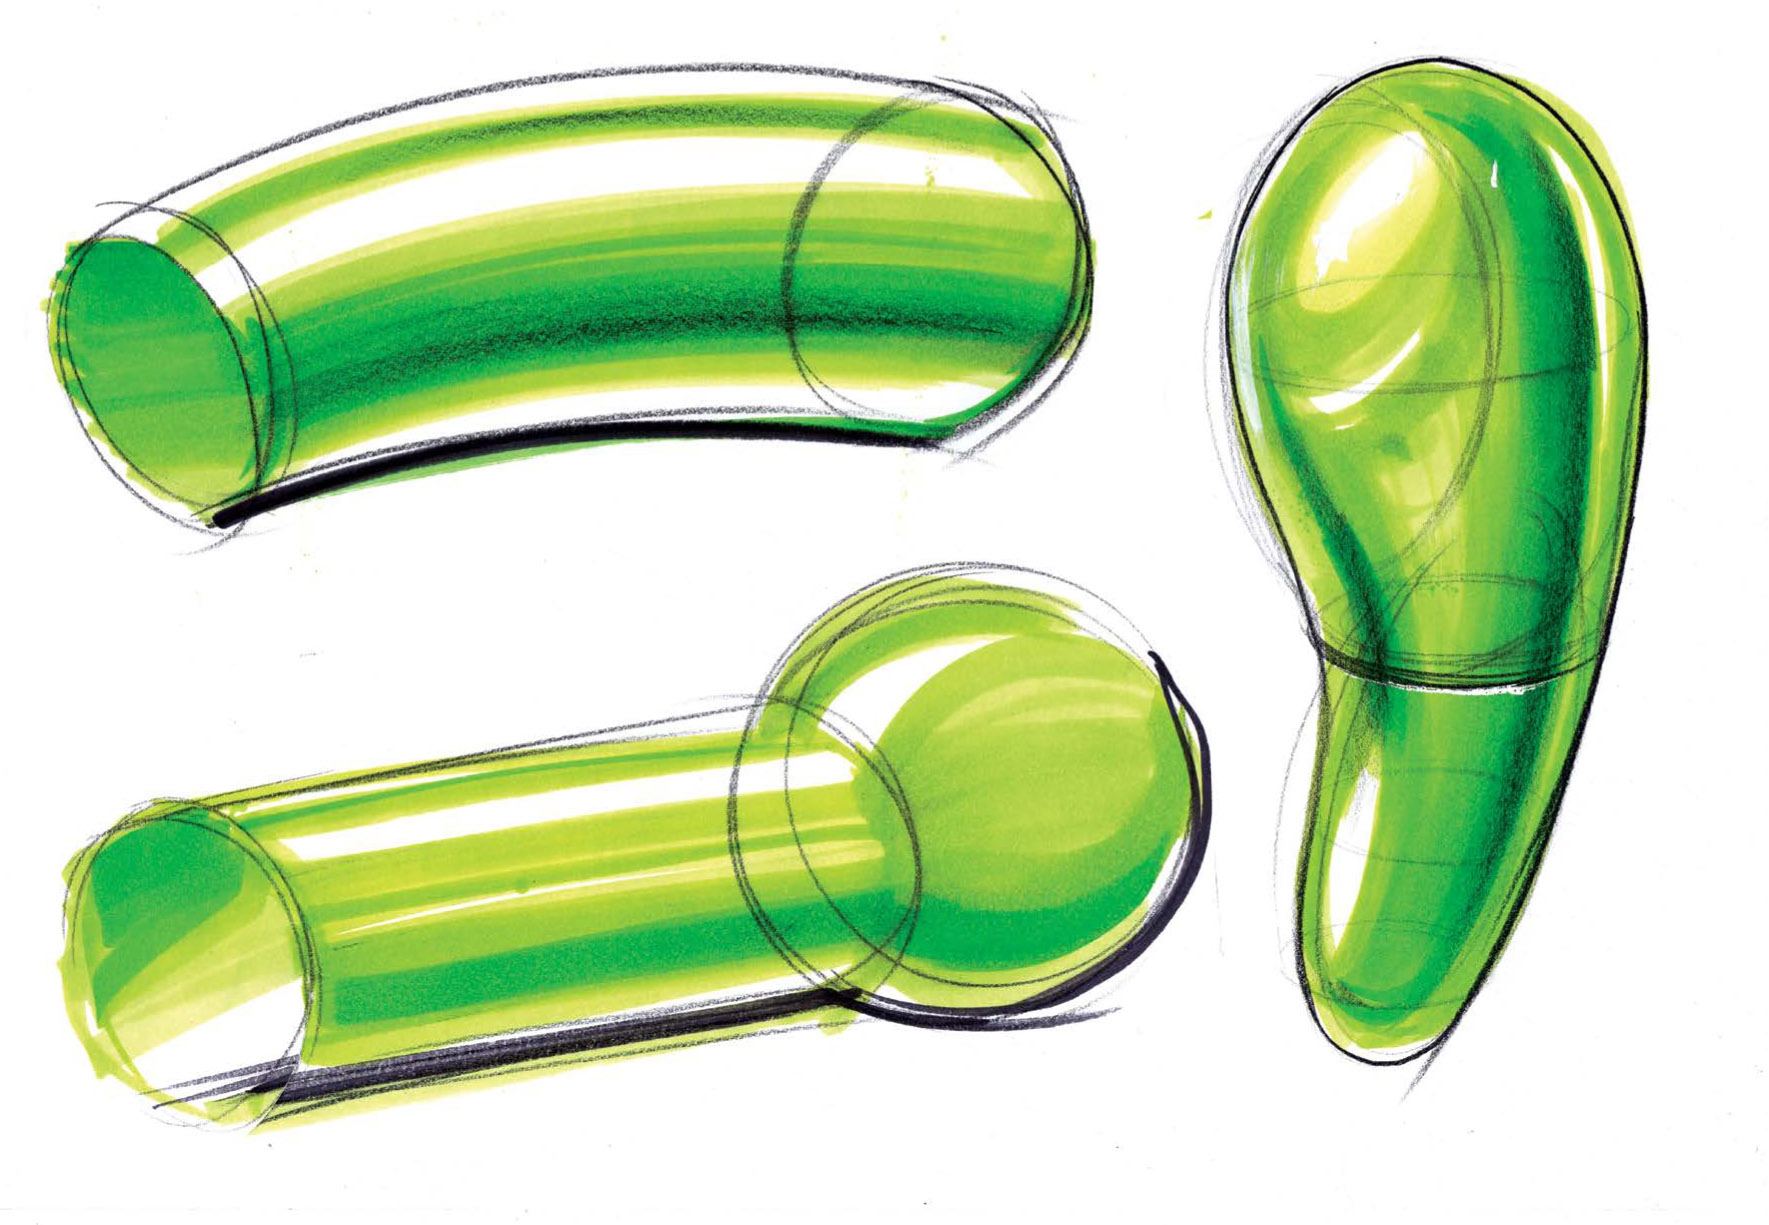
Because curved surfaces are not flat, midtones appear between the shadows and the bright spots. To portray the depth of objects, it’s important to master blending tones to shade and communicate a range of values. For example, look at the shading of this cylinder, sphere, and cone. Each object features a highlight, shadow core, and midtones. Because the light source is off to the right and slightly elevated, the highlight appears to the right of the objects, as that side of each object is closest to the light source.
Shadow Core and Blending Demonstration: Cylinder with Markers
Cylinders are a useful building block for complex form. Let’s shade one to understand a bit more about how light communicates its form.
1. Start by drawing a cylinder of any size. For details on how to do this, refer back to Chapter 6, “Drawing with Depth in 3D.” As with the cube, I used a 30%, 50%, and 70% gray marker selection, but if you’re using colors make sure they work together and have a 20% to 30% value spread. Rotate the paper to draw at a comfortable angle.
2. Outline the cylinder with your lightest marker. Start with the vertical surface of the cylinder and shade in a shadow core and midtones. Depending on the surface finish of the cylinder, leave a vertical band blank for a highlight.
3. Next, use your midtone marker to shade in and deepen the shadow core and blend with the lightest tone as you move from the shadow core to the highlight. How wide or narrow do you make the shadow core and highlight? That depends on your cylinder’s surface finish. The darker, narrower, and crisper the shadow core is, the shinier the surface will appear. The more evenly blended, the more matte it will appear.
4. Add more contrast to the shadow core with your darkest marker and blend into the midtone shade using your lightest and midtone markers to complete the blend.

Because the top of the cylinder is facing the light source, use your lightest marker to shade in a way that contrasts the vertical surface of the cylinder. This is a great technique for any form with a cylindrical base.
Shadow Core and Blending Demonstration: Sphere
Spheres are also a useful building block for complex form. Let’s shade one to understand a bit more about how light communicates its form.
1. Start by drawing a sphere of any size. Any circle will do as a sphere is a circle anywhere in perspective. Once again, I went light until my shading was right, used a 30%, 50%, and 70% gray marker selection, and recommend colors that work together and have a 20% to 30% value spread.
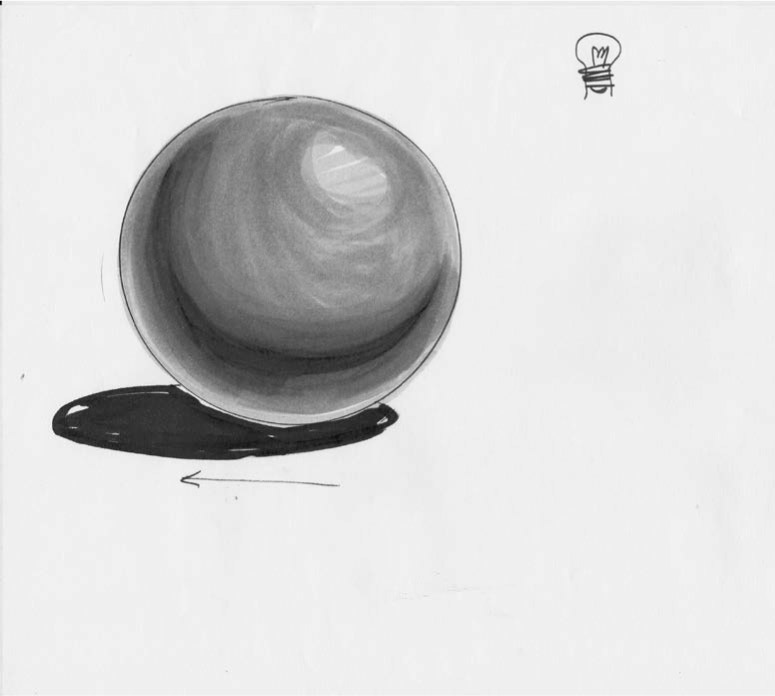
2. With your paper angled comfortably, outline the sphere with your lightest marker. Align the chisel tip of the marker with the outline of the sphere, and shade in the sphere so that the path of the marker follows its curvature. Leave an oval-shaped spot for a highlight.
3. Locate the position of your shadow core based on the widest point at a cross section of the sphere.
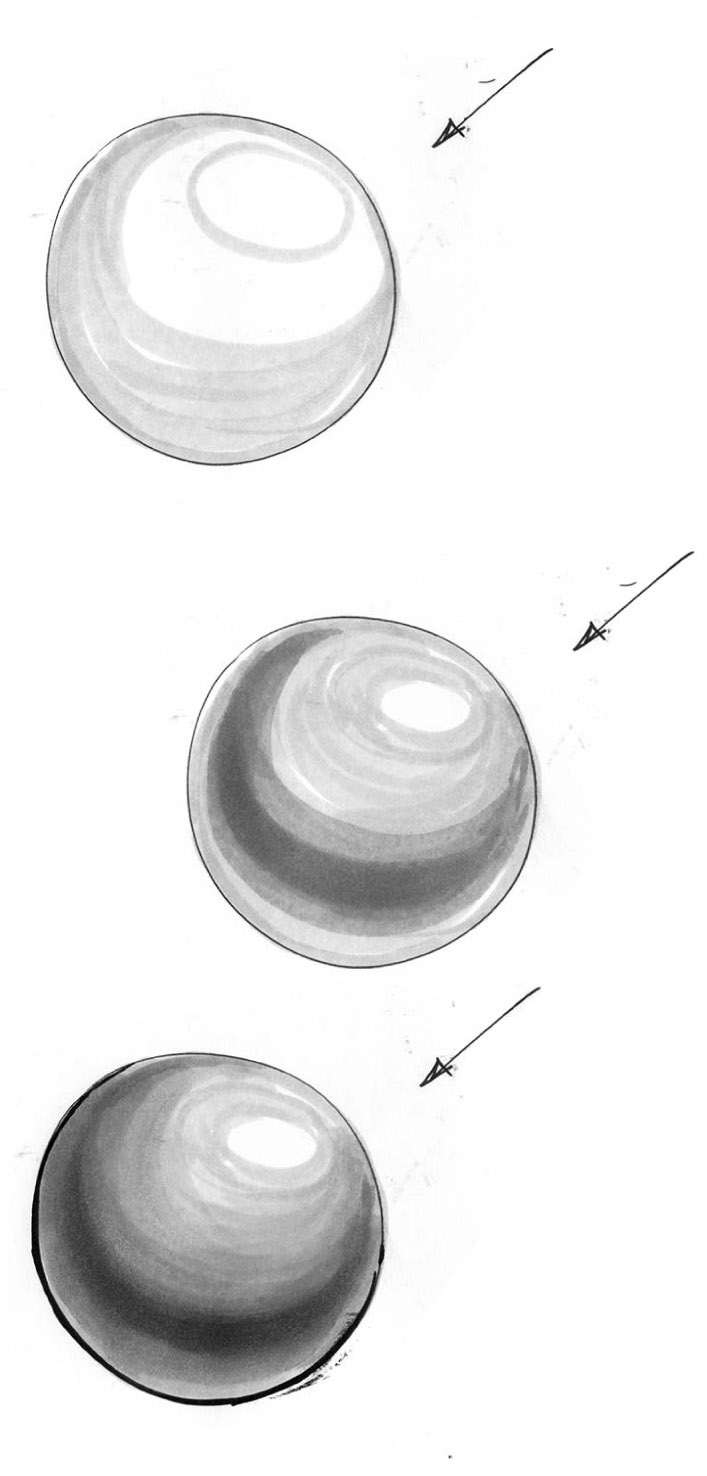
4. Next, use your midtone marker to shade in and deepen the shadow core, as well as to blend with the lightest tone as you move from the shadow core to the highlight. It’s up to you, based on surface finish, how wide or narrow to make the shadow core and highlight. The darker, narrower, and crisper the shadow core is, the shinier the surface will appear, and the more evenly blended, the more matte the surface will appear.
5. Try not to shade all the way to the edge of the sphere with the darker markers. A blend is necessary to capture the effect of reflected light.
6. Add more contrast to the shadow core with your darkest marker and blend into the midtone shade using your lightest and midtone markers to complete the blend.
7. Finish up with a light marker to soften the blend as necessary and ease the transition into your highlight spot.
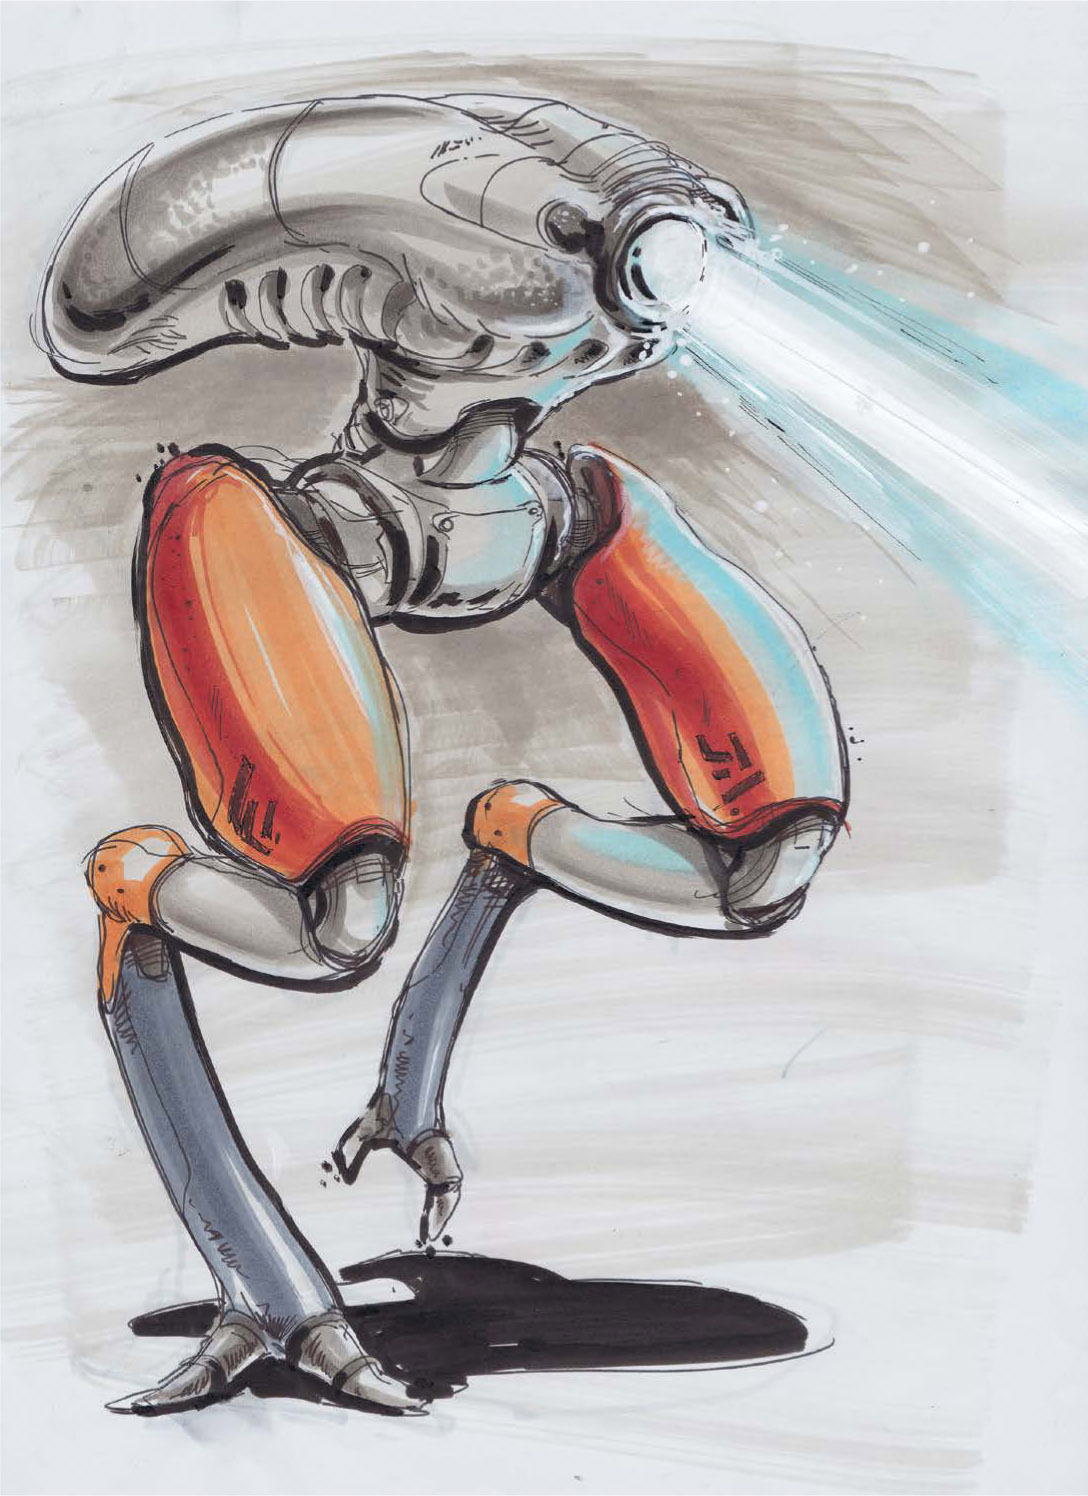
This technique also works well for organic forms with no rational or rectilinear characteristics.
Cast Shadows
An object may not only be in shadow, but also can cast a shadow onto surfaces and other objects in its environment. Cast shadows stretch away from an object based on the direction, angle, and intensity of the light reaching the object. Think of a summer’s day. At noon when the sun is directly above you, your shadow is relatively short. As the sun lowers toward the horizon, your shadow lengthens behind you. You can mimic this behavior in your drawings to enhance the illusion of depth and perspective.
Cast shadow outlines may have soft edges or hard edges. This is dependent on the light source and whether it is diffused, making the propagation of the light multidirectional. Generally, in my sketching, I don’t worry too much about the softness of the shadow. Instead, I focus on the value of the shadow being cast on the object or by the object onto the surface where it rests.
Shadows that are cast follow the rules and norms of measured and estimated perspective. However the way that shadows are drawn differs based on the nature of the lighting source. When drawing, I divide light sources for shadows into two categories: natural light (sunlight) shadows and artificial light shadows.
Natural or Sunlight Shadows
Natural light shadows are created when the Sun is the primary light source in a scene. Although the term natural light is used as a distinction, the Sun in effect is also a point light source. With any point light source, light rays can be assumed to be divergent in nature. However, because of the relative distance of the Sun from to the Earth (and anything you want to draw with a shadow), it’s safe to assume that with natural light shadows light rays do not diverge and are effectively parallel. This important detail makes calculating natural light shadows much easier to understand and draw.

Natural Light Shadows Demonstration: Cubes
Let’s cast a shadow from a simple cube to begin. To draw a natural light shadow, pick a relative position for the sunlight in relation to your cube. This position is based on the angle relative to the cube, which is determined by the position of the sun (time of day) as well as the relative rotational position to the cube on an axis centered at the middle of the cube. It is not important how large the diameter of the ellipse is when considering relative position of the sunlight source to the object.
Draw a simple cube and be sure to draw through to show the rear corners and edges of the cube in your drawing. You will need to use these edges and points for your learning.
Next, mark a point where the general direction of your sun resides in your scene relative to the central axis of the cube. From this point, project your first line through the top corner of the cube.

Draw another line parallel to your first line, but not converging to the point marking the location of the sun. Instead maintain the parallel relationship between these lines and subsequent lines through each corner of the top of the cube.
From the general direction of the sun point on the virtual ground plane, project lines that are parallel through each of the bottom corners of the cube to intersect with the lines projected from the sunlight source direction.
You should have four points, one of which may be located internally to the cube. This is to be expected in the calculation of the shape of the shadow. What you may notice is that the shadow is merely a projection of the top surface of the cube on the ground plane on which the cube rests.

Notice also the shape of the shadow and how the lines of the shadow seem to converge to a vanishing point to the left and right in your scene.
Cubes are simple objects, because of the four easily identifiable corners of their top surface. The resultant shadow, while simple, shows how the lines behave relative to vanishing points and the light source.

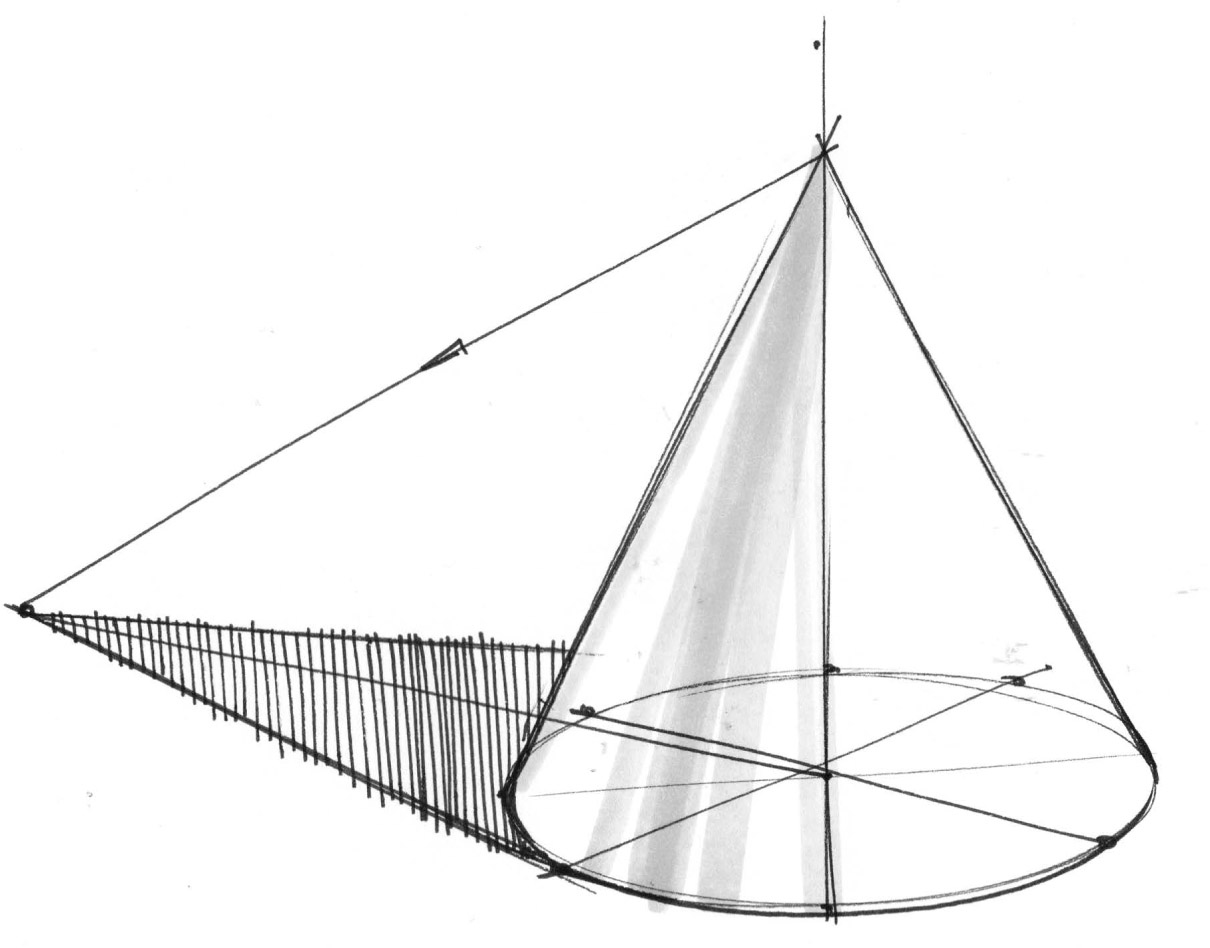
Natural Light Shadows Demonstration: Cylinders, Spheres, and Cones
A cylinder is a bit more complicated to cast a shadow on the ground plane. You can, however, use the methodology of casting a cylinder’s shadow to determine the shape of the shadow of other curvilinear objects that may cast a shadow onto a ground plane surface.
To cast a shadow, start by drawing a simple cylinder. Draw two ellipses connected by vertical lines to create the volume of the cylinder. Like the cube example, draw through to the backside to show the structure of the cylinder. You can draw this cylinder in two- or three-point perspective.
Pick any number of points along the top of the cylinder. I tend to divide the top of the cylinder into eight parts by drawing four lines that intersect at the center of the top surface.
Project lines down to the base of the ellipse from each of these points that you selected to find the corresponding points at the base of the cylinder. You should now have eight points on top and eight points on the bottom of the cylinder to calculate your shadow.
Much like for the cube, project lines along the ground plane and project lines down from your chosen light source direction to intersect your lines along the ground plane. These eight intersecting points are the points you need to form the shadow. Complete the shape by drawing lines tangent to the new ellipse on the ground plane. Much like the cube, depending on your light location, you may have points on the inside of the silhouette of your cylinder. Focus on the overall shape of the cast shadow that was plotted.

A cone follows essentially the same process, save for the fact that the top of the cone is a single point, rather than a circle.
A sphere requires a bit of understanding of what the cross section of the sphere looks like. Spoiler: It’s a circle, no matter how you slice the sphere. In perspective, circles are ellipses and thus, calculating the shape of the shadow is as simple as projecting an ellipse onto the ground plane.
Determine the relative location of your sun to the sphere and mark its location. At the widest point of the sphere, where light would then cast a shadow, mark an ellipse.
Divide the ellipse into any number of points and project lines downward from these points to intersect with the ground plane where the sphere would be touching the ground. Draw an ellipse. This can be approximate, or if you prefer, construct a plane and place the ellipse within it.
Next, being mindful of your chosen sun location, project lines representing the light rays from the light source through the points along the widest part of the sphere. This point is shown by the elliptical cross section that was sketched in at the widest part of the sphere. Choose any direction that is indicative of the relative position of the sun to your spherical shape, and project lines from the base elliptical shape to intersect the projection of lines from the widest point of the sphere.
Project lines from the elliptical shape on the ground plane to intersect with the lines that represent the light rays. Find an equivalent number of intersections to the number of points chosen along the widest part of the sphere.
You should have an elliptical profile cast on the ground plane that represents the area of shadow that would be cast by the sphere.
You can construct cast shadows from organic or non-rectilinear shapes in a similar way as for a sphere. Rather than an elliptical profile, the shadow of an organic shape necessitates figuring out what the cross section of the organic shape looks like and projecting lines representing light rays from the profile of the cross section on the ground plane with corresponding intersection points.
Try it a few times and see how it feels!
Artificial Light Shadows
Artificial light shadows are similar to natural light shadows with one key difference: The light rays that create them diverge from the originating source that emits them rather than remaining parallel with each other. Because of this light behavior, the shape of the cast shadow is divergent and distorted relative to the shape of the object casting the shadow.
Notice the shadow appears larger than the cube itself.
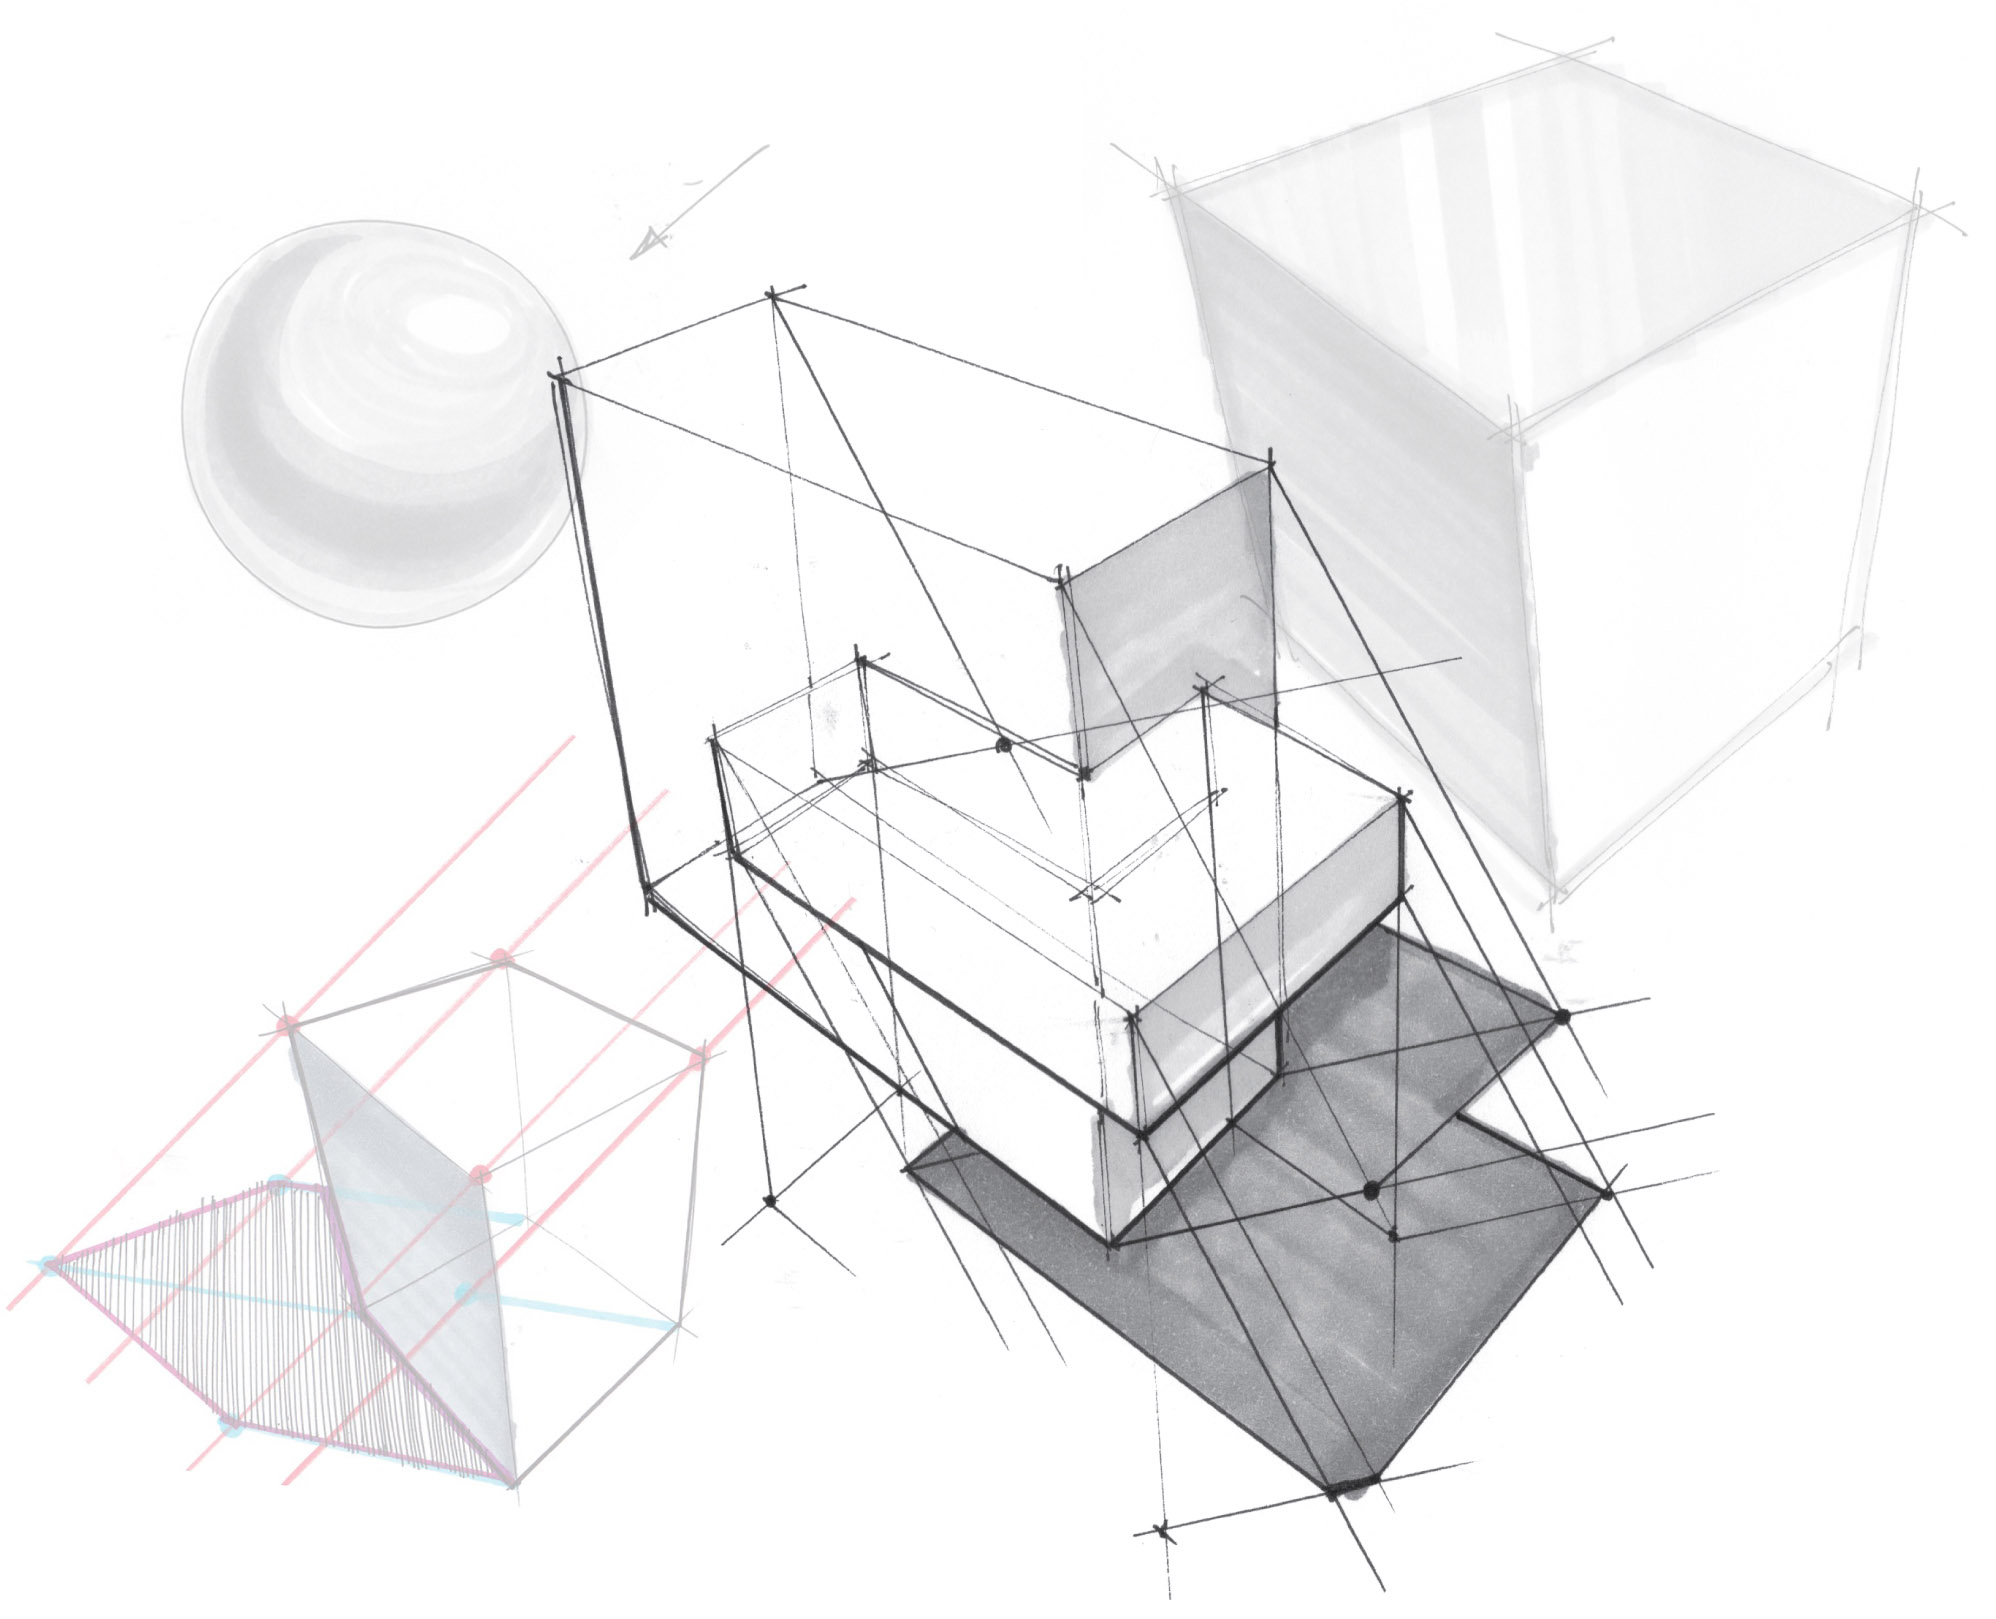
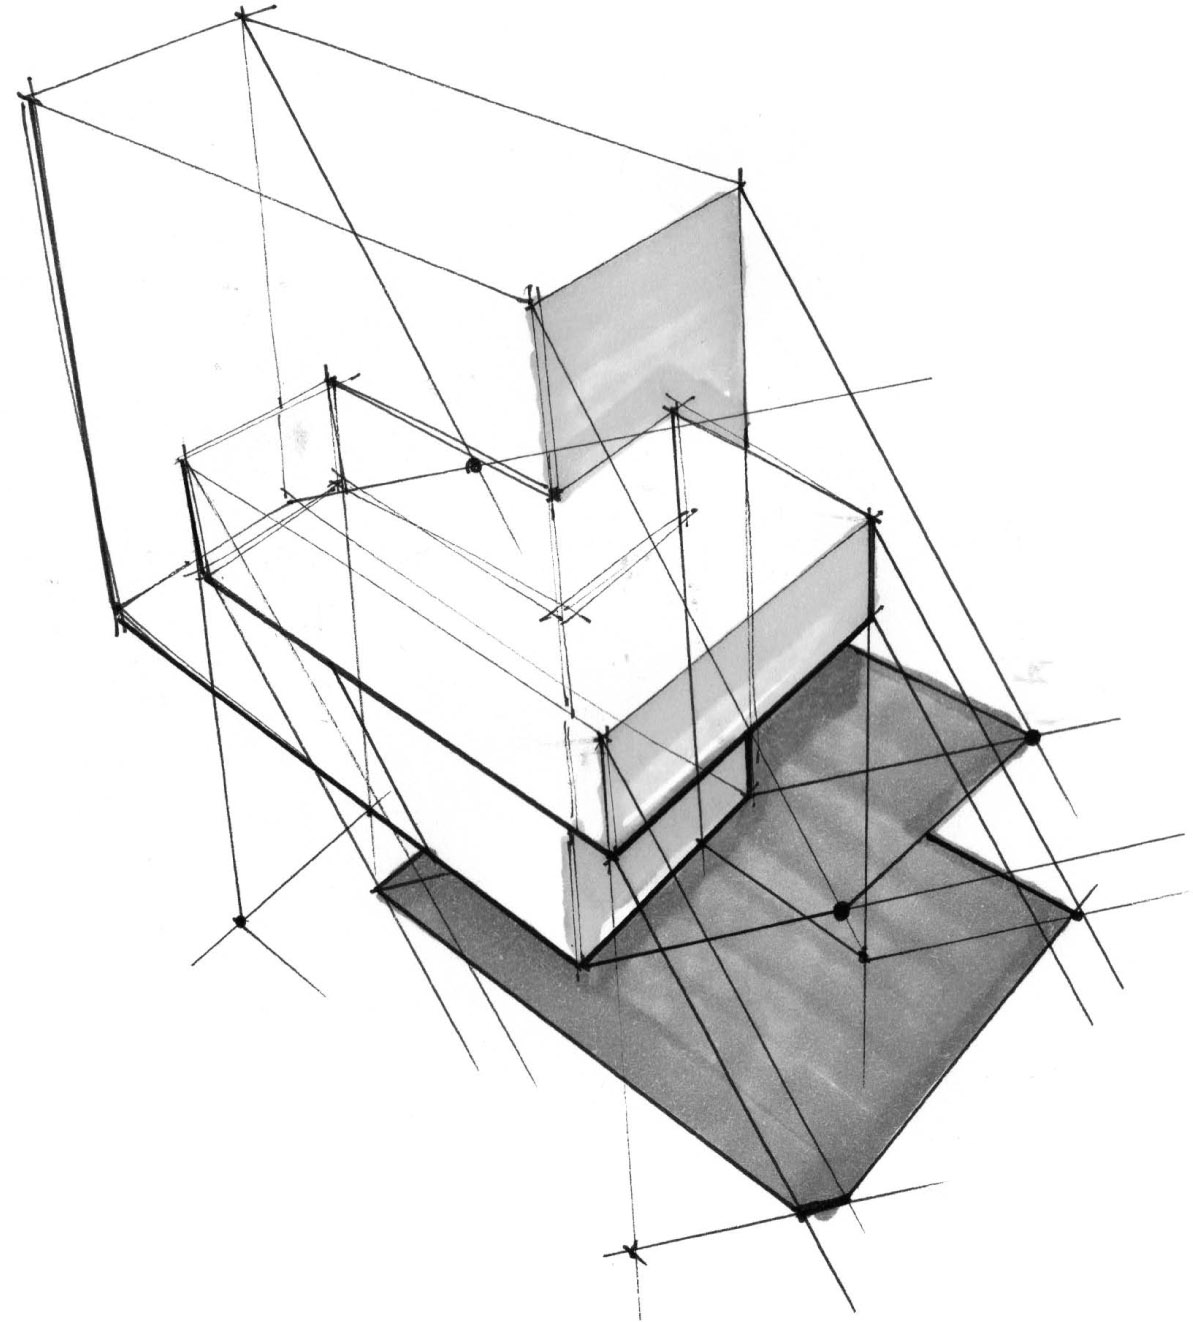
Artificial Light Shadows Demonstration: Cubes
To cast an artificial light shadow, start by drawing a primitive of your choosing. I used a cube in this example; it’s easy to understand, and the principle can be applied to other shapes.
Similar to the example with natural light, choose a point to place your light source. This time, draw a line vertically upward toward it from a corresponding point on the ground plane. This line (and therefore, your light source’s position) can be as high as you like. The closer to the ground plane, however, the longer the shadow will appear.
With the light source positioned, draw lines from the top-most point of the light source and project the lines through the corners of the top surface of the cube toward the ground plane. Make sure the lines extend far enough to intersect with the next set of lines that will be projected from the base of the light source line.
Project lines from the base of the vertical light source you drew. Draw through each corner of the base of the cube to intersect with the lines projected from the top-most point of the light source line. (You can do this process in either order: from the top or from the bottom as the first step.)
With the intersection points, you should have an outline of a cast shadow. The divergent lines are emitted from a special vanishing point at the base of the light source, giving the cast shadow its distorted appearance. Some of the shadow lines should converge at the regular vanishing points in the scene.

Be mindful that the closer in proximity to the cube you place the base of the light source, the more divergent and distorted the shadow will appear. The further out the base of the light source, the less distorted the cast shadow will appear.
Simplified Shadowing and Drop Shadows
Many times when you draw, you may place a simplified shadow on the ground plane. If you have been following along, you may have noticed that a shadow is a projected cross section of the object you’re drawing. Sometimes you can estimate and project a shadow in a way that conveys the general cross section of the object without precise calculation, thus saving time. Taking things a step further, when quickly sketching an object, I often project an elliptical shape onto the ground plane as a simplified version of the profile of the cast shadow.
Alternatively, rather than creating a scene with a light source that is angled somewhat relative to the object on view, you can add a drop shadow as a simple way to provide some depth in the scene.
For drop shadows, try a setup where the light source is emitting parallel or near parallel rays of light from above the object toward the ground plane. The object can be resting on the surface or slightly raised.
Consider this organic form. By placing it on the ground plane or above the ground plane, you could cast a simple drop shadow by projecting parallel lines through points along the cross section of object at its widest point.

Figuring out how far away from the object to place the cast drop shadow is simply a matter of estimating optical difference. There is no wrong answer given the fact that you are in control of how to present the object. Because the shadow is being cast by an overhead light source, the relative distance from the object to the shadow is a means of communicating depth or distance from the ground plane. The further away the object is from the ground plane, the lighter the shadow may appear because of diffusion and ambient light in the environment illuminating the surface below the object at a distance. Still, for effect, you can simply pick a value, shade the shadow, and not worry too much about this factor, although it’s worth observing from real-life experience.
Shadows Cast by Complex Forms
To draw shadows for a more complex form, break the form down. Much like drawing complex objects, you can calculate shadows for complex using a breakdown of the simple elements that compose the object. Project lines in a similar fashion to calculating a natural or artificial light shadow in the previous demonstrations, and then find the overlap in the lines.
It takes a bit of time and patience to figure out where to find the intersections. After a few times through and some practice, however, you can create a simplified shadow instead, one informed by what you know about constructing shadows.
With enough practice, much of the how and the why becomes intuitive and you will be able to draw in your shadows much more confidently and quickly. Remember, contrast is your friend, and shadows will further add to the “pop” in your drawings of objects and their environments.
