
In the previous chapter, we discussed IBM Worklight's client-side tools and their capabilities. We also discussed the range of components required to build a mobile application interface and managed to run them on real devices. In this chapter, we'll examine the Worklight's server-side adapter component in detail to understand how the adapters are utilized to build a connection between mobile applications and the company's backend business service for data manipulation and handling. The main purpose and reason of this chapter is to introduce you to the mechanism of data communication and handling throughout the mobile application in a heightened manner.
IBM Worklight Server provides us with the adapter as a way to communicate with the organization's business processes. A developer can manage to create a request to web services, REST services, and databases in a very structured way to compound information from various sources where the developer can perform necessary server-side logic on this response data to mobile devices.
Worklight Adapter works as an interpreter between mobile applications and backend enterprise systems with a flexible authentication facility to open a secure bridge between them. Moreover, adapter is developed in JavaScript and XSL, where the developer needs to write powerful server-side JavaScript code to integrate it with backend applications, and use XSL to transform hierarchical response data to JSON.
An IBM Worklight Adapter contains server-side code in its developer-defined procedures to retrieve data from the remote database and enterprise application services. Worklight Adapters are deployed on the IBM Worklight Server and can be accessed by IBM Worklight apps via a simple invocation API. Please refer to the following diagram to understand the concept of adapter calling activities in the IBM Worklight platform:
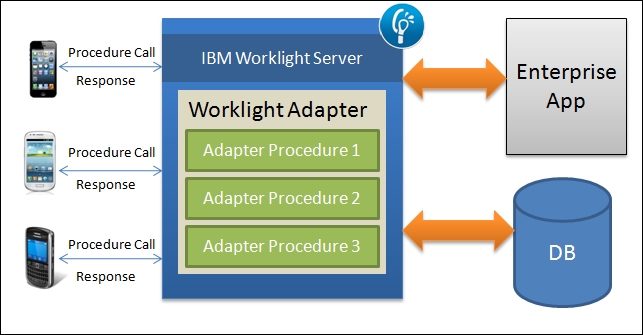
The diagram also shows a high-level view of the communication components in the Worklight platform; every adapter has the same steps for all the components:
- The mobile client creates a request to the adapter, which runs in Worklight Server
- The adapter sends this web request to destination sources such as web services and databases
- The services return the response to the adapter in an XML/JSON format
- Finally, the adapter returns the response to the mobile client in the JSON/XML format
A developer can use JavaScript, XML, and XSL to develop IBM Worklight Adapter, and each adapter must have following elements to run on Worklight Server:
- The XML file: This describes the connectivity for the backend system, to which the adapter connects and lists the procedure that is exposed by it to other adapters and applications.
- The JavaScript file: This contains the implementation of the procedure declared in the XML file.
- The XSL file: This contains zero or more XSL files, each containing a transformation from the raw XML data retrieved by the adapter. This is returned to JSON through adapter procedures.
The XML file has a main root element, <adapter>, and other subelements, such as <connectivity> and <procedure>, which must be declared to configure adapter in Worklight application. To get more detail on each element, please use the following IBM information center's URL:
An adapter is a collection of JavaScript functions that are remotely invoked by an application. These functions include the implementation for each procedure that is defined in the adapter.
The following list defines the procedure's rules in adapter JavaScript:
- A procedure must be declared in the adapter XML file
- The adapter JavaScript file must be used to implement the procedure's logic
- The name declared in the XML file must be used for the procedure's JavaScript function
IBM Worklight provides three types of adapters to help the Worklight developer choose an appropriate adapter that depends on the developer's need and make his/her life easier with an XML configuration that has simple elements, as discussed earlier:
- HTTP adapters
- SQL adapters
- Cast Iron adapters
JavaScript is used to write the adapter code and it runs on a server on IBM Worklight's mobile application platform. IBM Worklight uses the Rhino JavaScript engine internally to run the JavaScript source code. Besides, a JMS adapter has been introduced in newer versions, which is used for messaging services and response handling.
IBM Worklight's HTTP adapter provides access to HTTP- and HTTPS-based enterprise services and is used to invoke RESTful services and SOAP-based services using the GET, POST, PUT, and DELETE methods into the request. For the response, data can be received in the XML, JSON, and HTML formats, with the content type defined in the request.
To cover the HTTP adapter example, we will use a real-time scenario by utilizing a Flickr feed RESTful service and loading data from the live server. Later on, we will manipulate this response data to utilize and create a sample demo app for Flickr in http://www.flickr.com/services/feeds/.
To create a HTTP adapter in the Worklight project, please perform the following steps:
- Create a Worklight Project and name it
FlickrDemo. - In the next screen, define the app name
FlickrApp.We already covered the steps for this project's creation in Chapter 3, Creating a Basic Worklight Application, in case you have trouble creating the Worklight Project.
- In the Project Explorer, right-click on the
adapterfolder and navigate to New | Worklight Adapter, as shown in the following screenshot: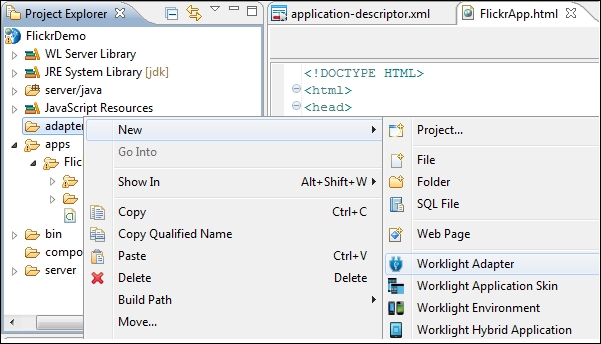
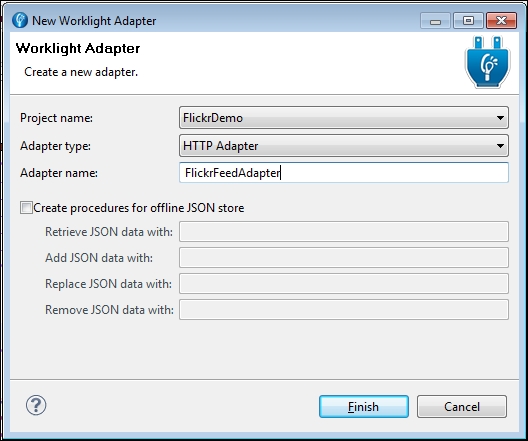
- Select Project name as FlickrDemo from the combo, Adapter type as HTTP Adapter, and finally, enter Adapter name as shown in following screenshot:
- After clicking on Finish, this will generate a subfolder—the
adapterfolder. Thisadapterfolder will come up with three important autogenerated files that include XML, JavaScript, and XSL, with default input text for these files. They will have the same name that we gave to the main adapter file. - Now we need to create a procedure declaration and configure this adapter to load the Flickr feed. Open the XML file and locate the
<connectivity>element that holds three important elements—protocol, domain, and port. As we follow the Flickr feed's domain, we need to replace the domain value with api.flickr.com, where port and protocol remain same. The following code listing exposes the<connectivity>tag with these elements:<connectivity> <connectionPolicy xsi:type="http:HTTPConnectionPolicyType"> <protocol>http</protocol> <domain>api.flickr.com</domain> <port>80</port> </connectionPolicy> <loadConstraints maxConcurrentConnectionsPerNode="2"/> </connectivity> - Another way to configure adapter is to use Adapter Editor. By double-clicking on the
adapter.xmlfile, the following editor will open in the IDE where you can write the adapter description as well: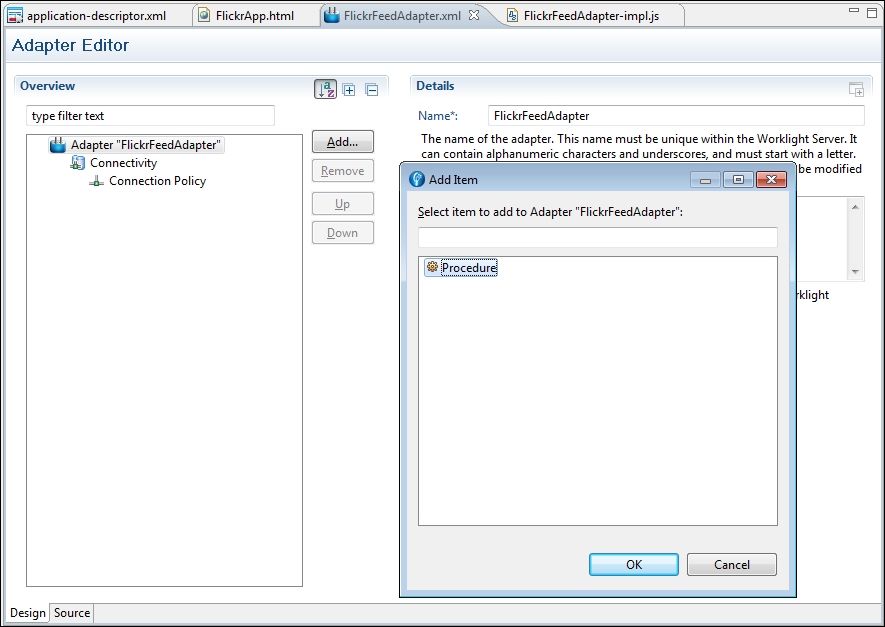
- If you follow the wizard that was used to create the adapter, you will see two default procedures/functions with these names:
getStoriesandgetStoriesFiltered. These have already been defined in the recently developed adapter. We recommend you to remove both the procedures and add the new adapter procedure's name by using the Add button after selecting the adapter's root element in the left window. When you click on the Add button, it will open a pop-up window and select the Procedure item in order to add it into the adapter. The following screenshot shows you how you can add a procedure by defining a name, display, and description. You can choose any adapter name, or you can usegetFlickrFeedto define your procedure's name.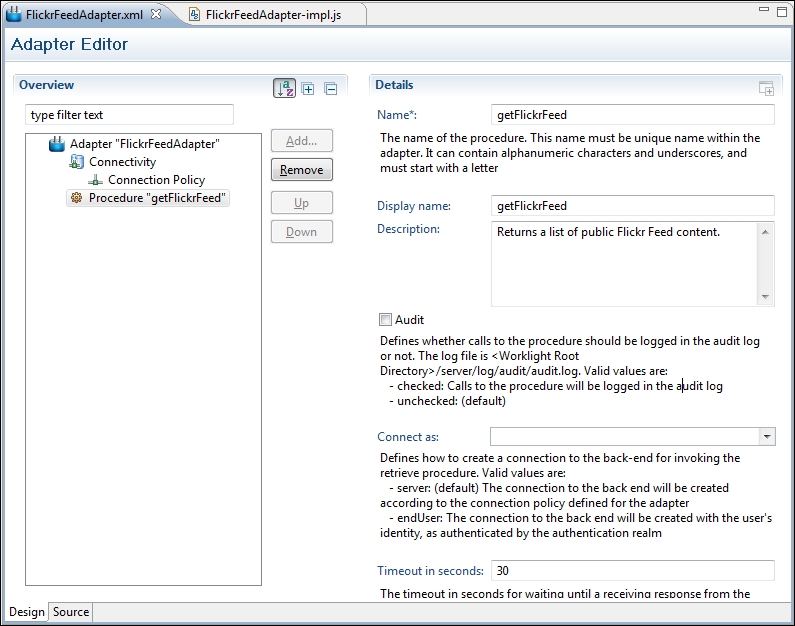
- Once the procedure is added into the
FlickrFeedAdapter.xmlfile, we are done with the declaration part. Now you must write this adapter's behavior in the JavaScript file. Open the.jsfile in the same generatedadapterfolder, remove all existing content from it, and define the function with the same procedure name that we used for the procedure. Use the following code listing and paste it into theFlickrFeedAdapter-impl.jsfile, which will later be used for the Flickr feed's request:function getFlickrFeed() { var flickrFeedUrl = "/services/feeds/photos_public.gne?id=47906772@N05&lang=en-us&format=json"; var input = { method : 'get', returnedContentType : 'plain', path : flickrFeedUrl, }; var response = WL.Server.invokeHttp(input); var responseText = response.text; varres = responseText.replace("jsonFlickrFeed(", ""); res = res.substring(0, (res.length - 1)); res = JSON.parse(res); returnres; }
In the preceding code listing, var filckrFeedUrl holds the URL to call the Flickr feed from the live site and bind it with the domain that we defined in the FlickrFeedAdapter.xml file. The complete URL look like this:
http://api.flickr.com/services/feeds/photos_public.gne?id=47906772@N05&lang=en-us&format=json
Please use following link to understand the feed's URL with all the parameter definitions in detail:
http://www.flickr.com/services/feeds/docs/photos_public/
The WL.Server.invokeHttp(input) function provided in Worklight Server API is responsible for the request/response in calling services. Now that we have done our first procedure declaration and definition, it's time to test and verify the adapter's result.
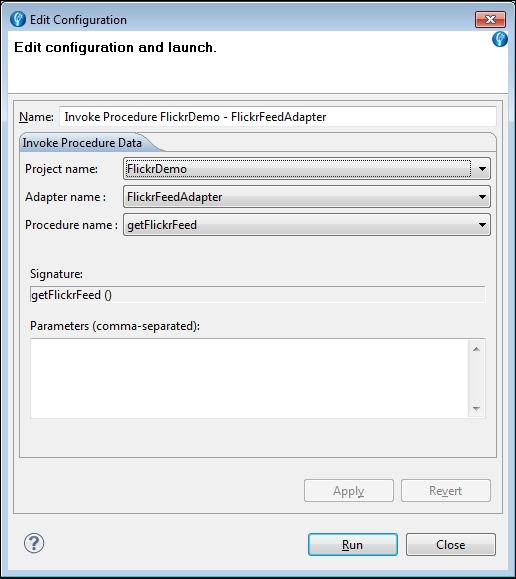
Before moving on to test the adapter's result, we need to deploy our adapter to the Worklight Sever. To do that, we also need to build our adapter to make sure that the error-free code will deploy itself into Worklight Server. In order to do that, Worklight Studio provides the Deploy Worklight Adapter the option to complete this procedure with a single click. Right-click on the FlickrFeedAdapter folder under the adapter folder and navigate to Run As | Deploy Worklight Adapter, as shown in the following screenshot:

This will deploy the adapter on Worklight Server or check the console window for the deployment status in the Worklight Console section. Now our adapter is ready to invoke. Right-click on the FlickrFeedAdapter folder and navigate to Run As | Invoke Worklight Procedure. Clicking on it will open the pop-up Edit Configuration and Launch window and to invoke this, you have to select Project name, Adapter name, Procedure name, and Parameters and then click on the Run button.
After clicking on the Run button, the Invoke Procedure Result explorer window will open in the IDE to display the results. If all the steps have been followed correctly so far, then the response that the JSON data fetched from Flickr will be displayed in the explorer window, as shown in the following screenshot:
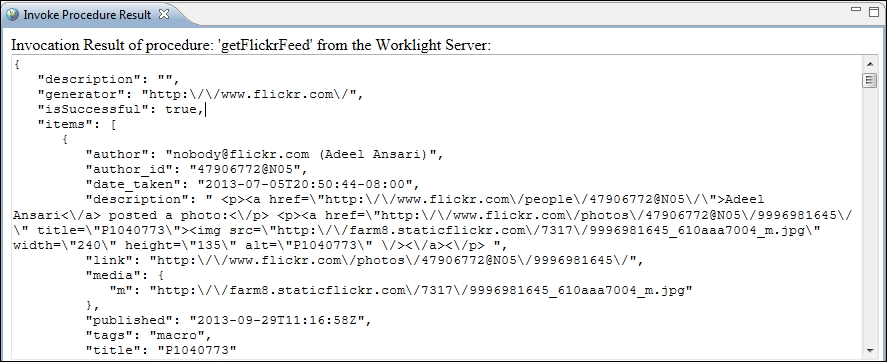
If you have followed the steps correctly, you will have an output that is similar to the preceding screenshot, which shows successful results from the Flickr feeds with your own created adapter.
IBM Worklight SQL adapter is designed to interact with any SQL data source and is used to execute plain parameterized SQL queries and stored procedures to retrieve and update data in the databases. Currently, Worklight SQL adapter supports the following databases:
- MySQL
- Oracle 11g
- DB2
The JDBC connector driver for a specific database type can be downloaded from the MySQL, DB2, and Oracle websites. The developer will have to add a specific driver jar into the server | lib folder under Worklight project directory structure to make it available to the app.
To get a clearer idea about the SQL adapter, we will include an exercise for you to authenticate a user by matching the user credentials from the database. Through this exercise, you will learn two basic things that include database connection and performing a SQL using the SQL adapter. Creating a SQL adapter's steps is very much similar to an HTTP adapter.
Before diving into the creation of a SQL adapter, we would like you to have an in-depth understanding of the SQL adapter, regarding its files and configuration elements. A SQL adapter mainly has two important files—one is the .xml file that is used to configure the data source and declare the procedures, and another is the JavaScript for the definition of the declared procedures. The .xml file has the <connectionPolicy> element under <connectivity>, which is used to configure the connection type for an adapter. For a SQL adapter, a mandatory attribute xsi:type must be set to a sql:SQLConnectionPolicy value.
The <connnectionPolicy> element provides you with two choices to connect with the database. One is the <datasourceDefinition> subelement that is used to define the data source and the other is the <dataSourceJNDIName> subelement that is used for the JNDI Name of the data source provided by the application server.
To use the <dataSourceDefinition> subelement, the following elements must be defined:
driverClass: This is used to load the driver class; for example,com.mysql.jdbc.Drive.url: This is used to specify the data source such as "jdbc.mysql://localhost:3306/dbName.user: This is used to specify the username that is used to access the database.password: This is used to specify the database's user password.
The following code listing shows us the structure of the preceding elements with their configuration:
<connectivity>
<connectionPolicyxsi:type="sql:SQLConnectionPolicy">
<dataSourceDefinition>
  <driverClass>com.mysql.jdbc.Driver</driverClass>
  <url>jdbc:mysql://localhost:3306/dbName</url>
  <user>myPassword</user>
<password>myPassword</password>
  </dataSourceDefinition>
</connectionPolicy>
<loadConstraints maxConcurrentConnectionsPerNode="5"/>
</connectivity>
Declaring the procedure in a SQL adapter is same as an HTTP adapter, where a .js file is used to define the SQL statement that executes under a procedure/function. To create a SQL statement, Worklight Server API has a WL.Server.createSQLStatement method and to invoke this SQL statement, the same Server API has the WL.Server.invokeSQLStatement function.
Later in this chapter, we will discuss both the functions in detail and implement the creation of the SQL adapter's steps.
We will assume that you already have a database setup in your machine and to use Worklight SQL adapter, we need to have a schema ready to test and run it. The following code is a SQL script for the database and table that we have used in our example:
CREATE SCHEMA `FlickrDemo`;

CREATE TABLE `FlickrDemo`. `Authentication` (
  `username` VARCHAR (50) NOT NULL,
  `password` VARCHAR (50) NOT NULL ,
`first_name` VARCHAR (45) NULL,
  `last_name` VARCHAR (45) NULL,
  UNIQUE INDEX `username_UNIQUE` (`username` ASC));
For the table data, use the following queries to prepare the record for the table that will be created:
INSERT INTO `FlickrDemo`. `authentication` (`username`,`password`,`first_name`,`last_name`)VALUES('talhaH','123456','Talha', 'Haroon' );

INSERT INTO `FlickrDemo`. `authentication` (`username`,`password`,`first_name`,`last_name`)VALUES  ('saifo', '123456','Muhammad', 'Saifuddin'),
Let's use the following steps to create a SQL adapter:
- In Project Explorer, right-click on the
adapterfolder, navigate to New | Worklight Adapter, and use following screenshot to fill up the values for each required field:
- Use Adapter type SQL Adapter and define Adapter name, and click on the Finish button. This will generate
AuthSQLAdapterunder theadapterfolder with two files—one is.xmland other is a.jsfile. - Now open the
.xmlfile; you'll find that the default code is written for you to configure the database source and procedure definition; we will follow the same code with slight changes. You can use the following code to make changes if you follow the same values into the new generated adapter.xmlfile:<connectivity> <connectionPolicyxsi:type="sql:SQLConnectionPolicy"> <dataSourceDefinition> <driverClass>com.mysql.jdbc.Driver</driverClass> <url>jdbc:mysql://localhost:3306/flickrDemo</url> <user>root</user> <password>root</password> </dataSourceDefinition> </connectionPolicy> <loadConstraints maxConcurrentConnectionsPerNode="5"/> </connectivity>
- Defining the procedure in
adapter.xmlis the same as the procedure in an HTTP adapter. As we use this database connection to authenticate the user, we declare the procedure with theauthenticateUsername, as shown in the following code:<procedure name="authenticateUser"/>
- Now, open the
adapter.jsfile to define the function with the same name that we used to declare in theadapter.xmlfile to implement the procedure logic. Don't forget the rules that we have mentioned earlier to define a procedure in the adapter JavaScript file. You can copy the following code and paste it theadapter.jsfile to follow up this example:var procedure1Statement = WL.Server.createSQLStatement ("select * from authentication where username =? AND password =?"); Function authenticateUser(username, password) { return WL.Server.invokeSQLStatement ({ preparedStatement : procedure1Statement, Parameters: [username, password] }); }As shown in the preceding code,
WL.Server.createSQLStatmenetis used to create the SQL query; in this query, we will authenticate the user by matching the username and password. A SQL statement's object must always be defined outside the function. The second most important function used in theauthnticateUserfunction isWL.Server.invokeSQLStatement. This is used to invoke SQL statement/queries and returns the result to the application or procedure caller. - It's time to test what we have done so far before we deploy the adapter on the server. In order to do this, we can use the same adapter deployment and invoke the steps that we used in the HTTP adapter. When the Invoke Adapter option is selected, the pop-up window will appear as shown in the following screenshot:
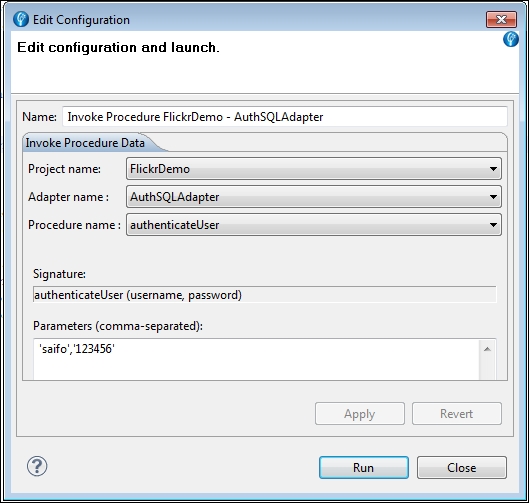
- I hope that you're already familiar with the screen of the procedure's call and selection at this stage. As this makes sense to you, we will also provide a parameter as our procedure accepts two arguments to invoke this procedure. So move on and click on Run; this will open the Invoke Procedure Result explorer window in the IDE with the result as shown in the following screenshot:
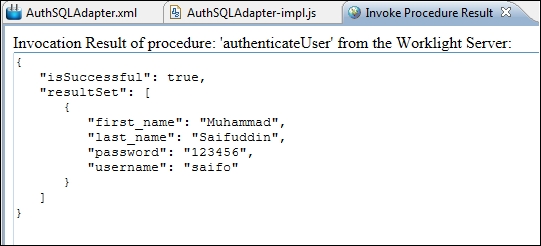
Congratulations! You have successfully created the SQL adapter. The result is retrieved as a JSON object where it is a property named isSuccessful, as shown in the preceding screenshot, pointing out that the invocation was successful and resultSet is an array of returned database records.
In general, we do face the problem of cross domain/origin security issues when making a call to a server from JavaScript. Here, IBM Worklight's application architecture is designed in a way to avoid these constraints so that the developer can easily manage these procedure calls with the adapters that are deployed on IBM Worklight Server.
The WL.Client.invokeProcedure function invokes the adapter's procedure that has been exposed by an IBM Worklight Client API. This function accepts two parameters, the first one is mandatory and second one is optional, as shown in the following code:
WL.Client.invokeProcedure(invocationData, options)
The parameter's details are listed as follows:
invocationData: This contains three configuration parameters—the adapter name, procedure name, and parameters to be passed as JSON objects.options: This is an optional parameter that is passed as a standard option object and defines different properties, which are listed as follows:timeout: This accepts an integer number of milliseconds, which will be used to wait for the server's response before it fails with a request timeout.onSuccess: This is a success handler used for a callback function to receive the data in a standard response object. TheisSuccessfulattribute of theinvocationResultproperty is true.onFailure: This is a failure handler used for a callback function to receive a standard response object with technical failure. This resulted in the sameinvocationResultproperty, with theisSuccessfulattribute set to true.
The InvocationData parameter syntax must be the same as the following JSON block:
var invocationData = {
  adapter : 'AdapterOne', // adapter name
  procedure : 'procedureOne', // procedure name
  parameters : [] // parameters if any
};
To invoke a procedure from the client application, the WL.Client.invokeProcedure function is used to hit the request, which takes the invocationData and both success and failure callback methods. The syntax that is used to call the adapter procedure using the invokeProcedure method will be like the following code:
WL.Client.invokeProcedure(invocationData, {
  onSuccess: handleSuccess,
  onFailure: handleFailure,
});

function handleSuccess(result){
  WL.Logger.debug(JSON.stringify(result));
}

function handleFailure(result){
  WL.Logger.debug(JSON.stringify(result));
}
When the adapter's procedure is invoked by the invocationResult property that is included in the response, which is received on both success and failure handler functions. Furthermore, this invocationResult property has one more attribute defined with the name isSuccesful, which represents the Boolean data type. This isSuccessful attribute contains the true value when the procedure invocation is successful or is false when the procedure invocation fails.
Worklight Adapter is a server-side entity and the adapter is implemented in JavaScript, where the developer is limited to performing complex functions such as data encryption, accessing and maintaining disturbed directory information such as the Lightweight Directory Access Protocol (LDAP), custom or utility API's such as iText to generate a PDF document, and so on. As most of the available utility libraries are commonly written in Java and PHP languages, JavaScript is not enough to handle these kind of features. To overcome this issue, IBM Worklight provides us with a way to write Java code within the application and calls it from the adapter using the JavaScript code.
To write the Java code, Worklight provides us with the java folder within the server directory. Moreover, IBM Worklight Studio automatically builds the Java files and deploys them to the IBM Worklight Server.
Note that the developer will have to declare the package to add a Java class into the project, and the package name must start with com, org, or net to be defined under the Worklight project.
To demonstrate this concept, we will create a Java class and define a method that accepts a string and converts it into a hashcode using MD5 algorithm. Using the adapter function, we will this hits java method, which returns the hashcode of the given input.
- In the first step, we need to create the
javaclass in theserver/javafolder under the Worklight Project, as shown in the following screenshot.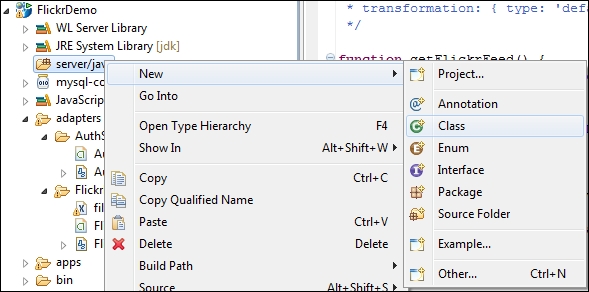
- Selecting Class from menu will open the class' definition window. Please note a few things in the following screenshot—you must define any Package name that starts with
com,net, ororgand declare the class name with any name you like, or you can use the same values that we used in the following screenshot: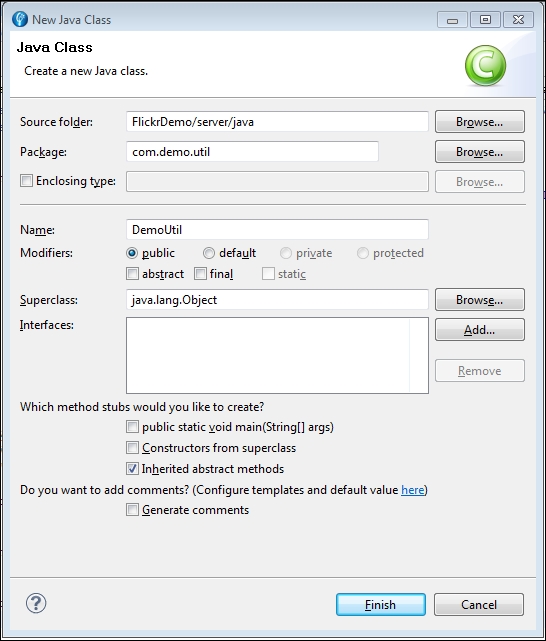
- When you click on Finish, the blank class is created in the
server/javafolder. Open this file and paste the following code snippet into it:package com.demo.util; import java.security.MessageDigest; import java.security.NoSuchAlgorithmException; public class DemoUtil { public String convertHash (String password) { StringBuffer sb = null; try { MessageDigest md = MessageDigest.getInstance("MD5"); md.update(password.getBytes()); byte byteData[] = md.digest(); sb = new StringBuffer(); for (int i = 0; i < byteData.length; i++) { sb.append(Integer.toString((byteData[i] & 0xff)+ 0x100, 16).substring(1)); } } catch (NoSuchAlgorithmException e) { e.printStackTrace(); } return sb.toString(); } }
This DemoUtil class has only one method name, convertHash, which is used to accept the string type's value and convert this hashcode using the MD5 algorithm and finally return the converted string to the caller.
To invoke this Java code, we add the procedure into the same HTTP adapter with the testJavaCode name in the adapter.xml file, as shown in the following code:
<procedure name="testJavaCode"></procedure>
Now, add the function in the same adapter.js file and if you're following the same example, you can paste the following code into your adapter.js file:
function testJavaCode() {
  var obj = new com.demo.util.DemoUtil();
  return { result : obj.convertHash("123456"),}
}
First, we create the object of our class with a fully qualified name using a package and then we call the class method covertHash using the same object, passing a string value. Finally, we return the JSON format result.
Now, follow the same steps to deploy and invoke the adapter's procedure using the IDE option, select the testJavaCode procedure in the procedure combo in the Edit Configuration and Launch window, and click on Run. This will print a result that will be similar to the following listing in the Invoke Procedure Result explorer window:
{
  "isSuccessful": true,
  "result": "e10adc3949ba59abbe56e057f20f883e"
}